
ART20 - Electric fireplace DIMPLEX - Free user manual and instructions
Find the device manual for free ART20 DIMPLEX in PDF.


| Product Type | Electric fireplace |
| Model | Dimplex ART20 |
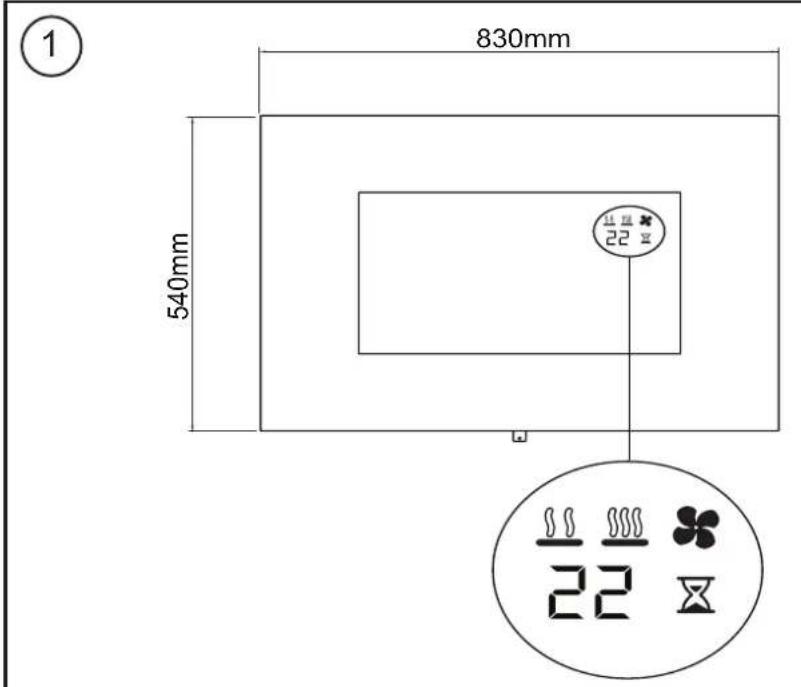
| Dimensions (W x H x D) | 830 mm x 540 mm x 155 mm |
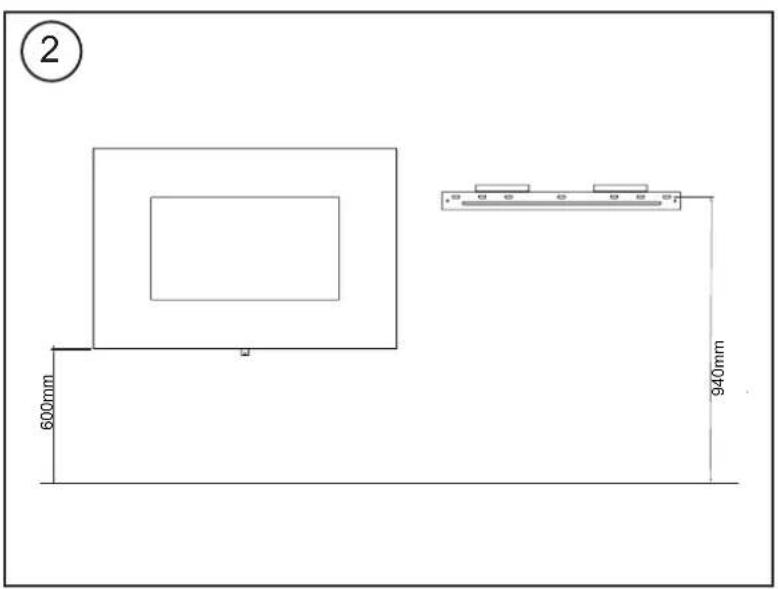
| Installation Height (bottom to floor) | 600 - 725 mm recommended |
| Power Supply | 230 V ~ 240 V AC, earthed |
| Heat Output (Nominal) | 1.7 - 1.9 kW |
| Heat Output (Minimum) | 0.9 - 0.9 kW |
| Standby Power Consumption | 0.48 - 0.49 W |
| Flame Effect Settings | On/Off, 5 brightness levels (F1-F5), Cycling mode |
| Heating Modes | Low Heat, High Heat, Cool Blow, Off |
| Thermostat Range | 18°C - 30°C (or HH for continuous) |
| Sleep Timer | 0.5 hr to 8.0 hr (0.5 hr increments) |
| Backlight Settings | Sides only, Top only, All OFF, All ON |
| LED Mood Lighting | Orange, Red, Green, Blue, or cycling |
| Bluetooth Speaker | Yes, pairs with "Dimplex Fire" |
| Crackling Sound Effect | Yes, adjustable volume |
| Remote Control Range | Approx. 5 meters |
| Fuel Bed Media | Acrylic ice crystals and white pebbles included |
| Safety Features | Thermal cut-out, do not cover warning |
| Battery for Remote | CR2025 or CR2032 |
| Cleaning | Soft duster; vacuum grille; no abrasive cleaners |
| Warranty | 1 year from purchase |
Frequently Asked Questions - ART20 DIMPLEX
User questions about ART20 DIMPLEX
0 question about this device. Answer the ones you know or ask your own.
Ask a new question about this device
Download the instructions for your Electric fireplace in PDF format for free! Find your manual ART20 - DIMPLEX and take your electronic device back in hand. On this page are published all the documents necessary for the use of your device. ART20 by DIMPLEX.
USER MANUAL ART20 DIMPLEX
natural_image
Modern black wall-mounted gas stove with yellow flames and white spherical insulating base (no text or symbols visible)ARTESIA
EN
EN : This product is only suitable for well insulated rooms or occasional use. DE : Dieses Produkt ist nur für gut isolierte Bereiche oder gelegentliche Verwendung geeignet. FR : Ce produit convient uniquement à des endroits bien isolés ou pour un usage occasionnel. IT : Questo prodotto è adatto solo per spazi ben isolati o per uso occasionale. ES : Este producto sólo es adecuado para espacios bien aislados o un uso ocasional. NL : Dil product is uitsluitend geschikt voor goed geïsoleerde ruimten of voor sporadisch gebruik. PL : Produkt ten jest odpowiedni wyłącznie do dobrze odizolowanych miejsc lub do okazjonalnego użytku. NO : Dette produktet egner seg kun for godt isolerte rom eller sporadisk bruk. RO : Acest produs este adecvat exclusiv spațiilor bine ventilate sau utilizării ocazionale. CZ : Tento výrobek je vhodný pouze do dobře izolovaných prostor nebo k přiležitostnému použití. DK : Dette produkt er kun egnet til velisolerede rum eller lejlighedsvis brug. PT : Este produto somente é adequado para espaços bem isolados ou uso ocasional. SE : Denna produkt är endast avsedd för välisolerade utrymmen eller tillfällig användning. FI : Tămă tuote soveltuu ainoastaan hyvin eristettyihin tiloihin tai saturnnaiseen käyttöön. SK : Tento výrobok je vhodný len pre dobre izolované priestory alebo na občasné použitie. SI : Ta izdelek je primeren le za dobro izolirane prostore ali za občasno uporabo. HR : Ovaj proizvod je pogodan samo za dobro izolirane prostore ili povremenu upotrebu. HU : Ez a termék csak jól szigetelt terekhez vagy eseti használatra alkalmas. SV : Denna produkt är endast lämplig för användning i väl isolerade utrymmen eller enstaka användning.
IMPORTANT: THESE INSTRUCTIONS SHOULD BE READ CAREFULLY AND RETAINED FOR FUTURE REFERENCE
Important Safety Advice
When using electrical appliances, basic precautions should be followed to reduce the risk of fire, electric shock, and injury to persons, including the following: If the appliance is damaged, check immediately with the supplier before installation and operation.
Do not use this appliance in the immediate surroundings of a bath, shower or swimming pool.
Do not use outdoors.
This appliance must not be located immediately above or below a fixed socket outlet or connection box.
WARNING: The appliance carries
the Warning Symbol indicating that it must not be covered or has a Do not cover label. Do not cover or obstruct in any way the heat outlet grille located above the flame window on the appliance Overheating will result if the appliance is accidentally covered. Do not place material or garments on the appliance, or obstruct the air circulation around the appliance, for instance by curtains or furniture, as this could cause overheating and a fire risk.
In the event of a fault unplug the heater. Unplug the appliance when not required for long periods. The supply cord must be placed on the right hand side of the heater away from the heat outlet underneath the appliance.
This appliance can be used by children aged from 8 years and above and persons with reduced physical, sensory or mental capabilities or lack of experience and knowledge if they have been given supervision or instruction concerning use of the appliance in a safe way and understand the hazards involved. Children shall not play with the appliance. Cleaning and user maintenance shall not be made by Children without supervision. Children of less than 3 years should be kept away unless continuously supervised. Children aged from 3 years and less than 8 years shall only switch on/off the appliance provided that it has been placed or installed in its intended normal operating position and they have been given supervision or instruction concerning use of the appliance in a safe way and understanding the hazards involved. Children aged from 3 years and less than 8 years shall not plug in, regulate and clean the appliance or perform user maintenance.
The appliance must be positioned so that the plug is accessible.
Although this appliance complies with safety standards, we do not recommend its use on deep pile carpets or on long
hair type of rugs.
If the supply cord is damaged it must be replaced by the manufacturer or service agent or similarly qualified person in order to avoid a hazard.
CAUTION: In order to avoid a hazard due to inadvertent resetting of the thermal cut-out, this appliance must not be supplied through an external switching device, such as a timer, or connected to a circuit that is regularly switched on and off by the utility.
CAUTION - Some parts of this product can become very hot and cause burns. Particular attention has to be given where children and vulnerable people are present.
Technical Information
Model No: ART20
Heat Output 230V 240V
| Nominal Heat Output P | Nom | 1.7 - 1 | 9 kW | |
| Minimum Heat Output P | min | 0.9 - 0 | 9 kW | |
| Maximum Continuous Heat Output Pmax.c | 1.7 - 1 | 9 kW | ||
Auxiliary Electricity Consumption
| In Standby mode e/ | SB | 0.48 | -0.49 W |
with electronic room temperature control
General
Unpack the heater carefully and retain the packaging for possible future use, in the event of moving or returning the fire to your supplier.
The fire incorporates a flame effect, which can be used with or without heating, so that the comforting effect may be enjoyed at any time of the year. Using the flame effect on its own only requires little electricity.
Before connecting the heater check that the supply voltage is the same as that stated on the heater.
Please note: Used in an environment where background noise is very low, it may be possible to hear a sound which is related to the operation of the flame effect. This is normal and should not be a cause for concern.
Electrical Connection
WARNING: THIS APPLIANCE MUST BE EARTHED
This heater must be used on an AC \~ supply only and the voltage marked on the heater must correspond to the supply voltage.
Before switching on, please read the safety warnings and operating instructions.
Operating Instructions:
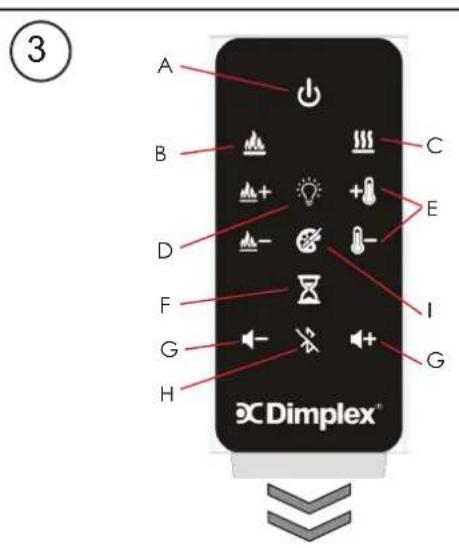
Please see Fig. 3
| Icon | Display Function Description | |||
| A |  | Power / Standby | Press Once to turn the product 'ON'.Press a second time to put the product into 'STANDBY'(When returning from 'STANDBY' mode the product will return to previous settings unless the product has been unplugged, in which case it will reset to factory settings) | |
| B |  | [kx6x] | 'FLAME EFFECT' button this turns the flame effect ON or OFF independently of the products other features. | |
| + | Flame Up | This Button will increase the brightness of the flame effect. There are 5 brightness settings shown as F1, F2, F3, F4, F5. This button will ONLY increase the brightness level. | ||
| [ZV2V] | Flame Down | This Button will decrease the brightness of the flame effect. There are 5 brightness settings shown as F1, F2, F3, F4, F5. This button will ONLY decrease the brightness level. | ||
| FC | Flame Cycling | This setting is set by pressing the Flame Up button once more after F5. this will cause the brightness of the flame effect to cycle from F2 to F5 in a continuous Loop. | ||
| [648W] | Off | This will turn the flame effect off. If the heater is ON, the display will activate and remain active to read the set temperature and show if the product is on LOW HEAT/ HIGH HEAT/ COOL BLOW. | ||
| C | [IMAGE] | [k446] | 'HEAT' button cycles the unit sequentially through the 4 settings: LOW HEAT, HIGH HEAT, COOL BLOW and OFF. The heat setting will be indicated by an icon in the display see Fig.1.When the flame effect is 'ON' the display will turn off after 5 seconds, however if the heater is being used independently of the flame effect. The low heat or high heat icon will appear continuously in the display. | |
 | Low Heat | This setting will run the heater at 'LOW HEAT' this setting will be indicated by the 'LOW HEAT' icon. To Adjust the temperature setting the Temp Down or Temp Up buttons described below must be used.(This icon isOrangein Colour) | ||
 | High Heat | This icon in the display indicates 'HIGH HEAT' this setting will be indicated by the 'HIGH HEAT' icon. To Adjust the temperature setting the Temp Down or Temp Up buttons described below must be used.(This icon isRedin Colour) | ||
 | Cool Blow | This icon in the display indicates 'COOL BLOW' this setting will be indicated by the 'COOL BLOW' icon and the letters 'CB' appearing in the display.(This icon isBluein Colour) | ||
| - Off | This switches the heater and blower 'OFF', no icon will be displayed in the display. Note the blower will run for 5-10 seconds after being turned off, this is to ensure the product cools down safely. | |||
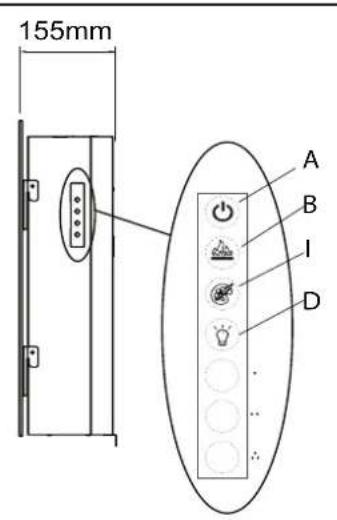
| D | [GKZS] | Back Light | Pressing this button will turn ON and OFF the Back Lighting. There are 4 settings, Sides only, Top only, all OFF and All ON | |
| E |  | Temp Down | Press multiple times to lower the heater temperature in 1^ increments. The lowest temperature that can be set is 18^ . | |
| E |  | Temp Up | Press multiple times to increase the heater temperature in 1^ increments. The highest temperature that can be set 30^ .When High Heat is selected, the letters 'HH' appear in the display, this means the heat will remain ON continuously and is not controlled by the thermostat. | |
| F |  |  | Sleep Timer | Press multiple times to change the 'SLEEP TIMER' in 0.5 hr increments from 0.5 hr to 8.0 hr before turning off. The remaining time on the 'SLEEP TIMER' displays.(This icon isGreenin Colour) |
| G | [WDGS] | - | Volume down | Pressing multiple times to control the volume level of the speaker down to mute.When Bluetooth is not connected, the speaker will play sound of a fire, this can be turned OFF by pressing this button until the sound is muted. |
| G | [GB52] | - | Volume Up | Controls the level of the speaker Volume up.The volume buttons can also control the volume of your paired bluetooth device |
| H |  | Blue-tooth | When a device is paired to the product, pressing this button will disconnect the paired device. | |
| I |  | LED COLOUR | Press multiple times to change the colour of the LED mood lighting and the coloured fuel bed. The colour can be set as Orange, Red, Green, Blue, or cycling through all four colours continuously. | |
| Mode Name /Discription Action (Actions cannot be input by remote control) | |
| Change Celsius (°C) to Fahrenheit (°F) | Press both 3 Dot Button ( ) and 2 Dot ( ) on the unit and hold until beep is heard and display flashes. (To revert back to Celsius repeat this action) |
Remote Control - See Fig. 3
maximum range of use is \~ 5metres.
NOTE: It takes time for the receiver to respond to the transmitter. NOTE: The receiver for the remote control is located in the display, aim the remote control in this direction when inputting commands.
Do not press the buttons more than once within two seconds for correct operation.
Battery Information - See Fig. 3
- To activate the remote control remove the clear battery isolation strip at the base of the remote control, which is used to ensure your remote control reaches you fully charged.
- To replace the remote control battery, turn over the remote control, and follow the diagram embossed on the remote control
- Only use CR2025 or CR2032 size of batteries.
Wireless Speaker Control.
The unit needs to be in standby for the speaker function to operate, you do not need the flame effect to be operating. The speaker can be used in 2 ways. You can pair a suitable device to the speaker wirelessly and listen to music, audio books or casts from a suitable device, or when the flame effect is operating the soothing crackling sound of a log fire can be played for ambient sound effect.
To listen to the crackling log effect, just press the volume up button on your remote control until you reach a vlolume level which is comfortable for you, to lower the volume press the volume down button. The crackling is turned OFF by pressing the volume down button until the sound is muted.
To use the speaker to listen to your own material the speaker must first be paired to a compatible device. To pair with the unit:
- Ensure the unit is plugged in and switched on at the mains socket.
- Using a compatible device search for "DImplex Fire", select and pair your device to "DImplex Fire".
- Once connection is made between your device and the unit an electronic tone will sound to alert you the pairing was successful.
With the unit now paired you can control the speaker volume using the volume buttons on the remote control handset or your device's volume controls.
Note: If you experience problems pairing to the speaker, you may need to re-pair to the speaker, follow these steps:
- On your device go to the Bluetooth Settings.
- Select the "Dimplex Fire" and press "Forget" to disconnect from the speaker.
- Turn Bluetooth OFF, and then ON. Your device should now rediscover "Dimplex Fire" again.
- Select "Dimplex Fire" to pair with the speaker.
Installation
WARNING: FALLING OR TIPPING APPLIANCES CAN CAUSE INJURY OR DEATH OF YOUNG CHILDREN, PLEASE ENSURE CHILDREN DO NOT CLIMB, HANG OR STAND ON THIS PRODUCT.
WARNING: THE APPLIANCE IS PROVIDED WITH A WALL FIXING KIT, THIS KIT IS DESIGNED TO HOLD THE PRODUCTS WEIGHT, IT IS NOT A SUBSTITUTE FOR PROPER ADULT SUPERVISION. DO NOT ALLOW CHILDREN TO CLIMB OR HANG ON THIS PRODUCT.
Safety Message - Sufficient expertise is required for installing this product. If unsure we recommend that you use an installer and pay special attention to safety during the installation.
Wall Installation- See Fig. 2
Do not connect appliance until properly fixed to the wall and the Instruction leaflet is fully read. In particular, the minimum distances must be observed.
The wall plugs supplied with this product are for use with Block/Brick built walls only.
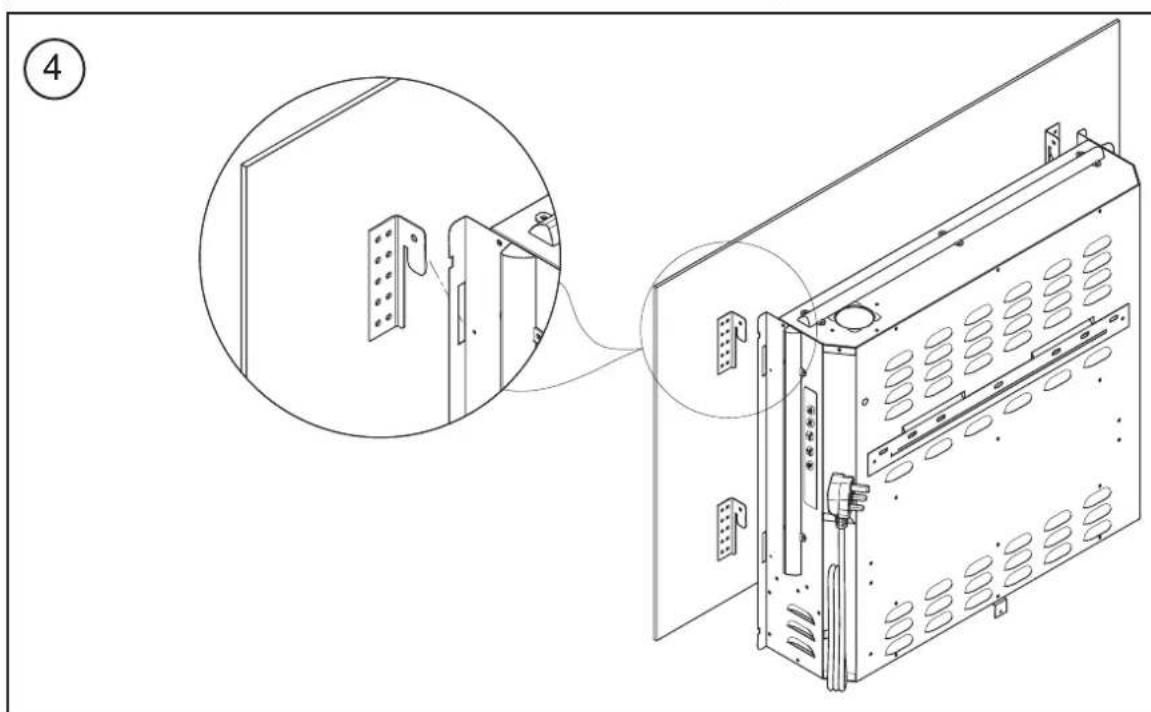
This model is designed to be permanently fixed to a wall at a minimum height of 300mm. The wall bracket must be fitted horizontally and the cable routed to the bottom right of the appliance.
A height of 600 to 725mm from bottom of the appliance to floor is recommended for optimum viewing of fuel bed.
For optimum viewing, mark the top three screw fixing positions on the wall in accordance with the recommended fixing dimensions - see Fig. 2. Drill holes with a 6mm drill bit. Fix the wall bracket using the plugs and screws provided. Carefully lift the appliance up ensuring that the appliance engages with the wall bracket correctly.
A bottom fixing bracket is supplied with the unit, fixed to the base of the appliance. Remove the screw and the bracket, turn the bracket through 180 degrees so it is now facing downward and re-fit using the screw just removed. With the bracket in place mark the location of the hole on the wall. Remove the appliance, drill the wall, fit the wall plug and re-fit the appliance ensuring that you secure it in place by screwing the bottom fixing bracket to the wall.
Fuel Bed Media
Acrylic Ice Crystals and White Pebbles are supplied in the box with your fire. allowing you the option of which to place on your fire. To Fit the Acrylic Ice Crystals, place the small Crystals on the fuel bed tray, then place the larger crystals on top of the small pieces. Arrange the larger pieces to your liking. A suggestion is to place one large crystal centrally on the fuel bed and the other four positioned symmetrically around this piece.
The White pebbles are placed on the fuel bed tray until the tray is completely covered by pebbles to your liking.
Fitting the Front Glass- See Fig. 5
Your new fire is supplied with the front glass not secured to the engine, this is to keep the glass safe in transit. To fit the glass to your fire, simply insert the four hangers on the back of the glass through the slots provided on the chassis. The hangers go in through the slots and then move down to hold the glass in place. The glass can then be secured in place by inserting the small black screw provided through the hole in any one of the hangers into the side of the unit.
Thermal Safety Cut-out
The built-in overheat cut-out switches the appliance off automatically in the event of a fault. If this occurs switch off the appliance or disconnect the mains plug from the socket. After a short cooling down phase, the appliance is ready for use again. If the fault should occur again, see your local dealer.
Light Emitting Diode
This fire is fitted with LED (Light Emitting Diode) bulbs in place of traditional incandescent bulbs. These generate the same light levels as traditional bulbs, but use a fraction of the energy consumed. These bulbs cannot be replaced.
Maintenance
WARNING: ALWAYS DISCONNECT FROM THE POWER SUPPLY BEFORE ATTEMPTING ANY MAINTENANCE.
Cleaning
WARNING: ALWAYS DISCONNECT FROM THE POWER SUPPLY BEFORE CLEANING THE HEATER.
For general cleaning use a soft clean duster – never use abrasive cleaners. The glass viewing screen should be cleaned carefully with a soft cloth.
DO NOT use proprietary glass cleaners.
To remove any accumulation of dust or fluff the soft brush attachment of a vacuum cleaner should occasionally be used to clean the outlet grille of the fan heater.
WARNING: do not operate the product without the grille and outer glass in position as this may effect the operation of the heater.
Recycling
For electrical products sold within the European Community. At the end of the electrical products useful life it should not be disposed of with household waste. Please recycle where facilities exist. Check with your Local Authority or retailer for recycling advice in your country.
After Sales Service
Your product is guaranteed for one year from the date of purchase.
Within this period, we undertake to repair or exchange this product free of charge (excluding lamps & subject to availability) provided it has been installed and operated in accordance with these instructions.
Your rights under this guarantee are additional to your statutory rights, which in turn are not affected by this guarantee.
Should you require after sales information or assistance with this product please go to www.dimplex.co.uk where you will find our self help guide by clicking on "After Sales" or ring our helpdesk on 0844 879 3588 (UK) or 01 842 4833 (R.O.l.) .
Spare parts are also available on the website
www.dimplex.co.uk
Please retain your receipt as proof of purchase.
Dimplex
Millbrook House
GrangeDrive
HedgeEnd
Southampton
[c] GDC Group Ltd,
All rights reserved. Material contained in this publication may not be reproduced in whole or in part, without prior permission in writing of Dimplex, a division of GDC Group Ltd.
- Important Safety Advice
- Technical Information
- General
- Electrical Connection
- WARNING: THIS APPLIANCE MUST BE EARTHED
- Remote Control - See Fig. 3
- Battery Information - See Fig. 3
- Wireless Speaker Control.
- Installation
- Wall Installation- See Fig. 2
- Fuel Bed Media
- Fitting the Front Glass- See Fig. 5
- Thermal Safety Cut-out
- Light Emitting Diode
- Maintenance
- Cleaning
- Recycling
- After Sales Service
Brand : DIMPLEX
Model : ART20
Category : Electric fireplace