
Healthy Choice AF1300 - Deep fryer Lenoxx - Free user manual and instructions
Find the device manual for free Healthy Choice AF1300 Lenoxx in PDF.


| Product Type | Digital Air Fryer (Deep Fryer) |
| Brand & Model | Lenoxx Healthy Choice AF1300 |
| Capacity | 13 Litres |
| Power Source | AC mains (240V, 50Hz, typical Australian) |
| Power Consumption | 1500 W (estimated) |
| Temperature Range | 60°C to 230°C |
| Timer Range | 1 to 60 minutes (adjustable in 1-minute increments) |
| Delay Start Range | 10 minutes to 9 hours 50 minutes (10-minute increments) |
| Preset Programs | Meat, Poultry, Fish, Bake, Chips, Pizza (with pre-defined temperature and time) |
| Control Panel | Digital with ON/OFF, MENU, TEMP/TIME, +/- , ROLL, PRESET buttons |
| Display | Digital screen showing temperature and time |
| Rotisserie Function | Yes, with rotisserie stick and fork for whole chicken |
| Included Accessories | Dual rack (low & high positions), baking cage, rotisserie fork, cage tongs, rotisserie stick, screws |
| Bowl Material | Stainless steel inner bowl (estimated) |
| Lid | Transparent cover with lock and latch button |
| Safety Features | Auto pause when lid opened, cool-touch handles (estimated), overheat protection |
| Cleaning & Maintenance | Bowl, baking cage, and rotisserie are dishwasher safe; fan cover wipe with damp cloth; self-cleaning mode with water and detergent |
| Warranty | 12 months from date of purchase (proof required) |
| Dimensions (Estimated) | 40 x 35 x 35 cm (external) |
| Weight (Estimated) | 7 kg |
Frequently Asked Questions - Healthy Choice AF1300 Lenoxx
User questions about Healthy Choice AF1300 Lenoxx
0 question about this device. Answer the ones you know or ask your own.
Ask a new question about this device
Download the instructions for your Deep fryer in PDF format for free! Find your manual Healthy Choice AF1300 - Lenoxx and take your electronic device back in hand. On this page are published all the documents necessary for the use of your device. Healthy Choice AF1300 by Lenoxx.
USER MANUAL Healthy Choice AF1300 Lenoxx
13 LITRE DIGITAL AIR FRYER



Model: AF1300
Batch: PR3918
This appliance is intended for household use only.
Please read and retain these instructions for future reference.
Important safeguards:
When using electrical appliances, basic safety precautions should always be followed, including the following:
- Read instructions carefully before use.
- Do not touch hot surface directly. Use handles and tongs provided or oven mittens to handle.
- Before use, check that your local voltage corresponds with the specifications shown on the appliance nameplate located under the appliance.
- Do not turn on the power until the appliance and parts are in place as required. Make sure the lid is on before plugging and switching on the power.
- To protect against electric shock do not immerse cord, plugs, or this appliance in water or other liquid.
-
Close supervision is necessary when any appliance is used near children.
-
Unplug from the outlet when not in use and before cleaning. Allow time to cool down before putting on or taking off parts, and before cleaning the appliance.
-
Do not operate any appliance with a damaged cord or plug, after the appliance malfunctions or has been damaged in any manner.
-
Using the appliances in a way that is not recommended in this manual could cause injury and damage the appliance.
-
Do not use the appliance for anything other than intended use. This appliance is intended for household use only and not for use in outdoor or commercial purposes.
-
Always attach the plug to the appliance first, then plug the cord in the wall outlet. To disconnect, turn any control to "off", then remove the plug from the wall outlet.
-
The unit should be operated on a separate electrical circuit from other operating appliances. If the electric circuit is overloaded with other appliances, this appliance may not work properly.
-
Do not move an appliance containing hot food.
-
Do not place on or near a hot gas or electric burner or in a heated oven. Keep away from flammable materials such as curtains or drapes when in operation.
-
Do not let the cord hang over the edge of a table or counter or touching a hot surface.
-
Do not unplug the appliance by force.
-
Do not overload the steel bowl, the maximum weight of food is 5KG.
-
Do not cover the appliance while in use.
-
Clean the lid, windows, and splash guard with a sponge and soapy water.
-
This appliance is not designed to be used by people (including children) with a physical, sensory or mental impairment, or people without knowledge or experience unless they are supervised or given prior instructions concerning the use of the appliance by someone responsible for their safety.
Cord:
Do not use with an extension cord; a short power supply cord is provided to reduce the risks resulting from being entangled in or tripping over a long cord.
Before using for the first time:
Warning: When using for the first time, the appliance may emit slight odor which is not harmful and will cease after a few minutes. This is because protection oil was applied to protect parts from possible friction during transport.
Carefully unpack the unit and remove all the packing materials. Select a flat, heat-resistant, non-flammable surface to place the unit. Do not immerse the appliance into water or any other liquid. Use a sponge and soapy water to remove any dust on the surface that may happen during packing and transport. Allow to dry completely before use.
Parts:
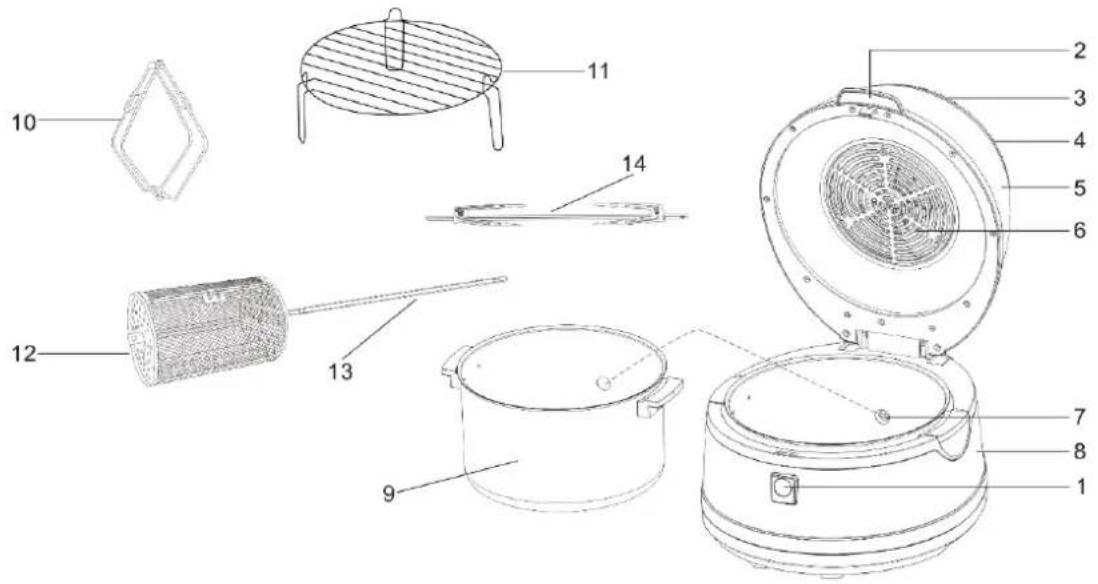
| 1. Lid latch button | 2. Lid handle |
| 3. Control panel | 4. Heat emission |
| 5. Transparent cover | 6. Heating fan |
| 7. Rotisserie stick placement | 8. Base |
| 9. Inner bowl | 10. Cage tongs |
| 11. Dual rack | 12. Baking cage |
| 13. Rotisserie stick | 14. Rotisserie fork |
Accessories:

Cage tongs

Dual rack
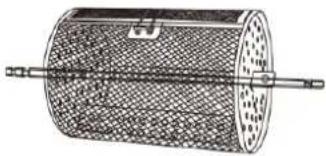
Baking cage

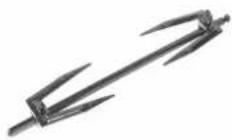
Rotisserie fork
| Item | Description |
| Cage tongs | For handling food, the baking cage and dual rack |
| Dual rack | Low rack: for cooking larger food items such as roast poultry, vegetables, etc.High rack: for cooking medium-size food items such as chicken wings and pizza |
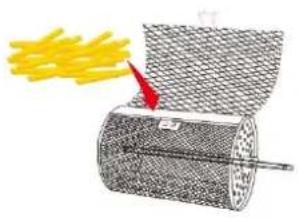
| Baking cage | For food items such as chips which need rotation & even heating |
| Rotisserie fork | For a whole chicken or lamb legs |
Note: only one stick is included for use with the baking cage and rotisserie fork.
Note: only two screws are included for use with the baking cage and rotisserie fork.
How to use the accessories:
- When handling the heated accessories and food, please use the tongs provided and if necessary, use oven mittens. Use both hands to carry to prevent any accident.

- Use of the rotisserie stick for whole chicken:
(1)

(2)

(3)

(4)
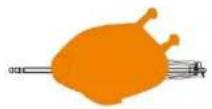
(5)

(6)

- Use of the baking cage:
(1)


(3)
(4)

(5)
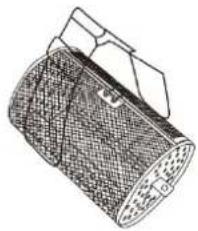
Opening and closing the air fryer:
(1)

(2)

Press the button
(3)

(4)


Warning: before using, please take out the paper holder inside the unit.
Control Panel:
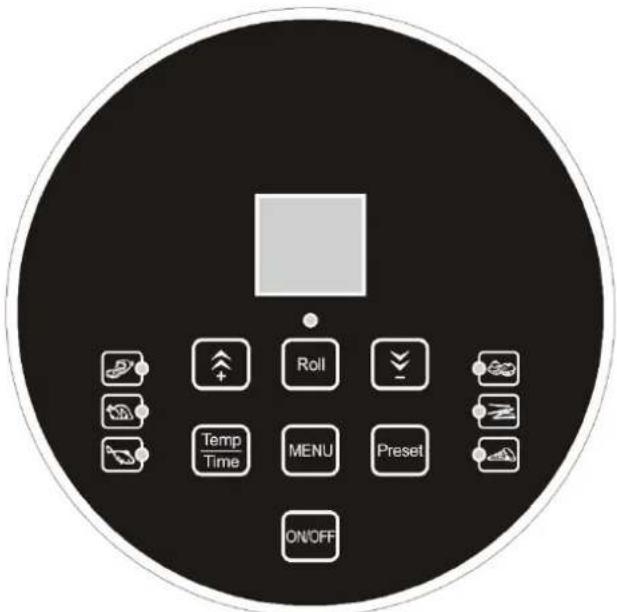
| Button | Function |
| + (plus) | Used to adjust up the timer and temperature. |
| - (minus) | Used to adjust down the timer and temperature. |
| ROLL | Used to start and stop the rotation. |
| TEMP/TIME | Used to set desired cooking temperature and time. |
| ON/OFF | Used to turn the appliance on and off. |
| MENU | Used to change between different preset cooking programs. |
| PRESET | Used to set a delay-start time. |
Cooking:
- Choose your desired method to cook your food items, whether it is using the included dual rack, baking cage, rotisserie fork or an oven safe pan (not included) inside the air fryer.
- Add the food to the air fryer. If you are using the baking cage, please put the food inside it before placing it into the air fryer.
- Keep the food about 15-20mm from the inner bowl of the air fryers edge to allow for maximum hot air circulation.
- Close the lid down so it clicks into place and make sure the food inside does not touch the lid.
- Connect the power lead into the rear of the unit. Insert the power cord firmly into the wall AC main outlet.
- If the lid is opened during the cooking process, the air fryer will pause. The timer will continue but the appliance will not heat. When the lid is closed again, the cooking process will resume.
- When the timer reaches zero, the air fryer will make a ‘ding’ sound to alert that the cooking process has been completed and the air fryer will stop operation.
Operation:
- Press the ON/OFF button on the control panel to turn on the appliance.
- There are two ways to use the air fryer, one is using the menu cooking program times and temperatures, the other is to manually set your desired temperature and time.
- For preset menu cooking, press the MENU button on the control panel. Press the MENU button repeatedly to choose between the different menu cooking program options. There will be a red LED light next to the selected cooking program.
- Once the desired cooking program is selected, press the ON/OFF button to start the cooking process.
| Menu | Temperature | Time |
| Meat | 200°C | 25 minutes |
| Poultry | 230°C | 25 minutes |
| Fish | 200°C | 15 minutes |
| Bake | 230°C | 10 minutes |
| Chips | 230°C | 25 minutes |
| Pizza | 220°C | 14 minutes |
- To manually set a desired temperature and time, press the MENU button on the control panel, then press the TEMP/TIME button. First, the temperature will be flashing on the screen and you can adjust the temperature by pressing the + or - buttons. When your desired temperature is shown on the screen, you can then adjust the time by pressing the TEMP/TIME button again. Now the time will be flashing on the screen and you can adjust the time by
pressing the + or - buttons. When your desired cooking time is shown on the screen, press the ON/OFF button to start the cooking process.
- The maximum temperature which can be set is 230°C .
- The minimum temperature which can be set is 60°C .
- The maximum time which can be set is 60 minutes.
- The minimum time which can be set is 1 minute.
Delay start:
The PRESET button allows you to delay start the air fryer to start its operation at a later time.
- The minimum time the delay start can be set is 10 minutes.
- The maximum time the delay start can be set is 9 hours and 50 minutes.
-
It is set in 10-minute increments.
-
To set the delay start, first choose the desired cooking program from the MENU button or manually select the temperature and time.
- Instead of immediately pressing the ON/OFF button to start the cooking process, press the PRESET button.
- Use the + or - buttons to adjust the delay start time. When your desired delay start time is shown on the screen, press the ON/OFF button once.
- The delay start time will be shown on the screen. There will be blinking figures underneath the time on the screen indicating that it will turn on and begin the cooking process once the timer reaches 00:00.
- Pressing the ON/OFF button a second time will cancel the delay start count down.
Roll:
The ROLL button allows the rotisserie fork and baking cage to rotate when fitted inside the air fryer. The food roller mode is a great way to cook a roast chicken as it creates even heating and circulation. Using the baking cage fitted to the rotisserie stick is a great way to cook hot chips and other smaller fried foods.
- Press the ROLL button to activate the rotation of the rotisserie stick. There will be a red LED light on next to the ROLL button to indicate it is rotating.
- Press the ROLL button again to stop the rotation of the rotisserie stick. There will be no LED light to indicate it is no longer rotating.
Pause:
The lid can be opened during a cooking process and the cooking will be paused. You can adjust the food or add seasoning and sauce during this time. Once the lid is closed securely again, the cooking process will automatically resume.
Cooking guide:
These cooking times are a guide only. They could vary depending on quantity, initial temperature, and weight.
| Food | Temperature | Time | Accessory to recommend |
| Chicken Roast | 200°C | 90–95mins* | Rotisserie fork |
| Frozen French Fries | 230°C | 25–30mins | Baking cage |
| Cashew nuts | 200°C | 5–8mins | Baking cage |
| Coffee beans | 230°C | 15–20mins | Baking cage |
| Chicken Wings | 200°C | 12–15mins | Baking cage / high rack |
| Cake | 180°C | 10–15mins | Low rack or baking tray |
| Pizza | 200°C | 10–15mins | High rack |
| Steak | 190°C | 12–16mins | High rack |
| Shrimp | 200°C | 5–8mins | High rack |
| Bread | 180°C | 15–20mins | Low rack + baking tray |
Note: 1.7 kg – 2.5 kg whole chicken cooked on the rotisserie stick will take around 90 minutes. A smaller 1.5 kg – 1.7 kg chicken will take around 60 minutes. In the case of needing extra cooking time, simply set the air fryer again for an additional \~ 30 minutes. To help extend the longevity of the air fryer, 60 minutes is the maximum cooking time allowed to be set each time.
Cleaning and maintenance:
Unplug the unit and allow it to cool down completely before cleaning. Clean and dry all parts after every use.
- Once the unit has cooled completely, clean the bowl thoroughly with warm soapy water and a damp cloth. Do not clean with a scouring pad to avoid scratching and causing rust. The bowl, baking cage, and rotisserie are all dishwasher safe.
- For self-cleaning, add 3cm of water with liquid dish detergent. Close the lid. Set the temperature to 60° C and the timer for 15 minutes. Allow the residue to soften as it heats. Unplug and cool completely before continuing to clean.
- To clean the fan cover, unplug the appliance and cool completely. Wipe the top of the fan cover with a soapy damp cloth or sponge to remove any grease.
Caution:
- Never immerse the cord or plug into water or any other liquid.
- If scrubbing is necessary, use a nylon or polyester mesh pad.
- Do not use a steel wood pad or any other abrasive material.
- Never use solvents or cleaning powder.
Storing:
Allow the unit to cool completely before storing. Store the appliance in a dry location. Do not place any heavy items on top of the appliance during storage as this may result in possible damage of the appliance.
Recipes:
We have included a handful of recipes below to help get you started with your new air fryer. Please also refer to the included cookbook for a variety of recipes.
Meat loaf
① 10 minutes + 25 minutes air fryer
400 g mince beef
1 egg, lightly beaten
3 tablespoons bread crumbs
50 g salami or chorizo sausage, finely chopped
1 small onion, finely chopped
1 tablespoon fresh thyme
1 pinch sea salt
1 pinch freshly ground black pepper
2 mushrooms, thick slices
1 tablespoon olive oil
1 round shallow oven dish
- Preheat the air fryer to 230° C.
- Mix the mince beef in a bowl with the egg, bread crumbs, salami, onion, thyme, sea salt and a black pepper. Knead and mix thoroughly.
- Transfer the ground meat to the pan or dish and smooth the top. Press in the mushrooms and coat the top with olive oil.
- Place the oven dish onto the wire rack and put it into the air fryer. Set the timer to 25 - 30 minutes and roast the meat loaf until brown and well done.
- Let the meat loaf stand for at least 10 minutes before serving. Cut the loaf into wedges and serve.
French fries
25 - 30 minutes air fryer
300-400 g frozen potato chips
1 tablespoon oil
1/3 tablespoon sea salt
- Spray the oil onto the potato chips.
- Insert the potato chips into the air fryer basket.
- Slide the basket into the air fryer. Set the timer to 25-30 minutes and temperature at 230° C and fry the potatoes until they are crispy brown.
- Arrange chips on a plate and sprinkle lightly with sea salt.
Ricotta balls
15 minutes + 20 minutes air fryer
250 g ricotta
2 tablespoons flour
1 egg, separated
1 pinch sea salt
1 pinch freshly ground black pepper
15 g fresh basil, finely chopped
1 tablespoon chives, finely chopped
1 tablespoon grated orange peel
3 slices of stale white bread
1 tablespoon olive oil
- Mix the ricotta in a bowl with the flour, egg, yolk, sea salt and black pepper. Stir the basil, chives and orange peel through the mixture.
- Divide the mixture into 20 equal portions and shape them into balls with wet hands. Let the balls rest for 10 minutes.
- Grind the bread slices into fine bread crumbs with a food processor and mix with the olive oil. Pour the mixture into a deep dish. Briefly beat the egg white in another deep dish.
- Preheat the air fryer to 230° C.
- Carefully coat the ricotta balls in the egg white and then in the bread crumbs.
- Put 10 balls on the wire rack and the wire rack into the air fryer. Set the timer to 20 minutes. Bake the balls until golden brown. Bake the rest of the balls in the same way.
- Serve the ricotta balls in a platter.
Roasted potatoes with greek yoghurt
② 25 - 30 minutes air fryer
500 g waxy potatoes
2 tablespoons olive oil
1 tablespoon spicy paprika
1 pinch sea salt
1 pinch freshly ground black pepper
150 ml Greek yoghurt
- Set the air fryer to 250° C. Peel the potatoes and cut them into 2 cm cubes. Soak the cubes in water for at least 30 minutes. Drain them thoroughly and then pat them dry with paper towels.
- In a medium-sized bowl, mix 1 tablespoon of olive oil with the paprika and add pepper to taste. Coat the potato cubes with the spicy oil.
- Transfer the potato cubes to the fryer basket and slide the basket into the air fryer. Set the timer to 25 - 30 minutes and fry the potato cubes until they are golden brown and done.
- Mix the Greek yoghurt in a small bowl with the remaining spoonful of olive oil and add sea salt and black pepper to taste. Sprinkle with paprika. Serve the yoghurt as a dip with the potatoes.
- Serve the potato cubes in a platter and sprinkle with sea salt.
Feta triangles
20 minutes + 15 minutes air fryer
1 egg yolk
100 g feta
2 tablespoons flat-leafed parsley, finely chopped
1 green onion, finely sliced into rings
1 pinch freshly ground black pepper
5 sheets of frozen filo pastry, defrosted
2 tablespoons olive oil
- Beat the egg yolk in a bowl and mix the feta, parsley and green onion; season with black pepper to taste.
- Cut each sheet of filo pastry into three strips.
- Scoop a full teaspoon of the feta mixture on the underside of a strip of pastry. Fold the tip of the pastry over the filling to form a triangle, folding the strip zigzag until the filling is wrapped up in a triangle of pastry. Fill the other strips of pastry with feta in the same manner.
- Preheat the air fryer to 220° C.
- Brush the triangles with a little oil and place five triangles on the Wire rack. Put the wire rack into the air fryer and set the timer to 15 minutes. Bake the feta triangles until they are golden brown. Bake the other feta triangles in the same manner.
- Serve the triangles in a platter.
Salmon croquettes
10 minutes + 15 minutes air fryer
200 g red salmon in a tin, drained
1 egg, lightly beaten
1 tablespoon fresh dill, finely chopped
2 tablespoons chives, finely chopped
1 pinch sea salt
1 pinch freshly ground black pepper
50 g bread crumbs
2 tablespoons oil
- Preheat the air fryer to 230° C.
- With a fork, mash up the salmon in a deep dish and mix it with the egg and herbs. Season the mixture to taste with sea salt and black pepper.
- Mix the bread crumbs with the oil in another deep dish until you obtain a loose mixture.
- Shape the salmon mixture into eight small croquettes and coat them in the bread crumb mixture.
- Put the croquettes in the basket and slide the basket into the air fryer. Set the timer to 15 minutes and bake the croquettes until golden brown.
Meatballs with feta
10 minutes + 12 minutes air fryer
150 g lamb mince or lean minced beef
1 slice of stale white bread, turned into fine crumbs
50 g Greek feta, crumbled
1 tablespoon fresh oregano, finely chopped
1/2 tablespoon grated lemon peel
1 pinch freshly ground black pepper
1 round shallow oven dish
- Mix the mince in a bowl with the bread crumbs, feta, oregano, lemon peel and black pepper, thoroughly kneading everything together.
- Divide the mince into 10 equal portions and form smooth balls, using damp hands.
- Put the balls in the oven dish and place this dish on the wire rack. Put them into the air fryer. Set the timer to 12 - 15 minutes & temperature at 250° C and bake the mince balls until they are nicely brown and done.
- Serve the meatballs hot in a platter with tapas forks.
Garlic mushrooms
10 minutes + 12 minutes air fryer
1 slice of white bread
1 clove garlic, crushed
1 tablespoon flat-leafed parsley, finely chopped
1 pinch sea salt
1 pinch freshly ground black pepper
1 tablespoon olive oil
12 small mushrooms
- Preheat the air fryer to 200° C.
- Grind the slices of bread into fine crumbs in a food processor and mix in the garlic, parsley, sea salt, and black pepper to taste. Lastly, stir in the olive oil.
- Cut off the mushroom stalks and fill the caps with the bread crumbs.
- Put the mushroom caps in the basket and slide it into the air fryer. Set the timer to 12 - 15 minutes. Bake the mushrooms until crispy and golden.
- Serve the mushrooms in a platter.
King prawns
15 minutes + 15 minutes air fryer
1 large red capsicum, halved
10 (frozen) king prawns, defrosted
5 slices of raw ham
1 tablespoon olive oil
1 large clove garlic, crushed
1/2 tablespoon paprika
1 pinch sea salt
1 pinch freshly ground black pepper
- Preheat the air fryer to 230° C. Put the capsicum into the basket and slide it into the air fryer. Set the timer to 15 minutes. Roast the capsicum until the skin is slightly charred. Put the capsicum in a bowl and cover it with a lid or cling film. Let it rest for 15 minutes.
- Peel the prawns, make an incision in the back and remove the black vein. Halve the slices of ham lengthwise and wrap each prawn in a slice of ham.
- Coat the parcels with a thin film of olive oil and put them into the basket. Slide the basket into the air fryer and set the timer to 3 - 5 minutes. Fry the prawns until crispy and just right.
- In the meantime, peel the skin off the capsicum halves, remove the seeds and cut the capsicum into pieces. Puree it in the blender with the garlic, paprika and olive oil. Pour the sauce into a dish, season with sea salt and black pepper to taste.
- Serve the prawns in a platter with the red capsicum dip on the side.
Healthy Choice™
Dear Valued Customer,
Thank you for purchasing the AF1300, 13 Litre Digital Air Fryer.
Your comments are important to us because they help us provide high quality, competitive and innovative products, just for you. If you are satisfied with your product, we kindly ask you to please take a moment to write a review on www.productreview.com.au and/or through the website where you have purchased your item.
If you have any questions concerning our products, please call our customer service department on 1300 666 848. Your feedback makes us better.
Thank you for choosing Healthy Choice by Lenoxx.
LENOXX
LENOXX ELECTRONICS AUSTRALIA PTY LTD
Importers & Wholesalers of Electronics & Toys
6 Oban Court Laverton North Vic 3026
ABN: 97 844 321 851
Customer Service: 1300-666-848
Email Address: Lenoxx@lenoxx.com.au
Web Site: www.lenoxx.com.au
ELECTRONICS GOODS WARRANTY
WE WARRANT THIS PRODUCT TO BE FREE FROM DEFECTS IN MATERIAL AND WORKMANSHIP UNDER NORMAL USE FOR A PERIOD OF 12 MONTHS AFTER DELIVERY TO THE ULTIMATE USER AND WE WILL REPAIR AT NO CHARGE OR REPLACE IT AT OUR OPTION SHOULD IT BECOME DEFECTIVE UNDER THIS WARRANTY PROVIDING YOU SUBMIT PROOF OF PURCHASE (ORIGINAL SALES RECEIPT) WHEN MAKING A REQUEST UNDER THIS WARRANTY. THIS WARRANTY DOES NOT APPLY TO ANY PRODUCT, WHICH HAS BEEN SUBJECT TO MISUSE NEGLECT OR ACCIDENT. THE WARRANTY DOES NOT COVER: HANDLES, BATTERIES, ELECTRICAL CORDS, ANTENNAS, MICROPHONES, BROKEN CABINETS OR ANY OTHER ACCESSORIES USED IN CONNECTION WITH THE PRODUCT. UNDER NO CIRCUMSTANCES WILL LENOXX ELECTRONICS (AUSTRALIA) PTY LTD BE LIABLE FOR ANY INCIDENTAL OR CONSEQUENTIAL DAMAGE.
IMPORTANT MESSAGE: BEFORE SENDING YOUR UNIT TO LENOXX FOR REPAIR YOU MUST SUPPLY PROOF OF PURCHASE (Original Sales Receipt) TO VALIDATE YOUR WARRANTY.
THIS WARRANTY IS IN ADDITION TO OTHER RIGHTS AND REMEDIES OF THE CONSUMER UNDER A LAW IN RELATION TO THE GOODS OR SERVICES TO WHICH THE WARRANTY RELATES.
"Our goods come with guarantees that cannot be excluded under the Australian Consumer Law. You are entitled to a replacement or refund for a major failure and for compensation for any other reasonably foreseeable loss or damage. You are also entitled to have the goods repaired or replaced if the goods fail to be of acceptable quality and the failure does not amount to a major failure".
For warranty registration please visit our website www.lenoxx.com.au
Service Direct Line (Australia only): 1300 - 666 - 848
MODEL NO:
AF1300
BATCH NO:
PR3918
- 13 LITRE DIGITAL AIR FRYER
- IMPORTANT SAFEGUARDS
- CORD
- BEFORE USING FOR THE FIRST TIME
- PARTS
- ACCESSORIES
- HOW TO USE THE ACCESSORIES
- OPENING AND CLOSING THE AIR FRYER
- COOKING
- OPERATION
- DELAY START
- ROLL
- PAUSE
- COOKING GUIDE
- CLEANING AND MAINTENANCE
- CAUTION
- STORING
- RECIPES
- MEAT LOAF
- FRENCH FRIES
- RICOTTA BALLS
- ROASTED POTATOES WITH GREEK YOGHURT
- FETA TRIANGLES
- SALMON CROQUETTES
- MEATBALLS WITH FETA
- GARLIC MUSHROOMS
- KING PRAWNS
- HEALTHY CHOICE™
- LENOXX
- LENOXX ELECTRONICS AUSTRALIA PTY LTD
- ELECTRONICS GOODS WARRANTY
Brand : Lenoxx
Model : Healthy Choice AF1300
Category : Deep fryer