
MR41806BT - Radio MAGNAVOX - Free user manual and instructions
Find the device manual for free MR41806BT MAGNAVOX in PDF.


| Product Type | Portable Radio with Bluetooth |
| Brand | Magnavox |
| Model | MR41806BT |
| Tuner Bands | AM, FM |
| Bluetooth | Yes, for wireless audio streaming |
| Power Source | AC adapter (included) or 4x AA batteries (not included) |
| Battery Type | AA (1.5V) x 4 |
| Display | LCD digital display with clock |
| Alarm | Dual alarm with wake to radio or buzzer |
| Sleep Timer | Yes, up to 90 minutes |
| Snooze | Yes, 9-minute snooze |
| Volume Control | Rotary knob |
| Preset Stations | 10 AM / 10 FM |
| Aux Input | 3.5mm auxiliary input |
| Headphone Jack | 3.5mm headphone output |
| Dimensions (WxHxD) | 7.1 x 3.5 x 5.5 inches (180 x 89 x 140 mm) |
| Weight | 1.2 lbs (0.54 kg) without batteries |
| Color | Black |
| Material | Plastic casing |
| Warranty | 1 year limited |
Frequently Asked Questions - MR41806BT MAGNAVOX
User questions about MR41806BT MAGNAVOX
0 question about this device. Answer the ones you know or ask your own.
Ask a new question about this device
Download the instructions for your Radio in PDF format for free! Find your manual MR41806BT - MAGNAVOX and take your electronic device back in hand. On this page are published all the documents necessary for the use of your device. MR41806BT by MAGNAVOX.
USER MANUAL MR41806BT MAGNAVOX
with Bluetooth® Wireless Technology
OWNER'S MANUAL
PLEASE READ BEFORE OPERATING THIS EQUIPMENT.
MODEL: MR41806BT
IMPORTANT SAFETY INSTRUCTION
CAUTION
RISK OF ELECTRIC SHOCK DO NOT OPEN

CAUTION: TO REDUCE THE RISK OF ELECTRIC SHOCK, DO NOT REMOVE COVER (OR BACK). NO USER-SERVICEABLE PARTS INSIDE. REFER SERVICING TO QUALIFIED SERVICE PERSONNEL.

DANGEROUS VOLTAGE:
The lightning flash with arrowhead symbol, within an equilateral triangle is intended to alert the user to the presence of uninsulated dangerous voltage within the product's enclosure that may be of sufficient magnitude to constitute a risk of electric shock to persons.

ATTENTION:
The exclamation point within an equilateral triangle is intended to alert the user to the presence of important operating and maintenance (servicing) instructions in the literature accompanying the appliance.
WARNING:
TO REDUCE THE RISK OF FIRE OR ELECTRIC SHOCK, DO NOT EXPOSE THIS PRODUCT TO RAIN OR MOISTURE. TO REDUCE THE RISK OF FIRE OR ELECTRIC SHOCK, AND ANNOYING INTERFERENCE, USE THE RECOMMENDED ACCESSORIES ONLY.
INFORMATION:
This equipment has been tested and found to comply with the limits for a Class B digital device, pursuant to Part 15 of the FCC Rules. These limits are designed to provide reasonable protection against harmful interference in a residential installation. This equipment generates, uses and can radiate radio frequency energy and, if not installed and used in accordance with the instructions, may cause harmful interference to radio communications. However, there is no guarantee that interference will not occur in a particular installation. If this equipment does cause harmful interference to radio or television reception, which can be determined by turning the equipment off and on, the user is encouraged to try to correct the interference by one or more of the following measures:
- Reorient or relocate the receiving antenna.
- Increase the separation between the equipment and receiver.
- Connect the equipment into an outlet on a circuit different from that to which the receiver is connected.
- Consult the dealer or an experienced radio/TV technician for help.
IMPORTANT SAFETY INSTRUCTION
Before using the unit, be sure to read all operating instructions carefully. Please note that these are general precautions and may not pertain to your unit. For example, this unit may not have the capability to be connected to an outdoor antenna.
1) Read these instructions. All the safety and operating instructions should be read before the product is operated.
2) Keep these instructions. The safety and operating instructions should be retained for future reference.
3) Heed all warnings. All warnings on the product and in the operating instructions should be adhered to.
4) Follow all instructions. All operating and use instructions should be followed.
5) Do not use this apparatus near water. Do not use this product near water and moisture, for example: near a bathtub, washbowl, kitchen sink or laundry tub; in a wet basement; or near a swimming pool.
6) Clean only with dry cloth. Unplug this product from the wall outlet before cleaning. Do not use liquid cleaners or aerosol cleaners. Use a dry cloth for cleaning.
7) Do not block any ventilation openings. Install in accordance with the manufacturer's instructions.
Slots and openings in the cabinet and in the back or bottom are provided for ventilation, to ensure reliable operation of the product and to protect it from overheating. These openings must not be blocked or covered. The openings should never be blocked by placing the product on a bed, sofa, rug or other similar surface. This product should never be placed near or over a radiator or heat source. This product should not be placed in a built-in installation such as a bookcase or rack unless proper ventilation is provided or the manufacturer's instructions have been adhered to.
8) Do not install near any heat sources such as radiators, heat registers, stoves, or other apparatus (including amplifiers) that produce heat.
9) Do not defeat the safety purpose of the polarized or grounding-type plug. A polarized plug has two blades with one wider than the other. A grounding type plug has two blades and a third grounding prong. The wide blade or the third prong is provided for your safety. If the provided plug does not fit into your outlet, consult an electrician for replacement of the obsolete outlet.
10) Protect the power cord from being walked on or pinched particularly at plugs, convenience receptacles, and the point where they exit from the apparatus.
11) Only use attachments/accessories specified by the manufacturer.
12) Use only with the cart, stand, tripod, bracket, or table specified by the manufacturer, or sold with the apparatus. When a cart is used, use aution when moving the cart/apparatus combination to avoid injury from tip-over.

An appliance and cart combination should be moved with care.
Quick stops, excessive force and uneven surfaces may cause the appliance and cart combination to overturn.
IMPORTANT SAFETY INSTRUCTION
13) Unplug this apparatus during lightning storms or when unused for long periods of time.
To protect your product from a lightning storm, or when it is left unattended and unused for long periods of time, unplug it from the wall outlet and disconnect the antenna or cable system. This will prevent damage to the product due to lightning and power-line surges.
14) Refer all servicing to qualified service personnel. Servicing is required when the apparatus has been damaged in any way, such as power-supply cord or plug is damaged, liquid has been spilled or objects have fallen into the apparatus, the apparatus has been exposed to rain or moisture does not operate normally, or has been dropped.
15) Power source
This product should be operated only from the type of power source indicated on the marking label. If you are not sure of the type of power supply to your home, consult your appliance dealer or local power company. For products intended to operate from battery power, or other source, refer to the operation instructions.
16) Power lines
An outside antenna system should not be located in the vicinity of overhead power lines or other electric light or power circuits, or where it can fall into such power lines or circuits. When installing an outside antenna system, extreme care should be taken to keep from touching such power lines or circuits as contact with them might be fatal.
17) Overloading
Do not overload wall outlets and extension cords as this can result in a risk of fire or electric shock.
18) Object and liquid entry
Never push objects of any kind into this product through openings as they may touch dangerous voltage points or short out parts that could result in fire or electric shock. Never spill or spray any type of liquid on the product.
19) Outdoor antenna grounding
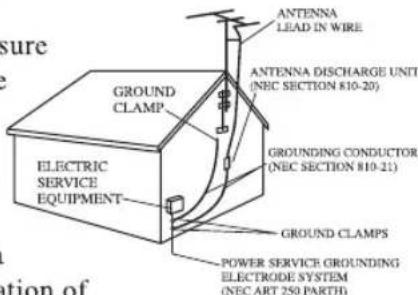
If an outside antenna is connected to the product, be sure the antenna system is grounded so as to provide some protection against voltage surges and built up static charges. Section 810 of the National Electric Code ANSI/NFPA 70 provides information with respect to proper to grounding of the mast and supporting structure, grounding of the lead-in wire to an antenna
discharge product, size of grounding conductors, location of antenna-discharge product, connection to grounding electrodes and requirements for the grounding electrodes.
20) Service
Do not attempt to service this product yourself as opening or removing covers may expose you to dangerous voltage or other hazards. Refer all servicing to qualified service personnel.
IMPORTANT SAFETY INSTRUCTION
21) Replacement parts
When replacement parts are required, be sure the service technician uses replacement parts specified by the manufacturer or those that have the same characteristics as the original parts. Unauthorized substitutions may result in fire or electric shock or other hazards.
22) Safety check
Upon completion of any service or repairs to this product, ask the service technician to perform safety checks to determine that the product is in proper operation condition.
23) Wall or ceiling mounting
The product should be mounted to a wall or ceiling only as recommended by the manufacturer.
24) Damage requiring service
Unplug this product from the wall outlet and refer service to qualified service personnel under the following conditions.
a) When the power-supply cord or plug is damaged.
b) If liquid has been spilled or objects have fallen into the product.
c) If the product has been exposed to rain or water.
d) If the product does not operate normally by following the operating instructions.
Adjust only those controls that are covered by the operating instructions, as an adjustment of other controls may result in damage and will and require extensive work by a qualified technician to restore in the product to its normal operation.
e) If the product has been dropped or the cabinet has been damaged.
f) When the product exhibits a distinct change in performance-this indicates a need for service.
25) Note to CATV system installer
This reminder is provided to call the CATV system installer's attention to Article 820-40 of the NEC that provides guidelines for proper grounding and, in particular, specifies that the cable ground shall be connected to the grounding system of the building, as close to the point of cable entry as practical.
NOTE: Refer all servicing to qualified service personnel. Servicing is required when the unit has been damaged in any way such as the following: the power-supply cord or plug has been damaged, liquid has been spilled into the unit, the unit has been exposed to rain or moisture, the unit has been dropped or the unit does not operate normally.
LOCATION OF CONTROLS
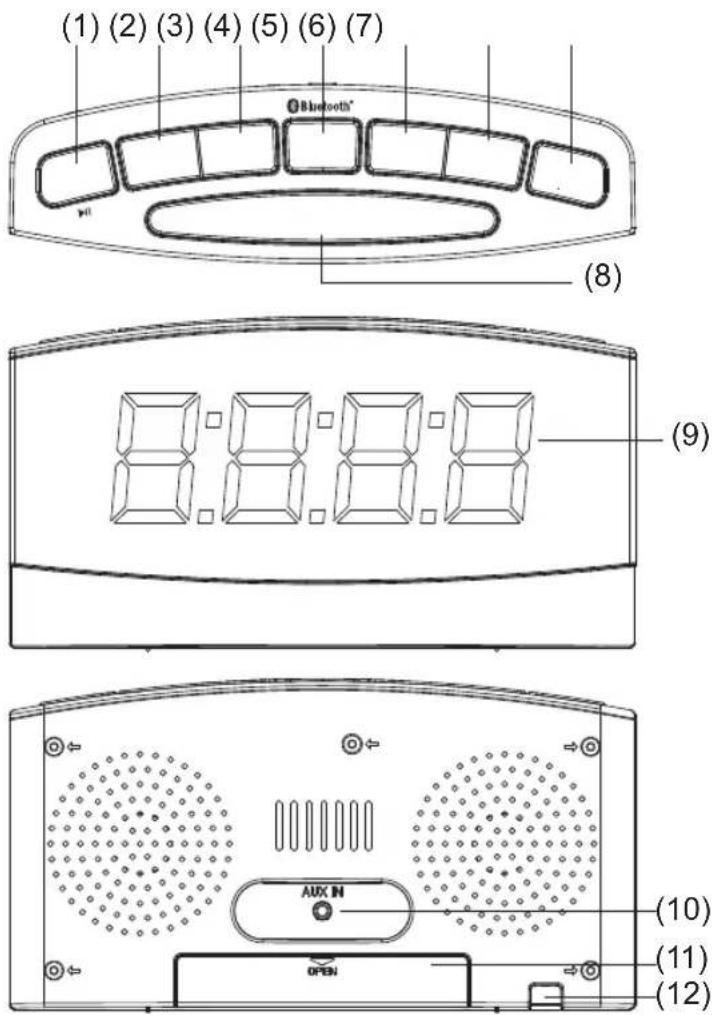
- CLK/MEM/ ▶ II (Clock set/Memory/BT Play-Pause) Button
- ◀/HR (Skip-Search Backward/Hour set) Button
- ▶/MIN (Skip-Search Forward/Minute set) Button
- DIMMER Button
- ALM 2/VOL- (Alarm 2 set/Volume down) Button
- ALM 1/VOL+ (Alarm 1 set/Volume up) Button
- ALM OFF/SOURCE/ ⏻ ( Alarm off/Source selection/Power on-off) Button
- SNOOZE/SLEEP Button
- LED Display
- AUX IN Jack
- Battery Door
- AC Power Cord
POWER SOURCE
Unwind the AC power cord and extend it to its full length. Insert the AC plug into any convenient 120V 60Hz household outlet as the illustrated below:

- This unit is equipped with a polarized AC plug which has one blade wider than the other. This is a safety feature to reduce the likelihood of electric shock. This polarized AC plug will only fit in a polarized AC outlet. If you find that you cannot insert this plug into your outlet, you may have an obsolete non-polarized outlet. Please do not try to defeat this safety feature by using a non-polarized adaptor or by filling the wider blade to make it fit into your outlet. If this plug does not fit into your outlet, you should contact a qualified licensed electrician to replace your obsolete outlet
- If the AC power failure, this electronic clock is designed to continue operating internally (without showing the time on the Clock Display) with two (2) AAA size batteries (not included). Install the batteries as follows:
Open the battery door on the rear of the unit by sliding it out and then lifting it.
Insert two (2) AAA size batteries (not included) according to the polarity diagram inside the battery compartment. (Alkaline batteries are recommended.)
Replace the battery door.
BATTERY PRECAUTIONS:
Follow these precautions when using a battery in this device:
- Use only the size and type of battery specified.
-
Be sure to follow the correct polarity when installing the battery as indicated in the battery compartment. A reversed battery may cause damage to the device.
-
Do not mix different types of batteries together (e.g. Alkaline and Carbon-zinc) or old batteries with fresh ones.
-
If the batteries in the device are consumed or the device is not to be used for a long period of time, remove the batteries to prevent damage or injury from possible battery leakage.
-
Do not try to recharge the battery not intended to be recharged; it can overheat and rupture. (Follow battery manufacturer's instructions.)
-
Do not dispose of battery in fire. Battery may explodes or leak.
-
Clean the battery contacts and also those of the device prior to battery installation.
OPERATION
ACTUAL TIME SETTINGS:
To set or reset the actual time at first time use:
-
Connect the unit to AC power as previous procedure. The Display will illuminate and blink.
-
Press the ◀/HR Button to set hour. (Make sure the PM Indicator on the display is light if the time is PM and not light if the time is AM).
-
Press the ▶/MIN Button to set minute.
-
When finished, press the CLK/MEM/ ▶ II Button to save the settings and exit. The display will stop blinking.
To set or reset the actual time at normal operation:
- In standby mode, press and hold the CLK/MEM/ ▶ Button until the display start blinking.
- Press the ◀/HR Button to set hour. (Make sure the PM Indicator on the display is light if the time is PM and not light if the time is AM).
- Press the ▶/MIN Button to set minute.
- When finished, press the CLK/MEM/ ▶ II Button to save the settings and exit. The display will stop blinking.
BT (BLUE TOOTH):
In first time use or re-pairing to a new BT Device, pairing it as below:
- In standby mode, press the ALM OFF/SOURCE/Button to power on the unit.
- Press the ALM OFF/SOURCE/ Button repeatedly until "bt" appears on the display. The "BT." Indicator on the display will illuminate and blink.
- Power on the external BT Device and enter to BT searching mode. Start pairing as the on screen instructions on the external BT Device. After paired, the “BT.” Indicator will stop blinking. (For details pairing procedures, please refer to the user’s manual of your BT device.).
Notes:
- When the external BT Device searched the unit, our model number “MR41806BT” will appear on the display of external BT Device.
● Pairing code "0000" or "1234" may need to enter.
Normal operation after paired:
- Turn on the BT function of the external BT Device.
- In Standby mode, press the ALM OFF/SOURCE/ Button to power on the unit .
-
Press the ALM OFF/SOURCE/ Button repeatedly until "bt" appears on the display. The "BT." Indicator on the display will illuminate and blink.
-
Wait a few seconds until the unit paired to the external BT Device automatically. (The Indicator stop blinking).
-
Play the music on the connected BT Device as usual.
-
Duri ng playback:
-
Press and release the CLK/MEM/ ▶II Button to pause; press again to resume normal playback.
-
Press the ◄/HR or ▶/MIN Button repeatedly to skip tracks.
-
To shut off, press and hold the ALM OFF/SOURCE/ ⏻ Button until “OFF” appear on the display then release the button.
RADIO:
FM Band:
- In standby mode, press the ALM OFF/SOURCE/Button to power on the unit.
- Press the ALM OFF/SOURCE/ ⏻ Button repeatedly until the FM Frequency (87.5 – 108) appear on the display.
-
Press and hold the ◄/HR or ▶/MIN Button to auto search the pervious or next available FM station. Repeat the same procedure until the desired FM Station is found.
-
If the reception is not good, press the ◀/HR or ▶/MIN Button repeatedly to fine tune.
-
Adjust the volume to the desired level by pressing the ALM 2/VOL – or ALM 1/VOL + Button.
- When finished listening, press and hold the ALM OFF/SOURCE/ Button until "OFF" appears on the display to shut off the radio (standby mode).
AM Band:
- In standby mode, press the ALM OFF/SOURCE/Button to power on the unit.
- Press the ALM OFF/SOURCE/ Button repeatedly until the AM Frequency (520 - 1710) appear on the display.
- Press and hold the ◀◀ /HR or ▶▶/MIN Button to auto search the pervious or next available AM station. Repeated the same procedures until the desired FM Station is searched and play.
- If the reception is not good, press the ◀/HR or ▶/MIN Button repeatedly to fine tune.
- Adjust the volume to the desired level by press the ALM 2/VOL – or ALM 1/VOL + Button.
- When finished listening, press and hold the ALM OFF/SOURCE/ Button until "OFF" appear on the display to shut off the radio (standby mode).
Radio stations preset:
- Power on the radio and receive the desired radio station as previously instructed.
- Press and hold the CLK/MEM/ ▶Button until "P XX" appears on the display and blink. Press the ◀/HR or ▶/MIN Button repeatedly to select the program number (P01 – P10) you want it stored to. Press the CLK/MEM/ ▶Button again to store it.
- Repeat the same procedures until all the desired radio stations were stored into the program list.
- After setting, in radio AM or FM band. Press the CLK/MEM/ ▶■ Button repeatedly to select and play the desired stored radio station.
Notes:
- If the backup batteries are not installed when the power goes out presets may be erased
- Preset stations can only be removed by storing another station over it.
● A total of 20 radio stations can be stored (10 AM / 10 FM).
Antenna:
The unit has built-in AM/FM antennas. If reception is not clear, turn or relocate the unit to improve the radio reception.
AUX IN
Listen to music from an external Audio Player as follows:
- Connect the external Audio Player with a 3.5mm AUX cable (Cable not included).
- Insert one end to the AUX IN Jack on the rear of unit.
- Insert the other end to the Phones Jack; Line Out Jack or AUX Out Jack on the external Audio Player.
- Press the ALM OFF/SOURCE/ ⏻ Button to power on the unit .
- Press the ALM OFF/SOURCE/ Button repeatedly until "AUX" appear on the display.
- Play the music on the external Audio Player as usual.
-
Adjust the volume to the desired level by pressing the ALM 2/VOL – or ALM 1/VOL + Button.
(Make sure the volume level of the connected external player is set to high.) -
When no longer in use, press and hold the ALM OFF/SOURCE/ Button until "OFF" appear on the display to shut off the unit (standby mode).
ALARM:
Alarm 1 setting:
- Make sure the unit is in standby mode before setting.
- Press and hold the ALM 1/VOL + Button until alarm 1 time appears on the display and blinks. (One of AL 1 Indicator will light).
- Press the ◀/HR Button to set hour. (Make sure the PM Indicator on the display is lit if the alarm 1 time is PM and not lit if the alarm 1 time is AM).
- Press the ▶/MIN Button to set minute.
- Press the ALM 1/VOL + Button again to save the settings and exit. The display will stop blinking.
- Press the ALM 1/VOL + Button repeatedly to set or reset the weak up mode to Buzz (ALARM 1 Indicator will light) or Radio (RADIO Indicator under ALARM 1 Indicator will light) or turn it off (Both indicators will not light).
Alarm 2 setting:
Same as the settings of Alarm 1. But, press the ALM 2/VOL - Button instead of ALM 1/VOL +Button.
Important:
If radio was selected as weak up mode, received the desired radio station as previous procedure before activate alarm. Otherwise, when alarm goes off, no sound output from the speaker or sound weak.
Shut off alarm:
- When alarm goes off, press the ALM OFF/SOURCE/ ⏻ Button to turn off alarm, the alarm will be reset for next day. (The correspondence alarm indicator will keep illuminate).
- To turn off the alarm completely (not reset for next day). Press the ALM 1/VOL + and/or ALM 2/VOL - Button repeatedly until all the alarm indicators not light.
SNOOZE:
The alarm can be temporarily turned off manually by pressing the SNOOZE/SLEEP Button. After pressing the button the alarm will stop sounding, the correspondence alarm indicator will blink and the alarm will turn back on automatically nine (9) minutes later. This feature can be repeated until the ALM OFF/SOURCE/Button was pressed (The correspondence alarm indicator will stop blinking and the alarm will reset for next day).
SLEEP TIMER:
In BT (Blue Tooth), Radio or Aux (in) mode, press the SNOOZE/SLEEP Button to activate the sleep function, sleep timer will appear on the display. Press the SNOOZE/SLEEP Button repeatedly to set the sleep timer to 10 – 90 minutes as desire. To turn off the sleep timer before the time is up, press the SNOOZE/SLEEP Button repeatedly until “OFF” appear on the display.
DIMMER:
Press the DIMMER Button repeatedly to set the brightness level of the display as desired.
TROUBLE SHOOTING GUIDE
| Symptom Possible | Cause Solution | |
| Power | ||
| No power | Plug from AC Power Cord had not inserted to AC wall outlet. | Insert the plug to wall outlet having AC 120V~, 60 Hz. |
| Radio | ||
| Noise or sound distorted on radio broadcasts | Station not tuned properly. | Retune the radio station. |
| The location not good for radio reception. | Turn or relocation the unit. | |
| Volume at minimum. | Increase Volume level by press the ALM 1/VOL + Button. | |
| BT | ||
| BT not functioning | The BT Device had not paired to the unit. | Paired the BT Device to the unit as page 8-9 |
| Sound weak or distortion | The BT Device too far from the unit. | Place the BT Device close to the unit. |
GENERAL SPECIFICATIONS
Power Source: AC 120V\~, 60 Hz, 5W
Clock back up:
DC=3V, 2 x AAA size batteries; Not included
Audio Power: 1 Watts
Impendence of Speakers: 8 Ohm; 2W
Radio Band Coverage: AM 520 - 1710 kHz
FM 87.5 - 108 MHz
BT Version: 2.0
BT Effective Range:
32 feet in open area
ACCESSORY
1 x User's Manual
SPECIFICATIONS ARE SUBJECT TO CHANGE WITHOUT NOTICE
LIMITED WARRANTY
Craig Electronics warrants this product to be free from manufacturing defects in material and workmanship under normal use for a period of 180 days from date of purchase. If service is required, please return the product to the store where it was purchased for exchange; or, pack the unit in the original packing material with all accessories if applicable, a copy of your sales receipt and a Cashier's check or Money Order for \$7 (to cover shipping and handling costs) payable to Craig Electronics Inc. For consumers in Canada, please make sure that the cashier check or money order is redeemable through a U.S. bank. Ship your product freight pre-paid. Your unit will be repaired, replaced or if the unit can not be repaired or replaced, a refund will be forwarded to you within four weeks of receipt of your unit. Please ship your unit to:
Craig Electronics Inc.
1160 NW 163 Drive
Miami, FI 33169
This warranty is void if the product has been: a) Used in a commercial application or rental. b) Damaged through misuse, negligence, or abuse. c) Modified or repaired by anyone other than an authorized Craig service center. d) Damaged because it is improperly connected to any other equipment.
Note: This warranty does not cover: a) Ordinary adjustments as outlined in the Owner's Manual which can be performed by the customer. b) Damage to equipment not properly connected to the product. c) Any cost incurred in shipping the product for repair. d) Damage to the product not used in the USA.
This warranty is not transferable and only applies to the original purchase. Any implied warranties, including the warranty of merchantability, are limited in duration to the period of this expressed warranty and no warranty whether expressed or implied shall apply to the product thereafter.
Under no circumstance shall Craig be liable for any loss or consequential damage arising out of the use of this product. This warranty gives specific legal rights. However, you may have other rights which may vary from state to state. Some states do not allow limitations on implied warranties or exclusion of consequential damage. Therefore, these restrictions may not apply to you.
This product has been manufactured by and is sold under the responsibility of Craig Electronics Inc, and Craig Electronics Inc is the warrantor in relation to this product. MAGNAVOX and SMART. VERY SMART are registered trademarks of Koninklijke Philips N.V. and are used under license from Koninklijke Philips N.V.
To Obtain Service on your Product
email:service@craigelectronics.com
Printed in China MR41806BT_WC_E0FH1_B0WU

- IMPORTANT SAFETY INSTRUCTION
- DANGEROUS VOLTAGE:
- ATTENTION:
- WARNING:
- INFORMATION:
- 21) Replacement parts
- 22) Safety check
- 23) Wall or ceiling mounting
- 24) Damage requiring service
- 25) Note to CATV system installer
- LOCATION OF CONTROLS
- POWER SOURCE
- BATTERY PRECAUTIONS:
- OPERATION
- ACTUAL TIME SETTINGS:
- To set or reset the actual time at normal operation:
- BT (BLUE TOOTH):
- In first time use or re-pairing to a new BT Device, pairing it as below:
- Notes:
- Normal operation after paired:
- RADIO:
- FM Band:
- AM Band:
- Radio stations preset:
- Antenna:
- AUX IN
- ALARM:
- Alarm 1 setting:
- Alarm 2 setting:
- Important:
- Shut off alarm:
- SNOOZE:
- SLEEP TIMER:
- DIMMER:
- TROUBLE SHOOTING GUIDE
- GENERAL SPECIFICATIONS
- ACCESSORY
- SPECIFICATIONS ARE SUBJECT TO CHANGE WITHOUT NOTICE
- LIMITED WARRANTY
Brand : MAGNAVOX
Model : MR41806BT
Category : Radio