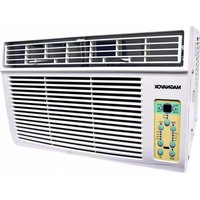
USER MANUAL P-12NPE MAGNAVOX
natural_image
Line drawing of a portable air conditioner unit with wheels and vent slots (no text or symbols)
MODEL: P-08NPE
P-12NPE
P-14NPE
For any service needs, call 1-855-368-8606
Before operating this product, please read the instructions carefully and save this manual for future use.
Contents
Preparation----2---
Safety Precautions----3
Cautions 4
Installation----5
Operation 9
Maintenance---- 12
Faults Diagnosis---- 13
Design and Unit Temperature Range ----14
| Preparation

Safety Precautions
Please read through these instructions before you start the installation process. Improper installation can cause damage to the unit, your personal property, and also poses a personal safety hazard.
-Installation must be performed according to the installation instructions. Improper installation can cause water leakage, electrical shock, or fire.
-Use only the included accessories and parts, and specified tools for the installation. Using non-standard parts can cause water leakage, electrical shock, fire, and injury or property damage.
-Make sure that the outlet you are using is grounded and has the appropriate voltage. The power cord is equipped with a three-prong grounding plug to protect against shock. Voltage information can be found on the side of the unit, behind the grille.
-Install the unit on a flat, sturdy surface. Failure to do so could result in damage or excessive noise and vibration.
-The unit must be kept free from obstruction to ensure proper function and to mitigate safety hazards.
-DO NOT modify the length of the power cord or use an extension cord to power the unit. DO NOT share a single outlet with other electrical appliances. Improper power supply can cause fire or electrical shock.
-DO NOT install your air conditioner in a wet room such as a bathroom or laundry room. Too much exposure to water can cause electrical components to short circuit.
-DO NOT install the unit in a location that may be exposed to combustible gas, as this could cause fire.
-The unit has wheels to facilitate movement. Make sure not to use the wheels on thick carpet or to roll over objects, as this could cause unit to fall.
-DO NOT operate the unit that has been dropped or damaged.
-DO NOT allow children to play with the air conditioner.
Children must be supervised around the unit at all times.
- If the air conditioner is knocked over during use, turn off the unit and unplug it from the main power supply immediately. Visually inspect the unit to ensure there is no damage. If you suspect the unit has been damaged, contact a technician or customer service for assistance.
-During a thunderstorm, the power must be cut off to avoid damage to the machine due to lightning.
Cautions
-This appliance is not intended for use by children or persons with reduced physical sensory or mental capabilities, unless they are supervised by a responsible adult or considered capable enough to operate the appliance safely.
-Children should be supervised to ensure that they do not play with the appliance.
-If the supply cord is damaged, it must be replaced by the manufacturer, its service agent or similarly qualified persons in order to avoid a hazard.
-Prior to cleaning or other maintenance, the appliance must be disconnected.
-Do not run cord under carpeting. Do not cover cord with throw rugs, runners, or similar coverings. Do not route cord under furniture or appliances. Arrange cord away from traffic area and where it will not be tripped over.
-Do not operate unit with a damaged cord or plug. Discard unit or return to an authorized service facility for examination and/or repair.
-To reduce the risk of fire or electric shock, do not use this unit with any solid-state speed control device.
-The appliance shall be installed in accordance with national wiring regulations.
-Contact the authorised service technician for repair or maintenance of this unit.
-Contact the authorised installer for installation of this unit.
-When there are wide differences between "USER'S MANUAL" and "Remote Control Illustration" on function description, the description on "USER'S MANUAL" shall prevail.
Installation
Choosing The Right Location

Your installation location should meet the following requirements:
-Make sure that you install your unit on an even surface to minimize noise and vibration.
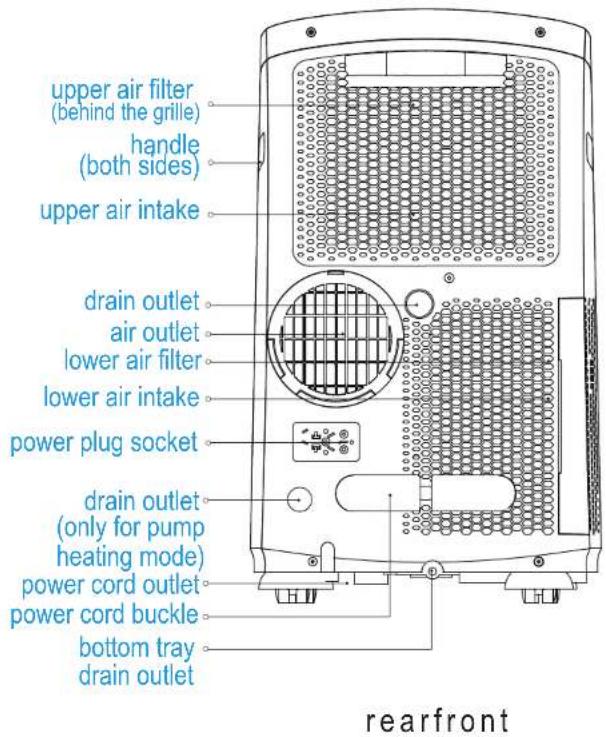
-The unit must be installed near a grounded outlet, and the Collection Tray Drain (found on the back of the unit) must be accessible.
-The unit should be located at least 30cm (12") from the nearest wall to ensure proper air conditioning.
-DO NOT cover the Intakes, Outlets or Remote Signal Receptor of the unit, as this could cause damage to the unit.

Note About Fluorinated Gasses
-This air-conditioning unit is a hermetically sealed unit that contains fluorinated gasses. For specific information on the type of gas and the amount, please refer to the relevant label on the unit itself.
-Installation, service, maintenance and repair of this unit must be performed by a certified technician.
-Product uninstallation and recycling must be performed by a certified technician.
-If the system has a leak-detection system installed, it must be checked for leaks at least every 12 months.
-When the unit is checked for leaks, proper record-keeping of all checks is strongly recommended.
NOTE:
All the illustrations in the manual are for explanation purpose only. Your machine may be slightly different.
The unit can be controlled by the unit control panel alone or with the remote control. This manual does not include Remote Control Operations, see the <> packed with the unit for details.
Installation
-Medium Philips screwdriver; -Tape measure or ruler; -Knife or scissors;
-Saw (optional, to shorten window adaptor for narrow windows)
Accessories
Your Window Installation Kit fits windows 26.5-48" (67.5-123cm) and can be shortened for smaller windows.
| Part | Description | Quantity |
| Unit Adaptor | 1 pc |
 | Exhaust Hose | 1 pc |
 | Window Slider Adaptor | 1 pc |
 | Bolt | 1 pc |
 | Window Slider A | 1 pc |
 | Window Slider B | 1 pc |
 | Foam Seal A (Adhesive) | 2 pc |
 | Foam Seal B (Adhesive) | 2 pc |
 | Foam Seal C (Non-adhesive) | 1 pc |
 | Security Bracket and 2 Screws | 1 set |
| [XHZ] | Drain Hose | 1 pc |
  | Remote Control and Battery(For remote control models only) | 1 set |
Window Installation Kit
Step One: Preparing the Exhaust Hose assembly
Press the exhaust hose into the window slider adaptor and unit adaptor, clamps automatically by elastic buckles of the adaptors.

Step Two: Install the Exhaust hose assembly to the unit
Insert unit adaptor of the Exhaust hose assembly into the lower groove of the air outlet of the unit while the hook of the adaptor is aligned with the hole seat of the air outlet and slide down the Exhaust hose assembly along the arrow direction for installation.

Step Three: Preparing the Adjustable Window Slider
- Depending on the size of your window, adjust the size of the window slider.
- If the length of the window requires two window sliders, use the bolt to fasten the window sliders once they are adjusted to the proper length.

Installation
Note: Once the Exhaust Hose assembly and Adjustable Window Slider are prepared, choose from one of the following two installation methods.
Type 1: Hung Window Installation

Cut the adhesive foam seal A and B strips to the proper lengths, and attach them to the window sash and frame as shown.

Insert the window slider assembly into the window opening.

Cut the non-adhesive foam seal C strip to match the width of the window. Insert the seal between the glass and the window frame to prevent air and insects from getting into the room.
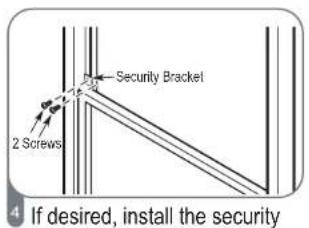
If desired, install the security bracket with 2 screws as shown.

natural_image
Line drawing of a vacuum tube inserted into a window frame (no text or symbols)
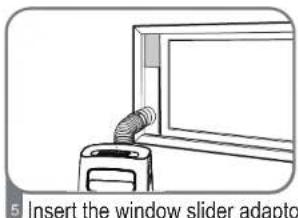
5 Insert the window slider adaptor into the hole of the window slider.
Type 2: Sliding Window Installation

1 Cut the adhesive foam seal A and B strips to the proper lengths, and attach them to the window sash and frame as shown.
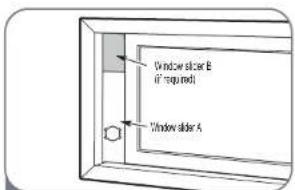
Insert the window slider assembly into the window opening.
Installation
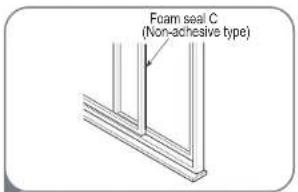
Cut the non-adhesive foam seal C strip to match the window height. Insert the foam seal between the glass and the window frame to prevent air and insects from getting into the room.

If desired, install the security bracket with 2 screws as shown.
natural_image
Line drawing of a window slider adapter inserting a device into a monitor (no text or symbols)
Insert the window slider adaptor into the hole of the window slider.
Note: To ensure proper function, DO NOT overextend or bend the hose. Make sure that there is no obstacle around the air outlet of the exhaust hose (in the range of 19.69inch) in order for the exhaust system works properly. All the illustrations in this manual are for explanation purpose only. Your air conditioner may be slightly different. The actual shape shall prevail.


Note: While operating in cool mode, the exhaust hose will become warm to the touch (This is normal).
Having the exhaust hose overextended can cause radiant heat into the room causing ineffective operation.
Operation
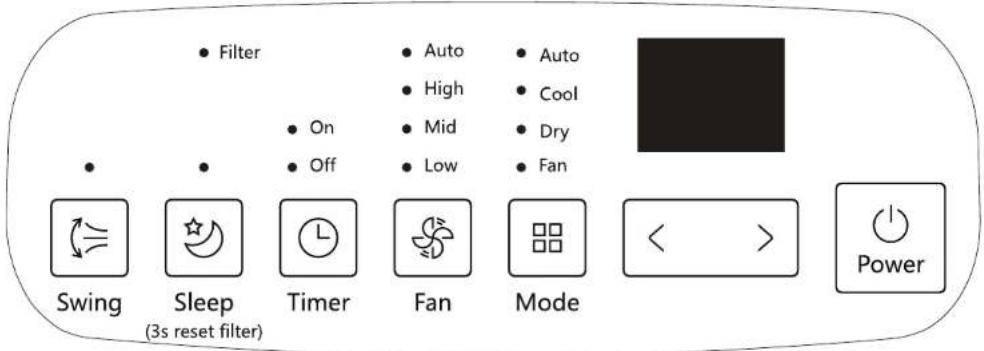

Swing
(Applicable to the models with auto swing feature only) Used to initiate the Auto swing feature. When the operation is ON, press the SWING button can stop the louver at the desired angle.

Sleep reset filter
Used to initiate the SLEEP/ECO operation.
NOTE: After 250 hours of operation, the filter indicator light illuminates. This feature is a reminder to clean the Air Filter for more efficient operation. Press this button for 3 seconds to cancel the reminder.

Timer
Used to initiate the AUTO ON start time and AUTO OFF stop time program, in conjunction with the + & - buttons. The timer on/off indicator light illuminates under the timer on/off settings.

Pan
Fan
Control the fan speed. Press to select the fan speed in four steps-LOW, MID, HIGH and AUTO. The fan speed indicator light illuminates under different fan settings.

Mode
Selects the appropriate operating mode. Each time you press the button, a mode is selected in a sequence that goes from AUTO, COOL, DRY, and FAN.
The mode indicator light illuminates under the different mode settings.

Used to adjust (increasing/decreasing) temperature settings in 1°C/1°F increments in a range of 17°C/62°F to 30°C/86°F or the TIMER setting in a range of 0\~24hrs.
NOTE: The control is capable of displaying temperature in degrees Fahrenheit or degrees Celsius. To convert from one to the other, press and hold the Up and Down buttons at the same time for 3 seconds.

Power switch on/off.
Operation

LED display
- Shows the set temperature in °C or °F and the Auto-timer settings.
- While on DRY and FAN modes, it shows the room temperature.
- Shows Error codes and protection code:
E1-Room temperature sensor error.
E2-Evaporator temperature sensor error.
E3-Condenser temperature sensor error (on some models).
E4-Display panel communication error.
E7-Zero-crossing malfunction.
P1-Bottom tray is full--Connect the drain hose and drain the collected water away. If this error repeats, call for service.
Note: When one of the above malfunctions occurs, turn off the unit, and check for any obstructions. Restart the unit, if the malfunction is still present, turn off the unit and unplug the power cord. Contact the manufacturer or its service agents or a similar qualified person for service.

Operation Instructions
COOL operation
-Press the "MODE" button until the "COOL" indicator light comes on.
-Press the ADJUST buttons "+" or "-" to select your desired room temperature. The temperature can be set within a range of 17°C\~30°C/62°F\~86°F.
-Press the "FAN SPEED" button to choose the fan speed.
DRY operation
-Press the "MODE" button until the "DRY" indicator light comes on.
-Under this mode, you cannot select a fan speed or adjust the temperature. The fan motor operates at LOW speed.
-Keep windows and doors closed for the best dehumidifying effect.
-Do not put the duct to window.
Self-Evaporation System
-In cool mode, this unit is made to self-evaporate. This means, if you keep the rubber stoppers closed on the back of the unit, the water will evaporate and you will not have to drain.
-In cases of extreme humidity you may have some water accumulation that the unit is unable to evaporate, in this case the unit will beep 8 times, switch to fan mode and
read a p1 error on the display (it will stay like this until the unit is drained) if this happens, you should drain the water from the lower drain (located at the bottom of the unit).
-The top drain is used only if you choose DRY mode.
* Self Evaporation System works in COOL mode only
AUTO operation
-When you set the air conditioner in AUTO mode, it will automatically select cooling, heating(cooling only models without), or fan only operation depending on what temperature you have selected and the room temperature.
-The air conditioner will control room temperature automatically around the temperature point set by you.
-Under AUTO mode, you cannot select the fan speed.
FAN operation
-Press the "MODE" button until the "FAN" indicator light comes on.
-Press the "FAN SPEED" button to choose the fan speed. The temperature cannot be adjusted.
-Do not put the duct to window.
TIMER operation
- While the unit is on, press the TIMER button, the TIMER OFF indicator light illuminates. This indicates the AUTO OFF STOP program is initiated. Press the UP or DOWN button to select the desired time. Press the TIMER button again within 5 seconds, the TIMER ON indicator light illuminates. This indicates the AUTO ON START program is initiated. Press the UP or DOWN button to select the desired time.
- While the unit is off, press the TIMER button to initiate the AUTO ON START program. Press the TIMER button again within 5 seconds to initiate the AUTO OFF STOP program.
-Press or hold the UP or DOWN button to change the Auto time by 0.5 hour increments, up to 10 hours, then at 1 hour increments up to 24 hours. The control will count down the time remaining until start.
-The system will automatically revert back to display the previous temperature setting if there is no operation in a 5 seconds period.
-Turning the unit ON or OFF at any time or adjusting the timer setting to 0.0 will cancel the Auto Start/Stop timer program.
-When the malfunction occurs, the Auto Start/Stop timed program will also be cancelled.
Operation
SLEEP/ECO operation
-Press this button, the selected temperature will increase(cooling) or decrease(heating) by 1^ / 1^ 30 minutes. The temperature will then increase (cooling) or decrease (heating) by another 1^ / 1^ after an additional 30 minutes. This new temperature will be maintained for 7 hours before it returns to the originally selected temperature. This ends the Sleep/Eco mode and the unit will continue to operate as originally programmed. NOTE: This feature is unavailable under FAN or DRY mode.
Other features
FOLLOW ME/TEMP SENSING feature(optional)
NOTE: This feature can be activated from the remote control ONLY. The remote control overseas a remote thermostat allowing for the precise temperature control at its location. To activate the Follow Me/Temp Sensing feature, point the remote control towards the unit and press the Follow Me/Temp Sensing button. The remote display is actual temperature at its location. The remote control will send this signal to the air conditioner every 3 minutes interval until press the Follow Me/Temp Sensing button again. If the unit does not receive the Follow Me/Temp Sensing signal during any 7 minutes interval, the unit will beep to indicate the Follow Me/Temp Sensing mode has ended.
AUTO-RESTART
If the unit breaks off unexpectedly due to the power cut, it will restart with the previous function setting automatically when the power resumes.
WAIT 3 MINUTES BEFORE RESUMING OPERATION
After the unit has stopped, it cannot be restarted operation in the first 3 minutes. This is to protect the unit. Operation will automatically start after 3 minutes.
AIR FLOW DIRECTION ADJUSTMENT
The louver can be adjusted automatically. Adjust the air flow direction automatically (NOTE: On some models the louver can be adjusted manually only):
-When the Power is ON, the louver opens fully.
-Press the SWING button on the panel or remote control to initiate the Auto swing feature. The louver will swing up and down automatically.
-Please do not adjust the louver manually.
Water drainage
-During dehumidifying modes, remove the upper drain plug from the back of the unit, install the drain connector(5/8" universal female mender) with 3/4" hose(locally purchased). For the models without drain connector, just attach the drain hose to the hole. Place the open end of the hose directly over the drain area in your basement floor, or into a bucket.

-When the water level of the bottom tray reaches a predetermined level, the unit beeps 8 times, the digital display area shows "P1". At this time the air conditioning/dehumidification process will immediately stop. However, the fan motor will continue to operate(this is normal). Carefully move the unit to a drain location, remove the bottom drain plug and let the water drain away. Reinstall the bottom drain plug and restart the machine until the "P1" symbol disappears. If the error repeats, call for service.
NOTE: Be sure to reinstall the bottom drain plug firmly to prevent leakage before using the unit.

natural_image
Line drawing of a portable air conditioner unit with ventilation grille and control buttons (no text or symbols)
Maintenance
Safety Precautions
-Always unplug the unit before cleaning or servicing.
-DO NOT use flammable liquids or chemicals to clean the unit.
-DO NOT wash the unit under running water. Doing so causes electrical danger.
-DO NOT operate the machine if the power supply was damaged during cleaning. A damaged power cord must be replaced with a new cord from the manufacturer.
Clean the Air Filter
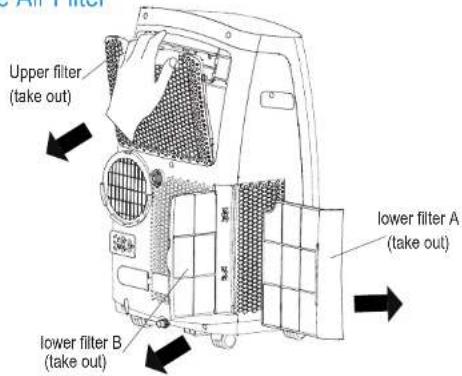
Remove the air filter

Maintenance Tips
-Be sure to clean the air filter every 2 weeks for optimal performance.
-The water collection tray should be drained immediately after P1 error occurs, and before storage to prevent mold. In households with animals, you will have to periodically wipe down the grill to prevent blocked airflow due to animal hair.
Clean the Unit
Clean the unit using a damp, lint-free cloth and mild detergent. Dry the unit with a dry, lint-free cloth.
Store the unit when not in use
-Drain the unit's water collection tray according to the instructions in the following section.
-Run the appliance on FAN mode for 12 hours in a warm room to dry it and prevent mold.
-Turn off the appliance and unplug it.
-Clean the air filter according to the instructions in the previous section. Reinstall the clean, dry filter before storing.
-Remove the batteries from the remote control.

Be sure to store the unit in a cool, dark place. Exposure to direct sunshine or extreme heat can shorten the lifespan of the unit.
Faults Diagnosis
Please check the machine according to the following form before asking for maintenance:
| Problem Possible Cause | Troubleshooting |
| Unit does not turn on when pressing ON/OFF button | P1 Error Code | The Water Collection Tray is full. Turn off the unit, drain the water from the Water Collection Tray and restart the unit. |
| In COOL mode: room temperature is lower than the set temperature | Reset the temperature |
| Unit does not cool well | The air filter is blocked with dust or animal hair | Turn off the unit and clean the filter according to instructions |
| Exhaust hose is not connected or is blocked | Turn off the unit, disconnect the hose, check for blockage and reconnect the hose |
| The unit is low on refrigerant | Call a service technician to inspect the unit and top off refrigerant |
| Temperature setting is too high | Decrease the set temperature |
| The windows and doors in the room are open | Make sure all windows and doors are closed |
| The room area is too large | Double-check the cooling area |
| There are heat sources inside the room | Remove the heat sources if possible |
| The unit is noisy and vibrates too much | The ground is not level | Place the unit on a flat, level surface |
| The air filter is blocked with dust or animal hair | Turn off the unit and clean the filter according to instructions |
| The unit makes a gurgling sound | This sound is caused by the flow of refrigerant inside the unit | This is normal |
Design and Compliance Notes
Design Notice
In order to ensure the optimal performance of our products, the design specifications of the unit and remote control are subject to change without prior notice.
Unit Temperature Range
| Mode Temperature Range |
| Cool | 17-35°C (62-95°F) |
| Dry | 13-35°C (55-95°F) |