
HD4000 - Uncategorized ZEBRA - Free user manual and instructions
Find the device manual for free HD4000 ZEBRA in PDF.


| Product Type | Head Mounted Display (Smart Glasses) |
| Brand | Zebra |
| Model | HD4000 |
| Display Type | Monocular, full color |
| Display Resolution | 640 x 400 pixels |
| Field of View | 20.3° diagonal |
| Focal Distance | 2 m ± 0.5 m fixed |
| Max Brightness | >300 cd/m² |
| Camera Resolution | 640 x 400 (5 MP fixed focus) |
| Camera Frame Rate | 15 FPS |
| Camera Field of View | 65.20° |
| Sensors | 3-axis accelerometer, 3-axis gyro, 3-axis magnetometer |
| Connectivity | USB 2.0 High Speed (USB-C) |
| Cable Length | 98.4 cm ± 1 cm (38.74 in ± 0.30 in) |
| Weight (without cable) | < 30 g (1.05 oz) |
| Dimensions (H x W x D) | 46.3 mm x 48 mm x 21.3 mm (1.82 in x 1.89 in x 0.84 in) |
| Operating System Compatibility | Android 5.0 and higher, Microsoft Windows 10 |
| Operating Temperature | -20°C to +50°C (-4°F to +122°F) |
| Storage Temperature | -30°C to +70°C (-22°F to +158°F) |
| Drop Rating | 5 ft (1.5 m) to concrete |
| Sealing | IP67 |
| Electrostatic Discharge | Air: ±8 kV, Contact: ±4 kV |
| Cleaning Instructions | Use only ethanol wipes; do not apply liquid directly; do not use alkyl wipes |
| Replaceable Parts | Cable Retention Sleeve (5-pack, part HD4000-GA1-CS5); ESS replacement parts for glasses/prescription frames |
| Safety Notes | Take breaks every 2 hours; avoid pointing display at sun; use with provided glasses to prevent injury; may cause vestibular effects |
Frequently Asked Questions - HD4000 ZEBRA
User questions about HD4000 ZEBRA
0 question about this device. Answer the ones you know or ask your own.
Ask a new question about this device
Download the instructions for your Uncategorized in PDF format for free! Find your manual HD4000 - ZEBRA and take your electronic device back in hand. On this page are published all the documents necessary for the use of your device. HD4000 by ZEBRA.
USER MANUAL HD4000 ZEBRA
Head Mounted Display
natural_image
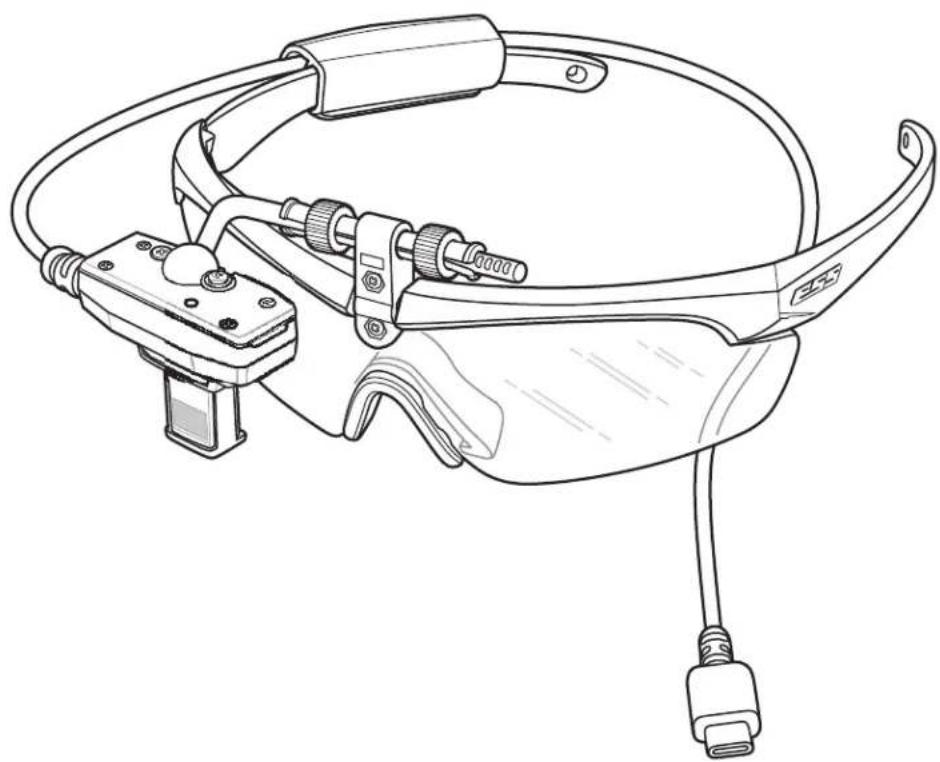
Line drawing of a smart glasses headset with attached cable and connector (no text or symbols)
natural_image
Abstract blue icon with white geometric shapes (no text or symbols)ZEBRA
Quick Start Guide
Copyright
ZEBRA and the stylized Zebra head are trademarks of Zebra Technologies Corporation, registered in many jurisdictions worldwide. Google, Android, Google Play and other marks are trademarks of Google LLC. All other trademarks are the property of their respective owners. ©2020 Zebra Technologies Corporation and/or its affiliates. All rights reserved.
COPYRIGHTS & TRADEMARKS: For complete copyright and trademark information, go to www.zebra.com/copyright.
WARRANTY: For complete warranty information, go to www.zebra.com/warranty.
END USER LICENSE AGREEMENT: For complete EULA information, go to www.zebra.com/eula.
Terms of Use
- Proprietary Statement
This manual contains proprietary information of Zebra Technologies Corporation and its subsidiaries (“Zebra Technologies”). It is intended solely for the information and use of parties operating and maintaining the equipment described herein. Such proprietary information may not be used, reproduced, or disclosed to any other parties for any other purpose without the express, written permission of Zebra Technologies.
• Product Improvements
Continuous improvement of products is a policy of Zebra Technologies. All specifications and designs are subject to change without notice.
- Liability Disclaimer
Zebra Technologies takes steps to ensure that its published Engineering specifications and manuals are correct; however, errors do occur. Zebra Technologies reserves the right to correct any such errors and disclaims liability resulting therefrom.
- Limitation of Liability
In no event shall Zebra Technologies or anyone else involved in the creation, production, or delivery of the accompanying product (including hardware and software) be liable for any damages whatsoever (including, without limitation, consequential damages including loss of business profits, business interruption, or loss of business information) arising out of the use of, the results of use of, or inability to use such product, even if Zebra Technologies has been advised of the possibility of such damages. Some jurisdictions do not allow the exclusion or limitation of incidental or consequential damages, so the above limitation or exclusion may not apply to you.
Revision History
Changes to the original guide are listed below:
| Change Date Description |
| -05 Rev A 07/2020 Added Prescription frames. |
| -04 Rev A 01/2020 Added support for TC5x. |
| -03 Rev A 12/2019 Minor grammatical update. |
| -02 Rev A 12/2019 Minor grammatical update. |
| -01 Rev A 10/2019 Initial release. |
Unpacking
- Carefully remove all protective material from the device and save the shipping container for later storage and shipping.
- Verify that the following items were received:

NOTE: The HD4000 with Glasses differs from the HD4000 with Prescription Frames.
• HD4000 mounted on Glasses or Prescription Frames with USB Cable.
• Cable Retention Sleeve.
• Regulatory Guide.
- Inspect the equipment for damage. If equipment is missing or damaged, contact the Zebra Global Customer Support immediately.
- Prior to using the device for the first time, remove the protective shipping film that covers the optical module.

CAUTION: Do not attempt to repair the Optical Module Assembly; contact Zebra Global Customer Support to report damaged or missing equipment.
Cautions
- The lensless prescription frames provide no protection if worn with ordinary prescription eyeglasses. Protective eyewear must be worn over the prescription eyeglasses where it is required.
- Ensure proper adjustment and fit of the optical module. The user must be able to see the full image through the display window without any cropping, as it could lead to focus issues.
- Ensure that there is adequate eye clearance while wearing the glasses or prescription frames.
• Take periodic breaks (approximately every two hours) to prevent straining eyes.
• Proper training, use, and appropriate maintenance are essential for the product to help protect the wearer.
• Always ensure that the complete product is:
• Suitable for the application
- Fitted correctly
- Replaced when necessary.
• Always use both hands to put on and remove the product.
• Incorrect assembly may result in serious injury.
Device Features

NOTE: The HD4000 with glasses and prescription frames are Eye Safety Systems, Inc. (ESS) Crosshair™ and are marked Z87+.
HD4000 with Glasses
Figure 1 HD4000 with Glasses Features
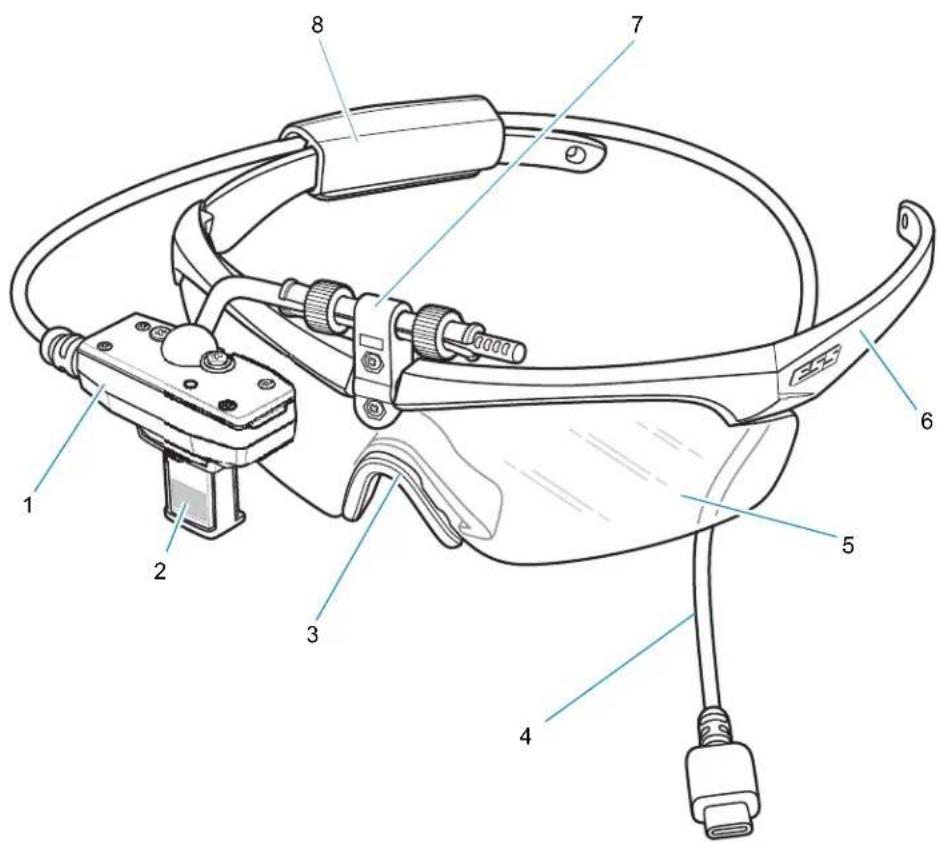
| Number Item |
| 1 Optical Module Assembly |
| 2 Display |
| 3 Rubber Nose Guard |
| 4 USB C Cable |
| 5 Safety Lenses |
| 6 Glasses Frame |
| 7 Optical Module Mount |
| 8 Cable Retention Sleeve |
Prescription Frames
Figure 2 HD4000 with Prescription Frames Features
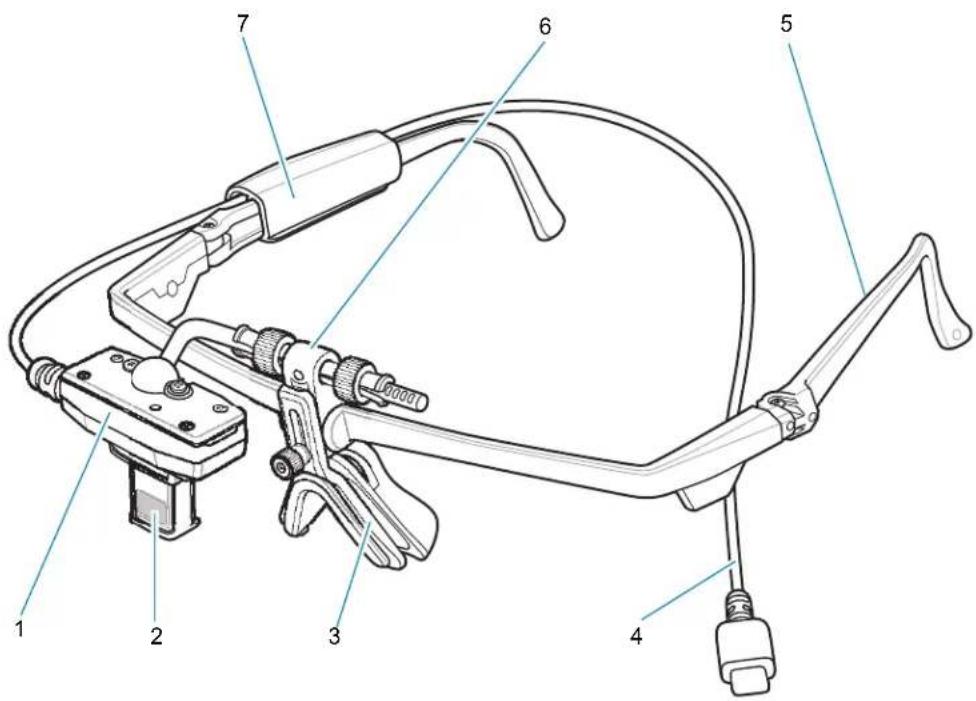
| Number Item |
| 1 Optical Module Assembly |
| 2 Display |
| 3 Rubber Nose Guard |
| 4 USB C Cable |
| 5 Frame |
| 6 Optical Module Mount |
| 7 Cable Retention Sleeve |
Getting Started

CAUTION: Vestibular Effects - Use of the device may cause the user to experience dizziness, headache, nausea, loss of concentration. If you experience any of these effects, discontinue use of the device.
Perform the following steps to setup the device for the first time:
- Determine dominant eye.
- Position Optical Module Assembly.
- If required, switch the Optical Module Assembly.
- Place the device on head.
- Route the cable.
- Adjust Optical Module Mount.
- Connect to a terminal.

CAUTION: You must use the Optical Module Assembly with the provided Glasses. Using the Optical Module Assembly without Glasses can lead to serious injury.

CAUTION: Do not point the exit window of the Optical Module Assembly directly at the sun or other intense light source, as it can damage the internal display.
Determining Dominant Eye
Eye dominance is the tendency to prefer visual input from one eye to the other. Most people are right-eye dominant, however, in a small portion of the population, neither eye is dominant. It is best to use your dominant eye when viewing the display.
To determine which eye is dominant:
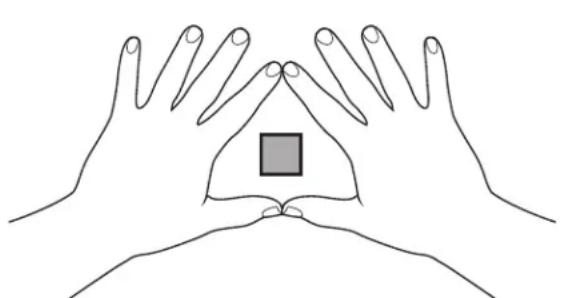
- Place hands together as shown forming a triangle.
natural_image
Line drawing of two hands forming a triangular shape with a central square (no text or symbols)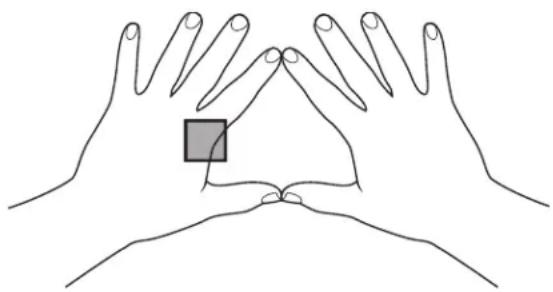
natural_image
Line drawing of two hands forming a triangular shape with a small square at the center (no text or symbols)- Keeping both eyes open, focus on any distant object.
- Maintaining focus on the object centered in the triangle, close your right eye. If the object is still in the triangle, you are left eye dominant.
- Maintaining focus on the object centered in the triangle, close your left eye. If the object is still in the triangle, you are right eye dominant.
If the object is in the triangle with either eye then you are dominant eye neutral.
- Repeat test to confirm.
Positioning the Optical Module Assembly
To position the Optical Module Assembly:

NOTE: From the factory, the device is configured for left eye dominant.
Figure 3 Optical Module Assembly over Glasses
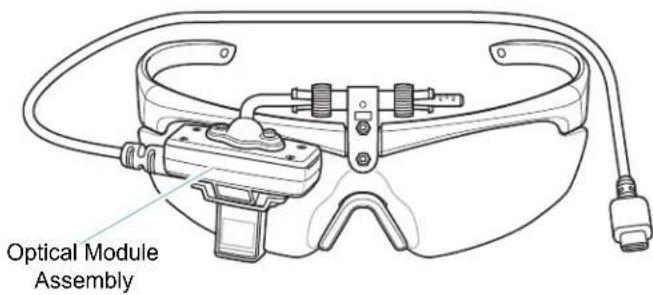
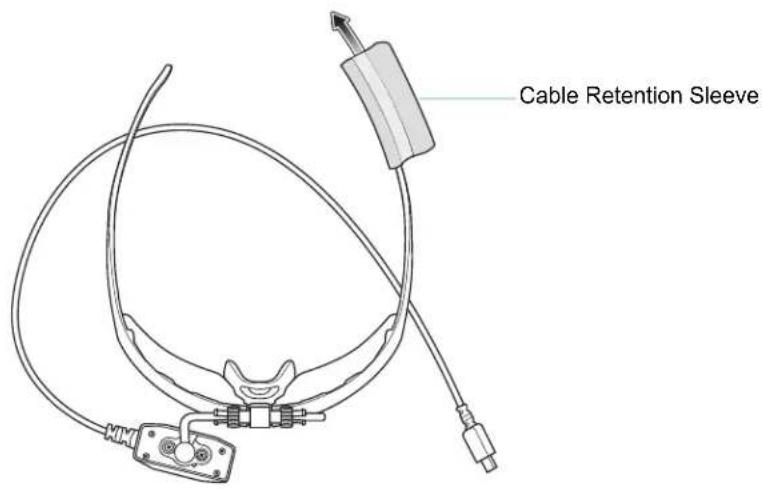
- Slide the Cable Retention Sleeve onto the left arm of the glasses until snug.

NOTE: The flap should be on the outside of the glasses arm.
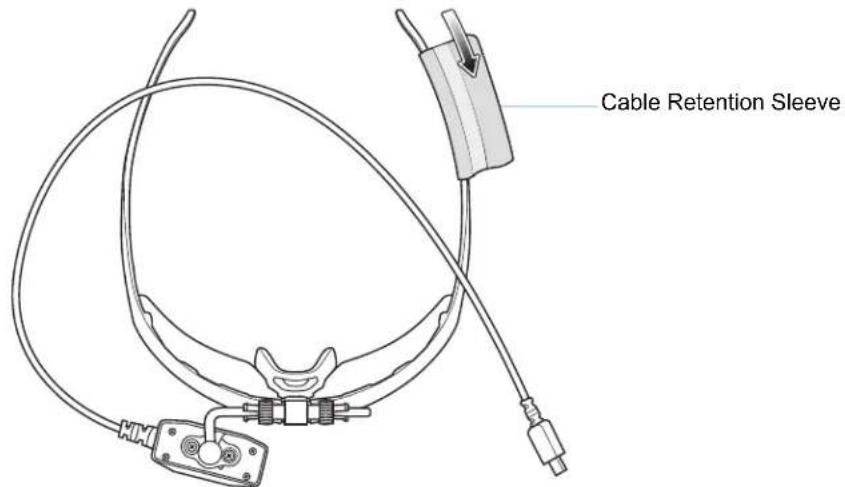
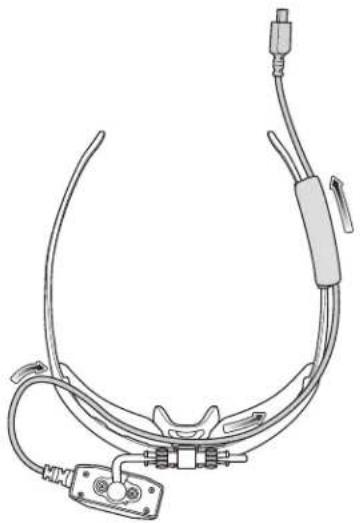
- Route the cable over the Optical Module Assembly onto the left arm of the Glasses frame.

NOTE: For balance, it is recommended to route the cable to the opposite side of the mounting.
- Place the cable securely into the Cable Retention Sleeve, and close the Velcro flap.
natural_image
Technical line drawing of a medical or surgical device with tubing and connectors (no text or symbols)Switching the Optical Module Assembly
To switch the Optical Module Assembly position from over the right eye to the left eye:
- Remove the Velcro flap on the Cable Retention Sleeve to release the cable, and slide the sleeve off the Glasses arm.
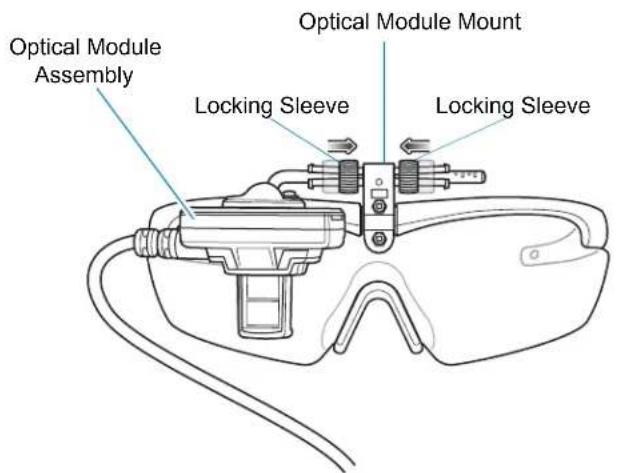
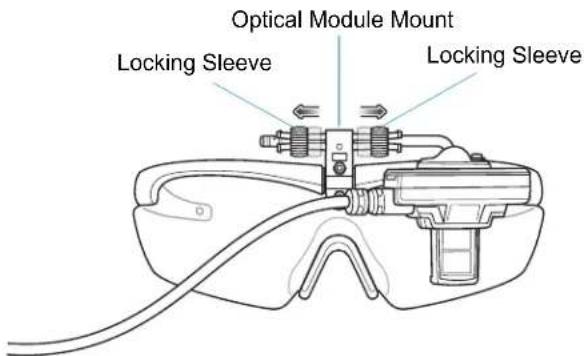
- On the Optical Module Assembly, slide both the Locking Sleeves towards the center of the Glasses until they hit the hard stop.
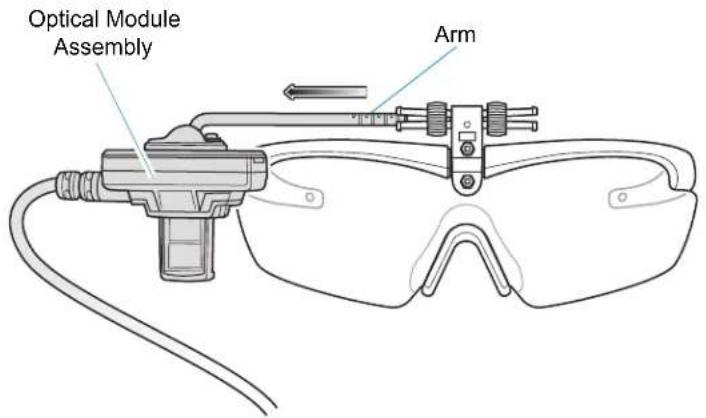
- Slide the Optical Module Assembly and the arm all the way out of the right side of the Optical Module Mount. Ensure that the Locking Sleeves do not slide off the Optical Module Mount.
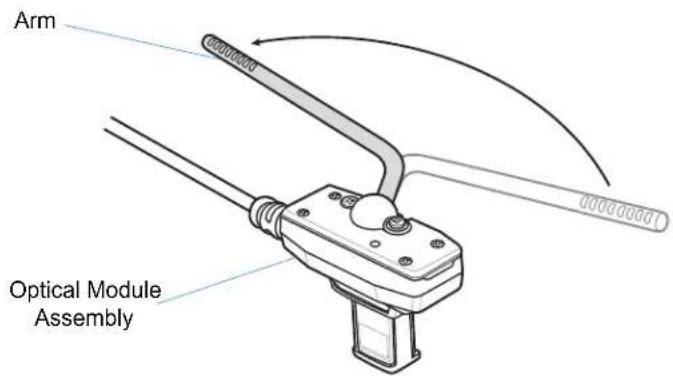
- Rotate swivel arm 180°.
- Insert the Optical Module Assembly and the arm into the left side of the Optical Module Mount.
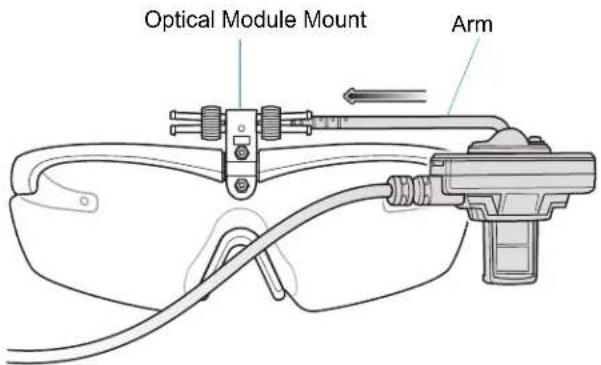
- Pull the Locking Sleeves apart to secure the Optical Module Mount.
- Adjust the Pupillary Distance (PD) and slide one or both plastic sleeves towards the outside of the Optical Module Mount.

NOTE: There are grid lines on the arm that you can use for reference when you adjust PD.
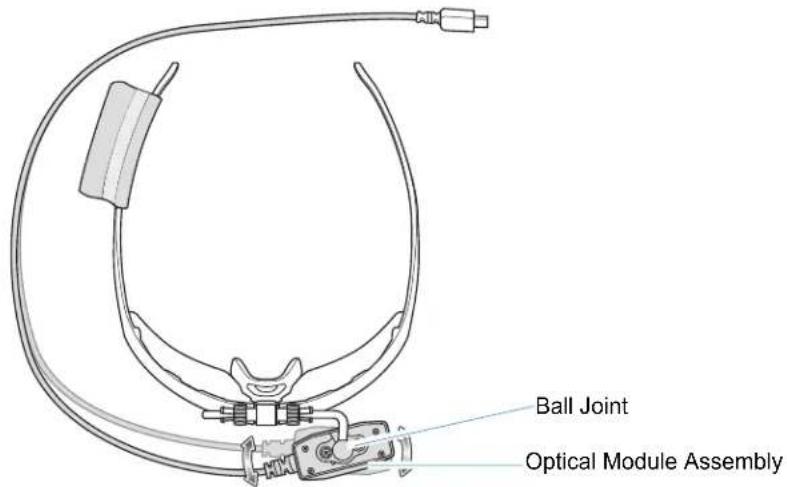
- Adjust the Ball Joint by rotating the Optical Module Assembly into the correct orientation.
-
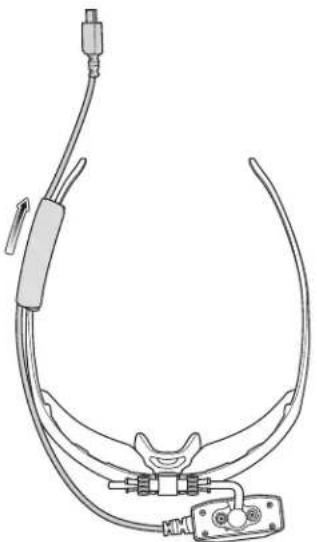
Slide the Cable Retention Sleeve onto the right arm of the Glasses, and slide until snug.
-
Route the cable over to opposite (right) side of the Optical Module Assembly.
natural_image
Technical line drawing of a medical or surgical device with tubing and connectors (no text or symbols)- Place the cable securely into the Retention Cable Sleeve, and close the Velcro flap.

NOTE: The flap should be on the outside of the Glasses arm.
Placing the Device on Head and Adjusting Display
If you are using the glasses, make sure the device is balanced on your head like a pair of eyeglasses. If you are using a prescription frame, ensure that the frame sits comfortably over your eyeglasses.
Figure 4 Wearing the Device
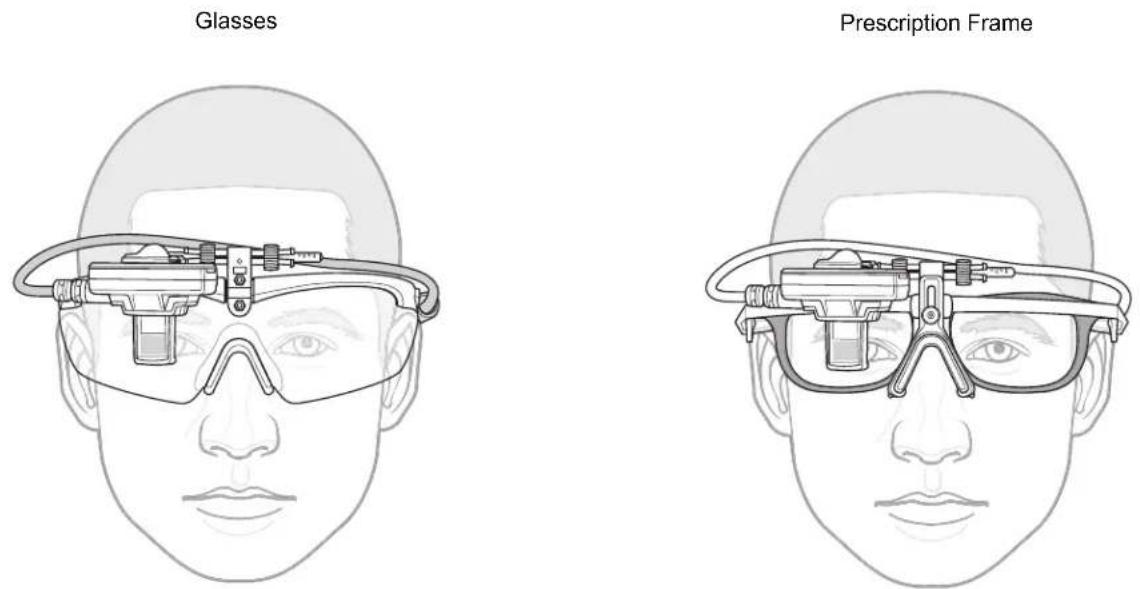
After you wear the device, if it is not at the correct angle you may not be able to see all of the display text. Adjust the display until you see the start-up logo, and see as much as possible on the displayed screen.
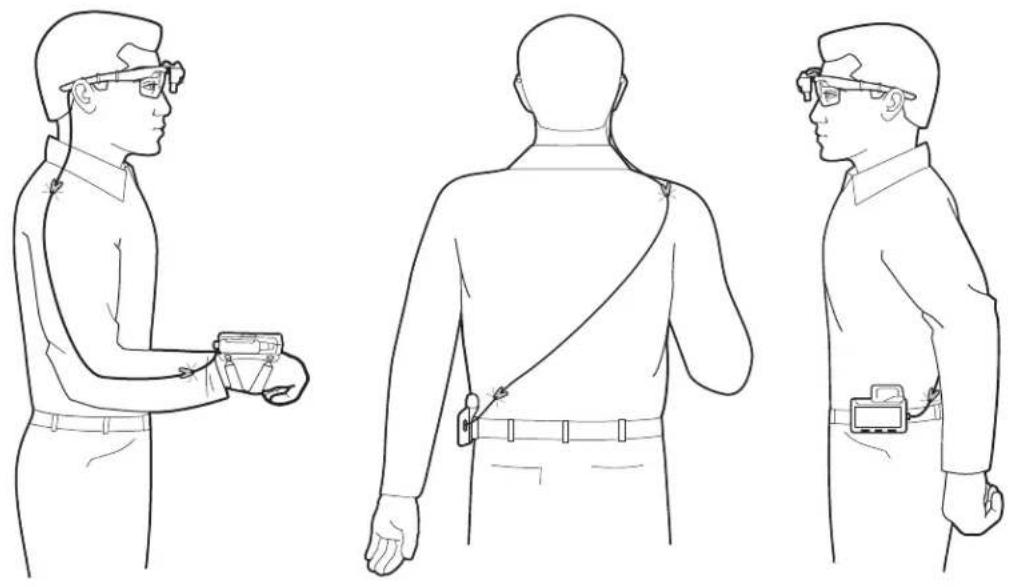
Routing the Cable to a Device
When using the device with a mobile computer, route the cable down to the shoulder, and secure the cable to clothing with a cable clip.
- If using a hip mounted mobile computer, route the cable down your back and to your hip.
- If using a wrist mounted mobile computer, route the cable to down your arm to your wrist. Secure the cable to clothing with a second cable clip.
Figure 5 Route Cable to Device
natural_image
Three line drawings of a person wearing smart glasses, standing in different poses (ear, back, and forward), no text or symbols present.Adjusting the Optical Module Assembly
When adjusting the Optical Module Assembly, hold Optical Module Mount when moving it up and down.
Figure 6 Adjust Optical Module Assembly
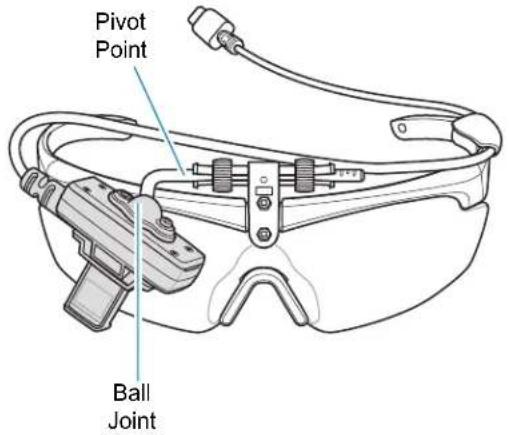
The Optical Module Assembly pivots and rotates, allowing you to properly position the Optical Module Assembly, and to move the Optical Module Assembly when you do not need to use it.
Use the pivot point to rotate the Optical Module Assembly. The ball joint allows for fine tuning the position of the display for viewing.
- Loosen the Locking Sleeves.
- Place the device on your head, and then adjust for best viewing angle.
- Hold the Optical Module Assembly with one hand, and rotate at the pivot point.
- Hold the Optical Module Assembly with one hand, and rotate the Optical Module Assembly at the ball joint for the best viewing angle.
- Occasionally, due to normal wear, tension adjustment may be required to maintain stiffness to the ball joint. Tighten the Ball Joint Adjustment Screw to the desired level of stiffness.
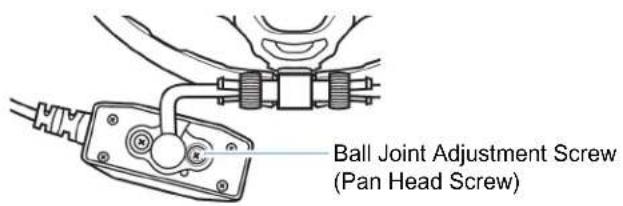
- Pull apart the Locking Sleeves to ensure the Optical Module Assembly remains in position.
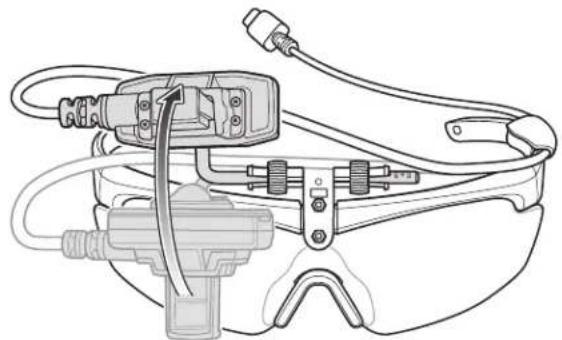
Positioning Optical Module When not in Use
You can move the Optical Module Assembly away from your face when it is not being used for long periods of time.
- Grasp the boom and rotate up and away from the face.
natural_image
Technical line drawing of a mechanical device with hoses and connectors (no text or symbols)- Pull apart the Locking Sleeves to ensure the Optical Module Assembly remains in position.
Connecting the Device
As soon as you connect the HD4000 to a Zebra powered device, it will turn on.
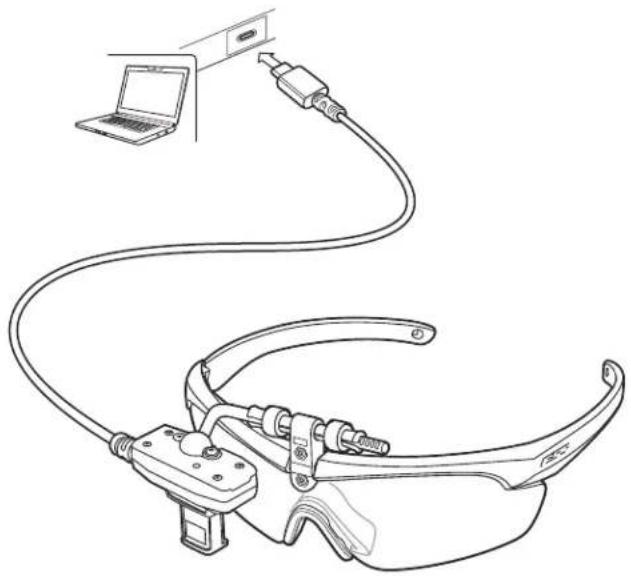
Device power, radio, and application processing require a connection to a device running Android, or a computer running Windows 10.
Connect the device to a host computer using the attached USB cable.
Figure 7 Attached USB Cable
natural_image
Line drawing of a wire-wrapped mechanical device connected to a laptop (no text or symbols present)HD4000 Quick Start Guide
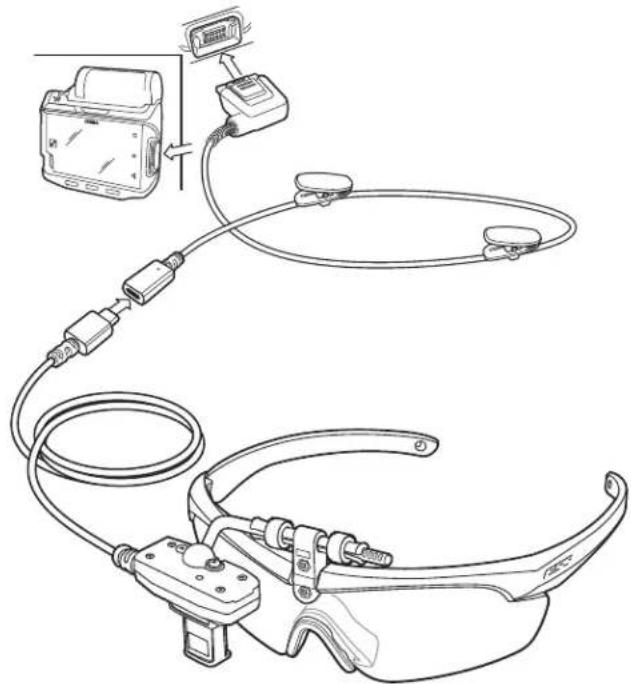
Connect the device to a mobile computer using an optional USB adapter cable.

NOTE: Via appropriate USB cables, the HD4000 is compatible with other Zebra products, once certified, such as mobile computers (for example: WT6000, TC7X, and TC5X), and tablets (for example: ET5X and L10). The compatible USB (Type C) cables are sold separately.
Figure 8 USB Adapter Cable
natural_image
Line drawing of a smart glasses with cable and connector, connected to an electronic device (no text or symbols present)Device Cleaning Instructions
To clean the device:
- Remove the Cable Retention Sleeve, and discard the sleeve.

NOTE: For hygiene concerns, do not reuse the Cable Retention Sleeve.
- Disassemble the Optical Module Assembly from the Glasses frames.
- Wipe the USB Cable, Glasses frames, Lenses, and the Optical Module Assembly.

CAUTION: Do not use Alkyl wipes. Use only Ethanol wipes to clean the device. Do not apply liquid directly to the device. Be gentle when wiping the lenses.
- Allow the device to air dry.
- Reassemble the Optical Module Assembly back onto the Glasses frames.
- Add a new Cable Retention Sleeve.
Replacement Parts
For ESS replacement parts, contact Eye Safety Systems, Inc. *(ESS).
Eye Safety Systems, Inc.
Toll Free: +1 877.726.4072
International: +1.208.726.4072
Fax: +1 208.726.4563
Email: csinfo@esseyepro.com
Eye Safety Systems Canada Forces, St-Laurent, Canada
Toll Free: +1 877-625-5396
Email: forces@oakley.com
Website: www.esseyepro.com

NOTE: The 5 pack Cable Retention Sleeves (Part Number HD4000-GA1-CS5) are sold by Zebra Technologies.
Zebra Cables for HD4000
The following table specifies Zebra cables that are compatible with the HD4000.
Table 1 Zebra Cables for the HD4000
| Item Part Number | |
| USB Cable - WT6000 CBL-NGWT-USBHD-01 | |
| USB Cable - TC7X CBL-TC7X-USBHD-01 | |
| USB Cable - TC5X CBL-TC5X-USBHD-01 |
Troubleshooting
The following table provides typical problems that might arise and the solution for correcting the problem.
Table 2 Troubleshooting the HD4000
| Issue Cause Solution | ||
| No display on the screen. | Proper SDK is not loaded. Ensure that the proper SDK is loaded. Go to www.zebra.com/hd4000-info for software downloads. | |
| No display on the screen. | USB C cable is not plugged in properly. | Unplug and replug the USB cable to the Zebra device. |
| HD4000 not turning on when connected to a Zebra device. | Zebra device is not in USB host mode. | The Zebra device must be in USB host mode. |
| Only partial screen visible. | Optical Module Assembly is not positioned properly. | Reposition the Optical Module Assembly. |
Specifications
The following table details the devices' specifications.
Table 3 HD4000 Specifications
| Item Description | |
| Performance Characteristics | |
| Operating System Android 5.0 and | higherMicrosoft Windows 10 |
| Output Universal Serial Bus (USB) | 2.0 high speed |
| Physical Characteristics | |
| Display Monocular | Resolution: 640 x 400Focal Distance: 2 m ± 0.5 m fixedField of View: 20.3° diagonalFull color displayMax Brightness: >300 cd/m^2 |
| Sensor Technologies 3-axis accelerometer | erometer3-axis gyro3-axis magnetometer |
| Cable USB 2.0 High Speed | Length: 98.4 cm ± 1 cm /38.74 in ± 0.30 inConnector: USB C plugNOTE: To connect the device as a client to an Android mobile computer, the mobile computer must be in USB host mode. |
| Weight < 30 g/1.05 oz (without cable) | |
| Dimensions H 46.3 mm X W 48 mm | X D 21.3 mmH 1.82 in X W 1.89 in X D 0.84 in |
| User Environment | |
| Operating Temperature -20°C to +50°C / -4°F to +122 °F | |
| Storage Temperature -30°C to +70°C / -22°F to +158 °F | |
| Drop 5 ft/1.5 m (to concrete) | |
| Sealing IP67 | |
| Electrostatic Discharge Air: +/- 8 kVContact: +/- 4 kV | |
| Camera | |
| Interface USB UVC (Video Device) | Class) |
| Resolution | 640 x 400, 5 MP fixed focus |
| Frame Rate | 15 FPS |
| Compression JPEG | |
| Focal Distance Infinite (> 2 m) | |
| Field of View 65.20° | |
- Head Mounted Display
- Quick Start Guide
- Copyright
- Terms of Use
- Revision History
- Unpacking
- Cautions
- Device Features
- HD4000 with Glasses
- Prescription Frames
- Getting Started
- Determining Dominant Eye
- Positioning the Optical Module Assembly
- Switching the Optical Module Assembly
- Placing the Device on Head and Adjusting Display
- Routing the Cable to a Device
- Adjusting the Optical Module Assembly
- Positioning Optical Module When not in Use
- Connecting the Device
- HD4000 Quick Start Guide
- Device Cleaning Instructions
- Replacement Parts
- Zebra Cables for HD4000
- Troubleshooting
- Specifications
Brand : ZEBRA
Model : HD4000
Category : Uncategorized