
MC40YPVM - Air purifier DAIKIN - Free user manual and instructions
Find the device manual for free MC40YPVM DAIKIN in PDF.


| Product Type | Air Purifier |
| Model | MC40YPVM |
| Dimensions (H × W × D) | 500 mm × 270 mm × 270 mm |
| Weight | 6.8 kg |
| Power Supply | Single phase 220–240 V / 50 Hz, 220–230 V / 60 Hz |
| Power Consumption (Turbo/Standard/Low/Quiet) | 23 W / 13 W / 9 W / 7 W |
| Airflow Rate (Turbo/Standard/Low/Quiet) | 240 m³/h / 168 m³/h / 108 m³/h / 66 m³/h |
| Operating Sound (Turbo/Standard/Low/Quiet) | 49 dB / 36 dB / 27 dB / 19 dB |
| Coverage Area (Turbo) | 31 m² |
| Main Technology | Streamer Discharge for deodorizing and PM2.5 control |
| Fan Modes | AUTO FAN, ECONO, ANTI-POLLEN |
| Fan Speed Settings | Quiet, Low, Standard, Turbo |
| Sensors | Dust/PM2.5 sensor, Odour sensor |
| Indicator Lamps | FAN, MODE, DUST ODOUR, PM2.5 INDICATOR, STREAMER; brightness adjustable |
| Pre-filter Cleaning Interval | Every 2 weeks (vacuum or wash with water) |
| Dust Collection Filter | Replace every 10 years (model KAFP080B4E) |
| Deodorising Filter | Vacuum clean only; do not wash with water; no replacement needed |
| Streamer Unit | Replace when STREAMER lamp blinks (contact place of purchase) |
| Safety Features | Safety switch on streamer unit cover; auto shutdown if parts missing; voltage protection 180–264 V |
| Mounting | Floor standing or desktop use |
| Power Cord Length | 1.8 m |
| Accessories | Operation manual (1) |
Frequently Asked Questions - MC40YPVM DAIKIN
User questions about MC40YPVM DAIKIN
0 question about this device. Answer the ones you know or ask your own.
Ask a new question about this device
Download the instructions for your Air purifier in PDF format for free! Find your manual MC40YPVM - DAIKIN and take your electronic device back in hand. On this page are published all the documents necessary for the use of your device. MC40YPVM by DAIKIN.
USER MANUAL MC40YPVM DAIKIN
Floor standing or desktop type
Model
MC40YPVM
natural_image
3D rendering of a white industrial air purifier unit with ventilation slots and ventilation ducts (no text or symbols visible)- Thank you for purchasing this air purifier.
- Please read the operation manual carefully and follow it for correct use.
- Please read the "Safety Precautions" section before use. ▶Page 3, 4
Please keep the operation manual in a safe place for later reference.
Features
Streamer Technology

STREAMER
This technology employs a "streamer discharge", a type of plasma discharge comprising high-speed electrons with powerful oxidative capacity, that is generated inside the air purifier. The discharge swiftly removes odours. (The high-speed electrons are generated and then adsorbed within the unit to ensure your safety.)
Streamer discharge decomposes adsorbed odour.
- Decomposition cycle that maintains deodorising capacity.

flowchart
graph TD
    A["Adorption"] --> B["Deodorising catalyst adsorbs odour."]
    B --> C["Replacement of the deodorising catalyst is unnecessary."]
    C --> D["Recovery"]
    D --> E["Odour adsorption capacity is restored."]
    E --> F["This cycle maintains deodorising capacity."]
    F --> G["Decomposition"]
    G --> H["Streamer discharge decomposes odour."]
    H --> A
Streamer operation is conditional on the degree of air impurity.
During operation, the streamer discharge may generate a hissing sound, however, this does not indicate a defect.
In addition, the sound may lessen or change in tone depending on the operating environment, however, such changes are normal.
In some cases the air outlet may emit a slight odour as trace amounts of ozone are generated. However, the amount is negligible and is not harmful to your health.
Controlling PM2.5
These results were obtained in a 32m^3 airtight space. They are not demonstrable effects in customer environments.
Elimination of 99% of 0.1-2.5μm particles (\*1).
- Does not take into account inflow of new particles from outdoors owing to ventilation etc.
- PM2.5 is a generic term for particulate matter that is 2.5 m or less in size.
- Elimination of particulate matter that is less than 0.1 m in size by this air purifier has not been verified.
This product cannot eliminate all airborne toxic substances.
(*1) Test methodology: The Japan Electrical Manufacturers' Association standard (JEM1467)
Decision criteria: Elimination of 99% of 0.1-2.5μm particulate matter in a 32m³ airtight space in 90 minutes or less.
Equivalent value for 32m^3 test space.
Powerful and swift suction action driven by large airflow
Suction of house dust and odours with large airflow.
3 filter layer structure ensures thorough and rapid purification of the ambient air.
Substances that can be controlled/broken down

Pollen


Allergens such as dust mite droppings and remains
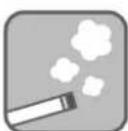
Odours NOxM6a4h8b1e5b4de



particulate matter
Substances that can be trapped
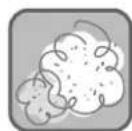
Dust

Yellow sand
Contents
Read First
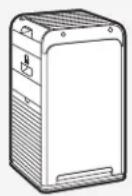
Features 1
Safety Precautions 3
Names of Parts and Operations 5
Preparation Before Operation.... 7
Operation
Using the Air Purifying Operation 9
Changing the Airflow Rate 9
Useful Functions
Operating the Unit in a MODE 10
AUTO FAN / ECONO / ANTI-POLLEN
Adjusting Indicator Lamp Brightness 11
Advanced Settings
Setting Dust/PM2.5 Sensor Sensitivity 12
Maintenance
Maintenance 13
Replacing the Streamer Unit 15
Separately Sold Parts /
When Not Using the Unit for Long Time Periods 16
Troubleshooting
About the Indicator Lamps 17
FAQs 18
Troubleshooting 19
Specifications 22
Safety Precautions
■Observe these precautions in order to prevent property damage or injury.
■The consequences of incorrect use are categorised as follows.
 WARNING CAUTION WARNING CAUTION | [Gxzx] |
| Failure to follow these instructions properly may result in personal injury or loss of life. | Failure to follow these instructions properly may result in property damage or personal injury, which may be serious depending on the circumstances. |
■Precautions to be observed are categorised using symbols.

Never attempt. Be sure to follow the instructions.

WARNING Observe in order to prevent fires, electric shocks or severe injury.
■Concerning the power supply plug and cord

- Do not unplug while the unit is in operation. (Fire or an electric shock may result from heating)
- Do not plug or unplug with wet hands. (An electric shock may result)
- Do not use in such a way that the ratings of the power socket or wiring appliances are exceeded or use a voltage outside of the range AC220-240V.
(Fire may result from heating if the ratings of multi-socket power adapters, etc., are exceeded) - Do not pull on the power supply cord when unplugging. (Heating or fire may result from wire breakage)
- Do not subject to acts that might damage them.
- Such acts include damaging, modifying, forcibly bending, pulling, twisting, bundling up, placing heavy objects on, etc., the power supply plug or cord. If the power supply plug or cord is damaged, it must be replaced by the manufacturer, its service agent, or a similar qualified person in order to avoid a hazard. (An electric shock, short circuiting, or fire may result from use while damaged)

- Insert the power supply plug firmly all the way in. - Do not use a damaged power supply plug or a loosely fitted power socket. (An electric shock or fire, due to heating or short circuiting, may result if the power supply plug is not firmly inserted)
- Periodically wipe dust off the power supply plug with a dry cloth.
- If the unit is not to be used for an extended period of time, unplug the power supply plug. (Fire or overheating may be caused by defective insulation resulting from moisture etc.)
- When performing maintenance, inspecting, or moving the unit, make sure to turn off and unplug the appliance. (An electric shock or injury could result)
■Do not use in the following places

- Places where oil or flammable gases are used or may leak. (Fire or smoke may result from ignition or suction toward the unit, or injury may result from degradation or cracking of plastic)
- Places where there is corrosive gas or metal dust particles. (Fire or smoke may result from ignition or suction toward the unit)
- Places where temperature and humidity levels are high or water may scatter, such as a bathroom. (Fire or an electric shock may result from electrical leakage)
- Places accessible to small children. (An electric shock or injury may result)
During use

- Do not use chlorinated or acidic detergents. (Injury may result from the degradation or cracking of plastic, or harm may be caused to health from the production of toxic gases)
- Keep burning cigarettes or incense sticks away from the unit. (Fire or smoke may result from ignition or suction toward the unit)
- Do not attempt to disassemble, reconstruct or repair the unit yourself. (Fire, an electric shock, or injury may result) For repairs, please contact the place of purchase.
- Do not insert fingers, sticks, or any other item, into the air inlets or air outlet. (An electric shock, injury, or damage may result)
- Do not pour water on to the air outlet or the unit. (Fire or an electric shock may result)
- Do not use flammable substances (hair spray, insecticide, etc.) near the unit. Do not wipe the unit with benzine or thinner. (An electric shock, fire, or cracking may result)

WARNING Observe in order to prevent fires, electric shocks or severe injury.
Immediately turn off and unplug the unit if there are any signs of abnormality or damage Examples of abnormality or damage

- The unit does not operate even if the switch is turned on.
- Current passes through the cord only sometimes if the cord is moved.
- There are abnormal sounds or vibrations during operation.
- The casing of the unit has deformed or is abnormally hot.
- There is a burnt smell. (Malfunctioning, an electric shock, smoke, fire, etc., may result if the abnormality is not addressed and the unit continues to be used)
Contact the place of purchase.

CAUTION Observe in order to prevent short circuiting, injury or property damage.
During use

- Small children or immobile persons (due to illness or injury) should not operate the unit by themselves.
◆For EU:
This appliance can be used by children aged from 8 years and above and persons with reduced physical, sensory or mental capabilities or lack of experience and knowledge if they have been given supervision or instruction concerning use of the appliance in a safe way and understand the hazards involved.
Children shall not play with the appliance. Cleaning and user maintenance shall not be made by children without supervision.
◆For other than EU:
This appliance is not intended for use by persons (including children) with reduced physical, sensory or mental capabilities, or lack of experience and knowledge, unless they have been given supervision or instruction concerning use of the appliance by a person responsible for their safety.
- Children should be supervised to ensure that they do not play with the appliance.
- Persons who are heavily intoxicated or have taken sleep medication should not operate the unit.
(An electric shock, injury or poor health may result)
- Do not use products, such as cosmetics, that contain fine powder, near the unit. (An electric shock or malfunctioning may result)
- Do not operate the unit when fumigating insecticide is in use.
- After using insecticide, make sure to sufficiently ventilate the room before operating the unit.
(Harm may be caused to health from an outflow of accumulated chemical compounds from the outlet)
- Do not use near a smoke detector.
- If out flowing air flows in the direction of a smoke detector, the response of the smoke detector may be delayed or it may fail to detect smoke.

- Frequently ventilate the room when using the unit together with combustion-based heating devices.
– Usage of this product is not a substitute for ventilation. (Potential cause of carbon monoxide poisoning)
This product cannot eliminate carbon monoxide.
- If the unit is placed within reach of a pet, be careful that the pet does not urinate on the unit or chew on the power supply cord. (Fire, an electric shock, or injury may result)
■Concerning the unit body

- Do not obstruct the air inlets or air outlet with laundry, cloth, curtains, etc.
(Overheating or fire may result from poor circulation) - Do not climb, sit or lean on the unit. (Injury may result from falling or toppling)
■When moving the unit

- When picking up the unit to move it, handle the unit with caution.
- Make sure to always hold the unit using the correct grips. Do not hold the unit using the grip on the deodorising filter unit. (Injury may result from falling)
CJO001EU
Names of Parts and Operations

CAUTION
Do not lift up the unit holding the grip on the deodorising filter unit. (May lead to falling over)
Front

Back

Main Removable Parts
Attention
To prevent malfunctioning, make sure to only operate the unit with all parts attached.
Front


flowchart
graph TD
    A["Operating/Indicator panel"] --> B["MODE lamps [green"]]
    A --> C["ON/OFF lamp [green"]]
    A --> D["FAN MODE"]
    A --> E["DUST ODOUR"]
    A --> F["PM2.5 INDICATOR"]
    B --> G["FAN"]
    C --> H["ON/OFF lamp"]
    D --> I["FAN"]
    E --> J["PM2.5 INDICATOR lamp"]
    F --> K["PM2.5 INDICATOR lamp"]
    G --> L["FAN lamps [green"]]
    H --> M["1 Streamer lamp [blue"]]
    I --> N["2 Dust sensor lamp / PM2.5 INDICATOR lamp"]
    K --> O["3 Odour sensor lamp"]
    L --> P["Light indicates the active FAN setting (4 settings: Quiet, Low, Standard, Turbo)."]
    M --> Q["Light indicates the volume of ambient dust."]
    N --> R["• Green indicates that the air is clean."]
    N --> S["• The dust sensor lamp / PM2.5 INDICATOR lamp can detect small (approx. 1.0-2.5μm) and large (approx. 2.5μm and above) dust particles. The PM2.5 INDICATOR lamp light in response to small particles and the dust lamp lights in response to large dust particles."]
    O --> T["Lit up"]
    P --> U["Dust"]
    Q --> V["Low"]
    R --> W["Low"]
    S --> X["High"]
    T --> Y["Lamp colour Green Orange Red"]
    U --> Z["Lump colour Green Orange Red"]
    V --> AA["Lump colour Green Orange Red"]
    W --> AB["Lump colour Green Orange Red"]
    X --> AC["Lump colour Green Orange Red"]
① About the streamer lamp
- This lamp lights up when the streamer is operating. The streamer operates depending on the degree of air impurity.
② About the dust sensor lamp / PM2.5 INDICATOR lamp
• After operation is started, the lamp will light green for the first minute (approx.) regardless of air impurity level.
- The responsiveness of the dust/PM2.5 sensor may be poor during FAN setting "Turbo" or when airflow is high in AUTO FAN MODE. The strong airflow causes dust to be drawn into the air inlets before it can be detected by the dust/PM2.5 sensor. This is normal (not a malfunction).
- If the responsiveness of the dust/PM2.5 sensor is poor, change the sensitivity setting of the sensor. ▶Page 12
③ About the odour sensor lamp
- If operation is started immediately after the power supply plug is inserted, the lamp will light green for the first minute (approx.).
- If odour intensity levels are unchanging, the sensor may not respond even if there is a strong odour in the air.
- The sensor may not respond to some odours such as pet odours (excluding ammonia), garlic odour, etc.
- As odour perception varies by person, in some cases an odour may be sensed even when the lamp is green. If the odour bothers you, switch to manual airflow rate, and select a high airflow rate. ▶Page 9
The ambient odour level in the first minute after the unit is plugged in serves as the reference level upon which the sensitivity of the odour sensor is determined. Insert the power supply plug when the air is clean (odour-free).
Dust/PM2.5 sensor detection range
| Detectable matter |
| house dust, tobacco smoke, pollen, mites, pet hairs, diesel particulate matter |
| Sometimes detectable |
| steam, oil smoke |
Odour sensor detection range
| Detectable matter |
| tobacco odours, cooking odours, pet odours, toilet smells, waste smells, mould odours, sprays, alcohol |
| Sometimes detectable |
| sudden changes in temperature/humidity, steam, oil smoke, gas emitted from combustion-based heating devices |
Names of Parts and Operations
Operating/Indicator panel
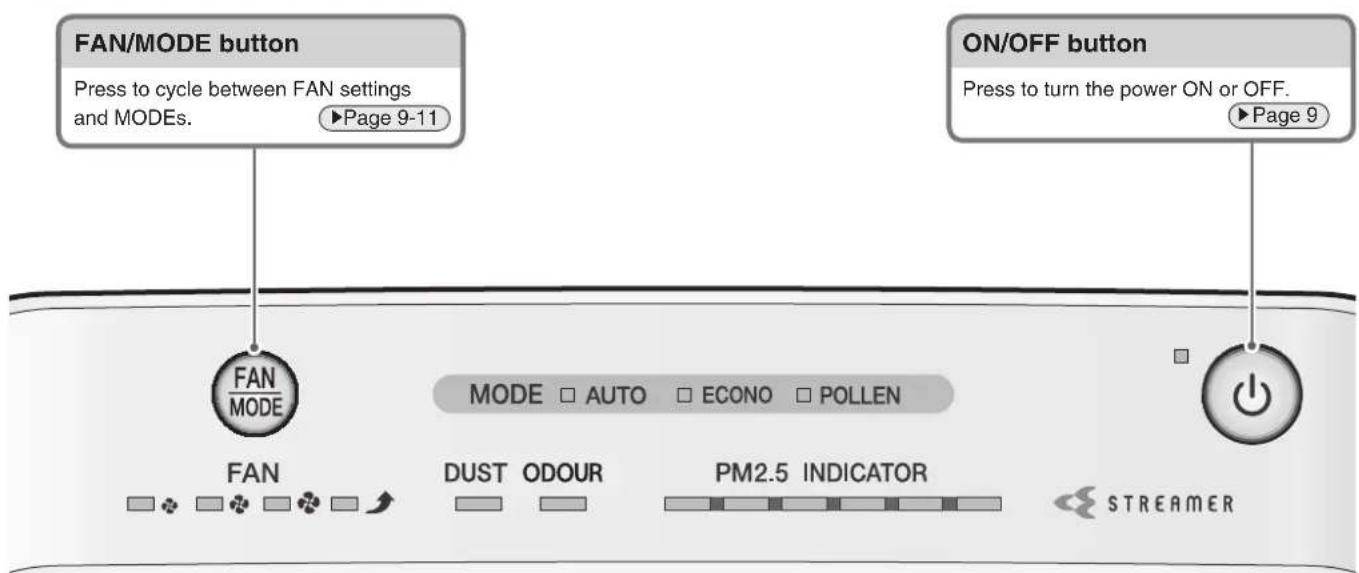
Accessories

Operation manual ..... 1
Preparation Before Operation
1 Positioning the unit
Before installation, peel off the tape fixing the power supply cord to the bottom of the unit and draw out the power supply cord.
Power supply cord
Tape (blue)

natural_image
Technical line drawing of a mechanical or electronic component with internal structure and wiring (no text or symbols)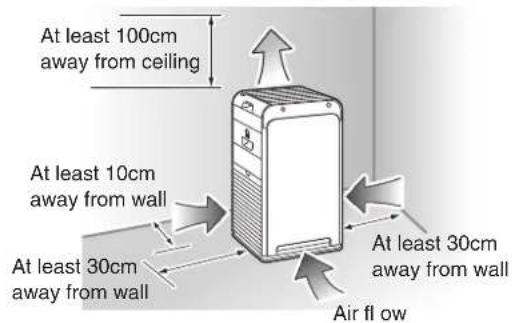
Pointers for good positioning
- Choose a position from where airflow can reach all areas of the room.
- Place on a stable surface. If the unit is placed on an unstable surface, vibrations from the unit may be amplified.
- If you find that interference from the power circuit inside the unit or cables causes interference on your TV screen or static noise to be emitted from nearby radios or stereos, move the unit to at least 2m away from the device.
Keep cordless phones and radio-controlled clocks away from the unit also.
Attention
- To avoid staining of walls, position the unit in accordance with the positioning measurements in the illustration. However, note that since this unit draws in dirty air, certain types of wall may be stained even if the measurements are adhered to. In such cases, make sure to maintain sufficient distance between the unit and the wall.
- When used for a long period of time in the same location, the floor and surrounding walls may get stained as air is drawn into air inlets near the base of the unit. It is recommended to clean the unit periodically.
Preparation Before Operation
Do not use in the following places
■ Places exposed to direct sunlight
(Discolouration may result)
■ Positions near combustion-based heating and other high temperature devices
(Discolouration or deformation may result)
■ Places where chemicals and pharmaceuticals are used such as hospitals, factories, laboratories, beauty salons, and photographic laboratories
(Volatilised chemicals and solvents may degrade mechanical parts and lead to malfunction)
■ Places with high levels of electromagnetic waves such as near an electromagnetic cooker, speakers, etc.
The unit may not function correctly.
■ Places exposed to soot (conductive dust) released by candles, aromatic candles, etc.
The performance of the filters may be impaired, causing the room to become dirty due to the build-up of dust that is not captured.
- Do not use cosmetics etc., containing silicone* near the unit.
* Hair care products (split ends coating agents, hair mousse, hair treatment agents etc.), cosmetics, antiperspirants, antistatic agents, waterproof sprays, lustering agents, glass cleaners, chemical wiping cloths, wax, etc.
- If an insulator such as silicone adheres to the needle of the streamer unit, the streamer discharge may not be generated.
- The dust collection filter may become clogged up resulting in reduced air purifying capacity.
■ Do not use an ultrasonic humidifier or similar appliance near the unit.
The dust collection filter may become clogged up resulting in reduced air purifying capacity.

About streamer discharge
In some cases the air outlet may emit a slight odour as trace amounts of ozone are generated. However, the amount is negligible and is not harmful to your health.
This product cannot eliminate the toxic substances in tobacco smoke (carbon monoxide etc.)
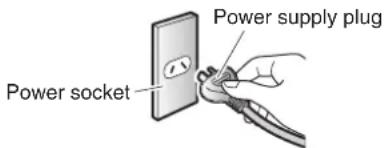
2 Insert the power supply plug into the socket
- The sensitivity of the odour sensor will be determined by odour levels in the first minute (approx.) after the power supply plug is inserted. Insert the power supply plug when the air is clean (odour-free).


MODE □ AUTO □ ECONO □ POLLEN
DUST ODOUR


Using the Air Purifying Operation (turning operation ON/OFF)
Cleans the air in the room.
Press

• ON/OFF lamp [green] lights up.
- Press again to turn OFF.

natural_image
Line drawing of a hand placing a gridded top component into a rectangular device (no text or symbols)Attention
- Do not move the unit, or attach or remove parts to/from the unit while it is in operation. Breakage or malfunctioning may result.
Note
- At the time of purchase, the unit is set to Air purifying operation, AUTO FAN MODE.
- When the unit is unplugged or turned OFF, it will operate with the settings last used the next time it is turned ON.
- Operation settings cannot be changed for about 2 seconds immediately after the power supply plug is inserted.
Changing the Airflow Rate
Select the desired FAN setting.


: Low

: Standard: Quiet : Turbo
* The size of the symbols varies in accordance with the FAN setting.
Press

• Each press cycles between the FAN lamps [green] and MODE lamps [green].

flowchart
graph LR
    A["(Quiet)"] --> B["(Low)"]
    B --> C["(Standard)"]
    C --> D["(Turbo)"]
    D --> E["AUTO AUTO FAN"]
    E --> F["ECONO (ECONO)"]
    F --> G["POLLEN (ANTI-POLLEN)"]
    G --> H["FAN"]
    style A fill:#f9f,stroke:#333
    style B fill:#f9f,stroke:#333
    style C fill:#f9f,stroke:#333
    style D fill:#f9f,stroke:#333
    style E fill:#f9f,stroke:#333
    style F fill:#f9f,stroke:#333
    style G fill:#f9f,stroke:#333
    style H fill:#f9f,stroke:#333
About FAN settings

Quiet
A gentle breeze is emitted. Recommended for use during sleep hours.
To quickly eliminate odours from a room, it is recommended that the FAN setting be set to Standard or above otherwise deodorising capacity is reduced.

Turbo
The ambient air is quickly purified using a large airflow. Recommended for use while you are cleaning up a room.
Useful Functions

Operating the Unit in a MODE
Select a MODE specific to your needs.
Airflow is adjusted automatically when the unit is running in a MODE.
Press

• Each press cycles between the MODE lamps [green] and FAN lamps [green].

flowchart
graph LR
    A["AUTO"] --> B["ECONO (ECONO) (ANTI-POLLEON)(AUTO FAN)"]
    B --> C["FAN"]
    C --> D["(Turbo)"]
    D --> E["(Standard)"]
    E --> F["(Low)"]
    F --> G["(Quiet)"]
    G --> H["Mode"]
MODE Usage and Function
| AUTO FAN | Automatic airflow rate adjustmentFAN setting (Quiet, Low, Standard, High) is automatically adjusted according to the degree of air impurity. Purifying capacity increases as airflow rate rises.Degree of air impurity corresponds to the volume of dust and the intensity of odours in the ambient air. |
| ECONO |  In Power saving mode within ECONO MODE, the FAN setting automatically switches between Quiet and Low only. Power consumption (*1) and operating sounds are minimised.If the air is clean, after a short while, Monitoring mode automatically activates.Recommended for use during sleep hours.*1 By comparison to AUTO FAN MODE (approx. 9.2Wh), power consumption in ECONO MODE (approx. 6.5Wh) is approx. 2.7Wh lower.Test conditions: operation in 10m^2 area over 1 hour. Assuming 1 cigarette was smoked immediately after the unit was turned on.Power saving mode Monitoring mode, after a short while... In Power saving mode within ECONO MODE, the FAN setting automatically switches between Quiet and Low only. Power consumption (*1) and operating sounds are minimised.If the air is clean, after a short while, Monitoring mode automatically activates.Recommended for use during sleep hours.*1 By comparison to AUTO FAN MODE (approx. 9.2Wh), power consumption in ECONO MODE (approx. 6.5Wh) is approx. 2.7Wh lower.Test conditions: operation in 10m^2 area over 1 hour. Assuming 1 cigarette was smoked immediately after the unit was turned on.Power saving mode Monitoring mode, after a short while...  If dust or odours are detected...As the FAN setting is limited to Quiet and Low, air purifying capacity is reduced.As air is not drawn in when the fan has stopped, the dust/PM2.5 sensor, and odour sensor reduce in sensitivity.FAN setting is adjusted automatically. Airflow cannot be adjusted manually. If dust or odours are detected...As the FAN setting is limited to Quiet and Low, air purifying capacity is reduced.As air is not drawn in when the fan has stopped, the dust/PM2.5 sensor, and odour sensor reduce in sensitivity.FAN setting is adjusted automatically. Airflow cannot be adjusted manually. |
| ANTI-POLLEN | Reducing pollen levelsA gentle air current is created by switching every 5 minutes between the FAN setting Standard and Low so that pollen can be drawn in and caught before it reaches the floor.FAN setting is adjusted automatically. Airflow cannot be adjusted manually. |
Useful Functions

Adjusting Indicator Lamp Brightness
Indicator lamp brightness is adjustable.
Press (FAN) for 3 seconds.
- Press to cycle between settings.

- The FAN setting and MODE of operation will also switch. After switching to the desired brightness, press FAN MODE and select FAN setting and MODE of operation again.
Note
- This function is useful if the lamps bother you during sleep hours etc.
- The ON/OFF lamp does not turn off even if the brightness is set to OFF. These lamps will be set to DIM.
- If the (FAN MODE) is pressed when brightness is set to OFF, brightness will change to DIM and return to OFF after about 10 seconds.
Advanced Settings
When the sensitivity of the dust/PM2.5 sensor does not meet your preferences
*Setting at time of purchase
Setting Dust/PM2.5 Sensor Sensitivity
High
Normal*
Low
- Hold down ⏻ for about 5 seconds and when a short beep sounds, press FAN MODE while pressing ⏻.
- This setting change can be performed when the unit is on or off.
- When a short beep sounds, release and . FAN MODE
- One of the FAN lamps (♣ (Low), ♣ (Standard), ⚙ (Turbo)) will blink for about 5 seconds and then the lamp corresponding to the currently set sensitivity will light up.
- Press ⏻ to change the sensitivity setting.
• Each press cycles between the FAN lamps allowing you to change the sensitivity.
To set sensitivity High
▶ Select the FAN lamp (Turbo).
To set sensitivity Low
▶ Select the FAN lamp♣(Low).

flowchart
graph TD
    A["(Turbo)"] --> B["High"]
    C["(Standard)"] --> D["Normal"]
    E["(Low)"] --> F["Low"]
    style A fill:#f9f,stroke:#333
    style C fill:#f9f,stroke:#333
    style E fill:#f9f,stroke:#333
    style B fill:#ccf,stroke:#333
    style D fill:#ccf,stroke:#333
    style F fill:#ccf,stroke:#333
- Setting is indicated using the FAN lamps. If the FAN lamp does not change, unplug the unit, wait at least 5 seconds, then reinsert the power supply plug and repeat the above procedure from the beginning.
-
Press after selecting the new setting.
-
A short beep sounds and the new setting will blink. Unplug the unit while the lamp is blinking, wait at least 5 seconds, and then reinsert the power supply plug. Setting is now complete.
- If this procedure is not performed, the unit will not return to regular operation mode.
Note
- Settings are remembered even if the unit is unplugged.
Outflow grille
When dirt becomes an issue
- Wipe up dirt with a soft damp cloth and rinse with water.
- Do not use a hard brush etc. (Breakage may result)
- When dirt buildup is severe, leave the part soaking in lukewarm or room temperature water mixed with kitchen-use neutral detergent, thoroughly rinse off the detergent, and leave the part in shade to dry off.
Wipe
Wash/Rinse
Removing
Place a finger into the notch in the top of the unit and lift.
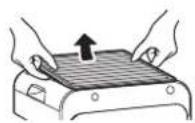
Attaching
Pay attention to orientation and attach securely.

Unit
When dirt becomes an issue
Wipe
- Wipe up dirt with a soft damp cloth.
- Do not use a hard brush etc. (Damage may result)
- When dirt buildup is severe, wet a cloth with kitchen-use neutral detergent and wipe up the dirt.
Pre-fi Iter(Front/Left-side/Right-side)
About every 2 weeks
Vacuum clean
Wash/Rinse

natural_image
Illustration showing a hand pressing down on a wall with a cable, and a close-up of a device with a handle (no text or symbols)• After removing any dust using a vacuum cleaner, remove and wash the fi Iter with water and then leave it in shade to dry off.
- Use a soft brush when cleaning the spaces in the grid.
Attention
- Do not use a cotton bud or hard brush etc. (Partial breakage of the filter may result)
- Do not apply heavy force.(Partial breakage/damage of the fi Iter may result)
- When dirt buildup is severe, leave the part soaking in lukewarm or room temperature water mixed with kitchen-use neutral detergent, thoroughly rinse off the detergent and leave the part in shade to dry off.
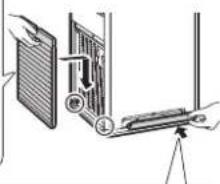
Removing
Grip the indent in the pre-fi Iter and pull.

① Grip either end of the pre-fi iter resting your thumb against the unit.

② Pull toward you.
Attaching
Insert the hooks (2 places) into the unit and press until a catching sound is heard.

Reverse side
natural_image
Diagram of a mechanical device with labeled parts and directional arrows (no readable text or symbols)Insert the hook (1 place) into the unit. Push both ends until securely attached.
Hook (1 place)

Viewed from above

Dust/PM2.5 sensor
When dust has built up
Vacuum clean
① Remove the pre-fi iter (left-side).
②Vacuum off any dust that has adhered to the air intake for dust/PM2.5 sensor using the vacuum cleaner crevice tool or similar.

Air intake for dust/PM2.5 sensor
About every 3 months
Wipe
① Remove the pre-fi iter (left-side) and the cover for the air intake for dust/PM2.5 sensor.
② Wipe the lens with a dry cotton bud.

Lens
Use a light if hard to see
Use the vacuum cleaner crevice tool or similar to remove any dust that has built up around the lens.
③ Place the cover on securely. (Malfunction may result if the cover is off)

WARNING
- Do not use petrol, benzine, thinner, polishing compound, paraffin, alcohol, etc. (An electric shock, fire, or cracking may result)
- Do not wash the main body of the unit with water. (An electric shock, fire, or malfunctioning/breakage may result)
Deodorising filter unit
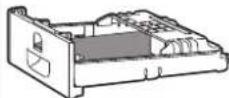
When concerned about odours or dirt
Vacuum clean
Do not use water
- Remove from the unit together with the frame and remove dust using a vacuum cleaner.
- If odour becomes an issue, leave the part in a shaded, breezy area. (about 1 day)
- Do not scrub the surface.
- Do not use water when cleaning. (If water is used, the part will lose its shape and become unusable.) ▶Page 18

Removing
Hold the lever and grip of the deodorising filter unit and remove.

Attaching
Fully insert the deodorising filter unit.
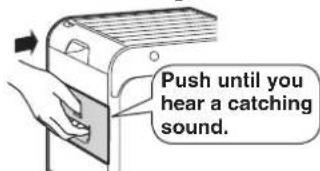
- If the deodorising filter unit is removed or incorrectly installed, the odour sensor lamp will blink.
Dust collection filter
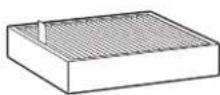
About every 10 years Replace
Do not use water Do not vacuum clean
- Do not use a vacuum cleaner or use water when cleaning. (If the filter is damaged or holes are opened etc., dust will pass through the filter and capacity for dust collection will be reduced.)
About part replacement timing
- Replacement timing depends on usage patterns and the location of the unit. If the unit is used daily in a home where 5 cigarettes are smoked a day, the filter should be replaced about every 10 years. (Calculation based on testing method of Japan Electrical Manufacturers Association JEM1467 standard.) If the impurity content of the ambient air is high, the filter will need more frequent replacement. If the filter is failing to perform, it is time to replace it.
About purchasing and disposal
- Refer to "Separately Sold Parts". ▶Page 16
Removing
① Remove the deodorising filter unit.
② Pull the tag upward.
③Hold the lower part of the dust collection filter and lift it out.
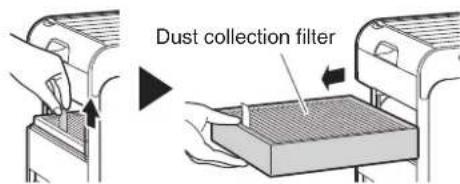
Attaching
① Install the new dust collection filter, being careful of the orientation.
Side with tag and markings should face outward and arrow should point up
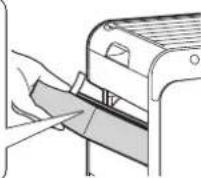
②Attach the deodorising filter unit.
Attention
- Make sure that the dust collection filter and deodorising filter unit are attached to the unit when the unit is operating. If these parts are not attached when the unit is operated, breakage/malfunctioning may result.
- Follow the advice below to prevent discolouration or deformation.
If detergent was used, make sure to wipe it up thoroughly so none remains.
- If hot water is used, make sure that it is 40^ or less.
- Do not leave parts to dry in direct sunlight.
- Do not dry parts using a dryer.
- Do not apply fire to parts.
- If using a vacuum cleaner, make sure to not apply force to or knock the part. (Damage may result)
Replacing the Streamer Unit

If the streamer lamp blinks
The streamer unit will not need to be replaced. However, depending on where the unit is used (places where oils are present, or dust and humidity is abundant, or sprays and chemical agents are used, etc.) replacement may become necessary. ▶Page 17
Contact the place of purchase.
-
Remove the pre-fi iter on the left side from the back of the unit. ▶Page 13
-
Flip up the protective covers and remove the streamer unit cover.

- Remove the streamer unit.
① Remove the streamer unit connector.
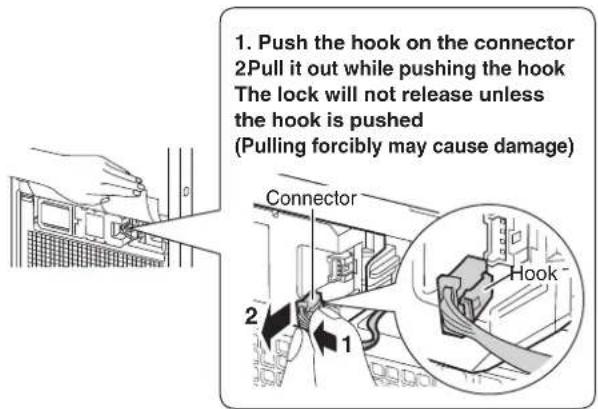
② Push in the left side of the streamer unit so the right side comes out.

③ Remove the streamer unit.
- Attach the new streamer unit.
① Insert the streamer unit from the left side, and push until the hook makes a catching sound.

② Make sure the hook is facing to the right, and insert the connector as deeply as it will go.

natural_image
Hand inserting a component into a device (no text or symbols visible)- Attach the streamer unit cover.

- Ensure you don't trap the connector cord. - If the streamer unit cover is not properly attached the safety switch will engage, and the unit cannot operate.
-
Attach the pre-fi Iter. ▶Page 13
-
Insert the power supply plug while pressing on the unit, and wait until a short beep sounds.
• The streamer lamp will turn off.
- If you release FAN MODE and attempt operation before the short beep sounds, the streamer lamp will blink again.
- If you perform this step and the streamer lamp still blinks, please check that the connector is properly inserted.
Separately Sold Parts
Contact the place of purchase.
Replacement part
Dust collection filter (1 piece)
Model: KAFP080B4E

natural_image
Simple 3D diagram of a rectangular box with a slotted top and internal grid pattern (no text or symbols)- Replace about every 10 years.
• Catches dust and pollen.
- Failure to clean parts properly could result in:
- Reduced air purifying capacity.
- Reduced deodorising capacity.
- Emission of odours.
- Observe local waste separation rules when disposing of the dust collection filter (made of polyester and polypropylene).
When Not Using the Unit for Long Time Periods
- Remove the power supply plug.
- Clean the parts. ▶Page 13, 14
- In particular, components cleaned with water should be completely dry. (Mould may result from remaining moisture)
- Cover the air outlet and other openings with a plastic bag or similar to prevent dust entry, and store the unit upright in a dry place.
(Malfunctioning/breakage may result from storing the unit upside down or on its side)
About the Indicator Lamps
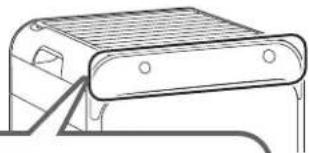
Operating/Indicator panel
Check the indicator lamps and respond as indicated below.
natural_image
Line drawing of a mechanical device with a grid-patterned top and side brackets (no text or symbols)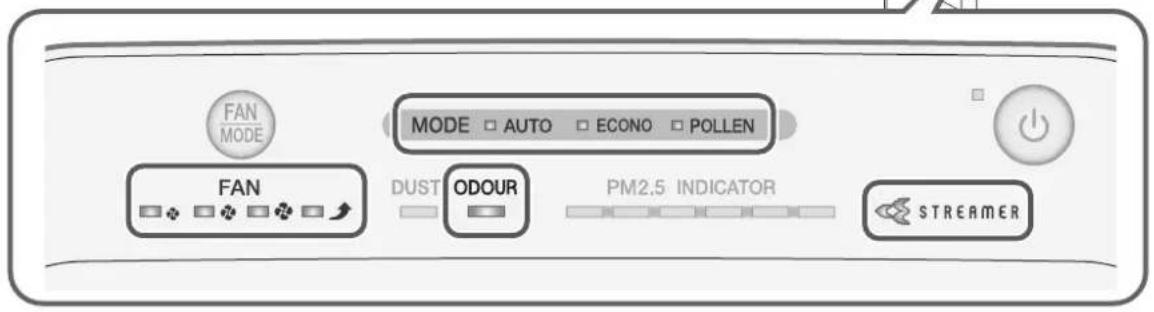
| Indicator lamp Cause/Solution | ||
Odour sensor lamp is blinking. | This lamp blinks if the deodorising filter unit has become detached or is not attached properly.→ Attach the deodorising fi iter unit properly. ▶Page 14 | |
Streamer sensor lamp is blinking. STREAMER STREAMER | It is time to replace the streamer unit. ▶Page 15 | |
| All 3 MODE lamps are blinking simultaneously.MODE-□AUTO-□ECONO-□POLLEN | An electrical component is faulty.→ Contact the place of purchase. | |
All 4 FAN lamps are blinking simultaneously. | Are the pre-fi lter, outfl ow grille, and dust collection fi lter attached? These lamps may blink if the unit is operated without a part attached. | ■ If all parts are attachedAn electrical component is faulty.→ Contact the place of purchase. |
| ■ If one or more components are not attachedRemove the power supply plug, reattach the parts and then turn the unit on again. | ||
| Is there a buildup of dust on the pre-filter? | ■ If there is no dust buildupAn electrical component is faulty.→ Contact the place of purchase. | |
| ■ If there is a dust buildupRemove the power supply plug, clean the pre-fi lter and then turn the unit on again. ▶Page 13 | ||
| Is the air outlet blocked? | ■ If the air outlet is not blockedAn electrical component is faulty.→ Contact the place of purchase. | |
| ■ If the air outlet is blockedRemove any obstacles blocking the air outlet and then turn the unit on again. | ||
| These lamps may blink if there is a sudden drop in voltage. | ||
Please check the following before contacting us.
Q: The dust/PM2.5 sensor seems to have poor sensitivity...
A: Perform periodic cleaning of the dust/PM2.5 sensor as dirt on its lens can lead to poor sensitivity. ▶Page 13
In addition, the response time of the dust/PM2.5 sensor varies depending on room size. Make adjustments in accordance with the procedure for setting dust/PM2.5 sensor sensitivity. ▶Page 12
The responsiveness of the dust/PM2.5 sensor may be poor during FAN setting "Turbo" or when airflow is high in AUTO FAN MODE.
The strong airflow causes dust to be drawn into the air inlet before it can be detected by the dust/PM2.5 sensor. This is normal (not a malfunction).

natural_image
Diagram of a server rack with a highlighted internal component (no text or symbols)Dust/PM2.5 sensor
Q: Can the dust collection filter be cleaned?
A: No. Do not attempt to clean it with a vacuum cleaner or water.
(Reduced performance of the dust collection filter may result) Replace it if dirt buildup is severe.

Q: The dust collection filter easily turns black...
A: The blackening does not affect dust collection performance. However, it can be replaced if it is an issue.
Q: Can the deodorising filter be cleaned with water? Or should it be replaced?
A: It cannot be cleaned with water.
(If water is used, the part will lose its shape and become unusable.)
If you have inadvertently washed it with water, consult the place of purchase.
Remove the deodorising filter unit from the main body and vacuum off dust with a vacuum cleaner.
It is not necessary to replace the filter. If odour becomes an issue, leave the part in a shaded, breezy area. (about 1 day) ▶Page 14

natural_image
Technical line drawing of a mechanical housing or enclosure component (no text or symbols)Troubleshooting
■ Before making an inquiry or a request for repair, please check the following.
If the problem persists, contact the place of purchase.
■ In the event of malfunction during operation
If the indicator lamps light up abnormally, or become inoperable, due to a lightning strike etc., remove the power supply plug, wait at least 5 seconds then reinsert the power supply plug and turn the unit on again.

Not a problem
This case is not a problem.

Check
Please check again before requesting repairs.
■ Unit does not respond
| Phenomenon Check points | |
| No response even if is pressed | To protect the system, the unit may stop operating after sudden large voltage fluctuations.If operating at the time, operation will resume automatically once voltage returns to normal.Voltage range protection: 180V-264V |
| Unit will not operate | Is the streamer unit cover attached?If it is not attached the safety switch will engage, and the unit cannot operate.→ Install the streamer unit cover properly and attempt operation again.▶Page 15 |
Sounds can be heard
| Phenomenon Check points | |
| Hissing sound during operation | While the streamer is operating, the streamer unit will emit a hissing sound when conducting streamer discharge.Depending on usage conditions, the sound may fall in volume or change to a crackling, whirring, or guzzling sound, however, this is normal.If the sounds are an issue, try moving the unit to a different location. |
| Whistling and fl uttering sound during operation | Is there a buildup of dust on the pre-fi iter?→ Clean this part. ▶Page 13Is the dust collection fi Iter clogged up?→ Depending on usage conditions, the dust collection filter may become clogged up, shortening its service life. ▶Page 8Replace the dust collection filter. ▶Page 14 |
| Operating sound is loud | Is the dust collection filter attached properly?→ If it is not properly attached, operating sounds may become louder. ▶Page 14 |
Indicator lamps
| Phenomenon Check points | |
| Indicator lamps do not light upIndicator lamps turn off about 10 seconds after the unit is turned on | ?• Is indicator lamp brightness set to OFF?→ If indicator lamp brightness is set to OFF, all lamps except the ON/OFF lamp will remain off.→ If indicator lamp brightness is set to OFF, after the unit is turned on, the brightness of the indicator lamps will be DIM for about 10 seconds and then turn OFF. ▶Page 11 |
| All the FAN lamps ( ◆(Quiet), ◆(Low), ◆(Standard), and ▼Burbo)) blink together | Are the pre-fi iter, outfl ow grille, and dust collection fi Iter attached? These lamps may blink if the unit is operated without a part attached. [If one or more parts are not attached]Remove the power supply plug, reattach the parts and then turn the unit on again. [If all parts are attached]An electrical component is faulty.Contact the place of purchase.Is there a buildup of dust on the pre-fi Iter?[If there is a dust buildup] ▶Page 13Remove the power supply plug, clean the pre-filter and then turn the unit on again. [If there is no dust buildup]An electrical component is faulty.Contact the place of purchase.Is the air outlet blocked?[If the air outlet is blocked]Remove any obstacles blocking the air outlet and then turn the unit on again. [If the air outlet is not blocked]An electrical component is faulty.Contact the place of purchase. |
| These lamps may blink if there is a sudden drop in voltage.The lamps will return to their previous condition once voltage returns to normal.Voltage range protection: 180V-264V | |
| The dust sensor lamp remains orange or red | Is there a buildup of dust in or around the air intake for the dust/PM2.5 sensor?→Vacuum off any dust from the air intake using a cleaner. ▶Page 13Is the cover detached from the air intake for the dust/PM2.5 sensor?→Securely attach the cover. ▶Page 13Is the lens for the dust/PM2.5 sensor dirty?→Wipe off dirt from the lens using a dry cotton bud or similar. ▶Page 13Is the pre-fi Iter dirty? ▶Page 13→Clean these parts.After cleaning, the unit will return to normal operation a short while after being turned on. |
| The PM2.5 INDICATOR lamp remain red, purple or brown. | |
| There is an odour but the odour sensor lamp remains green | Did an odour emerge around the time you inserted the power supply plug?→The sensitivity of the odour sensor will be determined by odour levels in the fi rst minute (approx.) after the power supply plug is inserted.When the air is clean (i.e. there are no odours), remove the power supply plug. Wait at least 5 seconds then reinsert the power supply plug and turn the unit on again. This process adjusts the reference odour level that determines the sensitivity of the odour sensor. |
| Sometimes the streamer lamp does not light up | The streamer may cease operating depending on the degree of air impurity. The streamer lamp turns off when the streamer ceases operating. |
| Is the unit operating in ECONO MODE?→The streamer lamp does not light up when the unit is in Monitoring mode.▶Page 10 | |
| The streamer lamp blinks even though the streamer unit has been replaced | After replacement, was the power supply plug inserted while pressing ▶Page 15on the unit? ▶Page 15Is the streamer unit's connector properly installed?[In case of improper installation]→Pull out the power supply plug, reattach the connector, and attempt operation again. ▶Page 15[In case of proper installation]An electrical component is faulty.→Contact the place of purchase. |
| The odour sensor lamp blinks | Is the deodorising fi Iter unit attached?→Attach the deodorising fi Iter unit. ▶Page 14 |
Troubleshooting
■ Air purifying function
| Phenomenon Check points | |
| Air purifying capacity is reduced | Is the unit positioned in a place where airflow cannot reach or surrounded by obstacles?Choose a position that is obstacle-free and from where airfl ow can reach all areas of the room.Is the pre-fi liter or dust collection fi liter dirty?Clean these parts. ▶Page 13, 14 |
| The air outlet is emitting an odour • Is the teodorising fi liter dirty?• In some cases the air outlet may emit a slight odour as trace amounts of ozone are generated. However, the amount is negligible and is not harmful to your health.Is the room fi lled with odours due to cooking or several people smoking together etc?→ The odour will gradually fade as the unit operates.Have you moved the unit from another room?→ The unit may emit the odour of the room in which it was used previously. Let the unit run a while longer.Is there anything in the room that is giving off an odour continuously?(Paint, new furniture, wallpaper, sprays, cosmetics, chemicals)→ As continuously emitted odours cannot be completely eliminated, you should ventilate the room at the same time or run the unit in a well-ventilated room for a short while. | |
| No air is being emitted | Is the air outlet or an air inlet blocked?If they are not blocked, the fan motor is faulty.→ Contact the place of purchase. |
Other
| Phenomenon Check points | |
| The fan stops midway through unit operation | When the unit switches to Monitoring mode during operation in ECONO MODE, the fan turns on and off repeatedly. ▶Page 10 |
| Are the pre-fi iter, outfl ow grille, and dust collection fi iter attached before the unit is operated?The fan is confi gured to stop in order to protect electrical components if a part is not properly attached.→ If a part is not attached, unplug the unit and attach all parts before turning the unit on again. | |
| The sound of streamer discharge can no longer be heard | The streamer may cease operating depending on the degree of air impurity. ▶Page 6 |
| There is interference on our TV screen | Is the TV or radio positioned within 2m of the unit, or is an indoor antenna positioned near the unit?Are the power supply cord or antenna cable of the TV or radio routed near the unit?Keep the unit as far as possible from the TV, radio, or antenna. |
| Just inserting the power plug causes operation to start | Did you disconnect the power plug during a power failure, or when a sudden voltage fl ectuation occurred, to move the unit or disconnect the power plug during the last operation?→ The auto-restart function automatically resumes operation. |
Specifications
| Model name | MC40YPVM | |||
| Power supply Single phase 50Hz 220-240V / 60Hz 220-230V | ||||
| Operation mode | Air Purifying | |||
| Turbo Standard Low Quiet | ||||
| Power consumption (W) | 23 13 9 7 | |||
| Operating sound (dB) | 49 36 27 19 | |||
| Airflow rate (m3/h) | 240 168 108 | 66 | ||
| Coverage area (m2) | 31 *162 *2 | |||
| External dimensions (mm) 500(H)× | 270(W)× 270(D) | |||
| Weight (kg) | 6.8 | |||
| Power supply cord length (m) | 1.8 | |||
- These specification values are applicable to both 50Hz 220–240V and 60Hz 220–230V.
- Even when the power is off, approx. 1W of power is consumed to run the microcomputer.
*1.Coverage area was calculated in accordance with JEM1467. (when FAN setting is "Turbo")
*2. Coverage area was calculated in accordance with NRCC-54013 standard using cigarette smoke CADR that was tested according to JEM1467. (when FAN setting is "Turbo")
DAIKIN INDUSTRIES, LTD.
Head office:
Umeda Center Bldg., 2-4-12, Nakazaki-Nishi,
Kita-ku, Osaka, 530-8323 Japan
Tokyo office:
JR Shinagawa East Bldg., 2-18-1, Konan,
Minato-ku, Tokyo, 108-0075 Japan
http://www.daikin.com
- Features
- Streamer Technology
- Streamer discharge decomposes adsorbed odour.
- Controlling PM2.5
- Elimination of 99% of 0.1-2.5μm particles (\*1).
- Powerful and swift suction action driven by large airflow
- Contents
- Read First
- Operation
- Useful Functions
- Advanced Settings
- Maintenance
- Troubleshooting
- Safety Precautions
- WARNING Observe in order to prevent fires, electric shocks or severe injury.
- Immediately turn off and unplug the unit if there are any signs of abnormality or damage Examples of abnormality or damage
- CAUTION Observe in order to prevent short circuiting, injury or property damage.
- During use
- ■Concerning the unit body
- ■When moving the unit
- Names of Parts and Operations
- CAUTION
- Main Removable Parts
- Attention
- ① About the streamer lamp
- ② About the dust sensor lamp / PM2.5 INDICATOR lamp
- ③ About the odour sensor lamp
- Preparation Before Operation
- Positioning the unit
- Pointers for good positioning
- Do not use in the following places
- About streamer discharge
- Insert the power supply plug into the socket
- Using the Air Purifying Operation (turning operation ON/OFF)
- Press
- Note
- Changing the Airflow Rate
- About FAN settings
- Quiet
- Turbo
- Operating the Unit in a MODE
- Adjusting Indicator Lamp Brightness
- Press (FAN) for 3 seconds.
- Setting Dust/PM2.5 Sensor Sensitivity
- Outflow grille
- When dirt becomes an issue
- Wipe
- Wash/Rinse
- Removing
- Attaching
- Unit
- Pre-fi Iter(Front/Left-side/Right-side)
- About every 2 weeks
- Vacuum clean
- Dust/PM2.5 sensor
- When dust has built up
- About every 3 months
- WARNING
- Deodorising filter unit
- When concerned about odours or dirt
- Do not use water
- Dust collection filter
- About every 10 years Replace
- Do not use water Do not vacuum clean
- About part replacement timing
- About purchasing and disposal
- Replacing the Streamer Unit
- If the streamer lamp blinks
- Separately Sold Parts
- Replacement part
- When Not Using the Unit for Long Time Periods
- About the Indicator Lamps
- Operating/Indicator panel
- Q: The dust/PM2.5 sensor seems to have poor sensitivity...
- Q: Can the dust collection filter be cleaned?
- Q: The dust collection filter easily turns black...
- Q: Can the deodorising filter be cleaned with water? Or should it be replaced?
- Not a problem
- Check
- DAIKIN INDUSTRIES, LTD.
Brand : DAIKIN
Model : MC40YPVM
Category : Air purifier