
CMXGCAQ108493 - Lawn mower Craftsman - Free user manual and instructions
Find the device manual for free CMXGCAQ108493 Craftsman in PDF.


| Product Type | String Trimmer (Lawn Mower) |
| Brand | Craftsman |
| Model | CMXGCAQ108493 |
| Engine | Kohler XT6.75, 149CC, 3600 RPM |
| Cutting Width | 22 inches |
| Cutting Height | 5 positions, 1.5 - 3.5 inches (10mm increments) |
| Cutting Speed (Blade RPM) | 3800 RPM |
| Cutting Line Diameter | .155 inch (4 mm) |
| Cutting Line Length | 19 inches per side (25 inches recommended when cut from roll) |
| Wheel Size | 14 x 1.75 inches |
| Frame Material | 14 Gauge Steel |
| Drive Belt | V-Belt, 3L440 |
| Dimensions (L x W x H) | 50.4 x 21.5 x 38.3 inches |
| Shipping Weight | 67 lbs |
| Starting System | Recoil Starter (Manual) |
| Throttle Control | Lever on handlebar (Choke/Run/Stop) |
| Safety Features | Safety Control Bar (bail bar), Blade Brake (stops within 3 seconds), Discharge Cover |
| Cutting Head Type | Spinning line plate with two cutting cords (180° apart) |
| Handlebar Adjustment | Adjustable height via knobs |
| Fuel Type | Unleaded gasoline (min 85 octane) |
| Oil Type | SAE 30 HD engine oil (15-22 oz) |
| Intended Use | Mowing and trimming grass, light brush |
| Warranty | Under license from Craftsman (Stanley Black & Decker) |
Frequently Asked Questions - CMXGCAQ108493 Craftsman
User questions about CMXGCAQ108493 Craftsman
0 question about this device. Answer the ones you know or ask your own.
Ask a new question about this device
Download the instructions for your Lawn mower in PDF format for free! Find your manual CMXGCAQ108493 - Craftsman and take your electronic device back in hand. On this page are published all the documents necessary for the use of your device. CMXGCAQ108493 by Craftsman.
USER MANUAL CMXGCAQ108493 Craftsman
natural_image
Line drawing of a lawn mower with visible blades and mounting bracket (no text or symbols)CAUTION: Before using this product, read this manual and follow all safety rules and operating instructions.
TABLE OF CONTENTS
Safety Instructions.... Page 3
Assembly Page 7
Operation..... Page 10
Maintenance Page 18
Off-Season Storage .... Page 21
Troubleshooting Page 22
Under License.... Page 32
PRODUCT SPECIFICATIONS MODEL NUMBER
Engine: Kohler XT6.75, 149CC
Engine Speed: 3600 RPM
Cutting Width: 22 inches
Cutting Height: 5 Heights 1.5 - 3.5"
Cutting Speed: 3800 RPM
Cutting Line: .155" dia. (4mm) x 19" length
Wheel Size: 14" x 1.75" width
Frame: 14 Gauge Steel
Trimmer Ball: 4" dia., 4" heat treated cutting blade
Drive Belt: V-Belt, 3L440
Dimensions: 50.4" L x 21.5" W x 38.3" H
Shipping Weight: 67 Lbs.
Model Number ____
Serial Number ____
Date of Purchase ____
Record the model number, serial number, and date of purchase above.
Definitions: Safety Alert Symbols and Words
This instruction manual uses the following safety alert symbols and words to alert you to hazardous situations and your risk of personal injury or property damage.

DANGER: Indicates an imminently hazardous situation which, if not avoided, will result in death or serious injury.

WARNING: Indicates a potentially hazardous situation which, if not avoided, could result in death or serious injury.

CAUTION: Indicates a potentially hazardous situation which, if not avoided, may result in minor or moderate injury.

(Used without word) Indicates a safety related message.
NOTICE: Indicates a practice not related to personal injury which, if not avoided, may result in property damage.

READ AND UNDERSTAND INSTRUCTION MANUAL: To reduce the risk of injury, user and all bystanders must read and understand instruction manual before using this product.
SAVE THESE INSTRUCTIONS FOR FUTURE USE
SAFETY INSTRUCTIONS

WARNING
This symbol points out important safety instructions which, if not followed, could endanger the personal safety and/or property of yourself and others. Read and follow all instructions in this manual before attempting to operate this string trimmer. Failure to comply with these instructions may result in personal injury. When you see this symbol, HEED ITS WARNING!

DANGER
This string trimmer was built to be operated according to the safe operation practices in this manual. As with any type of power equipment, carelessness or error on the part of the operator can result in serious injury. This machine is capable of amputating fingers, hands, toes and feet and throwing debris. Failure to observe the following safety instructions could result in serious injury or death.

WARNING
CALIFORNIA PROPOSITION 65
Engine Exhaust, some of its constituents, and certain vehicle components contain or emit chemicals known to State of California to cause cancer and birth defects or other reproductive harm.

WARNING
Your Responsibility—Restrict the use of this power machine to persons who read, understand and follow the warnings and instructions in this manual and on the string trimmer.
SAVE THESE INSTRUCTIONS!
GENERAL OPERATION
a. Read this operator's manual carefully in its entirety before attempting to assemble this string trimmer. Read, understand, and follow all instructions on the string trimmer and in the manuals before operation. Keep this manual in a safe place for future and regular reference and for ordering replacement parts.
b. Be completely familiar with the controls and the proper use of this string trimmer before operating it.
c. This string trimmer is a precision piece of power equipment, not a plaything. Therefore, exercise extreme caution at all times. This string trimmer has been designed to perform one job: to mow grass. Do not use it for any other purpose.
d. Never allow children under 14 years of age to operate this string trimmer. Children 14 and over should read and understand the instructions and safe operation practices in this manual and on the string trimmer and should be trained and supervised by an adult.
e. Only responsible individuals who are familiar with these rules of safe operation should be allowed to use this string trimmer.
f. Thoroughly inspect the area where the equipment is to be used. Remove all stones, sticks, wire, bones, toys and other foreign objects, which could be tripped over or picked up and thrown by the trimmer line. Thrown objects can cause serious personal injury.
g. Plan your trimming operation to avoid discharge of material toward roads, sidewalks, bystanders and the like. Also, avoid discharging material against a wall or obstruction, which may cause discharged material to ricochet back toward the operator.
h. To help avoid trimmer line contact or a thrown object injury, stay in operator zone behind handles and keep children, bystanders, helpers and pets at least 75 feet from trimmer while it is in operation. Stop the string trimmer if anyone enters area.
i. Always wear safety glasses or safety goggles during operation and while performing an adjustment or repair to protect your eyes. Thrown objects which ricochet can cause serious injury to the eyes.
j. Wear sturdy, rough-soled work shoes and close-fitting slacks and
shirts. Shirts and pants that cover the arms and legs and steel-toed shoes are recommended. Never operate this string trimmer in bare feet, sandals, slippery or light-weight (e.g. canvas) shoes.
k. Do not put hands or feet near rotating parts or under the cutting deck. Contact with cutting line can amputate fingers, hands, toes and feet.
1. A missing or damaged discharge cover can cause cutting line contact or thrown object injuries.
m. Many injuries occur as a result of the trimmer being pulled over the foot during a fall caused by slipping or tripping. Do not hold on to the trimmer if you are falling: release the handle immediately.
n. Never pull the trimmer back toward you while you are walking. If you must back the trimmer away from a wall or obstruction, first look down and behind to avoid tripping and then follow these steps:
1. Step back from trimmer to fully extend your arms forward.
2. Be sure you are well balanced with sure footing.
3. Pull the trimmer back slowly, no more than half way toward you.
4. Repeat these steps as needed.
o. Do not operate the trimmer while under the influence of alcohol or drugs.
p. The safety control bar is a safety device. Never attempt to bypass its operation. Doing so makes the safety device inoperative and may result in personal injury through contact with the cutting line. The safety control bar must operate easily in both directions and automatically return to the disengaged position when released.
q. Never operate the trimmer in wet grass. Always be sure of your footing. A slip and fall can cause serious personal injury. If you feel you are losing your footing, release the safety control bar immediately and the cutting line will stop rotating within three seconds.
r. Operate only in daylight or good artificial light. Walk, never run.
s. Release the safety control bar when crossing gravel drives, walks or roads.
SAFETY INSTRUCTIONS
t. If the equipment should start to vibrate abnormally, stop the engine and check immediately for the cause. Vibration is generally a warning of trouble.
u. Shut the engine off and wait until the blade comes to a complete stop before removing the grass catcher or unclogging the chute. The cutting blade continues to rotate for a few seconds after the blade control is released. Never place any part of the body in the blade area until you are sure the blade has stopped rotating.
v. Never operate the string trimmer without proper shield, discharge cover, grass catcher, blade control handle or other safety protective devices in place and working. Never operate string trimmer with damaged safety devices. Failure to do so can result in personal injury.
w. Muffler and engine become hot and can cause a burn. Do not touch.
x. Never attempt to make a wheel or cutting height adjustment while the engine is running.
y. Only use parts and accessories made for this string trimmer by the manufacturer as listed in the Parts pages of this Operator's Manual. Failure to do so can result in personal injury.
z. When starting engine, pull cord slowly until resistance is felt, then pull rapidly. Rapid retraction of starter cord (kickback) will pull hand and arm toward engine faster than you can let go. Broken bones, fractures, bruises or sprains could result.
aa. If situations occur which are not covered in this manual, use care and good judgement.
SLOPE OPERATION
Slopes are a major factor related to slip and fall accidents, which can result in severe injury. Operation on slopes requires extra caution.
The string trimmer is heavy and can speed up when going downhill. Be prepared to maintain control of the string trimmer. If you feel uneasy on a slope, do not mow it. For your safety, use the slope gauge included as part of this manual to measure slopes before operating this string trimmer on a sloped or hilly area. If the slope is greater than 15 degrees, do not mow it.
Do:
a. Operate across the face of slopes; never up and down to avoid loss of control.
b. Exercise extreme caution when changing direction on slopes; turn uphill not down.
c. Watch for holes, ruts, rocks, hidden objects, or bumps which can cause you to slip or trip. Tall grass can hide obstacles.
d. Always be sure of your footing. A slip and fall can cause serious personal injury. If you feel you are losing your balance, release the safety control bar immediately and the cutting line will stop rotating within three (3) seconds.
Do Not:
a. Do not trim near drop-offs, ditches or embankments, because you could lose your footing or balance.
b. Do not trim slopes greater than 15 degrees as shown on the slope guide.
c. Do not trim on wet grass. Unstable footing could cause slipping.
CHILDREN
Tragic accidents can occur if the operator is not alert to the presence of children. Children are often attracted to the string trimmer and the trimming activity. They do not understand the dangers. Never assume that children will remain where you last saw them.
a. Keep children out of the trimming area and under watchful care of a responsible adult other than the operator.
b. Be alert and turn string trimmer off if a child enters the area.
c. Before and while moving backwards, look behind and down for small children.
d. Use extreme care when approaching blind corners, doorways, shrubs, trees, or other objects that may obscure your vision of a child who may run into the string trimmer.
e. Keep children away from hot or running engines. They can suffer burns from a hot muffler.
f. Never allow children under 14 years of age to operate the string trimmer. Children 14 and over should read and understand the instructions and safe operation practices in this manual and on the string trimmer and be trained and supervised by an adult.
SERVICE
Safe Handling of Gasoline:
To avoid personal injury or property damage use extreme care in handling gasoline. Gasoline is extremely flammable and the vapors are explosive. Serious personal injury can occur when gasoline is spilled on yourself or your clothes which can ignite. Wash your skin and change clothes immediately.
a. Use only an approved gasoline container.
b. Never fill containers inside a vehicle or on a truck or trailer bed with a plastic liner. Always place containers on the ground away from your vehicle before filling.
c. Remove gas-powered equipment from the truck or trailer and refuel it on the ground. If this is not possible, then refuel such equipment on a trailer with a portable container, rather than from a gasoline dispenser nozzle.
d. Keep the nozzle in contact with the rim of the fuel tank or container opening at all times until fueling is complete. Do not use a nozzle lock-open device.
e. Extinguish all cigarettes, cigars, pipes and other sources of ignition.
f. Never fuel the string trimmer indoors because flammable vapors will accumulate in the area.
g. Never remove gas cap or add fuel while engine is hot or running. Allow engine to cool at least two minutes before refueling.
h. Never over-fill fuel tank. To allow for expansion of the fuel, do not fill above the bottom of the fuel tank neck.
i. Replace gasoline cap and tighten securely.
j. If gasoline is spilled, wipe it off the engine and equipment. Move the string trimmer to another area. Wait 5 minutes before starting engine.
SAFETY INSTRUCTIONS
Never store the string trimmer or fuel container near an open flame, spark or pilot light as on a water heater, space heater, furnace, clothes dryer or other gas appliances.
a. To reduce fire hazard, keep string trimmer free of grass, leaves, or other debris build-up. Clean up oil or fuel spillage and remove any fuel-soaked debris.
b. Allow string trimmer to cool at least 5 minutes before storing.
General Service:
a. Never run an engine indoors or in a poorly ventilated area. Engine exhaust contains carbon monoxide, an odorless and deadly gas.
b. Before cleaning, repairing, or inspecting, make certain the blade and all moving parts have stopped. Disconnect the spark plug wire and ground against the engine to prevent unintended starting.
c. Check the blade and engine mounting bolts at frequent intervals for proper tightness. Also, visually inspect blade for damage (e.g., bent, cracked, worn). Replace blade with the original equipment manufacturer's (O.E.M.) blade only, listed in the Parts pages of this manual. Use of parts which do not meet the original equipment specifications may lead to improper performance and compromise safety!
d. String trimmer blades are sharp and can cut. Wrap the blade or wear gloves, and use extra caution when servicing them.
e. Keep all nuts, bolts, and screws tight to be sure the equipment is in safe working condition.
f. Never tamper with safety devices. Check their proper operation regularly.
g. After striking a foreign object, stop the engine, disconnect the spark plug wire and ground against the engine. Thoroughly inspect the string trimmer for any damage. Repair the damage before starting and operating the string trimmer.
h. Never attempt to make a wheel or cutting height adjustment while the engine is running.
i. Grass catcher components, discharge cover, and trail shield are subject to wear and damage which could expose moving parts or allow objects to be thrown. For safety protection, frequently check components and replace immediately with original equipment manufacturer's (O.E.M.) parts only, listed in the Parts pages of this manual. Use of parts which do not meet the original equipment specifications may lead to improper performance and compromise safety!
j. Do not change the engine's governor setting or over-speed the engine. The governor controls the maximum safe operating speed of the engine.
k. Check fuel line, tank, cap, and fittings frequently for cracks or leaks. Replace if necessary.
I. Do not crank engine with spark plug removed.
m. Maintain or replace safety and instruction labels, as necessary.
n. Observe proper disposal laws and regulations. Improper disposal of fluids and materials can harm the environment.
o. According to the Consumer Products Safety Commission (CPSC) and the U.S. Environmental Protection Agency (EPA), this product has an Average Useful Life of seven (7) years, or 140 hours of operation. At the end of the Average Useful Life have the string trimmer inspected annually by a Sears or other qualified service dealer to ensure that all mechanical and safety systems are working properly and not worn excessively. Failure to do so can result in accidents, injuries or death.
DO NOT MODIFY ENGINE
To avoid serious injury or death, do not modify engine in any way. Tampering with the governor setting can lead to a runaway engine and cause it to operate at unsafe speeds. Never tamper with factory setting of engine governor.
NOTICE REGARDING EMISSIONS
Engines which are certified to comply with California and federal EPA emission regulations for SORE (Small Off Road Equipment) are certified to operate on regular unleaded gasoline, and may include the following emission control systems: Engine Modification (EM), Oxidizing Catalyst (OC), Secondary Air Injection (SAI) and Three Way Catalyst (TWC) if so equipped.
SPARK ARRESTOR

WARNING
This machine is equipped with an internal combustion engine and should not be used on or near any unimproved forest-covered, brush covered or grass-covered land unless the engine's exhaust system is equipped with a spark arrestor meeting applicable local or state laws (if any).
If a spark arrestor is used, it should be maintained in effective working order by the operator. In the State of California the above is required by law (Section 4442 of the California Public Resources Code). Other states may have similar laws. Federal laws apply on federal lands. A spark arrestor for the muffler is available through your nearest Sears Parts and Repair Service Center.
SAFETY INSTRUCTIONS
SAFETY SYMBOLS
This page depicts and describes safety symbols that may appear on this product. Read, understand, and follow all instructions on the string trimmer before attempting to assemble and operate.
| SymbolDescription | |
 | READ THE OPERATOR'S MANUAL(S)Read, understand, and follow all instructions in the manual(s) before attempting to assemble and operate. |
 | DANGER —WEAR EYE PROTECTIONTo reduce the risk of eye injury, wear protective eye ware, goggles or glasses. |
 | DANGER —SHARP CUTTING LINETo reduce the risk of injury, keep hands and feet away. Do not operate unless the discharge cover is in its proper place. If damaged, replace immediately. |
 | DANGER —DO NOT OPERATE NEAR OTHER PEOPLEThe string trimmer may eject objects at high speed. Use caution when operating around children, pets and other adults. |
 | DANGER —MAY EJECT ITEMS AT HIGH SPEEDThe string trimmer may eject objects at high speed. Use caution when operating around children, pets and other adults. |
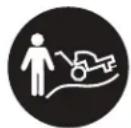 | DANGER —USE CAUTION ON SLOPESThe string trimmer is heavy and can speed up when going downhill. To avoid loss of control, operate across slopes, not up and down. When turning, turn uphill, not down. Do not operate on slopes greater than 15°. |
 | DANGER —GASOLINE IS FLAMMABLEAllow the engine to cool at least five minutes before refueling. Never smoke, use matches or lighters in the immediate vicinity of the string trimmer. |
 | DANGER —CARBON MONOXIDECarbon Monoxide from engine exhaust is a deadly poisonous, odorless and colorless gas. Never run the engine in an enclosed space or poorly ventilated area. Carbon Monoxide can render a person unconscious in a matter of minutes. |
 | DANGER —HOT SURFACESEngine parts, especially the muffler and other exhaust components, can become extremely hot during operation. Use caution to avoid severe burns. Allow the engine to cool down before performing any maintenance. |

WARNING: Your Responsibility—Restrict the use of this power machine to persons who read, understand and follow the warnings and instructions in this manual and on the string trimmer.
SAVE THESE INSTRUCTIONS!
ASSEMBLY
IMPORTANT: This unit is shipped without gasoline or oil in the engine. Be certain to fill engine with gasoline and oil as instructed in the Operation section of the Engine Manual before starting or running your string trimmer.
List of tools needed for assembly:
- 13mm wrench
• (2) 10mm wrenches
OPENING CARTON
- Cut each corner of the carton vertically from top to bottom.
- Remove all loose parts.
- Remove loose packing material.
REMOVING UNIT FROM CARTON
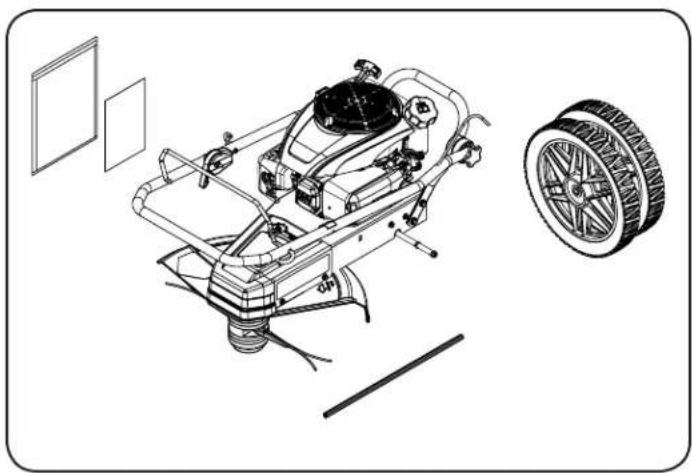
- Remove wheels, manuals and extra trimming line from box (see Figure 1). With assistance, lift the trimmer out of box and set on a level surface.
- Attach wheels to the trimmer axle using nuts and washers (see figure 2).
natural_image
Technical line drawing of a mechanical assembly with a separate close-up of a tire wheel (no text or symbols present)Figure 1
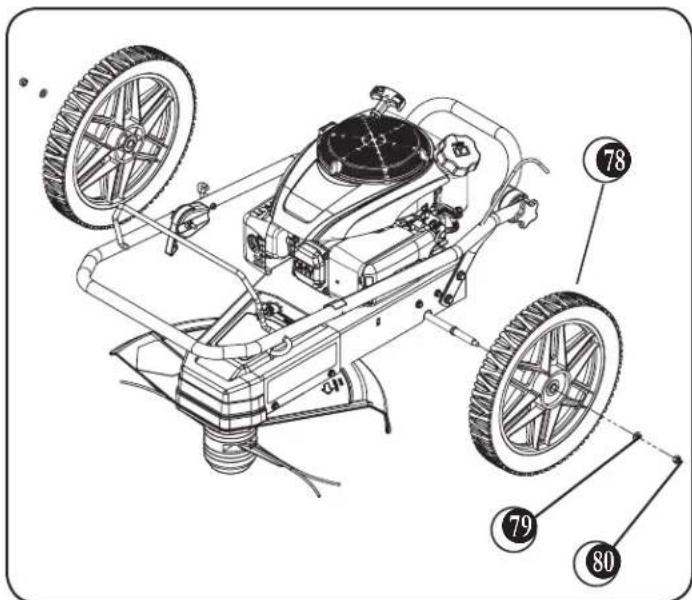
Figure 2
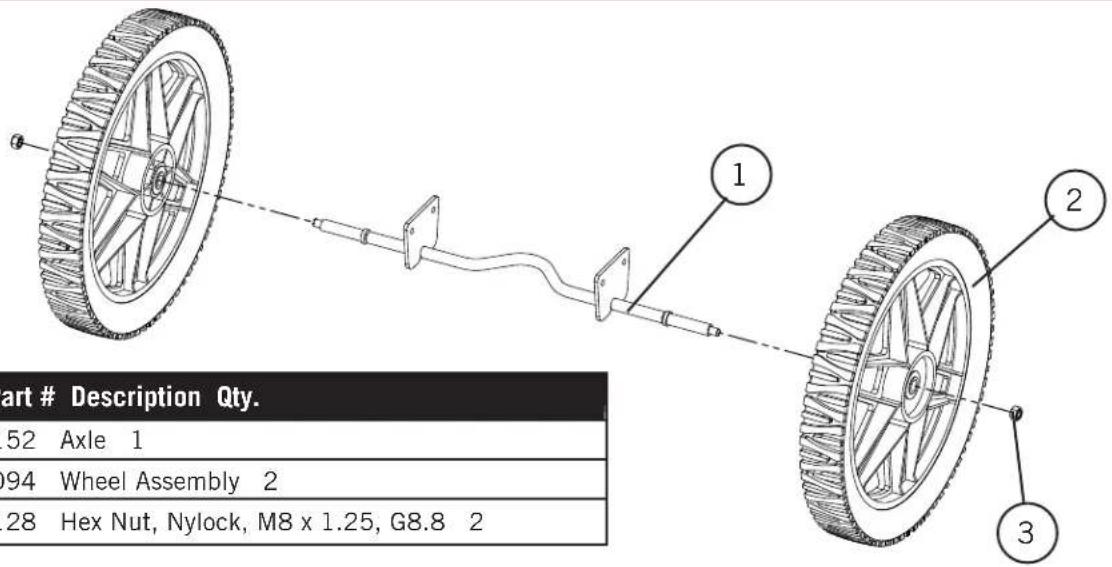
| Item # Part # Description Qty. | |
| 1 101094 | Trimmer Wheel Assembly 2 |
| 2 100130 | Flat Washer, M8 2 |
| 3 100128 | Hex Nut, Nylock, M8 x 1.25mm, G8.8 2 |
ASSEMBLY
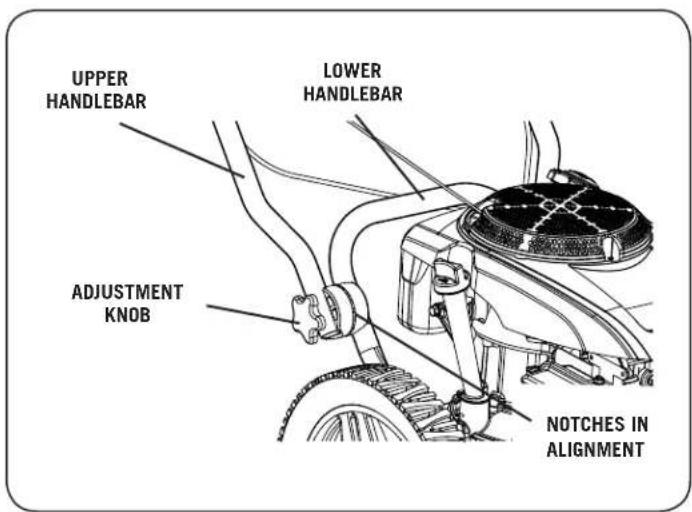
- Flip upper handlebar up to the operating position. Loosen both adjustment knobs (see Figure 3) and align the upper handlebar both sides to a comfortable operating position. Tighten the adjustment knobs securely. It is important to find a handlebar height that allows the cutting head to hover just above the ground and remain balanced so you do not have to push down or pull up on the handlebar.
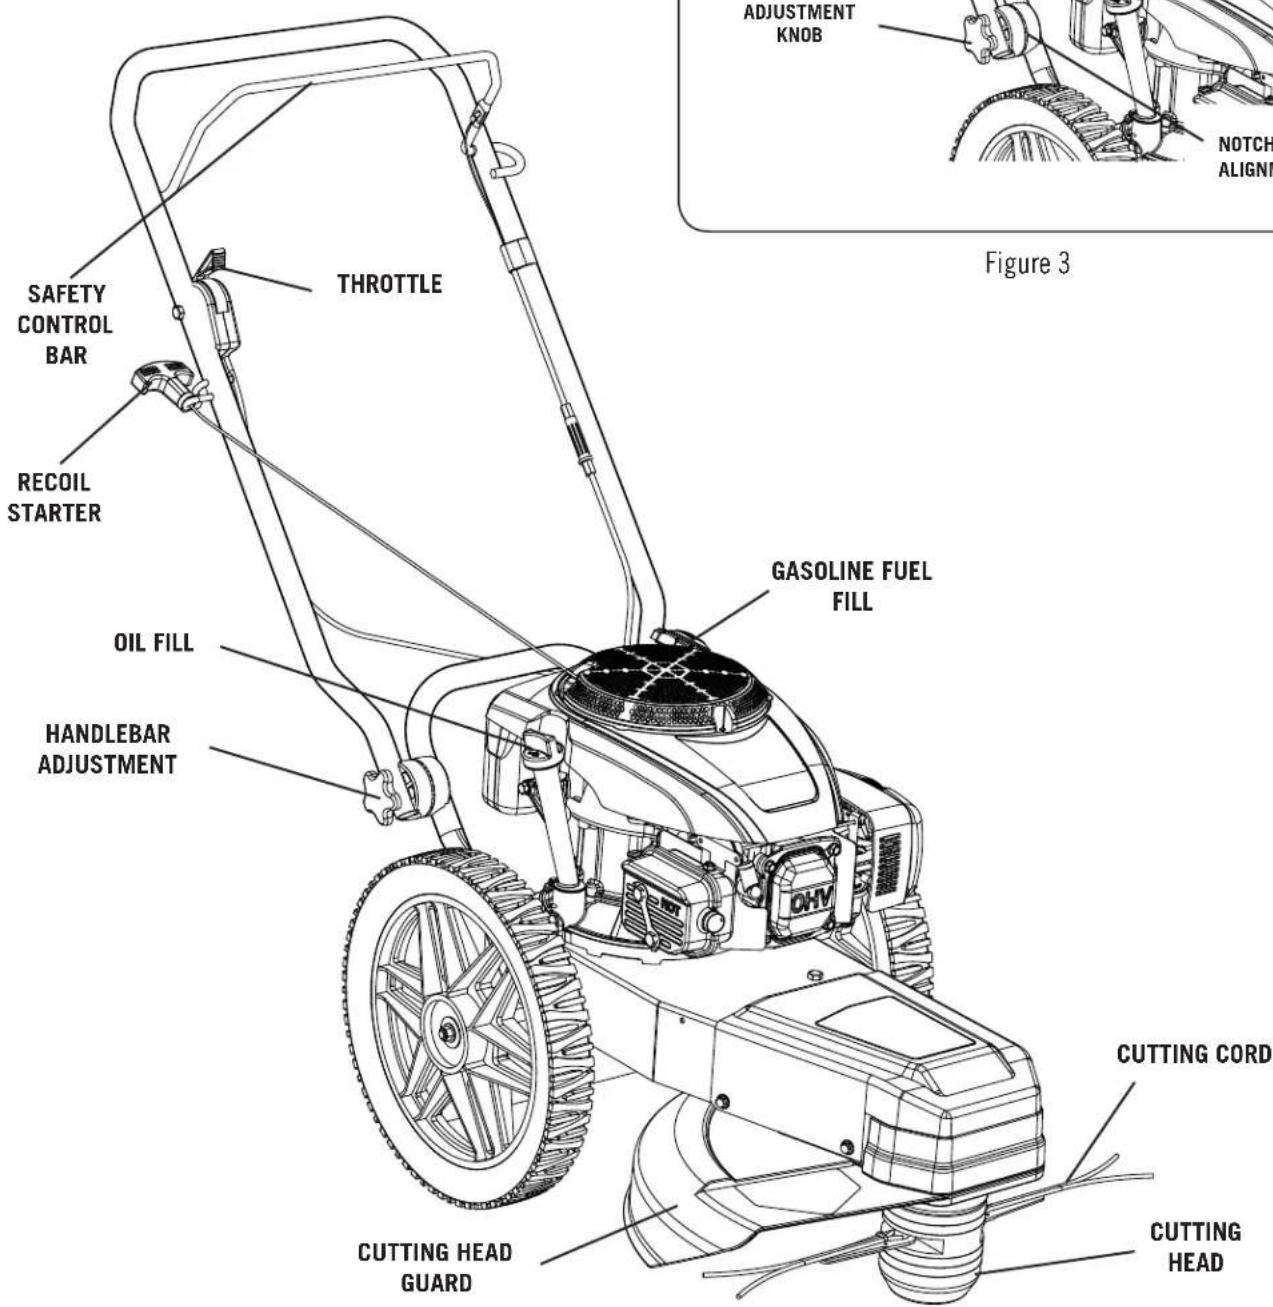
String trimmer Components
ASSEMBLY
INSTALLING THE CUTTING LINE
There are two installation points on the line plate. Each point is 180 degrees apart. Always install two lines, one opposite the other of the same length and weight (diameter).
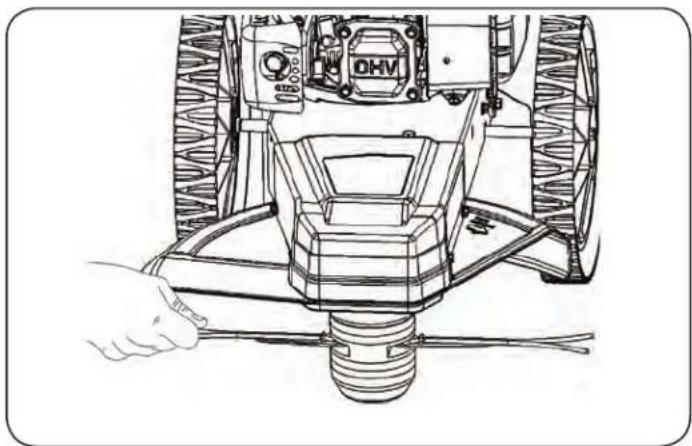
- Insert the end of the cord into the side openings in the line plate (see Figure 4).
- Push the cord through until the end comes out the center hole in the line plate. Adjust the cord ends so the tips are of equal length.
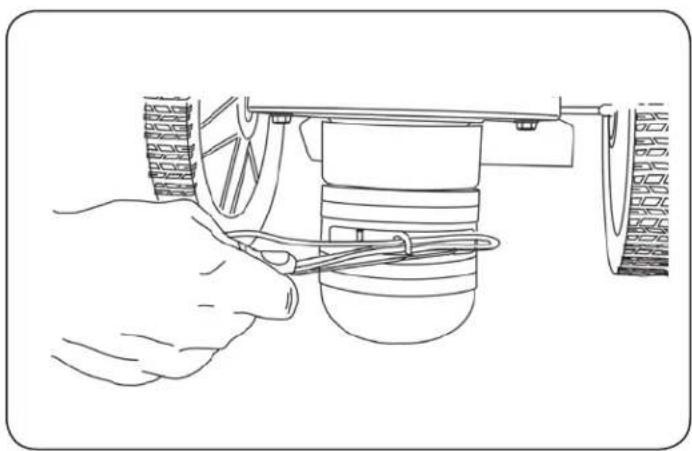
- Pull the cord under the loop and push the loop up into the line plate groove above them (see Figure 5) and then pull the cord ends tight.

CAUTION
If the tips of the cutting cords are not of equal length, it can cause unbalance of the cutting head and will result in increased vibration and potential damage to the cutting head.
Figure 6 illustrates the proper cord installation on the line plate. It shows the line plate from a top view. The cord ends should be of equal length and the same length on each side. There are two installation points on the line plate. Each point is 180 degrees apart. Always install two cords, one opposite the other of the same length and weight (diameter).
natural_image
Technical line drawing of a mechanical assembly with a hand adjusting a screwdriver (no text or symbols present)Figure 4
natural_image
Line drawing of a hand using a tool to adjust or install a mechanical component (no text or symbols present)Figure 5

natural_image
Pure technical line drawing of a symmetrical mechanical or electrical component with no text, numbers, or symbolsFigure 6
OPERATION
FILLING WITH OIL AND GASOLINE

WARNING
ADD OIL BEFORE STARTING THE ENGINE The string trimmer is shipped without fluids installed.
Keep the caps on the fuel and oil fills until you are ready to pour either gasoline or oil into the correct fill. Requires approximately 15 - 22 ounces of SAE 30 engine oil.
Please refer to your Engine Owner's Manual for detailed information on oil quantity and cold temperature oil specifications.
- Place the string trimmer on a level surface and initially add 12 of the SAE 30 high detergent oil into the oil fill (see Figure 7) and wait one (1) minute for the oil to settle.
- Check the dipstick and continue adding a few ounces of oil at a time, rechecking the dipstick until the oil reaches the fill mark. Be careful not to overfill.
- Fill the fuel tank with fresh, unleaded gas (min. 85 Octane), to 1/4" from the top of the fill neck to allow for expansion. Be careful not to overfill and reinstall the cap before starting the engine.

WARNING
ALWAYS FILL THE TANK WITH ENGINE OFF AND COOL. ALWAYS CHECK THE OIL LEVEL BEFORE OPERATING.
Allow the engine to cool for at least two minutes before removing the fuel cap.
Before performing any adjustments to the cutting head, cutting cords or any other procedure or inspection, stop the engine, wait five minutes to allow parts to cool. Disconnect the spark plug wire, keeping it away from the spark plug. Contact with internal rotating parts will cause serious personal injury. Never put hands, face, feet, or clothing under the string trimmer deck or discharge opening at any time.
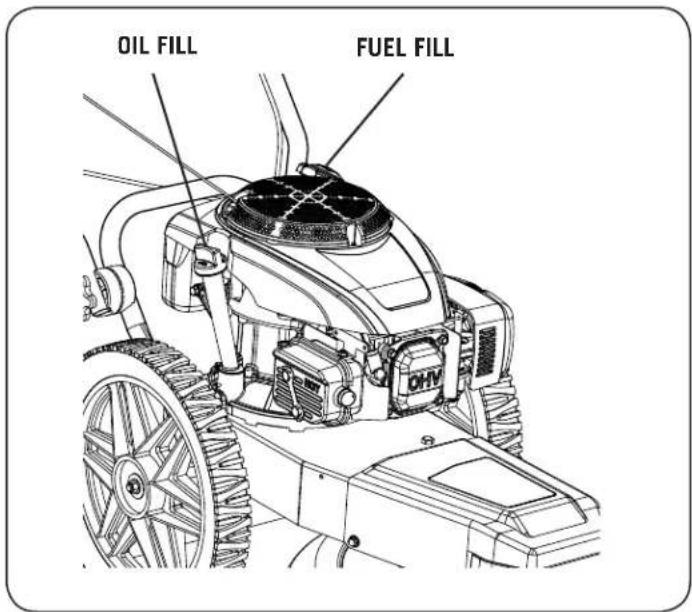
Figure 7
OPERATION

CAUTION
CHECK THE ENGINE OIL LEVEL Check fuel level. Remove any debris from around the underside of the string trimmer.
Manual Starting
- Push the throttle control lever on the right side of the handlebar (see Figure 8) all the way forward (choke position).
- Grasp the recoil starter and slowly pull until you feel resistance. Let the cord retract a little bit and then pull the cord rapidly to start the engine. One or two pulls usually starts the string trimmer. Do not engage the safety bar until after the engine has started.
- Once the engine is started, move the throttle lever to the RUN or IDLE position.
If the engine fails to start after several pulls of the recoil starter, allow the motor to cool down. Check the cause of hard starting; see the Troubleshooting Guide (page 22).
Stopping the Engine
- Move the throttle control lever (see Figure 8) all the way back past the SLOW position to the STOP position.
Engaging the Cutting Head
- Bring the safety bar toward you and grip it together with the handlebar. Cutting cords rotate until you release the safety bar.
Note: Before using your cutting head for the first time or after you have installed a new belt, engage the safety bar 10 times and hold it for 3 seconds each time.
Stopping the Lines from Spinning
- Release the safety bar from the handlebar. The cutting head will stop spinning while the engine continues to run.
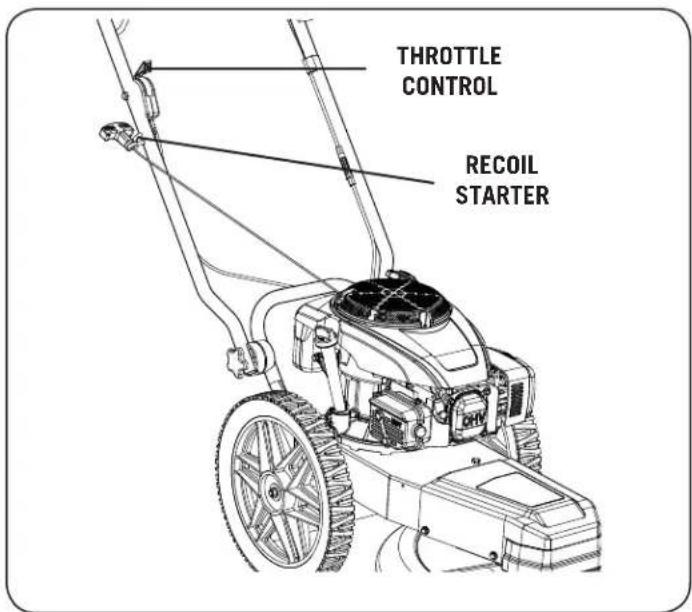
Figure 8
OPERATION
SETTING THE CUTTING HEIGHT

CAUTION
BEFORE PERFORMING ANY ADJUSTMENT, MAINTENANCE PROCEDURE OR INSPECTION, STOP THE ENGINE, WAIT FIVE (5) MINUTES TO ALLOW PARTS TO COOL AND DISCONNECT THE SPARK PLUG WIRE, KEEPING IT AWAY FROM THE SPARK PLUG.
Setting the cutting height is easy. Cutting heights range in 10mm (0.4 in).

WARNING
RUNNING THE CUTTING HEAD WITH CORDS OF UNEQUAL LENGTH OR A CORD INSTALLED AT OTHER THAN 180 DEGREES APART CAN CAUSE EXCESSIVE VIBRATION AND MAY DAMAGE THE STRING TRIMMER.
Installing the trimming line
After you install cutting cord, and before trimming, engage the cutting head with the engine running to spin the new cord for a few seconds so they pull tight and are set.
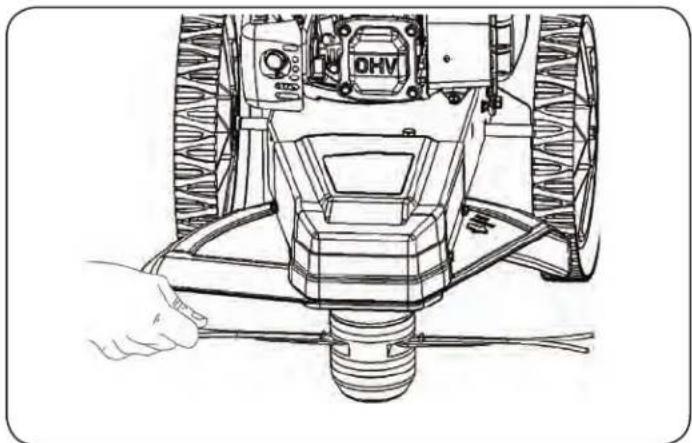
- Insert the ends of the cord into the side opening in the line plate (see Figure 10).
- Push the cord through until the ends come out the center opening in the line plate. Adjust the cord ends so they are even.
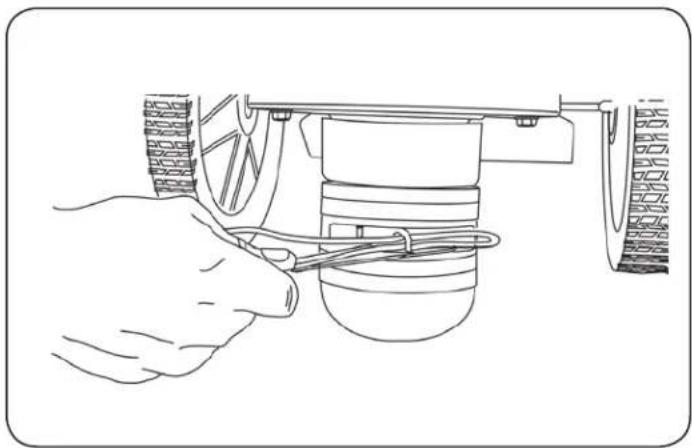
- Pull the ends of the cord under the loop and push the loop up into the line cord ends plate groove above them (see Figure 11) and then pull the ends tight.
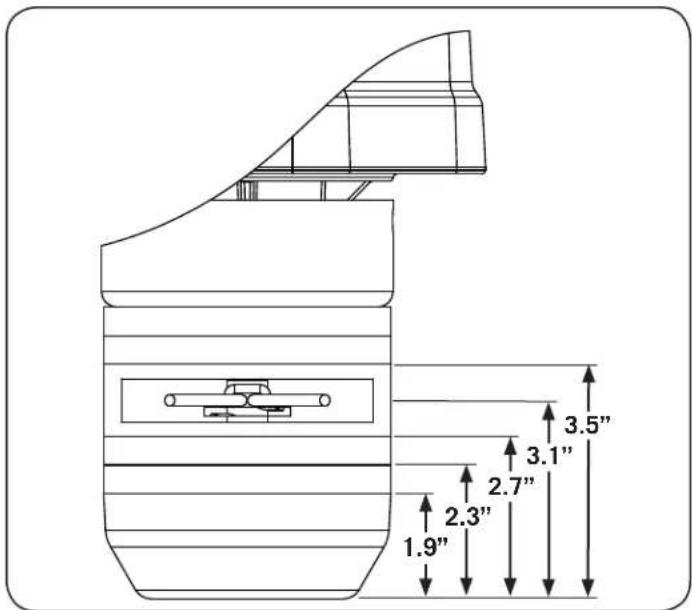
Figure 9
natural_image
Technical line drawing of a mechanical assembly with a hand adjusting a component (no text or symbols)Figure 10
natural_image
Line drawing of a hand adjusting a bicycle wheel assembly (no text or symbols)Figure 11
OPERATION
CUTTING CORD RECOMMENDATIONS
Cutting cord is available in Blue (175 mil) and Green (155 mil). Because conditions and vegetation vary so much, you should experiment with cord weights (diameters) to discover what works best for your particular mowing and trimming situations.
Here are a few things to keep in mind:
- If the cutting cord is purchased in rolls, cut to 25" lengths.
- Cord life depends on trimming conditions. Replace cords when they become broken or frayed.
- The smallest diameter cord combined with the fastest engine speed provides the best grass trimming performance. The 175 mil cord is recommended for thicker growth such as bramble, thistle, and ragweed.
- Ease the ends of the cord into heavy growth and move slowly through thick growth. If there are woody weeds in the material you are cutting, the cutting cords may wrap around the stalks they cannot cut, and pull away from the cutting head.
- Installing two (2) cords, 180 degrees apart, of equal length and weight on the line plate, is the best method for optimal trimming performance.
- When replacing cords, do it one at a time and use the old cord to mark the position for the new cord that you are replacing.
- If the cord breaks off flush at the line plate, use needle nose pliers to pull out the old cord.
- Storing the cord in a plastic bag with a damp sponge or cloth will help keep it pliable. You can also soak your cutting cord in a bucket of room temperature water for a few days before use to make it more pliable.
• UV light can degrade cord, store out of direct sunlight.
DO NOT USE DIFFERENT WEIGHT CORDS ON THE CUTTING HEAD AT THE SAME TIME. THIS CAN CAUSE EXCESSIVE VIBRATION AND MAY DAMAGE THE STRING TRIMMER.
OPERATION
CUTTING HEAD
Allow the front end of the string trimmer to rest lightly on the cutting head as you are trimming. The cutting head should glide on the ground as you maneuver the string trimmer. To achieve the best and smoothest cut, do not lift up on the handlebar while operating your string trimmer. Lifting the handlebar will force weight down on the cutting head. This uses more energy, slows the cutting, and produces an unsatisfactory cut. Ideally, the cutting head should lightly rest on the ground while the wheels balance most of the weight of the string trimmer.
Replacing the Cutting Head or Line Plate
Tools and Supplies Needed:
• Phillips head screwdriver with at least a 6" shank
- Gloves
Cutting Head Disassembly
- Align the hole in the anti-wrap canister with the hole in the internal housing at the location shown (see Figure 12).
- Insert a Phillips head screwdriver into the hole in the anti-wrap canister and the hole in the internal housing
- Rotate the cutting head assembly until the screw driver slides into a hole in the shaft, locking it into place.
- Looking down at the top of the frame, turn the cutting head clockwise until it unscrews completely from the bearing housing.
NOTE: If the cutting head continues to turn, but does not come off, check to be sure that you locked the screwdriver into the shaft. If the cutting head will not turn by hand a 9/16" socket wrench can be used on the bolt (inside the bottom of the cutting head) to loosen it. You may need to clean grass or debris out of the recess first.
- Slide the line plate and spacers off the shaft.
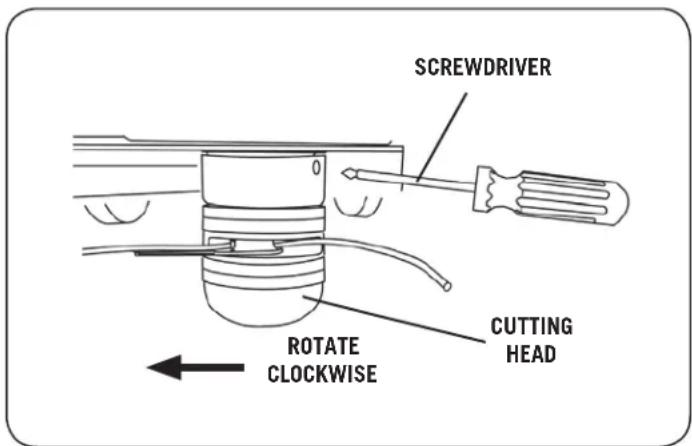
Figure 12
OPERATION
CUTTING HEAD COMPONENTS

CAUTION
Improper installation can cause damage to the cutting head bearings. Follow directions carefully to protect the string trimmer from damage.
Assemble components in the order shown (see figure 13.)
- Place the spacer and bearing cover (with the lip facing up) onto the shaft (Figure 13).
- Align the flats at the center of the plates with the flat on the shaft and slide the line plate onto the shaft. Ensure they are facing top side up as shown.
- Place the cutting head bolt so it is sitting in the hex cavity at the bottom of the cutting head.
- Looking down at the top of the frame, hold the bolt head in place with your finger and turn the cutting head counterclockwise to start the bolt into the shaft.
- Insert the screwdriver as shown in Figure 12 and tighten the assembly securely by turning the cutting head counterclockwise when looking down on the top of the frame.
NOTE: When finished there should be no gaps between any of the components.

WARNING
Always make sure you remove the screwdriver from the head assembly when finished. Failure to remove the screwdriver could cause injury when the head assembly is engaged.
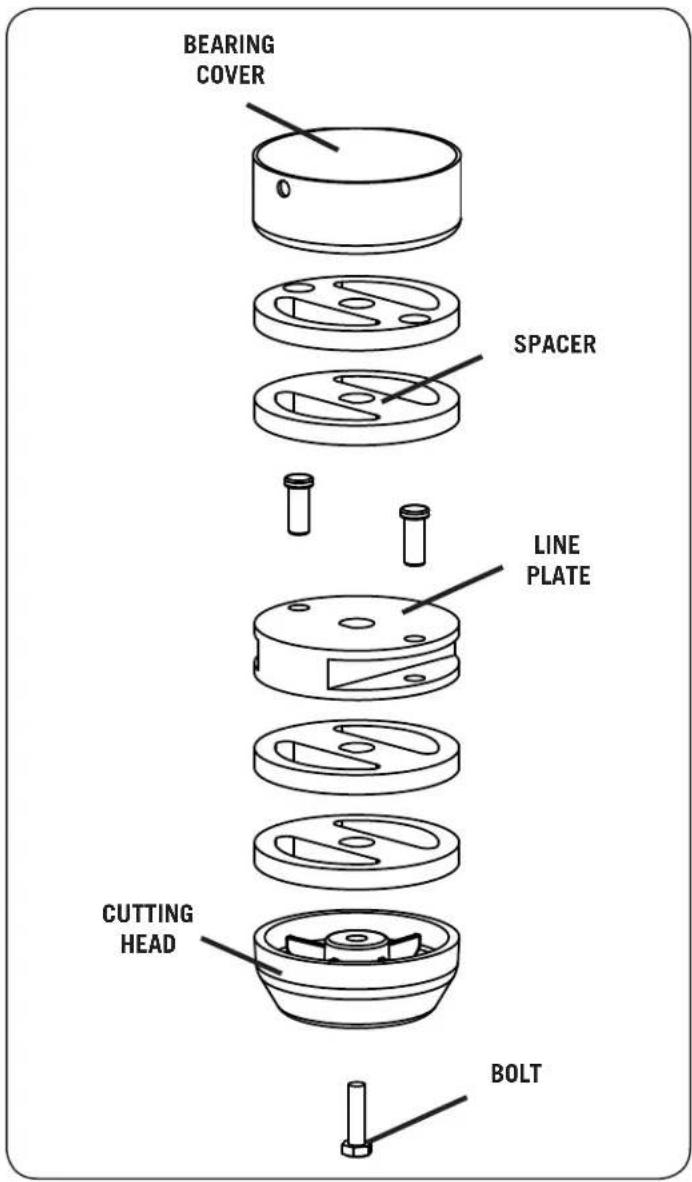
Figure 13
OPERATION
OPERATING ENVIRONMENT

WARNING
The cutting head can easily throw debris at great velocity, which could cause personal injury or property damage. Do not run the string trimmer over loose gravel or mulch with the cutting head spinning.
- The string trimmer discharges cut material to the right.
- Always try to cut and trim with the uncut tall grass or weeds on the left.
- Always check your work area before trimming and remove any debris that might tangle or damage the string trimmer.
- If you do run into debris and the cutting head becomes tangled, turn off the engine and disconnect the spark plug wire before attempting to untangle the string trimmer.
- For the neatest appearance, do your trimming first, discharging clippings away from borders and shrubs, then do your mowing.
- Many owners like to mow easy, open areas with their regular riding or walk behind string trimmer and finish trimming all the odd and hard-to-reach spots with the string trimmer.
Heavy Growth Trimming Recommendations
• Take your time in heavy growth.
- Be sure to keep uncut material to your left, maintaining a clear discharge area to your right.
- If the string trimmer cannot do it all in one pass, overlap half of the cutting swath.
- If the grass is very thick and heavy, try raising the cutting head off the ground a few inches by pushing down on the handlebar. Cut the material at this height, and then make a second pass with the cutting head close to the ground.
- Ease the string trimmer into denser growth. If the material is too tough or woody to cut, the cutting cords will wrap around it, wear down, or even break off.
- Sometimes the growth is so heavy, you cannot mow it in rows. Use a forward and back “vacuum cleaner” motion in these cases.
OPERATION
OPERATING ENVIRONMENT
Wet Environments
You can use the string trimmer in damp and wet conditions, after a rain, or in the early morning dew without clogging or stalling. You can mow wet areas such as ditches and around ponds.
Note: NEVER mow in the rain. Water on the spark plug may cause the engine to stall.
Dry Environments
When trimming and mowing in very dry conditions, be extra cautious of cut grass, chaff, weeds, seeds, etc., accumulating on the engine, especially around the recoil-starter housing and engine cooling fins. Please see the Engine Owner's Manual for more detailed information on cleaning the air intake, air filter, and cooling system on the engine.

WARNING
Frequently remove debris from the recoil guard on top of the engine and the cooling fins on the front of the engine to prevent overheating and engine damage.
Slopes
You can trim and mow on slopes up to 20 degrees. Continuous use on slopes steeper than 20 degrees may deprive the engine of adequate lubrication, and damage components.
Windrows
The string trimmer cutting cords cut tall grass in one pass, so you can collect clippings and leaves for mulch without raking. The string trimmer ejects cut material to its right side, so you can use it like a lawn broom to make cleanup easy and to create windrows.
Firebreaks
Use your cutting head as a labor saving tool to cut material when creating firebreaks.
Garden Clean-Up
The string trimmer is perfect for cutting down dead perennials, annuals, and wildflowers, saving you hours of hand pruning and deadheading. You can also re-cut downed material a second time to create mulch for garden beds.
MAINTENANCE

WARNING
BEFORE PERFORMING ANY MAINTENANCE PROCEDURE STOP THE ENGINE, WAIT FIVE (5) MINUTES TO ALLOW ALL PARTS TO COOL. Disconnect the spark plug wire, keeping it away from the spark plug.
Regular maintenance is the way to ensure the best performance and long life of your string trimmer. Please refer to this manual and the engine manufacturer's owner's manual for maintenance procedures.
Maintenance Checklist
| Procedure | Each Use | 25 Hours of Use | 100 Hours of Use |
| Check engine oil level X | |||
| Clean engine exterior, cooling fins and X remove debris. Cleaning the engine top during use is critical for proper air flow. | |||
| Check general equipment condition X including nuts, bolts, welds, etc. | |||
| Replace broken or frayed cutting cords X | |||
| Check cutting head and line plate X for excessive wear | |||
| Check the belt for stretching The first time X Adjust the drive cable if necessary | after 2 hours of use | ||
| Lubricate throttle cable and cutting head control cable with SAE 30 oil | X | ||
| Change the engine oil | The first time X after 5 hours of use | ||
| Replace the engine air filter cartridge and foam pre-filter if equipped. | X | ||
| Replace spark plug | X |
MAINTENANCE
CHANGING THE ENGINE OIL
Tools and Supplies needed:
• SAE 30 HD Oil (refer to your Engine Owner's Manual for quantity required)
• Suitable container for used oil
- Cleaning Rags
• Wooden pallet or workbench
NOTE: Drain the oil when the engine is warm. Warm oil drains quickly and completely.
- For convenience, place the string trimmer up on a wooden pallet or workbench.
- Remove the oil cap/dipstick and position a suitable oil receptacle beside the oil fill tube.
- Make sure to securely tighten the gas fill cap.
- Using the handle of the string trimmer, tip the string trimmer to drain the oil out through the oil filler tube into a suitable receptacle. (see Figure 14).
NOTE: Be sure to use environmentally safe disposal procedures in the disposing of the used oil.
- Refill the engine using SAE 30 HD oil to the level indicated on the dipstick.
ADJUSTING THE BELT TENSION THROUGH THE CUTTING HEAD CONTROL CABLE
Before adjusting the cutting head belt tension cable, check that the belt is properly installed. Also make sure the cable is attached to the bail bar. The belt will stretch a little when new, then more over time. If the cutting head does not spin with the safety bar engaged, adjust the cutting head control cable to put more tension on it. The adjuster is located on the control cable itself.
- Locate the cutting head cable along the left handlebar. There is an in-line adjuster to change the tension on the cable (see Figure 15).
- You can take the slack out of the cable by holding the hex flat sections of the in-line adjuster and rotating the body of the in-line adjuster in the counterclockwise direction as you look down on the cable. If the cable is too tight, you can loosen the cable by twisting the adjuster in the clockwise direction.
- If the in-line adjuster is adjusted all the way out and more adjustment is needed then the belt needs to be replaced.
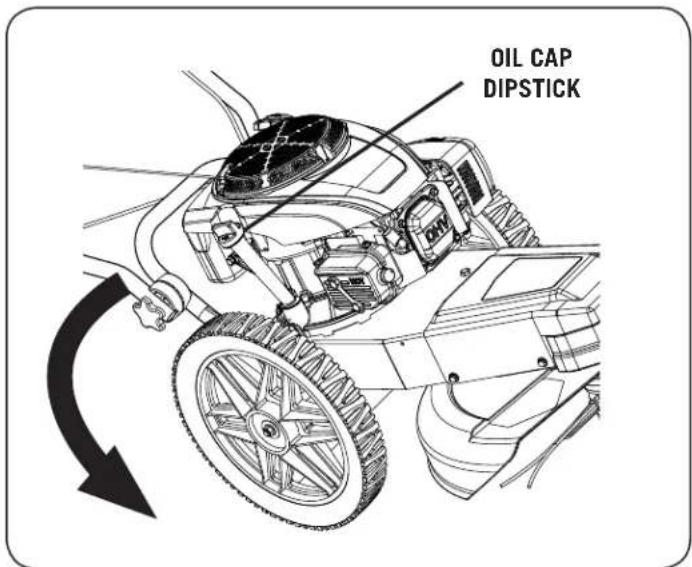
Figure 14
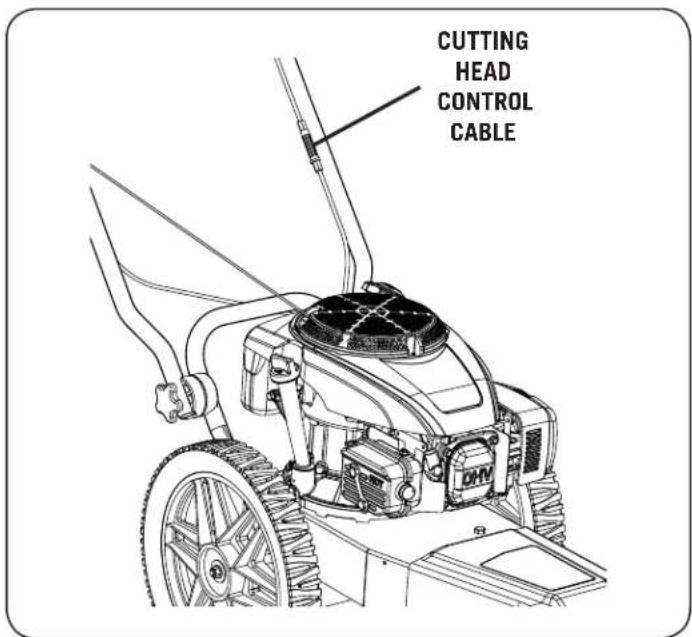
Figure 15
MAINTENANCE
REPLACING THE BELT
Tools needed:
- 10mm Wrench
-
13mmWrench
-
Tip the string trimmer back just far enough to access the underside and support the handlebars.
- Unscrew cutting head cap and remove cutting head plates from spindle.
- Remove the four debris guard bolts and flat washers with a 10mm wrench. Remove the cutting head guard (see Figure 16).
- Loosen the belt guide locknut using a 10mm wrench (see Figure 17) and rotate the guide out of the way.
- Remove the two locknuts from the idler link using a 13mm wrench so the idler link, idler pulleys and spacers can be removed from the string trimmer.
- Remove the belt from around the engine and head assembly pulleys.
- Install a new drive belt around the engine and head assembly pulleys.
- Install the small spacer and flat idler pulley (see Figure 18). Make sure you place the belt correctly between the idler pulley, bracket tab, and guide pin.
- Install the small spacer and v-groove idler pulley. Position the idler link over the idlers and secure with the two locknuts using a 13mm wrench (Figure 17).
- Rotate the belt guide into position and tighten the locknut with a 10mm wrench.
- Position the cutting head guard and secure with the four bolts and flat washers using the 10mm wrench.
- Install the cutting head and tip the cutting head down on the head assembly.
- After installing the new belt, be sure to adjust the tension properly by adjusting the in-line adjuster all the way in (refer to page 19). Proper tension will extend the life of the belt.
Note: Before using your string trimmer for the first time or after you have installed a new belt, engage the safety bar 10 times and hold it for 3 seconds each time. This is required to wear in the belt to ensure the best grip for trimming.
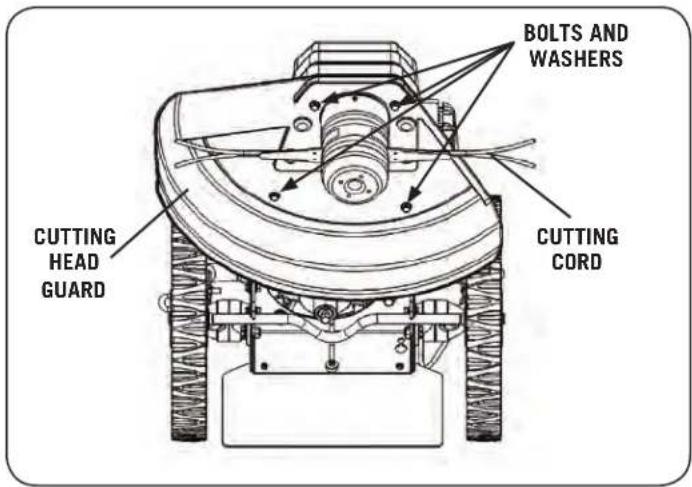
Figure 16
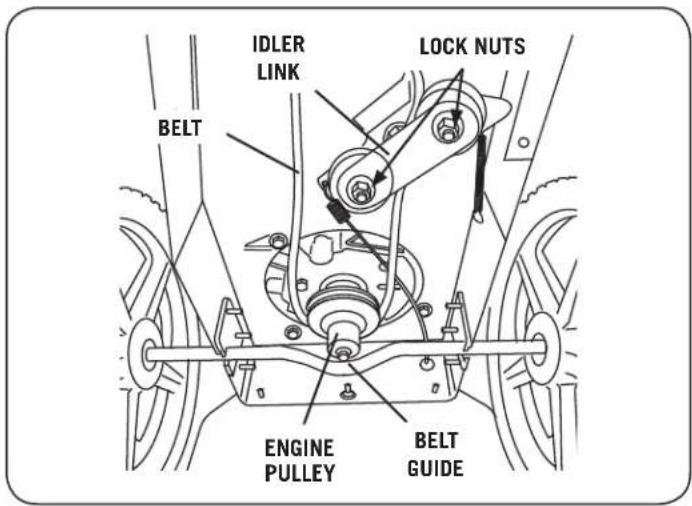
Figure 17
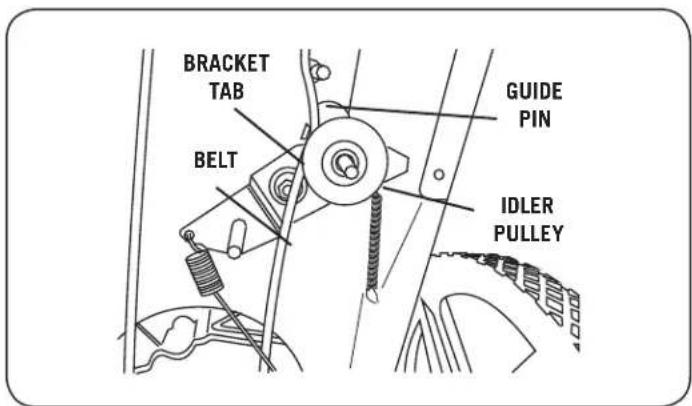
Figure 18
MAINTENANCE
Replacing the Wheels
Tool needed:
- 13mmWrench
- Block and stabilize the string trimmer so that the wheels are off the ground.
- Loosen and remove the locknut (see Figure 19).
- Slide the wheel off the axle.
- Reverse the steps to install the new wheel.
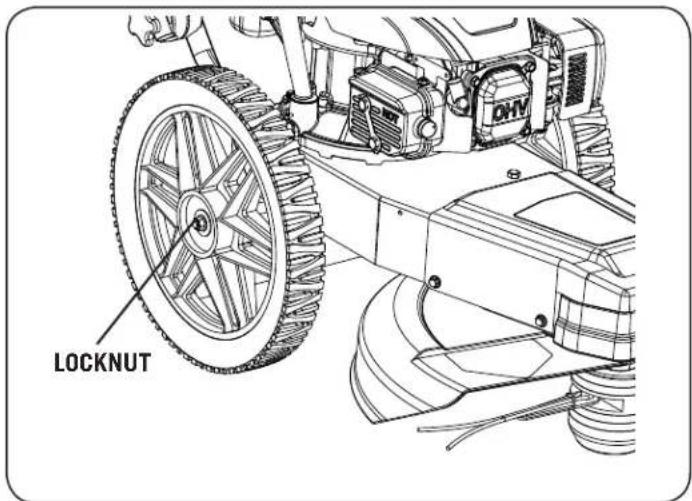
Figure 19
OFF SEASON STORAGE
! WARNING
Never store lawn string trimmer with fuel in tank indoors or in poorly ventilated areas where fuel fumes may reach an open flame, spark, or pilot light as on a furnace, water heater, clothes dryer, or gas appliance.
Preparing The Engine
For engines stored over 30 days:
- To prevent gum from forming in fuel system or on carburetor parts, run engine until it stops from lack of fuel or add a gasoline additive to the gas in the tank. If you use a gas additive, run the engine for several minutes to circulate the additive through the carburetor.
- An oil change is not required but if you desire to change the oil then change while the engine is warm.
- Clean engine of surface debris.
Preparing The Lawn String trimmer
- Clean and lubricate string trimmer thoroughly as described in the lubrication instructions.
- Do not use a pressure washer or garden hose to clean your unit.
- Coat string trimmer's cutting blade with chassis grease to prevent rusting.
- Refer to Preparing the Engine for correct engine storage instructions.
- Store string trimmer in a dry, clean area. Do not store next to corrosive materials, such as fertilizer.
When storing any type of power equipment in a poorly ventilated or metal storage shed, care should be taken to rust-proof the equipment. Using a light oil or silicone, coat the equipment, especially cables and all moving parts of your lawn string trimmer before storage.
TROUBLESHOOTING

WARNING
BEFORE PERFORMING ANY MAINTENANCE PROCEDURE STOP THE ENGINE, WAIT FIVE (5) MINUTES TO ALLOW ALL PARTS TO COOL. Disconnect the spark plug wire, keeping it away from the spark plug.
| PROBLEM | SOLUTION |
| Recoil will not pull out or is difficult to pull.(Refer to the engine Owner's Manual)The recoil may be broken or jammed. Try to turn the engine pulley by hand, with the spark plug wire off. If it turns, the recoil is broken or jammed. Visit our web site at www.dirtyhandtools.com or call 1-877-487-8275 for assistance. | Check the engine oil level, the engine may be seized.There may be an oil compression lock in the cylinder. Take out the spark plug; hold a rag over the spark plug hole and pull the recoil cord several times to blow out any oil in the cylinder. Wipe off the spark plug and reinstall it. |
| The engine will not start manually.Check for proper attachment of the spark plug wire.Check that the engine has the right amount of clean oil. If use only fresh, clean, unleaded gas. If the gas is old, check the fuel filter (if equipped) to see if it is clear. Place Check that the air filter is clean. If it is dirty, change it Make sure that the spark plug is clean. If the spark plug is dirty or cracked, change it. If it is oily, leave it out, hold a rag over the spark plug hole and pull the recoil cord several times to blow out any oil in the cylinder, then wipe off the spark plug and reinsert it.If the engine still will not start, visit our web site at www.dirtyhandtools.com or call 1-877-487-8275 for assistance. | Check that the throttle is in the most forward position (or RUN position when the engine is warm). Check the throttle cable and make sure that it is attached to the engine and is moving freely.the oil is dirty, change it following the procedure on page 17.change it. Use a fuel stabilizer if you keep gas longer than one month. Place a can under the fuel filter and remove the fuel line from the engine side of the filter. If gas flows freely, it is OK.following the procedure in the engine Owner's Manual. |
TROUBLESHOOTING
| PROBLEM | SOLUTION |
| Engine smokes. • Check the oil level and adjust as needed.You may be operating the trimmer on too great an incline.Check the air filter and clean or replace if needed.You may be using the wrong oil - too light for thetemperature. Refer to your engine Owner's Manual for detailed information.Clean the engine cooling fins and the carburetor housing ifthey are dirty.If the engine still smokes, visit our web site at www.dirtyhandtools.com or call 1-877-487-8275 for assistance. | |
| Engine lacks power or isn't running smooth.Check for debris (hay seed, etc.) clogging the air filter intakeand clean out as required.The engine's blower housing, throttle linkage, and coolingfins should be free of debris. Clean them following the instructions in the engine Owner's Manual.Check that the air filter is clean. If it is dirty, change itfollowing the procedure in the engine Owner's Manual.Remove the spark plug wire and dry the connection with aclean rag.The spark plug may be dirty or cracked, change it. If it's oily,leave it out, hold a rag over the spark plug hole and pull the recoil cord several times to blow out any oil in the cylinder, then wipe off the spark plug and reinsert it.You should be using fresh, clean, unleaded gas. If it is old,change it. Use a fuel stabilizer if you keep gas longer than one month.Check that the engine has the right amount of clean oil. If itis dirty, change it following the procedure on page 19.If your engine still lacks power, visit our web site at www.dirtyhandtools.com or call 1-877-487-8275 for assistance. | • Check the throttle travel. The throttle lever should be in the most forward position (or RUN position when the engine is warm).Check for debris (hay seed, etc.) clogging the air filter intakeand clean out as required.The engine's blower housing, throttle linkage, and coolingfins should be free of debris. Clean them following the instructions in the engine Owner's Manual. |
| Cutting head won't spin or lacks power.The belt may be worn or frayed; if so, replace it.If the cutting head still will not spin, follow the procedurefor "Adjusting the Belt Tension through the Cutting head Control Cable" on page 19.If none of the above helps, visit our web site at www.dirtyhandtools.com or call 1-877-487-8275 for assistance. | • Check for proper alignment of the v-belt. Check it against Figure 18 in the “Replacing the Belt” section on page 20.The belt may be worn or frayed; if so, replace it.If the cutting head still will not spin, follow the procedurefor “Adjusting the Belt Tension through the Cutting head Control Cable” on page 19.If none of the above helps, visit our web site at www.dirtyhandtools.com or call 1-877-487-8275 for assistance. |
TROUBLESHOOTING
| PROBLEM | SOLUTION |
| Cutting head keeps spinning or spins when you release the safety bar.If the cutting head keeps spinning when you release the safety bar, see “Adjusting the Belt Tension through the Cutting Head Control Cable” on page 19.If none of the above helps, visit our web site at www.dirtyhandtools.com or call 1-877-487-8275 for assistance. | Check for proper alignment of the v-belt. Check it against Figure 18 in the “Replacing the Belt” section on page 20. |
| Cutting cords are breaking.You may be trying to do too much too fast.Make sure that you are not hitting the cords against a stone or a chain-link fence. The cords won’t last as long against obstacles as in the open. Work on controlling the cutting pattern. With practice, you’ll learn to cut closer to obstacles without hitting them. | The cords may be too dry. Store cords in a plastic bag with a damp sponge or cloth to make them less prone to breaking or soak them in a bucket of water for a few days.Ease into the material you are cutting; let the cord tips do the work. Take small bites of tall or tough vegetation. Cut half a swath at a time, keeping the cut area to the discharge or right side of the cutting head. Go over tall material twice, the first time with the cutting head tilted up and back; the second time with the cutting head on the ground. |
| Cutting cords are pulling out. You may be moving too fast into tough, woody growth. In doing so, the cords may wrap on stalks and pull out. Check the operating tips in the section above on breaking cords. Make sure that you are not trying to cut material too heavy for the cord. The design of your cutting head is to cut green material up to about the thickness of a pencil. If none of the above helps, visit our web site at www.dirtyhandtools.com or call 1-877-487-8275 for assistance. | You may be pushing the cutting head down into the ground. The string trimmer works best with a light touch, with the cutting head resting easily on the ground. |
| The cutting head is wearing too quickly.You may be hitting the cutting head against rocks, concrete driveways or other hard obstacles. Try approaching them slowly, and from different directions, to avoid unnecessary wear.If none of the above helps, visit our web site at www.dirtyhandtools.com or call 1-877-487-8275 for assistance. | You may be pushing the cutting head down into the ground. The string trimmer works best with a light touch, with the cutting head resting easily on the ground. |
HANDLEBAR ASSEMBLY
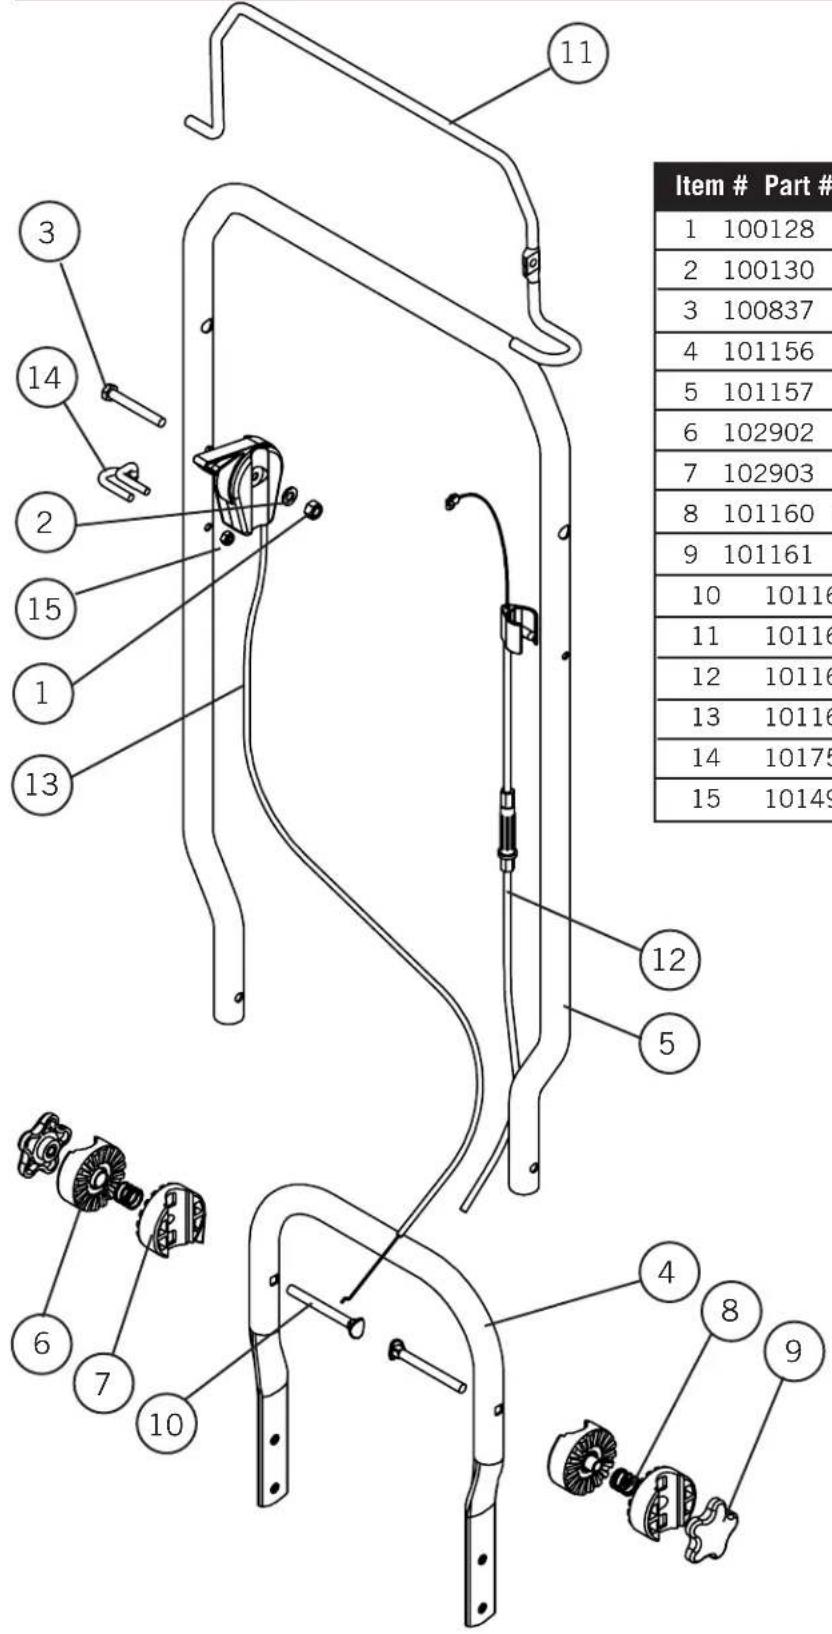
Item # Part # Description Qty.
| 1 | 100128 | Hex Nut, Nylock, M8 x 1.25, G8.8 | 1 |
| 2 | 100130 | Flat Washer, M8 | 1 |
| 3 | 100837 | Hex Bolt, M8 x 1.25 x 60mm, G8.8 | 1 |
| 4 | 101156 | Lower Handlebar | 1 |
| 5 | 101157 | Upper Handlebar | 1 |
| 6 | 102902 | Handlebar Jaw Adjuster, Left | 2 |
| 7 | 102903 | Handlebar Jaw Adjuster, Right | 2 |
| 8 | 101160 | Spring .720 OD x .063 | 2 |
| 9 | 101161 | Handlebar Adjuster Handle | 2 |
| 10 | 101162 | Carriage Bolt, M8 x 1.25 x 80mm | 2 |
| 11 | 101165 | Bail Bar | 1 |
| 12 | 101166 | Belt Engagement Cable Assembly | 1 |
| 13 | 101164 | Throttle Cable Assembly | 1 |
| 14 | 101752 | Pull Cord Guide | 1 |
| 15 | 101494 | Hex Nut, Nylock M6 x 1.0, G8.8 | 1 |
ENGINE ASSEMBLY
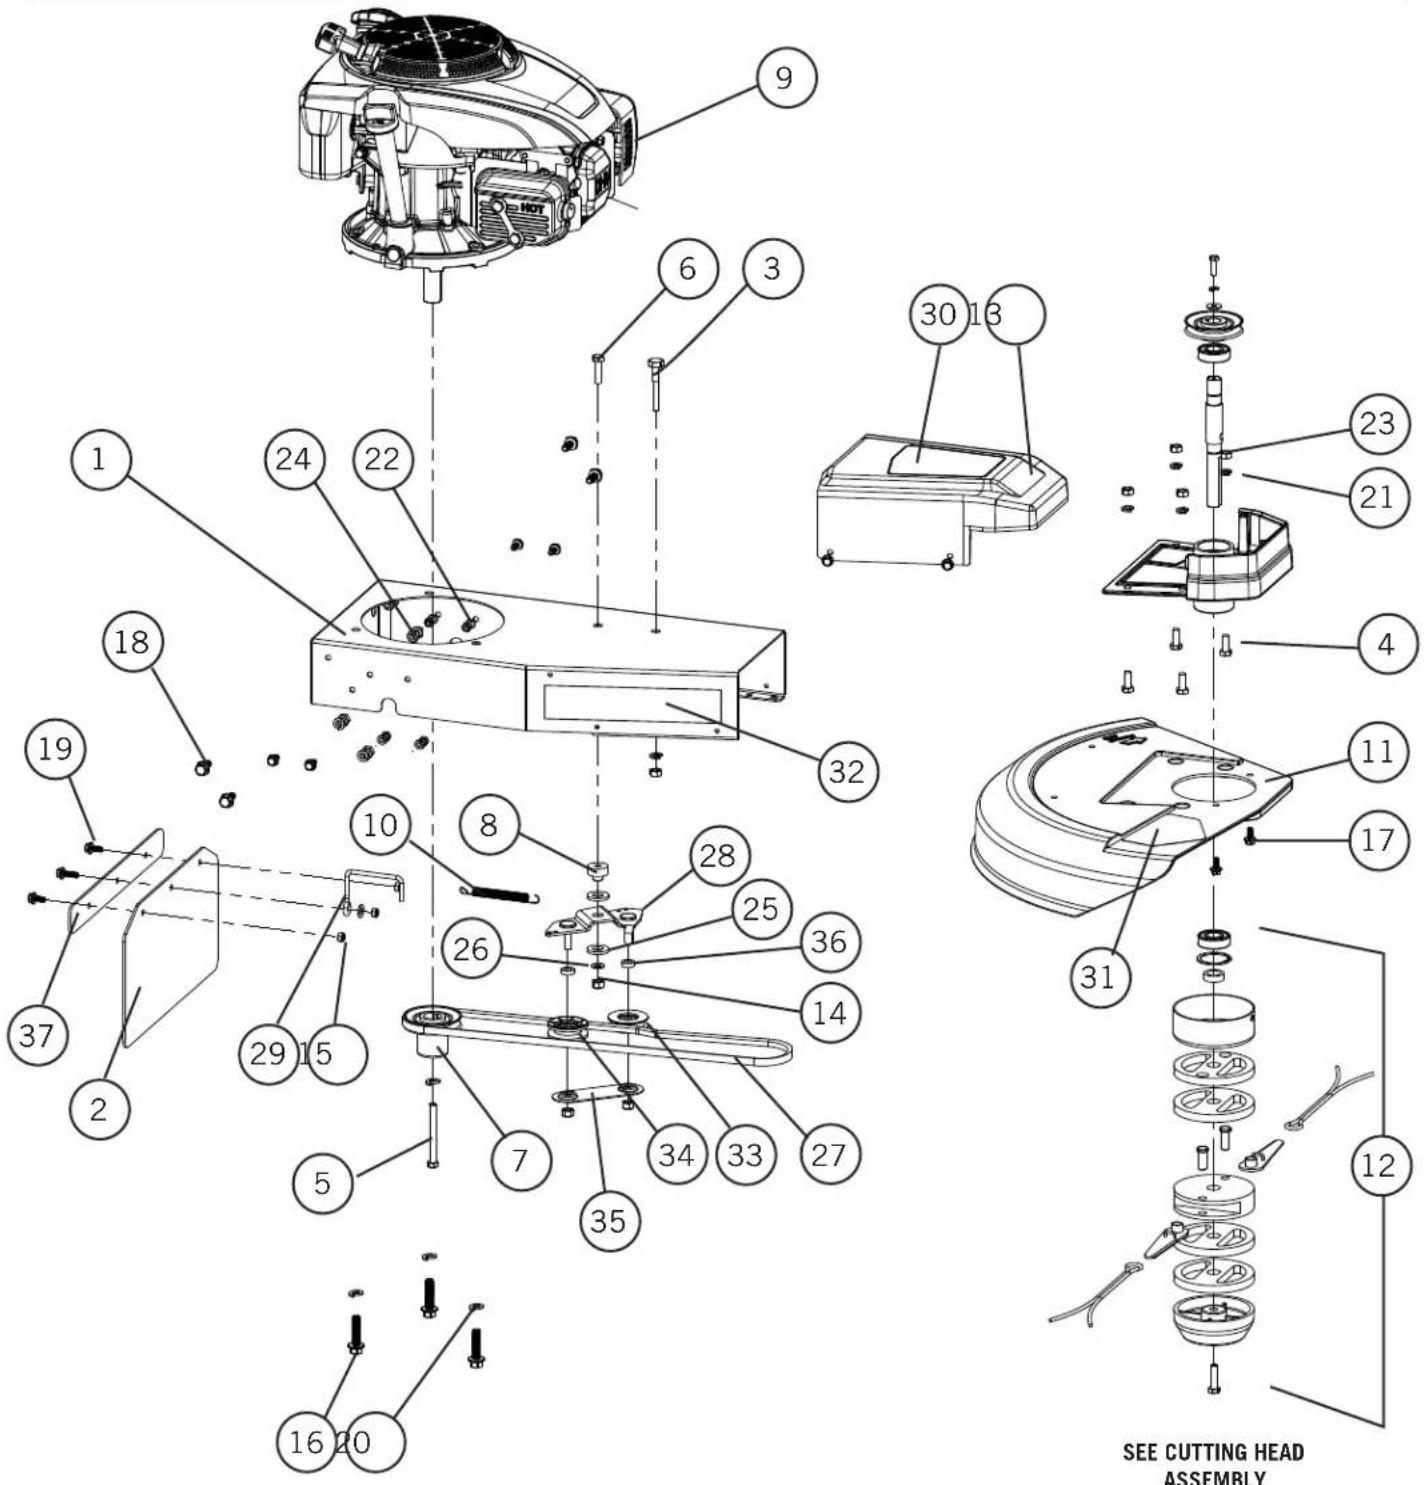
SEE CUTTING HEAD
ASSEMBLY
PAGE 28
ENGINE ASSEMBLY
| Item # | Part # | Description Qty. |
| 1 | 101138 | Frame Plate 1 |
| 2 | 101151 | Debris Guard 1 |
| 3 | 101148 | Belt Guide 1 |
| 4 | 100125 | Hex Bolt, M8 x 1.25 x 20mm, G8.8 4 |
| 5 | 101300 | Hex Bolt, 5/16-18 x 3", G5 1 |
| 6 | 100126 | Hex Bolt, M8 x 1.25 x 30mm, G8.8 1 |
| 7 | 101140 | Engine Belt Pulley 1 |
| 8 | 101146 | Idler Stand Off 1 |
| 9 | 101136 | Engine, Kohler XT6.5, 49ST 1 |
| 10 | 101145 | Spring 1 |
| 11 | 101150 | Safety Guard 1 |
| 12 | 101050 | Cutting Head Assembly 1 |
| 13 | 101049 | Nose Cover 1 |
| 14 | 100128 | Hex Nut, Nylock, M8 x 1.25, G8.8 1 |
| 15 | 101494 | Hex Nut, Nylock, M6 x 1.0, G8.8 3 |
| 16 | 101491 | Hex Bolt, 3/8-16 x 1.5, G5 3 |
| 17 | 101492 | Hex Bolt, M6 x 1.0 x 14, G8.8 1 4 |
| 18 | 101493 | Hex Bolt, M8 x 1.25 x 20, G8.8 4 |
| 19 | 101536 | Hex Bolt, M6 x 1.0 x 20, G8.8 1 |
| 20 | 100611 | Lock Washer, 3/8 4 |
| 21 | 100127 | Lock Washer, M8 9 |
| 22 | 100202 | Lock Washer, M6 4 |
| 23 | 100579 | Hex Nut, M8 x 1.25 9 |
| 24 | 100198 | Hex Nut, M6 x 1.0, G8.8 4 |
| 25 | 100077 | Flat Washer, 1/2" 2 |
| 26 | 100130 | Flat Washer, M8 2 |
| 27 | 107456 | V-Belt, 3L X 44" 1 |
| 28 | 101137 | Tension Pulley Bracket 1 |
| 29 | 101227 | Engine Belt Guide 1 |
| 30 | 101225 | DHT Decal 1 |
| 31 | 101052 | Danger Decal 1 |
| 32 | 101054 | Safety Decal 1 |
| 33 | 101144 | Idler Pulley Flat 1 |
| 34 | 101143 | Idler Pulley V 1 |
| 35 | 101810 | Pulley Bottom Bracket 1 |
| 36 | 101147 | Spacer, Idler Pulley 2 |
| 37 | 108747 | Debris Guard Bar 1 |
AXLE/WHEEL ASSEMBLY
CUTTING HEAD ASSEMBLY
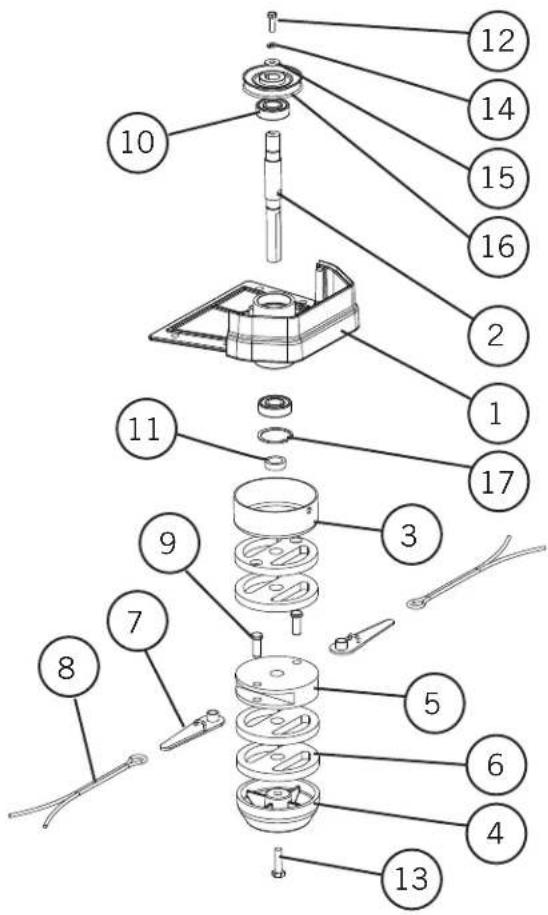
| Item # Part # Description Qty. | ||
| 1 | 101149 Hexagon Spindle 1 | |
| 2 | 101041 Spindle Rod 1 | |
| 3 | 101043 Bearing Cover 1 | |
| 4 | 101042 End Cap 1 | |
| 5 | 101037 Blade Slot 1 | |
| 6 | 101038 Spacer 4 | |
| 7 | 101036 Blade 2 | |
| 8 | 101044 String 2 | |
| 9 | 101039 Blade Pin 2 | |
| 10 | 101045 Bearing 2 | |
| 11 | 101040 Spindle Spacer 1 | |
| 12 | 100085 Hex Bolt, M6 x 1.0 x 20mm, G8.8 1 | |
| 13 | 100126 Hex Bolt, M8 x 1.25 x 30mm, G8.8 1 | |
| 14 | 100202 Lock Washer, M6 1 | |
| 15 | 100445 Fender Washer, M6 1 | |
| 16 | 101141 Belt Pulley 1 | |
| 17 | 101827 Retaining Ring, Internal, 40mm 1 | |
NOTES
NOTES
NOTES

CRAFTSMAN®
is a registered trademark of Stanley Black & Decker, Inc., used under license.
© 2018 CRAFTSMAN
All rights reserved.
Product Manufactured by:
Frictionless World
1100 W 120th Ave. Suite 600
Westminster, Colorado 80234
U.S. & Canada Only
- TABLE OF CONTENTS
- PRODUCT SPECIFICATIONS MODEL NUMBER
- Definitions: Safety Alert Symbols and Words
- SAVE THESE INSTRUCTIONS FOR FUTURE USE
- SAFETY INSTRUCTIONS
- WARNING
- DANGER
- CALIFORNIA PROPOSITION 65
- GENERAL OPERATION
- SLOPE OPERATION
- Do:
- Do Not:
- CHILDREN
- SERVICE
- Safe Handling of Gasoline:
- General Service:
- DO NOT MODIFY ENGINE
- NOTICE REGARDING EMISSIONS
- SPARK ARRESTOR
- SAFETY SYMBOLS
- ASSEMBLY
- List of tools needed for assembly:
- OPENING CARTON
- REMOVING UNIT FROM CARTON
- INSTALLING THE CUTTING LINE
- CAUTION
- OPERATION
- FILLING WITH OIL AND GASOLINE
- Manual Starting
- Stopping the Engine
- Engaging the Cutting Head
- Stopping the Lines from Spinning
- SETTING THE CUTTING HEIGHT
- Installing the trimming line
- CUTTING CORD RECOMMENDATIONS
- Here are a few things to keep in mind:
- CUTTING HEAD
- Replacing the Cutting Head or Line Plate
- Cutting Head Disassembly
- CUTTING HEAD COMPONENTS
- OPERATING ENVIRONMENT
- Heavy Growth Trimming Recommendations
- Wet Environments
- Dry Environments
- Slopes
- Windrows
- Firebreaks
- Garden Clean-Up
- MAINTENANCE
- CHANGING THE ENGINE OIL
- ADJUSTING THE BELT TENSION THROUGH THE CUTTING HEAD CONTROL CABLE
- REPLACING THE BELT
- Replacing the Wheels
- OFF SEASON STORAGE
- ! WARNING
- Preparing The Engine
- Preparing The Lawn String trimmer
- TROUBLESHOOTING
- HANDLEBAR ASSEMBLY
- ENGINE ASSEMBLY
- NOTES
Brand : Craftsman
Model : CMXGCAQ108493
Category : Lawn mower