
FPP - Thermometer Comark - Free user manual and instructions
Find the device manual for free FPP Comark in PDF.


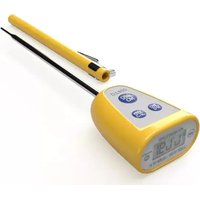
| Product Type | Digital Thermometer |
| Brand | Comark |
| Model | FPP |
| Dimensions | 20 x 45 x 150 mm |
| Weight | 50 g |
| Power Supply | 1 x CR2032 battery |
| Display Type | LCD digital |
| Temperature Range | -50°C to 300°C |
| Accuracy | ±1°C |
| Probe Material | Stainless steel |
| Functions | Temperature measurement, hold, min/max |
| Ingress Protection | IP54 |
| Certifications | CE, NSF |
| Cleaning | Wipe with damp cloth, do not immerse |
| Safety | Not for microwave use |
| Spare Parts | Battery, probe (replaceable) |
| Repairability | Limited, battery replacement only |
| Warranty | 1 year |
Frequently Asked Questions - FPP Comark
User questions about FPP Comark
0 question about this device. Answer the ones you know or ask your own.
Ask a new question about this device
Download the instructions for your Thermometer in PDF format for free! Find your manual FPP - Comark and take your electronic device back in hand. On this page are published all the documents necessary for the use of your device. FPP by Comark.
USER MANUAL FPP Comark
This Fluke product will be free from defects in material and workmanship for two years from the date of purchase. This warranty does not cover fuses, disposable batteries, or damage from accident, neglect, misuse, alteration, contamination, or abnormal conditions of operation or handling. Resellers are not authorized to extend any other warranty on Fluke's behalf. To obtain service during the warranty period, contact your nearest Fluke authorized service center to obtain return authorization information, then send the product to that Service Center with a description of the problem.
THIS WARRANTY IS YOUR ONLY REMEDY. NO OTHER WARRANTIES, SUCH AS FITNESS FOR A PARTICULAR PURPOSE, ARE EXPRESSED OR IMPLIED. FLUKE IS NOT LIABLE FOR ANY SPECIAL, INDIRECT, INCIDENTAL OR CONSEQUENTIAL DAMAGES OR LOSSES, ARISING FROM ANY CAUSE OR THEORY. Since some states or countries do not allow the exclusion or limitation of an implied warranty or of incidental or consequential damages, this limitation of liability may not apply to you.
Fluke Corporation
P.O. Box 9090
Everett, WA 98206-9090
U.S.A.
Fluke Europe B.V.
P.O. Box 1186
5602 BD Eindhoven
The Netherlands
11/99
Table of Contents
Title
Page
Product Statement......1
FoodPro Plus Specifications and Features .....2
Proper Application and Operation ....4
Before You Start 4
Noncontact (Infrared) Mode ....4
Mode Selection ....5
Probe Mode ....5
Countdown (Timer) Mode 6
HACCP Check 7
Noncontact Temperature Measurement
Applications......B
Measuring Liquid Temperatures 8
Measuring Packaged Products in Cold
Storage Cases 9
Measuring Food at the Receiving Dock .....10
Measuring Food in Holding and Serving
Areas 10
Field Verification of Accuracy ....10
Infrared (IRT) and Probe channels (RTD).....10
Cold Temperature Verification Check .....10
Hot Temperature Verification Check....11
Field of View ......12
Operating and Ambient Temperature Range .13
Response Time....13
Humidity....14
Emissivity....14
Setting/Changing °C and °F Temperature
Scales 14
Selecting the °C Scale: 14
Selecting the °F Scale:....15
Cleaning Instructions ....15
Probe Replacement ....16
Battery Insertion and Replacement......16
Troubleshooting....17
Other Operational Considerations ....17
Certifications 18
Noncontact Food Safety Thermometer
Product Statement
Thank you for purchasing this food safety thermometer. We are confident that you will be pleased with the quality and performance of this product. Please take a few moments to familiarize yourself with the operation, features, and benefits of this fine product. This food safety thermometer combines two precision thermometers in one unit: a specially calibrated noncontact infrared thermometer (IRT) and a calibrated resistance thermal device (RTD) penetration probe. The noncontact mode can be used for quick scans of a surface temperature, while the probe mode is used to accurately measure internal temperatures.
FoodPro Plus Specifications and Features
See Table 1 for specifications and features. Specifications are subject to change without notice.
Table 1. Specifications and Features
| Infrared | |
| Temperature Range | IR Channel -35 to +275 °C (-30 to 525 °F) |
| AccuracyAssumes ambient operating temperature of 23 °C ±2 °C (73 °F ±4 °F) | Between 0 °C and 65 °C (32 - 150 °F): ±1 °C (±2 °F) Below 0 °C (32 °F): ±1 °C (±2 °F)± 0.1 degree/degree Above 65 °C (150 °F): ±1.5 % of reading |
| Response Time | <500 ms after initial reading |
| Spectral response | 8-14 microns |
| Emissivity [1] | Pre-set for Food Service Applications |
| Distance to Spot Size Optical Resolution (D:S) | 2.5:1 @ 90 % energy, typical |
| Typical Working Range (target illumination) | ≈25 mm to 250 mm (≈1" to 10") |
| Minimum Target Size | 12 mm (0.5 ") |
| Illumination to IR Channel Offset | 13 mm (0.52 ") |
| Probe | |
| Temperature Range | -40 °C to +150 °C (-40 °F to +302 °F) |
| AccuracyAssumes ambient operating temperature of 23 °C ±2 °C (73 °F ±4 °F) | Between -5 °C and 65 °C (23 °F - 150 °F): ±0.5 °C (±1 °F)Below -5 °C (23 °F): ±1 °C (±2 °F)Above 65 °C (150 °F): ±1 % of reading |
| Probe (cont.) | |
| Response Time 7-8 seconds (3 time constants) | |
| Probe Dimensions ∅: 3.0 mm (0.118") Length:80 mm (3.0") | |
| Sensor Thin Film, Platinum Class A | RTD |
| Operational | |
| Repeatability | Within accuracy the unit |
| Ambient Operating Range | 0 °C to 50 °C (32 °F to 122 °F) |
| Relative Humidity 10 - 90 % (± 5 %) | RH noncondensing @ 30 °C (86 °F) |
| Storage Temperature | -20 °C to +60 °C (-4 °F to +140 °F) |
| Weight/Dimensions (with Battery) | 165 mm x 32 mm x 50 mm(6.5" x 1.25" x 2") 150 g(0.33 lbs) |
| Power | 9V Alkaline |
| Battery Life (Alkaline) 10 hours min | mum @ 23 °C(73 °F) |
| Target Illumination High Brightness | LED |
| Display Resolution | 4 digits, 0.1 °C (0.2 °F) |
| Display Hold (7 sec) | • |
| LCD Backlit Display | • |
| Standards | Conforms to:EN 61326-1 Electromagnetic Emissions and Susceptibility, Criteria B, EN 61010-1 General Safety, IP54 Sealing (hand washable, non-submersible) |
| Other | |
| Certifications | CE, NSF, |
| Warranty | 2 years |
| Accessories Nylon Carrying Pouch, | QuickStartGuide, and Battery |
| [1] Calibration Geometry: >22 °C 144 mm source @ 200 mm (1.45:1)E=0.97DD <25 °C 140 mm source @ 100 mm (0.7:1) E=1.00 BB. | |
Proper Application and Operation
Before You Start
First time users should reference “Battery Insertion Replacement” before using the unit.
Noncontact (Infrared) Mode
Pressing and holding the ON button starts the food safety thermometer in noncontact (infrared) measurement mode. The measurement will continue as long as the ON button is depressed, indicated by the blinking “SCAN”. When the button is released, “HOLD” appears on the display and the last measurement remains visible for 7 seconds before the display goes blank.
The unit will display the temperature of an area highlighted by the target illuminator. The maximum reading is indicated in the lower portion of the display (Figure 1).

ebq03.eps
Figure 1. Noncontact (infrared) Mode
Note
The infrared temperature measurements are used for screening and measuring surface temperatures only. Critical internal temperatures must be verified by using the probe.
Mode Selection
The SELECT button has two functions. Pressing the SELECT button after the display has gone blank will recall the last display. Pressing the SELECT button with an active display cycles through the three different operating modes: Noncontact, Probe, and Countdown Timer (Figure 2).
![graph TD A["IR Mode"] --> B["Probe Mode"] B --> C["Timer Mode"] C --> D["MODE"] D --> A](/content/2026/05/930482/images/6d98a0b3917413eff985810281d3fefd0d3475cb20b9196279fc3e7bf143fccf.jpg)
ebq04.eps
Figure 2. IR Mode Display
Probe Mode
To measure the internal temperature of an object, extend the probe (see Figure 3) and press the SELECT button until the Probe Icon is displayed (see Figure 4). Insert the probe at least 12 mm (1/2") into the target and press the ON button to measure the core temperature.
The Probe Icon on the display will blink for approximately 15 seconds as the probe comes to equilibrium with the object being measured. Three short beeps will sound to indicate the reading is complete and the temperature will be shown on the display. When the highest accuracy is required, it is advisable to repeat the measurement cycle to insure the probe has fully stabilized and reached equilibrium with the object.

ebq05.eps
Figure 3. Extended Contact Probe

ebq06.eps
Figure 4. Probe Mode Display
Notes
Remember if the display blanks the select button will recall the last measurement.
The probe tip must be sterilized before and between measurements of food samples to avoid cross contamination.
Countdown (Timer) Mode
The food safety thermometer has a built in countdown timer to conveniently monitor cooking, cooling, and critical exposure times, as well as Hazard Analysis Critical Control Points (HACCP) inspection intervals. HACCP principles and good food safety practices require monitoring the length of time perishable foods are exposed to temperatures that may support rapid bacterial growth.
To set the countdown timer, press the SELECT button until the timer icon is displayed (Figure 5). Press the SET button once to enter the set mode (“SET” on display blinks). Press the SET button a second time to clear and increment the timer value. The timer value increases initially by 10 second intervals then by minutes and hours. The timer can be set for a maximum of 7 hours and 59 minutes.
Once the desired timer value is set, pressing the ON button will start and stop the countdown. An alarm will sound for approximately 30 seconds when the timer reaches zero.
Note
The timer can be activated and running in the background (indicated by the flashing timer icon) during either IR or Probe measurements or when the display is off. Pressing any button will silence the sounding alarm.
To clear the displayed timer value, press the SET button once to enter set mode and a second time to zero the timer value.
HACCP Check
This thermometer incorporates a “HACCP Check” feature to graphically display critical temperature zones. The icons and LED indicators located above the display indicate a food product is safely held at a sufficient holding temperature, or if it has fallen within the unsafe HACCP “Danger Zone” temperatures (Figure 5). The HACCP Check indicators operate in both the Noncontact and Contact modes. The indicator light will flash during an active measurement and will be lit steadily during display Hold or Recall (Figure 4).
HACCP Zone Indicators


ebq07.eps
Figure 5. Countdown Timer Display
- A Green LED indicator shows a safe chilled or frozen condition below 4 °C (40 °F) or a safe holding temperature above 60 °C (140 °F).
- The Red LED indicator light is displayed when temperatures are within the HACCP “Danger Zone” of 4 °C to 60 °C (39 °F to 140 °F) where microbe growth occurs most rapidly (Figure 5).
Notes
When the temperatures within ±1\ °C ( ±2\ °F ) of the HACCP “Danger Zone” boundary, both the relevant Green and Red LED indicator lights will be triggered to alert the user of the border temperature.
Whenever the Red LED indicator light is lit it is necessary to evaluate the safe storage and handling rules dictated by both exposure time and temperature.
Noncontact Temperature Measurement Applications
Measuring Liquid Temperatures
To accurately measure the temperature of liquids and semi-liquids, such as soup, chili, salad dressing, etc., stir the liquid to bring the internal temperature to the surface, while taking a measurement with the unit in noncontact mode. Steam, dust, smoke, etc., can prevent accurate measurement by interfering with the energy emitted from the target. To increase the reliability of the measurement, do not hold the unit directly over a steaming or smoking product. Instead, hold the unit back and at an angle to ensure the most accurate measurement (Figure 6).

ebq09.eps
Figure 6. Measuring Liquid Temperatures
Measuring Packaged Products in Cold Storage Cases
Ideally, the temperature of a product should be measured outside of a refrigerated environment whenever possible. If it is necessary to measure
the product in a refrigerated environment such as a walk-in cooler, either make rapid measurements (within 1 minute or less) or allow 30 minutes for the unit to stabilize in the refrigerated environment (above 0°C / 32°F ) before measuring. To measure an item within a storage case, open the door or curtain, and directly scan the product for uniform temperatures. The presence of warmer areas may indicate improper stocking resulting in blocked airflow in the cabinet (Figure 7).

ebq10.eps
Figure 7. Measuring Packaged Products
Note
The unit will not measure through glass or plastic doors.
Measuring Food at the Receiving Dock
Use the food safety thermometer to accurately measure perishable products at the receiving dock. When a delivery of fresh or frozen food arrives, check that the products, shipping crates, and internal temperature of the delivery truck are all at the proper storage temperatures. Check for warm spots in products that can result from improper stacking and blocked airflow.
Measuring Food in Holding and Serving Areas
Use the noncontact thermometer to easily scan and accurately measure surface temperature of products held in hot or cold holding areas, such as open-top refrigeration units, steam tables, salad bars, fresh meat or fish displays and warming ovens.
Use the HACCP Check feature to quickly identify unsafe temperatures within the HACCP “Danger Zone” of 4 °C to 60 °C (39 °F to 140 °F) by slowly scanning across the surface of food, storage containers, the
contents of delicases, chilled salads and desserts, holding ovens, rotisseries, etc.
Note
If any questionable temperatures are indicated or if temperature readings are within ±1\ °C ( ±2\ °F ) of the HACCP “Danger Zone” boundary, use the probe to check internal temperatures.
Field Verification of Accuracy
Infrared (IRT) and Probe channels (RTD)
Follow the steps below to verify the accuracy of your food safety thermometer. The 0 °C (32 °F) “stirred ice bath” is the recommended verification reference point. Since it is more difficult to measure the surface of hot water, the hot verification should be used only as a general accuracy check of the IRT channel.
Cold Temperature Verification Check
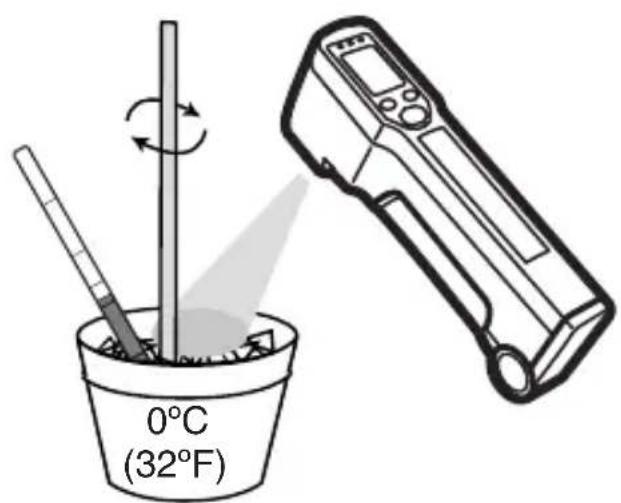
- Fill a large styrofoam cup halfway to the surface with ice cubes. Add cold water to just below the rim of the cup.
- Immerse the tip of a known calibrated probe thermometer (reference probe) into the water and stir the mixture with the probe for one minute, or until the probe temperature stabilizes.
- Continue stirring the water with a straw or swizzle stick while taking simultaneous temperature measurements with the reference probe and the IR thermometer. The unit should be held within 3 inches of the surface of the water (Figure 8). To insure measurement accuracy the probe tip must be immersed to a minimum depth of 12 mm (1/2").
ebq11.eps
Figure 8. Cold Temperature Verification Check
The noncontact (IRT) measurement should be within ±1\ °C ( ±2\ °F ) of the reference probe reading (nominally 0\ °C ( 32\ °F )).
The probe temperature reading should be within ±0.5\ °C ( ±1\ °F ) of the reference probe reading.
Hot Temperature Verification Check
-
Follow the same procedure as above, substituting hot water (>140 °F/60 °C). Hot tap water is adequate for the procedure.
-
Repeat steps two and three from above.
Note
Due to evaporative cooling on the surface of the hot water, it is particularly important that the surface of the water be continually stirred while making the IR measurement (Figure 9).

ebq12.eps
Figure 9. Hot Temperature Verification Check
Using this method, the noncontact (IRT) channel should be considered accurately calibrated if the reading is within ± 2°C ( ± 3.5°F ) of the reference probe's reading; the unit's probe reading should be within ± 0.5°C ( ± 1°F ) of the reference probe reading.
Cautions
- Hold the noncontact thermometer outside the rim of the cup, approximately 3 inches from the surface of the water.
- Avoid steam condensation on the unit's lens. If condensation forms, carefully wipe the lens or let it dry at room temperature and resume measurement.
Field of View
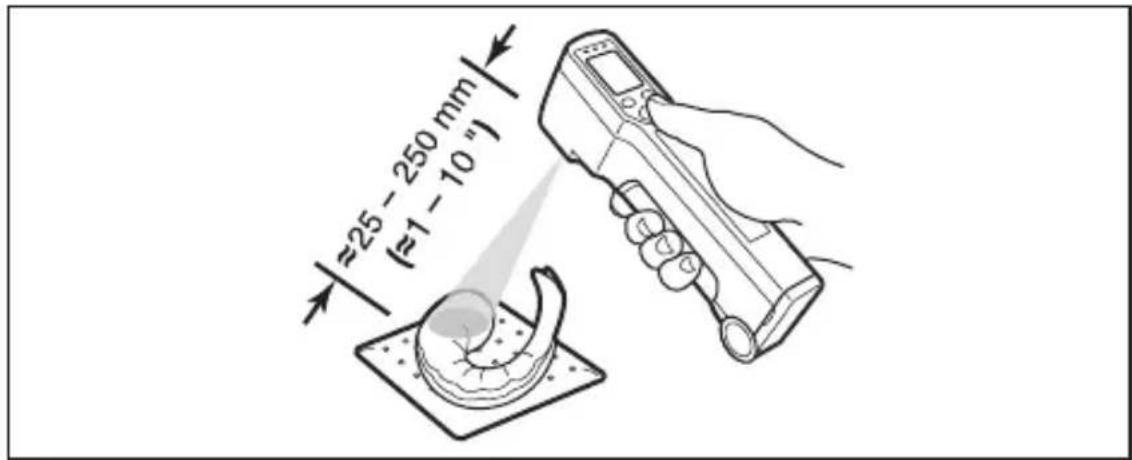
The ideal working range of the noncontact thermometer (IRT) is between 25 mm and 250 mm (1 and 10 inches) or the field of view from the target to the unit, divided by 2. The built in target illumination beam helps to indicate the measurement area. To ensure accurate measurements, the measurement target must fill or exceed the field of view. When conditions permit move in closer to the subject (Figure 10).
ebq13.eps
Figure 10. Noncontact Thermometer Working Range
Operating and Ambient Temperature Range
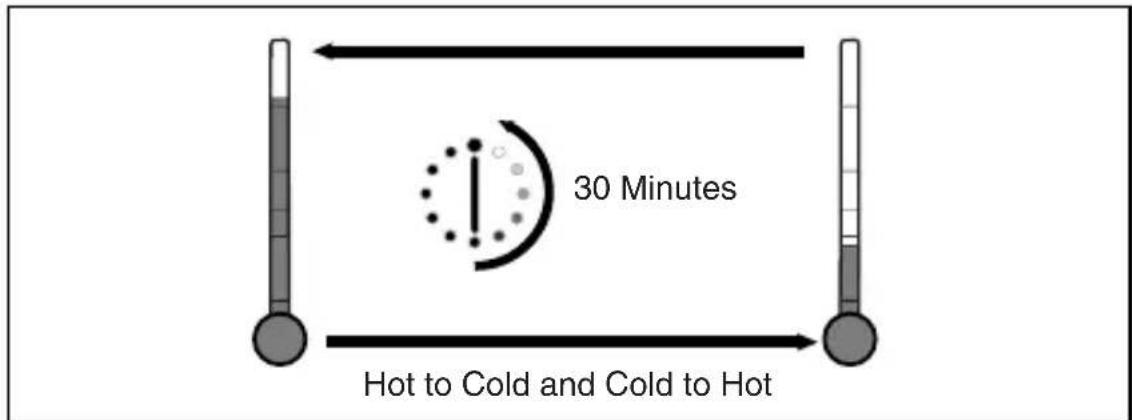
The food safety thermometer is designed to operate in environments between 0 °C – 50 °C (32 °F – 122 °F). Avoid subjecting the unit to extreme or abrupt changes in ambient temperatures. Allow the unit to stabilize for a minimum of 30 minutes if exposed to rapid temperature changes. Failure to precondition the instrument to the ambient temperature may result in measurement errors (Figure 11).
ebq14.eps
Figure 11. Ambient Temperature Ranges
Response Time
The response time of the instrument from initial start up is less than 1 second. The temperature display is updated at approximately 2 times per second during sustained operation.
Humidity
Noncontact thermometers (IRTs) are not intended for use in extremely humid or condensing environments. Condensation on the lens window will impede the optical performance and prevent accurate temperature measurements. If this occurs, allow the window to dry by evaporation or wipe with a soft cloth and resume measurements.
Emissivity
A noncontact thermometer (IRT) determines temperature by measuring the emitted energy of an object. Emissivity (E value) is the measure of an object's ability to emit infrared energy.
This noncontact thermometer is specially calibrated for high emissivity targets and is preset to an E value of 0.97. This setting is the most advantageous for capturing the emitted energy from water, oils, shortening, fat, vegetables, as well as frozen, partially frozen and refrigerated products in boxes and plastic containers.
Note
Shiny metal surfaces (such as polished or stainless steel) have low emissivities and reflect the energy of their surrounding, resulting in inaccurate temperature readings. The emissivity of shiny metal surfaces can be enhanced to provide more accurate readings by covering the measurement area with masking tape, flat black paint, or a coating of shorting or oil. Blackened cooking surfaces such as griddles and cast iron pans make good targets.
Setting/Changing °C and °F Temperature Scales
The food safety thermometer can display temperature in either the °C (Celsius) or °F (Fahrenheit) scales. The desired scale is selected at the time the battery is installed:
Selecting the °C Scale:
When the battery is connected to the battery leads the °C scale indicator shows on the display for approximately 15 seconds. If the SET button is not pressed the unit will time out and default to the °C or Celsius scale.
Selecting the °F Scale:
If the SET button is pressed within 15 seconds of connecting the battery to the battery leads, the temperature scale display will toggle to the °F scale indicator and the unit will now default to the °F or Fahrenheit scale (Figure 12).
![graph TD A["①: Battery disconnection device"] --> B["②: Disconnect battery to reset"] B --> C["NOTE! For °F Press SET within 15 seconds of connecting battery"] C --> D["③: Defaults to °C after 15 seconds"]](/content/2026/05/930482/images/d4a1f968b9945f9b8c4984d77ac7f19af4c9bc5e45067173f863b755b107095e.jpg)
ebq15.eps
Figure 12. Setting/Changing °C and °F Temperature Scales
Note
The ℃/ ℰ temperature scale initialization process must be performed whenever battery power is interrupted or the battery is replaced.
Cleaning Instructions
This food safety thermometer is sealed to IP54 standards. The unit may be wiped down with a wet sponge or cloth using a mild water based detergent or anti-bacterial soap and rinsed under a gentle stream of cold water (Figure 13).

ebq16.eps
Figure 13. Cleaning Instructions
Note
This unit is not designed for complete submersion or washing in automated dishwashers.
Probe Replacement
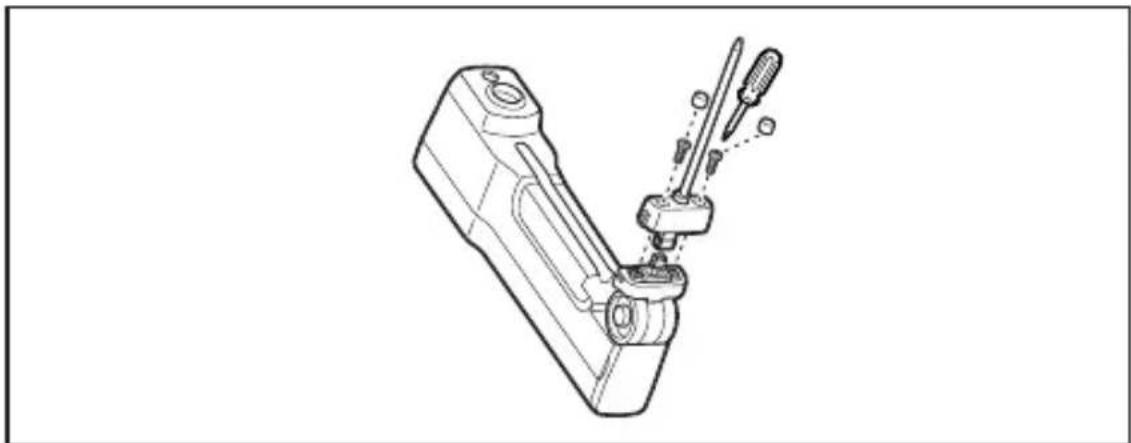
The modular probe of the food safety thermometer is replaceable. To replace probe, extend the probe partially to access the rubber caps. Carefully pry up the rubber caps using a pin, and remove the screws using a #2 cross-tip screwdriver as shown. Grasp the probe and carefully separate the old probe from the probe base. Install the new probe in the reverse order, firmly tightening the screws and replacing the rubber plugs. The calibration accuracy of the unit is not affected by probe replacement (Figure 14).
ebq17.eps
Figure 14. Probe Replacement
Battery Insertion and Replacement
To install a new 9V battery, remove the rubberized battery compartment "plug" at the base of the unit by grasping the sides of the cover and pulling straight out, exposing the battery. Gently shake or tap the base of the unit on your palm to gain access to the battery. The 9V battery of the unit is connected to the polarized snap connector (Figure 15).

ebq18.eps
Figure 15. Battery Insertion and Replacement
Note
Each time the battery is installed or replaced, the temperature scale will default to the Celsius scale. To select the Fahrenheit scale see 'Setting/Changing ℃ and ℤ Temperature Scales'.
Troubleshooting
Code: --- (on display)
Problem: Target temperature is over or under range
Action: Select target within range specifications
Code: Battery Symbol
Problem: Possible low battery
Action: Check and/or replace battery
Code: Blank display
Problem: Dead battery or unit failure
Action: Check and/or replace battery. If the battery is OK, then contact a Fluke service center for repair.
Other Operational Considerations
All models are protected from the following:
- EMI (Electro Magnetic Interference) from induction heaters and microwave ovens
- Electrostatic discharge
- Should the unit become damaged, check the accuracy of the unit by performing the verification process recommended in this manual. If the unit is out of calibration, do not rely on it for critical temperature measurements. Contact a Fluke service center for repair,
- Heat from stovetops, pans, or other hot surfaces (don't set it on the stove)
Certifications
CE, NSF, CMC
This instrument conforms to the following standards:
• EN 61326-1 Electromagnetic Emissions and Susceptibility
• EN 61010-1 General Safety
IP54



京制00000298号

- TABLE OF CONTENTS
- TITLE
- PAGE
- NONCONTACT FOOD SAFETY THERMOMETER
- PRODUCT STATEMENT
- FOODPRO PLUS SPECIFICATIONS AND FEATURES
- PROPER APPLICATION AND OPERATION
- BEFORE YOU START
- NONCONTACT (INFRARED) MODE
- NOTE
- MODE SELECTION
- PROBE MODE
- NOTES
- COUNTDOWN (TIMER) MODE
- HACCP CHECK
- NONCONTACT TEMPERATURE MEASUREMENT APPLICATIONS
- MEASURING LIQUID TEMPERATURES
- MEASURING PACKAGED PRODUCTS IN COLD STORAGE CASES
- MEASURING FOOD AT THE RECEIVING DOCK
- MEASURING FOOD IN HOLDING AND SERVING AREAS
- FIELD VERIFICATION OF ACCURACY
- INFRARED (IRT) AND PROBE CHANNELS (RTD)
- COLD TEMPERATURE VERIFICATION CHECK
- HOT TEMPERATURE VERIFICATION CHECK
- CAUTIONS
- FIELD OF VIEW
- OPERATING AND AMBIENT TEMPERATURE RANGE
- RESPONSE TIME
- HUMIDITY
- EMISSIVITY
- SETTING/CHANGING °C AND °F TEMPERATURE SCALES
- SELECTING THE °C SCALE
- SELECTING THE °F SCALE
- CLEANING INSTRUCTIONS
- PROBE REPLACEMENT
- BATTERY INSERTION AND REPLACEMENT
- TROUBLESHOOTING
- OTHER OPERATIONAL CONSIDERATIONS
- CERTIFICATIONS
Brand : Comark
Model : FPP
Category : Thermometer