OCBLT-100 - Battery tester Ozito - Free user manual and instructions
Find the device manual for free OCBLT-100 Ozito in PDF.


| Product Type | Battery Load Tester |
| Brand | Ozito |
| Model | OCBLT-100 |
| Battery Test Capacity | 6V or 12V DC |
| Load Test Capacity (6V) | 50A |
| Load Test Capacity (12V) | 100A |
| Cold Cranking Amps (CCA) Range | 200 - 1000 CCA |
| Accuracy | +/- 0.2V |
| Weight | 1.1 kg |
| Dimensions | Approx. 20 x 15 x 10 cm (estimated) |
| Display | Analog Meter |
| Clamps | Red (+) and Black (-) Terminal Clamps |
| Features | Load Test Switch, Carry Handle, Cooling Vents, Charging System Test, Starter Motor Test |
| Safety | Overheat protection (cool-down required), reverse polarity protection, insulated clamps |
| Maintenance | Clean with moist soft cloth; keep clamps clean and dry |
| Spare Parts | Available from Bunnings Special Orders Desk or via Ozito Customer Service |
| Warranty | 3 Year Replacement Warranty (DIY domestic use only) |
| Compliance | Regulatory Compliance Mark (RCM) |
| Intended Batteries | Lead-acid batteries only (not for Lithium) |
| Cooling Requirement | Allow 5 minutes cool-down between tests |
Frequently Asked Questions - OCBLT-100 Ozito
User questions about OCBLT-100 Ozito
0 question about this device. Answer the ones you know or ask your own.
Ask a new question about this device
Download the instructions for your Battery tester in PDF format for free! Find your manual OCBLT-100 - Ozito and take your electronic device back in hand. On this page are published all the documents necessary for the use of your device. OCBLT-100 by Ozito.
USER MANUAL OCBLT-100 Ozito
ozito
BATTERY LOAD TESTER
6 / 12V 100A
INSTRUCTION MANUAL
SPECIFICATIONS
Battery Test Capacity: 6V or 12V DC Load Test Capacity: 6V - 50A
12V - 100A Amps Capacity: 200 - 1000 CCA
Accuracy: +/- 0.2V Weight: 1.1 kg
ozito.com.au
3 YEAR REPLACEMENT WARRANTY\*
GENERAL POWER TOOL SAFETY WARNINGS
d. Remove any adjusting key or wrench before turning the power tool on. A wrench or a key left attached to a rotating part of the power tool may result in personal injury.
e. Do not overreach. Keep proper footing and balance at all times. This enables better control of the power tool in unexpected situations.
f. Dress properly. Do not wear loose clothing or jewellery. Keep your hair, clothing and gloves away from moving parts. Loose clothes, jewellery or long hair can be caught in moving parts.
h. Do not let familiarity gained from frequent use of tools allow you to become complacent and ignore tool safety principles. A careless action can cause severe injury within a fraction of a second.
4. Power tool use and care
WARNING! Read all safety warnings and all instructions. Failure to follow the warnings and instructions may result in electric shock, fire and/or serious injury.
1. Work area safety
a. Keep work area clean and well lit. Cluttered or dark areas invite accidents.
b. Do not operate power tools in explosive atmospheres, such as in the pre-
liquids, gases or dust. Power tools create sparks which may ignite the dust c.
c. Keep children and bystanders away while operating a power tool. Distrac
to take control.
to lose control.
2. Electrical safety
a. Do not force the power tool. Use the correct power tool for your application. The correct power tool will do the job better and safer at the rate for which it was designed. b. Disconnect the plug from the power source and/or the battery pack from the power tool before making any adjustments, changing accessories, or storing power tools. Such preventive safety measures reduce the risk of starting the power tool accidentally. c. Store idle power tools out of the reach of children and do not allow persons unfamiliar with the power tool or these instructions to operate the power tool. Power tools are dangerous in the hands of untrained users.
e. Maintain power tools. Check for misalignment or binding of moving parts, breakage of parts and any other condition that may affect the power tool's operation. If damaged, have the power tool repaired before use. Many accidents are caused by poorly maintained power tools.
g. Use the power tool, accessories and tool bits etc. in accordance with these instructions, taking into account the working conditions and the work to be performed. Use of the power tool for operations different from those intended could result in a hazardous situation.
h. Keep handles and grasping surfaces dry, clean and free from oil and grease. Slippery handles and grasping surfaces do not allow for safe handling and control of the tool in unexpected situations.
b. Service a. Have your power tool serviced by a qualified repair person using only identical replacement parts. This will ensure that the safety of the power tool is maintained.
BATTERY TESTER WARNINGS
a. Power tool plugs must match the outlet. Never modify the plug in any way. Do not use any adapter plugs with earthed (grounded) power tools. Unmodified plugs and matching outlets will reduce risk of electric shock.
b. Avoid body contact with earthed or grounded surfaces, such as pipes, radiators, ranges and refrigerators. There is an increased risk of electric shock if your body is earthed or grounded.
c. Do not expose power tools to rain or wet conditions. Water entering a power tool will increase the risk of electric shock.
d. Do not abuse the cord. Never use the cord for carrying, pulling or unplugging the power tool. Keep cord away from heat, oil, sharp edges or moving parts. Damaged or entangled cords increase the risk of electric shock.
- Personal safety a. Stay alert, watch what you are doing and use common sense when operating a power tool. Do not use a power tool while you are tired or under the influence of drugs, alcohol or medication. A moment of inattention while operating power tools may result in serious personal
b. Use personal protective equipment. Always wear eye protection. Protective equipment such as
In use personal protective equipment, airways wear eye protection. Protective equipment each addust mask, non-skid safety shoes, hard hat, or hearing protection used for appropriate conditions w reduce personal injuries.
c. Prevent unintentional starting. Ensure the switch is in the off-position before connecting to power source and/or battery pack, picking up or carrying the tool. Carrying power tools with your finger on the switch or energising power tools that have the switch on invites accidents.
WARNING! Save all warnings and instructions for future reference
Eye, immediately used eye with running solid water for at least ten minutes and got medical attention immediately.
Personal Safety - Wear ANSI-approved safety goggles and protective gloves during set up and use of the Battery load Tester. - Test in a well ventilated area. Explosive gases may be produced during testing. Do not smoke, cause sparks, or strike matches near the battery when testing.
- Protective, electrically non-conductive clothes and non-skid footwear are recommended when working. Wear steel-toed boots to prevent injury from falling objects. - Refer to the user manual of the battery being tested for testing instructions and precautions prior to using the battery load tester. - Do not connect in reverse polarity.
WARRANTY
The benefits provided under this warranty are in addition to other rights and remedies which are available to you at law.
which are available to you at law. Our goods come with guarantees that cannot be excluded at law. You are entitled to a
replacement or refund for a major failure and for compensation for any other reasonably
foreseeable loss or damage. You are also entitled to have the goods repaired or replaced if the goods fail to be of acceptable quality and the failure does not amount to a major
failure. Generally you will be responsible for all costs associated with a claim under this warranty.
dernally you will be responsible for all costs associated with a claim under this warranty; however, where you have suffered any additional direct loss as a result of a defective
product you may be able to claim such expenses by contacting our customer service
Theorem 1.2. (Theorem 1.3) Let be a finite field and let (x) be the line of x for all elements of x . Then
3 YEAR REPLACEMENT WARRANTY*
3 YEAR REPLACEMENT WARRANTY* Your product is guaranteed for a period of 36 months from the original date of
purchase. If a product is defective it will be replaced in accordance with the terms of this
warranty. Warranty excludes consumable parts. *This product is intended for DIY use only and replacement warranty covers domestic use.
This product is intended for E.P. Use Only and Replacement Monthly Cover Domestic Use
WARNING
The following actions will result in the warranty being void.
If the tool has been operated on a supply voltage other than that specified on the tool. If the tool shows signs of damage or defects caused by or resulting from abuse, accidents or alterations.
Failure to perform maintenance as set out within the instruction manual. If the tool is disassembled or tampered with in any way.
Professional, industrial or high frequency use.
IN ORDER TO MAKE A CLAIM UNDER THIS
WARRANTY (YOU MUST RETURN THE PRODUCT
WARRANTY YOU MUST RETURN THE PRODUCT TO YOUR NEAREST BUNNINGS WAREHOUSE
TO YOUR NEAREST BUNNINGS WAREHOUSE WITH YOUR BUNNINGS REGISTER RECEIPT.
PRIOR TO RETURNING YOUR PRODUCT
FOR WARRANTY PLEASE TELEPHONE OUR CUSTOMER SERVICE HELPLINE:
CUSTOMER SERVICE HILLF LINE.
Australia: 1800 069 486 New Zealand: 0508 069 486
TO ENSURE A SPEEDY RESPONSE PLEASE HAVE THE MODEL NUMBER AND DATE OF
HAVE THE MODEL NUMBER AND DATE OF
PURCHASE AVAILABLE A CUSTOMER SERVICE
REPRESENTATIVE WILL TAKE YOUR CALL AND
ANSWER ANY QUESTIONS YOU MAY HAVE
RELATING TO PROCEDURE
[Non-Text]
Tester Use and Care Instructions WARNING: Do not touch the
- Check that the switch of the battery load tester is in the "OFF" (O) position and is functioning correctly prior to use. The switch should automatically switch to the "OFF" (O) position once released, if the switch does not do this do not use the Battery load tester. - The battery load tester produces heat when in use. Do not exceed recommended testing time in manual instructions. Allow sufficient time of 5 minutes or more for the battery load tester to cool down between tests to avoid injury due to heat build up of the Battery load tester surface. - This battery load tester was designed for specific functions. Do not modify, disassemble or alter the battery load tester, all parts and accessories are designed with built-in safety features that may
- Use this product in accordance with these instructions, taking into account the working conditions and the work to be performed. Use of this product for operations different from those intended could result in a hazardous situation.
- This product is not a toy. Keep it out of reach of children.
- Maintain labels and nameplates on the unit. These carry important safety information.
- People with pacemakers should consult their physician(s) before use. Electromagnetic fields in close proximity to heart pacemaker could cause pacemaker interference or pacemaker failure. Caution is necessary when near coil, spark plug cables, or distributor of running engine. Engine should be off during distributor adjustment.
-
Undercharged lead-acid batteries will freeze during cold weather. Do not test or charge a frozen battery.
-
Do not smoke or have open flames near the battery.
- Never remove battery load tester clamps while testing.
- Ensure automatic vehicles are in park with the handbrake engaged before starting the engine.
- Ensure manual vehicles are in neutral with the handbrake engaged before starting the engine.
- Put blocks on drive wheels and never leave car unattended while running tests.
- Road Safety Road Rules 2009 penalty code 2135, it is illegal to leave “motor vehicle unattended with keys in ignition, motor running, brakes not secured or doors unlocked.
Risk of Electric Shock
- Never touch the clamps and the terminals with wet hands. - Do not pull the clamps from the terminals by pulling on the clamp cables.
- Check the clamp leads for damage before every use.
- De certain for the test battery load/charge before connecting the battery load tester clamps. The RLD (+) positive battery clamp goes to the positive terminal of the battery. The BLACK (-) negative battery clamp goes to the negative terminal of the battery. Reversing the battery load tester battery clamps on the battery may damage the battery load tester. - Do not drop the battery load tester as it may affect proper operation. Do not operate the battery load tester if it has received a large blow or is damaged. - Do not smoke or have open flames near the battery.
- The warnings and precautions discussed in this manual cannot cover all possible conditions and situations that may occur. It must be understood by the operator that common sense and caution are factors which cannot be built into this product, but must be supplied by the operator. - Do not connect the battery load tester to the battery while the engine is running. Turn the engine off before connecting. - Use extreme caution when working around the ignition coil, distributor cap, ignition wires and spark plugs. These components create hazardous voltages when the engine is running.
Tester Use and Care Instructions
WARNING: Do not touch the cooling vents on the battery load tester during or immediately after testing the battery. They become very hot.
-
Check that the switch of the battery load tester is in the "OFF" (0) position and is functioning correctly prior to use. The switch should automatically switch to the "OFF" (0) position once released, if the switch does not do this do not use the battery load tester.
-
The battery load tester produces heat when in use. Do not exceed recommended testing time in manual instructions. Allow sufficient time of 5 minutes or more for the battery load tester to cool down between tests to avoid injury due to heat build up of the Battery load tester surface.
-
This battery load tester was designed for specific functions. Do not modify, dissassemble or alter the battery load tester, all parts and accessories are designed with built-in safety features that may
- Do not use the battery load tester in a way for which it was not designed.
WARNING! Read all safety warnings and all instructions. Failure to follow the warnings and instructions may result in electric shock, fire and/or serious injury.
- This appliance is not intended for Lithium batteries
- This appliance is not intended for use by young or infirm persons unless supervised by a
WARNING! Save all warnings and instructions for future reference
WARNING! Read all safety warnings and all instructions. Failure to follow the warnings and instructions may result in electric shock, fire and/or serious injury.
- This appliance is not intended for Lithium batteries
- This appliance is not intended for use by young or infirm persons unless supervised by a
responsible person to ensure that they can use the appliance safely.
- The warnings, cautions and instructions discussed in this instruction manual cannot cove
possible conditions and situations that may occur.
- Common sense and caution are factors that cannot be built into this product but must be supplied by the operator.
- It is recommended to work with someone who can come to your aid when working near a lead acid battery.
- Have plenty of fresh water and soap nearby in case battery acid contacts skin, clothing or eyes.
- If battery acid contacts skin or clothing, wash immediately with soap and water. If acid enters eye, immediately flood eye with running cold water for at least ten minutes and get medical.
responsible person to ensure that they can use the appliance safely.
- The warnings, cautions and instructions discussed in this instruction manual cannot cover all possible conditions and situations that may occur.
- Common sense and caution are factors that cannot be built into this product but must be supplied by the operator.
- It is recommended to work with someone who can come to your aid when working near a lead acid battery.
- Do not come in contact with leaking battery.
- Have plenty of fresh water and soap nearby in case battery acid contacts skin, clothing or eyes.
- If battery acid contacts skin or clothing, wash immediately with soap and water. If acid enters eye, immediately flood eye with running cold water for at least ten minutes and get medical attention immediately.
- Be extra cautious to reduce risk of dropping a metal tool onto the battery. It could spark or short circuit the battery or other electrical parts and could cause an explosion.
- Remove personal metal items such as rings, bracelets, necklaces and watches when working with a lead acid battery. It can produce a short circuit current high enough to weld a ring or the like
- Clean battery terminals. Be careful to keep corrosion from coming in contact with eyes.
- Before testing inspect the battery for cracks or broken case or cover. Of the battery is damaged, do not use battery load tester.
- Be extra cautious to reduce risk of dropping a metal tool onto the battery. It could spark or short-circuit the battery or other electrical parts and could cause an explosion.
- Remove personal metal items such as rings, bracelets, necklaces and watches when working with a lead acid battery. It can produce a short circuit current high enough to weld a ring or the like to metal causing a severe burn.
- Clean battery terminals. Be careful to keep corrosion from coming in contact with eyes.
- Before testing inspect the battery for cracks or broken case or cover. Of the battery is damaged, do not use battery load tester.
Do not be necessary for action. Work Area
- Operate in a safe work environment. Keep your work area clean and well lit.
- Keep anyone not wearing the appropriate safety equipment away from the work area. Minimize distractions in the work environment.
- Distractions can cause you to lose control of the tool.
- When connecting the battery load tester cables to the battery, avoid creating sparks; especially
when the battery is being charged. Explosive gases are created during charging. Sparking could also damage the vehicle electrical system. - Always lock up tools and keep them out of the reach of children
- Do not expose battery load tester to rain, snow or wet conditions.
- Stay clear of hot engine and car parts.
Work Area
- Operate in a safe work environment. Keep your work area clean and well lit.
- Keep anyone not wearing the appropriate safety equipment away from the work area. Minimize distractions in the work environment.
- Distractions can cause you to lose control of the tool.
- When connecting the battery load tester cables to the battery, avoid creating sparks; especially
when the battery is being charged. Explosive gases are created during charging. Sparking could also damage the vehicle electrical system.
- Always lock up tools and keep them out of the reach of children
- Do not expose battery load tester to rain, snow or wet conditions.
- Stay clear of hot engine and car parts.
[Non-Text]
Personal Safety - Wear ANSI-approved safety goggles and protective gloves during set up and use of the Battery load Tester. - Test in a well ventilated area. Explosive gases may be produced during testing. Do not smoke, cause sparks, or strike matches near the battery when testing. - Protective, electrically non-conductive clothes and non-skid footwear are recommended when working. Wear steel-toed boots to prevent injury from falling objects. - Refer to the user manual of the battery being tested for testing instructions and precautions prior
- Refer to the user manual of the bat to using the battery load tester. - Do not connect in reverse polarity.
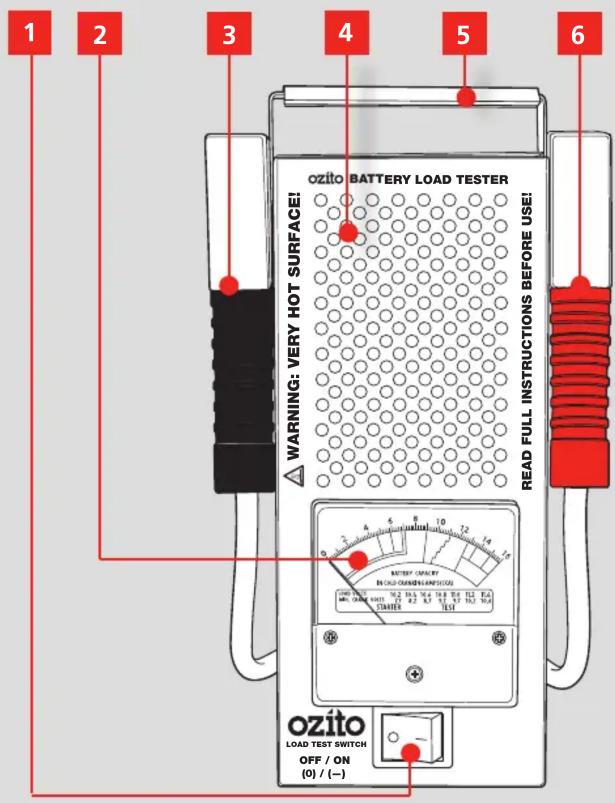
KNOW YOUR PRODUCT
BATTERY LOAD TESTER
- Load Test Switch
- Meter
- Black Negative Terminal Clamp (−)
- Cooling vents
- Carry Handle
- Red Positive Terminal Clamp (+)
- 6V Load Test Range
- 12V Load Test Range
-
Cold Cranking Amps Range
-
Charging Test Range
- Starter Test Voltage Scale
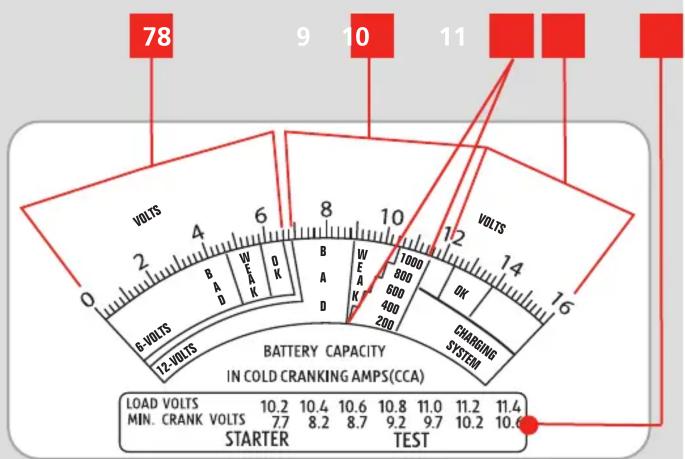
gauge
BATTERY CAPACITY IN COLD CRANKING AMPS(CCA) | Measurement | Test (Volts) | | :--- | :--- | | LOAD VOLTS | 10.2 | | MIN. CRANK VOLTS | 7.7 | | STARTER | 8.2 | | TEST | 8.7 | | CHANGING SYSTEM | 9.2 | | DQK | 400 | | 600 | 600 | | 800 | 800 | | 1000 | 1000 | | 12 | 12 | | 14 | 14 | | 16 | 16 | 78, 9, 10, 11 are marked with red squares above the scale.ONLINE MANUAL
Scan this QR Code with your mobile device to take you to the online manual.

YEAR REPLACEMENT WARRANTY*
SETUP & PREPARATION
1. BATTERY CONNECTION

WARNING! READ AND UNDERSTAND THE WARNINGS BEFORE SETUP AND TESTING.

WARNING! ENSURE THE POWER CORD IS UNCOILED AND FULLY EXTENDED TO AVOID OVERHEATING THE POWER CORD. ENSURE THAT IT DOES NOT GET TANGLED OR CAUGHT IN ANY ROTATING PARTS WITHIN THE ENGINE COMPARTMENT OF THE VEHICLE.

WARNING! CHECK CORD AND CLAMP FOR DAMAGE BEFORE EVERY USE. DO NOT USE IF CORD OR CLAMP INSULATION IS MISSING OR DAMAGED AND WIRE IS EXPOSED.

WARNING! THE METAL HOUSING WILL GET VERY HOT AND WILL BURN SKIN OR CAUSE PROPERTY DAMAGE; WEAR PROTECTIVE GLOVES AND DO NOT PLACE HANDS, BODY OR ANY OBJECTS NEAR THE COOLING VENTS AREA.
Connecting to a Vehicle Lead Acid Battery
Note: During first use, you will notice a little smoke and/or a burning smell coming from the unit. This is normal and will stop after a short burn-in period.
Before testing make sure the battery terminals are really clean as grease and dust could lead to errors in the test results. The battery MUST be disconnected prior to cleaning. Check the battery and connections for any cracks or damage before proceeding with cleaning and testing. To help ensure a good connection of the battery load tester clamps, clean the battery terminals with a solution of baking soda and water, and wipe the battery terminals with a cloth to remove any dirt, grease and any residual water.
- Turn off vehicle ignition, all electronics and any loads.
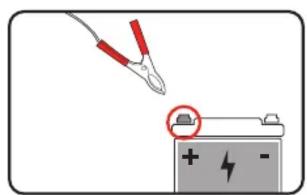
- With the vehicle engine turned off, connect the red positive terminal clamp to the positive (+) pole on your vehicles 12V or 6V lead acid battery.
- Connect the black negative terminal clamp to the negative (−) pole on your vehicles battery.
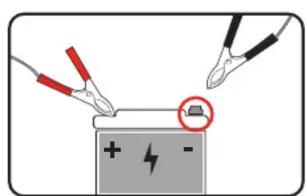
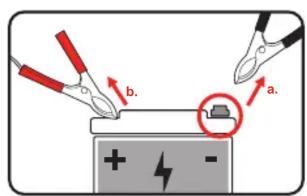
Disconnecting from a Vehicle Battery
- Remove the black negative terminal clamp from the negative (−) pole of your vehicle battery.
- Remove the red positive terminal clamp from the positive (+) pole of the vehicle battery.
2. BATTERY ANALYSIS
Check the battery terminal clamps are correctly connected to the lead acid battery. Twist the clamps slightly to ensure a good connection.
6V Battery Analysis
- Confirm battery voltage is in the green "OK" area of the 6V Range area. If it is not in the OK range, disconnect the battery and recharge before retesting.
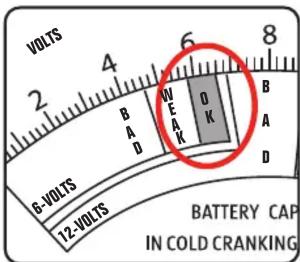
- Press and hold the load switch in the ON (-) position for a maximum of 10 seconds while reading the meter. The needle should remain in the green area, if it does not, the battery is weak or bad.
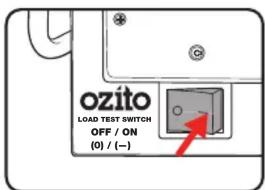

WARNING! TO PREVENT OVERHEATING, ALLOW UNIT TO COOL FOR 5 MINUTES BEFORE DEPRESSING THE LOAD SWITCH AGAIN IF FURTHER TESTING IS REQUIRED.
12V Battery Analysis
- Confirm battery Cold Cranking Amps (CCA) on the meter that matches the CCA rating of the battery being tested.
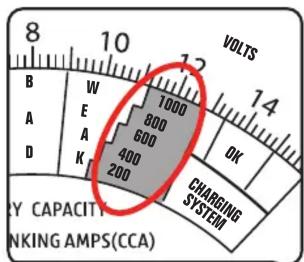
- Press and hold the load switch ON (-) position for a maximum of 10 seconds while reading the meter. The needle should indicate the approximate capacity (for 12V batteries 200-1000CCA), refer to Battery Analysis table in this manual or on the label.
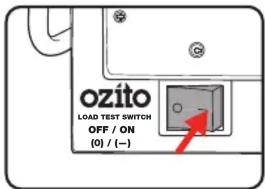

WARNING! TO PREVENT OVERHEATING, ALLOW UNIT TO COOL FOR 5 MINUTES BEFORE DEPRESSING THE LOAD SWITCH AGAIN IF FURTHER TESTING IS REQUIRED.
Testing the Charging System
With the battery terminal clamps correctly connected to your vehicles Lead Acid Battery and all electronic accessories off.

WARNING! DO NOT PRESS THE LOAD SWITCH DURING THIS TEST.

WARNING! ENSURE LOAD TESTER AND CABLES ARE CLEAR OF ANY MOVING PARTS.
-
Start the engine and accelerate to 1200 - 1500 rpm.
-
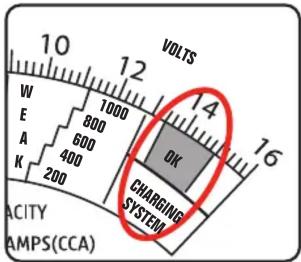
Confirm reading is in the green "OK" position in the Charging Test Range area.
-
Turn on the headlights and fan motor on high, the meter should remain in the green "OK" area.
-
If the reading is in the red area or outside the charging system zone, the alternator may be defective.
Testing the Vehicles Starter Motor
This will identify excessive starter current draw, which makes starting difficult and potentially shortens battery life. It is best to load test the battery before starter motor test to ensure the battery is in good condition. If the battery tests either weak or bad, this test cannot be performed.
Note: The vehicles engine must be off and at normal operating temperature.

WARNING! DO NOT PRESS THE LOAD SWITCH DURING THIS TEST.
-
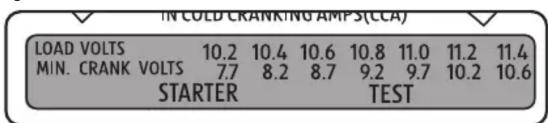
Perform a load voltage test to confirm battery's state of charge reading is in the green "OK position and note the exact voltage.
-
Using the load voltage obtained in step 1, refer to the meter to select the minimum cranking voltage. Apply next higher minimum crank volts for engines with less than 200 CID.
- For example, if the load voltage is 11.00, use 10.2 for the minimum cranking volts instead of 9.7.
-
The vehicles ignition must be disabled so the engine will not start. (Refer to the vehicle's instruction manual or contact a automotive professional technician for advice). The test works best if the starter cranks for 2 to 5 seconds.
-
With an assistant cranking the engine, view the meter voltage reading.
-
If the cranking volts during the test is less than the minimum cranking volts selected from the table, the starter current draw is excessive. If the starter cranks slowly, check for high resistance or poor connections.
OPERATION (cont.)
| BATTERY ANALYSIS | |
| LOAD TEST BATTERY CONDITION | |
| Good (Green) Battery | capacity is OK. Battery may or may not be fully charged. Check specific gravity of battery to determine state of charge, check the electrical drain or possible charging system trouble. |
| Weak or Bad, but the Needle remains steady (Yellow or Red) | Battery capacity is not satisfactory. Battery may be either defective or not fully charged. Check specific gravity to determine which condition exists. If charging does not bring specific gravity to full charge level, battery should be replaced. |
| Weak or Bad, but the Needle continues to fall (Yellow or Red) | Battery may be either defective or very run down. Release the Load Test Switch and note volt meter reaction. Voltage recovery to 12 volt or above within seconds indicates a defective battery. Slow voltage recovery indicates run down condition. For best results, check specific gravity. |
MAINTENANCE
- If the enclosure of the battery load tester requires cleaning, do not use solvents. Use a moist, soft cloth only. Never immerse any part of the Battery load tester into liquid.
- Keep terminal clamps clean and dry at all times.
DESCRIPTION OF SYMBOLS
| V | Volts | A | Amperes | |
 | Regulatory Compliance Mark (RCM) | CCACold Cranking Amps | ||
 | Wear protective gloves | Warning | ||
 | Very hot surface. Do not touch! | Wear eye protection | ||
 | Read Instruction Manual | |||
CARING FOR THE ENVIRONMENT
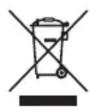
Power tools that are no longer usable should not be disposed of with household waste but in an environmentally friendly way. Please recycle where facilities exist. Check with your local council authority for recycling advice.

Recycling packaging reduces the need for landfill and raw materials. Reuse of recycled material decreases pollution in the environment. Please recycle packaging where facilities exist. Check with your local council authority for recycling advice.
SPARE PARTS
Spare parts can be ordered from the Special Orders Desk at your local Bunnings Warehouse.
For further information, visit www.ozito.com.au or contact Ozito
Customer Service:
Australia 1800 069 486
New Zealand 0508 069 486
E-mail: enquiries@ozito.com.au
- ozito
- BATTERY LOAD TESTER
- / 12V 100A
- INSTRUCTION MANUAL
- SPECIFICATIONS
- ozito.com.au
- YEAR REPLACEMENT WARRANTY\*
- GENERAL POWER TOOL SAFETY WARNINGS
- BATTERY TESTER WARNINGS
- WARNING! Save all warnings and instructions for future reference
- WARRANTY
- WARNING
- The following actions will result in the warranty being void.
- Australia: 1800 069 486 New Zealand: 0508 069 486
- Tester Use and Care Instructions WARNING: Do not touch the
- Risk of Electric Shock
- [Non-Text]
- KNOW YOUR PRODUCT
- ONLINE MANUAL
- SETUP & PREPARATION
- BATTERY CONNECTION
- Connecting to a Vehicle Lead Acid Battery
- Disconnecting from a Vehicle Battery
- BATTERY ANALYSIS
- 6V Battery Analysis
- 12V Battery Analysis
- Testing the Charging System
- Testing the Vehicles Starter Motor
- OPERATION (cont.)
- MAINTENANCE
- DESCRIPTION OF SYMBOLS
- CARING FOR THE ENVIRONMENT
- SPARE PARTS
Brand : Ozito
Model : OCBLT-100
Category : Battery tester