
FIDWB14 - Dishwasher Euromaid - Free user manual and instructions
Find the device manual for free FIDWB14 Euromaid in PDF.


| Product Type | 60cm Fully Integrated Dishwasher |
| Brand | Euromaid |
| Model | FIDWB14 |
| Power Supply | 220-240 V, 50 Hz |
| Total Power Consumption | 1800 - 2100 W |
| Heater Power | 1800 W |
| Water Pressure Range | 0.3 - 10 bar (3 - 100 N/cm²) |
| Number of Programmes | 8 (Pre-wash, Mini, Eco, Quick, Intensive, Hygiene, Mix+, Auto) |
| Drying System | Fan drying system (depends on model) |
| Water Softening System | Yes, adjustable hardness levels |
| Salt and Rinse Aid Indicators | Yes |
| Time Delay Function | Up to 24 hours |
| Auxiliary Functions | Half Load, Extra Drying, Fast+, TurboWash, Auto Tablet |
| Interior Lighting | Available (depends on model) |
| Floor Illumination | Yes (during washing) |
| Filter System | Multi-stage (micro, coarse, metal/plastic) – clean weekly |
| Impeller Types | Lower, Upper, Ceiling impeller – clean regularly |
| Safety Features | Aquasafe+ (leak protection), child safety, grounded outlet required |
| Spare Parts Availability | Original spare parts available for 10 years |
| Dimensions (Width x Height x Depth) | 60 cm x approximately 85 cm (adjustable feet) x approximately 58 cm (standard integrated) |
| Weight | Approximately 40-45 kg (typical for integrated models) |
| Energy Efficiency Class | Not specified in manual (likely A+ to A++ range for this model year) |
Frequently Asked Questions - FIDWB14 Euromaid
User questions about FIDWB14 Euromaid
0 question about this device. Answer the ones you know or ask your own.
Ask a new question about this device
Download the instructions for your Dishwasher in PDF format for free! Find your manual FIDWB14 - Euromaid and take your electronic device back in hand. On this page are published all the documents necessary for the use of your device. FIDWB14 by Euromaid.
USER MANUAL FIDWB14 Euromaid
60cm Fully Integrated Dishwasher FIDWB14
Product/Installer details
For future reference we suggest that you staple a copy of your purchase receipt here and complete the below so the information is always at hand.
Product Details
Model number:
Description:
Serial number:
(Located on the product rating label)
Purchase Details
Date of purchase:
Place of purchase:
Store name:
Address:
Telephone:
Invoice/receipt number:
Installation Details
Electrical date of installation:
Electrician Installers Details:
Company/Installers Name:
Licence Number:
Telephone Number:
Gas date of installation:
Gas installers details:
Company/Installers Name:
Licence Number:
Telephone Number:
Plumbing date of installation:
Plumbers installers details:
Company/Installers Name:
Licence Number:
Telephone Number:
Dear Customer,
Congratulations on the purchase of your new product from Home Appliances Pty Ltd.
We recommend you please take some time to read the instruction manual thoroughly to familiarise yourself with the functionality and operations to ensure optimum performance of your new appliance.
After reading the manual, please store it in a safe and accessible location for future reference.
Installation
The installation of your new appliance must be carried out by a qualified installer / technician in accordance to local regulations.
The packaging of your appliance has been selected from environmentally friendly materials and can usually be recycled. Please ensure these are disposed of correctly.
Customer Care
Our Customer Care centre is available should you wish to learn more about your appliance in relation to how to use it to its best potential, or tips on cleaning as well as available accessories.
For further details please contact our Customer Care team on 1800 444 357 or email: customercare@hapl.com.au
Thank you
Regards, Home Appliances

Please read this user manual first!
Dear Customer,
We hope that you get the best results from your product which has been manufactured with high quality and state-of-the-art technology. Therefore, please read this entire user manual and all other accompanying documents carefully before using the product and keep it as a reference for future use. If you handover the product to someone else, give the user manual as well. Follow all warnings and information in the user manual.
Remember that this user manual is also applicable for several other models.
Differences between models will be identified in the manual.
Explanation of symbols
Throughout this User Manual the following symbols are used:
| Important information or useful hints about usage. | |
| Warning for hazardous situations with regard to life and property. | |
| Warning for electric shock. | |
| Packaging materials of the product are manufactured from recyclable materials in accordance with our National Environment Regulations. |
| Packaging materials of the product are manufactured from recyclable materials in accordance with our National Environment Regulations. |
Do not dispose of the packaging materials together with the domestic or other wastes. Take them to the packaging material collection points designated by the local authorities.
This product was manufactured using the latest technology in environmentally friendly conditions.
CONTENTS
1 INSTRUCTIONS FOR SAFETY AND ENVIRONMENT 4
General safety 4
Intended use ....4
Children's safety ....5
Disposing of packaging material....5
Transportation of the product ....5
Compliance with WEEE Directive and
Disposing of the Waste Product ......6
Compliance with RoHS Directive......6
Package information ....6
2 DISHWASHER 7
Overview....7
Fan drying system ....8
Technical specifications ....8
3 INSTALLATION 9
Appropriate installation location....9
Connecting water supply 9
Connection to the drain 10
Adjusting the feet 10
Aquasafe+ 11
Electrical connection....11
Initial use 11
4 PREPARATION 12
Tips for energy saving ....12
Water softening system ....12
Adjusting the water softening system .....12
Adding salt 14
Detergent 15
Adding detergent ....15
Combined tablet detergents ....16
Rinse aid....17
Silverware basket piece....20
Silverware basket 20
Cutlery basket 21
Cutlery basket 21
Collapsible lower basket wires (6 pieces) 22
Collapsible lower basket wires (4 pieces) 23
Collapsible lower basket wires (2 pieces) 23
Collapsible lower basket tines .....24
Collapsible lower basket tines .....25
Lower basket bottle wire ....25
SoftTouch Accessory 26
Lower Basket Glass Holder ....26
Tray Wash Supports ....26
Lower basket multipurpose / height adjustable service rack ....27
Upper basket height adjustable rack .....28
Upper basket drawer 28
Upper basket glass support piece .....28
Upper basket glass support piece .....29
Collapsible upper basket wires....29
Collapsible upper basket tines....30
Collapsible upper basket tines....30
Adjusting the height of the upper basket .31
Adjusting the height of loaded upper basket ....32
Height setting with empty basket .....33
Upper cutlery basket....34
5 OPERATING THE PRODUCT 35
Keys....36
Function keys ......36
Preparing the machine ....36
Programme selection....36
Auxiliary functions....38
Scheduling the washing time ....39
Starting the programme ....40
Cancelling the programme ....40
Salt indicator (S) 40
Rinse Aid indicator (★) 41
End of programme ....41
Water cut-off warning....41
Overflowing warning ....41
InnerClean 41
6 MAINTENANCE AND CLEANING 42
Cleaning the outer surface of the product42
Cleaning the interior of the machine .....42
Cleaning the filters 42
Cleaning the hose filter 43
Cleaning the impellers ....44
Lower impeller ....44
Upper impeller ....44
Ceiling Impeller 45
7 TROUBLESHOOTING 46
1 INSTRUCTIONS FOR SAFETY AND ENVIRONMENT
This section contains safety instructions that will help to get protected from risk of personal injury or property damage. Failure to follow these instructions shall void all warranties.
General safety
- Never place the product on a carpet-covered floor; otherwise, lack of airflow beneath the product will cause electrical parts to overheat. This will cause problems with your product.
- Do not operate the product if the power cable / plug is damaged! Call the Authorised Service Agent.
- Connect the product to a grounded outlet protected by a fuse complying with the values in the “Technical specifications” table. Do not neglect to have the grounding installation made by a qualified electrician. Our company shall not be liable for any damages that will arise when the product is used without grounding in accordance with the local regulations.
- The water supply and draining hoses must be securely fastened and remain undamaged.
- Unplug the product when not in use.
-
Never wash the product by spreading or pouring water onto it! There is the risk of electric shock!
-
Never touch the plug with wet hands! Never unplug by pulling on the cable, always pull out by grabbing the plug.
- The product must be unplugged during installation, maintenance, cleaning and repairing procedures.
• Always have the installation and repairing procedures carried out by the Authorised Service Agent. Manufacturer shall not be held liable for damages that may arise from procedures carried out by unauthorised persons. - Never use chemical solvents in the product. They bring forth the risk of explosion.
- When you pull the upper and lower baskets out completely, the door of the product will bear all the weight of the baskets. Do not put other loads on the door; otherwise, the product may tilt.
- Never leave the door of the product open apart from loading and unloading procedures.
- Do not to open the door of the product when it is running unless necessary. Be careful for the rush of hot vapour when you need to open the door.
Intended use
• This product has been designed for domestic use.
- It must be used to do the domestic type dishes only.
- This appliance is intended to be used in household and similar applications such as:
- Staff kitchen areas in shops, offices and other working environments;
- Farm houseś;
- By clients in hotels, motels and other residential type environments;
- Bed and breakfast type environments
- Only dishwasher safe detergents, rinse aids and additives must be used.
- The manufacturer waives any responsibility arisen from incorrect usage or transportation.
- The service life of your product is 10 years. During this period, original spare parts will be available to operate the product properly.
- This appliance can be used by children aged from 8 years and above and persons with reduced physical, sensory or mental capabilities or lack of experience and knowledge if they have been given supervision or instruction concerning use of the appliance in a safe way and understand the hazards involved. Children shall not play with the appliance. Cleaning and user maintenance shall not be made by children without supervision.
Children's safety
• Electrical products are dangerous for the children. Keep children away from the product when it is in use. Do not let them to tamper with the product.
- Do not forget to close the door of the product when leaving the room where it is located.
- Store all detergents and additives in a safe place away from the reach of the children.
Disposing of packaging material
Packaging materials are dangerous to children. Keep packaging materials in a safe place away from reach of the children.
Packaging materials of the product are manufactured from recyclable materials. Dispose of them properly and sort in accordance with recycled waste instructions. Do not dispose of them with normal domestic waste.
Transportation of the product

If you need to move the product, do it in upright position and hold from the rear side. Slanting the product onto its front side may cause the electronic parts in it get wet and damaged.
- Unplug the product before transporting it.
- Remove water drainage and water supply connections.
- Drain the remaining water in the product completely.
Compliance with WEEE Directive and Disposing of the Waste Product
This product complies with EU WEEE Directive (2012/19/EU). This product bears a classification symbol for waste electrical and electronic equipment (WEEE). This product has been manufactured with high quality parts and materials which can be reused and are suitable for recycling. Do not dispose of the waste product with normal domestic and other wastes at the end of its service life. Take it to the collection center for the recycling of electrical and electronic equipment. Please consult your local authorities to learn about these collection centers.
Compliance with RoHS Directive
The product you have purchased complies with EU RoHS Directive (2011/65/EU). It does not contain harmful and prohibited materials specified in the Directive.
Package information
Packaging materials of the product are manufactured from recyclable materials in accordance with our National Environment Regulations. Do not dispose of the packaging materials together with the domestic or other wastes. Take them to the packaging material collection points designated by the local authorities.
2 DISHWASHER
Overview
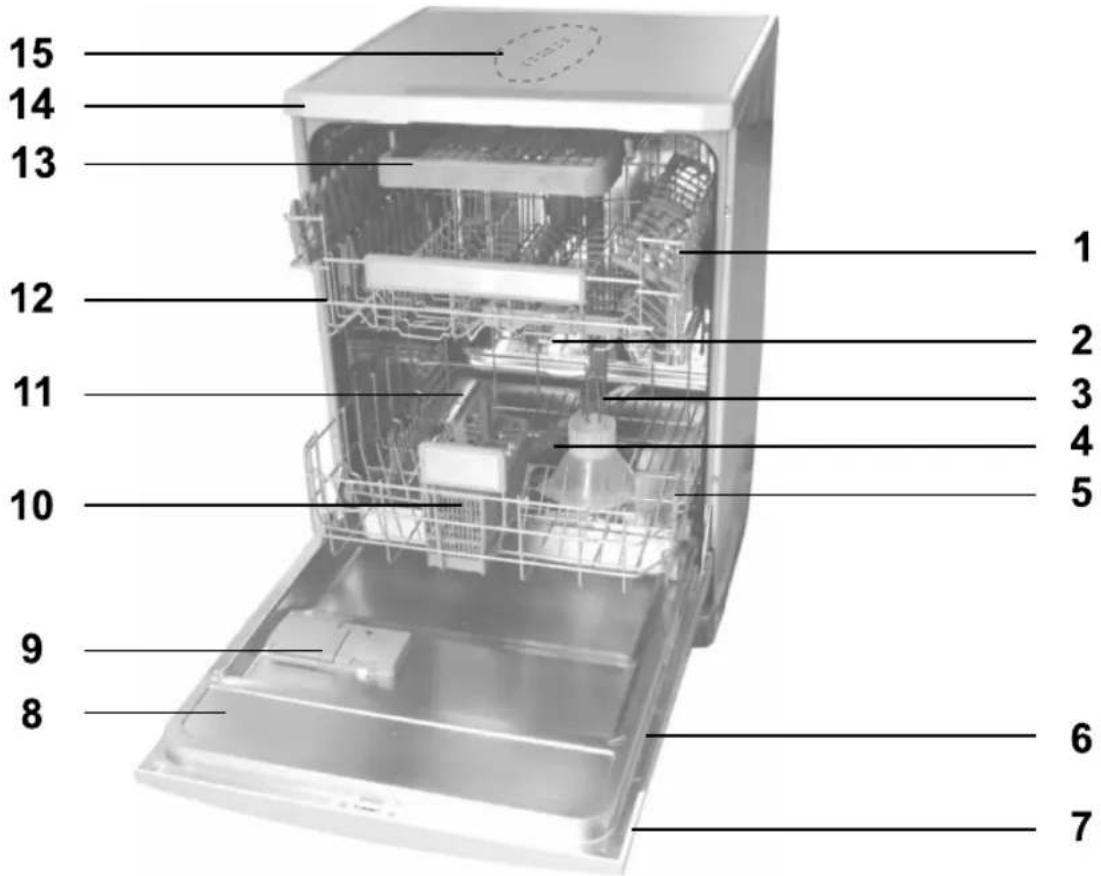
-
Upper basket
-
Upper impeller
-
Lower impeller
-
Filters
-
Lower basket
-
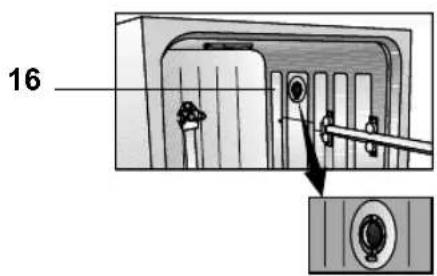
Rating Label
-
Control panel
-
Door
-
Detergent dispenser
-
Cutlery basket
-
Salt reservoir lid
-
Upper basket rail
-
Upper cutlery basket
-
Top Cover (depends on model)
-
Ceiling impeller
-
Fan drying system (depends on model)
Technical specifications

Compliance to standards and test data / EC declaration of conformity This product complies with the following EU directives;
Development, production and sales stages of this product comply with the safety rules included in all pertaining European Community regulations.
2014/35/EU, 2014/30/EU, 93/68/EC, IEC 60436/DIN 44990, EN 50242
| Power input 220-240 V, 50 Hz (see rating label) | |
| Total power consumption 1800-2100 W | (see rating label) |
| Heater power consumption 1800 W (see rating label) | |
| Total current (depends on the model) 10 | A (see rating label) |
| Drain pump power consumption 30 W (see rating label) | |
| Water pressure 0.3 –10 bar (= 3 – 100 N) | cm^2 = 0.01-1.0 Mpa) |

Technical specifications may be changed without prior notice to improve the quality of the product.

Figures in this manual are schematic and may not match the product exactly.

Values stated on the markings of the product or in the printed documents accompanying the product are obtained in the laboratory on basis of the relevant standards. Depending on operational and environmental conditions of the product, these values may vary.
Fan drying system
(depends on model)
Fan drying system ensures efficient drying of your dishes.
It is normal to hear a different sound than that of washing cycle during fan operation.
Note for test institutions:
Data required for performance tests shall be provided upon request. Requests can be e-mailed to the following address:
dishwasher@standardloading.com
Do not forget to provide the code, stock and serial numbers of the product to be tested in your request e-mail along with your contact information. Code, stock and serial numbers of the product may be found on the type label attached to the side wall of the door.
3 INSTALLATION
Refer to the nearest Authorised Service Agent for installation of your product. To make the product ready for use, make sure that the electricity, tap water supply and water drainage systems are appropriate before calling the Authorised Service Agent. If they are not, call a qualified technician and plumber to have any necessary arrangements carried out.
 | Preparation of the location and electrical, tap water and waste water installations at the place of installation is under customer's responsibility. |
 | Installation and electrical connections must be carried out by the Authorised Service Agent. Manufacturer shall not be held responsible for damages arising from processes carried out by unauthorised persons. |
 | Prior to installation, visually check if the product has any defects on it. If so, do not have it installed. Damaged products cause risks for your safety. |
 | Make sure that the water inlet and discharge hoses are not folded, pinched or crushed while pushing the product into its place after installation or cleaning procedures. |
When placing the product, pay attention not to damage the floor, walls, piping, etc. Do not hold the product from its door or panel to move it.
Appropriate installation location
- Place the product on a solid and flat floor that has sufficient load carrying capacity! The product must be installed on a flat surface in order for the door to be closed comfortably and securely.
- Do not install the product at places where temperature may fall below 0°C.
- Place the product at least 1 cm away from the edges of other furniture.
- Place the product on a rigid floor. Do not place it on a long pile rug or similar surfaces.

Do not place the product on the power cable.
- Make sure that you select a location that will allow you to load and unload the dishes in a fast and comfortable manner.
• Install the product in a place close to the tap and the drain hole. Select the installation location by considering that it will not be changed after the connections are made.
Connecting water supply
| We recommend attaching a filter on the house/apartment supply water inlet to protect the machine from damages that may arise from impurities (sand, dirt, rust, etc.) coming from the urban water supply system or from your own water system as well as to prevent complaints such as yellowing or sludge accumulation at the end of washing. |
Permitted water temperature: up to 25°C
The dishwasher may not be connected to open warm water devices or flow-through water heaters.
- Do not use old or used water inlet hose on the new product. Use the new water inlet hose supplied with the product.
- Connect the water inlet hose directly to the water tap. Pressure coming from the tap should be minimum 0.3 and maximum 10 bars. If the water pressure exceeds 10 bars, a pressure relief valve should be installed in between.
- Open the taps completely after making the connections to check for water leaks.

Use a screw-on hose connector to connect the water inlet hose to a water tap with a 34 inch external thread. If required, use a filter insert to filter deposits from the pipes.
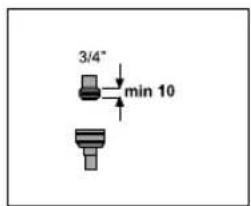
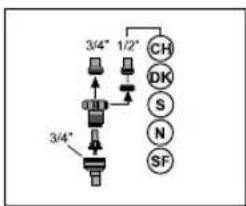

For your safety, close the water inlet tap completely after the washing programme is over.
Connection to the drain
Water discharge hose can directly be connected to the drain hole or sink's drainage. The length of this connection must be min. 50 cm and max. 100 cm from the floor. A discharge hose longer
than 4 meters causes dirty washing. Attach the water discharge hose to the drainpipe without bending it. Tightly fix the water discharge hose to the drainpipe in order to prevent any dislocation of the water discharge hose during operation of the product.
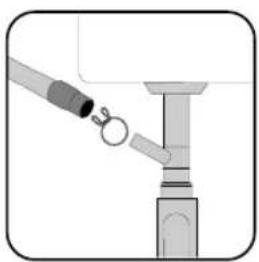
natural_image
Diagram of a mechanical assembly with a tool interacting with a bracket (no text or symbols visible)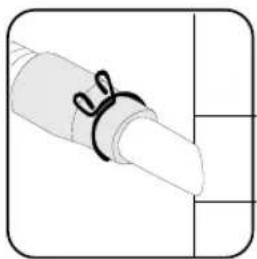
natural_image
Simple line drawing of a pipe with a loop, no text or symbols present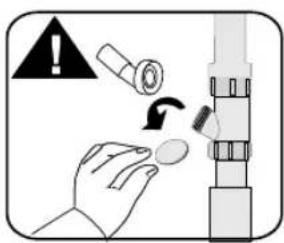
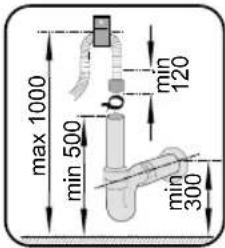

Drainpipe must be connected to the sewage system and it should not be connected to any surface water.
Adjusting the feet
If the door of the product cannot be closed properly or if the product swings when you push it slightly, then you need to adjust the feet of the product. Adjust the feet of the product as illustrated in the installation manual supplied with the product.

Diswashers door must be aligned properly otherwise hot steam can escape! Danger of serious burns, other injury or may damage furniture.
Aquasafe+
(depends on model)
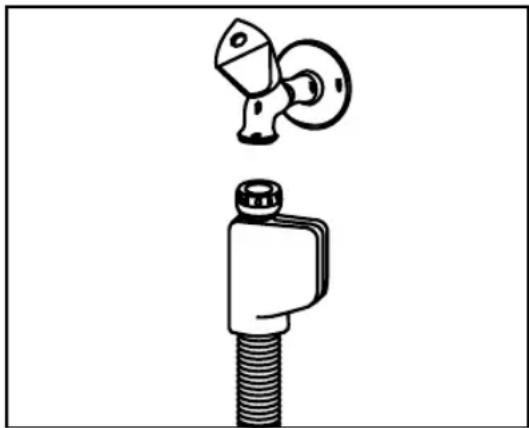
The Aquasafe+ system protects against water leaks that may occur at the hose inlet. Water contact with the valve box of the system must be avoided to prevent damage to the electrical system. If the Aquasafe+ system is damaged, unplug the product and call the Authorised Service Agent.

As the hose set contains electrical connections and assemblies, never shorten or lengthen the hose with extension hoses.
natural_image
Technical illustration of a mechanical component with a threaded base and two circular components above it (no text or symbols)Electrical connection
Connect the product to a grounded outlet protected by a fuse complying with the values in the “Technical specifications” table. Our company shall not be liable for any damages that will arise when the product is used without grounding in accordance with the local regulations.
- Connection must comply with national regulations.
- Power cable plug must be within easy reach after installation.

Unplug the product after the washing programme is over.
- The voltage and allowed fuse or breaker protection are specified in the “Technical specifications” section. If the current value of the fuse or breaker in the house is less than 16 Amps, have a qualified electrician install a 16 Amp fuse.
- The specified voltage must be equal to your mains voltage.
- Do not make connections via extension cables or multi-plugs.

Damaged power cables must be replaced by the Authorised Service Agent.

If your dishwasher is equipped with internal illumination, lamp should only be replaced by the Authorised Service Agent in case of failures that may occur on the lamp.

If the product has a failure, it should not be operated unless it is repaired by the Authorised Service Agent! There is the risk of electric shock!
Initial use
Before starting to use the product, make sure that all preparations are made in accordance with the instructions in sections “Important safety instructions” and “Installation”.
• To prepare the product to do the dishes, perform first operation in the shortest programme with detergent while the machine is empty. During the initial use, fill the salt reservoir with 1 litre of water prior to filling it with salt

There might be a small amount of water left in the product after factory quality control tests. This has no harm on the product.
4 PREPARATION
Tips for energy saving
Following information will help you use the product in an ecological and energy-efficient manner.
Wipe away any coarse food remnants on the dishes before putting them in the product. Operate the product after filling it completely. When selecting a programme, consider the table of “Programme data and average consumption values”.
Do not put more detergent than suggested on the detergent package.
Adjusting the water softening system
Cleaning, rinsing and drying performance of your dishwasher will increase when water softening system is adjusted properly.
Adjust the new water hardness level according to the Water hardness level instruction in this booklet.
Use the test strip supplied with the product according to the steps given below to determine hardness level of your supply water.
Water softening system

Your dishwasher requires soft water. If the hardness of the water is above 6^ dH, the water must be softened and descaled. Otherwise, ions that create the hardness will accumulate on the surfaces of the dishes and may adversely affect the washing, shining and drying performances of the product.
The product is equipped with a water softening system which reduces the hardness of incoming water. This system softens the supply water that enters into the product to a level that will allow washing the dishes with the required quality.
Preparation
a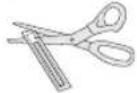 Remove the test strip from the packet. Remove the test strip from the packet. | b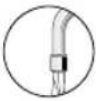 Turn on the tap and let the water run for about a minute. Turn on the tap and let the water run for about a minute. | c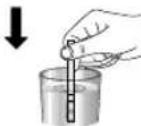 Hold the test strip in the water for about a second. Hold the test strip in the water for about a second. | c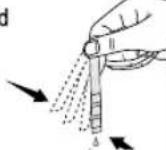 Remove the test strip from the water and shake it. Remove the test strip from the water and shake it. | e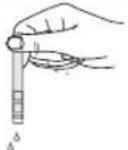 Wait for 1 minute. Wait for 1 minute. | f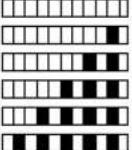 The test strip shows you the hardness level. The test strip shows you the hardness level. |
After determining hardness level of the supply water:
- Turn on the machine, press Time Delay and P+/P keys simultaneously. After the countdown (3,2,1) is displayed keep the keys pressed for a while.
- Press P+/P key to activate the (r..) position.
- Using Time Delay key, adjust water hardness level according to the hardness of the supply water. See "Water hardness level adjustment table" for correct setting.
- Press On / Off key to save the setting.
Water hardness level adjustment table
| Hardness Level | English Water Hardness °dE | German Water Hardness °dH | French Water Hardness °dF | Water Hardness Level Indicator |
| 0th Level | 0-5 0-4 0-8 | Press the Time Delay key to switch the water hardness level to position 1. (r1) | ||
| 1st Level | 6-9 5-7 9-13 | |||
| 2nd Level | 10-15 8-12 | 14-22 | Press the Time Delay key to switch the water hardness level to position 2. (r2) | |
| 3rd Level | 16-19 13-15 | 23-27 | Press the Time Delay key to switch the water hardness level to position 3. (r3) | |
| 4th Level | 20-24 16-19 | 28-34 | Press the Time Delay key to switch the water hardness level to position 4. (r4) | |
| 5th Level | 25-62 20-50 | 35-90 | Press the Time Delay key to switch the water hardness level to position 5. (r5) |
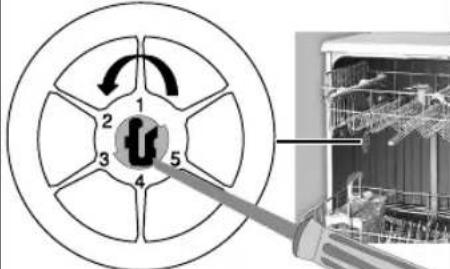
In order to protect your glassware against glass corrosion in an optimal way, you have to perform the same hardness settings, which you have made in the control panel, with the regeneration setting switch.
For example, if you have adjusted to "3rd level" in the control panel, also set the regeneration adjustment switch to 3rd level.
| Regeneration Adjustment Switch | 0th Level 1 | 1st Level 2nd | Level 3rd Level | 4th Level | 5th Level |
 | 1 | 1 | 2 3 | 4 5 |
Preparation
If the hardness level of the supply water is above 90 °dF or if you are using well water, then it is recommended to use water purification devices and special filters.
If the hardness level of the supply water is below 13^ dF, there is no need to use salt in your dishwasher. If this is the case, “No Salt Warning Indicator” (if any) illuminates continuously on the panel of your machine.
If the water hardness level adjustment is set to level 1, the "No salt warning indicator" will illuminate continuously although it is not necessary to use salt. If you use salt under this condition, salt will not be consumed and the Salt indicator will not illuminate.

If you move your house, it is necessary to readjust water hardness level of your machine by considering the information given above according to the hardness level of the supply water in your new location. Your machine will display the most recently adjusted water hardness level.
Adding salt
Water softening system needs to be regenerated in order that the product operates with the same performance continuously. Dishwasher salt is used for this purpose.

Use only special softening salts produced particularly for the dishwashers in your machine.

We recommend using granular or powder softening salts. Do not use salts that are insoluble in water such as table salt or common salt. Performance of water softening system may get worse in time.

Salt reservoir will fill with water when you start the product. Therefore, add the softening salt before starting the machine.
- First take the lower basket out to add softening salt.
- Turn the salt reservoir lid counter clockwise to open it (A, B).
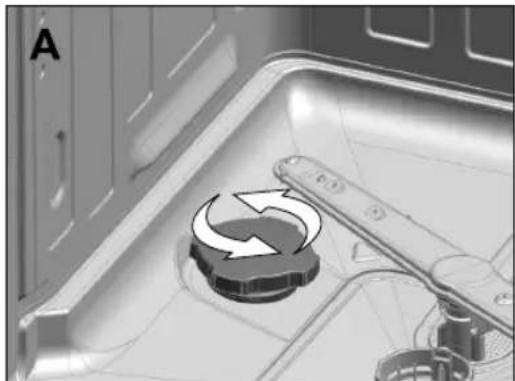
natural_image
Close-up of a kitchen appliance interior with a circular component and mechanical parts (no visible text or symbols)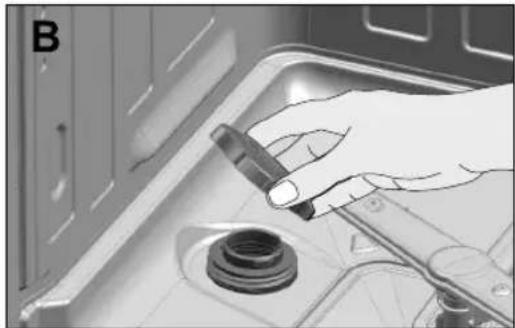
natural_image
Hand holding a tool near a mechanical component (no visible text or symbols)
Salt reservoir will fill with water when you start the product. Therefore, add the softening salt before starting the machine.
Preparation
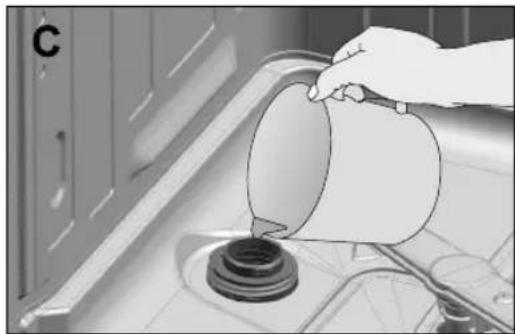
natural_image
Hand pouring liquid into a kitchen sink with a lid, no text or symbols visible- Fill the salt reservoir with salt by using salt funnel (D). To speed up dissolution rate of salt in water, stir it with a spoon.
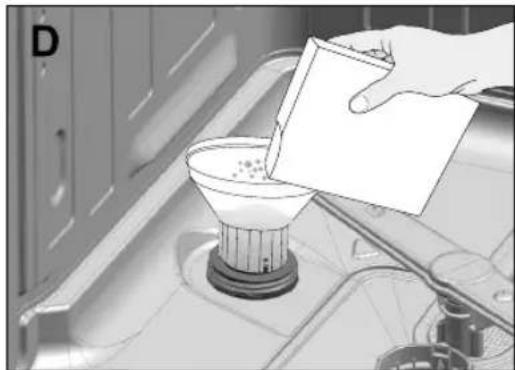
natural_image
Illustration of a hand pouring liquid into a funnel on a stove (no text or symbols visible)
- Replace the lid and tighten it securely when the reservoir is full.
- If you will not start a washing programme immediately after adding the salt, run the machine empty in the shortest programme to dissolve and wash away the scattered salt in the machine.

Since different salt brands in the market have different particle sizes and since the water hardness may vary, dissolution of the salt in water may take a couple of hours. Therefore, Salt Indicator remains on for a while after adding salt into the machine. Loose salt grains can cause rust marks in your machine if not rinsed away. Only fill salt just before a programme is run.
Detergent
You can use powder, liquid/gel and tablet detergents in the machine.

Only use the detergents produced particularly for use with dishwashers. Never use washing up liquids. We recommend you not to use detergents that contain chlorine and phosphate as they are harmful for the environment.
Adding detergent

Refer to the "Programme Table" to determine the correct amount of detergent for the selected programme.

In order to have good washing and drying results, always follow the instructions on the detergent packaging. If you have further questions, we recommend to contact with the producer of the detergent.
Preparation

Do not put solvents into the detergent dispenser. There is risk of explosion!
Put the detergent into the detergent dispenser just before operating the machine as illustrated below.
- Push the latch to right to open the detergent dispenser lid (A).
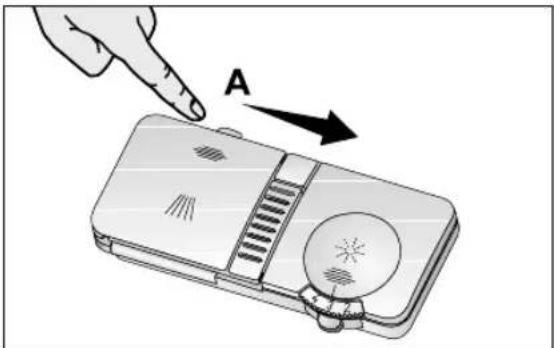
- Put suggested amount of powder, liquid/gel or tablet detergent in the dispenser.

Inside the detergent dispenser, there are level markings that help you use appropriate amount of detergent. When brimful, detergent dispenser will contain 40 cm ^3 of detergent. Fill detergent up to 15 cm ^3 or 25 cm ^3 level marks in the detergent dispenser according to fullness of the machine and/or soiling degree of the dishes (1).
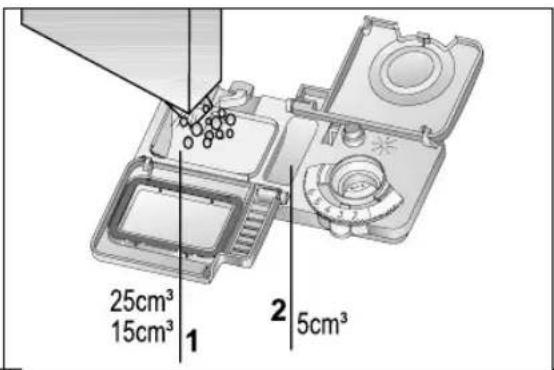

If dishes have been waiting for a long time and have dried residues, fill the 5cm^3 compartment too (2).
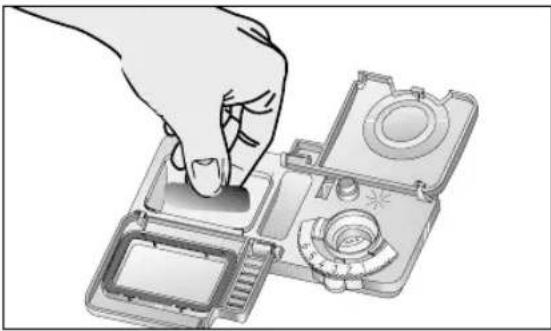
- Close the detergent dispenser lid by pressing on it lightly. A "click" will be heard when the lid is closed.

In programmes with prewash and high temperature, in which you use tablet detergents, make sure that the detergent dispenser lid is closed firmly.
natural_image
Illustration of a hand pressing down on a device component (no text or symbols visible)
Use powder detergent in short programmes without prewash since the solubility of the tablet detergent changes depending on the temperature and time.

Excessive usage of powder detergents will cause the detergent not dissolve completely and will also cause scratches on the glassware.
Combined tablet detergents
Combined tablet detergents exhibit water softening and / or rinse aid effect in addition to detergent effect. Some types of these detergents also contain special-purpose washing chemicals such as glass and stainless steel protectors.
Preparation
Combined tablet detergents are available as 3in1, 5in1, Allin1 etc. They function only up to a specific degree of water hardness. Above this limit regeneration salt and rinse aid must be added. Refer to the instructions on the packaging of the combined detergent whether it is suitable for the hardness level of the water supply.
| i | While using combined tablet detergents contact with the detergent producers if the dishes are wet and/or if you notice limescale spots particularly on glasses after the washing programme is over. |
 | |
When you switch to powder, liquid/gel or tablet detergent from a combined tablet detergent:
- Make sure that salt and rinse aid reservoirs are full.
- Set the water hardness to the highest level and perform an empty run.
- After the empty washing cycle, review the user manual and readjust the water hardness level so as to suit the water supply.
- Make the appropriate rinse aid settings.
| i | Depending on the model,salt indicator and/or rinse aidindicator must be enabledagain if they were disabledbefore. |
Rinse aid

The rinse aid used in dishwashers is a special combination used to increase drying efficiency and prevent water or limescale stains on the washed items. For this reason, care must be paid to have rinse aid in the rinse aid reservoir and to use rinse aids produced specially for dishwashers only.
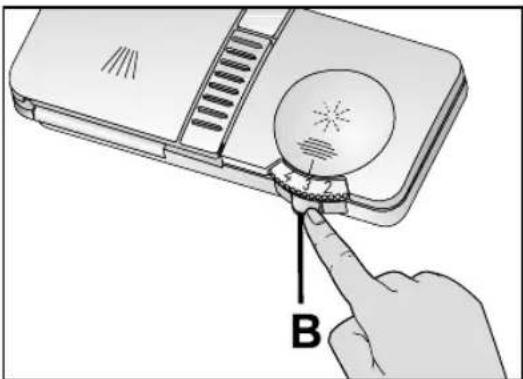
- Open the lid of the rinse aid reservoir by pressing its latch (B).
- Fill the reservoir until "MAX" level.
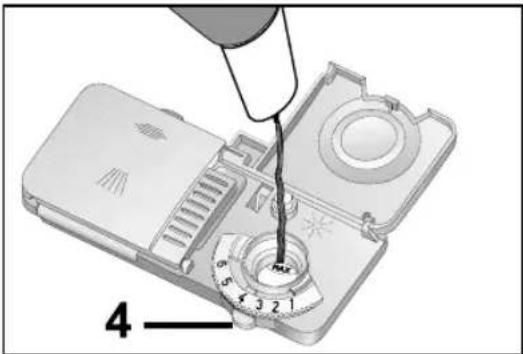
- Turn the rinse aid amount adjuster manually to a position between 1 and 6 (4). If there are stains on tableware items after washing, level must be increased and if there is a blue trace after wiping them by hand, it must be decreased. This is
Preparation
set to position 4 as factory default.
- Close the lid of the reservoir by pressing on it lightly.

Wipe clean any spilled rinse aid outside the reservoir. Rinse aid that spilled accidentally will cause foaming and it will eventually decrease washing performance.
Items not suitable for washing in the dishwasher
- Never wash dishes soiled by cigarette ash, candle remnants, polish, dyestuff, chemicals, etc. in your dishwasher.
- Do not wash iron alloy items in the dishwasher. It can get corroded or leave stains on other items.
- Do not wash cutlery with wooden or bone stems, glued pieces, or pieces that are not resistant to heat, as well as copper and tin-plated containers in the dishwasher.

Decorative prints of chinaware as well as aluminum and silver items may get discoloured or tarnished after washing in the dishwasher just as it happens in handwashing as well. Some delicate glass types and crystals may become dull in time. We strongly recommend you to check if the tableware you are going to purchase is suitable for washing especially in the dishwasher.
Placing the dishes into the dishwasher
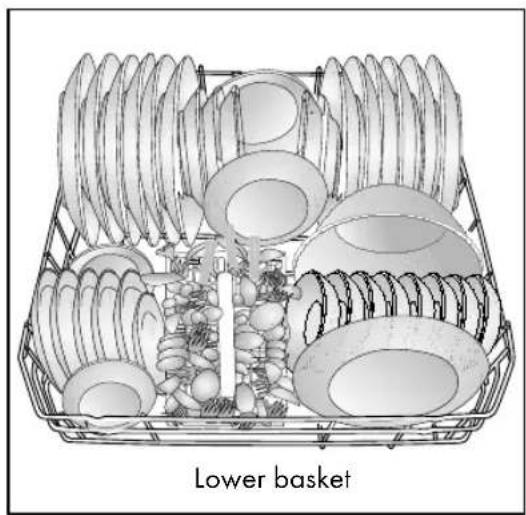
You can use your dishwasher in the optimum way with respect to energy consumption and washing and drying performance only if you place the dishes in an orderly way.
- Wipe away any coarse food remnants (bones, seeds, etc.) on the dishes before placing them in the dishwasher.
- Place thin, narrow pieces in the middle sections of baskets if possible.
- There are two separate baskets in which you can place your dishes in the dishwasher. Place the heavily soiled and bigger items in the lower basket and smaller, delicate and light items in the upper basket.
- Place the hollowed dishes such as bowls, glasses and pans upside down in the dishwasher. Thus, accumulation of water in deep hollows is prevented.

To prevent possible injuries, always place the sharp and pointed dishes such as service fork, bread knife, etc. upside down so as their pointed ends will face down or they will lie horizontally in the dish basket.
Unload dishes in the lower basket first and then the dishes in the upper basket.
Preparation
Suggestions for loading the dishwasher
natural_image
Illustration of a basket containing various kitchen utensils and dishes, labeled 'Lower basket' (no text or symbols on the diagram itself)Improper Loading Of Dishware
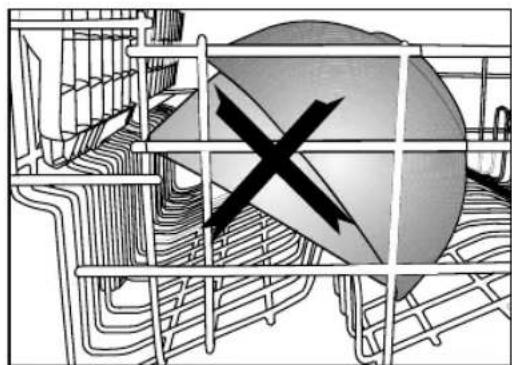
natural_image
Diagram of a grid structure with a central globe and cross symbol, no readable text or labels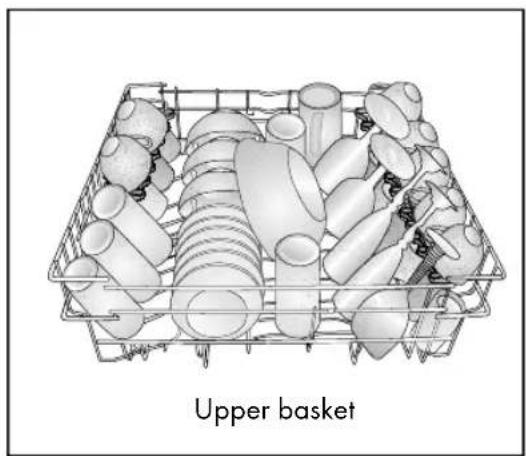
natural_image
Illustration of a basket filled with various plastic bottles and cutouts, labeled 'Upper basket' below (no other text or symbols)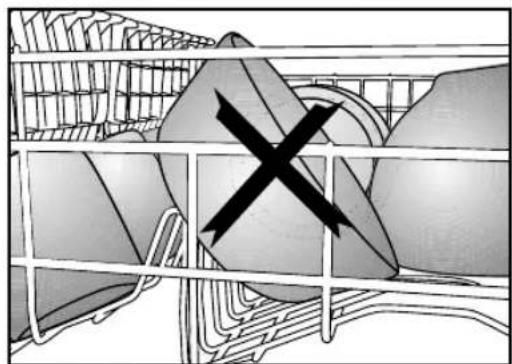
natural_image
Diagram of a cage with a black X mark symbol, no text or labels presentImproper Loading Of Dishware
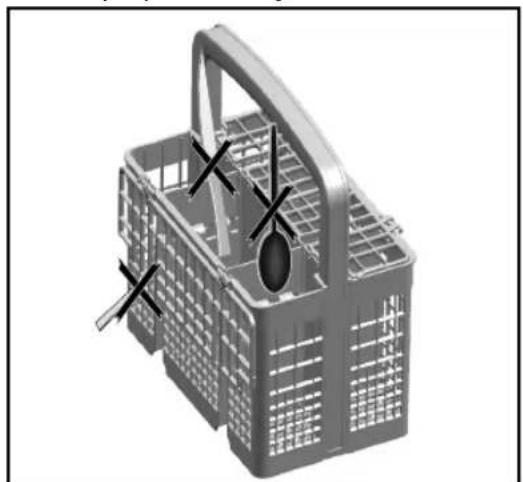
natural_image
3D model of a plastic basket with handles and compartments, marked with black X symbols (no text or labels)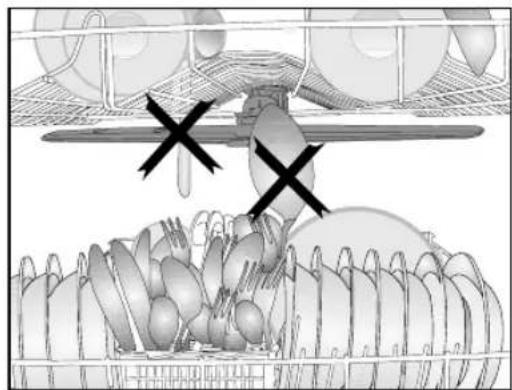
natural_image
Illustration of a poultry farm with chickens and fish, marked with X symbols (no text or labels)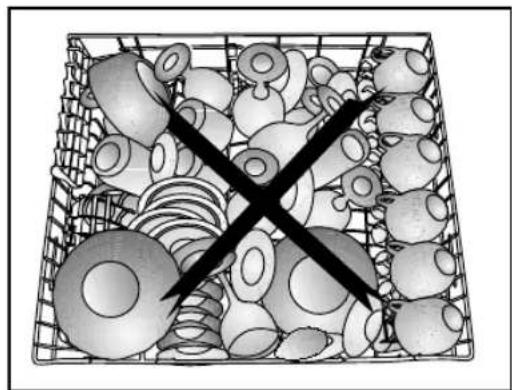
natural_image
Black cross symbol crossed over a grid of circular objects, no text or symbols presentSilverware basket piece
(depends on model)
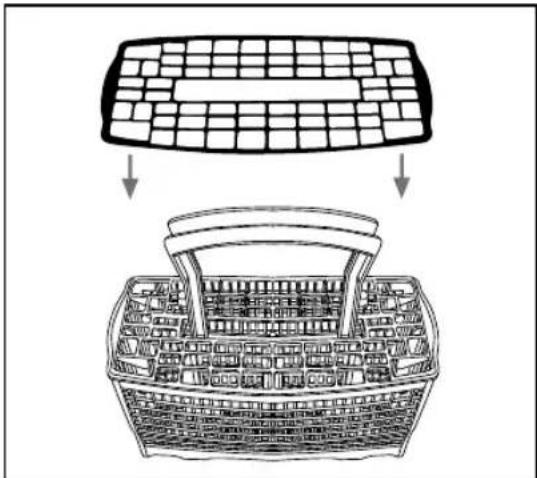
You can place your forks, spoons and etc. to upper basket with the additional piece in the figure..
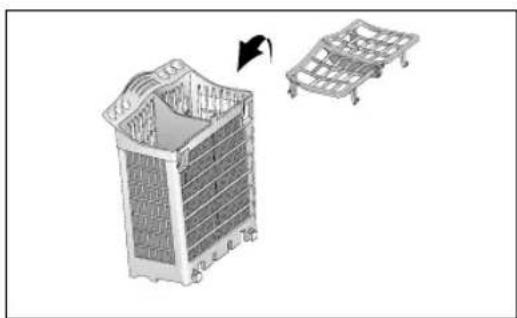
natural_image
3D architectural model of a building with a curved roof and a separate cart, shown in two views (no text or symbols)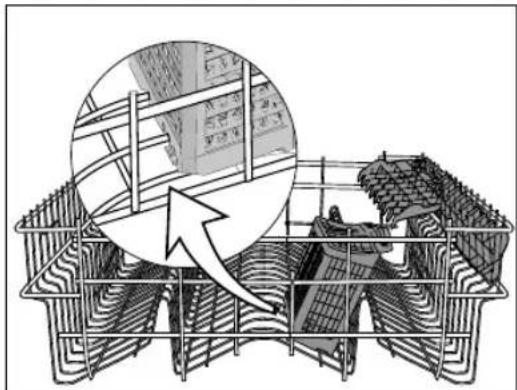
natural_image
Illustration of a construction site with scaffolding and workers, no visible text or symbolsSilverware basket
(depends on model)
Silverware basket is designed to wash your dishes such as fork, spoon and etc. in a cleaner manner.
Cutlery basket
(depends on model)
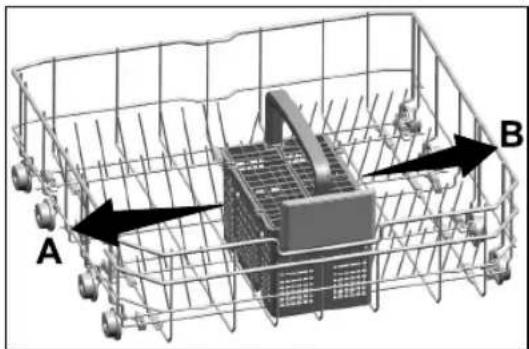
Cutlery basket is designed to wash your dishes such as knife, fork, spoon, etc. in an efficient manner.
Since the cutlery basket can be moved (A, B), you can create more space while placing your dishes in the lower basket and free up space for your dishes of different sizes.
natural_image
3D wireframe model of a mechanical or industrial component with labeled points A and B, no readable text or symbols present.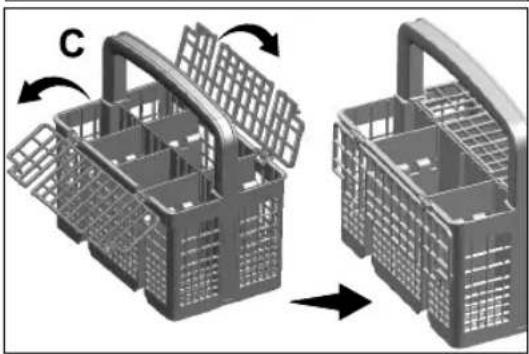
natural_image
3D model of a plastic basket with internal compartments and handle, shown in two sequential stages (no text or symbols)Cutlery basket
(depends on model)
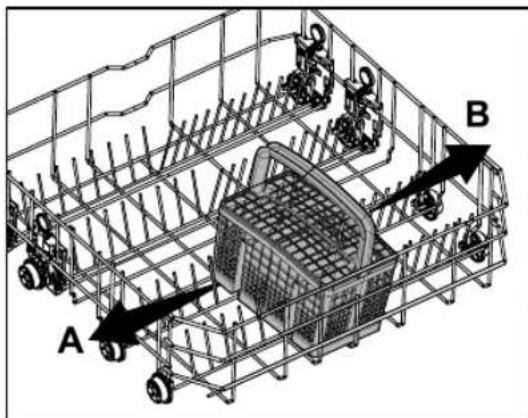
Cutlery basket is designed to wash your dishes such as knife, fork, spoon, etc. in an efficient manner.
Since the cutlery basket can be moved (A, B), you can create more space while placing your dishes in the lower basket and free up space for your dishes of different sizes..
natural_image
3D wireframe diagram of a shopping cart with labeled points A and B, showing structural components and arrows (no text or symbols beyond labels)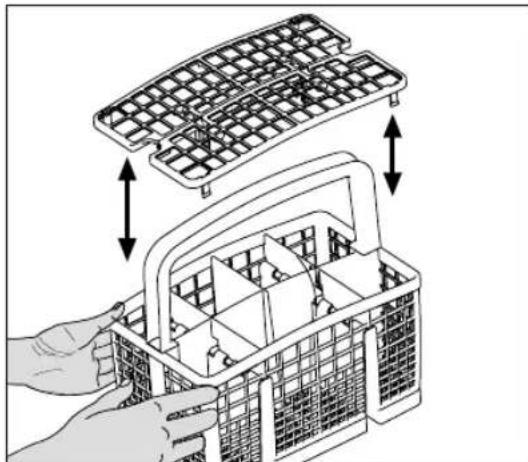
natural_image
Illustration of a hand assembling a wire cage into a container with arrows indicating assembly (no text or symbols)Collapsible lower basket wires (6 pieces)
(depends on model)
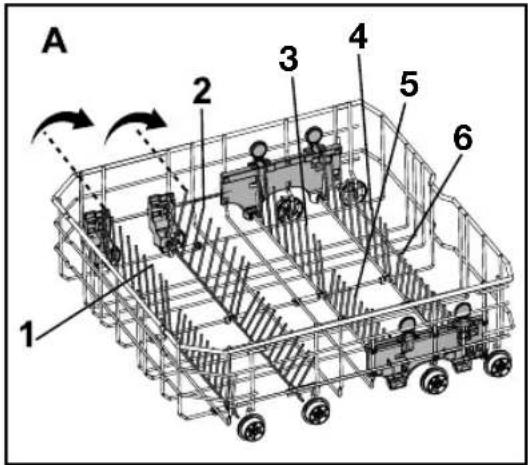
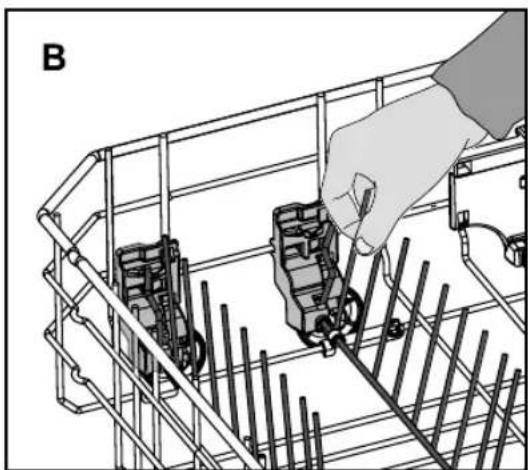
The foldable wires (A) located at the lower basket of the machine are designed for an easier placement of large pieces such as pans, bowls, etc. You can create larger spaces by folding each wire individually or all them at once.
To bring the collapsible wires into horizontal position, grab the wire from mid position and push them in the directions of arrows (B) To bring the wires back to vertical position, just lift them up. Collapsible wires will click into the latch again.

Bringing the wires to the horizontal position byholding them from the tips may cause them to bend. Therefore, it will be appropriate to bring the wires in the middle to horizontal or vertical position by holding them from their stems and pishing in the direction of arrow.
natural_image
Technical line drawing of a mechanical assembly with a hand adjusting components inside a wire cage (no text or symbols)Collapsible lower basket wires (4 pieces)
(depends on model)
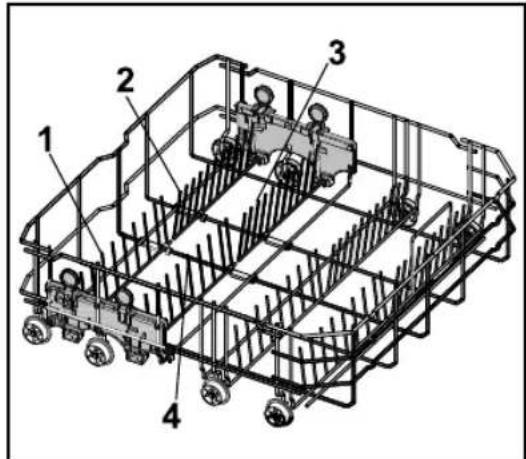
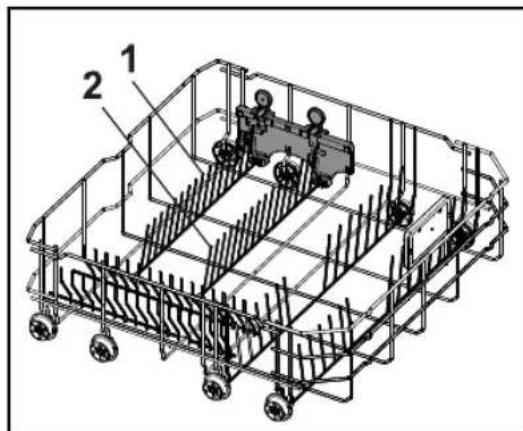
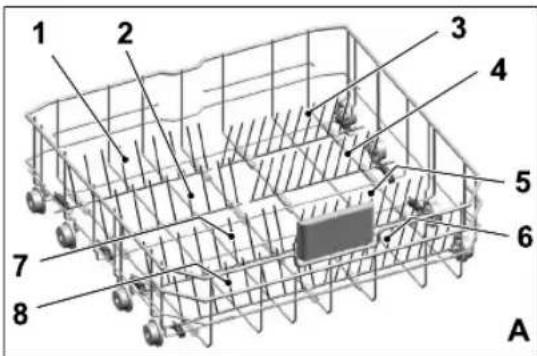
The four piece foldable wires located at the lower basket of the machine are designed for an easier placement of large pieces such as pans, bowls, etc. (1, 2, 3, 4). You can create larger spaces by folding each wire individually or all of them at once. Lay the foldable wires down by pressing on the latch (A).
Collapsible lower basket wires (2 pieces)
(depends on model)
The two piece foldable wires located at the lower basket of the machine are designed for an easier placement of large pieces such as pans, bowls, etc. (1, 2).
You can create larger spaces by folding each wire individually or all of them at once. Lay the foldable wires down by pressing on the latch (A).
Collapsible lower basket tines
(depends on model)
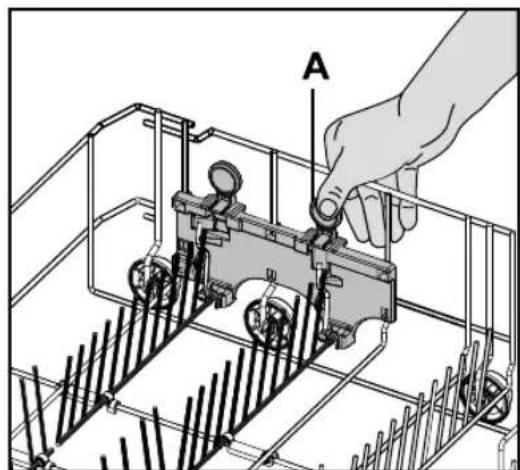
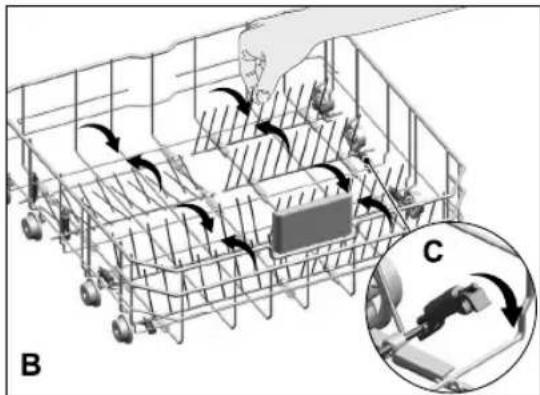
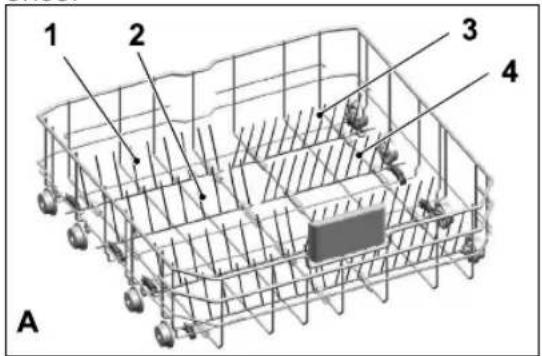
There are foldable tines (A) located at the lower basket of the machine are designed for an easier placement of large pieces such as pans, bowls, etc. You can create larger spaces by folding each tines individually or all of them at once.
To bring the collapsible tines into horizontal position, grab the tines from mid position and push them in the directions of arrows (B). To bring the tines back to vertical position, just lift them up. Collapsible tines will click into the latch again (C).
natural_image
Diagram of a car storage or logistics system with directional arrows indicating movement, no text or symbols present
Bringing the tines to the horizontal position by holding them from the tips may cause them to bend. Therefore, it will be appropriate to bring the tines in the middle to horizontal or vertical position by holding them from their stems and pushing in the direction of arrow.
Collapsible lower basket tines
(depends on model)
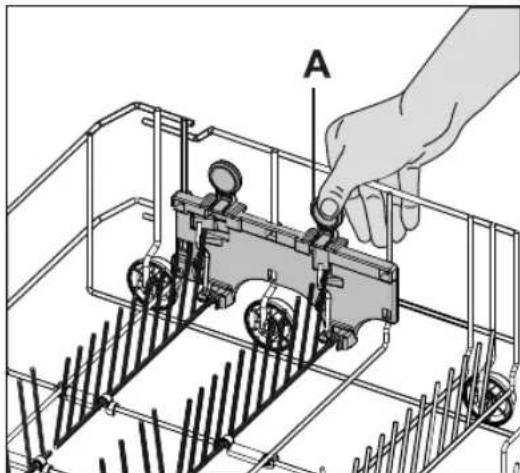
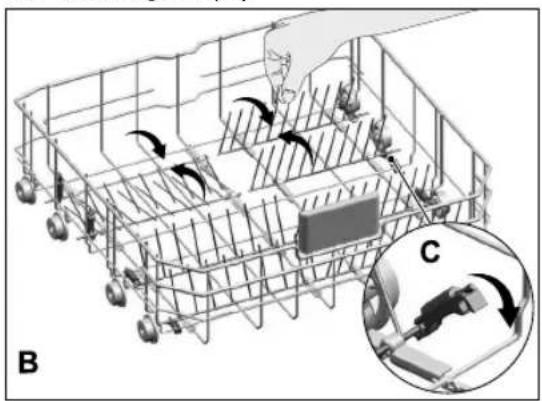
There are foldable tines (A) located at the lower basket of the machine are designed for an easier placement of large pieces such as pans, bowls, etc. You can create larger spaces by folding each tines individually or all of them at once.
To bring the collapsible tines into horizontal position, grab the tines from mid position and push them in the directions of arrows (B). To bring the tines back to vertical position, just lift them up. Collapsible tines will click into the latch again (C).
natural_image
Diagram of a vehicle storage or processing system with rotating components and a magnified inset showing internal components (no text or symbols)
Bringing the tines to the horizontal position by holding them from the tips may cause them to bend. Therefore, it will be appropriate to bring the tines in the middle to horizontal or vertical position by holding them from their stems and pushing in the direction of arrow.
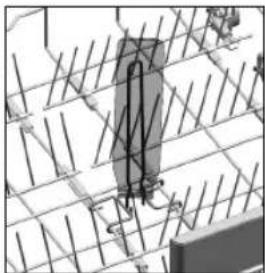
Lower basket bottle wire
(depends on model)
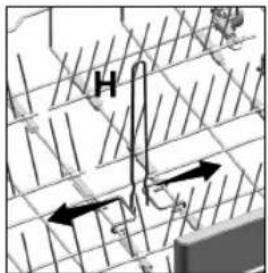
The bottle wire is designed for easier washing of long pieces with wide mouths. You may take out the bottle wire from the basket when not in use by pulling it out from both sides (H).
natural_image
Architectural or engineering diagram showing grid lines and a central shaded area (no text or symbols)SoftTouch Accessory
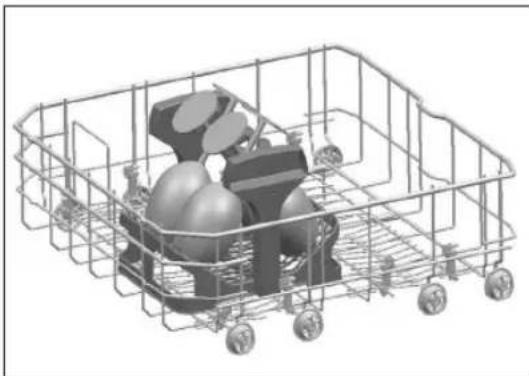
(depends on model)
The SoftTouch Accessory found in the lower basket of your machine enables a safe washing for your fragile glasses.
natural_image
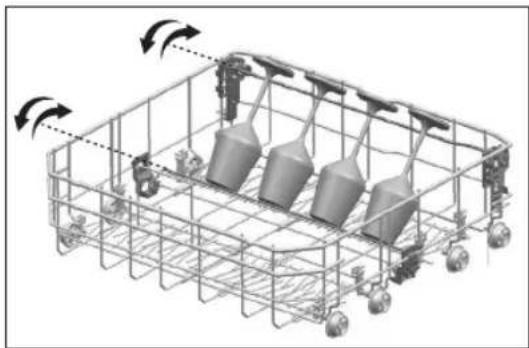
3D wireframe model of a shopping cart filled with goods, no text or symbols visibleLower Basket Glass Holder
(depends on model)
Lower Basket Glass Holder found in the lower basket of your machine enables a safe washing for your oversized and tall glasses.
natural_image
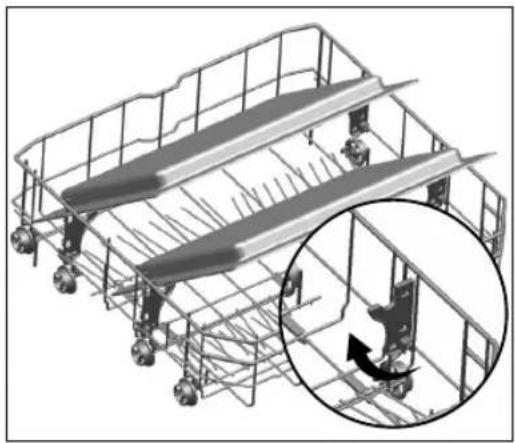
3D wireframe diagram of a mechanical assembly with cylindrical components and directional arrows (no text or symbols)Tray Wash Supports
(depends on model)
Use the supports to wash trays in the bottom basket.
See the Auxiliary functions section for appropriate programme and function selection.
natural_image
3D wireframe diagram of a multi-level metal shelving unit with a magnified inset showing a mechanical component (no text or symbols)Lower basket multipurpose / height adjustable service rack
(depends on model)
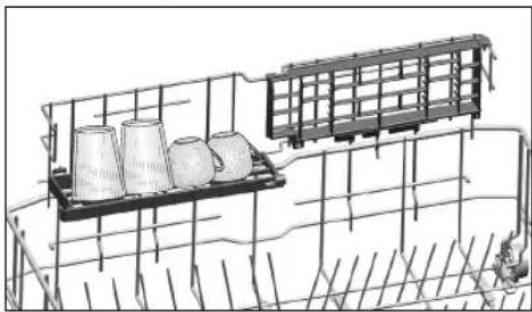
This accessory located at the lower basket of your machine allows you to easily wash pieces such as extra glasses, long ladles and bread knives.
natural_image
Technical line drawing of a mechanical assembly with cylindrical components and a grid-patterned component (no text or symbols)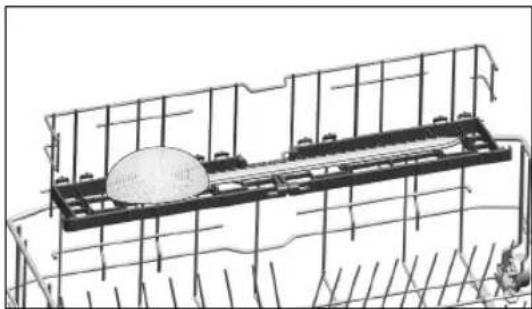
natural_image
Technical line drawing of a mechanical assembly with grid lines and a central circular component (no text or symbols)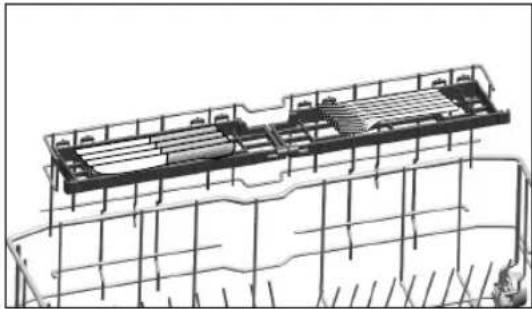
natural_image
Technical line drawing of a structural framework with grid supports and a central platform (no text or symbols)
You may use the racks as required by moving them to lower or upper position, or close them to create a wider space in your lower basket.

Make sure that the impeller does not touch the dishes you placed on the racks.
To close the racks:
- Fold the rack (A).
- Slide the rack up (B).
- Put the rack in vertical position (C).
- Slide the rack down and lock it by the tabs (D).
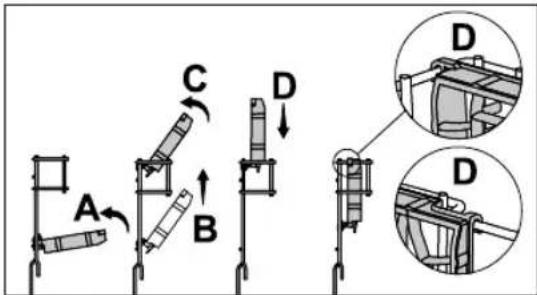

You may open the racks in the same process in reverse order.
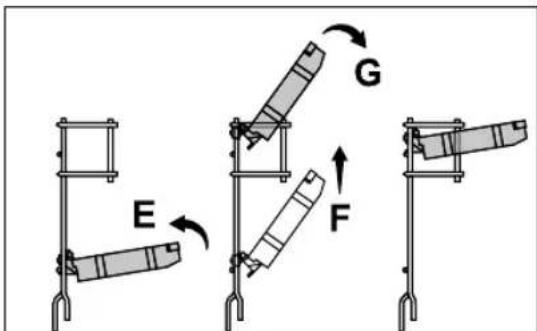
To adjust the height of the racks:
- Fold the rack (E).
- Slide the rack up (F).
- Open the rack at the desired level (G).
Upper basket height adjustable rack
(depends on model)
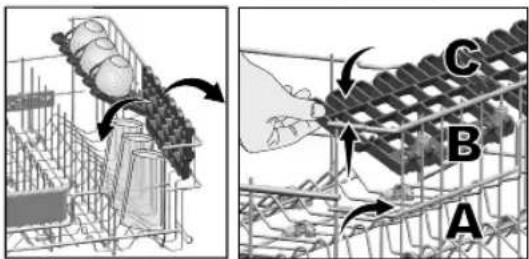
Use the lower and upper parts of the height adjustable racks in the upper basket of the machine by sliding them down or up according to the heights of the glasses, cups or etc. (A, B, C).
Upper basket drawer
(depends on the model)
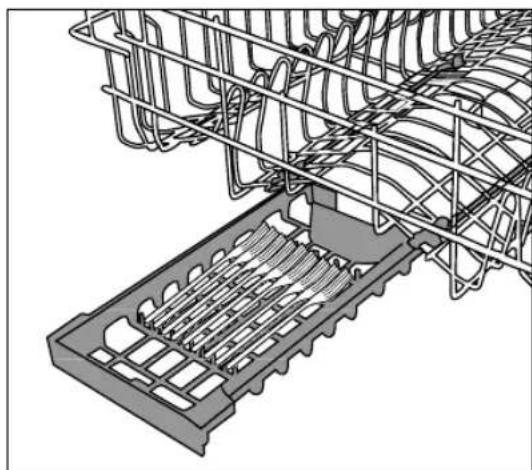
You can easily place additional desert spoons, small forks and knives into the basket drawer installed to the upper basket of your machine.
natural_image
Technical line drawing of a mechanical component with grid-like structure and internal channels (no text or symbols)Upper basket glass support piece
(depends on the model)
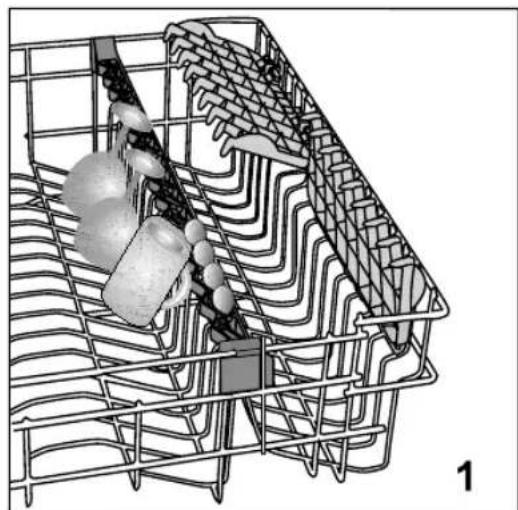
When placing long stemmed glasses or wine glasses, do not lean them against other pieces but to the edge of the basket or to the rack (1). Do not lean long glasses against each other. They can move and get damaged during washing.
If you wish to place large-volume pieces on the upper basket, release the tab of the glass support piece from the upper basket wire it is hooked to. Thus, you can obtain a wider space.
natural_image
Diagram of a wire mesh container with embedded objects, no visible text or symbols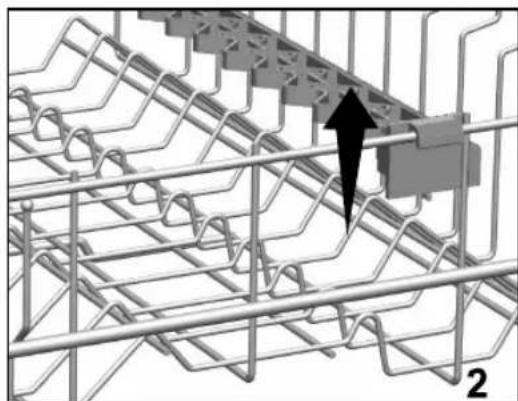
natural_image
Technical diagram of a grid-based structure with a black arrow pointing to a component, labeled '2' (no text or symbols on the diagram itself)Upper basket glass support piece
(depends on the model)
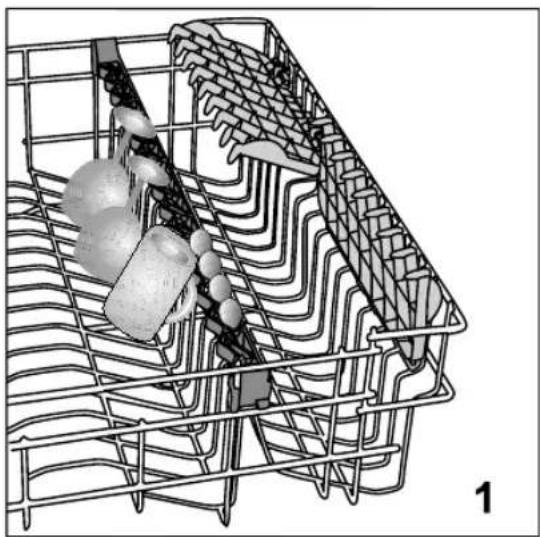
When placing long stemmed glasses or wine glasses, do not lean them against other pieces but to the edge of the basket or to the rack (1). Do not lean long glasses against each other. They can move and get damaged during washing.
If you wish to place large-volume pieces on the upper basket, release the tab of the glass support piece from the upper basket wire it is hooked to. Thus, you can obtain a wider space.
natural_image
3D wireframe diagram of a mechanical or electrical component with spherical elements and a grid structure (no text or symbols)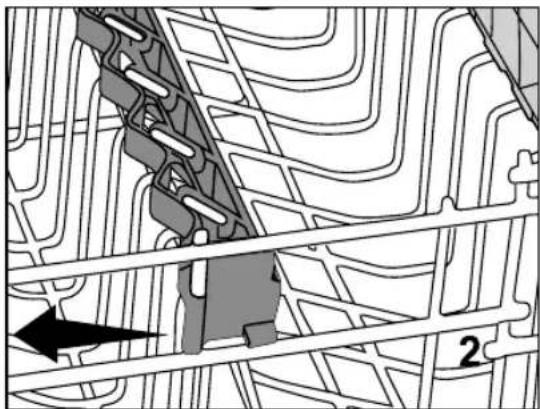
natural_image
Topographic map section showing contour lines, roads, and a marked location (no text or labels)Collapsible upper basket wires
(depends on the model)
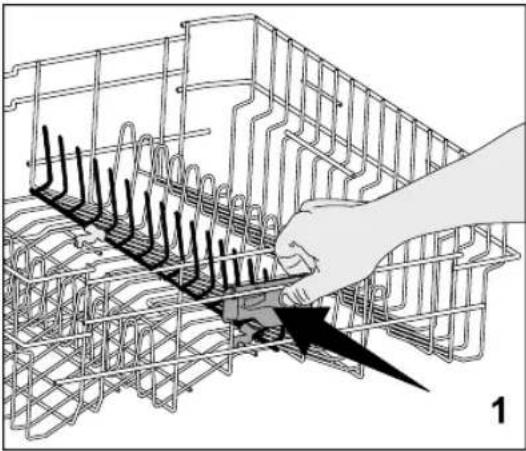
To bring the collapsable wires on the upper basket of the machine into horizontal position, press on the latch (1). Place your larger dishes into the area created (2). To bring the wires back to vertical position, just lift them up.
natural_image
Illustration of a hand using a tool to adjust or install a grid-like structure with black connectors (no text or symbols visible)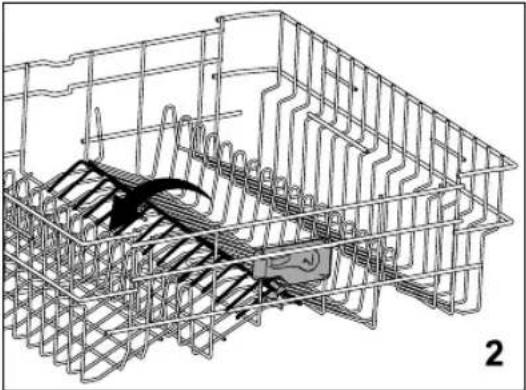
natural_image
3D wireframe model of a mechanical cage or enclosure with internal components (no text or symbols)Collapsible upper basket tines
(depends on model)
There are foldable tines on the upper basket of the machine that you can lay down when you need larger space for big dishes. On your upper basket there are two types of laying tines namely, fully laid system (A) and gradually laid system (B). To bring the foldable tines into horizontal position, push the tines in the direction of the arrow by holding from the middle. Place your larger dishes into the area created. To bring the tines back to vertical position, just lift them up. Foldable tines will then snap in the latch again.
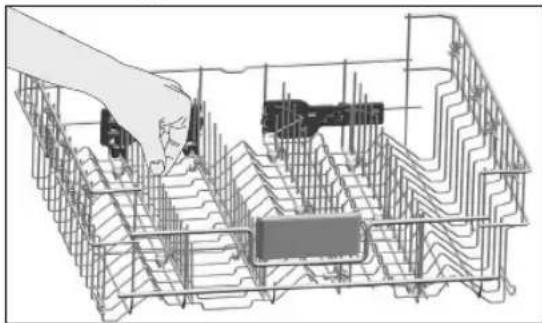
natural_image
Technical line drawing of a mechanical assembly with internal components and a hand interacting (no text or symbols)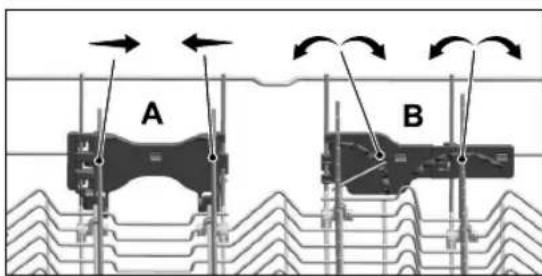

Holding the tines from ends to put them in lying position may cause the tines to bend. For this reason, it will be appropriate to hold the tines in the middle from their bottoms and to push in the direction of the arrow to lay down or bring them to vertical position.
Collapsible upper basket tines
(depends on model)
Upper basket of the machine is equipped with tines with gradual folding system (A) that you can lay down when you need a larger space for large dishes.
To bring the collapsible tines into horizontal position, grab the tines from mid position and push them in the directions of arrows. Place your larger dishes into the area created. To bring the tines back to vertical position, just lift them up. Collapsible tines will click into the latch again.
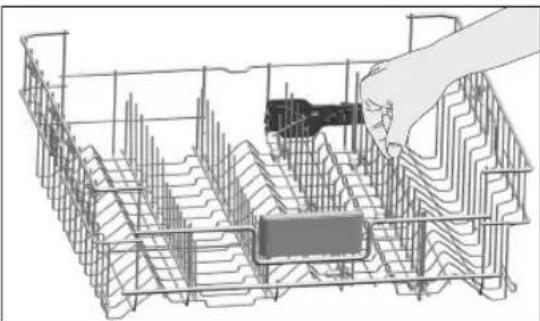
natural_image
Technical line drawing of a mechanical assembly with internal components and a hand interacting with it (no text or symbols)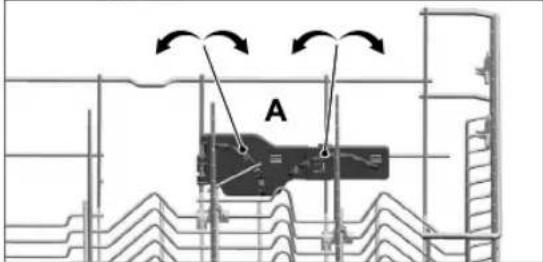

Bringing the tines to the horizontal position by holding them from the tips may cause them to bend. Therefore, it will be appropriate to bring the tines in the middle to horizontal or vertical position by holding them from their stems and pushing in the direction of arrow.
Adjusting the height of the upper basket
(depends on model)
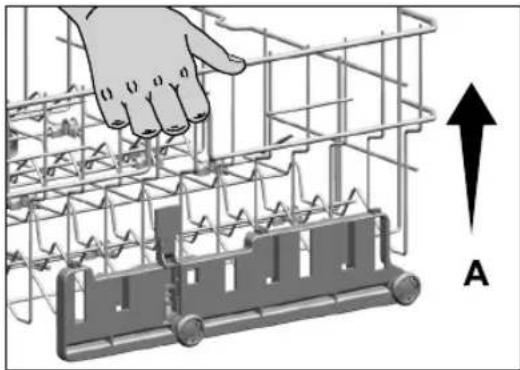
Basket adjustment mechanism on the loaded upper basket of the machine is designed to allow you create taller areas in the upper or lower section of the machine based on your requirements by adjusting the height of the loaded basket in up or down directions.
To raise the basket:
Grab one of the upper basket wires (right or left) and lift it up (A).
Repeat the same process to raise the other side of the basket.
natural_image
Diagram of a hand interacting with a multi-level mechanical device, showing structural components and an upward arrow labeled 'A' (no text or symbols on the diagram itself)Make sure that both sides of the loaded basket height adjustment mechanism are at the same level (down or up).
To lower the basket:
Press the latch on the loaded basket adjustment mechanism (right and left) to lower the basket (B).
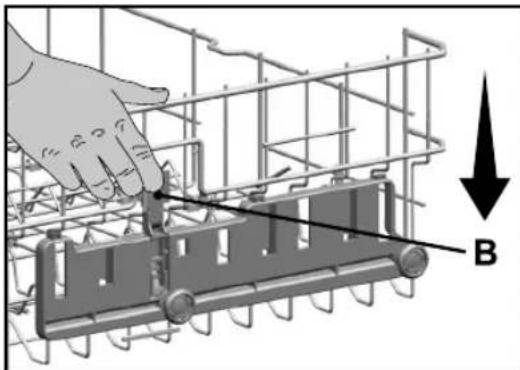
Repeat the same process to lower the other side of the basket.
Make sure that both sides of the loaded basket height adjustment mechanism are at the same level (down or up).
Adjusting the height of loaded upper basket
(depends on model)
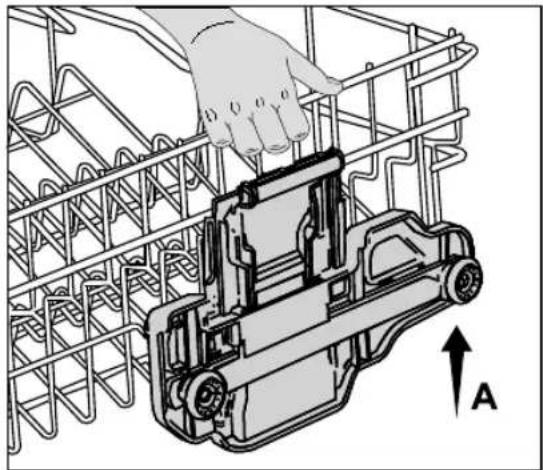
Basket adjustment mechanism on the upper basket of the machine is designed to allow you create wider areas in the upper or lover section of the machine based on your requirements by adjusting the height of the loaded basket in up or down directions without removing it from the machine.
To raise the basket:
- Grab one of the upper basket wires (right or left) and lift it up (A).
- Repeat the same process to raise the other side of the basket.
- Make sure that both sides of the basket height adjustment mechanism are at the same level (down or up).
To lower the basket:
- Press the latch on the basket adjustment mechanism (right or left) to lower the basket (B).
- Repeat the same process to lower the other side of the basket.
- Make sure that both sides of the basket height adjustment mechanism are at the same level (down or up).
natural_image
Technical illustration of a hand interacting with a mechanical device inside a wire mesh cage (no text or symbols)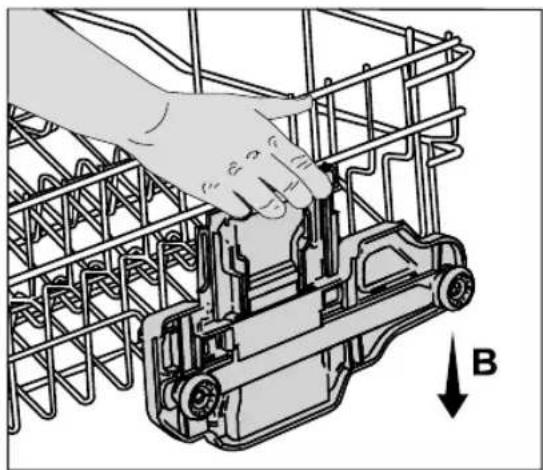
natural_image
Diagram of a hand operating a mechanical device inside a wire cage, with a directional arrow labeled B (no text or symbols on the diagram itself)Height setting with empty basket
(depends on model)
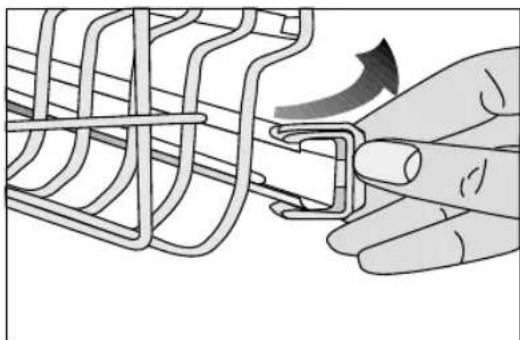
In this model, the height setting of the upper basket may be changed using the wheels which are mounted at two different heights.
Release the latches on both the right and left tracks of the upper basket by pushing them outwards
Pull out the basket out completely.
Place the basket back into the tracks at the desired height
Push the latches back into the correct position.
natural_image
Illustration of a hand fastening a wire mesh component with a curved arrow indicating rotation (no text or symbols)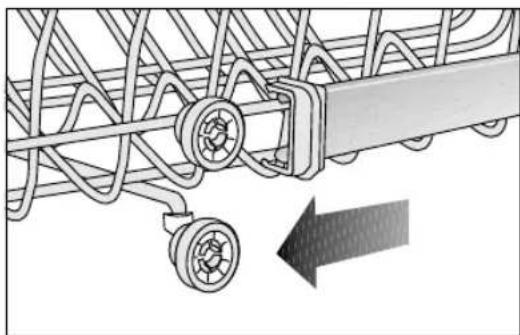
natural_image
Mechanical assembly diagram showing a linkage mechanism with pulleys and a directional arrow (no text or symbols)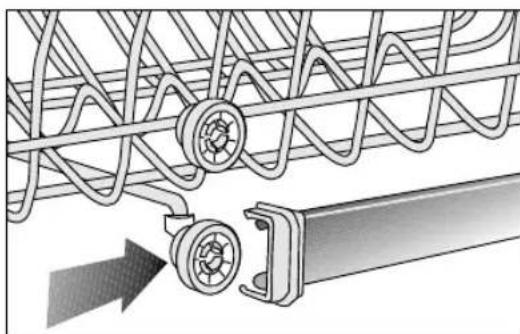
natural_image
Technical illustration of a mechanical assembly with coiled spring and connecting rod (no text or symbols)Upper cutlery basket
(depends on model)
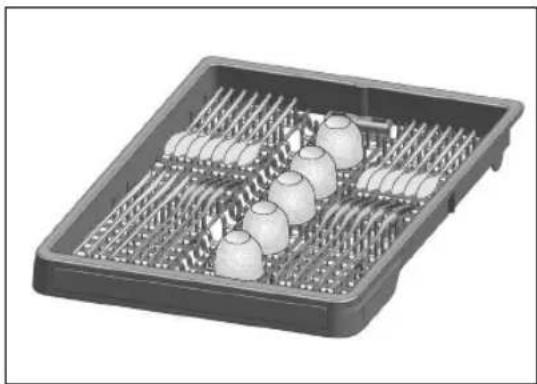
The upper cutlery basket is designed for small dishes, or long items that cannot fit into the lower cutlery basket.
natural_image
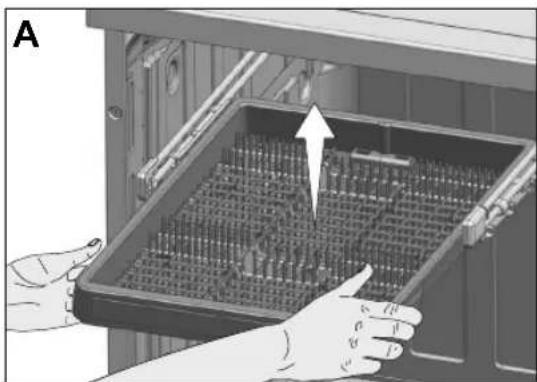
3D rendering of a rectangular tray with multiple circular objects arranged in rows (no text or symbols visible)Thanks to the easy take-out-from-the-machine feature, it allows taking out the dishes from the machine together with the basket after they are washed (A). Since it can fit into all standard size drawers, it does not require the dishes to be removed from the basket and placed into the kitchen drawers or shelves.
natural_image
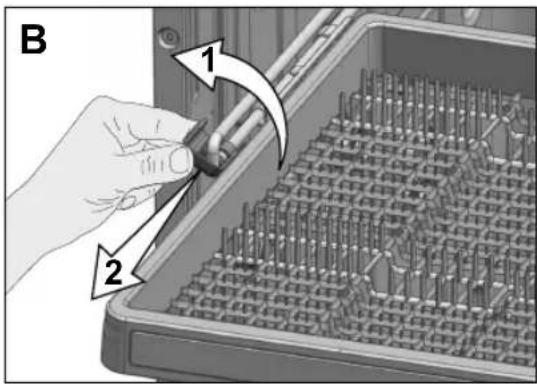
Illustration of hands installing a rack-mounted grid device into a control panel (no text or symbols visible)If you don't want to use the upper cutlery basket, pull it back to yourself to remove it from the machine, rotate the rail lids towards outside and pull them towards yourself to take them out (B).
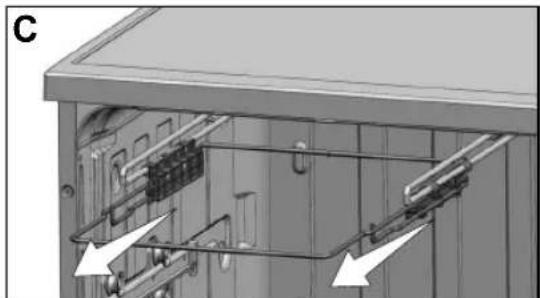
After taking out the basket by lifting it up, remove the carrier part from the rails by pulling it towards yourself (C).
natural_image
Technical diagram of an electrical cabinet with internal components and directional arrows indicating movement (no text or symbols present)Replace the rail lids and push them back to seat them into their places. Turn the rails inside the machine sideways to seat them properly in their places (D).
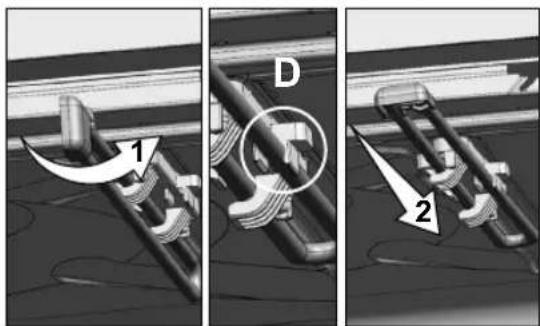
In order to replace the upper cutlery basket into its place again, repeat the same process in reverse order.
5 OPERATING THE PRODUCT
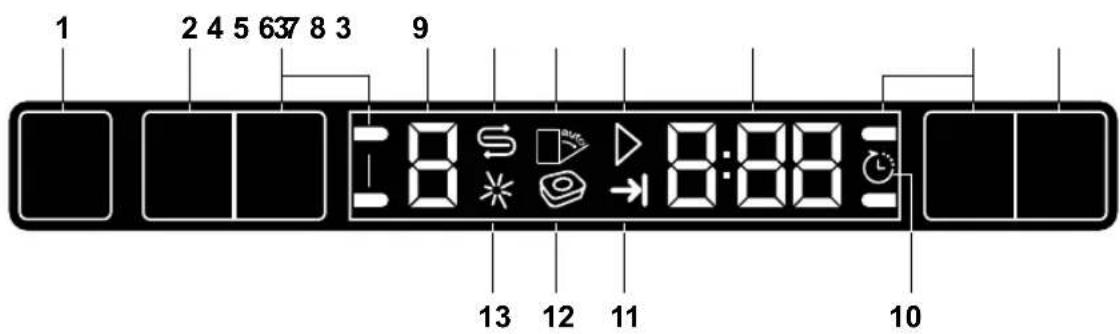
- On/Off key
- Programme Selection / Programme Cancel (3 seconds) key
- Function keys
F1 Half Load function
F2 Extra Drying Function
F3 Fast+ Function
F4 TurboWash Function - Programme indicator
- Salt indicator
- Not in use
- Start / Cancel indicator
- Time Delay / Programme Time indicator
- Time Delay key
- Time Delay indicator
- End of Programme indicator
- Not in use
- Rinse Aid indicator
Keys
On/Off key
When you press On / Off key, indicator lights illuminate on the display for ON position. The lights turn off in OFF position.
Programme Selection / Programme Cancel key
Press this key until the desired programme appears in the programme indicator.
To cancel the running programme open the door of the product. Press and hold the Programme Selection / Programme Cancel keys for 3 seconds. After the 3 - 2 - 1 countdown, 0:01 is displayed, close the door of the product and wait for the draining process complete.
Draining is completed in 2 minutes and the machine gives an audible warning when it is completed.
Function keys
If you press any of the Function keys during programme selection or time delay selection, an affirmative key signal will be heard provided that the relevant function is supported by the selected programme. Function will be deemed selected when the indicator of the selected function is lit.
To cancel the selected function, keep the function key pressed until the function indicator disappears.
Preparing the machine
- Open the door of the dishwasher.
- Place the dishes in accordance with the instructions in the user manual.
- Make sure that the upper and lower impellers rotate freely.
- Put adequate amount of detergent into the detergent dispenser.
Programme selection
- Press the On/Off button to turn on your machine.
- Check the Salt and Rinse Aid indicators and add salt and/or rinse aid if needed.
- Refer to the table of "Programme data and average consumption values" to determine a washing programme suitable for your dishes.
- Selected programme will start when you close the door of your machine.
| Programme Table | ||||||||
| Programme number | 1 | 2 | 3 | 4 | 5 | 6 | 7 | 8 |
| Programme name | Pre-wash | Mini | Eco * | Quick | Intensive | Hygiene | Mix+ | Auto |
| Cleaning temperature | - 35 °C 45 | °C 60 °C 70 °C 70 | °C 70 °C 40-65 °C | |||||
| Degree of Soiling | Suitable for removing the remnants on the soiled dishes that will be kept waiting in the machine for a few days, and thus, for preventing the bad odour buildup. | Suitable for lightly soiled daily dishes that are scraped or pre-cleaned. | Most economical washing programme for the medium soiled daily dishes that are kept waiting. | Daily washing programme at which the medium soiled dishes that are kept waiting are cleaned in the fastest way. | Suitable for heavily soiled dishes, pots and pans. | Suitable for the dishes which require extra hygiene such as articles for babies. Also suitable for heavily soiled dishes. | The best suitable programme for the mixed nature of the daily dishes. Glass and crystal utensils are washed sensitively in the upper basket while the pots and pans are washed powerfully in the lower basket. | Determines the soiling degree of the dishes and sets the temperature and amount of the washing water as well as the washing time automatically. Suitable for all types of dishes. |
| - | Low | Medium | Medium | High | High | High | Medium to high | |
| Prewash | + | - | + | - | + | + | + | + |
| Wash | - | + | + | + | + | + | + | + |
| Dry | - | - | + | + | + | + | + | + |
| Duration (min) | 15 | 30 | 142 | 58 | 153 | 127 | 183 | 110-210 |
| Water (l) | 4 | 10,2 | 11,2 | 10,2 | 16,2 | 17,6 | 18,6 | 10,2-14,4 |
| Energy (kWh) | - | 0,80 | 0,89 | 1,30 | 1,43 | 1,68 | 1,36 | 0,90-1,45 |
The consumption values shown in the table were determined under standard conditions. Differences may therefore occur under practical conditions. * Reference
programme for testing institutes. The tests in accordance with EN 50242 must be carried out with a full water softener salt dispenser and a full rinse aid reservoir, and
using the test programme.
Auxiliary functions
Washing programmes of your dishwasher are designed to obtain the best cleaning effect, considering the type of the soiling, soiling degree and properties of the dishes to be washed. Auxiliary functions allow you save from time, water and power.

Auxiliary functions may cause changes in the programme duration.
Auxiliary functions are not suitable for all washing programs. Indicator of the auxiliary function that is not compatible with the programme will not be active.
Half Load function
It is used to operate the machine without loading it completely.
- Load your dishes in the machine as you like.
- Turn the machine on with On/Off key.
- Select the desired programme and press the Half Load key.
While the function is enabled, the Half Load indicator will become on in the function selection indicator and on the display.
- Close the door of the machine to start the programme.

With the Half Load function you can save both water and power while using the lower and upper baskets of the machine.
TurboWash Function
This function operates the lower impeller with a higher pressure and higher speed to enable a better washing for dishes such as pans and trays with stubborn, dried soiling.
Fast+ Function
It shortens the time of the washing cycle selected and decreases water consumption by enabling washing under higher pressure.
Extra Drying Function
It provides superior drying performance.
Auto Tablet Feature
Auto Tablet is a feature which detects the use of combined tablet detergents automatically.

Drying performance of these type of detergents is improved by adjusting temperature and duration accordingly.
Owing to this feature, there is no need to press any button in case of a tablet detergent use.
Feature can be activated if automatic detection is desired.
To activate / to deactivate:
- After turning on the machine, press Time Delay and P keys simultaneously. Keep them pressed until the countdown 3, 2, 1 is completed on the display.
- Press P key to activate the a: option. Automatic detergent detection feature is disabled at "a:0" option and enabled at "a:1" option. Set the desired option by pressing the Time Delay key.
- Turn off the machine with On/Off key to save the changes.
Interior Lighting
(Depends on the model)
Some models have interior lighting to illuminate the interior when the door is opened.
Changing the interior lighting setting
-
After turning on the machine, press Time Delay and P+ keys simultaneously. Continue to press until the countdown 3, 2, 1 is completed on the display.
-
Press P+ key to activate the L: option. The interior lighting is turned off at "L:0" option and turned on at "L:1" option. Set the desired option with the Time Delay key.
-
Turn off the machine with On/Off key to save the changes.
Changing Warning Sound Volume
- After switching your machine on, press Time Delay and P / P+ keys simultaneously. Keep them pressed until the countdown 3, 2, 1 is completed on the display.
- Press P / P+ key to activate the S: position on the display.
- Each pressing on the Time Delay key will change the warning sound volume as "S:0" off, "S:1" medium and "S:2" high.
- Turn off the machine with the On/Off key to save the changes.
- Each pressing on the Selection key will change the warning sound volume as "S:0" off, "S:1" medium and "S:2" high.

Your machine is set to "S:2" as factory default.
Floor illumination
Warning to show that machine is in washing phase
(depends on the model)
Your machine reflects a light to the floor during the washing process. This light turns off after the washing process is complete.

Floor illumination is activated automatically when the washing programme starts and remains lit until the end of the programme.

Floor illumination cannot be cancelled by the user.
Scheduling the washing time
Time Delay
If an economical electricity tariff is applied in your region, you can use the Time Delay function to wash your dishes during appropriate hours. You can delay the start of the selected programme until 24 hours.
- Press the Time Delay function key after selecting the washing programme and other auxiliary functions.
- Once you press the Time Delay key, Display Information Line will show "0:30" and Time Delay indicator will start flashing.
- Set the desired time by pressing the Time Delay key. Time will increase with increments of 30 minutes up to 6 hours and after that in 1 hour increments up to 24 hours every time you press the key.
- Close the door of your machine after setting the Delayed Start. Once the delay time is over, the selected programme will start automatically.
Changing the settings while Time Delay function is active
While the Time Delay function is activated, you cannot make changes in the washing programme, auxiliary functions or the duration of delay time.

Programme and auxiliary functions cannot be set/ changed after the programme has started.
To cancel the Time Delay function
Open the door of the product Press and hold the Programme Selection / Programme Cancel keys for 3 seconds. After the 3 - 2 - 1 countdown, 0:01 is displayed, close the door of the product and wait for the draining process complete. Draining is completed in 2 minutes and the machine gives an audible warning when it is completed.

You can select and start a new programme following the cancellation of Time Delay function.

Time Delay function cannot be set after the programme starts.
Starting the programme
Close the door of your machine to start it after selecting the programme and auxiliary functions.

Your machine performs water softening depending on the hardness level of the supply water. Washing time can change while the programme is running depending on the ambient temperature where your machine is installed, temperature of the supply water and amount of the dishes.

Pay attention not to open the door of the machine when it is running. There may be a rush of vapour when you open the door of your machine; be careful.

The machine will remain silent in pause mode for some time in order to remove the water from the machine and on the dishes completely and to have the water softener cleaned, and then it will resume running in drying mode.
Cancelling the programme
Open the door of the product Press and hold the Programme Selection / Programme Cancel keys for 3 seconds. After the 3 - 2 - 1 countdown, 0:01 is displayed, close the door of the product and wait for the draining process complete. Draining is completed in 2 minutes and the machine gives an audible warning when it is completed.

There might be residues of detergent or rinse aid in the machine and/or on the pieces being washed depending on the step the programme you have cancelled was in.
Salt indicator (§)
Please check the salt indicator on the display to see whether there is adequate amount of softening salt in the dishwasher or not. You need to refill the salt reservoir with salt whenever salt indicator appears on the display of your machine.

Adjusting the water hardness level is explained in Water Softening System section.
Rinse Aid indicator (\*)
Please check the rinse aid indicator on the display to see whether there is adequate amount of rinse aid in the dishwasher or not. You need to refill the rinse aid reservoir with rinse aid whenever rinse aid indicator appears on the display of your machine.
End of programme

When the programme you have selected comes to an end, an audible warning signal will warn you to turn off your machine. This audible signal will warn you with certain intervals before it turns off.
End of Programme indicator will light up when the washing programme is over.
- Open the door of the machine.
- Press On/Off key to turn off your machine.
- Close the tap.
- Unplug the machine from the socket.

For energy saving, the machine is automatically turned off following the completion of the programme or if the programme is not started.

Leave your dishes in the machine for about 15 minutes to allow them cool down after they are washed. Your dishes will dry in a shorter time if you leave the door of your machine ajar during this period. This process will increase the drying effectiveness of your machine.
Water cut-off warning
If mains water is cut or water inlet tap is turned off the machine cannot take water in and E:02 icon will flash on the programme indicator. As long as the problem continues, washing programme is paused and the water inlet is checked regularly by the machine; when the water is restored E:02 icon will disappear after a while and the washing programme resumes.
Overflowing warning
If the machine intakes too much water or there is leakage at any of the components then the machine will detect this and E:01 icon will flash on the Programme indicator. As long as the overflowing continues safety algorithm will be active and try to discharge the water. If overflowing stops and safety is assured, E:01 icon will disappear. If E:01 does not disappear, there is a permanent fault. In this case the authorised service should be contacted.
InnerClean
This programme is recommended to be operated on each 1-2 months for machine cleaning and necessary hygiene. The programme should be operated while the machine is empty. In order to achieve an efficient result, it is recommended to use together with special machine cleaning agents.

Do not use this programme to clean dishes. As it operates in high temperatures, it is harmful for the dishes.
6 MAINTENANCE AND CLEANING
Service life of the product extends and frequently faced problems decrease if it is cleaned at regular intervals.
| Unplug the product and turn off the tap before attempting any cleaning procedures. | |
| Do not use abrasive substances for cleaning. | |
 | |
Cleaning the outer surface of the product
Wipe the outer surface and door gaskets of the product gently with a mild cleaning material and damp cloth. Wipe the "Control panel" only with a slightly damp cloth.
Cleaning the interior of the machine
- Clean the interior of the machine and the tank by running a programme with or without detergent based on the degree of soil.
- If water has remained in the machine, drain the water by performing the procedures under the topic "Canceling a programme". If the water cannot be discharged, remove the filters as specified in the "Cleaning the filters" section and check if there are any leftover deposits that have accumulated at the bottom of the machine, blocking the water path. Clean if necessary.
Cleaning the filters
Clean the filters at least once a week in order for the machine operates efficiently. Check if food residues are left on the filters. If there are food residues on filters, take them out and clean well under running water.
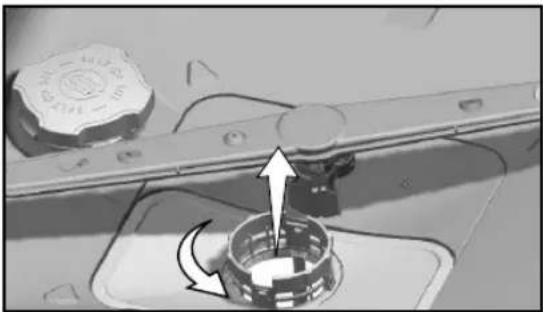
- Turn the micro filter (1) and coarse filter (2) assembly counter clockwise and pull it out from its seating.
natural_image
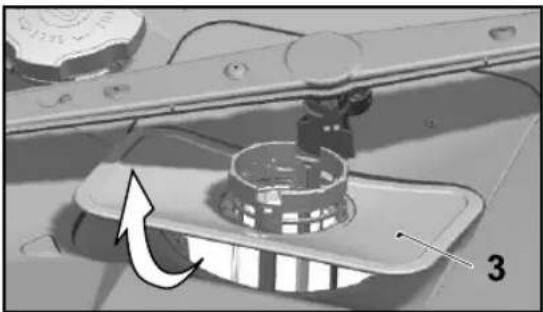
Mechanical assembly diagram showing a rotating component with directional arrows indicating motion (no text or symbols)- Pull out the metal/plastic filter (3) from the seating.
natural_image
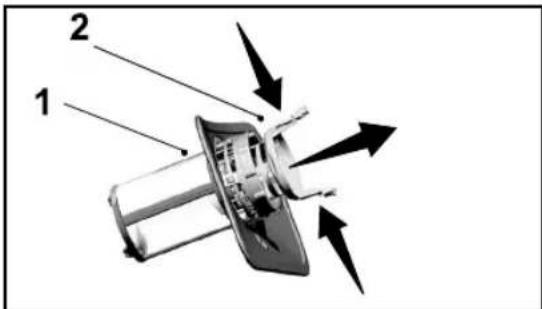
Mechanical assembly diagram showing a component with a rotating arrow and numbered label (3), no readable text or symbols present.- Press the two pawls on the coarse filter inwards and separate the coarse filter from the assembly.
- Clean all three filters under tap water by means of a brush.
- Place the metal/plastic filter.
- Place the coarse filter into the micro filter. Make sure that it is properly seated. Turn the coarse filter clockwise until a "click" sound is heard.

Do not use the dishwasher without filter.

Incorrect placement of the filters will reduce washing efficiency.
Cleaning the hose filter
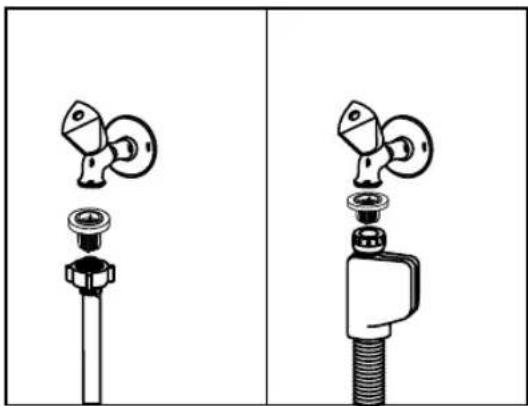
Damages on the machine that may be caused by impurities coming from the urban supply water or your own water installation (such as sand, dirt, rust, etc.) can be prevented by means of the filter attached to the water inlet hose. Check the filter and the hose regularly and clean them if necessary.
- Turn off the tap and remove the hose.
- After taking out the filter, clean it under running tap water.
- Place the cleaned filter back to its seat in the hose.
- Install the hose to tap.
(depends on model)
natural_image
Technical illustration of a mechanical valve assembly with two views (left and right) showing different components (no text or symbols)Cleaning the impellers
Clean the impellers at least once a week in order for the machine operates efficiently.
Lower impeller
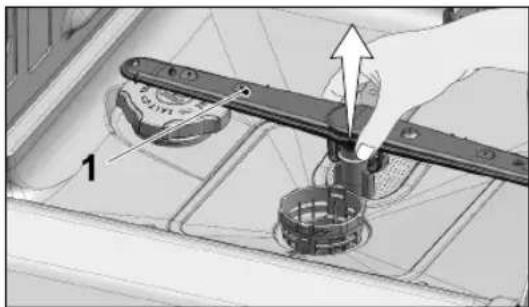
Check if the holes on the lower impeller (1) are clogged. If they are clogged, remove and clean the impeller. You can pull the lower impeller up to remove it.
natural_image
Mechanical assembly diagram showing a hand operating a lever with a gear and shaft (no text or symbols)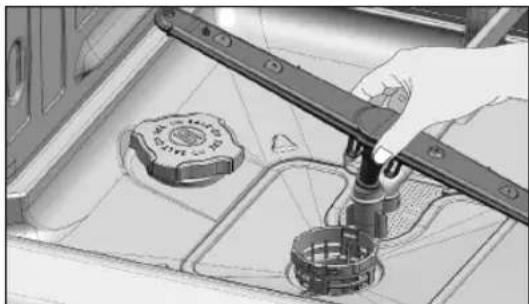
natural_image
Illustration of a hand using a tool to clean or repair a kitchen sink with a circular component (no text or symbols visible)Upper impeller
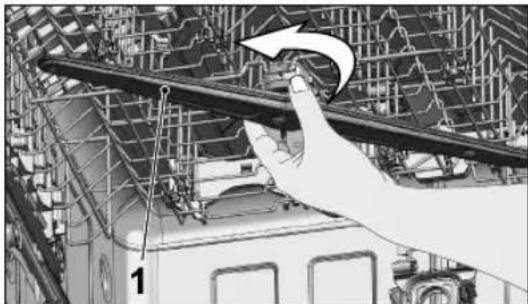
Check if the holes on the upper impeller (1) are clogged. If they are clogged, remove and clean the impeller. Turn its nut to left to remove the upper impeller. Make sure that the nut is tightened well when installing the upper impeller.
natural_image
Illustration of a hand holding a metal rod above a train car, with no visible text or symbols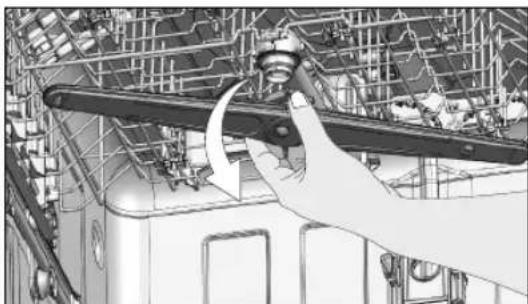
natural_image
Illustration of a hand adjusting a mechanical component on an industrial conveyor system (no text or symbols visible)Ceiling Impeller
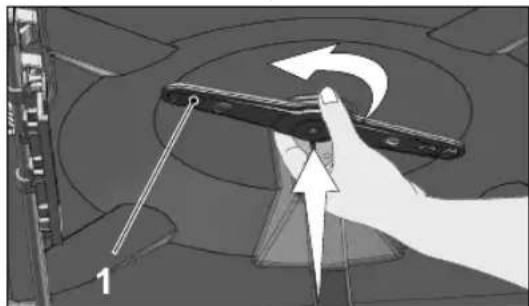
Check if the holes on the top ceiling impeller (1) of your machine are clogged. If they are clogged, remove and clean.
To remove them, slightly push them upwards and then rotate to left.
To install the impeller, seat it into its slot, push slightly upwards and turn it rightwards until it is securely tightened. When the impeller is released, check if it rotates without any obstruction.
natural_image
Mechanical assembly diagram showing a hand holding a component with directional arrows indicating motion (no text or symbols)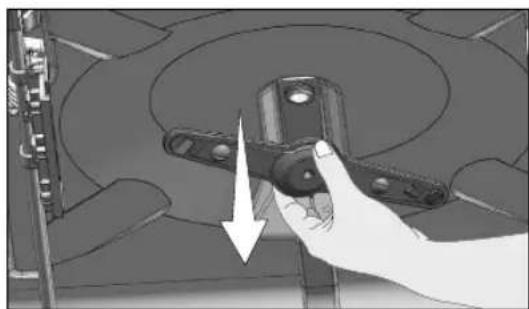
natural_image
Hand holding a mechanical component with an arrow indicating direction (no text or symbols visible)7 TROUBLESHOOTING
Machine does not start.
- Power cable is unplugged. >>> Check if the power cable is plugged in.
- Fuse is blown. >>> Check the fuses in your house.
• Water is cut. >>> Make sure that the water inlet tap is open. - Door of the machine is open. >>> Make sure that you have closed the door of the machine.
- On / Off button is not pressed. >>> Make sure that you have turned on the machine by pressing the On / Off button.
Dishes are not washed clean
- Dishes are not placed orderly in the machine. >>> Load the dishes as described in the user manual.
- Selected programme is unsuitable. >>> Select a programme with a higher temperature and cycle time.
- Impellers are stuck. >>> Prior to starting the programme, turn the lower and upper impellers by hand to make sure that they rotate freely.
- Impeller holes are clogged. >>> Lower and upper impeller holes might be clogged with food remnants such as lemon pips. Clean the impellers regularly as illustrated in section “Cleaning and Care”.
- Filters are clogged. >>> Check if the filter system is clean. Clean the filter system regularly as illustrated in section “Cleaning and Care”.
- Filters are installed incorrectly. >>> Check the filter system and make sure that it is installed correctly.
- Baskets are overloaded. >>> Do not overload the baskets in excess of their capacity.
- Detergent is stored under unsuitable conditions. >>> If you are using powder detergent, do not store the detergent package in humid places. Keep it in a closed container if possible. For ease-of-storing, we recommend you to use tablet detergents.
- Detergent is not sufficient. >>> If you are using powder detergent, adjust the amount of detergent according to the soiling degree of your dishes and/or programme definitions. We recommend you to use tablet detergents for optimum results.
- Rinse aid is not sufficient. >>> Check the rinse aid indicator and add rinse aid if necessary. Increase the rinse aid setting if there is enough amount of rinse aid in the machine.
- Detergent dispenser lid is left open. >>> Make sure that the detergent dispenser lid is closed tightly after adding detergent.
Dishes are not dry at the end of cycle
- Dishes are not placed orderly in the machine. >>> Place your dishes in a way that no water will accumulate in them.
Troubleshooting
- Rinse aid is not sufficient. >>> Check the rinse aid indicator and add rinse aid if necessary. Increase the rinse aid setting if there is enough amount of rinse aid in the machine.
- Machine is unloaded right after the programme is over. >>> Do not unload your machine right after washing process is completed. Slightly open the door and wait for evacuation of the steam inside for a while. Unload the dishes after the pieces cool down to a touchable level. Start unloading process from the lower basket. Thus, dropping of water remained on a piece at upper basket onto the pieces at lower basket is prevented.
- Selected programme is unsuitable. >>> Since rinsing temperature is low at programmes with short duration, drying performance will also be low. Select programmes with longer duration for a higher drying performance.
- Surface quality of the kitchen utensils is deteriorated. >>> Desired washing performance can not be obtained on kitchen utensils with deteriorated surfaces and it is not suitable to use such utensils in terms of hygiene as well. Also, water can not flow easily on deteriorated surfaces. It is not recommended to wash such kitchen utensils in dishwasher.

It is normal that drying complaints can be experienced with Teflon kitchen utensils. It is associated with the structure of Teflon. Since the surface tensions of Teflon and water are different, water droplets will remain as beads on the Teflon surface.
Tea, cafe or lipstick stains remain on dishes.
- Selected programme is unsuitable. >>> Select a programme with a higher temperature and cycle time.
- Surface quality of the kitchen utensils is deteriorated. >>> Tea and cafe stains or other dye spots may not be cleaned in dishwasher when they have penetrated in deteriorated surfaces. Desired washing performance can not be obtained on kitchen utensils with deteriorated surfaces and it is not suitable to use such utensils in terms of hygiene as well. It is not recommended to wash such kitchen utensils in dishwasher.
- Detergent is stored under unsuitable conditions. >>> If you are using powder detergent, do not store the detergent package in humid places. Keep it in a closed container if possible. For ease-of-storing, we recommend you to use tablet detergents.
Lime traces remain on dishes and glassware gains a misty appearance
- Rinse aid is not sufficient. >>> Check the rinse aid indicator and add rinse aid if necessary. Increase the rinse aid setting if there is enough amount of rinse aid in the machine.
- Water hardness setting is low or salt level is insufficient >>> Measure the hardness of the supply water appropriately and check the water hardness setting.
- Salt leakage exists. >>> Pay attention not to spill salt around the salt filling hole while adding salt. Make sure that the salt reservoir lid is tightly closed after
Troubleshooting
finishing the filling process. Run the prewash programme to remove the salt that spilled inside the machine. Since the salt granules that will remain under the lid will dissolve during prewash, causing the lid loosen, check the lid once again at the end of the programme.
There is a different odour in the machine

A new machine has a peculiar odour. It will fade out after a couple of washes.
- Filters are clogged. >>> Check if the filter system is clean. Clean the filter system regularly as illustrated in section “Cleaning and Care”.
- Dirty dishes are kept in dishwasher for 2-3 days. >>> If you are not going to start the machine right after you have put the dishes into it, remove the remnants on the dishes and run the Prewash programme without detergent every 2 days. In such cases, do not close the door of the machine completely in order to avoid odour build up in machine. You can also use commercially available odour removers or machine cleaners.
Rust, discoloration or surface deterioration occurs on dishes
- Salt leakage exists. >>> Salt may cause deterioration and oxidation on metal surfaces. Pay attention not to spill salt around the salt filling hole while adding salt. Make sure that the salt reservoir lid is tightly closed after finishing the filling process. Run the prewash programme to remove the salt that spilled inside the machine. Since the salt granules that will remain under the lid will dissolve during prewash, causing the lid loosen, check the lid once again at the end of the programme.
- Salty food remnants have remained on dishes for a long time. >>> If cutlery soiled with such foods will be kept waiting in machine, dirt must be removed by prewash or dishes must be washed without being kept waiting.
- Electric installation is not grounded. >>>Check if your machine is connected to the actual grounding line. Otherwise, the static electric created in the product causes arcs on the surfaces of metal items creating pores, removing the protective cover on the surface and causing discoloration.
- Intensive cleansers such as bleaches are used. >>> Protective cover on metal surfaces gets damaged and looses its efficiency in time when it gets in contact with cleansers such as bleach. Do not wash your dishes with bleach.
- Metal items particularly such as knives are used for purposes other than their intended uses. >>> Protective cover on the edges of knives may get damaged when they are used for purposes such as opening cans. Do not use metal kitchen utensils out of their intended uses.
- Cutlery are made of low quality stainless steel. >>> Corrosion on such items is inevitable; they should not be washed in dishwashers.
- Kitchen utensils that are already corroded are washed in dishwasher. >>> Rust on a corroded item can migrate to other stainless steel surfaces and cause corrosion on those surfaces as well. Such items should not be washed in dishwashers.
Detergent remains in detergent dispenser.
- Detergent dispenser was damp when adding detergent. >>> Make sure that the detergent dispenser is dried well prior to filling it with detergent.
- Detergent is added long before the washing process. >>> Pay attention to add detergent shortly before start-up of the washing.
- Opening of the detergent dispenser lid is prevented during washing. >>> Place the dishes in a way that will not prevent the detergent dispenser lid from opening and the water going into the machine from impellers.
- Detergent is stored under unsuitable conditions. >>> If you are using powder detergent, do not store the detergent package in humid places. Keep it in a closed container if possible. For ease-of-storing, we recommend you to use tablet detergents.
- Impeller holes are clogged. >>> Lower and upper impeller holes might be clogged with food remnants such as lemon pips. Clean the impellers regularly as illustrated in section “Cleaning and Care”.
Decorations and ornaments on kitchen utensils are being erased.

Decorated glasses and decorated lustre porcelains are not suitable for washing in the dishwasher. Manufacturers of some glassware and porcelain tableware items do not recommend washing such kitchen utensils in the dishwashers either.
Dishes are scratched.

Kitchen utensils that contains or are made of aluminum should not be washed in dishwasher.
- Salt leakage exists. >>> Pay attention not to spill salt around the salt filling hole while adding salt. Spilled salt can cause scratches. Make sure that the salt reservoir lid is tightly closed after finishing the filling process. Run the prewash programme to remove the salt that spilled inside the machine. Since the salt granules that will remain under the lid will dissolve during prewash, causing the lid loosen, check the lid once again at the end of the programme.
- Water hardness setting is low or salt level is insufficient >>> Measure the hardness of the supply water appropriately and check the water hardness setting.
- Dishes are not placed orderly in the machine. >>> When placing the glasses and other glassware into the basket lean them not against other dishes but the edges or racks of the basket or the glass support tines. Striking of the glasses to each other or to other dishes due to the impact of water during washing can cause breaks, or scratches on their surfaces.
A smear remains on glasses that resembles milk stain which can not be removed when wiped by hand. A bluish / rainbow appearance occurs when the glass is pointed to light.
- Excessive rinse aid is used. >>>Lower rinse aid setting. Clean the spilled rinse aid when adding rinse aid.
- Corrosion has occurred on glass due to soft water. >>> Measure the hardness of the supply water appropriately and check the water hardness setting. If your supply water is soft (<5 dH), do not use salt. Choose programmes that wash in higher temperatures (e.g. 60-65°C). You can also use glass protective detergents that are commercially available.
Foam forms in the machine.
- Dishes are washed with hand-wash detergent by hand but not rinsed before placing them into the machine. >>> Hand-wash detergents do not contain antifoam. There is no need to hand-wash the dishes before placing them into the machine. Removing the coarse soil on the dishes under tap water, with a tissue paper or fork will be sufficient.
- Rinse aid has spilled into the machine when adding rinse aid. >>> Take care that rinse aid is not spilled in the machine when you are filling it. Clean any spilled rinse aid with the help of a tissue paper/towel.
- Lid of the rinse aid reservoir is left open. >>> Make sure that the lid of the rinse aid reservoir is closed after adding rinse aid.
Kitchen utensils are broken.
- Dishes are not placed orderly in the machine. >>> Load the dishes as described in the user manual.
- Baskets are overloaded. >>> Do not overload the baskets in excess of their capacity.
Water remains in the dishwasher at the end of the programme.
- Filters are clogged. >>> Check if the filter system is clean. Clean the filter system regularly as illustrated in section “Cleaning and Care”.
- Discharge hose is clogged/blocked. >>> Check the discharge hose. If necessary, remove the discharge hose, clear the blockage and insert is as illustrated in the user manual.

If you cannot eliminate the problem although you follow the instructions in this section, consult your dealer or the Authorised Service Agent. Never try to repair a nonfunctional product yourself.
- 60cm Fully Integrated Dishwasher FIDWB14
- Product/Installer details
- Product Details
- Purchase Details
- Installation Details
- Installation
- Customer Care
- Please read this user manual first!
- Explanation of symbols
- CONTENTS
- INSTRUCTIONS FOR SAFETY AND ENVIRONMENT 4
- DISHWASHER 7
- INSTALLATION 9
- PREPARATION 12
- OPERATING THE PRODUCT 35
- MAINTENANCE AND CLEANING 42
- TROUBLESHOOTING 46
- INSTRUCTIONS FOR SAFETY AND ENVIRONMENT
- General safety
- Intended use
- Children's safety
- Disposing of packaging material
- Transportation of the product
- Compliance with WEEE Directive and Disposing of the Waste Product
- Compliance with RoHS Directive
- Package information
- DISHWASHER
- Overview
- Technical specifications
- Fan drying system
- Note for test institutions:
- dishwasher@standardloading.com
- INSTALLATION
- Appropriate installation location
- Connecting water supply
- Permitted water temperature: up to 25°C
- Connection to the drain
- Adjusting the feet
- Aquasafe+
- Electrical connection
- Initial use
- PREPARATION
- Tips for energy saving
- Adjusting the water softening system
- Water softening system
- Preparation
- Adding salt
- Detergent
- Adding detergent
- Combined tablet detergents
- Rinse aid
- Items not suitable for washing in the dishwasher
- Placing the dishes into the dishwasher
- Silverware basket piece
- Silverware basket
- Cutlery basket
- Collapsible lower basket wires (6 pieces)
- Collapsible lower basket wires (4 pieces)
- Collapsible lower basket wires (2 pieces)
- Collapsible lower basket tines
- Lower basket bottle wire
- SoftTouch Accessory
- Lower Basket Glass Holder
- Tray Wash Supports
- Lower basket multipurpose / height adjustable service rack
- Upper basket height adjustable rack
- Upper basket drawer
- Upper basket glass support piece
- Collapsible upper basket wires
- Collapsible upper basket tines
- Adjusting the height of the upper basket
- Adjusting the height of loaded upper basket
- Height setting with empty basket
- Upper cutlery basket
- OPERATING THE PRODUCT
- Keys
- On/Off key
- Programme Selection / Programme Cancel key
- Function keys
- Preparing the machine
- Programme selection
- Auxiliary functions
- Half Load function
- TurboWash Function
- Fast+ Function
- Extra Drying Function
- Auto Tablet Feature
- To activate / to deactivate:
- Interior Lighting
- Changing the interior lighting setting
- Changing Warning Sound Volume
- Floor illumination
- Warning to show that machine is in washing phase
- Scheduling the washing time
- Time Delay
- Changing the settings while Time Delay function is active
- To cancel the Time Delay function
- Starting the programme
- Cancelling the programme
- Salt indicator (§)
- Rinse Aid indicator (\*)
- End of programme
- Water cut-off warning
- Overflowing warning
- InnerClean
- MAINTENANCE AND CLEANING
- Cleaning the outer surface of the product
- Cleaning the interior of the machine
- Cleaning the filters
- Cleaning the hose filter
- Cleaning the impellers
- Lower impeller
- Upper impeller
- Ceiling Impeller
- TROUBLESHOOTING
- Machine does not start.
- Dishes are not washed clean
- Dishes are not dry at the end of cycle
- Troubleshooting
- Tea, cafe or lipstick stains remain on dishes.
- Lime traces remain on dishes and glassware gains a misty appearance
- There is a different odour in the machine
- Rust, discoloration or surface deterioration occurs on dishes
- Detergent remains in detergent dispenser.
- Decorations and ornaments on kitchen utensils are being erased.
- Dishes are scratched.
- A smear remains on glasses that resembles milk stain which can not be removed when wiped by hand. A bluish / rainbow appearance occurs when the glass is pointed to light.
- Foam forms in the machine.
- Kitchen utensils are broken.
- Water remains in the dishwasher at the end of the programme.
Brand : Euromaid
Model : FIDWB14
Category : Dishwasher