USER MANUAL WQE6870BA WESTINGHOUSE
natural_image
Pure technical diagram of a door with a central component, no text or symbols present
REGISTER YOUR FRIDGE
WITH YOUR SMARTPHONE
1 Locate the label on the inside of your fridge


2 Photograph the camera icon, including the 4 dots (●)
3 Text image to 0488 446 622 (Australia only)
© 2017 Electrolyte Home Products Pty. JEC US | PhotoRegister |idge_73x70_Deciv

CONGRATULATIONS
Dear Customer,
Congratulations and thank you for choosing our refrigerator. We are sure you will find your new refrigerator a pleasure to use. Before you use the relevant sections of this manual, which provides a description of your refrigerator and its functions.
To avoid the risks that are always present when you use an electric appliance, it is important that the refrigerator is installed correctly and that you read the safety instructions carefully to avoid misuse and hazards.
We recommend that you keep this instruction booklet for future reference and pass it on to any future owners.
After unpacking the refrigerator, please check it is not damaged. If in doubt, do not use the refrigerator but contact your local customer care Centre.
The symbols you will see in this booklet have these meanings:

WARNING
This symbol indicates information concerning your personal safety.

CAUTION
This symbol indicates information on how to avoid damaging the refrigerator

IMPORTANT
This symbol indicates tips and information about use of the refrigerator

ENVIRONMENT
This symbol indicates tips and information about economical and ecological use of the refrigerator
Conditions of use
This refrigerator is designed and intended to be used in normal domestic applications only.
Record model and serial number here:
Model number: ....
Serial number: ....
CONTENTS
Important safety instructions .... 3
Features at a Glance 4
Installation 5
Connecting Water Supply 7
Controls 9
Automatic Ice & Water Dispenser 13
Storage Features 15
Changing the Filter 19
Food Storage Guide 21
Care and Cleaning 22
Troubleshooting 23
Warranty 26
IMPORTANT SAFETY INSTRUCTIONS
Note: You must read these warnings carefully before installing or using the refrigerator. If you need assistance, contact your customer care centre. The manufacturer will not accept liability, should these instructions or any other safety instructions incorporated in this book be ignored.

WARNING
- This appliance is not intended for use by persons (including children) with reduced physical, sensory or mental capabilities, or lack of experience and knowledge, unless they have been given supervision or instruction concerning use of the appliance by a person responsible for their safety. Children should be supervised to ensure that they do not play with the appliance.
- It is essential the power point is properly earthed to ground. Consult a qualified electrician if you are unsure.
- Do not use electrical appliances inside the food storage compartments of the appliance, unless they are of the type recommended by the manufacturer.
- Unplug the refrigerator before cleaning or moving it to avoid electric shock.
- Never unplug the refrigerator by pulling the electrical cord as this may damage it. Grip the plug firmly and pull straight out.
- If the power cord is damaged, it must be replaced by the manufacturer, its service agent or similarly qualified persons in order to avoid a hazard.
- Don't use a steam cleaner. If live components come into contact with condensing steam, they may short-circuit or cause an electric shock.
- Do not store explosive substances such as aerosol cans with a flammable propellant in this appliance. If pressurised aerosol containers bear the word ‘flammable’ and/or a small flame symbol, do not store them inside any refrigerator or freezer. If you do so you may cause an explosion.
- Do not damage the refrigerant circuit. This appliance contains insulation formed with flammable blowing gases. Avoid safety hazards by carefully disposing of this appliance.
- If you wish to discard this refrigerator, please contact your local authorities and ask for the correct method of disposal.
-
When you dispose of your old refrigerators and freezers, remove any doors. Children can suffocate if they get trapped inside.
-
The plug must be accessible when the appliance is in position.
- Never try to repair the refrigerator yourself, only use a qualified or authorized service person for repairs.
- Never put the appliance in a location that is too cold or is unprotected, for example in a garage or on a veranda. The ambient should be above 10°C.
- When positioning the appliance, ensure the supply cord is not trapped or damaged.
- Do not locate multiple portable socket-outlets or portable power supplies at the rear of the appliance.

WARNING
R600a refrigerant warning

Symbol ISO 7010 W021
Warning : Risk of fire / Flammable materials
This appliance contains flammable R600a refrigerant. Avoid safety hazards by carefully installing, handling, servicing and disposing of this appliance.
- Ensure that the tubing of the refrigerant circuit is not damaged during transportation and installation.
- Leaking refrigerant may cause eye injuries or ignite.
- The room for installing appliance must be at least 1m3 per 8g of refrigerant. The amount of refrigerant in the appliance can be found on the rating plate inside the appliance.
- If you are unsure of the refrigerant check the rating plate inside the refrigerator compartment.
- It is hazardous for anyone other than an Authorised Service Person to service this appliance. In Queensland Australia the Authorisation Service Person MUST hold a Gas Work Authorisation for hydrocarbon refrigerants to carry out servicing or repairs which involve the removal of covers.
- Keep ventilation openings in the appliance enclosure or in the built-in structure, clear of obstruction.
- Do not use mechanical devices or other means to accelerate the defrosting process, other than those recommended by the manufacturer.
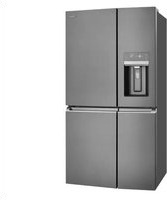
FEATURES AT A GLANCE
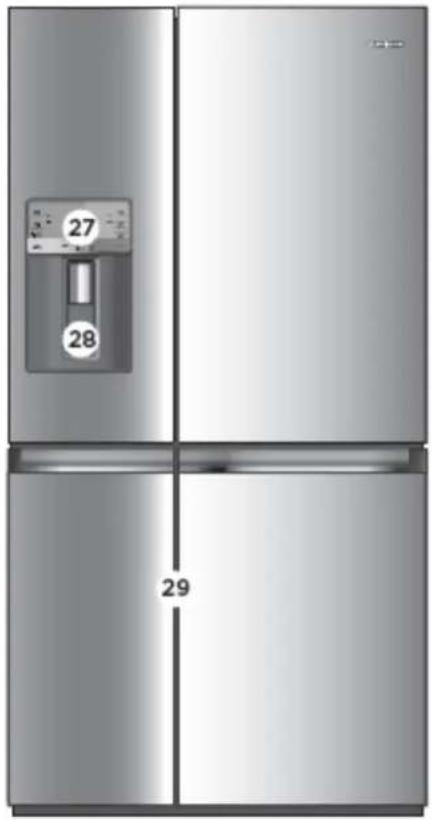
natural_image
Exterior view of a modern stainless steel refrigerator with front panel and door (no visible text or symbols)
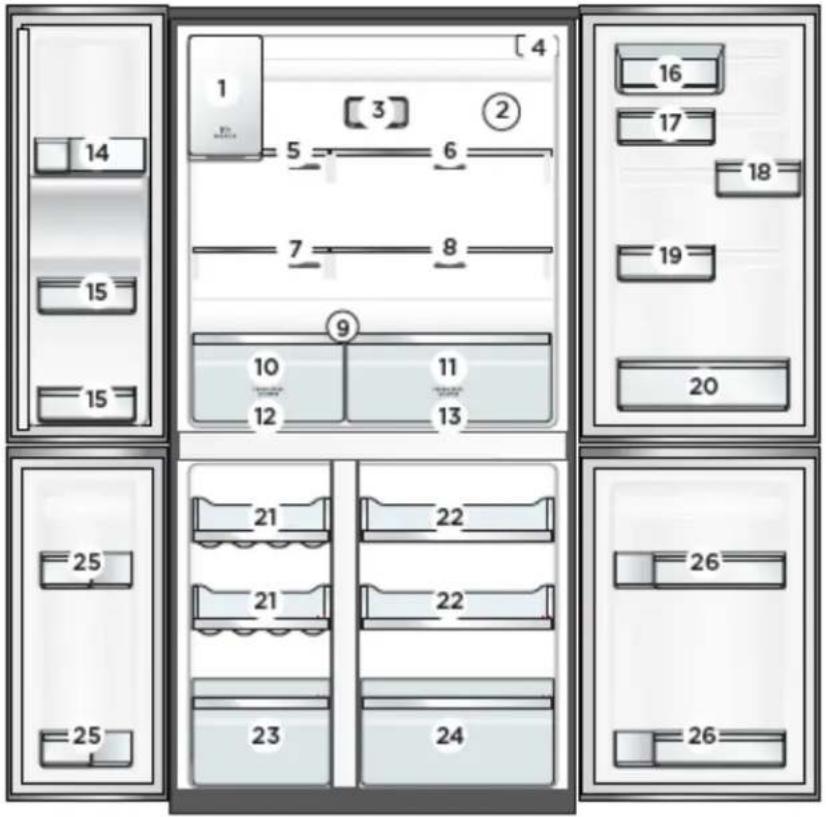
| 1 | Ice Maker | 11 21 FreshSealTM crisper | FlexSpaceTM shelf |
| 2 | Air distributor - Multiflow | 12 22 Left Snack Zone compartment | Freezer shelf |
| 3 | Air filter | 13 23 Right Snack Zone Compartment | FlexSpaceTM drawer |
| 4 | Water filter | 14 24 Upper fixed door bin | Freezer drawer |
| 5 | Flip up glass shelf | 15 25 Left fixed door bin | FlexSpaceTM door bin |
| 6 | Slide/fold glass shelf | 16 26 FlexStorTM dairy bin | Freezer door bin |
| 7 | Left SpillsafeTM glass shelf | 17 27 FlexStorTM 2/3 bin | Refrigerator/Freezer control panel |
| 8 | Right SpillsafeTM glass shelf | 18 28 FlexStorTM 1/3 bin | Water and Ice Dispenser Trigger |
| 9 | Crisper shelf cover | 19 29 Expandable bin | FlexSpaceTM control panel(On the FlexSpaceTM door side) |
| 10 | FreshSealTM crisper | 20 Bottle storage bin |
INSTALLING YOUR NEW APPLIANCE
Unpacking

ENVIRONMENT
Most of the packing materials are recyclable. Please dispose of those materials through your local recycling depot or by placing them in appropriate collection containers.
Important - check for any damages or marks. If you find the refrigerator is damaged or marked, you must report it within 7 days should you wish to claim for damage/marks under the manufacturers warranty. This does not affect your statutory rights.
Clean your refrigerator thoroughly following the instructions in the “Cleaning” section and wipe off any dust that has accumulated during shipping.
Locating the refrigerator

CAUTION
Automatic aerosol systems (such as insect control) should not be located adjacent to the product as the spray may cause long term damage to the external plastics of the appliance.
Do not put the refrigerator in a location that is too cold or is unprotected, for example in a garage or on a veranda. The ambient temperature should be above 10^ C.
Put the refrigerator in a dry place avoiding areas of high moisture or humidity.
Ensure the refrigerator is located on an even surface.
Adequate ventilation around your refrigerator
The diagram below shows the recommended airspace to allow for ventilation of your refrigerator.

When positioned in a corner area, spacing of right side at least 260 mm and left side at least 355 mm on the hinge side will allow the doors to open enough to enable the removal of bins and shelves.
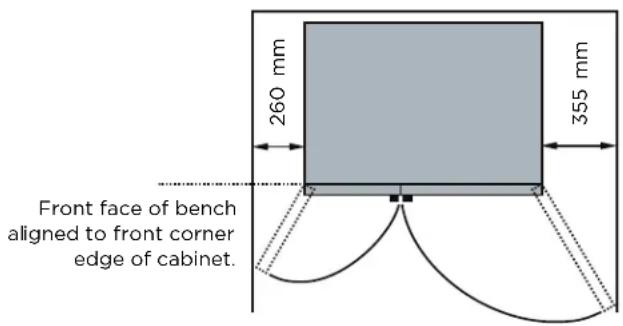
Note: Doors are designed to sit proud of cabinetry (not flush). The clearances shown above are the recommended minimum clearances.
Installing your refrigerator
Allow the following clearances for ease of installation, proper air circulation, and plumbing and electrical connections:

natural_image
Architectural cross-section diagram of a room with labeled dimension '工' (no text or symbols beyond label)

Space required
Note: If your refrigerator is placed with the door hinge side against a wall, you may have to allow additional space so the door can be opened wider.
Door opening
Your refrigerator should be positioned to allow easy access to a counter when removing food. For best use of refrigerator drawers and freezer baskets, the refrigerator should be in a position where both can be fully opened.

CAUTION
LED lighting
Your appliance is fitted with long life LED lighting. In the unlikely event the LED lights should fail, then the LED lights should be serviced by the service agent, to avoid a safety hazard. Refer to the warranty page for contact details.
Cabinet Leveling & Refrigerator Door Alignment (if necessary)
- All four corners of the cabinet must rest firmly on the floor
- The front should be slightly elevated to ensure that doors close and seal properly.
- Doors should align with each other and be level.
Most of these conditions can be met by raising or lowering the adjustable front rollers.
To level the cabinet using the front rollers:
- Lower anti-tip legs until they are both touching the floor. Use a pair of pliers to adjust.
To raise: turn leg clockwise.
To lower: turn leg counterclockwise.
- Ensure both doors are bind-free with their seals touching the cabinet on all four sides and that cabinet is stable.


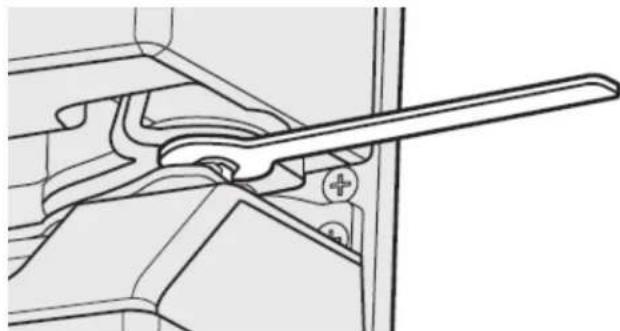
To make final door height adjustments:
- Insert Electrolux 10mm wrench into the shaft of the lower hinge.
- To lower door: turn adjustment screw clockwise.
To raise door: turn adjustment screw counterclockwise.
natural_image
Technical line drawing of a mechanical component with no visible text or symbols
Flipper Mullion
Adjust Flipper Mullion for proper connection with the mullion guide by ensuring the flipper mullion is folded and perpendicular to the fresh food door. If the mullion guide is not in the correct position, it could prevent the door from closing completely.

CONNECTING THE WATER SUPPLY

WARNING
To avoid electric shock, which can cause death or severe personal injury, disconnect the refrigerator from electrical power before connecting a water supply line to the refrigerator.

WARNING
To Avoid Property Damage:
- DO NOT install water supply tubing in areas where temperatures fall below freezing.
- Chemicals from a malfunctioning water softener can damage the ice maker. If your home has a water softening system, ensure the softener is maintained and working properly.

IMPORTANT
Ensure that your water supply line connections comply with all local plumbing codes.
The appliance complies with the relevant backflow prevention requirements specified in AS/NZS 2845.1
Before Installing the Water Supply Line, You Will Need:
- Basic Tools: adjustable wrench, flat-blade screwdriver, and Phillips™ screwdriver
- The water dispenser and automatic ice maker require a drinkable water supply with a pressure range of between 206kPa and 689kPa (30PSI and 100PSI). If the water supply is above 100psi a pressure limiting valve should be installed.
- A water supply to suit a 12 " tap fitting is required adjacent to the refrigerator. It is recommended that a licensed plumber install a new water supply outlet nearer to the appliance should the tubing supplied not be long enough. It is not recommended that the tubing be extended as this could adversely affect the flow of water to the ice maker or water dispenser. If there is a risk of flow rate higher than the maximum flow rate 2.46 L/min, a flow controller should be installed.

WARNING
Connect to potable water supply only. If using tank or bore water it is recommended to also use an external filter (not supplied).
The new hose-sets supplied with the appliances must be used and old hose-sets should not be reused.

WARNING
Never connect the appliance to a hot water supply.
Do not use with water that is microbiologically unsafe or with water of unknown quality without adequate disinfection.
To Connect Water Supply Line to Ice Maker Inlet Valve
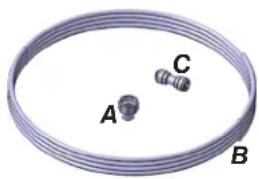
Installation kit supplied with Refrigerator:
natural_image
Coiled wire with two labeled components A and C, no text or symbols present
Figure 1
A - Adapter 12 to 14 inch to connect the water supply outlet to the water supply line.
B - Water supply line 14 inch with 3 meters in length.
C - 14 inch connector to connect the water supply line to the refrigerator tube.
- Disconnect the refrigerator from the power source.
- Attach the adapter (item A above) to the water line, connect the water supply line (item B) to the adapter (item A) while holding the other end of the water supply line in a bucket or sink Turn on the water supply to eliminate air and clean the water supply line.
Turn off the water supply.
- Remove the plastic protector from the refrigerator tube and connect the water supply line (item B) to the refrigerator tube using the connector (item C) as shown in fig. Make sure the tubes are inserted completely into the connections.
- Wrap excess water supply line behind refrigerator so that it does not vibrate with refrigerator operation.
Do not twist the pipe.
- Turn on the water supply, check that there are no leaks in the connections.
- Reconnect the refrigerator to the power source.
- The Ice Maker is factory-switched, within 24 hours your refrigerator will have produced ice, discard the first production.
Note: Expect the first ice harvest within first 24 hours of unit operation. To prevent any issues concerning ice production, please ensure that all water lines are primed. See “Priming the water supply system” in the “AUTOMATIC ICE & WATER DISPENSER” section.

Adapter to connect the water supply outlet to the water supply line.

Connector to connect the water supply line to the refrigerator tube
Figure 2

IMPORTANT
Your refrigerator's water supply system includes several tubing lines, a water filter, and a water valve. To ensure that your water dispenser works properly, this system must be completely filled with water when your refrigerator is first connected to the household water supply line.
Water Filter
The water filter should not be used on water that is micro biologically unsafe or with water of unknown quality. The service life of the filter may be reduced in water supplies that contain an excess of particles or other impurities. Reduced flow rate is an indication that a new filter is required. Failure to replace the filter when required can affect the function of the ice maker. Service calls caused by a failure to replace the filter are not covered by warranty. Replacement water filters are available from Electrolux Home Products Spare Parts Centres and can be posted to you for your convenience (refer to spare parts contact numbers on the warranty page).
ABOUT THE USER INTERFACE
Controls -External User interface

| BUTTON / ICON | DESCRIPTION | PRIMARY FUNCTION |
| 1. | Quick Freeze (on/off) | Activates a faster rate for freezing food in the freezer. Deactivates after 12 hours. |
| 2. Drinks | Chill | Quickly chills a drink inside the freezer compartment. Touch the Drinks Chill Key, a time value will display on the freezer temp display (in minutes) and can be changed using the +/- buttons. A tone will sound when the time has been input. Range is from 20-45 minutes in 5 minute intervals. |
| 3. | Ice Maker | When LED is lit, the ice maker is on. When ice maker is in OFF state, the indicator will blink when dispensing ice. Press and hold for 3 seconds to turn ice maker on/off. |
| 4. | Lock | Press and hold for 3 seconds to enable/disable. While in the locked state, you will not be able to change any settings on the display nor dispense ice and water. The indicator will flash and an audible warning tone is played. |
| 5. | Adjusting Temp | Press either the + or - to adjust to desired temperature setting.Freezer temp - Control temperatures rangeFrom -23°C to -15°C.Refrigerator temp - Control temperatures rangeFrom +1°C to +7°C. |
| 6. | Door Open | Illuminates and sounds an alarm when the door is left open for 5 minutes or more. It stays illuminated as long as the door is open. Pressing any key will mute and reset the alarm. |
| 7. | Replace Water Filter | Display illuminates every 6 months or when filter needs replacing. Press and hold ‘Reset Water Filter’ for 3 seconds to reset. |
| 8. | Replace Air Filter | Display illuminates every 6 months or when filter needs replacing. Press and hold ‘Reset Air Filter’ for 3 seconds to reset. |
| 9. | Water | Press the “water” key to select water. An indicator light will be illuminated above the active feature. |
| 10. | Cubed Ice | Press the “cube” key to select cubed ice. An indicator light will be illuminated above the active feature. |
| 11. | Crushed Ice | Press the “crush” key to select crushed ice. An indicator light will be illuminated above the active feature. |
| 12. | Quick Chill | Quick chill is a faster rate for chilling food in the refrigerator compartment. Deactivates after 6 hours. |
| 13. | Reset Air Filter | After replacing filter, press and hold for 3 seconds to reset. |
| 14. | Reset Water Filter | After replacing filter, press and hold for 3 seconds to reset. |
| 15. | Lighting | Press the light button to turn on/off the dispenser light. If you press and hold it for 3 sec. it will toggle on/off the handles ambient lighting. |
ABOUT THE USER INTERFACE
Controls - Internal User interface

| BUTTON / ICON | DESCRIPTION | PRIMARY FUNCTION |
| 1. | Unlock | The interface will automatically lock after 3 seconds without any interaction. Press and hold 3 seconds to unlock the interface. A tone will sound to confirm your choice. |
| 2. | Chilled Wine | Choosing Chilled Wine will set FlexSpace temperature to 7°C. A tone will sound to confirm your choice. |
| 3. | Deli Snacks | Choosing Deli Snacks will set FlexSpace temperature to 3°C. A tone will sound to confirm your choice. |
| 4. | Cold Drinks | Choosing Cold Drinks will set FlexSpace temperature to 0°C. A tone will sound to confirm your choice. |
| 5. | Ultra Chill | Choosing Ultra Chill will set FlexSpace temperature to -2°C. A tone will sound to confirm your choice. |
| 6. | Freezer | Choosing Freezer will set FlexSpace temperature to the same temperature as the freezer compartment. A tone will sound to confirm your choice. |
Setting cooling temperatures
Note: The recommended settings for a product installed in a kitchen is 3^ C for the fresh food compartment and -18^ C for the freezer.

IMPORTANT
If your product has food freezing in the fresh food compartment, increase the temperature setting 1 or 2 degrees Celsius.
If you place food within 3 cm in front of the air ports, there may be the chance of freezing food.

Note: Control features and alarms may vary by model.
Alerts and Alarms
Water Filter
When illuminated, the water filter needs to be replaced. Change the water filter every 6 months or when 750 litres of water has been dispensed. To reset, press and hold button for 3 seconds. Tone will sound once it has been reset.
Air Filter Installation
First operation the refrigerator need to installation the air filter which storage at crisper left side and follow installation method as below.
Carbon activated air filter
1) Remove plastic wrap.
2) Install filter according to your refrigerator's use&care guide.
3) Reset filter reminder light on your refrigerator.
4) Replace filter every 6 months.
When illuminated, air filter needs to be replaced. Change the air filter every 6 months. To reset, press and hold button for 3 seconds. Tone will sounds once it has been reset.
Door Open
If a door has been left open for 5 minutes or more, an alarm will sound and the door open indicator will illuminate on the display. The alarm can be turned off by closing the door or pressing any key. Control panel will return to normal operation after the door is closed.
Error Tone
An alarm will sound if the user tries to make a selection that is not available.
Sabbath Mode
The Sabbath Mode is a feature that disables portions of the refrigerator and its controls in accordance with observance of the weekly Sabbath and religious holidays within the Orthodox Jewish community.
Sabbath Mode is turned ON and OFF by simultaneously pressing and holding both the “-” (freezer side) and “+” (refrigerator side) for five seconds. Other than the High Temp alarm, no audible sounds will occur until the user exits the Sabbath mode. The display shows “Sb” while in Sabbath mode.
In the Sabbath Mode, the High Temp alarm is active for health reasons. For example,
If the door is left ajar the High Temp alarm is activated. The refrigerator will function normally once the door is closed, without any violation of the Sabbath/Holidays. The High Temp alarm is permitted when cabinet temperature is outside the safe zone for 20 minutes. The alarm silences itself after 10 minutes while the High Temp icon stays lit until the Sabbath mode is exited.
Note: While in Sabbath Mode, neither the lights, dispenser, nor the control panel will work until Sabbath Mode is deactivated.
Refrigerator stays in Sabbath Mode after power failure recovery. It must be deactivated with the buttons on the control panel.
Although you have entered the Sabbath Mode, the ice maker will complete the cycle it had already initiated. The ice cube compartment will remain cold and new ice cubes can be made with standard trays.
AUTOMATIC ICE & WATER DISPENSER
Using the ice maker after installation
Before making ice for the first time, be sure to prime the water supply system. Air in new plumbing lines can result in two or three empty ice maker cycles. Furthermore, if the system is not flushed, the first ice cubes may be discolored or have an odd flavor.
Priming the water supply system

CAUTION
For proper dispenser operation, recommended water supply pressure should fall between 206kPa and 689kPa (30PSI and 100PSI).
Excessive pressure may cause the system to malfunction.
- Begin filling the system by pressing and holding a drinking glass against the dispenser.
- Keep the glass in this position until water comes out of the dispenser. It may take about 1½ minutes.
- Continue dispensing water for about four minutes to flush the system and plumbing connections of any impurities (stopping to empty the glass as necessary).

Dispenser
Note: The water dispenser has a built-in device that shuts off the water flow after three minutes of continuous use. To reset this shut-off device, simply release the dispenser paddle.
Only the first 750 ml of dispensed water is chilled.

WARNING
Flushing system about 2 minutes after period of non-use exceeding 30 days
Ice maker operation & care
After the refrigerator is installed properly and has cooled for several hours, the ice maker can produce ice within 24 hours. The ice maker will fill the ice bin from the rear. You must dispense some ice to force the ice forward in the bin. This will allow the bin to fill completely.
Ice Maker and Storage Bin Capacity
This ice maker should produce 1 kg of ice per 24 hours. The ice bin will hold about 1.8 kg of ice.
Turning the ice maker on and off

IMPORTANT
Your ice maker is turned on at the factory so it can work as soon as you install your refrigerator. If you cannot connect a water supply, set the ice maker's On/Off feature to Off; otherwise, the ice maker's fill valve may make a loud chattering noise when it attempts to operate without water.
Ice production is controlled by the ice maker's On/Off feature on the control panel. Pressing the On/Off feature turns the ice maker on & off.
Note: The ice maker also has a built-in plastic signal arm that automatically stops ice production when the ice bin is full. This signal arm should not be used to manually stop the ice maker.

IMPORTANT
Turning off the ice maker simply disables ice making. You will still be able to dispense existing ice, and you will still be able to dispense water.
On occasion, unusually small ice cubes may be noticed in the bucket or in dispensed ice. This could occur in normal operation of the ice maker. If you start seeing these more frequently, it may be an indication of low water pressure, or that the water filter needs to be replaced. As the water filter nears the end of its useful life and becomes clogged with particles, less water is delivered to the ice maker during each cycle. Remember, if it has been six months or longer since you last changed your water filter, replace the water filter with a new one. Poor quality household water may require the filter to be changed more frequently.
Ice maker/dispenser tips
- If your refrigerator is not connected to a water supply or the water supply is turned off, turn off the ice maker as described in the previous section.
• The following sounds are normal when the ice maker is operating:

CAUTION
If the water supply to your refrigerator is softened, be sure the softener is properly maintained. Chemicals from a water softener can damage the ice maker.
Cleaning the ice maker
Clean the ice maker and ice bin at regular intervals, especially prior to vacation or moving.
- Turn off the icemaker.
- Remove the ice bin by pulling straight out.
- Empty and carefully clean the ice bin with mild detergent. Do not use harsh or abrasive cleaners. Do not place in dishwasher. Rinse with clear water.
- Allow the ice bin to dry completely before placing it back into the freezer.
- Place ice bin back into position. Turn the ice maker on.
Remove and empty the ice bin if:
- An extended power failure (one hour or longer) causes ice cubes in the ice bin to melt and refreeze together after power is restored, jamming the dispenser mechanism.
- You do not use the ice dispenser frequently. Ice cubes will freeze together in the bin, jamming the dispenser mechanism.

Removing Ice Bin
Remove the ice bin and shake to loosen the cubes or clean as explained above.

CAUTION
NEVER use an ice pick or similar sharp instrument to break up the ice. This could damage the ice bin and dispenser mechanism.
To loosen stuck ice, use warm water. Before replacing the ice bin, make sure it is completely dry.

IMPORTANT
When removing or replacing the ice bin, avoid rotating the auger in the ice bin. If the auger is accidentally rotated, you must realign the auger by turning it in 45 degree turns (see below) until the ice bin fits into place with the drive mechanism. If the auger is not properly aligned when replacing the ice bin, the refrigerator will not dispense ice. The fresh food door also may not close properly causing warm air to leak into the fresh food compartment.

Adjusting the Ice Bin Auger
STORAGE FEATURES

CAUTION
To avoid personal injury or property damage, handle tempered glass shelves carefully. Shelves may break suddenly if nicked, scratched, or exposed to sudden temperature change. Allow the glass shelves to stabilize to room temperature before cleaning. Do not wash in dishwasher.
You can easily adjust shelf positions in the freshfood compartments to suit your needs. Theshelves have mounting brackets that attach toslotted supports at the rear of each compartment.
To change a shelf position:
- Remove all food from shelf.
- Lift the front edge up and pull the shelf out.
- Replace by inserting the mounting bracket hooks into the desired support slots.
- Lower the shelf and lock into position.
To adjust the flip shelf:
- Remove food from shelf.
- Lift the right side edge of shelf upwards and push to the left towards ice maker

natural_image
Technical line drawing of a mechanical assembly with a bracket and directional arrows indicating motion (no text or symbols)
Flip Shelf
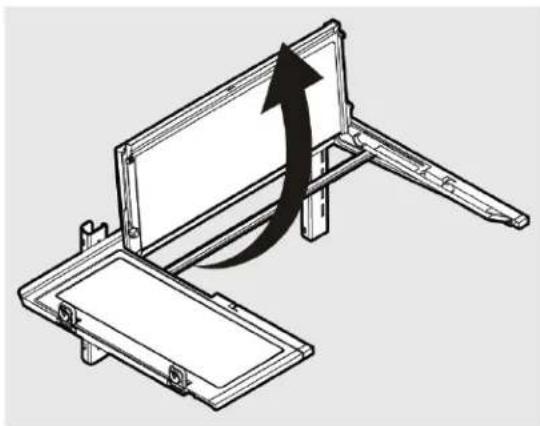
To adjust the slide-under/flip shelf:
- Pull front half shelf forward until its back drops down, then gently push front half shelf back and under back half shelf.

natural_image
Diagram of a hand using a tool to cut or adjust a mechanical component, showing an arrow indicating motion (no text or symbols present)
Slide-Under/Flip Shelf
- With front half fully below back half, lift front of shelf to flip it upwards toward the back of the cabinet.
natural_image
Technical line drawing of a mechanical assembly with an arrow indicating direction (no text or symbols)
Slide-Under/Flip Shelf
Drawers
Your refrigerator includes a variety of storage drawers.
FreshSeal™ Crisper (with automatic humidity control)
Crisper drawers are designed for storing fruits, vegetables, and other fresh produce. Crispers have an auto humidity control (with replaceable membrane) on the side of each crisper under the humidity control cover.
To remove the auto humidity control membrane:
-
Reach to back of humidity control cover.
-
Pull up on cover.
-
Pull cover towards back of cabinet and remove.
-
Replace humidity membrane.
-
Replace cover by reversing the steps above. Repeat for both crispers.

Opening the Crisper Drawer
To remove the FreshSeal™ Crisper for cleaning:
-
Pull the drawer out until it stops.
-
Lift the front slightly and remove the drawer.

Removing the FreshSeal™ Crisper
Recessed SnackZone
This drawer is ideal for storage of deli meats and cheese.
Slide back the cover to allow access to the drawers.

natural_image
Technical line drawing of a mechanical assembly with a black arrow pointing to a component (no text or symbols present)
Opening the SnackZone
Doors
Storage bins
The doors to your fresh food compartment use a system of modular storage bins. All of these bins are removable for easy cleaning. Bins can be adjusted to your needs.
Door bins are ideal for storing jars, bottles, cans, and large drink containers. They also enable quick selection of frequently used items.
Some models have adjustable door bins that can be moved to suit individual needs.
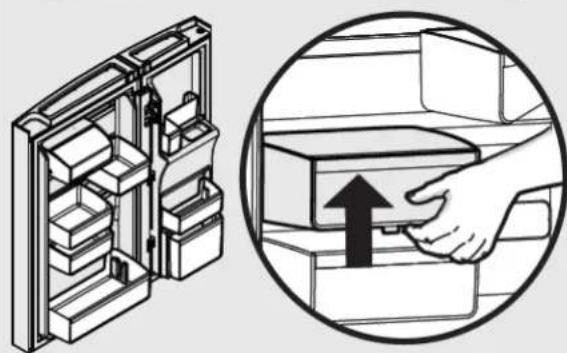
To adjust the collapsible door bin:
- Make sure bin is securely seated on rail in door.
- Grab one side of bin and place other hand on adjustable side.
- Pull on side of bin until the bin is adjusted to desired width.
Note: It can be difficult to pull out the collapsible bin. Some force may be required.
To move door bin along a rail:
- Tilt bin up so the back of the bin is off the door but the hook is still engaged.
- Slide bin along rail to desired position.
- Lower bin back into place.
To move door bin from rail to rail:
- Lift bin up disengaging the hook.
- Move bin to desired rail location.
- Push bin hook into rail engaging the hook.

natural_image
Illustration of a hand placing a box into a drawer with arrows indicating direction (no text or symbols)
natural_image
Illustration of a refrigerator interior with a magnified view showing hand placing a drawer into a cabinet (no text or symbols present)
Adjustable Door Bins
Freezer storage
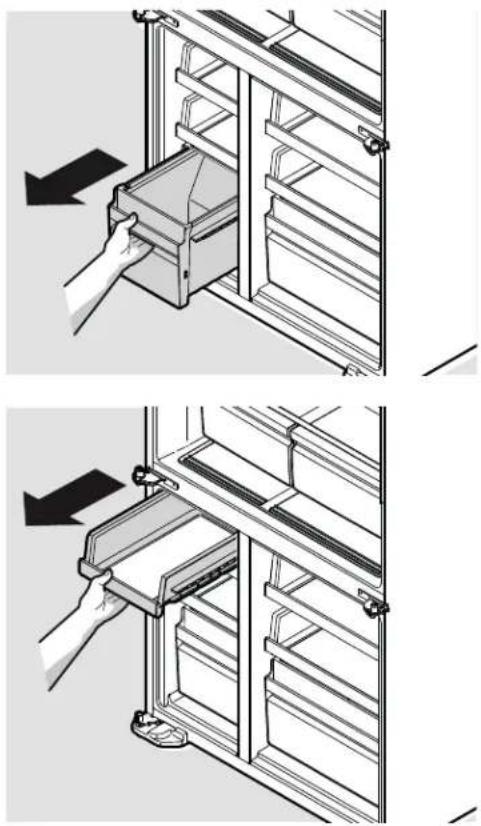
To remove freezer and FlexSpace shelves and drawers:
All freezer and FlexSpace shelves and drawers are removable.
- Open doors completely to gain access to shelves/drawers.
- Pull the shelf/drawer to the stopper. Lift up and pull to remove it from the cabinet.
- Reverse the steps to reinstall shelf/drawer.
natural_image
Two-step diagram showing hand positioning of a cabinet rack with a handle, no text or symbols present
The middle drawers in the freezer and FlexSpace™ can be mounted up to three height positions and can also invert 90 degrees allowing storage of bottles in the FlexSpace™.

natural_image
Three technical line drawings of a multi-level elevator shaft assembly, showing different mounting configurations (no text or symbols present)
Shelves in 3 Height Positions & Inverted

natural_image
Technical line drawing of a dual-panel storage cabinet with front-mounted railings (no text or symbols)
Possible Shelf Configuration Example
i IMPORTANT
There are wheels on the back of all shelves. Make sure all wheels are aligned on their respective tracks for proper function. If shelf is not aligned properly, it will cause problems with the door operation.
CLEANING YOUR REFRIGERATOR

WARNING
BEFORE CLEANING: Turn the refrigerator off at the power point and unplug the cord to prevent any chance of electrocuting yourself.
Doors and exterior (white and silver):
You should only clean the doors with lukewarm soapy water and a soft cloth.
Stainless Steel:
Your stainless steel refrigerator is manufactured from mark-resistant stainless steel. This stainless steel has a special advanced protective coating that eases the removal of marks such as fingerprints and water spots. To keep its appearance, clean it regularly with lukewarm soapy water and a soft cloth.

CAUTION
Never use stainless steel cleaners, abrasive pads or other cleaners that will scratch the surface. Damage to the appliance after delivery is not covered by your warranty.
Interior
Clean the inside of your refrigerator regularly with a soft cloth, unscented mild soap and lukewarm water. Thoroughly dry all surfaces and removable parts and avoid getting water on the controls. Replace removable parts, plug power cord in and switch the power on before returning the food.
Door seals
Always keep door seals clean by washing them with a mild detergent and warm water, followed by a thorough drying. Sticky food and drink can cause seals to stick to the cabinet and tear when you open the door.
Never use hot water, solvents, commercial kitchen cleaners, aerosol cleaners, metal polishes, caustic or abrasive cleaners, or scourers to clean your refrigerator. Many commercially available cleaning products and detergents contain solvents that will damage your refrigerator. Use only a soft cloth with an unscented mild soap and lukewarm water.

CAUTION
To clean a crisper or freezer bin with telescopic extension slides, simply wipe with a damp cloth and warm soapy water. Never immerse the cover in water, as this could affect the operation of the slide.
Switching off your refrigerator
If you switch off your refrigerator for an extended period, follow these steps to reduce the chances of mould.
- Remove all food.
- Remove the power plug from the power point.
- Thoroughly clean and dry the Interior.
- Ensure that all the doors are wedged open slightly for air circulation.
CHANGING THE FILTER
Air Filter (select models)
The air filter is located in the top center of the fresh food compartment.
Replacing your Air Filter
To ensure optimal filtering of refrigerator odors, you should change the air filter six months (The filter status light on the Touch Panel prompts you to replace the filter after six month)
- Remove the air filter cover by squeezing the sides of the cover together and removing from liner
- Remove the old filter and discard it.
- Unpack the new filter and slide it into the housing. The open face must (carbon media) of the filter should be installed facing the air port (hole) in the multiflow.
- Replace the air filter cover by squeezing the sides and snapping it back into place.
- Press and hold the "Reset Air Filter" button on the control panel for three seconds. When the LED turns off, the status has been reset.

natural_image
Diagram showing a hand inserting a device into a rack, with arrows indicating the process (no text or symbols present)
Water Filter
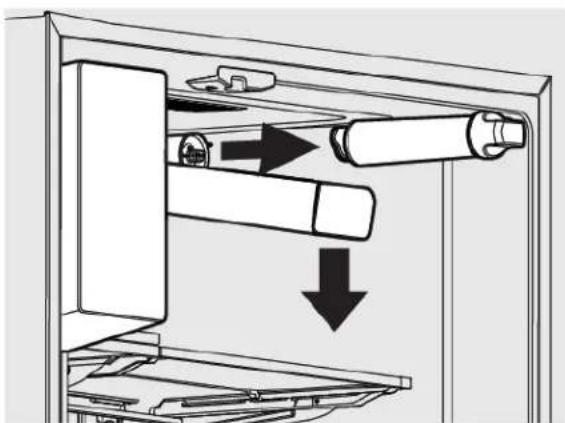
Your refrigerator is equipped with a water filtering system. The water filtering system filters all dispensed drinking water, as well as the water used to produce ice. The water filter is located at the top right side of the fresh food compartment.
In general, you should change the water filter every six months to ensure the highest possible water quality. Water filter status on the user interface prompts you to replace the filter after a standard amount of water (750 litres) has flowed through the system.
If your refrigerator has not been used for a period of time (during moving for example), change the filter before reinstalling the refrigerator
natural_image
Diagram of a refrigerator interior showing internal components and directional arrows (no text or symbols)
Note: When ordering your replacement filter, please reorder the same filter type that is currently in your refrigerator.

WARNING
Use the appliance with water filter supplied by Electrolux Home Products Pty Ltd or its authorized service agent only.
For correct operation of this appliance it is essential to observe the manufacturer's instructions.
Replacing the Water Filter
To Remove: Pull cover towards you and cover will drop down and allow access to filter.
To Reinstall: Push cover up towards liner and then push towards rear of cabinet. Filter cover will snap back into place.
It is not necessary to turn the water supply off to change the filter. Be ready to wipe up any small amounts of water released during the filter replacement.
- Ensure that the ice maker is turned off
- Remove the filter by turning anti-clockwise 180°
- Slide the old water filter cartridge straight out of the housing and discard it.
- Unwrap the new filter cartridge and using the alignment guide, slide it gently into filter housing until it stops against the filter connection at the back of the housing.
- Engage the filter by firmly rotating clockwise until the filter snaps into position (once engaged the filter cannot be rotated further).
- Press a drinking glass against the water dispenser while checking for any leaks at the filter housing. Any spurts and sputters that occur as the system purges air out of the dispenser system are normal.
- After filling one glass of water, continue flushing the system for about four minutes.
- Turn on the ice maker.
- When the filter has been replaced press and hold the 'Reset Water Filter' button for three seconds to reset the filter replace timer.
- Replace filter cover by pushing up and snapping into place.
FOOD STORAGE GUIDE
| CATEGORY PRODUCT | RECOMMENDED STORAGE TIMES FOR FRESH FOODS * | STORAGE TIPS |
| REFRIGERATOR | ULTRA CHILL | FREEZER |
| MEAT | Sausages and Mince | 1-2 Days | 3-5 Days 2-3 Months | | Keep cold meat at the back of the refrigerator where it is coldest. Plastic can cause meat to sweat if stored in refrigerator for more than a day. Roast can take up to 48 hours to defrost properly, transfer frozen roast to the refrigerator 2 days before use. |
| Chops and Steak | 3-4 Days 5-7 Days | 4-6 Months | |
| Cold Meats | 3-5 Days 5-7 Days | 4-6 Months | |
| Roasts | 3-5 Days | 1 week | 12 Months |
| POULTRY Chicken | 1-2 Days | 5-7 Days | 2 Months | If poultry takes on a smell or colour you are unsure about it is best to throw it out. Whole eggs are not suitable for freezing, slightly beaten eggs may be frozen for four months. |
| Roast Chicken | 3-5 Days | 1 week | 12 Months |
| Eggs | 6 Weeks | Not Suitable | Not Suitable |
| SEAFOOD | Whole fish and fillets | 2-3 Days | 5-7 Days | 2 Months | Store in an airtight container or foil. Never freeze prawns in salty water as this will dehydrate the flesh. |
| Lobster and Crab | 1-2 Days | 3-5 Days | 2 Months |
| Prawns | 1-2 Days | 3-5 Days | 2 Months |
| DAIRY | Milk | Until Expiry Date | Not Suitable | Not Suitable | If dairy takes on a smell or colour and you are unsure about it, it is best to throw it out. Depending on the variety hard cheese can last from 2 weeks to 2 months. * Texture may change depending of the type of soft cheese |
| Yoghurt | 7-10 Days | Not Suitable | Not Suitable |
| Hard Cheeses | 2 Weeks - 2 Months | 1-2 Months | 2 Months (Grated) |
| Soft Cheeses | 1-2 Weeks | 2-4 Weeks * | Not Suitable |
| Butter | 8 Weeks | 3-4 Months | 12 Months |
| FRUIT & VEGETABLES | Every fruit and vegetable has a different shelf life. Some stay fresh for a couple of days e.g. beans, others can last for a couple of months e.g. onions. | Not Suitable 8-12 Months When freezing chop and blanch in small portions. | Keep vegetables in the crisper and away from the air vents to avoid freezing. If you wash fruit and vegetables before storing them make sure they are dry or wrap in absorbent paper before storing in the refrigerator as this can make them susceptible to rotting. Try to keep fruit and vegetables separated as fruits that give off high levels of ethylene (the ripening agent) can prematurely ripen and spoil surrounding vegetables |

IMPORTANT
* Please note, use this information as a guide only, actual storage times will vary depending on how you use your refrigerator.
CARE & CLEANING
| Care & Cleaning Tips |
| Part | What To Use | Tips and Precautions |
| Interior & Door Liners | ·Soap and water·Baking soda and water | Use two tablespoons of baking soda in one quart of warm water. Be sure to wring excess water out of sponge or cloth before cleaning around controls, light bulb or any electrical part. |
| Door Gaskets | ·Soap and water | Wipe gaskets with a clean soft cloth. |
| Drawers & Bins | ·Soap and water | Use a soft cloth to clean drawer runners and tracks. |
| Glass Shelves | ·Soap and water·Glass cleaner·Mild liquid sprays | Allow glass to warm to room temperature before immersing in warm water. |
| Exterior & Handles | ·Soap and water·Non Abrasive Glass Cleaner | Do not use commercial household cleaners containing ammonia, bleach or alcohol to clean handles. Use a soft cloth to clean smooth handles or exterior. DO NOT use a dry cloth to clean smooth doors. |
| Exterior & Handles(Stainless Steel Models Only) | ·Soap and water·Stainless Steel Cleaners | Never use CHLORIDE or cleaners with bleach to clean stainless steel.Clean stainless steel front and handles with non-abrasive soapy water and a dishcloth. Rinse with clean water and a soft cloth. Use a non-abrasive stainless steel cleaner. These cleaners can be purchased at most home improvement or major department stores. Always follow manufacturer's instructions. Do not use household cleaners containing ammonia or bleach.NOTE: Always clean, wipe and dry with the grain to prevent scratching. Wash the rest of the cabinet with warm water and mild liquid detergent. Rinse well, and wipe dry with a clean soft cloth. |
TROUBLESHOOTING
| Concern | Potential Cause | Common Solution |
| Automatic Ice Maker |
| Ice maker is not making any ice. | Ice maker is turned off.Refrigerator is not connected to water line or water valve is not open.The water supply line is kinked.The water filter is not seated properly.The water filter may be clogged with foreign material. | Turn on ice maker. For the fresh food ice maker, press ice maker on-off button once.Connect the unit to the household water supply and ensure the water valve is open.Ensure that the supply line does not kink when the refrigerator is pushed into place against the wall.Remove and re-install the water filter. Be sure to seat it fully into the locked position.If water dispenses slowly or not at all, or if the filter is six months old or older, it should be replaced. |
| Ice maker is not making enough ice. | Ice maker is producing less ice than you expect.The water filter may be clogged with foreign material.The water supply line is kinked.Water pressure is extremely low. Cut-off and cut-on pressures are too low (well systems only).Reverse osmosis system is in regenerative phase. | The ice maker will produce approximately 1 kg of ice every 24 hours depending on usage conditions.If water dispenses slower than normal, or if the filter is six months old or older, it should be replaced.Ensure that the supply line does not kink when the refrigerator is pushed into place against the wall.Have someone turn up the cut-off and cut-on pressure on the water pump system (well systems only).It is normal for a reverse osmosis system to be below 137 kPa (20 psi) during the regenerative phase. |
| Ice cubes are freezing together. | Ice cubes are not being used frequently enough or interruption of power for prolonged time.Ice cubes are hollow (shells of ice with water inside). The hollow cubes break open in the bin and leak their water onto existing ice, which causes it to freeze together. | Remove ice container and discard ice. The ice maker will produce fresh supply. Ice should be used at least twice weekly to keep the cubes separated.This generally occurs when the ice maker does not get enough water. This is usually the result of a clogged water filter or restricted water supply. Replace the water filter and if the condition still occurs, check to see if the water valve is not turned on all the way or if there is a kinked water supply line. |
| Dispenser (Ice & Water) |
| Dispenser (Ice & water) not dispensing ice. | There is no ice in the bin to be dispensed.The refrigerator doors are not completely closed.Dispenser paddle has been pressed too long and the dispenser motor has overheated. | See the "Ice maker is not making any ice" section.Be sure the refrigerator doors are completely closed.The motor overload protector will reset in about three minutes and then ice can be dispensed. |
| Ice dispenser is jammed. | Ice has melted and frozen around auger due to infrequent use, temperature fluctuations, and/or power outages.Ice cubes are jammed between ice maker and back of ice container. | Remove ice container, thaw, and empty the contents. Clean container, wipe dry, and replace in proper position. When new ice is made, dispenser should operate.Remove ice cubes that are jamming the dispenser. |
TROUBLESHOOTING
| Concern | Potential Cause | Common Solution |
| Dispenser (Ice & Water) |
| Dispenser (Ice & water) not dispensing water. | ·Water filter not seated properly.·Water filter is clogged.·Household water line valve is not open. | ·Remove and reinstall the water filter. Be sure to rotate it to the right until it stops and the grip end is vertical.·Replace filter cartridge. Be sure to rotate it to the right until it stops and the grip end is vertical.·Open household water line valve. See CONCERN column AUTOMATIC ICE MAKER. |
| Water not cold enough. | ·As warmer tap water goes through the filter and enters the water supply system, the chilled water is pushed through to the dispenser. Once the chilled water is used up, it will take several hours to bring the freshly replaced water to a cooler temperature. | ·Add ice to cup or container before dispensing water. |
| Water has an odd taste and/or odor. | ·Water has not been dispensed for an extended period of time.·Unit not properly connected to cold water line. | ·Draw and discard 10-12 glasses of water to freshen the supply.·Connect unit to cold water line that supplies water to the kitchen faucet. |
| Opening/Closing Of Doors/Drawer |
| Door(s) will not close. | ·Door was closed too hard, causing other door to open slightly.·Refrigerator is not level. It rocks on the floor when moved slightly.·Refrigerator is touching a wall or cabinet.·Check gasket and cabinet interface for any obstructions. | ·Close both doors gently.·Ensure floor is level and solid, and can adequately support the refrigerator. Contact a carpenter to correct a sagging or sloping floor.·Ensure floor is level and solid, and can adequately support the refrigerator. Contact a carpenter to correct a sagging or sloping floor.·Clean the refrigerator door gaskets and interface with warm, soapy water to remove any grease, dirt and grime from the surface. Wipe clean with a dry cloth. Inspect the gasket to make sure it is thoroughly clean. |
| Drawers are difficult to move. | ·Food is touching shelf on top of drawer.·Track that drawers slide on is dirty. | ·Remove top layer of items in drawer.·Ensure drawer is properly installed on track.·Clean drawer, rollers, and track. See Care & Cleaning. |
| Running of Refrigerator |
| Compressor does not run. | ·Refrigerator is in defrost cycle.·Plug at electrical outlet is disconnected.·House fuse blown or tripped circuit breaker.·Power outage. | ·This is normal for a fully automatic defrost refrigerator. The defrost cycle occurs periodically, lasting about 30 minutes.·Ensure plug is tightly pushed into outlet.·Check/replace fuse with a 15 amp time-delay fuse. Reset circuit breaker.·Check house lights. Call local electric company. |
TROUBLESHOOTING
| Concern | Potential Cause | Common Solution |
| Running of Refrigerator |
| Refrigerator seems to run too much or too long. | ·Your variable speed compressor is designed to run 100% of the time except during the defrost cycle. At times it will run faster, such as after a defrost cycle. | ·It is normal for the compressor to run continuously except during defrost mode. |
| Digital Temperature Setting Display |
| Digital temperature displays an error. | ·Electronic control system has detected a performance problem. | ·Call your Electrolux service representative, who can interpret any messages or number codes flashing on the digital displays. |
| Water/Moisture/Frost Inside Refrigerator |
| Moisture collects on inside of refrigerator walls. | ·Weather is hot and humid.·Flipper mullion | ·The rate of frost buildup and internal sweating increases.·Adjust flipper mullion. (See “To adjust the flipper mullion” in the Installation section.) |
| Water collects on bottom side of drawer cover. | ·Vegetables contain and give off moisture. | ·It is not unusual to have moisture on the bottom side of the cover. |
| Water collects in bottom of drawer. | ·Washed vegetables and fruit drain while in the drawer | ·Dry items before putting them in the drawer. Water collecting in bottom of drawer is normal |
| Water/Moisture/Frost Outside Refrigerator |
| Moisture collects on outside of refrigerator or between doors. | ·Weather is humid. | ·This is normal in humid weather. When humidity is lower, the moisture should disappear. |
| Food in Fresh Food Compartment |
| Food is freezing. | ·Temperature setting is too low.·Temperature sensor is covered by food (right side of fresh food area).·Food is covering the air ports. | ·Move the setting to a higher degree.·Allow space for air flow to the sensor.·Allow space between the air ports and the food. |

Electrolux Warranty
FOR SALES IN AUSTRALIA AND NEW ZEALAND
APPLIANCE: WESTINGHOUSE REFRIGERATORS AND FREEZERS
This document sets out the terms and conditions of the product warranties for Westinghouse Appliances. It is an important document. Please keep it with your proof of purchase documents in a safe place for future reference should there be a manufacturing defect in your Appliance. This warranty is in addition to other rights you may have under the Australian Consumer Law.
1. In this warranty:
(a) 'ACL' or 'Australian Consumer Law' means Schedule 2 to the Competition and Consumer Act 2010;
(b) 'Appliance' means any Electrolux product purchased by you and accompanied by this document;
(c) 'ASC' means Electrolux's authorised serviced centres;
(d) 'Westinghouse' is the brand controlled by Electrolux Home Products Pty Ltd of 163 O'Riordan Street, Mascot NSW 2020, ABN 51 004 762 341 in respect of Appliances purchased in Australia and Electrolux (NZ) Limited (collectively "Electrolux") of 3-5 Niall Burgess Road, Mount Wellington, in respect of Appliances purchased in New Zealand;
(e) 'Warranty Period' means the period specified in clause 3 of this warranty;
(f) 'you' means the purchaser of the Appliance not having purchased the Appliance for re-sale, and 'your' has a corresponding meaning.
- Application: This warranty only applies to new Appliances, purchased and used in Australia or New Zealand and is in addition to (and does not exclude, restrict, or modify in any way) other rights and remedies under a law to which the Appliances or services relate, including any non-excludable statutory guarantees in Australia and New Zealand.
3.WarrantyPeriod: Subject to these terms and conditions, this warranty continues for in Australia for a period of 24 months and in New Zealand for a period of 24 months, following the date of original purchase of the Appliance. Specific components are warranted against manufacturing defects in Australia and New Zealand for the periods listed below;
- Comp essor – Further 3 years parts only,
- Exte nal Condenser – Further 3 years parts only
- Evaporator – Further 3 years parts onl
• Drier – Further 3 years parts onl
- Repair or replace warranty: During the Warranty Period, Electrolux or its ASC will, at no extra charge if your Appliance is readily accessible for service, without special equipment and subject to these terms and conditions, repair or replace any parts which it considers to be defective. Electrolux may, in its absolute discretion, choose whether the remedy offered for a valid warranty claim is repair or replacement. Electrolux or its ASC may use refurbished parts to repair your Appliance. You agree that any replaced Appliances or parts become the property of Electrolux.
- Travel and transportation costs: Subject to clause 7, Electrolux will bear the reasonable cost of transportation, travel and delivery of the Appliance to and from Electrolux or its ASC. Travel and transportation will be arranged by Electrolux as part of any valid warranty claim.
- Proof of purchase is required before you can make a claim under this warranty.
- Exclusions: You may not make a claim under this warranty unless the defect claimed is due to faulty or defective parts or workmanship. This warranty does not cover:
(a) light globes, batteries, filters or similar perishable parts;
(b) parts and Appliances not supplied by Electrolux;
(c) cosmetic damage which does not affect the operation of the Appliance;
(d) damage to the Appliance caused by:
(iii) negligence or accide
(ii)iii) misuse or abuse, including fa e to properly maintain or service;
(iii) improper, negligent or faulty servicing or repair works done by anyone other than an Electrolux authorised repairer or ASC;
(iv)iv) normal wear and t
(v)v) power surges, electrical storm damage or inc ect power supply;
(vi)vi) incomplete or oper installation;
(vii) i ect, improper or inappropriate operation;
(viii) insect or vermin infest
(ix) failure to comply with any additional instructions supplied with the Appliance;
In addition, Electrolux is not liable under this warranty if:
(a) the Appliance has been, or Electrolux reasonably believes that the Appliance has been, used for purposes other than those for which the Appliance was intended, including where the Appliance has been used for any non-domestic purpose;
(b) the Appliance is modified without authority from Electrolux in writing;
(c) the Appliance's serial number or warranty seal has been removed or defaced.
- How to claim under this warranty: To enquire about claiming under this warranty, please follow these steps:
(a) carefully check the operating instructions, user manual and the terms of this warranty;
(b) have the model and serial number of the Appliance available;
(c) have the proof of purchase (e.g. an invoice) available;
(d) telephone the numbers shown below.
-
Australia: For Appliances and services provided by Electrolux in Australia: Electrolux goods come with guarantees that cannot be excluded under the Australian Consumer Law. You are entitled to a replacement or refund for a major failure and for compensation for any other reasonably foreseeable loss or damage. You are also entitled to have the Appliance repaired or replaced if the Appliance fails to be of acceptable quality and the failure does not amount to a major failure. 'Acceptable quality' and 'major failure' have the same meaning as referred to in the ACL.
-
New Zealand: For Appliances and services provided by Electrolux in New Zealand, the Appliances come with a guarantee by Electrolux pursuant to the provisions of the Consumer Guarantees Act, the Sale of Goods Act and the Fair Trading Act. Where the Appliance was purchased in New Zealand for commercial purposes the Consumer Guarantee Act does not apply.
-
Confidentiality: You accept that if you make a warranty claim, Electrolux and its agents including ASC may exchange information in relation to you to enable Electrolux to meet its obligations under this warranty.
Important Notice
Before calling for service, please ensure that the steps listed in clause 8 above have been followed.
| FOR SERVICEor to find the address of your nearest authorised service centre in AustraliaPLEASE CALL 13 13 49For the cost of a local call (Australia only) | AUSTRALIAELECTROLUX HOME PRODUCTS163 O'Riordan Street, Mascot NSW 2020electrolux.com.au | FOR SPARE PARTSor to find the address of your nearest spare parts centre in AustraliaPLEASE CALL 13 13 50For the cost of a local call (Australia only) |
| FOR SERVICEor to find the address of your nearest authorised service centre in New ZealandPLEASE CALL 0800 10 66 10(New Zealand only) | NEW ZEALANDELECTROLUX (NZ) Limited3-5 Niall Burgess Road, Mount Wellingtonelectrolux.co.nz | FOR SPARE PARTSor to find the address of your nearest spare parts centre in New ZealandPLEASE CALL 0800 10 66 20(New Zealand only) |
Notes
For more information on all Westinghouse appliances, or for dimension and installation information, call into your retailer, phone or email our customer care team or visit our website:
AUSTRALIA
phone: 1300 363 640
fax: 1800 350 067
email: customercare@electrolux.com.au
web: westinghouse.com.au
NEW ZEALAND
phone: 0800 436 245
fax: 0800 225 088
email: customercare@electrolux.co.nz
web: westinghouse.co.nz
TOP SERVICE
Top Service encompasses the after sales service provided by The Electrolux Group to consumers including delivery, home service and spare parts.

and WESTINGHOUSE are trademarks of Westinghouse Electric Corporation. and under license. All Rights Reserved.
P/No..A10883138
© 2017 Electrolux Home Products Pty Ltd.
ABN 51 004 762 341