
SRT 8203 - Receiver STRONG - Free user manual and instructions
Find the device manual for free SRT 8203 STRONG in PDF.


| Product Type | Digital Terrestrial Receiver (DVB-T/T2) |
| Brand | STRONG |
| Model | SRT 8203 |
| Dimensions (W x D x H) | 85 x 67 x 28 mm |
| Net Weight (without accessories) | 0.06 kg |
| Power Supply | AC 100-240 V ~ 50/60 Hz; DC 5 V, 1.2 A via included adapter |
| Power Consumption (typical) | 3.5 W (without USB); 6 W (max) |
| Standby Power Consumption | max. 0.5 W |
| Supported Standards | DVB-T/T2, MPEG-4/H.264, AVC, Dolby Digital |
| Video Output Resolution | 480i, 480p, 576i, 576p, 720p, 1080i, 1080p |
| Audio Modes | Stereo, Left, Right; Dolby Digital via HDMI |
| Connectors | ANT IN (IEC female), HDMI, mini AV (CVBS + audio L/R), IR IN, USB 2.0 (5V/500mA), DC IN |
| Recording & Timeshift | Supports USB storage (FAT32/NTFS) for recording, timeshift, and multimedia playback |
| Remote Control Range | Up to 5 meters, ±30° angle |
| Default PIN | 0000 |
| Auto Standby | Adjustable: Off, 1h, 2h, 3h |
| Safety | Class II double insulated; do not expose to rain/moisture; keep ventilation clear |
| WEEE Compliance | Do not dispose with household waste; recycle responsibly |
| Included Accessories | Power adapter, remote control (2x AAA batteries), installation instructions, 2x stickers for mounting |
| Operating Temperature | 0°C to +45°C |
Frequently Asked Questions - SRT 8203 STRONG
User questions about SRT 8203 STRONG
0 question about this device. Answer the ones you know or ask your own.
Ask a new question about this device
Download the instructions for your Receiver in PDF format for free! Find your manual SRT 8203 - STRONG and take your electronic device back in hand. On this page are published all the documents necessary for the use of your device. SRT 8203 by STRONG.
USER MANUAL SRT 8203 STRONG
natural_image
Black STRONG 340 TBA device with visible ports and a green indicator light (no text or symbols on the device body)natural_image
Simple line drawing of a rectangular object with an arrow indicating rotation, no text or symbols present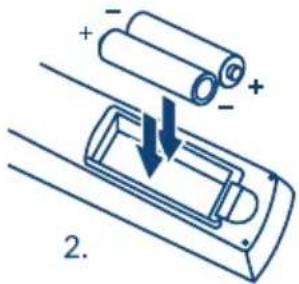
natural_image
Simple line drawing of a rectangular object with an arrow indicating rotation, no text or symbols presentFig. 5
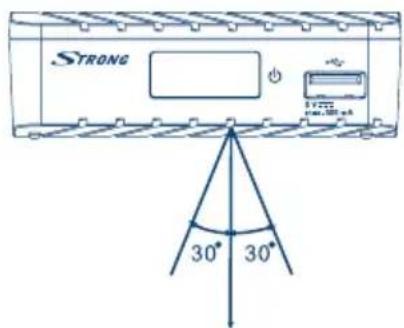
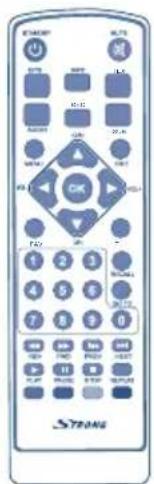
Fig. 6
Supplied by STRONG Austria
Represented by
STRONG Ges.m.b.H.
Franz-Josefs-Kai 1
1010 Vienna
Austria
Email: support_at@strong.tv
Licenses
THIS PRODUCT IS LICENSED UNDER THE AVC PATENT PORTFOLIO LICENSE FOR THE PERSONAL AND NONCOMMERCIAL USE OF A CONSUMER TO (i) ENCODE VIDEO IN COMPLIANCE WITH THE AVC STANDARD ("AVC VIDEO") AND/OR (ii) DECODE AVC VIDEO THAT WAS ENCODED BY A CONSUMER ENGAGED IN A PERSONAL AND NON-COMMERCIAL ACTIVITY AND/OR WAS OBTAINED FROM A VIDEO PROVIDER LICENSED TO PROVIDE AVC VIDEO. NO LICENSE IS GRANTED OR SHALL BE IMPLIED FOR ANY OTHER USE. ADDITIONAL INFORMATION MAY BE OBTAINED FROM MPEG LA, L.L.C. SEE HTTP://WWW.MPEGLA.COM
STRONG declares that this item complies with the basic requirements and other relevant regulations of directives EMC 2014/30/EU, LVD 2014/35/EU and RoHS 2011/65/EU.
Subject to alterations. In consequence of continuous research and development technical specifications, design and appearance of products may change. HDMI, the HDMI logo and High-Definition Multimedia Interface are trademarks or registered trademarks of HDMI Licensing LLC in the United States and other countries. All other product names are trademarks or registered trademarks of their respective owners. © STRONG 2018. All rights reserved.
TABLE OF CONTENTS
1.0 INTRODUCTION 3
1.1 Safety Instructions 3
1.2 Equipment Set-up 4
1.3 Accessories 4
1.4 Usage of external USB devices 5
2.0 YOUR RECEIVER 5
2.1 DEFAULT PIN: 0000 5
2.2 Front Panel 5
2.3 Rear Panel 5
2.4 Remote Control Unit (RCU) 5
2.5 Installing the batteries 6
2.6 Using the remote control 6
3.0 CONNECTIONS
3.1 Connecting to a terrestrial antenna 7
3.2 Connecting IR sensor extender 7
3.3 Fixed placement of the receiver 7
3.4 Connecting to TV with HDMI cable 7
3.5 Connecting to a digital audio amplifier using HDMI 7
3.6 Connecting to TV with mini AV-3RCA cable 8
3.7 Connecting a USB storage device 8
4.0 STARTING UP FOR THE FIRST TIME
5.0 QUICK GUIDE TO USING YOUR RECEIVER
6.0 OPERATION
6.1 Switching the receiver on and off 10
6.2 Channel selection 10
6.3 Volume adjustment 11
6.4 Viewing the programme information 11
6.5 Signal level and quality 12
6.6 Audio 12
6.7 Subtitles 12
6.8 Teletext 13
6.9 Usage of external USB devices 13
6.10 Pause and Timeshift of broadcasted programme 13
6.11 TV programmes recording 14
7.0 MAIN MENU
7.1 Installation 15
7.2 Channel 16
7.3 Preference 18
7.4 Settings 18
7.5 AV 21
7.6 Media Center 22
8.0 TROUBLESHOOTING
9.0 TECHNICAL SPECIFICATIONS
1.0 INTRODUCTION
1.1 Safety Instructions
Read all of the instructions before operating the device. Keep these instructions well for later use.
■ Only use attachments/accessories specified or provided by the manufacturer (such as the exclusive supply adapter, battery etc.).
■ Please refer to the information on the product enclosure for electrical and safety information before installing or operating the apparatus.
■ To reduce the risk of fire or electric shock, do not expose this apparatus to rain or moisture.
■ The ventilation should not be impeded by covering the ventilation openings with items, such as newspaper, table-cloths, curtains, etc.
■ The apparatus shall not be exposed to dripping or splashing and no objects filled with liquids, such as vases, shall be placed on the apparatus.

This mark indicates a risk of electric shock.
■ To prevent injury, this apparatus must be securely attached to the floor/wall in accordance with the installation instructions.
■ Danger of explosion if the battery is incorrectly replaced. Replace only with the same or equivalent types.
■ The battery (battery or batteries or battery pack) shall not be exposed to excessive heat such as sunshine, fire or the like.
■ Excessive sound pressure from earphones and headphones can cause hearing loss.
- Listening to music at high volume levels and for extended durations can damage one's hearing.
In order to reduce the risk of damage to hearing, one should lower the volume to a safe, comfortable level, and reduce the amount of time listening at high levels.
■ The mains plug or appliance coupler is used as disconnect device, it shall remain readily operable. When not in use and during movement, please take care of the power cord set, e.g. tie up the power cord set with cable tie or something like that. It shall be free from sharp edges or similar which can cause abrasion of the power cord set. When put into use again, please make sure the power cord is not damaged. The absence of a light indication on the apparatus does not mean that it is fully disconnected from the mains. To disconnect the apparatus completely, the mains plug must be pulled out.
■ Attention should be drawn to environmental aspects of battery disposal.
■ No naked flame sources, such as lighted candles, should be placed on the apparatus.
To prevent the spread of fire, keep candles or other open flames away from this product at all times.
■ Equipment with this symbol is a Class II or double insulated electrical appliance. It has been designed in such a way that it does not require a safety connection to electrical earth.
Precautions
■ Never try to open the device. It is dangerous to touch the inside of the device due to high voltages and possible electrical hazards. Opening the device will void the warranty of the product. Refer all maintenance or servicing to suitably qualified personnel.
■ When you are connecting cables, be sure that the device is disconnected from the mains supply voltage. Wait a few seconds after switching off the device before you move the device or disconnect any equipment.
It is a necessity that you only use an approved extension and compatible wiring that is suitable for the electrical power consumption of the installed equipment. Please ensure that the electrical power supply corresponds with the voltage on the electrical identification plate at the back of the device.
Operating Environment
■ Do not install this equipment in a confined space such as a bookcase or similar unit.
■ Do not use the set near damp, and cold areas, protect the set from overheating.
- Keep away from direct sunlight.
■ Do not use the set near dust place.
■ Do not place candles near the opening area, to avoid flammable foreign material from entering the device.
WEEE Directive

Correct Disposal of this product. This marking indicates that this product should not be disposed with other household wastes throughout the EU. To prevent possible harm to the environment or human health from uncontrolled waste disposal, recycle it responsibly to promote the sustainable reuse of material resources. To return your used device, please use the return and collection systems or contact the retailer where the product was purchased. They can take this product for environmental safe recycling.
Storage
Your device has been carefully checked and packed before shipping. When unpacking it, make sure that all the parts are included and keep the packaging away from children. We recommend that you keep the carton during the warranty period, to keep your device perfectly protected in the event of repair or warranty.
1.2 Equipment Set-up
The installation of your receiver does not require any special skills and can be done by yourself, as described in chapter 4. In this case, please follow the instructions.
■ Refer to the user manual of your TV.
■ Make sure that the HDMI cable is in a good condition.
■ Make sure that the 3 RCA or HDMI cable and outdoor components are in good condition and all connections are well shielded and of good quality.
■ Make sure the antenna cable is in good condition and the antenna is pointing to the nearest digital TV transmitter.
This manual provides complete instructions for installing and using this receiver. If you are unable to set up your receiver by yourself, please contact a qualified technician.
The symbols serve as follows.
WARNING! Indicates warning information.
NOTE Indicates any other additional important or helpful information.
MENU
Represents a button on the remote control or the receiver. (Bold characters)
Move to Represents a menu item within a window. (Italic characters)
1.3 Accessories
■ Installation Instructions
■ 1 Power Supply
■ 1 Remote Control Unit
■ 2x stickers for fixed placement
NOTE: For the appropriate usage with this device, use only power adapters as
listed below (in case of a necessary exchange):
■ Model: JKY088-0501000EU; Manufacturer: Shenzhen Jiakeyuan Industry Co., Ltd
■ Model: JKY0318-0501000EU; Manufacturer: Shenzhen Jiakeyuan Industry Co., Ltd The usage of other power adapters may cause damage to the device. Such damage is not covered under warranty.
WARNING! The batteries should not be recharged, disassembled, electrically short-circuited, be mixed or used with other types of batteries. If rechargeable accumulators instead of batteries are going to be used (e.g. NiMH), we recommend using types with low self-discharge to ensure long time operation of your remote control.
1.4 Usage of external USB devices
It is recommended to use USB 2.0 storage devices or higher. If your device is not compatible to USB 2.0 specifications, recording, playback and other multimedia functions of the receiver might not work properly.
■ STRONG cannot guarantee compatibility with all types of USB storage devices.
If you are going to use external USB HDDs (Hard Disk Drives), please consider that power specifications may exceed the supported output of your receiver (max. 5 V/500 mA). If so, please connect your USB HDD to an according external power adapter.
It is advised not to store important information on USB storage devices used with the receiver. Always make backups of data on your USB storage device before using it with this receiver. STRONG will not take responsibility for any loss of information or circumstances caused by loss of information.
2.0 YOUR RECEIVER
2.1 DEFAULT PIN: 0000
2.2 Front Panel
Fig. 1
- Remote control sensor:
Receives the signal from the remote control. Point your RCU towards this sensor - Mode indicator:
RED indicates that the receiver is in STANDBY mode.
GREEN indicates that the receiver is in OPERATING mode - USB: Connector for USB storage and other devices.
2.3 Rear Panel
Fig. 2
- ANT IN: To connect to your antenna for reception of broadcasted signals.
- IR: To connect IR sensor extender.
- HDMI: Connect to TV set HDMI input.
- AV: Connect to TV set video and audio inputs.
- DC IN: To connect power adaptor supplied with the receiver. (5 V, 1.2 A). Please, use only original adapter.
2.4 Remote Control Unit (RCU)
Fig. 3
- ⏻ Switches the receiver On/Standby
- Ⓞ Mutes all audio outputs of the receiver
- EPG Opens the EPG (Electronic Programme Guide) in TV mode
- INFO Shows information of the current programme. 2x opens the current event information and the signal information
- TEXT Displays Teletext contents
-
AUDIO Select an audio language or audio mode
-
REC Press to record a TV programme
- SUB Shows a list of subtitle languages
- MENU Opens or close of main menu
- EXIT Exit the current menu or returns to the previous menu
- ▲▼ Menu Off: Change channel to next/previous.
Menu On: Moves the cursor up/down - ◀▶ Menu Off: Decreases/increases the volume level Menu On: Navigate through the menus and to enter or exit settings for specific menus
- OK Menu Off: Displays the current channel list.
Menu On: Activates the highlighted menu item - FAV Display or edit the favourite programme list
- TV/R Switch between TV and Radio mode
- 0-9 Enters a channel number in viewing mode or a value inside the respective menu
- RECALL Back to previously watched channel
- GOTO Set the play time of media
- ← Search backward during media play
- ▶▶ Search forward during media play
- Change media file to previous
- ▶▶ Change media file to next
- Starts/resume playback of records and media files
- II Pauses playback
- ■ Stop media playback or to stop recording or Timeshift
- REPEAT Turn on/off repeat mode
- COLOUR BUTTONS
For Multimedia and Teletext functions
2.5 Installing the batteries
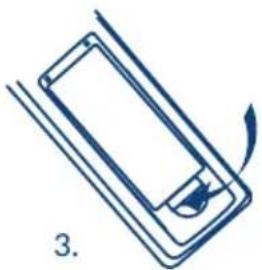
Fig. 4
Open the cover on the remote control and insert 2x AAA batteries into the compartment. Correct position of the polar diagram shows the batteries inside the compartment.
- Open the cover.
- Insert the batteries.
- Close the lid.
WARNING!
The batteries should not be recharged, disassembled, electrically short-circuited, be mixed or used with other types of batteries.
2.6 Using the remote control
Fig. 5
To use the remote control, point it towards the front of your receiver. The remote control supports a range of up to 5 meters distance to the receiver at an angle of up to approx. 30 degrees.
NOTE:
Managing the receiver will be limited or not possible if there are obstacles between the remote control sensor (at the front panel of the receiver) and the remote control. Direct sunlight or very bright light can reduce or disturb the reception of the remote control signals.
3.0 CONNECTIONS
WARNING! Make sure to check that the voltage specification of the wall outlet is the same rating with the receiver. To prevent the risk of electric shock, do not open the cover or the back of the receiver.
NOTE: When connecting the receiver to other equipment, e.g. TV, VCR and amplifier, make sure to refer to the relevant user manual for instruction. Also, make sure you disconnect all the equipment from the power before connecting.
3.1 Connecting to a terrestrial antenna
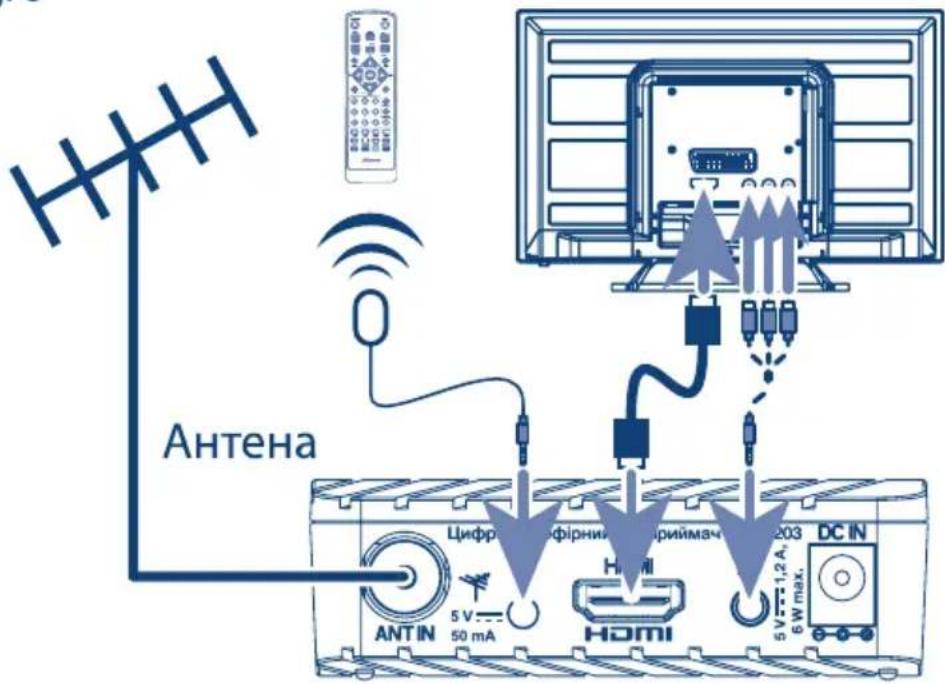
Fig. 6
To receive broadcasted signals, your terrestrial indoor or outdoor antenna must be connected to the ANT IN connector on the back of the receiver. Use a properly shielded antenna cable and suitable connectors.
NOTE: If the signals at your location are too weak to receive proper signals with an indoor antenna, we recommend using an outdoor antenna which can be pointed towards the transmission tower. Ask your local dealer for more information.
3.2 Connecting IR sensor extender
Fig. 6
If you install receiver on a wall or if there is no direct line of sight between the receiver and the RCU or for other reasons, you could use a remote control sensor extender.
The IR sensor extender is not included into the set of accessories of the receiver and could be purchased separately in retail networks.
3.3 Fixed placement of the receiver
Fig. 7
Use the stickers included in the packaging for fixed placing of the receiver on e.g. a wall, behind the TV or on the bottom of the TV panel.
3.4 Connecting to TV with HDMI cable
Fig. 6
The TV set shall be connected with the receiver using a good quality HDMI cable. This connection gives the highest possible quality.
3.5 Connecting to a digital audio amplifier using HDMI
Fig. 8
By connecting your receiver to the latest digital amplifiers or to Home Cinema systems, preferable with HDMI connections, you will enjoy the best possible sound quality and multi-channel audio (depending on broadcast). Connect the HDMI output of the receiver to an input of your amplifier, and then connect the HDMI output of the amplifier to your TV set. Select the correct input on your amplifier to watch and listen to programmes.
3.6 Connecting to TV with mini AV-3RCA cable
Fig. 6
Connect one side of the cable with the mini AV connector to the AV output of the receiver and the other side of the cable - with 3 RCA connectors to the RCA inputs of your TV set. Connect in accordance with the colour marking of the TV inputs and the connectors of the cable.
NOTE: You should switch your TV set to Video mode. For more details, see chapter 4. Starting up for the first time.
3.7 Connecting a USB storage device
Fig. 9
Connecting a USB device to the unit allows you to playback multimedia files. See chapter 7.6 Media Center.
NOTE: It is recommended to use USB 2.0 storage devices or higher for recording and playback of TV programmes or HD movies.
NOTE: Timeshift/recording and playback only works properly when a fast USB storage device such as a USB 2.0 HDD is connected to the receiver. Timeshift/recording and playback of HD content requires a sufficient read/write speed of the used USB storage device.
4.0 STARTING UP FOR THE FIRST TIME
After all connections have been made properly, switch on the TV and make sure the receiver is connected to the main power.
If the mode indicator on the front panel is red, press ⏻ to switch on the receiver.
If you are using the receiver for the first time or restoring to Factory Default, the Init Install menu will appear on your TV screen.
If your receiver is connected to a TV set by a mini AV-3RCA cable (supplied), then it is necessary to switch the TV set to the AV input.
To do this:
- Read the corresponding chapter of the user manual of your TV set.
■ Use the remote control of your TV set and switch it to AV input. Most of remote controls has a dedicated button to select the source of the signal. Often this button is named as: «AV», «VIDEO», «INPUT», «Source» or with the symbol ➤. If you have selected correct input, then you will see the on-screen menu of the receiver named «Init Install».
NOTE: Depending from brand and model of your TV, the name of the AV input can be different, for example: Video1, AV1.
If your receiver is connected to the TV set by an HDMI cable (not supplied with receiver), then it is necessary to switch the TV set to the HDMI input.
To do this:
■ Read corresponding chapter of the user manual of your TV set.
■ Use the remote control of your TV set and switch it to HDMI input. Most of remote controls has a dedicated button to select the source of the signal. Often this button named as: «AV»,
«VIDEO», «INPUT», «Source» or with the symbol ➤. If you have selected correct input, then you will see on the on-screen of the receiver named «Init Install».
NOTE: Depending from brand and model of your TV, the name of the HDMI input can be different, for example: HDMI1, HDMI2.
Select OSD Language. Press OK or ▶ to start language selection.
Select Country and press OK or ▶ to select the country of your residence.
Select LCN and press OK or ▶ to select if the channel numbering should be according to LCN (as defined by operator) or not.
Select Next and press OK or ▶ to go to Antenna Setup menu.
This part of the wizard is of great help when setting up your antenna system.
Use ▲▼ to move the highlight to the setting you wish to alter and use OK or ▶ to change values.
The following settings are available:
Active Antenna: Before connecting your antenna to the receiver, please read the user manual of your antenna regarding antenna powering. This parameter is recommended to set to On only for active internal or external antennas which require power supply via an antenna cable with voltage of 5 V DC and consume less than 50 mA. In all other cases please leave this parameter as Off.
Country Select the country of your residence.
Beep: Select On for an audible indication of signal reception. Off (default) turns the beeper off.
Channel No.: Select a channel that is known to carry a broadcast in your region. The Signal Strength and Signal Quality bars give a visual indication of the reception. Adjust your antenna to obtain maximum signal strength and quality.
Frequency: Reference information about frequency for the selected frequency channel. Parameter could be defined manually if you prefer to adjust antenna by frequency.
Bandwidth: Reference information about bandwidth for the selected frequency channel. Parameter could be defined manually if you prefer to adjust antenna by frequency/bandwidth parameters.
When all settings have been made, select Start Search and press OK or ▶ to start scanning.
The receiver will search for all available channels now.
Once scanning is finished, the receiver switches to viewing mode.
You are now ready to watch TV.
5.0 QUICK GUIDE TO USING YOUR RECEIVER
We at STRONG understand that you can't wait to enjoy your new digital terrestrial receiver.
The following chapter will make you familiar with the basic operation of this device.
We do, however, advice you to read all chapters of this manual to get the best performance from your receiver.
To turn your receiver ON or to Standby, use the ⏻ button on the remote control.
Choose a channel with ▲▼ (CH+/CH-) on the RCU. Alternatively, you can enter the channel number with 0-9 buttons on the RCU or press OK in viewing mode to display the channel list.
The volume can be adjusted with ◀/▶ (VOL-/VOL+).
6.0 OPERATION
In this section you will find the most frequently used functions of the receiver.
6.1 Switching the receiver on and off
To switch your receiver ON and OFF, press ⏻. This button is located on the remote control unit of the receiver.
Press ⏻ to switch the receiver into the operating mode.
Press ⏻ again to switch the receiver into standby mode.
NOTE: In standby mode the receiver does not consume more than 1.00 W of power.
If you plan not to use the receiver for a longer time, please completely disconnect the receiver from the power source - just simply unplug the power adapter from the outlet.
6.2 Channel selection
6.2.1 Switch channels in viewing mode
For sequential switching of channels in viewing mode you can use buttons ▲/▼ (CH+/CH-).
For direct switching to a channel with a certain number you can dial the channel number by using the buttons 0-9.
6.2.2 Switch channels via the channel list, switching between favourite channels
Press OK on the remote control in viewing mode to switch between channels via the channel list.
A list of stored channels in the receiver will be displayed on the TV screen.
Use ▲/▼ to highlight a channel in the channel list and press OK.
The channel list window will disappear from the screen and the receiver will switch to the selected channel.
NOTE: Use ◀/▶ to switch pages up and down in the channel list.
NOTE: You could find a channel by its name using YELLOW Find. You could enter from the virtual keyboard on-screen one or more of the first letters of the channel name (only in Latin) to set the filter.
Use ◀◀/▶◀ to switch between groups of Favourite channels in the channel list.
6.2.3 Switching between TV and radio channels
The receiver supports the following channel lists:
■ List of TV channels (if present in broadcasting);
■ List of radio channels (if present in broadcasting);
Press TV/R in viewing mode to switch between TV and radio channels.
6.2.4 Favourite channel lists
The receiver supports up to 4 favourite channel lists: Fav1,... Fav4.
Press FAV in viewing mode to enter favourite channel lists window.
Use ▲/▼ to select a channel, then use the COLOUR BUTTONS to add/remove the channel to/from the favourite list according to the buttons definition on the screen helpline. A selection symbol will appear and the programme will be included into favourite list of your choice.
Repeat these steps to select more Favourite programmes.
Press TV/R to switch between TV and radio channels.
Press EXIT or FAV to confirm and exit from the favourite channel lists window.
6.3 Volume adjustment
Use or ◀/▶ (VOL-/VOL+) in viewing mode to adjust the volume.
To temporarily mute the audio output, press 🔒.
To enable audio playing again, press 📍 again or use ◀/▶ (VOL-/VOL+).
6.4 Viewing the programme information
6.4.1 The information banner
Every time you switch from one channel to another, the information banner will be displayed on-screen.
NOTE:
This banner also can be displayed at any time by pressing INFO in viewing mode.
This banner displays the following information:
■ channel number and name;
■ current date and time;
■ the beginning and the end of the current programme with the name of the programme (if provided in the broadcasting);
■ the beginning and the end of the next programme with the name of the programme (if provided in the broadcasting);
■ icons showing the presence of additional services provided by the channel and some properties of this channel
TTX - presence of teletext information of the current channel
SUB - presence of subtitles on the current channel
HD - current channel broadcast resolution in HD format
♥ - this channel included into favourite list
DD - presence of Dolby® Digital* audio track on the current channel.
Presence of service on the current channel is indicated in yellow colour. If some services are grey, such services are not present on the current channel.
* Dolby and the double-D symbol are registered trademarks of Dolby Laboratories
The information banner will automatically be removed from the screen after a time interval specified in the menu Preferences (see chapter 7.3 parameter OSD Timeout).
6.4.2 Extended information panel
The extended information panel can be accessed by pressing INFO
■ once during presence of the information banner on screen
■ or twice from view mode.
The following information will be provided:
■ detailed event information: name and description of the current programme, time of the beginning and the end of the programme*. If the programme description does not fit in the display area, you can use ▲/▼ to scroll through this information. To view information about the next programme, use ◀/►;
■ technical information about frequency, bandwidth, etc. for viewed channel;
■ strength and quality signal indicators.
To exit the extended information panel, press EXIT or INFO again.
* Information will be displayed when available. Availability depends on the broadcast.
6.4.3 Electronic TV Programme Guide (EPG)
The Electronic TV Programme Guide gives you the opportunity to view programme schedules of digital terrestrial broadcasts for today and up to the 7 next days.
Availability of information about transmission and the period depends on the broadcasting operator.
Press EPG to open the EPG in viewing mode.
EPG has tree modes:
■ daily mode, information day-by-day for selected channel for next seven days;
■ weekly mode, information line-by-line for all channels on the screen for current and programs within next two hours;
■ now/next mode, information line-by-line for all channels on the screen for current and next programmes.
Use RED to switch between EPG modes.
Browse the EPG for channels and programmes with ▲/▼ and ◀/▶.
You can start a recording or to set a timer for a recording of a selected programme directly from the EPG.
Use GREEN to start a recording or to set a timer for a recording of a selected programme.
Press BLUE to show events for the next day. To return back to the previous day, press YELLOW.
NOTE: It is not possible to view information about past programmes.
Use TV/R to switch between TV and radio channels.
Press INFO to view detailed information for selected programme.
Press EXIT to exit from the EPG.
6.5 Signal level and quality
Information about the signal strength and quality displayed at the extended information screen is described in the chapters 6.4.2 and 7.1.2.
6.6 Audio
Some channels support a choice of audio formats and/or languages.
Press AUDIO in viewing mode to display a list of available audio languages.
Use ▲/▼ to highlight the language of your choice and press OK to confirm.
With ◀/▶ you can additionally select audio mode between Stereo, Left and Right.
Additionally, you can adjust your preferred audio language as described in chapter 7.3.
6.7 Subtitles
Press SUB in viewing mode to display a list of available subtitles languages.
Use ▲/▼ to select the subtitle language and press OK to confirm.
Additionally, you can adjust your preferred subtitle language as described in chapter 7.3.
NOTE: Please consider that this function supports DVB and TXT subtitles and this selection only displays them temporarily. Subtitles may not be supported by every channel or broadcaster.
6.8 Teletext
Press TEXT in viewing mode to view the teletext.
Use the COLOUR BUTTONS (in accordance with the bottom of the videotext screen) to navigate between pages or press 0-9 to enter the page number of the videotext.
Press EXIT to exit the teletext.
6.9 Usage of external USB devices
Your receiver is equipped with connectors for external USB storage device.
Connect a USB storage device to your receiver.
You will get a popup message "Has Found Storage Device" shortly.
When using external USB devices, it is necessary to follow below recommendations and to consider some limitations:
■ Use USB devices compliant to USB 2.0 specification. If your USB device is not compatible with this standard, the manufacturer cannot guarantee satisfactory operation of functions such as multimedia playback or software upgrade.
■ Please ensure that the USB device is already formatted to FAT/FAT32 or NTFS. If it is not, please format the USB device on the receiver or on your PC.
■ If you are going to use an external USB hard disk drive (HDD), please make sure that your HDD power specifications do not exceed the supported output of your receiver (5V/500 mA). If so, please use an additional external power adapter for this HDD.
■ STRONG cannot guarantee compatibility with all types of external USB storage devices.
IMPORTANT: It is advised not to store important information on the external USB device used with the receiver. Always make backups of it before you use USB devices with this receiver. STRONG will not take responsibility for any loss or damage of information or circumstances caused by the loss of information.
6.10 Pause and Timeshift of broadcasted programme
The pause function allows you to get a still frame of the selected moment on your screen.
Press II if you want to freeze picture on the screen.
The programme will be paused. You will see still the picture with the pause symbol on it.
If you have not connected to your receiver to an external USB storage device, just press ▶ or □ again to continue watching the broadcasted programme.
Otherwise, if the external USB storage device is connected, you could use the Timeshift function, which allows you not to miss any interesting moments of a live broadcasted programme by pausing it and resume playback later.
Press II if you need to go away for some time but want to resume watching the programme later from this moment on. The programme will be paused. You will still see the picture with the pause symbol on it.
Your receiver will start recording the broadcasted programme to an external USB storage device from the pause moment.
Press ▶ to continue watching from the paused moment.
In this mode, the receiver will simultaneously playback the programme from the paused moment and will continue recording of this programme from the broadcasting signal.
You could use ◀◀▶ for fast forward and rewinding during the timeshifted playback.
Press ■ to exit the Timeshift mode.
NOTE: Please ensure that your USB storage device is properly connected to the receiver and that it is formatted in the required file system.
NOTE: After exiting the Timeshift mode the recorded file will be deleted. It is not available for further viewing.
NOTE: Please define the Timeshift parameters in the PVR Config submenu, as described in chapter 7.6.3.
6.11 TV programmes recording
Start recording
Press ● in viewing mode on the remote control to start recording. You will get a popup message "Initializing Recorder..." shortly.
The receiver will switch into the recording mode. The indicator of the recording duration will appear on the TV screen. This indicator will fade away in a few seconds or by pressing EXIT.
The indicator of the recording status (letter R in red circle) will be present in the upper right corner of the screen during the whole period of recording.
Press ● twice to define the duration for the recording.
NOTE: Please ensure that your USB storage device is properly connected to the receiver and that it is formatted in the required file system.
NOTE: Folder for records with the name "PVR" will automatically be created (if it does not exist) on your storage device.
Stop recording and exit from recording mode
Press ■ on the remote control to stop the recording.
You will get on screen "Recording list".
Press OK to confirm. The receiver will stop recording and exit from the recording mode. The recording icon and recording time will disappear from the screen.
Press EXIT if you want to continue the recording. The receiver will return to the recording mode and the recording process will continue for the current programme.
Playback of records
Press MENU in viewing mode and select the Multimedia item of the Media Center menu.
Then select the Record Manager icon on the multimedia title bar.
Press OK to enter into the Record Manager. Select the connected storage device and press OK again.
You will be guided directly into the records folder.
Records are named after the channel name and (if available) after the EPG name of the recorded programme.
Also for each record is provided information about the date of recording, time of the beginning and ending of recording and size, occupied on the storage device.
The sort order of records is based on the date. The most recent files are placed to the end of the list.
Additionally, you can read more about how to use Record Manager in chapter 7.6.1.
7.0 MAIN MENU
In the main menu you can manage channels, timers, perform installation of channels and specific receiver settings, get access to multimedia and internet functions and get useful information about the receiver, programmes, operator's messages, etc.
To access the main menu, press MENU in viewing mode.
The main menu consists of six chapters (or sub-menus) and is organized horizontally as helpline on the bottom of the screen with chapter icons.
An active chapter icon has a yellow background. The title of it is shown on the top of the screen.
Each chapter includes some items or parameters, which are presented at the centre of the screen area.
The main menu consists of following sub-menus: Installation, Channel, Preference, Settings, AV and Media Center.
Use ◀▶ to select the required menu chapter.
Use ▲▼ or OK to enter the sub-menu and select items.
Press OK or ▶ to enter the item or parameter of the sub-menus. Use OK to confirm the item definition.
Press EXIT to get back to the previous menu level or to close the main menu.
Press MENU to exit the main menu.
7.1 Installation
Press MENU and select Installation.
This chapter consists of the following sub-menus or parameters: Auto Search, Manual Search, Channel Filter, Country, LCN and Active Antenna.
7.1.1 Auto Search
Search and install all channels automatically. This option overwrites all pre-set channels.
Select Auto Search and press OK or ▶ to start the channel search.
To cancel the channel search, press EXIT.
7.1.2 Manual Search
Install new channels manually. This option adds new channels without changing the current channel list. Select Manual Search and then press OK or ▶. The channel search screen will appear.
Channel No.: Select a channel that is known to carry a broadcast in your region. The Signal Strength and Quality bars give a visual indication of the reception. Adjust your antenna to obtain maximum signal strength and quality*
Frequency: Reference information about frequency for the selected frequency channel. Parameter could be defined manually if you prefer to adjust antenna by frequency
Bandwidth: Reference information about bandwidth for the selected frequency channel. Parameter could be defined manually if you prefer to adjust antenna by frequency/bandwidth parameters
Beep: Select On for an audible indication of signal reception. Off (default) turns the beeper off.
* Strength and Quality signal indicators will help you to make sure that you have signal on the selected frequency channel, as well as to adjust your antenna if necessary.
When all settings have been made, select Start Search and press OK or ▶ to start scanning.
The receiver will search this frequency only for all available channels.
Once scanning is finished, the receiver will store all found channels and switches to viewing mode.
7.1.3 Other parameters for channel installation
Define other parameters for channel installation.
Channel Filter: Define which channels will be stored into the channel list. With the selection of FTA Only, only open non-scrambled channels will be added into the channel list. If All Channels is selected, all kind of found channels (scrambled and non-scrambled) will be stored into the channel list
Country Select the country of your residence
LCN: To select if the channel numbering will be according to LCN (as defined by operator) or not
Active Antenna: Before connecting your antenna to the receiver, please read the user manual of your antenna regarding antenna powering. This parameter is recommended to set to On only for active internal or external antennas which require power supply via an antenna cable with voltage of 5 V DC and consume less than 50 mA. In all other cases please leave this parameter as Off.
7.2 Channel
Press MENU and select the Channel chapter.
This chapter provides options to organize your channels according to your preferences.
It consists of the following sub-menus: Channel Manager and Favorite List
7.2.1 Channels Manager
This sub-menu allows to lock, delete, skip, rename or to move of stored in receiver channels.
NOTE: To edit your channel preferences, it is required to enter the PIN-code to access the edit functions (default PIN-code 0000).
Lock
You can block certain channels from being viewed by other people, i.e. children. To lock a channel:
- use ▲/▼ to select a channel;
- press RED. The selected channel will be marked as locked with a confirmation symbol in the lock column;
- proceed as described for any other channels you wish to lock.
NOTE: Watching a blocked channel will be possible only after entering your PIN code. Please check if the parameter System Lock in the Child Lock submenu is set to "ON". See chapter 7.4.2.
NOTE: To unlock a channel, please proceed the same way.
Delete
To delete a channel from the channel list of your receiver:
■ use ▲/▼ to select a channel;
■ press GREEN. The selected channel will be marked for deletion with a confirmation symbol in the delete column.
A confirmation banner will be displayed. Select Yes to delete the marked channels or No to cancel deletion.
Skip
Channels marked as skipped will be skipped when zapping channels with the ▲▼ buttons.
These channels will be still available from the channel list.
To mark channels for skipping:
■ use ▲/▼ to select a channel;
■ press YELLOW. The selected channel will be marked as skipped with a confirmation symbol in the skip column;
■ proceed as described for any other channels you wish to lock.
Rename
To rename channel:
■ use ▲/▼ to select a channel;
■ press BLUE. A text field with the current channel name will now be present on the screen;
■ use INFO to empty the current channel name field (if required);
■ use ◀◀ ▶▶ to move along the channel name field (if required);
■ use ◀▶ ▲▼ to select characters from the virtual keyboard on screen* and enter them with OK;
■ use COLOUR BUTTONS to select a character page, enter space or to delete symbol from the channel name field.
When you have finished editing, press BLUE or EXIT.
A confirmation banner will be displayed. Select Yes to confirm changes or No to discard.
After confirmation channel will have name, as you defined.
* Only digits, Latin and symbol characters available
Move
Moving a channel and defining new position for it around the channel list meaning changing the number of the channel.
To move a channel to a new position:
■ use ▲/▼ to select a channel;
■ press OK. The number of the selected channel becomes empty;
■ enter with 0-9 a new channel number and press OK to confirm.
NOTE:
Press TV/R to switch between TV and radio channels (if such kind of channels present). All functions for radio channels are similar to functions available for TV channels.
Press EXIT to save all changes and exit from the Channel manager.
7.2.2 Favorite List Manager
The receiver supports up to 4 favourite channel lists: Fav1,..., Fav4.
To add a channel to a favourite list:
■ use ▲/▼ to select a channel;
■ use the COLOUR BUTTONS to select to which of the favourite lists this channel will be added. Note the button definition for this purpose the on-screen helpline.
A selection symbol will appear in the respective column on the screen and the channel will be included into the favourite list of your choice.
Repeat these steps to add other channels to Favourite lists.
NOTE: It is possible to add same channel into few favourite lists.
NOTE: To remove channel from the favourite list please proceed the same way.
Press TV/R to switch between TV and radio channels.
Press EXIT to confirm and exit from the favourite channel lists sub-menu.
7.3 Preference
Press MENU and select the Preference chapter.
This sub-menu allows you to set the preferred parameters for OSD, language, for subtitles and audio.
OSD Language: Select menu and OSD language
OSD Timeout: Define the duration of information banner display in viewing mode. It can be set in range from 1 to 6 seconds
OSD Transparency:
Define the transparency of menus and other system information windows. It can be set in range from 0% to 60%
1st Preferred Subtitle:
This setting allows you to define the default subtitle language. Digital TV allows the operator to transfer subtitles in one or more languages. Select your preferred subtitle language and the receiver will display the subtitles in that language automatically (if available). If you do not want to display subtitles, then adjust the setting to Undefined. In viewing mode, you can change this selection to a more suitable selection for the viewed channel, as described in chapter 6.7.
2nd Preferred Subtitle:
Select the preferred 2nd subtitle language if the 1st preference is not available
Hard Hearing: To enable Hard of Hearing mode set On. To disable it set to Off
1st Preferred Audio:
This setting allows you to define the default audio track or language. Digital TV allows the operator to transmit more than one audio track or language. If a channel has multiple audio tracks or languages, the receiver will select the suitable audio track automatically according to your selection. In viewing mode, you can change this selection to a more suitable for the viewed channel, as described in chapter 6.6.
2nd Preferred Language:
The receiver will use this language if 1st is not available.
NOTE: Subtitles will be displayed when available. Availability of DVB/HoH subtitles depends on the local broadcast.
NOTE:
Please also consider that an event may contain "built-in" subtitles which cannot be disabled.
7.4 Settings
Press MENU and select the Setting chapter.
This sub-menu allows you to manage the system settings of your receiver.
7.4.1 Timers
This menu allows you to set up to 27 timed events for switching on the channel, recording or waking up the receiver from standby mode in a defined time.
The Timer List will be shown on the screen
With ▲▼, select the timer you wish to set or change and press YELLOW or OK to edit it.
The timer setting menu will now be displayed.
Use ▲▼ to select required parameter.
Use ▶ to edit the selected parameter. Use OK to confirm changes.
The following settings are available:
Date: Use the 0-9 buttons to enter the date for the timed event
Programme Name:
Press ▶ to access the channel list, use ▲/▼ to select a channel and press OK to confirm. The name of this channel will appear in the options line
Start Time: Use the 0-9 buttons to enter the time to start the timed event
End Time: Optional field to define the ending time for timed event
Duration: Optional field for Recorded type to define the duration of timed event
Mode: Choose between Once, Daily (the timer will be executed every day, same time) or Weekly (the timer will be executed every week, same day, same time) and Monthly (the timer will be executed every month, same day, same time).
Type: Choose between Channel (the timer will switch to the selected channel), On (the timer will wake up the receiver), Standby (the timer will turn the receiver into standby mode) or Recorder (the timer will start recording the scheduled event)
AD Record: Optional field for Recorded type to define will Audio description be recorded for timed event
Subtitle Record: Optional field for Recorded type to define will subtitles be recorded for timed event
Teletext Record: Optional field for Recorded type to define will teletext be recorded for timed event.
When all settings have been made, press OK to set timer.
To quit the timer without saving your settings, press EXIT.
Use GREEN (Delete) to delete selected timer.
Use RED (Delete All) to delete all defined timers.
A confirmation banner will be displayed. Select Yes to confirm deletion or No to discard.
7.4.2 Child lock
This sub-menu allows you to protect the installation menu, some settings and/or access to some channel preview with PIN-code.
In this sub-menu you can also define new PIN-code.
You will be asked to enter your PIN code. (DEFAULT PIN: 0000)
Use ▲▼ to select Optional required parameter.
Use OK or ▶ to change Optional selected parameter. Use OK to confirm changes.
System Lock: Locks the installation menu. You can set it to On or Off.
Parental Rating: Choose between: Off, 4 and up to 18 of age. Channels with a parental rating above the chosen age will be protected with PIN code (if defined in your local broadcast)
Change Pin Code: To set or change the PIN code. You will be asked to enter your current PIN-code (or, if it was not changed, enter default PIN code 0000), then enter your new PIN code and confirm it with re-enter it again. Once it is confirmed, a confirmation pop-up window will appear to tell you that it has been saved successfully. Then your old PIN code will be replaced with your new PIN code.
7.4.3 Date Time
This sub-menu allows you to select mode of time and date synchronization, adjust time and date parameters in manual mode.
Date Time Mode: To enable/disable automatic time synchronization. The option Manual allows setting of parameters Date and Time manually. Time synchronization will not be performed by your receiver in this case. The option Auto meaning that synchronization of date and time will be performed by receiver according to the operator's definition. You could also manually define parameter Time Zone in this case
Date: Use 0-9 to set the current date
Time: uUe 0-9 to set the current time
NOTE:
The option Manual is not recommended due to the possibility of losing real time settings after standby mode.
Time Zone: Select Optional time zone in accordance with the country of residence. If this parameter set to Auto, it will perform an automatic selection for your time zone. It is possible to define it manually
Daylight Saving: Optional parameter for manual setting of the time zone to enable/disable summer daylight saving time. Select On or Off to add one hour for summer time.
7.4.4 Ethernet Configuring
This receiver is able to provide for you few internet services.
Please refer to chapter 7.6 for more detailed description of these services.
The Ethernet Config sub-menu allows you to configure the connection of the receiver to the Internet. It is possible to connect to the internet only through a USB Wi-Fi Internet adapter* (not included into the supply set).
* Use the USB Wi-Fi Internet adapter compatible with MTK7601 or RT5370
Please select the Config item to see the list of available Wi-Fi networks.
The device scans for available Wi-Fi networks and displays the names of those it finds.
Icons with connection status and strength of the signal will be present next to each network.
If your receiver gets connection to some network, the connection status icon for it looks like a normal chain.
Otherwise it looks like a broken chain.
If the device finds a network that you have connected to previously, it will connect to it.
Click a network name to see more details or for connection.
If the network is secured, you will be prompted to enter a password or other credentials (if required, please ask your network administrator for details).
Mark the Auto Link field if you want to be connected to this network after the next receiver reboot or switch on.
Select the Link button and press OK for connection.
Use RED to update the information about available networks.
Use GREEN to add new network to the list of network manually.
Press EXIT to exit from this sub-menu.
7.4.5 Factory Reset
This item will reset your receiver to the default factory settings.
WARNING!
By resetting your receiver to the factory defaults, all your settings and stored channels will be permanently deleted. Please use this option with care. After restoring of Factory Defaults, the Init Install menu will appear on your TV screen.
Use ▲▼ to select this item and then press OK or ▶ to restore the factory setting and to delete all earlier found channels and earlier made settings.
You will be asked to enter your current PIN code (or, if it was not changed, enter default PIN code 0000).
7.4.6 Update
This feature allows you to update the receiver software via the USB port.
When a new software is available for your receiver, it can be downloaded from our website www.strong.tv.
WARNING!
The software update procedure will permanently delete all your settings and stored channels. Please use this option with care. After this procedure the Init Install menu will appear on your TV screen.
For the USB upgrading procedure, please follow the provided instruction on the website.
WARNING!
During the upgrade process NEVER disconnect the receiver from the mains or switch off the power! Doing so might damage your receiver and will void warranty!
After an update the receiver restarts automatically.
7.4.7 Information
This sub-menu shows receiver specific information such as hardware, software and firmware information and build date.
7.4.8 Auto Standby
Auto Standby is a feature that helps you reducing power consumption.
When set to 1hr/2hr or 3hr, the receiver will switch to standby mode if it doesn't receive any commands during this time (in hours).
Set Auto Standby to Off to deactivate the automatic standby function.
7.5 AV
Use this sub-menu to match your receiver to your TV set.
The following settings are available:
Aspect Ratio
Use this option to select the aspect ratio of your TV and the preferred conversion method. The options are: Full Screen - Displays broadcast on full screen on your TV, 4:3 PS - Displays 16:9 widescreen broadcasts full screen on your 4:3 TV, 4:3 LB - black bars on top and under the picture on a 4:3 TV and 16:9 - use this setting for 16:9 TV sets
Video Resolution
Use this option to select the video resolution of your TV screen. The options are: Auto Detect (automatic detection of video resolution offered to the receiver) and manual selections from 480i_30 up to 1080p_60. Please use a setting that matches and not exceed the specifications for resolution of your TV. Selection above 576i is only applicable on HDMI output
HDMI Audio
Toggles between HDMI PCM, HDMI RAW and HDMI Mute output. When HDMI PCM is selected, all digital audio will be converted to (analogue) stereo audio. HDMI RAW enables you to listen or transfer Dolby® Digital/ Dolby® Digital Plus* audio to the TV via HDMI. HDMI Mute switch off digital audio output.
* Dolby and the double-D symbol are registered trademarks of Dolby Laboratories
7.6 Media Center
Use ◀/▶ to access sub-menu Media Center in the main menu.
This sub-menu includes following items:
■ for multimedia - Multimedia, Multimedia Configuration and PVR Config
■ for internet services - IPTV, Online-Weather, Online-Video and Online-RssNews
Use ▲/▼ to select required item of sub-menu and press OK.
7.6.1 Multimedia
In this sub-menu you can playback video and music files, watch recorded earlier programmes, view pictures and read texts.
Use ◀/▶ to select Movie, Music, Photo, Record Manager, Disk Manager or EBook.
Use ▲▼ to select the folder and file you want to playback.
Use ▶II ■ ◀◀▶ to control the playback of multimedia files.
Use ◀◀ ▶▶ to switch to previous/next of multimedia files during playback.
Use MENU to go to Multimedia Configuration sub-menu and adjust settings for playback.
Use EXIT to go backward to the upper level of folders or to exit from multimedia.
NOTE: Before you use the various multimedia functions of your receiver, please ensure that your USB storage device is properly connected to the receiver and that it is formatted in the required file system.
7.6.1.1 Movie
Additional buttons to use:
INFO Additional information about video file
VOL+/VOL- Volume control
AUDIO Select audio track (if the file contains more than one audio tracks)
RED Zoom control. Use ◀ to adjust. Press RED again to exit from zoom control mode
YELLOW Use for rewind in 1/2 speed
GOTO To define time for starting position of file playback. Use ▲▼ to switch between digital or scrollbar entering mode. Use OK to confirm definition. Press GOTO again to exit from this mode
REPEAT To select repeat type for playback
EXIT/■ Use to stop playback and return to file selection.
7.6.1.2 Music
Additional buttons to use:
OK/▶ Playback the selected file
GOTO To select shuffle mode for playback
REPEAT To select repeat type for playback.
7.6.1.3 Photo
Additional buttons to use:
YELLOW To switch between Normal and Thumbnail file selection mode
OK/▶
Playback selected file and start slideshow
INFO Additional information about selected file

To rotate picture
RED
Zoom control. Use ◀ to adjust. Press RED again to exit from zoom control mode
REPEAT To select repeat type during playback
7.6.1.4 Record Manager
Additional buttons to use in file selection mode:
GREEN To select drive partition for PVR
INFO information about connected USB drive
Additional buttons to use in browsing mode:
RED To delete selected record. After confirmation record will be permanently deleted
GREEN
to rename selected record. Use ◀▶ ▲▼ to select characters from virtual keyboard on screen* and enter them with OK
BLUE To delete all records. After confirmation all records on connected USB drive will be permanently deleted
* Only digits, Latin and symbol characters available
Additional buttons to use in preview mode:
INFO Information about connected USB drive
VOL+/VOL- Volume control
AUDIO Select audio track (if the file contains more than one audio tracks)
RED
Zoom control. Use ◀ to adjust. Press RED again to exit from zoom control mode
GOTO
To define time for starting position of file playback. Use ▲▼ to switch between digital or scrollbar entering mode. Use OK to confirm definition. Press GOTO again to exit from this mode
REPEAT To select repeat type for playback
EXIT/
Use to stop playback and return to file selection.
7.6.1.5 Disk Manager
Additional buttons to use in file selection mode:
RED To copy or mode selected file or folder. Use on-screen help information to select source and destination file and/or folder and perform action
GREEN To format connected USB drive in FAT32
YELLOW To format connected USB drive in NTFS
BLUE information about connected USB drive
WARNING! Formatting will permanently delete ALL data stored on the connected device. Please make a backup copy of all data you wish to keep before performing drive format. STRONG cannot be held responsible for loss of data from USB devices used with this receiver.
Additional buttons to use in browsing mode:
RED To copy or mode selected file or folder. Use on-screen help information to select source and destination file and/or folder and perform action
GREEN To rename the selected record. Use ◀▶ ▲▼ to select characters from virtual keyboard on screen* and enter them with OK
YELLOW To delete the selected file or folder. After confirmation, the file or folder will be permanently deleted
BLUE To delete all files and folders in the current folder. After confirmation, all files and folders in the current folder will be permanently deleted
* Only digits, Latin and symbol characters available
NOTE STRONG cannot guarantee compatibility (operation and/or bus power) with all USB mass storage devices and assumes no responsibility for any loss of data that may occur when connected to this unit.
With large amounts of data, it may take longer for the system to read the contents of a USB device. Some USB devices may not be properly recognized.
Even when they are in a supported format, some files may not be played or displayed depending on the content.
7.6.1.6 EBook
Additional buttons to use:
OK/▶ Playback the selected file and start automatic scrolling of the text
INFO Additional information about the selected file
▲▼ ◀/▶ To rotate the picture
RED Zoom control. Use ◀▶ to adjust. Press RED again to exit from the zoom control mode
REPEAT To select the repeat type during playback
7.6.2 Multimedia Configuration
This sub-menu allows you to set various multimedia parameters for comfortable usage of the receiver.
The following settings are available:
MP4 Subtitle Language: Preferred subtitle language for video files (if available)
EBook Language: Select language (and as result - characters encoding) of your books
| Movie Repeat: | To set repeat mode for video files playback. The options are: Repeat-Dir - cycling playback of all video files in folder, Repeat-One - cycling playback of selected file only or Repeat-OFF no repetition and stop playback. |
| Music Repeat: | To set repeat mode for audio files playback. The options are: Repeat-Dir - cycling playback of all audio files in folder, Repeat-One - cycling playback of selected file only or Repeat-OFF no repetition and stop playback. |
| Photo Repeat: | To set repeat mode for photo files preview. The options are: Repeat-Dir - cycling playback of all photo files in folder or Repeat-OFF no repetition and stop playback. |
| BG music: | Setting this parameter to On allows listening to a selected audio file or folder during navigation around multimedia files (excluding video), viewing photos or reading books. When set to Off, playback stops right after exit from Music chapter |
| Slide Time: | To define the slide show interval in the range from 3s to 15s |
| Effect | To define the slide show effect. A lot of different options as: WipeTop, WipeEdgeToCenter, WindowV, Random and many other. Set to None for no effect |
7.6.3 PVR Configuration
This sub-menu allows you to set various multimedia parameters for comfortable usage of the receiver.
The following settings are available:
| File Size | To define the limitation of the file size for a recording in the range from 1G to 4G. Set to Auto for no limitation (stop of recording will happen manually by pressing ■, for a timed event if a timer is set and if no more space available on the USB drive) |
| Timeshift | Use this option to select Timeshift mode. Select between Auto, Pause or Off. When Timeshift is set to Auto it will automatically start every time after zapping to a channel. When Timeshift is set to Pause it will start only after pressing ■. Select Off to deactivate Timeshift. |
| Timeshift Length | To define the limitation of length of Timeshift in the range from 30min to 2hr. Set to Auto for no limitation (stop of Timeshift mode will happen manually by pressing ■ and if no more space available on the USB drive) |
Timeshift to Record
Setting this parameter to On allows to start and make recording during Timeshift mode. Select Off to deactivate this function.
7.6.4 Internet Services
This receiver is able to provide for you a few internet services.
NOTE: It is possible to connect to internet only through a USB Wi-Fi Internet adapter* (not included into supply set).
* Use a USB Wi-Fi Internet adapter compatible with MTK7601 or RT5370.
Use ▲▼ to select IPTV, Online-Weather, OnlineVideo or Online-RssNews.
IPTV
This application allows you to watch TV broadcasting from internet sources according to installed playlist.
The receiver is supplied with an empty playlist. Please find a playlist acceptable for you and install it yourself.
Use OK to open the playlist.
Use the buttons from the helpline to manage the playlist.
Online-Weather
This application allows you to get information about the current conditions of weather and short weather forecast for next 5 days in your region from the internet.
Use the buttons from the helpline to manage the playlist.
Online-Video
This application allows you to get access to public sources (like YouTube) in your region from the internet.
Use the buttons from the helpline to manage the playlist.
Online RSS news
This application allows you to get access to few local news sources (like Google News) in your region from the internet.
Use the buttons from the helpline to manage the playlist.
For more details how to use internet services, please contact the local Service Hotline or send an email to our Support via www.strong.tv
8.0 TROUBLESHOOTING
There may be various reasons for abnormal operation of the receiver. Check the receiver according to the procedures shown below. If the receiver does not work properly after checking it, please contact your dealer or the local Service Hotline. Do NOT try to open or disassemble the receiver. It may cause a dangerous situation and warranty will be void.
| Problem Possible cause What to do | ||
| The mode indicator does not light up. | Power adapter is not connected to the outlet. | Check the connection of the receiver to the power adapter and the adapter to the mains. |
| The power adapter of the receiver is connected to mains through an extender and the power switch on the extender is in OFF position. | Turn the power extender ON. | |
| No signal. The antenna is disconnected. Check the antenna cable. | ||
| No video or audio. | HDMI/AV is not selected on your TV or the amplifier or is set to a higher resolution than the TV supports.TV is not switched on. | Switch to the correct TV input.Select a lower resolution via receiver.Switch on the TV. |
| Connections are not done properly.Quality of the connected cables is insufficient. | Please ensure that the connections are done correctly and are fitting well to the connected input/output.Check that the quality of all cables is good.Reconnect all cables between the receiver and the TV set. | |
| Only sound, no image on the screen | No or incorrect connection with AV cableThe programme is a radio programme | Connect the video cable correctlyPress TV/R to shift into TV mode |
| Video is “mosaic”, sound is noisy or A/V disappears from time to time. | Low signal level due to bad weather conditions. | For stable reception of the signal you may need to replace the antenna to a better one. |
| The antenna is damaged or covered by ice (winter time).Damaged cable from antenna to receiver. | Check the antenna and the cable. | |
| The indoor antenna has been moved from a good position and does not provide necessary level of signal. | Setup the antenna at a better position. Check the signal level and quality (see chapter 6.4.2 and 7.1.2). | |
| The power of the active indoor antenna is disabled. | Enable the antenna power as described in chapter 7.1.3. | |
| After moving the receiver to another room/ area you are no longer able to receive digital reception | Antenna signals are too weakThe signal strength/quality might be less than before, if using an indoor antenna. | Press the INFO button on remote 2x to call up signal bars and adjust antenna for (maximum) receptionor rescan channelsWhen using an active antenna, check antenna power.Try to use an outdoor antenna. |
| Scrambled channelMessage | Channel is scrambled Select alternative channel | |
| Not possible to control the receiver with the remote control. | The batteries are exhausted/wrongly inserted.The remote control is not aimed correctly.The IR sensor obstructed/disturbed. | Replace the batteries/check the correct polarity.Point your remote control towards the front panel.Check for obstructions, or other possible influence. |
| The IR sensor is covered by an object (obstacle between remote control and receiver). | Remove the obstacles between the remote control and the receiver. | |
| The receiver is switched off. Plug in/turn on the receiver. | ||
| Forgotten PIN codeForgotten channel lock code | Default PIN code is 0000Contact local Service Hotline or send email to our Support via www.strong.tv | |
| The receiver switches off automatically. | The auto standby function is enabled. | Disable/adjust the auto standby. See chapter 7.4.8 for details. |
| Playback of video (or Timeshift) is causing picture freeze/macro blocks or similar distortion, especially on HD content. | Read/write speed of your USB device could be too low. | Make sure to use a USB storage device with sufficient speed and space. Pen drives ('USB sticks') may not support sufficient speed. |
9.0 TECHNICAL SPECIFICATIONS
Demodulator
Demodulator: QPSK, 16QAM, 64QAM, 256QAM
DVB-T2 (EN 302 755)
Transmission mode: 1K, 2K, 4K; 8K, 16K, 32K
Guard intervals: 1/4, 1/8, 1/16, 1/32, 1/128, 19/128, 19/256
Video Decoder
Profile level: MPEG-4/H.264 MP&HP and ML&HL
Video resolution: 480i, 480p, 576i, 576p, 720p, 1080i, 1080p
Decoding & Video Out: PAL
Aspect ratio: 4:3,16:9, Auto
Audio Decoder
Audio support: MPEG-1 Layer I/II
Sampling rate: 32, 44.1, 48 KHz
Audio mode: Left/Right, Stereo
Tuner
Front End: DVB-T/T2, UHF & VHF Tuner
Antenna power: DC 5 V, 50 mA, shortcut protected
Input frequency range: 177.5\~226.5, 474\~862 MHz
Input signal level: -25 \~ -85 dBm
Memory and System
Flash memory: 32 Mb
SDRAM: 512 Mb
Multimedia
Video playback: AVI, MKV, TS, M2TS, MPEG-4 and MOV*
Audio playback: MP3 and WMA*
Picture view: BMP and JPEG, PNG, GIF*
* STRONG cannot guarantee the playback of video files although extensions are listed, as it depends on codec used, data bit rate and resolution (all MPEG codec formats are supported).
Connectors
ANT IN - IEC Female
HDMI
Mini AV 3.5 mm (CVBS, Audio L&R)
IR IN
USB 2.0 port: 5 V/500 mA (max.) supported
DC IN (5 V, 1.2 A)
General Data
Power supply: AC 100 - 240 V AC \~ 50/60 Hz
Input voltage: DC 5 V, 1.2 A
Power consumption: 3.5 W (typical w/o USB devices connected), 6 W (max)
Power consumption in standby: max. 0.5 W
Operating temperature: 0 °C \~ +45 °C
Storage temperature: 0 °C \~ +85 °C
Operating humidity range: 30 \~ 70%, RH, Non-condensing
Size (WxDxH) in mm: 85 x 67 x 28
Net-weight (excl./incl. power adapter, remote control unit):
0.06 kg/0.16 kg
- Licenses
- TABLE OF CONTENTS
- INTRODUCTION 3
- YOUR RECEIVER 5
- CONNECTIONS
- STARTING UP FOR THE FIRST TIME
- QUICK GUIDE TO USING YOUR RECEIVER
- OPERATION
- MAIN MENU
- TROUBLESHOOTING
- TECHNICAL SPECIFICATIONS
- INTRODUCTION
- Safety Instructions
- Precautions
- Operating Environment
- WEEE Directive
- Storage
- Equipment Set-up
- Accessories
- Usage of external USB devices
- YOUR RECEIVER
- DEFAULT PIN: 0000
- Front Panel
- Rear Panel
- Remote Control Unit (RCU)
- Installing the batteries
- Using the remote control
- Connecting to a terrestrial antenna
- Connecting IR sensor extender
- Fixed placement of the receiver
- Connecting to TV with HDMI cable
- Connecting to a digital audio amplifier using HDMI
- Connecting to TV with mini AV-3RCA cable
- Connecting a USB storage device
- Switching the receiver on and off
- Channel selection
- Switch channels in viewing mode
- Switch channels via the channel list, switching between favourite channels
- Switching between TV and radio channels
- Favourite channel lists
- Volume adjustment
- Viewing the programme information
- The information banner
- NOTE:
- Extended information panel
- Electronic TV Programme Guide (EPG)
- Signal level and quality
- Audio
- Subtitles
- Teletext
- Usage of external USB devices
- Pause and Timeshift of broadcasted programme
- TV programmes recording
- Start recording
- Stop recording and exit from recording mode
- Playback of records
- Installation
- Auto Search
- Manual Search
- Other parameters for channel installation
- Channel
- Channels Manager
- Lock
- Delete
- Skip
- Rename
- Move
- Favorite List Manager
- Preference
- Settings
- Timers
- Child lock
- Date Time
- Ethernet Configuring
- Factory Reset
- WARNING!
- Update
- Information
- Auto Standby
- AV
- Aspect Ratio
- Video Resolution
- HDMI Audio
- Media Center
- Multimedia
- Movie
- Music
- Photo
- Record Manager
- Disk Manager
- EBook
- Multimedia Configuration
- PVR Configuration
- Internet Services
- IPTV
- Online-Weather
- Online-Video
- Online RSS news
- Demodulator
- Video Decoder
- Audio Decoder
- Tuner
- Memory and System
- Multimedia
- Connectors
- General Data
Brand : STRONG
Model : SRT 8203
Category : Receiver