
Matilda A35 - Bed rail InfaSecure - Free user manual and instructions
Find the device manual for free Matilda A35 InfaSecure in PDF.


| Brand | InfaSecure |
| Model | Matilda A35 |
| Product Type | Bed Rail (Bed Guard) |
| Compliance | BS7972:2001 + A1:2009 |
| Age Range | 18 months to 5 years |
| Minimum Mattress Size | 90 x 190 cm |
| Maximum Mattress Size | 155 x 190 cm |
| Mattress Thickness | 10–20 cm |
| Maximum Bedding Height | 60 cm |
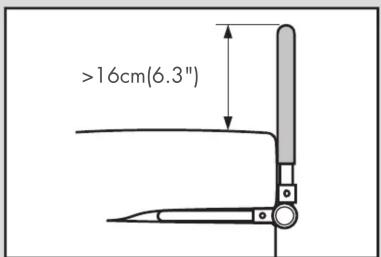
| Minimum Rail Top to Mattress Top | 16 cm (6.3 in) |
| Minimum Gap at Mattress Ends | 250 mm (10 in) each side |
| Material | Metal frame, fabric/mesh panel |
| Assembly Required | Yes, full assembly needed |
| Cleaning Instructions | Wipe with damp cloth |
| Warranty | 12 months from purchase (non-commercial); 6 months commercial |
| Manufacturer | InfaSecure Pty Ltd, Australia |
| Replacement Parts | Available from InfaSecure only |
Frequently Asked Questions - Matilda A35 InfaSecure
User questions about Matilda A35 InfaSecure
0 question about this device. Answer the ones you know or ask your own.
Ask a new question about this device
Download the instructions for your Bed rail in PDF format for free! Find your manual Matilda A35 - InfaSecure and take your electronic device back in hand. On this page are published all the documents necessary for the use of your device. Matilda A35 by InfaSecure.
USER MANUAL Matilda A35 InfaSecure
natural_image
Transparent plastic medical device with no visible text or symbols on its body, labeled 'infasecure' in the top right corner.This bed guard complies with BS7972: 2001 + A1: 2009
WARNING
- For use with children from 18 months to 5 years of age. This bed rail is to be used only when the child is able to climb in and out of bed unaided.
- This bed rail does not ensure the same level of safety as a child's cot.
- Only use mattresses with the following measurements: minimum size 90x190cm, maximum size 155x190cm and min. thickness 10cm and max. 20cm.
- Do not use when the height of the bedding is greater than 60cm. Never use on a bunk bed or any other bed that does not correspond to the instructions.
- To avoid risk of injury, carefully proceed according to the instructions when assembling, installing and using this bed rail.
- It should be checked periodically that the bed rail is always properly fitted and secure in place, and the locking mechanisms on the bed rail are securely fixed.

infasecure
caring for the wellbeing of infants
OPERATING INSTRUCTIONS
ASSEMBLY PARTS
(A) Left Vertical Side Rail
(B) Right Vertical Side Rail
(C) L-Shaped Top Rail
(D) L-Shaped Top Rail
(E) Right L-Shaped Foot Rail
(F) Left L-Shaped Foot Rail
(G) Straight Bottom Rail
(H) Straight Bottom Rail (with sleeve)
(I) Fabric/Mesh Panel
(J) Safety Belts & Anchors

TO ASSEMBLE
- Make sure no component is missing prior to assembly.

natural_image
Close-up of a medical catheter with attached tubing and a white paper bag (no visible text or symbols)- Depress the lock buttons and connect the Vertical Side Rails (A) & (B), to L-shaped Top Rails (C) & (D).

natural_image
Close-up of a dark fabric bag with a handle and a small object, no visible text or symbols- Slide the mesh panel (I) onto top rail as shown. Gather the mesh fabric until the top rail end is uncovered.

- Connect the top two rails (C) and (D) by aligning the two straight ends. Depress the lock button, move and turn the two top rails by aligning the two straight rails into place.

natural_image
Diagram of a rectangular device with a flat top and side panels, showing directional arrows (no text or symbols)- Pull and ease the mesh panel to cover the bed rail smoothly and flatly.

natural_image
Close-up of a robotic arm gripping a white plastic object, with a hand adjusting the part (no visible text or symbols)6.1 Insert the L-shaped foot rail (E) into the fabric sleeve, as shown, depress the two lock buttons, and connect with Vertical Right Side Rail (A). The locking buttons will automatically spring outwards with a 'click' when correctly seated into the receiving socket [6.1].

natural_image
Close-up of a white mechanical component with a curved handle and a black base, against a plain background (no text or symbols visible)6.2 Repeat the same operation to connect the opposite side foot rail (F) through the mesh sleeve, and into the Left Vertical Rail (B) [6.2]. Connecting plastic parts need to be in the same direction.
WARNING
Be sure to keep lock buttons securely in place.
Children should NOT be allowed to play with the bed rail or use it as a ladder. Discontinue use if any part of the bed rail becomes damaged or torn.


- Make sure Right Vertical (A) is placed on the right side.
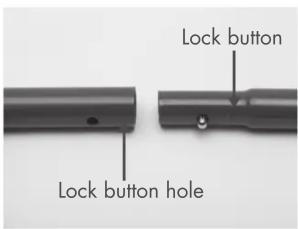
- Align and connect the two bottom rails (G) and (H) by depressing the lock button and allowing it to 'click' into the lock button hole.
natural_image
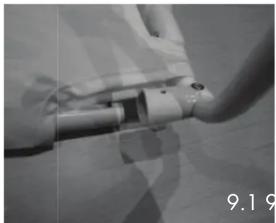
Close-up of a robotic arm joint with visible joints and a curved handle (no text or symbols)9.1 Insert the joined straight bottom rails (G/H) into the bottom of the fabric & mesh panel, and align the end of (G) with the receiving plastic socket on L-shaped Foot Rail (E), then slide into socket and ensure that the locking button 'clicks' securely into the lock button hole [9.1].

natural_image
Close-up of hands holding a white shirt with a button, against a plain background (no text or symbols visible)9.2 Align the end of Straight Bottom Rail (H) with the attachment stem on the L-shaped Foot Rail (F), and slide the movable socket flange over the stem, ensuring that the locking button is securely seated into position.

natural_image
Exterior view of a modern office building (no signage)9.3 Your Bedguard is now fully assembled. Please check that all attachment locking buttons are securely and correctly seated into their keepers [9.3].
TO USE
- Measure the width of the bed mattress, and adjust the length of both safety straps, so that the distance between the fabric/mesh cover and the L-shaped safety anchors are approximately equal to the mattress width (see diagram).

natural_image
Interior view of a modern office or library space with a closed book-shaped opening and white cables on the floor (no visible text or symbols)
WARNING

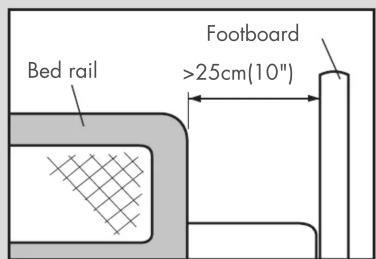
To prevent the risk of strangulation it is essential to ensure that when the bedguard is fitted into position, there is a gap of at least 250mm (10 in.), between each end of the bed and the corresponding end of the bedguard.
The bed rail must be securely against the side of mattress with the fixings all in place.
Once fitted in place, the bedguard should be checked to ensure that it is properly fitted and secure.
Top edge of bed rail must be at least 16cm (6.3 in.) above top edge of mattress.

NOTE: Please put away the extra Fixing Belt under the mattress.


- To install on bed:
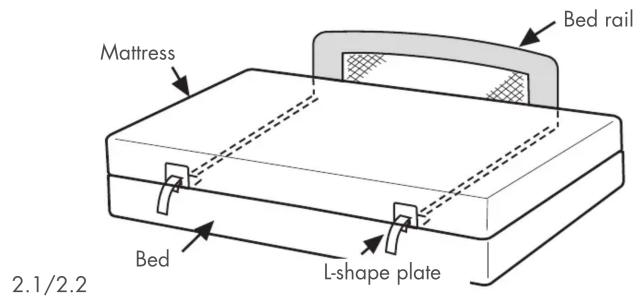
2.1 Keeping the bed rail upright, slide the bed rail feet beneath the mattress (it may be necessary to lift the edge of the mattress to position the bed rail feet easily). Push bed rail all the way in, until it touches the side of the mattress.
2.2 Fix the L-shape plates to the edge on the other side of the mattress away from the bed rail.
2.3 Hold the L-shapes plate and pull the red belt to adjust belt length.
2.4 Fasten the fixing belt.
2.5 To fold bed rail down: Depress the disk buttons on both sides of bed rail joints and swing the bed rail down. To reposition the bed rail: Swing the bed rail upward so that both the joints click into locked position securely. (To test, gently push the bed rail back and forth, it will not be swung out of position if it is locked properly.)
TO FOLD FOR STORAGE
- Remove the bed rail from the bed.
-
To detach and fold for storage, simply proceed in the reverse order of assembly, as follows:
2.1 Detach straight bottom rails (G) and (H), retracting the sleeve at (H) end first.
2.2 Detach L shaped foot rails (E) and (F).
2.3 Slide the Fabric/Mesh Cover, upwards.
2.4 Detach sides (A) and (B), remove cover.
2.5 Detach L shaped rails (C) and (D). -
To clean, wipe with damp cloth.
-
Any additional and replacement parts should only be obtained from InfaSecure
InfaSecure Warranty Details
InfaSecure Pty Ltd warrants this product for twelve months from the date of purchase against failure due to manufacturing faults or faulty materials. Misuse, accidental damages, normal wear and tear are not covered by this warranty. When used for commercial use the period is limited to six months. “Our goods come with guarantees that cannot be excluded under the Australian Consumer Law. You are entitled to a replacement or refund for a major failure and for compensation for any other reasonably foreseeable loss or damage. You are also entitled to have the goods repaired or replaced if the goods fail to be of acceptable quality and the failure does not amount to major failure.”
If at all damaged or faulty, do not use. Phone the Infa Customer Service Centre.
INFASECURE PTY LTD
ABN: 52 149 173 660
Head Office and Registered Address
110-114 Old Bathurst Rd, Emu Plains, NSW 2750
P.O. Box 487, Emu Plains, NSW 2750
We reserve the right to alter this product without notice.
Phone No : 02 4728 8080
Fax : 02 4728 8040
Customer Service
Phone No : 02 4728 8090

infasecure
caring for the wellbeing of infants
www.infasecure.com.au
Brand : InfaSecure
Model : Matilda A35
Category : Bed rail