
Thunder Sports BORVKIT1 - Loudspeaker MTX Audio - Free user manual and instructions
Find the device manual for free Thunder Sports BORVKIT1 MTX Audio in PDF.


| Product Type | Marine/Off-Road Audio System Kit (Amplifier, Bluetooth Remote, Speaker) |
| Amplifier Model | MUD100.2 |
| Amplifier Power Output (RMS) | 50 W x 2 (4 Ω), 100 W x 2 (2 Ω), 200 W bridged (4 Ω) |
| Amplifier Frequency Response | 20 Hz – 20 kHz |
| Amplifier Input Level | 0.2 – 5 V |
| Amplifier Crossover | Low-Pass (80 Hz), High-Pass (80 Hz), Full-Range |
| Amplifier Dimensions (HxWxL) | 1.61" x 5.71" x 6.65" (40.9 x 145.0 x 168.9 mm) |
| Bluetooth Remote Model | MUDBTRC |
| Bluetooth Remote Features | Play/Pause, Track Forward/Back, Volume Control, Auto-Pair, Weather-Proof |
| Speaker Model | MUD65P |
| Speaker Type | 6.5" Cage Mount Marine Speaker with RGB Illumination |
| Speaker Power Handling (RMS/Peak) | 50 W / 100 W |
| Speaker Sensitivity (2.83V/1m) | 89.9 dB |
| Speaker Frequency Response | 70 Hz – 20 kHz |
| Speaker Impedance | 4 Ω |
| Speaker Bar Fitment | 1.5", 1.75", 2" diameter bars |
| Power Supply | 12 V DC (Vehicle Battery) |
| Recommended Fuse (Amplifier) | 15 A inline |
| Maintenance | Clean with dry cloth; avoid moisture; check connections periodically |
| Safety Notes | Install fuse within 18" of battery; disconnect negative battery before installation; ensure proper grounding |
| Spare Parts / Repairability | Contact MTX dealer or technical support for service |
| Warranty | Refer to manufacturer |
Frequently Asked Questions - Thunder Sports BORVKIT1 MTX Audio
User questions about Thunder Sports BORVKIT1 MTX Audio
0 question about this device. Answer the ones you know or ask your own.
Ask a new question about this device
Download the instructions for your Loudspeaker in PDF format for free! Find your manual Thunder Sports BORVKIT1 - MTX Audio and take your electronic device back in hand. On this page are published all the documents necessary for the use of your device. Thunder Sports BORVKIT1 by MTX Audio.
USER MANUAL Thunder Sports BORVKIT1 MTX Audio
OWNER'S MANUAL MUD100.2 AMPLIFIER

Use your smartphone to scan or visit youtube.com/user/MTXAudioUSA to learn how to properly install this amplifier.
PRODUCT INFORMATION
Model # ____
Serial #
Dealer's Name ____
Date of Purchase
INTRODUCTION
Thank you for purchasing this MTX Audio Hi-Performance amplifier. Proper installation matched with MTX speakers and subwoofers provide superior sound and performance for endless hours of enjoyment whether you are waking the neighbors or just out enjoying your tunes. Congratulations and enjoy the ultimate audio experience with MTX!
FEATURES
- Compact Size
- Double Sided PCB
• Surface Mount Components - MOSFET Design
• LPF and HPF Crossover - Noise Free Design
CONTROL FUNCTIONS
- Wiring Harness - All wiring to the amplifier will run through the wiring harness.
Speakers - Connect speakers/subwoofers to these terminals. Be sure to check wire for proper polarity. Never connect the speaker cables to the chassis ground.
+BATT (+12 Volt Power) - Connect this terminal through a FUSE or CIRCUIT BREAKER to the positive terminal of the vehicle battery or the positive terminal of an isolated audio system battery. WARNING: Always protect this power cable by installing a fuse or circuit breaker of the appropriate gauge within 18 inches (45cm) of the battery terminal connection.
Remote Turn On - This terminal turns on the amplifier when (+) 12 volt is applied to it. Connect it to the remote turn on lead of the head unit or signal source.
GND - Connect this cable directly to the frame of the vehicle. Make sure the metal frame has been stripped of all paint down to the bare metal. Use the shortest distance possible. CAUTION: Do not connect this terminal directly to the vehicle battery ground terminal or any other factory ground points.
RCA Input Jacks - This unit is designed to function with source units that feature RCA outputs. If your source unit does not have RCA outputs you will need to use a high to low level converter. Do not connect this amplifier directly to the speaker level outputs of the source unit, damage to the amplifier will occur. A source unit with a minimum level of 200mV is required for proper operation.
-
Gain Control - The Gain control will match the amplifier's sensitivity to the source units signal voltage. The operating range is 5V to 200mV. NOTE: This is NOT a volume control.
-
X-Over Mode and Frequency Control (Full Range) - These controls allow control over the frequencies played. There is an option for Low Pass, Full Range, or High Pass. In LP or HP mode, the crossover frequency will be set at 80Hz.
PANEL LAYOUT

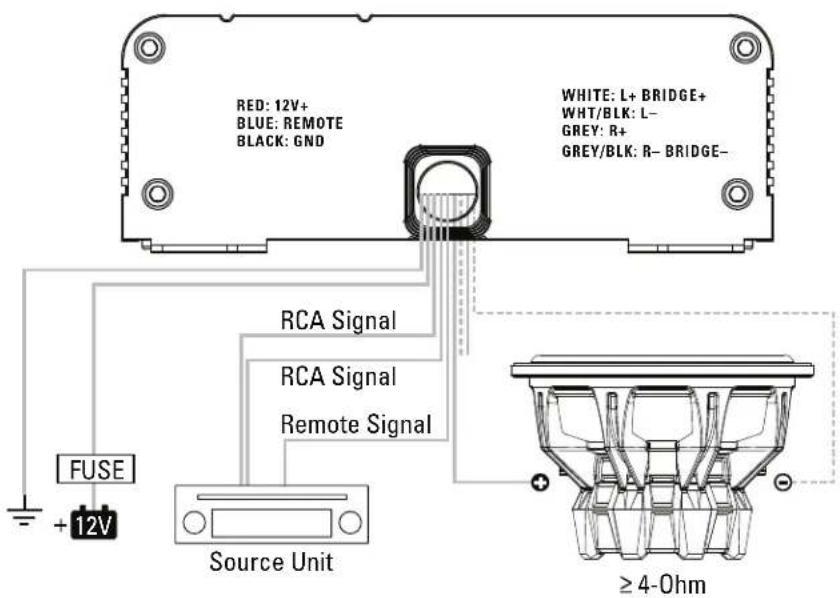
WIRING DIAGRAM
See page 22 for amplifier wiring diagrams.
INSTALLATION AND MOUNTING
MTX recommends your new Thunder Sports™ amplifier be installed by a 12 volt installation specialist. Any deviation from specified installation instructions can cause serious damage to the amplifier, speakers and/or vehicle's electrical system. Damage caused from improper installation is NOT covered under warranty. Please verify all connections prior to system turn on.
- Disconnect the vehicle's negative battery cable.
- Determine the mounting place for your MTX amplifier. Keep in mind there should be sufficient air flow for proper cooling. Mark the mounting holes from the amplifier to be drilled. Before drilling make sure all vehicle wires, gas lines, brake lines and gas tank are clear and will not interfere with installation. Drill the desired holes and mount the MTX amplifier.
- Install a positive (+) power cable from the vehicle's battery through the firewall using a grommet or firewall bushing to avoid cable damage from sharp edges of the firewall. Run the cable through the interior of the vehicle and connect it to the amplifier's +12V wire. Do not connect to the battery at this time. NOTE: Use only proper gauge wire for both positive and negative connections.
- Install a circuit breaker or fuse within 18 inches of the battery. This effectively lowers the risk of severe damage to you or your vehicle in case of a short circuit or accident. Make sure the circuit breaker is switched Off or the fuse is taken out of the fuse holder until all connections are made. Now connect your positive power cable to the positive battery terminal of the battery.
- Grounding - Locate a proper ground point on the vehicle's chassis and remove all paint, dirt or debris to reveal a bare metal surface. Attach the amplifier's ground wire to that contact point.
- Connect a Remote Turn-On wire from the source unit to the MTX amplifier's (REM) wire. If the source unit does not have a dedicated Remote Turn-On lead, you may connect to the source unit's Power Antenna lead.
- Supply the signal to your MTX amplifier by connecting the signal cables using high quality RCA to the corresponding outputs at the source unit and inputs of the amplifier.
- Connect your speakers to your MTX amplifier's speaker wires using the correct gauge speaker wire. Your MTX amp can drive a 2Ω stereo/4Ω bridged minimum load for optimum power.
- Double check all previous installation steps, in particular, wiring and component connections. Once verified, reconnect the vehicle's negative battery cable, turn the circuit breaker On or place the fuse in the fuse holder.
NOTE: Gain Levels on the amplifier should be turned all the way down (counter clockwise) before proceeding with adjustments.
INSTALLATION
For proper performance and safety, MTX recommends installing an inline fuse per the owner's manual instructions according to the following.
MUD100.2 15A Fuse
TROUBLESHOOTING
| Problem Cause Solution | ||
| Output Distorted | Head Unit Volume Set Too High Lower | Head Unit Volume |
| Amplifier Gain Set Too High Lower Amplifier Gain | ||
| Balance Reversed | Speaker Wire L & R Reversed Correct | Speaker Wire Orientation |
| RCA Inputs Reversed Reverse RCA Inputs | ||
| Bass is Weak | Speakers Wired Out of Phase Wire Speakers with Correct Phase | |
| Not Using MTX Subwoofers Buy MTX Subwoofers | ||
| Blowing Fuses | Excessive Output Levels Lower the Volume | |
| Amplifier Defective Return for Service | ||
SPECIFICATIONS
| Model MUD100.2 | |
| Description 50 W RMS/CH Stereo | |
| RMS Power at 14.4V | |
| 4Ω Bridged Load 200 W RMS | |
| 2Ω Load 100 W RMS | |
| 4Ω Load 50 W RMS | |
| Features | |
| Input Level 0.2 - 5V | |
| Frequency Response 20Hz - 20 kHz | |
| Low Pass Filter (LPF) 80Hz Fixed | |
| High Pass Filter (HPF) 80Hz Fixed | |
| THD at 4Ω, 1W <0.2% | |
| Signal-to-Noise Ratio >85dB | |
| Minimum Load 2Ω | |
| Low Voltage Protection Yes, Protect <8V | |
| Components & PCB SMD Parts / Double Sided FR | 4 PCB |
| Dimensions | |
| Height | 1.61" (40.9mm) |
| Width | 5.71" (145.0mm) |
| Length | 6.65" (168.9mm) |
WIRING DIAGRAM
4Ω Stereo

WIRING DIAGRAM
2Ω Stereo

WIRING DIAGRAM
4Ω Bridged
© 2014 Mitek Corporation. All rights reserved. MTX is a trademark of Mitek Corporation. Designed and Engineered in the U.S.A.
Due to continual product development, all specifications are subject to change without notice.
MTX Audio, 4545 East Baseline Rd. Phoenix, AZ 85042 U.S.A.
MTX004785 RevA 1/14 • 21A10131 • AW0014621

N535

OWNER'S MANUAL
MUDBTRC
BLUETOOTH REMOTE CONTROL

Bluetooth™
IMPORTANT NOTICE
If you have any questions regarding wire routing in a vehicle, please contact MTX Technical Support at 1-800-225-5689.
When connecting power and ground wires ensure that the yellow power wire is fused at the point where it is connected to the vehicle's battery. Failure to do so can result in damage to the vehicle if a short circuit develops between the vehicle connection point and the product.
PRODUCT INFORMATION
Model # ____
Serial #
Dealer's Name
Date of Purchase ____
IN THE BOX
- Bluetooth Remote Control
• Installation Cables (Power/Ground/Accessory) 1 Meter - Mounting Adapters
INTRODUCTION
Thank you for purchasing this MTX Audio Bluetooth Remote Control that is designed to work with most Bluetooth enabled devices including iPhone and Android smartphones and tablets. This easy to install and use all in one unit is capable of transforming your Bluetooth enabled mobile device into the center of your vehicle's audio system. Designed to mount a variety of vehicles and able to work with most amplifiers, the MUDBTRC can be used on motorcycles, side-by-sides, boats, cars, or trucks. Congratulations and enjoy the ultimate audio experience with MTX!
FEATURES
- Bluetooth Receiver and Remote Control
- Three Mounting Options - Surface, Flush, or Clamp
- Includes Power, Ground, and Output Connections
- Weather-Proof Design
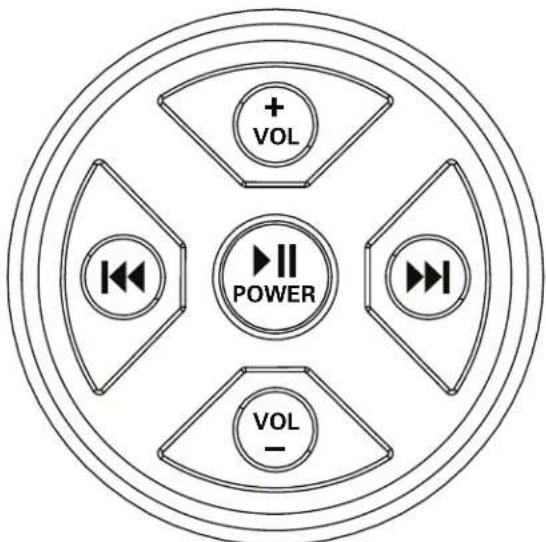
- Five Front Panel Touch Controls
- Works with Most Bluetooth Devices Including Smartphones and Tablets
REMOTE OPERATION
- Play/Pause - The Play/Pause button gives you the ability to play or to pause the current track with a single press. Holding the Play/Power button for 2 seconds will turn the unit On if currently Off or Off if currently powered On. The unit will beep to indicate when power is turned Off.
Note:
a. The unit will stay on indefinitely as long as a Bluetooth device is actively paired to the MUDBTRC.
b. The unit will turn Off after 5 minutes when there is no active Bluetooth device connection.
c. The Play/Pause button will illuminate when the unit is powered On.
d. The Play/Pause button will blink when the music track is paused.
- Track Forward and Track Back - The unit will switch audio tracks being played by pressing the track forward and track back buttons. Pressing and holding these buttons for 2 seconds will fast forward or rewind the audio track that is being played.
- Volume Up and Volume Down - These buttons will turn up or turn down the output of the Bluetooth unit so any external connected amplifier output will go up or down accordingly. When the unit has reached the minimum or maximum output level, the unit will beep to indicate that no further adjustment is possible.
- Bluetooth Auto-Pair Mode
a. Turn the unit On.
b. Search for MTX REMOTE from your device's Bluetooth menu
c. Select Pair.
INSTALLATION
The MUDBTRC can be used with any external 12-volt amplifier and can be mounted in a variety of ways using the included hardware. The unit has three wires in its wiring pigtail. The red wire, hot, should be directly connected to the vehicles positive battery terminal, the black wire, ground, should be connected directly to the vehicle's chassis where paint has been removed or the negative terminal on the battery, and the blue wire, remote, should be connected to the remote wire input on the external amplifier being used. When the MUDBTRC is powered On, a remote signal will be sent from the MUDBTRC to the connected amplifier, turning it On.

The unit can be surface, flush, or clamp mounted using the included hardware.
© 2014 Mitek Corporation. All rights reserved. MTX is a trademark of Mitek Corporation. Designed and Engineered in the U.S.A.
Due to continual product development, all specifications are subject to change without notice.
MTX Audio, 4545 East Baseline Rd. Phoenix, AZ 85042 U.S.A. 1-800-225-5689
MTX005074 RevA 12/14 • 21A10198 • AW0014782

MUD65P
CAGE MOUNT SPEAKER
OWNER'S MANUAL
PRODUCT INFORMATION
Model #
Serial #
Dealer's Name
Date of Purchase
IN THE BOX
- Speaker and Enclosure
- Brackets
- For mounting the bracket base to the enclosure
• (8) M6-1.0x14mm stainless steel Hex Bolt
• (8) M6 flat washer stainless steel
• (8) M6 split lock washer stainless steel
- For tightening the bracket strap to the base
• (2) M6-1.0x50mm stainless steel Hex Bolt
• (2) M6 serrated flange lock nut stainless steel
INTRODUCTION
Thank you for purchasing this MTX Audio cage mount speaker pod. This high performance speaker features all-weather construction designed to deliver exceptional sound quality and volume for high output systems for those that love to hear their music wherever they are. Congratulations and enjoy the ultimate audio experience with MTX!
FEATURES
- Weather Resistant Enclosure
- Fits 1 1/2 , 1 3/4 and 2 Bars
• Polypropylene Woofer and Mylar Dome Tweeter
• ABS Impact Resistant Grille with UV Inhibitor - Tested 500 hrs to ASTM B117, D4329 Standard
• Red LED Speaker Illumination
SPECIFICATIONS
RMS Power Handling: 50-Watts
Peak Power Handling: 100-Watts
Sensitivity (2.83V/1m): 89.9dB
Sensitivity (1W/1m): 85.6dB
Frequency Response: 70Hz - 20kHz
Impedance: 4Ω
Fits Bars 1½", 1¾", 2"
WIRE COLOR
Grey / Black - +/- speaker wire
Yellow / Black - +/- speaker illumination
INSTALLATION
- Choose appropriate bracket clamp, 1/2 , 13/4 or 2", for the application.
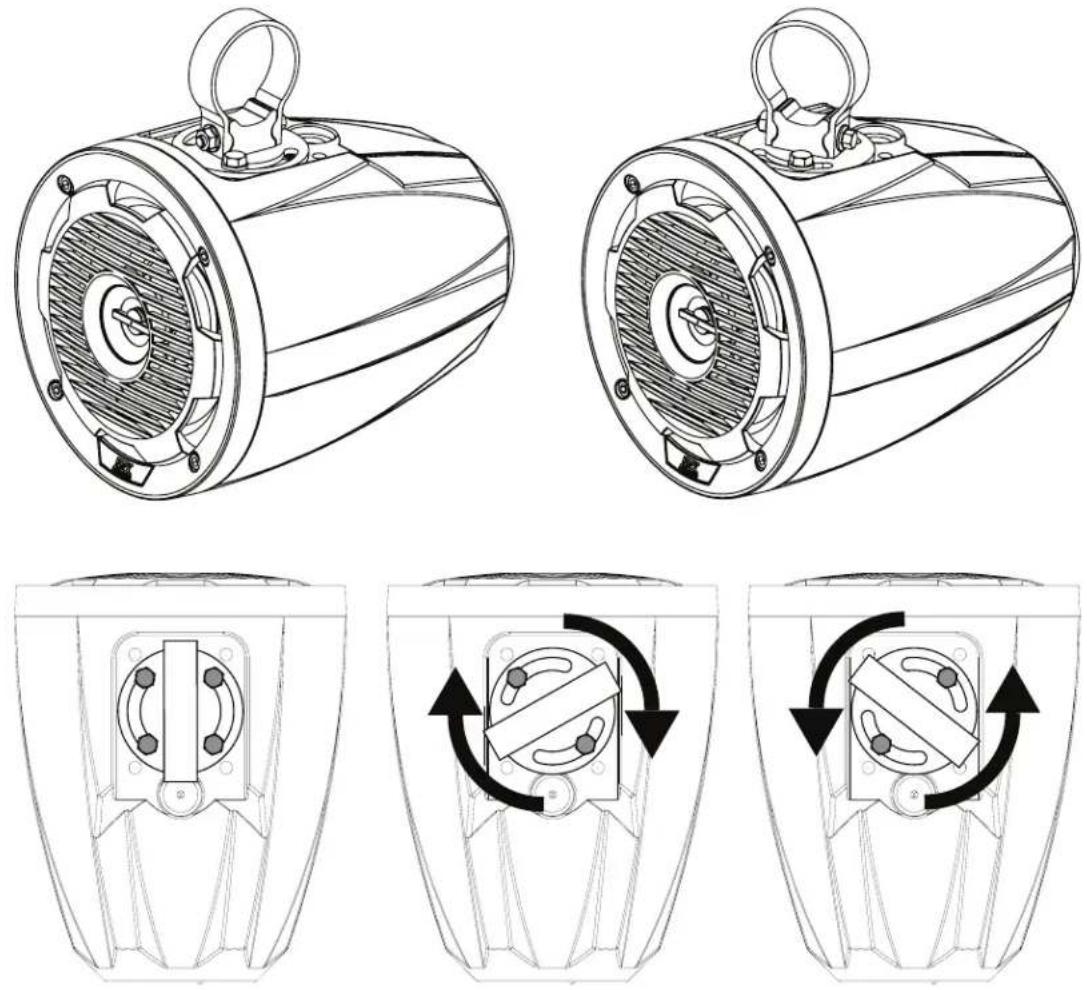
- Attach bracket base to enclosure at desired angle using a minimum of two (2) M6-1.0x14mm Hex bolts and M6 lock washers. If only two (2) bolts are used, ensure there is a bolt on each side of the round base for secure mounting.
-
Slide bracket clamp over pipe or bar at desired mounting location.
-
Hold the enclosure in place where the base fits in the open section of the clamp. Then place the M6-1.0x50mm Hex bolt through making sure the threads are towards the front of the enclosure. See Figure 1.
-
Tighten the M6 serrated nut onto the bolt until the bracket is tight. The nut is serrated and will lock in place. The speaker will not rotate on the bar it is mounted on when these are fully tightened.
-
Adjust and tighten the bolts to the desired position making sure to use a minimum of two bolts. Depending on the position of the speaker, only two (2) insertion points will be usable.
-
Attach the MTX badge to the rear recess of the enclosure with the included double stick tape.
-
Connect the speaker wires to your amplifier ensuring correct polarity Grey to positive and Black to negative.
The MUD65P includes speaker illumination. Connect the Yellow wire to +12VDC and the Black wire to a ground location (preferably the same ground location as the amplifier to avoid noise). Current draw is 14.5mA.
Figure 1


The bracket base can rotate in any direction desired, a minimum of 2 bolts must be used, 1 on each side.
© 2015 Mitek Corporation. All rights reserved. MTX is a trademark of Mitek Corporation. Designed and Engineered in the U.S.A.
Due to continual product development, all specifications are subject to change without notice.
MTX Audio, 4545 East Baseline Rd. Phoenix, AZ 85042 U.S.A. 1-800-225-5689
MTX005257 RevA 7/15 • 21A10428 • AW0015151
Brand : MTX Audio
Model : Thunder Sports BORVKIT1
Category : Loudspeaker