MACP-015 - Compressor Ozito - Free user manual and instructions
Find the device manual for free MACP-015 Ozito in PDF.


| Product Type | Air Compressor |
| Model | MACP-015 |
| Brand | Ozito |
| Motor Power | 1200 W (1.5 HP) |
| Tank Capacity | 6 L |
| Max. Pressure | 8 bar (116 psi) |
| Free Air Delivery (FAD) | 56.4 L/min |
| Max. Air Intake Volume | 180 L/min |
| No Load Speed | 3,450/min |
| IP Rating | IP20 |
| Weight | 11.5 kg |
| Voltage | 230-240 V~, 50 Hz |
| Safety Features | Safety release valve, thermal overload protection, RCD recommended |
| Included Accessories | 6.3 m air hose, blow gun, 8 inflation adapters, 10 connection accessories |
| Warranty | 3-year replacement warranty |
| Recommended Use | Inflating tires, sports equipment, inflatables; cleaning with blow gun |
| Maintenance | Drain tank daily; wipe with damp cloth; do not use solvents |
| Spare Parts & Repairability | Contact Ozito service centre for damaged seals, valves, or hoses |
Frequently Asked Questions - MACP-015 Ozito
User questions about MACP-015 Ozito
0 question about this device. Answer the ones you know or ask your own.
Ask a new question about this device
Download the instructions for your Compressor in PDF format for free! Find your manual MACP-015 - Ozito and take your electronic device back in hand. On this page are published all the documents necessary for the use of your device. MACP-015 by Ozito.
USER MANUAL MACP-015 Ozito
Motor: 1200W (1.5HP)
Tank Capacity: 6L
No Load Speed: 3,450/min
Max. Pressure: 8bar (116psi)
Max. Air-Intake Volume: 180 L/min
Free Air Delivery (FAD): 56.4 L/min
IP Rating: IP20
Weight:
11.5kg
ozito.com.au
natural_image
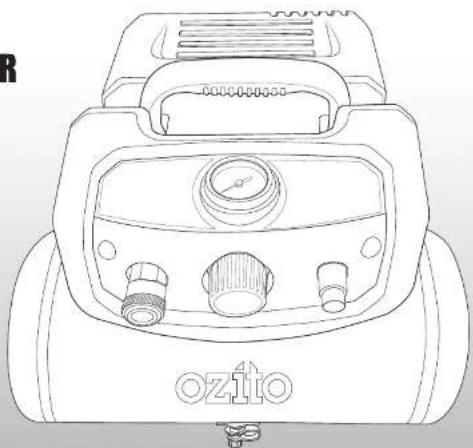
Line drawing of a portable air purifier with control panel and buttons (no text or symbols)STANDARD EQUIPMENT

Air Compressor

Air Gun
6.3m Air Hose
Inflation Adapters x 8

Connection
Accessories x 10
3 YEAR REPLACEMENT WARRANTY
MACP-015
WARRANTY
IN ORDER TO MAKE A CLAIM UNDER THIS
WARRANTY YOU MUST RETURN THE PRODUCT
TO YOUR NEAREST DRUMINGS WAREHOUSE WITH
The benefits provided under this warranty are in addition
to other rights and remedies which are available to you at law.
Our goixis come with guarantees that cannot be excluded
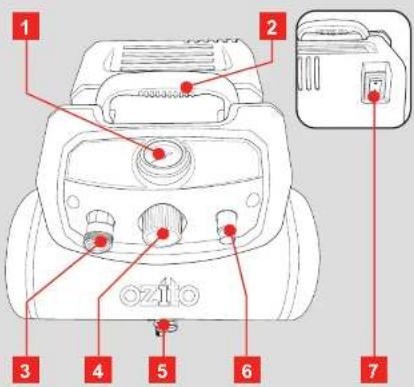
KNOW YOUR PRODUCT
AIR COMPRESSOR
1 Pressure Gauge
5 Drain Valve
2CarryHandle
6 Safety Release Valve
3 Nitto Style Coupling
7 On/Off Switch
4 Pressure Adjustment Dial
ACCESSORIES
8 Air Hose (6.3m)
11 Connection Accessories x 10
9 Blow Gun
SETUP & PREPARATION
1. ASSEMBLY AND STARTING
Pre Setup Checks
- Examine the machine for signs of transit damage. If damaged, do
not use, return to place of purchase
• The compressor should be set up near to the user. - Avoid long air lines and long supply lines (extensions).
• Make sure the intake air is dry and dust-free. - Do not set up the compressor in damp or wet rooms.
- The compressor is designed to be used in dry rooms. It is prohibited to use the compressor in areas where work is conducted with sprayed water. Before you use the machine, make sure that the mains voltage complies with the specifications on the rating plate.
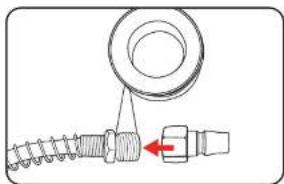
Connecting Air Hose to the Compressor
1 Attach the 1/4" female nitto quick plug to the air hose. Use pipe tape on all threads to ensure a good air seal.
natural_image
Diagram of a mechanical assembly with a spring and bolt, showing no text or symbols2 Insert the 1/4" male nitto quick plug of the air hose into the quick-lock coupling of the air compressor by pulling back the sleeve and inserting the plug.
OPERATION
Connecting to the Compressed Air Hose

BEFORE CONNECTING OR
DISCONNECTING ACCESSORIES, ALWAYS MAKE
SURE THAT THE COMPRESSOR IS OFF.
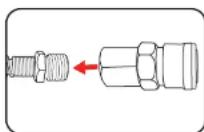
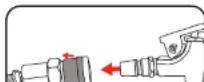
1 Insert the 1/4 female nitto coupler connector to the end of the male connector on the air hose.
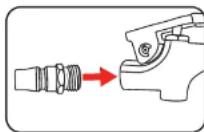
2 Attach the 1/4"male nitto quick plug into the air tool you wish to use.
3 Pull back the sleeve of the quick-lock coupling whilst pushing in the 1/4"nitto quick plug. The quick-lock sleeve will spring forward automatically.
2. OPERATION
Switching On

TO REDUCE THE RISK OF ELECTRIC
SHOCK, WE RECOMMEND THE USE OF A RESIDUAL CURRENT DEVICE (RATED AT 30MA OR LESS).

WARNING! DO NOT ATTEMPT TO ADJUST/MODIFY THE SAFETY VALVE IN ANY WAY. THE SAFETY VALVE INSTALLED ON THIS AIR COMPRESSOR IS DESIGNED TO AUTOMATICALLY RELEASE PRESSURE IN CASE OF EXCESS PRESSURE BUILD UP IN THE TANK.
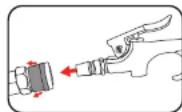
1 Attach the desired tool to the quick release coupling of the air hose.
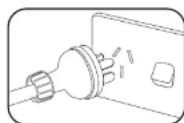
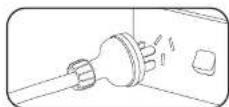
2 Connect the compressors power cord to the mains power supply.
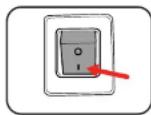
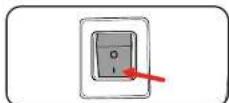
3 To switch ON the equipment, set the On/Off switch to position "I" (On).
Switching Off
WARNING! COMPRESSED AIR CAN BE A DANGEROUS FORM OF ENERGY. GREAT CARE IS REQUIRED WHEN USING THE COMPRESSOR AND ITS ACCESSORIES.
1 To switch OFF the equipment, move the On/Off switch to position "0" (Off). Disconnect the power cord from the mains.
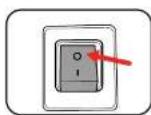
2 Release remaining pressurised air from tank using the blow gun. Once the pressure has reached 0 PSI, the drain valve should be opened to allow any additional pressure to be released.
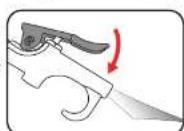
3 Close the drain valve.
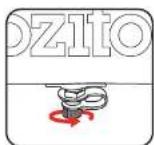
4 Disconnect tool and air hose from

3. INFLATING
Setup
1 Attach the desired tool to the quick release coupling of the air hose.
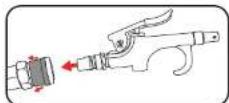
2 Connect the compressors power cord to the mains power supply.
3 To switch ON the equipment, set the On/Off switch to position "I" (On).
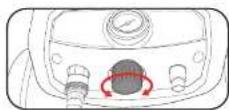
4 Set the compressor to the desired inflation pressure, using the pressure adjustment dial.
Inflating Tyres
1 Attach the tire chuck


WARNING
AVOID INFLATING THE OBJECTS
ABOVE THE RECOMMENDED INFLATION
PRESSURE. THIS MAY LEAD TO DAMAGE AND/OR INJURIES.
3 Check compressor is set to the correct pressure. Pressure can be adjusted using pressure adjustment dial.
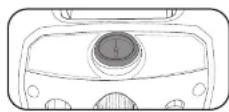
4 To inflate the tyre, hold down the tyre chuck onto the schrader valve.
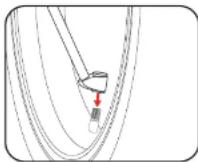
5 After a short time, release the air chuck and check the air pressure with the pressure gauge.
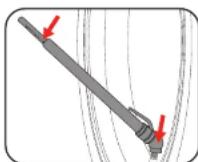
Inflating other items
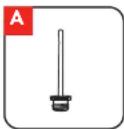
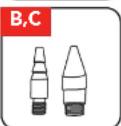
The compressor kit is supplied with a variety of adapters that can be fitted to the rubber hose or air gun. These adapters are suitable for different valves that are often used on inflatable items:
Adapter A is used for footballs, basketballs, soccer balls etc.
Adapters B&C are used for rubber dinghies, inflatable small swimming pools and air beds.
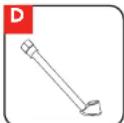
Adapter D is used for bicycle or car tyres with "Schrader" valves.
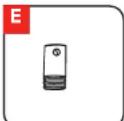
Adapter E is used for blowing air to clear work spaces of sawdust or other fine material.
4. BLOWER PISTOL 5. TROUBLESHOOTII
Using the Blower Pistol
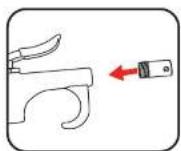
1 Attach the blow gun nozzle to the blow gun.
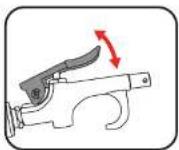
2 By varying the pressure on the trigger, you can control the amount of compressed air released through the air nozzle.
WARNING! OPERATOR IS ADVISED TO WEAR EYE PROTECTION WHEN USING THE AIR GUN. TAKE CARE NOT TO BLOW DIRT OR OTHER LOOSE PARTICLES TOWARDS YOURSELF OR OTHER PERSONS
The blower nozzle adapter is useful
| Problem Cause Solution | ||
| The compressor does not start | No supply voltage Check | the supply voltage, the power plug and the socket-outlet. |
| Insufficient supply voltage | Make sure that the extension cable is not too long. | |
| Try another product in power point | ||
| Outside temperature is too low | Neveroperate with an outside temperature of below 5°C. | |
| Motor is overheated Allow the motor to cool down. If necessary, remedy the cause of the overheating. | ||
| The compressor starts but there is no pressure | The seals are damaged. | Check the seals and have any damaged seals replaced by a service centre |
| The compressor starts, but the tools do not. | Loosehose connections | Check the compressed air hose and tools and replace if necessary. |
| Leak in a quick-lock coupling | Check the quick-lock coupling and replace if necessary. | |
MAINTENANCE

WARNING! BEFORE CLEANING YOUR COMPRESSOR OR CARRYING OUT ANY MAINTENANCE PROCEDURE, MAKE SURE THAT THE MOTOR IS OFF AND THE TOOL DISCONNECTED FROM THE POWER SUPPLY TO PREVENT ACCIDENTAL STARTING.

WARNING! WAIT UNTIL THE COMPRESSOR HAS COMPLETELY COOLED DOWN. RISK OF BURNS!

WARNING! ALWAYS DEPRESSURIZE THE EQUIPMENT BEFORE CARRYING OUT ANY CLEANING AND MAINTENANCE WORK.
Cleaning
- Keep the safety devices free of dirt and dust as far as possible. Wipe the equipment with a clean cloth or blow it with compressed air at low pressure.
• We recommend that you clean the appliance immediately after you use it. - Clean the appliance regularly with a damp cloth and some soft soap. Do not use cleaning agents or solvents; these may be aggressive to the plastic parts in the appliance. Ensure that no water can get into the interior of the appliance.
• You must disconnect the hose and any spraying tools from the compressor before cleaning. Do not clean the compressor with water, solvents or the like.

WARNING! STORE THE COMPRESSOR ONLY IN
DESCRIPTION OF SYMBOLS
| Type | Volts | Hz | Hertz |
| Type | Alternating Current Watts | W | |
| Type in line | Recoveries or reciprocations per minute | n_o | No load speed |
| Type | Lives | ⚠️ | Warning |
| Type in line | Wear eye, par & breathing protection | ⚠️ | Beware of electrical voltage |
| Type in line | Sound power level | ⚠️ | Beware of hot parts |
| Type | Regulatory Compliance Mark (RCM) | ⚠️ | Warning! The equipment may start up without warning. |
CARING FOR THE ENVIRONMENT

Power tools that are no longer usable should not be disposed of with household waste but in an environmentally friendly way. Please recycle where facilities exist. Check with your local council authority for recycling advice.

Recycling packaging reduces the need for landfill and raw materials. Reuse of recycled material decreases pollution in the environment. Please recycle packaging where facilities exist. Check with your local council authority for recycling advice.
SPARE PARTS
ELECTRICAL SAFETY

WARNING! When using main-powered tools, basic safety precautions, including the following, should always be followed to reduce risk of fire, electric shock, personal injury and material damage.
Read the whole manual carefully and make sure you know how to switch the tool off in an emergency, before opening the tool.
Save these instructions and other documents supplied with this tool for future reference.
The electric motor has been designed for 230V and 240V only. Always check that the power supply corresponds to the voltage on the rating plate.
Note: The supply of 230V and 240V on Ozito tools are interchangeable for Australia and New Zealand. If the supply cord is damaged, it must be replaced by an electrician or a power tool repairer in order to avoid a hazard.
Using an Extension Lead
Always use an approved extension lead suitable for the power input of this tool. Before use, inspect the extension lead for signs of damage, wear and aging. Replace the extension lead in damaged or defective. When using an extension lead on a pair, always unwind the lead completely. Use of an extension lead not suitable for the power input of the tool or which is damaged or defective may result in a lack of fine and electric shock.
The power outlet for the compressor is recommended to be protected by a 30amp residual current device
GENERAL POWER TOOL SAFETY WARNINGS

WARNING! Read all safety warnings and all instructions. Failure to follow the warnings and instructions may result in electric shock. Fire and/or serious injury.
Save all warnings and instructions for future reference. The term "power tool" in the warnings refers to your mains-operated (corded) power tool or battery-operated (cordless) power tool.
-
Work area safety
-
Keep work area clean and well lit. Cluttered or dark areas invite accidents.
b. Do not operate power tools in explosive atmospheres, such as in the presence of flammable liquids, gases or dust. Power tools create sparks which may ignite the dust or fumes.
c. Keep children and bystanders away while operating a power tool. Distractions can cause you to lose control.
-
Electrical safety
-
Power tool plugs must match the outlet. Never modify the plug in any way. Do not use any adapter plugs with earthed (grounded) power tools. Unmodified plugs and matching outlets will reduce risk of electric shock.
b. Avoid body contact with earthed or grounded surfaces, such as pipes, radiators, ranges and refrigerators. There is an increased risk of electric shock if your body is earthed or grounded.
c. Do not expose power tools to rain or wet conditions. Water entering a power tool will increase the risk of electric shock.
d. Do not abuse the cord. Never use the cord for carrying, pulling or unplugging the power tool. Keep cord away from heat, off, sharp edges or moving parts. Damaged or entangled cords increase the risk of electric shock.
c. When operating a power tool outdoors, use an extension cord suitable for outdoor use. Use of a cord suitable for outdoor use reduces the risk of electric shock.
- Personal safety
a. Stay alert, watch what you are doing and use common sense when operating a power tool. Do not use a power tool while you are tired or under the influence of drugs, alcohol or medication. A moment of instruction while operating power tools may result in serious personal injury.
b. Use personal protective equipment. Always wear eye protection. Protective equipment such as dust mask, non-skid safety shoes, hard hat, or hearing protection used for appropriate conditions will reduce personal injuries.
c. Prevent unintentional starting. Ensure the switch is in the off-position before connecting to power source and/or battery pack, picking up or carrying the tool. Carrying power tools with your finger on the switch or energising power tools that have the switch or invites accidents.
d. Remove any adjusting key or wrench before turning the power tool on. A wrench or a key left attached to a rotating part of the power tool may result in personal injury.
e. Do not overreach. Keep proper footing and balance at all times. This enables better control of the power tool in unexpected situations.
F. Dress properly. Do not wear loose clothing or jewellery. Keep your hair, clothing and glo- away from moving parts. Loose clothes, jewellery or long hair can be caught in moving parts.
g. If devices are provided for the connection of dust extraction and collection facilities, ensure these are connected and properly used. Use of dust collection can reduce dust-related hazards.
H. Do not let familiarity gained from frequent use of tools allow you to become complacent and ignore tool safety principles. A stressless action can cause severe injury within a fraction of a second.
4. Power tool use and care
5. Do not force the power tool. Use the correct power tool for your application. The correct power tool will do the job better and set at the rate for which it was designed.
b. Do not use the power tool if the switch does not turn it on and off. Any power tool that cannot be controlled with the switch is dangerous and must be repaired.
c. Disconnect the plug from the power source and/or the battery pack from the power tool before making any adjustments, changing accessories, or storing power tools. Such preventive safety measures reduce the risk of starting the power tool accidentally.
d. Store idle power tools out of the reach of children and do not allow persons unfamiliar with the power tool or these instructions to operate the power tool. Power tools are dangerous in the hands of untrained users.
e. Maintain power tools. Check for misalignment or binding of moving parts, breakage of parts and any other condition that may affect the power tool's operation. If damaged, have the power tool repaired before use. Many accessories are caused by good maintained power tools.
f. Keep cutting tools sharp and clean. Properly maintained cutting tools with sharp cutting edges are less likely to bind and are easier to control.
g. Use the power tool, accessories and tool bits etc. in accordance with these instructions, taking into account the working conditions and the work to be performed. Use of the power tool for acquisitions different from those intended so to result in a hazardous situation.
h. Keep handles and grasping surfaces dry, clean and free from oil and grease. Slippery handles and grasping surfaces do not allow for safe handling and control of the tool in unexpected situations.
6. Service
a. Have your power tool serviced by a qualified repair person using only identical replacement parts. This will ensure that the safety of the power tool is maintained.
A AIR COMPRESSOR SAFETY WARNINGS
- YEAR REPLACEMENT WARRANTY
- WARRANTY
- KNOW YOUR PRODUCT
- AIR COMPRESSOR
- ACCESSORIES
- SETUP & PREPARATION
- ASSEMBLY AND STARTING
- Pre Setup Checks
- Connecting Air Hose to the Compressor
- OPERATION
- Connecting to the Compressed Air Hose
- OPERATION
- Switching On
- Switching Off
- WARNING! COMPRESSED AIR CAN BE A DANGEROUS FORM OF ENERGY. GREAT CARE IS REQUIRED WHEN USING THE COMPRESSOR AND ITS ACCESSORIES.
- INFLATING
- Setup
- Inflating Tyres
- Inflating other items
- BLOWER PISTOL 5. TROUBLESHOOTII
- Using the Blower Pistol
- MAINTENANCE
- Cleaning
- DESCRIPTION OF SYMBOLS
- CARING FOR THE ENVIRONMENT
- SPARE PARTS
- ELECTRICAL SAFETY
- GENERAL POWER TOOL SAFETY WARNINGS
- A AIR COMPRESSOR SAFETY WARNINGS
Brand : Ozito
Model : MACP-015
Category : Compressor