SSH-2440 - Chopper Ozito - Free user manual and instructions
Find the device manual for free SSH-2440 Ozito in PDF.


| Product Type | Silent Shredder (Mincer) |
| Brand | Ozito |
| Model | SSH-2440 |
| Weight | 23 kg |
| Protection Class | Class I (Earthed Appliance) |
| Max Branch Diameter | 40 mm |
| Cutting Mechanism | Rolling cutter head with adjustable metal plate |
| Cutting Adjustment | Knob on right-hand side; clockwise tightens, anti-clockwise loosens |
| Direction Control | Feed (forward) and Reverse (for clearing jams) |
| Overload Protection | Automatic motor shut-off with reset button |
| No-Volt Release | Automatic shut-off on power loss; restart required |
| Wheels | 2 x wheels with axle and hub caps |
| Stand | Included for stability |
| Collection Bag | Included |
| Feed Opening (Hopper) | Designed for branches, twigs, hedge trimmings, palm fronds |
| Discharge Chute | Included |
| Maintenance | Keep air openings clean; periodically check nuts and screws; lubricate cutter head; store upright in dry place |
| Safety Features | Overload protection, no-volt release, direction control switch, emergency reverse |
| Warranty | 3-year replacement warranty |
Frequently Asked Questions - SSH-2440 Ozito
User questions about SSH-2440 Ozito
0 question about this device. Answer the ones you know or ask your own.
Ask a new question about this device
Download the instructions for your Chopper in PDF format for free! Find your manual SSH-2440 - Ozito and take your electronic device back in hand. On this page are published all the documents necessary for the use of your device. SSH-2440 by Ozito.
USER MANUAL SSH-2440 Ozito
Protection Class: 1 (Earthed Appliance)
Weight: 23 kg
ozito.com.au
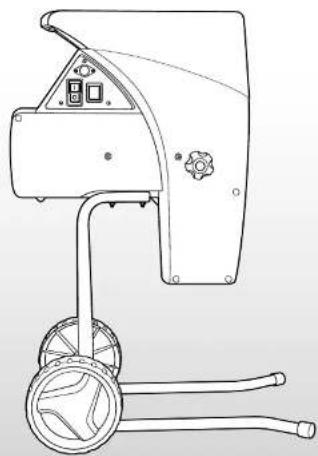
natural_image
Technical line drawing of a mechanical device with wheels and control panel (no text or symbols)STANDARD EQUIPMENT


Shredder
Housing


Wheels x 2 Wheel Axle

Hub Caps x 2


Collection BagWheel


Nut & Washer x 6
Hex Key

■
Bolt x 2
Hex Wrench
3 YEAR REPLACEMENT WARRANTY
SSH-2440
WARRANTY
IN ORDER TO MAKE A CLAIM UNDER THIS
WARRANTY YOU MUST RETURN THE PRODUCT
The benefits provided under this warranty are in addition
to other rights and remedies which are available to you at law.
Our goods come with guarantee that cannot be excluded
KNOW YOUR PRODUCT
SILENT SHREDDER
- On/off switch
- Transport handle
- Reset button/overload protector
- Direction control switch
-
Hopper
-
Cutting adjustment Knob
- Discharge chute
- Stand
- Wheels
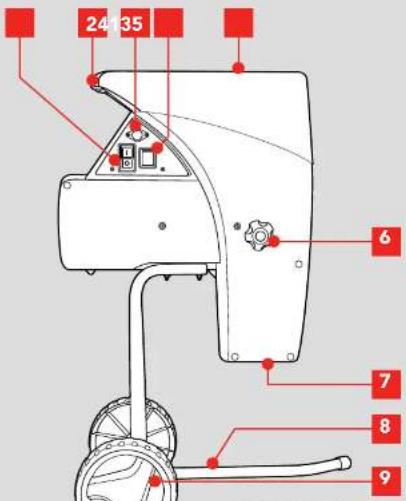
ASSEMBLY
1. WHEELS & STAND

WARNING: YOU MAY REQUIRE ASSISTANCE LIFTING THE SHREDDER OUT OF THE CARTON.

WARNING: ENSURE THE TOOL IS TURNED OFF AND DISCONNECT FROM THE POWER SUPPLY DRE PERFORMING ANY OF THE FOLLOWING RATIONS.
After removing the silent shredder from the carton, check that the shredder has not been damaged. Unpack the contents.
Fitting the wheels and stand
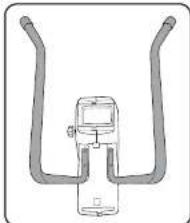
- Carefully place the shredder housing upside down on a flat surface.
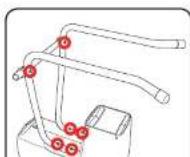
- Place each leg over the 2 threads on the base of the shredder housing. For maximum stability ensure that the legs are facing outwards.
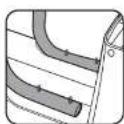
- Place a flat washer followed by the
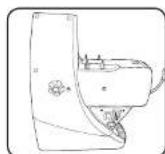
natural_image
Diagram of a vehicle with two articulated arms and a central device (no text or symbols)
- Secure the axle onto the legs using 2 bolts, nuts & washers.
a. Place the bolt through the hole in the axle followed by the leg.
b. Fit a flat washer over each bolt, attach the nut onto the bolt and tighten using the hex wrench and hex key (only partially tighten at this stage).
c. Repeat for the opposite leg.
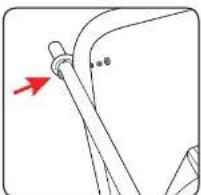
- Securely tighten the 4 nuts on the base of the shredder followed by the 2 bolts & Nuts on the wheel axle.
Ensure the stand and axle are secure and do not wobble.
natural_image
Simple line drawing of a mechanical component with a red arrow indicating direction (no text or symbols)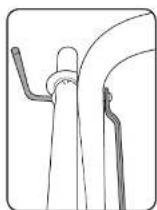
-
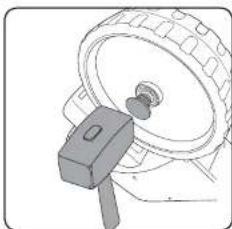
Fit a wheel plug onto each end of the axle to secure the wheels on the axle. Use a rubber mallet (not included) and lightly tap the plugs into position on the axle.
-
Push the hub caps onto the centre of the wheels so it clicks into place.
-
Once fully assembled, carefully lift the shredder into its correct position corrected by the stand and
natural_image
Technical line drawing of a mechanical component with a gasket and wheel (no text or symbols)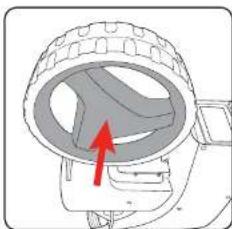
natural_image
Diagram of a car wheel assembly with a red arrow indicating direction (no text or symbols)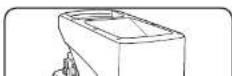
The shredder operates by using a rolling cutter head, the cutter head rotates and pulls the material past a metal plate which grinds and cuts the material.
Prior to operation the metal plate will need to be adjusted to ensure efficient performance. Adjust the metal plate as follows:
- Press the rotation direction switch so it is set to the feed position.
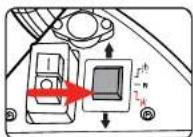
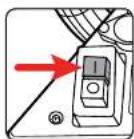
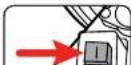
- Turn on the shredder by pressing the green ON button "I" on the on/off switch.
- Using the cutting adjustment knob located on the right-hand side of the shredder (when viewed from the rear).
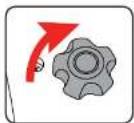
Note: Rotating the knob in a clockwise direction will move the metal plate closer to the rolling cutter head, rotating in an anti-clockwise direction will move the metal plate away from the
3. STARTING
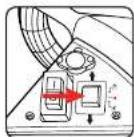
Direction control switch

WARNING: THE DIRECTION CONTROL SWITCH CAN ONLY BE USED WHEN THE SHREDDER IS TURNED OFF.
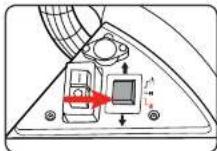
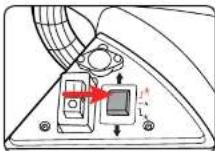
- Prior to operation the direction control switch must be set either to the feed or reverse position.
- When set to the feed position the shredder will pull material through the hopper, into the rolling cutter head and shred it.
- When set to the reverse position the shredder will run in the opposite direction and release any blocked or clogged material. In reverse direction, the power button must be held down.
Note: The direction control switch will not start the motor, it only sets the direction of the rolling cutter head.
Note: If the switch for selecting the direction of rotation is in its centre position 'N', the motor will not start.
ON/OFF switch

CAUTION TO REDUCE THE RISK OF ELECTRICAL SHOCK, WE RECOMMEND THE USE OF A RESIDUAL CURRENT
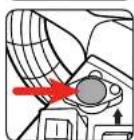
Overload protection
- The shredder is equipped with a built-in motor protection system that prevents the motor from being overloaded. The motor will switch off automatically in the event of overloading.
- If overloading occurs disconnect the shredder from the power supply and move the direction control switch to the "O" position.
- Allow at least 5 minutes for the motor to cool down.
- Press the reset button.
- Plug the shredder back into mains power and switch on.
- If the cutting blades are jammed turn off the shredder and turn the direction control switch to the reverse position, turn on the shredder to clear any blocked or clogged material.
No-volt release switch
- The shredder is equipped with an internal no-volt release switch. If there is a loss of power the machine will automatically turn-off.
- To re-start the shredder reconnect the power cord to the extension lead and press the green "l" button on the on/off switch.
The following types of material can be used in the shredder:
Twigs
- Branches
- Waste from cut bushes
- Waste from hedge trimming
-
Feed the material to be shredded into the feeding hopper.
-
The shredder will automatically pull the material through the rolling
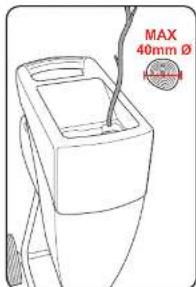
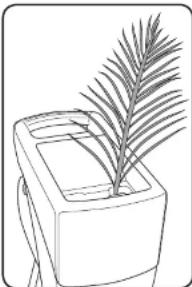
The shredder can shred palm fronds, reducing them to an easily disposable waste.
If the head of the palm frond is particularly large or hard it will need to be removed before being inserted into the shredder.
If the material is very hard the cutting adjustment bolt may need to be adjusted as described in 'Prior to operation' and run through the shredder once to soften it. Retighten the cutting adjustment bolt and insert the material a second time to effectively shred it.
natural_image
Line drawing of a potted plant with long fronds inside a rectangular container (no text or symbols)Composting tips
The shredded material can be composted in many various ways:
- The material can be placed in a heap directly on the ground (cold composting).
- The material can be placed in a plastic container, wooden crate, skeleton container or similar (cold composting).
- The material can be placed in an insulated compost holder. The heat is then maintained for longer periods and the rotting process continues during the winter. This method produces faster results (warm composting).
- The material can be spread directly onto the garden (surface composting).

ALWAYS USE A DUST MASK AND
SAFETY GLOVES WHEN HANDLING COMPOSTED
5. GENERAL MAINTENANCE

ALWAYS DISCONNECT THE
SHREDDER FROM THE POWER SUPPLY BEFORE
PERFORMING ANY MAINTENANCE.
The shredder requires very little maintenance. In order to maintain the efficiency of the machine and achieve a long service life observe the following:
- Keep the air openings clean and free of obstructing material.
• Periodically check that all nuts and screws are secure. - Spray the rolling cutter head after each use with a spray lubricant to protect against corrosion.
- Always clean the shredder after each use. Brush away dirt and plant residue which may be caught in the roller cutter. Wipe clean the outside of the shredder with a cloth which has been moistened with a mild detergent and water.
• Store the shredder upright in a dry place.
Note: Ozito Industries will not be responsible for any damage or injuries caused by the repair of the tool by an unauthorised person or by mishandling of the tool.
Cleaning
Always clean the shredder after each use.

NEVER USE A HIGH-PRESSURE
WASHER OR RUNNING WATER WHEN CLEANING
THE SHREDDER!
Brush away dirt and plant residue which may be caught in the rolling cutter blade. Wipe clean the outside of the shredder with a cloth which has been moistened with a mild detergent and water.
TROUBLESHOOTING
Problem Remedy
| The motor does not run | Set the direction control switch to position "0" and press the reset button. |
| Turn the direction control switch to either the feed or reverse position and turn on the shredder. | |
| Possible power failure, check the power supply/ cord and house fuse box. | |
| The material to be shredded is not pulling through the unit | The cutting blade is running in reverse. Turn off the shredder and change the direction control switch to the feed position. |
| The material is jammed in the roller blade. Set the control switch to the "0" position and switch the shredder on. Pull the material from the hopper. Carefully refeed thick branched material making sure the blade does not immediately grasp the pre-cut notches again. | |
| The rolling cutter head is blocked. Set the direction switch to the reverse position and switch the shredder on. The cutter head will now run backwards and release the blocked material. | |
| Material is not being shredded sufficiently | Ensure the metal plate is correctly adjusted in relation to the rolling cutter head. Refer to the 'Prior to operation' section for detailed instructions. |
| Tripping circuit breaker | Use shorter extension lead. Maximum length 25m. |
CAUTION! ONLY CHANGE THE DIRECTION OF
ROTATION AFTER THE SHREDDER HAS COME TO
DESCRIPTION OF SYMBOLS
| V | Volts Hz Hertz | |||
| - Automating current W Wells | ||||
| [control] | Diameter | |||
| [control] (revers) [control] | Revolutions or reciprocation per minute | no | No load speed | |
| [control] | Decibel (noise) rating | Do not expose to rain | ||
| [control] | Keep by standers away | Warning | ||
| [control] | Read instructions | Do not expose to rain | ||
| [control] (revers) [control] | Wear eye protection | Wear safety gloves | ||
| [control] (revers) [control] | Beware of debris being ejected from the shredder | Sound power level | ||
| [control] (revers) [control] | Disconnect and discontinue use should the power cord be damaged | |||
| [control] (revers) [control] | Danger - Rotating blades. Keep hands and feet out of openings while machine is running | |||
| [control] (revers) [control] | Direction control switch - Reverse - Neutral - Feed | |||
| [control] (revers) [control] | Cutting adjustment knob - Rotating clockwise * - "will move the metal plate closer to the cutting head, rotating ant-clockwise * * will move the metal plate away from the cutting head. | |||
ELECTRICAL SAFETY
WARNING! When using mains-powered tools, basic safety precautions, including the following, should always be followed to reduce risk of fire, electric shock, personal injury and material damage.
Read and understand the manual prior to operating this tool.
Save these instructions and other documents supplied with this tool for future reference. Before you connect the equipment to mains supply make sure that the data on the rating plate are identical to the mains data.
If the supply cord is damaged, it must be replaced by a qualified electrician or a power tool repairer in order to avoid a hazard.
If operating a power tool in a damp location is unavoidable use a residual current device (RCD) protected supply. Use of an RCD reduces the risk of electric shock. Using an Extension Lead
Always use an approved extension lead suitable for the power input of this load. Before use, inspect the extension load for signs of damage, wear and aging. Replace the extension load if damaged or defective.
When using an extension lead on a reel, always unwind the lead completely. Use of an extension lead not suitable for the power input of the tool or which is damaged or defective may result in a risk of fire and electric shock.
GENERAL POWER TOOL SAFETY WARNINGS
WARNING! Read all safety warnings and all instructions. Failure to follow the warnings and instructions may result in electric shock, fire and/or serious injury. Save all warnings and instructions for future reference.
The term "power tool" in the warnings refers to your mains-operated (corded) power tool or battery-operated (cordless) power tool.
a. Keep work area clean and well lit. Cluttered or dark areas invite accidents. b. Do not operate power tools in explosive atmospheres, such as in the presence of flammable liquids, gases or dust. Power tools create sparks which may ignite the dust or fumes.
c. Keep children and bystanders away while operating a power tool. Distractions can cause you to lose control.
a. Power tool plugs must match the outlet. Never modify the plug in any way. Do not use any adapter plugs with earthed (grounded) power tools. Unmodified plugs and matching outlets will reduce risk of electric shock.
b. Avoid body contact with earthed or grounded surfaces, such as pipes, radiators, ranges and refrigerators. There is an increased risk of electric shock if your body is earthed or grounded.
c. Do not expose power tools to rain or wet conditions. Water entering a power tool will increase the risk of electric shock.
d. Do not abuse the cord. Never use the cord for carrying, pulling or unplugging the power tool. Keep cord away from heat, oil, sharp edges or moving parts. Damaged or enlarged cords increase the risk of electric shock.
c. When operating a power tool outdoors, use an extension cord suitable for outdoor use. Use of a card suitable for outdoor use reduces the risk of electric shock.
f. If operating a power tool in a damp location is unavoidable, use a residual current device (RCD) protected supply. Use of an RCD reduces the risk of electric shock. 3. Personal safety
a. Stay alert, watch what you are doing and use common sense when operating a power tool. Do not use a power tool while you are tired or under the influence of drugs, alcohol or medication. A moment of attention while operating power tools may result in serious personal injury.
b. Use personal protective equipment. Always wear eye protection. Protective equipment such as dust mask, non-skid safety shoes, hard hat, or hearing protection used for
Carrying power tools with your finger on the switch or energising power tools that have the switch on invites accidents.
d. Remove any adjusting key or wrench before turning the power tool on. A wrench or a key left attached to a rotating part of the power tool may result in personal injury.
e. Do not overreach. Keep proper footing and balance at all times. This enables better control of the power tool in unexpected situations.
- Dress properly. Do not wear loose clothing or jewellery. Keep your hair, clothing and gloves away from moving parts. Loose clothes, jewellery or long hair can be caught in moving parts.
g. If devices are provided for the connection of dust extraction and collection facilities, ensure these are connected and properly used. Use of dust collection can reduce dust-related hazards.
- Power tool use and care
a. Do not force the power tool. Use the correct power tool for your application. The correct power tool will do the job better and safer at the rate for which it was designed.
b. Do not use the power tool if the switch does not turn it on and off. Any power tool that cannot be controlled with the switch is dangerous and must be repaired.
c. Disconnect the plug from the power source and/or the battery pack from the power tool before making any adjustments, changing accessories, or storing power tools. Such preventive safety measures reduce the risk of starting the power tool accidentally.
d. Store idle power tools out of the reach of children and do not allow persons unfamiliar with the power tool or these instructions to operate the power tool. Power tools are dangerous in the hands of untrained users.
e. Maintain power tools. Check for misalignment or binding of moving parts, breakage of parts and any other condition that may affect the power tool's operation. If damaged, have the power tool repaired before use. Many accidents are caused by poorly maintained power tools.
f. Keep cutting tools sharp and clean. Properly maintained cutting tools with sharp cutting edges are less likely to bind and are easier to control.
g. Use the power tool, accessories and tool bits etc. in accordance with these instructions, taking into account the working conditions and the work to be performed. Use of the power tool for operations different from those intended could result in a hazardous situation.
a. Have your power tool serviced by a qualified repair person using only identical replacement parts. This will ensure that the safety of the power tool is maintained.
- YEAR REPLACEMENT WARRANTY
- WARRANTY
- KNOW YOUR PRODUCT
- SILENT SHREDDER
- ASSEMBLY
- WHEELS & STAND
- Fitting the wheels and stand
- STARTING
- Direction control switch
- ON/OFF switch
- Overload protection
- No-volt release switch
- Composting tips
- ALWAYS USE A DUST MASK AND
- SAFETY GLOVES WHEN HANDLING COMPOSTED
- GENERAL MAINTENANCE
- ALWAYS DISCONNECT THE
- SHREDDER FROM THE POWER SUPPLY BEFORE
- PERFORMING ANY MAINTENANCE.
- Cleaning
- NEVER USE A HIGH-PRESSURE
- WASHER OR RUNNING WATER WHEN CLEANING
- THE SHREDDER!
- TROUBLESHOOTING
- DESCRIPTION OF SYMBOLS
- ELECTRICAL SAFETY
- GENERAL POWER TOOL SAFETY WARNINGS
Brand : Ozito
Model : SSH-2440
Category : Chopper