
TD-P863E - Monitor TOSHIBA - Free user manual and instructions
Find the device manual for free TD-P863E TOSHIBA in PDF.


| Product Type | LCD Monitor |
| Model | TD-P863E |
| Brand | Toshiba |
| Screen Size | 21.5 inches |
| Aspect Ratio | 16:9 |
| Resolution | 1920 x 1080 (Full HD) |
| Refresh Rate | 60 Hz |
| Response Time | 5 ms |
| Brightness | 250 cd/m² |
| Contrast Ratio | 1000:1 |
| Viewing Angles | 178° / 178° |
| Connectivity | VGA, DVI, HDMI |
| Power Consumption | 25 W (typical), <0.5 W (standby) |
| Weight | 4.5 kg |
| Dimensions (W x H x D) | 509 x 380 x 185 mm |
| VESA Mount Compatible | 100 x 100 mm |
| Features | Flicker-free technology, Blue light filter, Wall mountable |
| Cleaning Instructions | Use a soft dry cloth; do not use liquid cleaners or solvents |
| Safety | Ventilation slots: do not block; use only with specified power adapter |
| Spare Parts Availability | Spare parts available for 7 years after end of production |
Frequently Asked Questions - TD-P863E TOSHIBA
User questions about TD-P863E TOSHIBA
0 question about this device. Answer the ones you know or ask your own.
Ask a new question about this device
Download the instructions for your Monitor in PDF format for free! Find your manual TD-P863E - TOSHIBA and take your electronic device back in hand. On this page are published all the documents necessary for the use of your device. TD-P863E by TOSHIBA.
USER MANUAL TD-P863E TOSHIBA
Leading Innovation >>>
OWNERS MANUAL
LCD DISPLAY
TD-P863 - TD-P863E
For information on warranties and service please visit www.toshiba.eu/services
Contents
Important Safety Information....2
When Using a Wall Bracket....7
Connecting to external equipment....7 Daisy Chain Connection via HDMI Output....9
Daisy Chain Connection via DisplayPort Output....9
Control Buttons on the Display....10
Turning the Display On/Off 11
Remote Control 12 First Time Installation 13
Media Playback via USB Input 13
CEC and CEC RC Passthrough....14
Display Menu Contents 15 Connectivity 20
Connectivity....20 Internet Browser....20
Internal USB Operations....21
OSD Rotation Support (*) 21
DisplayPort 21
Real Time Clock (RTC) 22
Controlling With An External PC....22
Video Wall Settings....23
Scheduler Settings 24
RS232 HEX COMMANDS....24 System Features....25
Notification 27
Trouble Shooting & Tips 28

Important Safety Information

CAUTION RISK OF ELECTRIC SHOCK DO NOT OPEN

CAUTION: TO REDUCE THE RISK OF ELECTRIC SHOCK DO NOT REMOVE COVER (OR BACK). NO USER-SERVICEABLE PARTS INSIDE. REFER SERVICING TO QUALIFIED SERVICE PERSONNEL
Please read these instructions fully and carefully before use and keep for future reference
WARNING: This device is intended to be used by persons (including children) who are capable / experienced of operating such a device unsupervised, unless they have been given supervision or instruction concerning the use of the device by a person responsible for their safety. • This product is for indoor use only.
- Use this product at an altitude of less than 2000 meters above the sea level and in dry locations and in regions with moderate or tropical climates.
- Please keep this manual for further use.
- Unplug your product before starting to clean. Do not clean the product when it is on. Do not use liquid or aerosol cleaners. Use a damp cloth for cleaning. If that does not help, please use LCD display cleansers. Do not apply the cleaner directly on the product.
• To prevent breakdown, do not use non-advised accessories. - Please do not place your product near wash basins, sinks, water pans, pools etc.
- Do not expose the product to dripping or splashing of liquids and do not place objects filled with liquids, such as vases, cups, etc. on or over the product (e.g., on shelves above the unit).
- Please leave at least 5 cm of free space between the product and walls or other furnitures for ventilation purposes.
-
That product can only be started by the defined power source on its rating plate. For further information, please contact with your dealer
-
Please place the product in a position that electric cables cannot be affected by the operations on the product.
• Follow all warnings and instructions marked on the product. - Follow the on screen instructions for operating the related features.
• To prevent the risk of fire or electric shock, please do not overuse the plugs and extension cords. Do not remove the back cover. If service is required contact the authorized service centre. - If you will not use the product for a long period of time, unplug the power cord from the mains.
- Put the product on a well-ventilated place and prevent from bright light, overheat and damp.
- The product should be kept in 0 C° - 40 C°. Otherwise, the appliance may be damaged permanently.
- Plug the appliance to a grounded outlet. Always use the grounded power cord supplied with your product. Manufacturer is not responsible for any damage caused unearthed usage.
- The socket-outlet shall be installed near the equipment and shall be easily accessible.
- Do not stay in contact with the parts of the product that become hot for long periods of time. Doing so may result in low-temperature burns.
- The LCD panel used in this product is made of glass. Therefore, it can break when the product is dropped or applied with impact. Be careful not to be injured by broken glass pieces in case the LCD panel breaks.
• Usage of the monitor must not be accompanied by fatal risks or dangers that, could lead directly to death, personal injury, severe physical damage or other loss, including nuclear reaction control in nuclear facility, medical life support system, and missile launch control in a weapon system. - Do not expose the product to direct sunlight or do not place open flames such as lit candles on the top of or near the product.
- Do not place any heat sources such as electric heaters, radiators, etc. near the product.
- In order to prevent a potential electrical shock, in extreme weather (storms, lightning) disconnect the product from the mains.
-
Do not touch the controls other than those described
-
Do not interfere on your products screen or any other surface with a sharp object.
- Do not keep your product in a humid environment.
- Do not keep your product in an extremely cold environment.
- Do not keep your product in an extremely hot environment.
- Do not place the product on the floor and inclined surfaces.
• To avoid danger of suffocation, keep plastic bags out of the reach of the babies, children and domestic animals.
Vent holes of the product
The vent holes are designed to provide the product to work constantly and prevent it from overheat. Do not block these openings in anyway. For the same reason, please do not place your product on beds, sofas, carpets and similar surfaces.
Never insert an object into the product through vents or openings. High voltage flows in the product, and inserting any objects in the vents or openings of the product may cause electric shock, short circuit of the internal parts and/or fire. For the same reason, do not spill water or liquid on the product.
Repair
Unless a basic implementation on the product is specified by the producers' technical department on a document, do not repair your product by yourself. Otherwise, your guarantee may get suspended and you may risk your health or your product. In case of need, consult your authorized service.
- When the cable is worn off or harmed.
- If the product has been dropped or the cabinet has been damaged.
- If the performance of the product is changed or the appliance needs to be repaired.
- When a liquid was spilled on the product or when objects have fallen into the product.
- When the product has been exposed to rain or water.
- When the product does not operate properly as described in the operating instructions.
Replacement parts
In case the product needs replacement parts, make sure that the service person uses replacement parts specified by the manufacturer, or those with the same
Safety checks
Upon completion of service or repair work, request the service technician to perform safety checks to ensure that the product is in proper operating condition.
Wall mounting
When mounting the product on a wall, be sure to install the product according to the method recommended by the manufacturer.
- Read the instructions before mounting the product on the wall.
- The wall mount kit is optional. You can obtain from your local dealer, if not supplied with the product.
- Do not install the product on a ceiling or on an inclined wall.
- Use the specified wall mounting screws and other accessories.
- Tighten the wall mounting screws firmly to prevent the product from fall. Do not over-tighten the screws.
Power Cord
- The power cord is used to disconnect the product from the mains and therefore it must remain readily operable. If the product is not disconnected electrically from the mains, the device will still draw power for all situations even if the product is in standby mode or switched off.
- Use only the power cord supplied with the monitor. - Do not damage the power cord nor place heavy objects on it, stretch it, over bend it or step on it. Also, do not add extension cords. Damage to the cord may result in fire or electric shock.
- When unplugging the appliance, always pull directly on the plug. Do not pull from the cable when unplugging the appliance.
- Do not use the power cord with a power tap. Adding an extension cord may lead to fire as a result of overheating.
- Do not remove or insert the power plug with wet hands. Doing so could result in electric shock.
- Unplug the power cord if it is not used for a long time. - Do not attempt to repair the power cord if it is broken or malfunctioning. When damaged it must be replaced, this should only be done by qualified personnel.
Especially for child safety
- Don't allow children to climb on or play with the
monitor where it cannot be pushed, pulled over, or knocked down.
- Care should be taken to route all cords and cables connected to the monitor so that they cannot be pulled or grabbed by curious children.
Connections
Be sure to turn off the main power switch and disconnect the plug from the power outlet before connecting/disconnecting cables. Also, read the manual of the equipment to be connected.
Be careful not to confuse the input terminal with the output terminal when connecting cables. Accidentally reversing cables connected to the input and output terminals may cause malfunctions and other problems.
Positioning
If a monitor is positioned in an unstable or inclined location, it can be potentially hazardous due to falling. Many injuries, particularly to children, can be avoided by taking simple pre-cautions such as:
• Using fixing devices like wall mount brackets recommended or supplied by the manufacturer.
• Educating children about the dangers of climbing on furniture to reach the monitor or its controls. If your existing product is being retained and relocated, the same considerations as above should be applied
Transport and Shipping
- Your device must be kept in its original package to protect from damage to its accessories during transport and shipping.
- Keep the product in normal position during transport.
- Do not drop the device during transport and protect it against impacts.
- Damages and faults that occur during transport after the delivery of the appliance to the customer are not included in the warranty cover.
- Product transportation, installation, repair and servicing must be done by qualified technical service personnel.
Intended Use
- This product is intended to be used in public places such as schools, offices, theatres, places of worship but are also suitable for household and similar general use.
other than mentioned in user manual additional requirements may be necessary.

CAUTION

Do not leave a static image displayed for prolonged period of time. If a static image is displayed continuously for a long period of time, that image may cause image sticking on the display. This condition is not permanent, but may require a considerable amount of operational display time to dissipate, depending upon the degree of image stick. 120 minutes of continuous motion display will eliminate most image sticking effects at normal room temperature (not lower than 10 C). As the nature of the TFT technology, you may see some amount of bright, dark, red, green and blue dots and sparklings on the screen, those do not affect the performance of the computer and are not accepted as a defect.

Warning
This product is defined as Class A and is intended for commercial/industrial use.
BATTERY SAFETY GUIDELINES
Used correctly, domestic batteries are a safe and dependable source of portable power. Problems can occur if they are misused or abused resulting in leakage or, in extreme cases, fire or explosion. Here are some simple guidelines to safe battery use designed to eliminate any such problems.
• Take care to fit your batteries correctly, observing the plus and minus marks on the battery and appliance. Incorrect fitting can cause leakage or, in extreme cases, fire or even an explosion.
- Replace the whole set of batteries at one time, taking care not to mix old and new batteries or batteries of different types, since this can result in leakage or, in extreme cases, fire or even an explosion.
- Store unused batteries in their packaging and away from metal objects which may cause a short-circuit resulting in leakage or, in extreme cases, fire or
- Never dispose of batteries in fire or with hazardous or flammable materials as this can cause them to explode. Please recycle dead batteries; do not put with the normal household waste.
- Never attempt to recharge ordinary batteries, either in a charger or by applying heat to them. They may leak, cause fire or even explode. There are special rechargeable batteries which are clearly marked as such.
• Supervise children if they are replacing batteries themselves in order to ensure these guidelines are followed. - Do not ingest the battery, Chemical Burn Hazard.
- This product or the accessories supplied with the product may contain a coin/button cell battery. If the coin/button cell battery is swallowed, it can cause severe internal burns in just 2 hours and can lead to death.
- Remember that small button cell batteries such as used in some hearing aids, toys, games and other appliances, are easily swallowed by young children and this can be dangerous.
- Keep new and used batteries away from children.
- Make sure battery compartments are secure. If the battery compartment does not close securely, stop using the product and keep it away from children.
- Seek immediate medical attention if you believe batteries might have been swallowed or placed inside any part of the body.
- If leaked battery fluid gets on your skin or clothing, rinse immediately and thoroughly. If it gets into your eye, bathe your eye well rather than rubbing and seek medical treatment immediately. Leaked battery fluid that gets into your eye or your clothing may cause a skin irritation or damage your eye.
CAUTION
RISK OF EXPLOSION IF BATTERY IS REPLACED BY AN INCORRECT TYPE. DISPOSE OF USED BATTERIES ACCORDING TO THE INSTRUCTIONS.
Markings on the Product
The following symbols are used on the product as a marker for restrictions and precautions and safety instructions. Each explanation shall be considered where the product bears related marking only. Note
connection to electrical earth, the earth connection is used for functional purposes.
Protective Earth Connection: The marked terminal is intended for connection of the protective earthing conductor associated with the supply wiring.
Hazardous Live Terminal: The marked terminal(s) is/are hazardous live under normal operating conditions.
Caution, See Operating Instructions: The marked area(s) contain(s) user replaceable coin or button cell batteries.
Any issues which are caused by customer mis-adjustment of any software including the operating system are not covered by the warranty.
Depending on the model you buy, the actual appearance of the product may differ from the images used in this manual.
ABOVE ALL - NEVER let anyone, especially children, push or hit the screen, push anything into holes, slots or any other openings in the case.
WARNING - Excessive sound pressure from earphones or headphones can cause hearing loss.
Using the special functions to change the size of the displayed image (i.e., changing the height / width ratio) for the purposes display or commercial gain may infringe on copyright laws.
Exclusion Clause
Toshiba shall under no circumstances be liable for loss and/or damage to the product caused by:
i) fire;
ii) earthquake;
iii) accidental damage;
iv) intentional misuse of the product;
v) use of the product in improper conditions;vi) loss and/or damage caused to the product whilst in the possession of a third party;
vii) any damage or loss caused as a result of the owner's failure and/or neglect to follow the instructions set out in the owner's manual;
but not limited to the following, loss of profit, interruption of business, the loss of recorded data whether caused during normal operation or misuse of the product.
UK Power Cord Warning
In UK, use BS-approved power cord with molded plug having a black (10A) fuse installed for use with this monitor.
Children Warning
CAUTION: Do not let children swallow any small parts included on or with the product or play the plastic bag. Keep the small parts and the plastic bag out of the reach of children.
Additional Safety Precautions
CAUTION: If the monitor is dropped and the cabinet or enclosure surface has been damaged or the monitor does not operate normally, take the following precautions.
- ALWAYS turn off the monitor and unplug the power cord to avoid possible electric shock or fire.
- NEVER allow your body to come in contact with any broken glass or liquid from the damaged monitor. The LCD panel inside the monitor contains glass and a toxic liquid. If the liquid comes in contact with your mouth or eyes, or your skin is cut by broken glass, rinse the affected area thoroughly with water and contact your doctor immediately.
- ALWAYS contact a service technician to inspect the monitor any time it has been damaged or dropped.
Avoiding Image Retention
Caution: Do not display static (non-moving) content on the display for long periods of time.
This may cause image "burn-in" or image retention, which is not covered under warranty.
Avoid Static Content
- Display dynamic (moving) images whenever possible.
-Turn off the display when not in use, or use the schedule feature to automatically turn off the display at preset times.
Moving the Display:
Moving the display requires at least four people. Attempting to move the display with one person may result in dropping the display and/or serious injury.
However, we strongly recommend using a pallet or trolley to move or carry the shipping carton.
Carrying the display
This display is heavy; please follow proper lifting technique, as pictured below. Failure to do so may cause injury.

Vesa Wall Mount Measurements
| Hole Pattern Sizes (mm) | W | H |
| 600 400 | ||
| Screw Sizes | ||
| Length (X) | min. (mm) 15 | |
| max. (mm) 20 | ||
| Thread (Y) M8 | ||
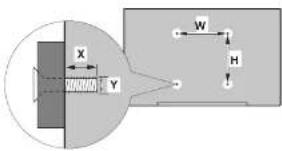
When Using a Wall Bracket
Please use a wall bracket appropriate for the size and weight of the LCD display and two people are required for the installation.
(1) Unplug and remove any cables and/or other component connectors from the rear of the LCD display.
(2) Carefully lay the front of the unit face down on a flat, cushioned surface such as a quint or blanket. (3) Follow the instructions provided with your wall bracket. Before proceeding, make sure the appropriate bracket(s) are attached to the wall and the back of the display as described in the instructions provided with the wall bracket.
Do not install the product on a ceiling or inclined Wall.
WARNING: If you decide to wall mount this display, always use a mounting bracket that has been listed by an independent laboratory (such as UL, CSA, ETL) and is appropriate for the size and weight of this display. The use of in appropriate omon-listed mounting brackets could result in serious bodily injury and/or property damage.
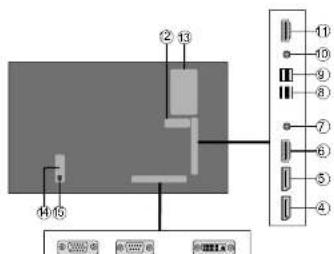
Connecting to external equipment
Rear Side (1)
- VGA
- Serial Communication Port
- DVI
- Display Port Input
- Display Port Output
- HDMI In
- Headphone
- USB (2.0)
- USB (3.0)
- IR Input (IR receiver / LED cable supplied)
- HDMI Out
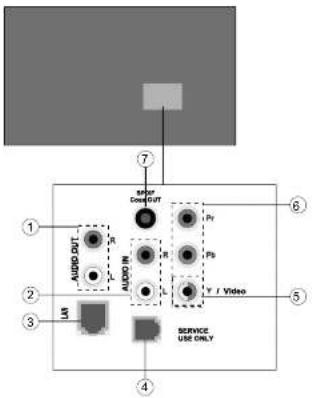
Rear Side (2)
- Audio Out
- Audio In
- Ethernet
- RJ12 (service use only)
- Video In
- YPbPr
- SPDIF Coaxial Out
Daisy Chain Connection via HDMI Output
![graph TD A["DISPLAY 1"] -->|HDMI In| B["+"] C["DISPLAY 2"] -->|HDMI Out| D["+"] E["DISPLAY 3"] --> F["+"] G["DISPLAY 4"] --> H["+"] I["HDMI Cable"] --> J["+"] style A fill:#f9f,stroke:#333 style C fill:#f9f,stroke:#333 style E fill:#f9f,stroke:#333 style G fill:#f9f,stroke:#333 style I fill:#f9f,str…](/content/2026/05/926277/images/d2039ccc7b1cab1f594018cf4daf3441ccc1e4ac214a5605b53f946b13ef3770.jpg)
• Maximum Connection w/HDCP: 7
• Maximum Connection wo/HDCP: No limit
Daisy Chain Connection via DisplayPort Output
![graph TD A["DISPLAY 1"] --> B["DisplayPort In"] A --> C["DisplayPort Out"] D["DISPLAY 2"] --> E["DisplayPort In"] D --> F["DisplayPort Out"] G["DISPLAY 3"] --> H["DisplayPort In"] G --> I["DisplayPort Out"] J["DISPLAY 4"] --> K["DisplayPort In"] J --> L["DisplayPort Out"]](/content/2026/05/926277/images/c821d23f1b6db7f851c82adb2804001cf5e17d86c93bce291be99757e5fb9c39.jpg)
HOT (Mol. Acesa-Tococcal) can be used for FID and use Udo-3Well as a solution
Control Buttons on the Display
To turn on the Display: Press the centre of the joystick in, the Display will turn on.
To turn the Display off: Press the centre of the joystick in and hold it down for a few seconds, the Display will turn into standby mode.
To change source: Press the centre of the joystick in, the sources list will appear on the screen. Scroll through the available sources by pushing the joystick up or down.
To change volume: Increase the volume by pushing the joystick right. Decrease the volume by pushing the joystick left.

Note: Main menu OSD cannot be displayed via joystick.
Connecting the IR Receiver
Before plugging the Display into the mains supply, connect the supplied IR receiver to the IR input on the Display. Place the IR receiver in sight of your own remote control. Simply operate your remote control whilst pointed at the IR receiver and it will relay the control signal to your Display.

Turning the Display On/Off
Press the Standby button on the remote or press the centre of the joystick in located on rear left side of the Display to switch it on from standby. Press the centre of the joystick in and hold it down for a few seconds or press the Standby button on the remote to switch display into standby mode.

| LED Status Status of the monitor | |
| Power led not lit Power on | |
| Power led lit Power off (Standby mode) | |
| Power led flashing (Slow) Scheduler active | |
| Power LED flashing (Fast) Power up / down and Sw update | |
Remote Control

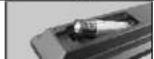
Inserting the Batteries into the Remote
Remove the screw that secure the battery compartment cover on the back side of the remote control first. Lift the cavity. Insert two AAA batteries. Make sure the (+) and (-) signs match (observe correct polarity). Place the cover back on. Then screw the cover back on again.

-
Standby: Switches On / Off the Display
-
Numeric buttons: Enters a number or a letter in the text box on the screen.
-
Signage: Displays Signage Settings menu
-
Volume +/-: Increases or decreases the volume
-
CMS: Opens the predefined Start url (in Signage Settings>Link options menu). Press and hold 3 seconds to open the predefined Settings url (in Signage Settings>Link options menu).
-
Menu: Displays the main menu
-
Directional buttons: Helps navigate menus, content etc.
-
Exit: Closes and exits from displayed menus or returns to previous screen
-
Network: Displays Network/Internet Settings menu
-
Sound: Displays Sound Settings menu
-
Coloured Buttons: Follow the on-screen instructions for coloured button functions
-
Picture Mode: Cycles between picture modes
-
Rapid reverse: Moves frames backwards in media such as movies
-
Pause: Pauses the media being played
-
Media browser: Opens the media browsing screen
-
Play: Starts to play selected media
-
Stop: Stops the media being played
-
Rapid advance: Moves frames forward in media such as movies
-
No function
-
Info: Displays information about on-screen content
-
Video Wall: Displays Video Wall Settings menu
-
Picture: Displays Picture Settings menu
-
Internet: Opens the predefined Open browser initial page (in Signage Settings>Link options menu).
-
Wireless Display: Opens the wireless display connection screen
-
Back/Return: Returns to previous screen
-
OK: Confirms user selections
-
Quick Menu: Displays a list of menus for quick access
-
No function
-
Mute: Completely turns off the volume of the Display
-
Screen: Changes the aspect ratio of the screen
-
Source: Shows all available content sources
First Time Installation
When turned on for the first time, the language selection screen will be displayed. Select the desired language and press OK.
On the next screen, set your country preference and press OK to continue.
You will be asked to set and confirm a PIN at this point. For some Country options, the PIN cannot be set to 0000, in this case you need to enter another 4-digit number combination.
The Signage Settings menu will be displayed next. Set ID, OSD Orientation, Auto software update options can be configured using this menu. Model name, Serial number and Software version options are for information only. They will be grayed out and not selectable. Please note this information as it will be required if contacting Toshiba regarding your monitor refer to the Signage Settings Menu Contents section for more information on the options of this menu. While this menu is displayed on the screen you can copy database files from a connected USB device to the Display by pressing the Yellow button. You can also save the model information data of the Display to a connected USB device by pressing the Blue button. After the settings are completed press OK to continue.
(*) This option may not appear depending on the model. On the next screen, the Network/Internet Settings menu will be displayed. Please refer to Connectivity section to configure a wired or a wireless connection. After the settings are completed press OK button to continue.
The First Time Installation is completed.
To repeat this process and reset the Display's settings to the factory defaults enter the Signage Settings menu, highlight First time installation and press OK. You will be asked to enter the PIN that you have defined in the First Time Installation. If the correct PIN is entered a confirmation message will be displayed asking whether you want to delete all settings and reset the Display. Select Yes and press OK to confirm. Note: Do not turn off the Display while initializing first time installation. Note that, some options may not be available depending on the country selection.
Media Playback via USB Input
If internal USB device is inserted and external device is also
(e.g. MP3 Players) or USB hard disk drives/memory sticks may not be compatible with this Display. The Display supports FAT32 and NTFS disk formatting.
Wait a little while before each plugging and unplugging as the player may still be reading files. Failure to do so may cause physical damage to the USB player and the USB device itself. Do not pull out your drive while playing a file.
You can use USB hubs with your Display's USB inputs. External power supplied USB hubs are recommended in such a case.
It is recommended to use the Display's USB input/s directly, if you are going to connect a USB hard disk. Note: When viewing image files the Media Browser menu can only display 1000 image files stored on the connected USB device.
Media Browser Menu
You can play photo, music and movie files stored on a USB disk by connecting it to your Display. Connect a USB disk to one of the USB inputs located on the side of the Display. Pressing the Menu button while in the Media Browser mode will access the Picture, Sound and Settings menu options. Pressing the Menu button again will exit from this screen. You can set your Media Browser preferences by using the Settings menu.
Loop/Shuffle Mode Operation
| Start playback with the Play button and activate | All files in the list will be continuously played in original order |
| Start playback with the OK button and activate | The same file will be played continuously (repeat) |
| Start playback with the Play button and activate | All files in the list will be played once in random order |
| Start playback with the Play button and activate | All files in the list will be continuously played in the same random order. |
USB Auto Play Feature
Note: USB autoplay function will only operate from AC cycle or if Quick standby is disabled c .
USB AutoPlay feature is to start playing the media content in removable device, automatically. It uses the Media Browser. The media content types have different priorities in order to be played. The reducing priority order is as Photo, Video and Audio. That means, if there is Photo content in the root directory of the removable device, MediaBrowser will play the
This feature will only work if all of the following circumstances occur:
• The USB device is plugged in.
- Auto Play option is enabled. It is placed in the Media Player>Settings menu.
Failover Feature
If No Signal option in the Signage Settings > controls menu menu is set as Failover the TV checks the connected USB device for available files to play. If no playable files are available or there is no USB device connected to the Display, the No Signal image will be displayed and the Display will turn itself off after a period of 5 minutes. If there isn't any No Sign Image available, No Signal OSD will be displayed on the screen and the Display will turn itself off after a period of 5 minutes.
Note: The setting of the Auto Play option in the Media Player>Settings menu is not important, in Failover mode it will function anyway.
CEC and CEC RC Passthrough
This function allows to control the CEC-enabled devices, that are connected through HDMI ports by using the remote control of the Display.
The CEC option in the System>Settings>More menu should be set as Enabled at first. Press the Source button and select the HDMI input of the connected CEC device from the Sources List menu. When new CEC source device is connected, it will be listed in source menu with its own name instead of the connected HDMI ports name(such as DVD Player Recorder 1 etc.).
The Display remote is automatically able to perform the main functions after the connected HDMI source has been selected.
To terminate this operation and control the Display via the remote again, press the Quick Menu button on the remote if available, highlight the CEC RC Passthrough and set as Off by pressing Left or Right button. If the Quick Menu button is not available press and hold the "0-Zero" button on the remote control for 3 seconds. This feature(CEC) can also be enabled or disabled under the System>Settings>More menu.
The Display supports also ARC(Audio Return Channel) feature. This feature is an audio link meant to replace other cables between the Display and the audio system (A/V receiver or speaker system).
case volume control keys are directed to connected audio device.
Note: ARC is supported only via the HDMI1 input.
System Audio Control
Allows an Audio Amplifier/Receiver to be used with the Display. The volume can be controlled using the remote control of the Display. To activate this feature set the Speakers option in the System>Settings>More menu as Amplifier. The Display speakers will be muted and the sound of the watched source will be provided from the connected sound system.
Note: The audio device should support System Audio Control feature and CEC option should be set as Enabled.
Display Menu Contents
| System - Picture Menu Contents | |
| Mode | You can change the picture mode to suit your preference or requirements. Picture mode can be set to one of these options: Text, Game, Sports, Signage and Natural. Signage mode has been developed to enhance Dynamic contrast, colors and sharpness levels. |
| Contrast | Adjusts the light and dark values on the screen. |
| Brightness | Adjusts the brightness values on the screen. |
| Sharpness | Sets the sharpness value for the objects displayed on the screen. |
| Colour | Sets the colour value, adjusting the colours. |
| Energy Saving | For setting the Energy Saving to Custom. Minimum, Medium, Maximum, Auto. Screen Off or Off. Note: Available options may differ depending on the selected Mode. |
| Backlight | This setting controls the backlight level. The backlight function will be inactive if the Energy Saving is set to an option other than Custom. |
| Advanced Settings | |
| Dynamic Contrast | You can change the dynamic contrast ratio to desired value. |
| Noise Reduction | If the signal is weak and the picture is noisy, use the Noise Reduction setting to reduce the amount of noise. |
| Colour Temp | Sets the desired colour temperature value. Cool, Normal and Warm options are available. Cool (1300K), Normal (930K), Warm (850K), Cool and Normal modes have a gamma setting of 2.2, warm mode has a gamma setting of 2.4. |
| Picture Zoom | Sets the desired image size format * |
| Film Mode | Films are recorded at a different number of frames per second. Turn this feature on when you are watching films to see the fast motion scenes clearly. |
| HDMI Full Range | While watching from a HDMI source, this feature will be visible. You can use this feature to enhance backness in the picture. Enabled = 0-255. Disabled = 0-235 |
| RGB Gain | Adjust the strength of the red, green and blue colors. To enable fine adjustment of White balance. |
| PC Position | Appears only when the input source is set to VGA/PC. |
| Autoposition | Automatically optimizes the display. Press OK to optimize. |
| H Position | This item shifts the image horizontally to the right hand side or left hand side of the screen. |
| V Position | This item shifts the image vertically towards the top or bottom of the screen. |
| Dot Clock | Dot Clock adjustments correct the interference that appear as vertical bending in dot intensive presentations like spreadsheets or paragraphs or text in smaller fonts. |
| Phase | Depending on the input source/computer etc.) you may see a lazy or noisy picture on the screen. You can use phase to get a clearer picture by trial and error. |
| Reset | Resets the picture settings to factory default settings (exempt Game mode). |
* Note: If you use the picture zoom function (changing the aspect ratio of the transferred image) to change the screen size for the purpose to be viewed in public in cafes and hotels, etc., it may violate the copyright which is protected by copyright law.
| System - Sound Menu Contents | |
| Volume | Adjusts the volume level. |
| Equalizer | Selects the equalizer mode. Custom settings can be made only when in User mode. |
| Balance | Adjusts whether the sound comes from the left or right speaker. |
| Headphone | Sets headphone volume.Please ensure before using headphones that the headphone volume is set to a low level, to prevent damage to your hearing. Only available if Headponerlineout is set to headphone. |
| AVL (Automatic Volume Limiting) | Sets the sound to obtain fixed output level between sources. |
| Headphone/Lineout | When you connect an external amplifier to your Display using the headphone jack, you can select this option as Lineout. If you have connected headphones to the Display, set this option as Headphone.Please ensure before using headphones that this menu item is set to Headphone.If it is set to Lineout, the output from the headphone socket will be set to maximum which could damage your hearing. |
| Digital Out | Sets digital out audio type. PCM or Compressed |
| Bass Gain | Controls the bass gain level. Use Left or Right button to set.Note: This feature may not be available depending on the model of your unit. |
| System - Settings Menu Contents | |
| Language | Sets the OSD menu language preference. |
| Date/Time | Sets date and time. |
| Sources | Enables or disables selected source options. |
| Network/Internet Settings | Displays network/internet settings. |
| More | Displays other setting options of the Display. |
| Menu Timeout | Changes timeout duration for menu screens. |
| Standby LED | Enables or disables the functionality of the standby led. If disabled the led will not function. |
| Software upgrade | Ensures that your Display has the latest firmware. Press OK to see the menu options. |
| Application Version | Displays current software version. |
| Auto Display OFF | Sets the desired time for the Display to automatically go into standby mode when not being operated. |
| Audio Video Sharing | Audio Video Sharing feature allows you to share files stored on your smartphone or tablet pc. If you have a compatible smartphone or tablet pc and the appropriate software is installed, you can share/pay photos on your Display. See instructions of your sharing software for more information. |
| Video Wall Settings | Press OK to open the Video Wall Settings menu screen. Row Count, Column Count, Cell and Offset options are available. |
| Speakers | To hear the Display audio from the connected compatible audio device set as Amplifier. You can use the remote control of the Display to control the volume of the audio device. |
| DP Stream Setting (*) | Sets the DisplayPort stream type. MST and SST options are available. (*) This menu item appears only when the input source is set to DP. |
| Signage Settings Menu Contents | ||
| Device Info | ||
| Set ID | Sets the device ID. You can select a value between 0-100 using the numeric buttons on the remote in order to identify your Display. | |
| Software upgrade | Displays current software version. Press OK to see the Upgrade options menu. You can use these options to start a manual search for software updates and set your automatic scan preference. | |
| Serial number | Displays serial number of the unit. (Cannot be changed by user) | |
| Model name | Displays serial number of the unit. (Cannot be changed by user) | |
| Save model information | Copies the model information data of the unit to a connected USB device. This information will be required is you contact Toshiba about your monitor | |
| Display Life Time | Displays the duration of life of the unit. | |
| Controls | |
| OSD Orientation | Sets the OSD (On Screen Display) rotation of your Display. Landscape and Portrait options are available. |
| Pixel shift | Enables or disables pixel shifting. This option can be used to avoid image retention (after image effects) that can occur when displaying fixed patterns or still images for a long periods of time. If enabled, the picture and OSD (On-Screen Display) will be shifted at specified time intervals. |
| No Signal | Sets the behavior preference of the Display, when no signal is detected from the currently set input source. Failover and Input Search options are available.If Failover is selected the Display checks the connected USB device for available files to play. If no playable files are available or there is no USB device connected to the Display the No Signal Image will be displayed. If there isn't any No Signal Image available. No Signal OSD will be displayed on the screen. The setting of the Auto Play option in the Media Browser>Settings menu is not important, In Failover mode it will function anyway.If Input Search is selected the Display will search all available input sources consecutively to find signal. If no signal is detected from other available sources, No Signal OSD will be displayed and the Display will turn itself off after a period of 30 seconds.Note: To set no signal image see USB operation command list. |
| No Signal Delay | Sets a delay value to the 'No Signal' preferences when the Display is in No Signal state. After the set delay time is expired 'No Signal' preferences will be applied. |
| No signal Power off | When enabled the Display will turn itself off after a period of 5 minutes, if no signal is received from the selected source.This feature will only work if all of the following circumstances occur:- No Signal option is set as Failover.- USB device is not connected to the Display / USB device is connected but there are no playable files installed in the USB device. |
Panel Lock | Sel as Off to prohibit the use of the buttons on the Display
| UART 0 | Select ASCII/HEX protocol for UART 0. Default value is ASCII. There is no need to restart the Display after selection in order to work with the protocols correctly. If the selection is changed, the latest selected protocol will be preserved and started when the Display is booted up.Also note that HEX protocol will work with the baud rate value 19200 for UART0 |
| UART 1 | Select ASCII/HEX protocol for UART 1. Default value is HEX. There is no need to restart the Display after selection in order to work with the protocols correctly. If the selection is changed, the latest selected protocol will be preserved and started when the Display is booted up.Also note that HEX protocol will work with the baud rate value 9600 for UART1 |
| Power Up Settings | |
| Power Up Mode | Configures the power up mode preference. Last State, Always On and Standby options are available. |
| Quick Standy | If this feature is enabled the Display can be turned on again with the RS232 and Lan commands if it is turned off through it. Press Left or Right button to enable or disable the feature. Enable if you wish to use the scheduler function. |
| Power on Delay | Sets a delay value at power on. This value can be set from 0 to 2000 ms in steps of 100 ms. The Display will turn on after the set delay time is expired. In certain installations of more than one monitor, if all monitors power on at the same time, the installation rush current could trip the installation supply. Using this function, set each monitor to a different power on time. |
| Auto Launch | Configures the auto launch preference. CMS(Start url). Open Browser(Open Browser Initial page) and Disabled options are available. |
| Boot Up Picture Mode | Configures the picture mode preference at power on. If set as Off the last set picture mode will be used at power on. |
| HDMI1 Wake Up Enabled | If this option is set as Enabled, the display will turn on with the HDMI input source. You can disable this option by setting as Disabled. Note, for this function to work the HDMI source must start/stop communication with the monitor, this function does not work by monitoring video content alone.If any Scheduler is set or an OPS unit is connected to the Display, this option will be inactive and can not be set as Enabled. |
| SB | |
| Clone to USB | Copies the database files from the unit to a connected USB device. |
| Clone from USB | Copies the database files from a connected USB device to the unit. |
| Internal USB operations | Copies files from internal USB to the unit. Only available when internal USB device is connected. |
| Copy app cache from USB | Copies app cache data from a connected USB device to the unit.Note: This features may not be available depending on the model of your unit. |
| USB Information | Press OK to open the USB information menu screen. Current Total space and Free space informations of the connected USB device will be displayed. You can also format the connected USB device using the Format Disk option in this menu (FAT32 format only). |
| USB operations | Highlight and press OK to perform USB operations. See separate USB operations command list for available functions available on your monitor. |
Set as Off to disable the USB ports on the Display. You can also set this option as 5V
| OPS Settings | Press OK to open the OPS Settings menu screen. Three sub-menu options are available.OPS Information: Displays read-only information about the OPS unit, if supported.OPS Status: Displays whether the OPS module is on or off. Allows the change of status via soft PSON signal (0.5s)Powerdown: Turns the OPS off via hard PSON signal (5s)Note: This menu will not be available if OPS is not supported or not connected to the unit. | |
| Scheduler Settings | Press OK to open the Scheduler Settings menu screen. You can set up to 4 different schedulers. Highlight the Status column of the desired scheduler option and set as Enabled by using the Left/Right directional buttons after pressing the OK button. Using the scheduler options you can set the unit to turn on automatically at defined time intervals with the defined input source setting. If the Source option is set as Last Source, the input source will not be changed at the power-up." to "If the Source option is set as Last Source, the input source will not be changed at the power-up. If CMS or Open browser is selected in the Auto launch menu, then the selected function will start | |
| Link options | Press OK to open the Link Options menu screen. Current Start url and Settings url links will be displayed. These items are for information only and not selectable and can only be changed by USB operation command and RS232. See USB operation and RS232 command list Open browser initial page and NTP server link preferences can be configured using the remote control or RS232. The display clock function will only operate if an NTP server is used. To ensure correct operation, please change the NTP server to one that is more suitable for the location where the display is to be used.Note: Start URL and Settings URL availability is depending on model. | |
| Volume Settings Press OK to see available menu options. | ||
| Reset to Default Values | Highlight this option and press the OK button on the remote to return the Display to default settings. | |
| First time installation | Highlight and press OK to perform First Time Installation and reset all settings to factory settings. You will need to enter the correct PIN to carry out this operation.Note: Enter the PW you have defined during the First Time Installation process.If you have forgotten the pin user, please contact Toshiba service center. | |
Connectivity
To configure wired or wireless settings please refer to the Network/Internet Settings section in the System>Settings menu.
Wired Connectivity
To Connect to a Wired Network
- You must have a modem/router connected to an active broadband connection.
- Connect your Display to your modem/router via an ethernet cable. There is a LAN port at the rear (back of your Display.
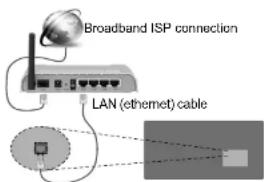
LAN input on the rear side of the Display
Configuring Wired Device Settings Network Type
The Network Type can be selected as Wired Device, Wireless Device or Disabled, in accordance with the active connection to the Display. Select this as Wired Device if you are connecting via an ethernet.
Internet Speed Test
Highlight Internet Speed Test and press the OK button. Display will check the internet connection bandwidth and display the result when complete.
Advanced Settings
Highlight Advanced Settings and press the OK button. On the next screen you can change the IP and DNS settings of the Display. Highlight the desired one and press Left or Right button to change the setting from Automatic to Manual. Now you can enter the Manual IP and / or Manual DNS values. Select the related item in the drop down menu and enter the
them more convenient to use on a home network. This standard allows you to view and play photos, music and videos stored on your media server connected to your home network.
1. Connect to a Wired or Wireless Network
See the Wired/Wireless Connectivity chapters for detailed configuration information.
2. Play Shared Files via Media Browser
Select Media Browser by using the directional buttons from the main menu and press OK. The media browser will then be displayed.
Audio Video Sharing
Select the desired media type on the main media browser menu and press OK. If sharing configurations are set properly, Device Selection screen will be displayed after selecting the desired media type. If available networks are found, they will be listed on this screen. Select media server or network that you want to connect to using the Up or Down buttons and press OK. If you want to refresh the device list, press the Green button. You can press Menu to exit.
If you select the media type as Videos and choose a device from the selection menu. Then select the folder with video files in it on the next screen and all the available video files will be listed.
To play other media types from this screen, you can go back to main Media Browser screen and select the media type as desired and then perform the network selection again. Or press the Blue button to switch to next media type quickly without changing the network. Refer to the Media Browser menu section for further information on file playback.
If a problem occurs with the network, please switch your display off at the wall socket and back on again. Trick mode and jump are not supported with the Audio Video Sharing feature.
PC/HDD/Media Player or any other devices that are compatible should be used with a wired connection for higher playback quality.
Use a LAN connection for quicker file sharing between other devices like computers.
Note: There may be some PC's which may not be able to utilize the Audio Video Sharing feature due to administrator and security settings (such as business PC's).
Internet Browser
be displayed as Speed Dial options along with the Edit Speed Dial and the Add to Speed Dial options.
You can press the Internet button on the remote to open the initial internet browser page. If the Open browser initial page URL in the Signage Settings>Link Options menu is defined, the browser will open on this page. Otherwise this button will not be functional.
To navigate the web browser, use the directional buttons on the remote or a connected mouse. To see the browser options bar, move the cursor to the top of the page. History, Tabs and Bookmarks options and the browser bar which contains previous/next buttons, the refresh button, the adress/search bar, the Speed Dial and the Browser buttons are available.
To add a desired website to the Speed Dial list for quick access, move the cursor to the top of the page. The browser bar will appear. Highlight the Speed Dial
- button and press the OK button. Then select Add to Speed Dial option and press the OK button. Fill in the blanks for Name and Address, highlight OK and press the OK button to add. Whilst you are on the site you wish to add to the Speed Dial list, highlight the Browser button and press the OK button. Then highlight Add to Speed Dial option in the submenu and press the OK button again. Name and Address will be filled automatically according to the site you are visiting. Highlight OK and press the OK button to add.
You can also use the menu options to manage the browser. Highlight the button and press the OK button to see available page specific and general options. There are various ways to search or visit websites using the web browser.
Enter the address of a website(URL) into the search/address bar and highlight the Submit button on the virtual keyboard and press the OK button to visit the site.
Enter keyword/s into the search/address bar and highlight the Submit button on the virtual keyboard and press the OK button to start a search for the related websites.
Highlight a Speed Dial thumbnail and press the OK button to visit the related website.
Your Display is compatible with USB keyboard/mice. Plug your device into the USB input of your Display for easier and quicker navigation.
Some web pages include flash content. These are not supported by the browser.
Internal USB Operations
Your Display has an internal memory. There are 4 operations available that can be performed with the internal memory: Copy From USB, Copy To USB, Delete and Format Disk (FAT32 only).
These options can be found in the Signage Settings>Internal USB operations menu.
The internal memory of your Display has a default folder named "int_usb" in the root directory. All Copy From/To USB operations are performed using this folder. If you want to copy data from an external USB storage device to the internal memory of your Display, this/these data file/s should be installed in a folder named "copy_to_int_usb" in the root directory of the external USB storage device. If you want to copy data from the internal memory of your Display to an external USB storage device, a folder named "copy_from_int_usb" should be created in the root directory of the external USB storage device.
Copy From/To USB operations will only be available if a USB storage device is connected to your Display. Delete and Format Disk options will be still functional, even if no USB storage device is connected. The default "int_usb" folder in the root directory of the internal memory will be automatically recreated after each time Delete and Format Disk operations are performed.
OSD Rotation Support (*)
You can change the OSD (On Screen Display) rotation of your Display if desired. While performing First time installation set the OSD Orientation option as desired when the Signage Settings menu is displayed. You can also change this setting later from the Signage Settings>Controls menu. Available options are: Landscape and Portrait.
(*) This feature may not be available depending on the model of your Display
Note: This function does not change the orientation of the video content.
DisplayPort
DisplayPort version 1.2 is supported via the DisplayPort input and output connectors on your Display.
DP Stream Setting option in the System>Settings>More menu is set as MST(Multi-Stream Transport) by default. If a MST compliant source device is
a splitter. In this case, same image will be displayed in all connected Displays.
To be able to stream the same image to all connected Displays using a MST compliant device, DP Stream Setting option in the System>Settings>More menu should be set as SST.
The maximum amount of the Displays that can be connected by using daisy-chaining function may differ depending on the source device's capacity. The image that will be displayed in all Displays will be defined by the source device. For example, to be able to stream 4 different FHD images, the source device should be capable of supporting this operation.
Note: It is recommended to use a DisplayPort certified cable for connection. In SST operation mode the total amount of the Displays is limited (a maximum of 7 units) due to HDCP encryption. If the signal is stable and there is no cable loss, there will be no limitation in case the source content is not HDCP-encrypted. For proper operation in MST operation mode makes sure your source device is MST compliant. If your source device is a computer check the specifications of its graphic card to ensure MST compatibility.
HDMI Out
The HDMI2 port located on the rear left side of the Display functions as an output port (upper HDMI port). This port will not function as an input, thus no source devices should be connected to this port. Only the content received from the HDMI1 input port located also on the rear left side of the Display (lower HDMI port) can be outputted from this port. The contents received from other inputs, such as VGA, DVI or Display Port, OPS, browser and USB to this list of inputs can not be outputted. This is a default function and you can not disable/enable through any menu option. HDMI output port will always function if a source device is connected to the HDMI input.
Real Time Clock (RTC)
Your Display has an RTC. It is used to maintain the real date and time information for a period of time if the energy supply is interrupted by separating the Display from the mains or by a power blackout. In this case the Display will use the date and time information stored in RTC.
- All time sources are able to override RTC date/time.
- Display tries to connect to the NTP server periodically (6 hours after last update) to get the current date and time information. If the Display successfully
external power source, RTC is able to function for a minimum of 14 days.
- If RTC is used as time source, manual date-time set is enabled from Date/Time option in the System>Settings menu.
Note : If selling the time without an NTP sever set, local time should be used. Summer / Winter time correction will be automatic.
Controlling With An External PC

You can control the product from an external PC via RS-232 (COM port or LAN(Ethernet port)) on the PC. For instance, system source can be changed by RS-232 from remote computer. When a command is sent from the PC to the product, the product operates according to the received command and sends a response message to the PC.
- Installed program on remote PC to send commands: In general, the RS-232 commands are sent for operating the implemented functions via serial port and utility a suitable utility can be used such as described below.
Connecting to the Display LAN port
Download and install the PuTTY software from the following link first: http://www.putty.org/.
Run the software and enter the Display's IP address in the field Host Name. Enter "1986" as a default value in the field Port. Then select "Telnet" as Connection type and click the Open button.
Note: Refer to the Connectivity section of this manual for information on connecting the Display to a network and displaying the IP address of the Display.
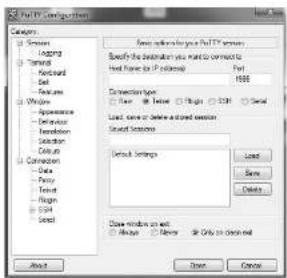
Use the commands in the RS232 Command Table which can be found on Toshiba website. For example, if "GETVOLUME" command is entered current volume level should be displayed on the putty window as shown in the pictures below.


The last example
When "GETSOURCE" command is entered, current source should be displayed on the putty window as shown in the picture below.

Connecting to the Display (RS232 port)
Run the software and select Serial as Connection Type. Enter the Display's serial port in the field Serial Line (in the following example it is COM4) and "115200" in the field Speed. Then click the Open button.

Video Wall Settings
Press the Menu button and enter the Video Wall Settings menu under the System>Settings>More or Signage Settings menu. Row Count, Column Count, Cell and Offset options are available.
Row count: Adjust the desired number of Video Wall "rows" by pressing Left/Right directional buttons. The maximum number that can be set is 10. Column count: Adjust the desired number of VideoWall "columns" by pressing Left/Right directional buttons. The maximum number that can be set is 10
maximum number that can be set is 50. For example, For a 2x3 video wall matrix, Row count option should be set as 2 and Column count option should be set as 3. Number of cells in a video wall matrix will be determined as shown in the template below. If you are setting the Display, which is positioned same as the Display with the number 1 in this template, then the Cell option should be set as 1 for this Display. In order to display the image in full-screen on a Display, the Cell option should be set as 0.
| 1 | 2 | 3 |
| 4 | 5 | 6 |
Scheduler Settings
Press the Menu button and enter the Signage Settings>Scheduler Settings menu. You can set up to 4 different schedulers. Highlight the Status column of the desired scheduler option and set as Enabled by using the Left/Right directional buttons after pressing the OK button. Using the scheduler options you can set the unit to turn on automatically at defined time intervals with the defined input source selling. If the Source option is set as Last Source, the Input source will not be changed at the power-up. If CMS or Open browser is selected in the Auto launch menu, then the selected function will start.
RS232 HEX COMMANDS
Protocol Test Steps
RJ12 and DSUB9 both are connected to UART
- UART 1 is connected to the OPS module for sending OPS to monitor commands. UART 1 is not reachable via the external RS232 or LAN port.
a. Enter Signage Settings Menu.
b. Change ASCII option to HEX in UART 0 or UART 1 sub-menu item
c. Where UART0 is the external RS232 port and UART1 is the OPS UART.
- Open any serial port communications program. Configure serial communication settings as below:
Baud Rate : 19200 for UART0, 9600 for
UART
Parity : None
Data Bits : 8
Stop Bits : 1
Handshake : None
- Note that UART0 default value: ASCII, UART1 default value: HEX
Note: If command send is successful, a ACK reply of 06 will be received.
Error Responses
- NAK reply: 15
When the display cannot understand the received command, it returns this value. In such a case, check the sending code and send the same command again.
- Error reply: 1C 00 00
When the display cannot execute the received command for any reasons, it returns this value. In such a case, check the sending code and the setting status of the display.
System Features
Panel
| Panel type | 86° (216cm) 24/7 ELED | |
| Resolution | 3840x2160 | |
| Active Area | 1895.04(H) x 1085.96(V) | |
| Visual angle | Horizontal | 178° |
| Perpendicular | 178° | |
| Max. brightness | Typ : 500 cd/m2 | |
| Max. Contrast | Typ : 1200 | |
| Response time | 8ms | |
| H-Frequency | 270 kHz | |
| V-Frequency | 120 Hz | |
Audio
2 x 12 W Audio Output Power
Network Connection
Ethernet (LAN)
Input/Output Ports
1 x USB 2.0 port
1 x USB 3.0 port
1 x Internal USB 3.0 port
1 x HDMI 2.0 In port (1.4 for FHD panels) (HDCP supported)
1 x HDMI Out (HDCP supported)
1 x VGA port
1 x Audio input port
1 x Audio output port
1 x RS232 port
1 x RJ12 port (Service only)
1 x Video In port
1 x YPbPr port
1 x SPDIF Coaxial Out port
1 x DVI port
1 x DiplayPort v1.2 In (HDCP supported)
1 x DiplayPort v1.2 Out (HDCP supported)
1 x Headphone port
1 x IR port
Power
Using Your LCD display Product More Effectively
Paying attention to the following points with respect to your product will provide a stable performance and also prolong its life.
Daily Care
• Environmental Factors
Do not directly expose your product to humidity, high temperature, fire, direct sun light and dust while using it. The vent holes of your product will allow it perform safer without system overheating. Do not cover these holes or do not prevent air flow with an object.
Position your product at least 15 cm away from strong magnetic field generating electrical devices such as product, refrigerator or large speakers. Do not suddenly take your product from a cold environment and suddenly put it in a warm environment. A sudden temperature change of 10° C may cause some of the internal parts to malfunction. Do not put your product on an uneven surface.
- General points
- Points to be taken into consideration while cleaning the product
Your system must be turned off while cleaning your product. Please use a soft and damp piece of cloth for cleaning its surface. Do not use chemical cleansers to clean the screen. Do not directly apply the cleaning material on your monitor.
- Orientation
Your display can be mounted in both portrait and landscape positions.
When changing from Landscape to Portrait mode, the display must only be rotated anti-clockwise.
![graph TD A["LANDSCAPE"] -->|Rotate| B["PORTRAIT"] B --> C["Logo piece location"]](/content/2026/05/926277/images/3cbca2591039512e9628951a6a34e152f00eac0551e042badb8414f5cdb509dc.jpg)
Notification
TRADEMARK ACKNOWLEDGMENT
The terms HDMI and High-Definition Multimedia Interface, and the HDMI Logo are trademarks or registered trademarks of HDMI Licensing LLC in the United States and other countries.
HDMI
HOMMOTON WATERBASHERS
Manufactured under license from Dolby Laboratories. Dolby Audio and the double-D symbol are trademarks of Dolby laboratories. Dolby Audio ™ (supporting Dolby Digital Plus ™ )
DOLBY AUDIO™
MP3 licence letter
MPEG Layer-3 audio coding technology licensed from Fraunhofer LLS and Thomson.
MP4 licence letter
THIS PRODUCT IS LICENSED UNDER THE MPEG-4 VISUAL PATENT PORTFOLIO LICENSE FOR THE PERSONAL AND NON-COMMERCIAL USE OF A CONSUMER FOR (I) ENCODING VIDEO IN COMPLIANCE WITH THE MPEG-4 VISUAL STANDARD (MPEG-4 VIDEO) AND/OR (II) DECODING MPEG-4 VIDEO THAT WAS ENCODED BY A CONSUMER ENGAGED IN A PERSONAL AND NON-COMMERCIAL ACTIVITY AND/OR WAS OBTAINED FROM A VIDEO PROVIDER LICENSED BY MPEG LA TO PROVIDE MPEG-4 VIDEO. NO LICENSE IS GRANTED OR SHALL BE IMPLIED FOR ANY OTHER USE. ADDITIONAL INFORMATION INCLUDING THAT RELATING TO PROMOTIONAL, INTERNAL AND COMMERCIAL USES AND LICENSING MAY BE OBTAINED FROM MPEG LA,L.L.C. SEE HTTP://WWW.MPEGLA.COM
AVC licence letter
THIS PRODUCT IS LICENSED UNDER THE AVC PATENT PORTFORIO LICENSE FOR THE PERSONAL AND NON-COMMERIAL USE OF A CONSUMER TO (I)ENCODE VIDEO IN COMPLIANCE WITH THE AVC STANDARD ("AVC VIDEO") AND/OR (II)DECODE AVC VIDEO THAT WAS ENCODED BY A CONSUMER ENGAGED IN A PERSONAL AND NON-COMMERIAL ACTIVITY AND/OR WAS OBTAINED FROM A VIDEO PROVIDER LICENSED TO PROVIDE AVC VIDEO. NO LICENSE IS GRANTED OR SHALL BE IMPLIED FOR ANY OTHER USE. ADDITIONAL INFORMATION MAY BE OBTAINED FROM MPEG LA,L.L.C. SEE HTTP://WWW.MPEGLA.COM
Trouble Shooting & Tips
Display does not turn on
Make sure the power cord is plugged in securely to the mains socket. Check if batteries are of the remote exhausted. Press the Standby button on the Display.
No picture
This means your Display is not receiving any signal.
Check if the correct source is selected.
Check if the connection cable is plugged in properly.
Check if the connection cable is damaged.
Check if suitable cables are used for connection.
Images from an HDMI source do not display. The HDMI cable from source to display is either defective or too
long. Try a known-good and/or shorter HDMI cable.
In some cases due to compatibility of certain HDMI sources, a no picture scenario may occur. In this case use of a splitter device between source and monitor is recommended.
No sound
Check if the Display is muted. Press the Mute button or increase the volume to check.
Sound may be coming from only one speaker. Check the balance settings from Sound menu.
Remote control - no operation
The batteries may be exhausted. Replace the batteries.
Input sources - can not be selected
Check the AV cables and connections if you are trying to switch to the input source dedicated to the connected
device
If you are in any doubt please consult your dealer.
Accessories Included
Remote Control
Batteries: 2 x AAA
Instruction Book
IR Extender
EU and UK mains lead
8Gb USB memory device (dependent on model)
Optional Accessories
OPS
Overlay Touch Screen Kit
Dimensions Unit
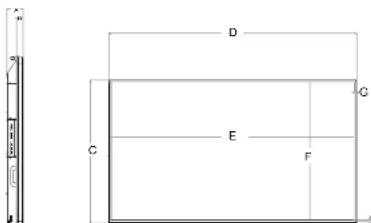
| A(mm) | B(mm) | C(mm) | D(mm) | E(mm) | F(mm) | G(mm) | H(mm) | |
| 86" 10 | 3 42 11 | 6 1975 1 | 599 1069 | 38 36 |
Weight : 66 Kg
Disposal...
The following information is only for EU-member states:
Disposal of products
The crossed out wheeled dust bin symbol indicates that products must be collected and disposed of separately from household waste. Integrated batteries and accumulators can be disposed of with the product. They will be separated at the recycling centres.
The black bar indicates that the product was placed on the market after August 13, 2005.
By participating in separate collection of products and batteries, you will help to assure the proper disposal of products and batteries and thus help to prevent potential negative consequences for the environment and human health.
For more detailed information about the collection and recycling programmes available in your country, please contact your local city office or the shop where you purchased the product.
Disposal of batteries and/or accumulators
The crossed cut wheeled dust bin symbol indicates that batteries and/or accumulators must be collected and
disposed or separately from household waste. If the battery or accumulator contains more than the specified values of lead (Pb), mercury (Hg), and/or cadmium (Cd) defined in the European Battery Directive, then the chemical symbols for lead (Pb), mercury (Hg) and/or cadmium (Cd) will appear below the crossed out wheeled dust bin symbol.
By participating in separate collection of batteries, you will help to assure the proper disposal of products and batteries and thus help to prevent potential negative consequences for the environment and human health. For more detailed information about the collection and recycling programmes available in your country, please contact your local city office or the shop where you purchased the product.


- REACH information
The European Union (EU) chemical regulation, REACH (Registration, Evaluation, Authorization and Restriction of Chemicals), entered into force on 1 June 2007, with phased deadlines to 2018.
Toshiba will meet all REACH requirements and is committed to provide our customers with information about the presence in our articles of substances included on the candidate list according to REACH regulation.
Please consult the following website http://www.toshiba.eu/reach for information about the presence in our articles of substances included on the candidate list according to REACH in a concentration above 0.1 % weight by weight.
EU Conformity Statement

This product is carrying the CE-Mark in accordance with the related European Directives.
Responsible for CE-Marking is TOSHIBA, 23 Davy Road, Plymouth, PL6 8BY UK.
This product is labeled with the CE Mark in accordance with the related European Directives, notably Low Voltage Directive 2014/35/EU, Electromagnetic Compatibility Directive 2014/30/EU and RoHS Directive 2011/65/EU.
TOSHIBA 2017
© TOSHIBA 23 Davy Road, Plymouth Devon PL6 8BY England
All rights reserved.
Reproduction in whole or part without written permission is strictly prohibited.
This equipment corresponds to requirements of the Technical Regulation on limitation of usage of certain dangerous substances in electrical and electronic equipment.
- OWNERS MANUAL
- CONTENTS
- IMPORTANT SAFETY INFORMATION
- CAUTION RISK OF ELECTRIC SHOCK DO NOT OPEN
- PLEASE READ THESE INSTRUCTIONS FULLY AND CAREFULLY BEFORE USE AND KEEP FOR FUTURE REFERENCE
- VENT HOLES OF THE PRODUCT
- REPAIR
- REPLACEMENT PARTS
- SAFETY CHECKS
- WALL MOUNTING
- POWER CORD
- ESPECIALLY FOR CHILD SAFETY
- CONNECTIONS
- POSITIONING
- TRANSPORT AND SHIPPING
- INTENDED USE
- WARNING
- BATTERY SAFETY GUIDELINES
- CAUTION
- MARKINGS ON THE PRODUCT
- EXCLUSION CLAUSE
- UK POWER CORD WARNING
- CHILDREN WARNING
- ADDITIONAL SAFETY PRECAUTIONS
- AVOIDING IMAGE RETENTION
- MOVING THE DISPLAY
- CARRYING THE DISPLAY
- WHEN USING A WALL BRACKET
- CONNECTING TO EXTERNAL EQUIPMENT
- REAR SIDE (1)
- REAR SIDE (2)
- CONTROL BUTTONS ON THE DISPLAY
- CONNECTING THE IR RECEIVER
- TURNING THE DISPLAY ON/OFF
- INSERTING THE BATTERIES INTO THE REMOTE
- FIRST TIME INSTALLATION
- MEDIA PLAYBACK VIA USB INPUT
- MEDIA BROWSER MENU
- USB AUTO PLAY FEATURE
- FAILOVER FEATURE
- CEC AND CEC RC PASSTHROUGH
- SYSTEM AUDIO CONTROL
- CONNECTIVITY
- WIRED CONNECTIVITY
- TO CONNECT TO A WIRED NETWORK
- CONFIGURING WIRED DEVICE SETTINGS NETWORK TYPE
- INTERNET SPEED TEST
- ADVANCED SETTINGS
- CONNECT TO A WIRED OR WIRELESS NETWORK
- PLAY SHARED FILES VIA MEDIA BROWSER
- AUDIO VIDEO SHARING
- INTERNET BROWSER
- INTERNAL USB OPERATIONS
- OSD ROTATION SUPPORT (*)
- DISPLAYPORT
- HDMI OUT
- REAL TIME CLOCK (RTC)
- CONNECTING TO THE DISPLAY LAN PORT
- VIDEO WALL SETTINGS
- SCHEDULER SETTINGS
- RS232 HEX COMMANDS
- PROTOCOL TEST STEPS
- ERROR RESPONSES
- NAK REPLY: 15
- ERROR REPLY: 1C 00 00
- SYSTEM FEATURES
- AUDIO
- NETWORK CONNECTION
- INPUT/OUTPUT PORTS
- USING YOUR LCD DISPLAY PRODUCT MORE EFFECTIVELY
- DAILY CARE
- ENVIRONMENTAL FACTORS
- GENERAL POINTS
- ORIENTATION
- NOTIFICATION
- TRADEMARK ACKNOWLEDGMENT
- DOLBY AUDIO™
- MP3 LICENCE LETTER
- MP4 LICENCE LETTER
- AVC LICENCE LETTER
- TROUBLE SHOOTING & TIPS
- NO PICTURE
- NO SOUND
- ACCESSORIES INCLUDED
- OPTIONAL ACCESSORIES
- DISPOSAL
- DISPOSAL OF PRODUCTS
- DISPOSAL OF BATTERIES AND/OR ACCUMULATORS
- REACH INFORMATION
Brand : TOSHIBA
Model : TD-P863E
Category : Monitor