TMW228X - Microwave Tisira - Free user manual and instructions
Find the device manual for free TMW228X Tisira in PDF.


| Product Type | Built-in Microwave Oven with Grill |
| Model | TMW228X |
| Brand | Tisira |
| Capacity | 28 Liters |
| Dimensions (W x D x H) | 535 x 400 x 388 mm |
| Weight | Approximately 25 kg |
| Power Supply | 220-240 V ~ 50 Hz |
| Rated Power | 1450 W |
| Microwave Power | 1100 W |
| Grill Power | 1100 W |
| Control Type | Digital with Dial and Touch Buttons |
| Display | LED Display |
| Cooking Functions | Microwave, Grill, Combi (2 modes), Auto Cook (8 menus), Defrost by Weight/Time, Quick Start, Multi-stage Cooking |
| Clock | 24-hour programmable |
| Child Lock | Yes, via long press of Stop/Clear |
| Safety Features | Door safety interlock system, auto shut-off after 1 minute inactivity |
| Interior Light | Yes |
| Turntable | Yes, with glass tray and ring assembly |
| Installation Type | Built-in (under bench or tower cabinet) |
| Cooling System | Requires 45 mm rear gap for air circulation |
| Cleaning | Wipe with damp cloth; avoid abrasives; do not immerse |
| Warranty | Refer to manufacturer; contact Arisit Pty Limited (Australia/NZ) |
Frequently Asked Questions - TMW228X Tisira
User questions about TMW228X Tisira
0 question about this device. Answer the ones you know or ask your own.
Ask a new question about this device
Download the instructions for your Microwave in PDF format for free! Find your manual TMW228X - Tisira and take your electronic device back in hand. On this page are published all the documents necessary for the use of your device. TMW228X by Tisira.
USER MANUAL TMW228X Tisira
IMPORTANT // Please ensure that you read through this manual prior to installation and use. This user manual contains important information to ensure optimal performance and keep you safe. Please retain your proof of purchase, as this will be needed in the event that you require a warranty service. Remember to keep this user manual for future reference.
t tisira
Contents
Warning & Safety Instructions 3
Cookware & Utensils Guide 4
Product Specifications 5
Product Overview 6
Control Panel 7-8
Operating Instructions 9-13
Maintenance 14
Maintenance Troubleshooting 15-16
Installation 17-21
Notes 22-23
ContactDetails Back Page
Warning & Safety Instructions
IMPORTANT // To ensure best performance, avoid risk of damage, exposure to microwave energy, burns, electric shock, fire or other accidents, please read the operating instructions carefully prior to first time use.
To maintain the efficiency and safety of this appliance, we recommend that you do the following:
• Only call the Service Centres authorised by the manufacturer;
• Always use original spare parts;
• If the supply cord is damaged, it must be replaced by a special cord or assembly available from the manufacturer or its service agent.
Do not operate the microwave oven if it is damaged. It is particularly important that the oven door closes properly and that there is no damage to the door, hinges and latches (broken or loosened).
WARNING // If the door or door seals are damaged, the oven must not be operated until it has been repaired by a competent person.
WARNING // It is hazardous for anyone other than a competent person to carry out any service or repair operation that involves the removal of a cover which gives protection against exposure to microwave energy.
Do not store or use this appliance outdoors.
This appliance is not intended for use by persons (including children) with reduced physical, sensory or mental capabilities, or lack of experience and knowledge, unless they have been given supervision or instruction concerning use of the appliance by a person responsible for their safety.
Children should be supervised to ensure that they do not play with the appliance.
This appliance is intended to be used in household and similar applications such as: staff kitchen areas in shops, offices and other working environments; farmhouses; by clients in hotels, motels and other residential environments; bed and breakfast type environments.
The microwave oven is intended for heating food and beverages. Drying of food or clothing and heating of warming pads, slippers, sponges, damp cloth and similar may lead to risk of injury or ignition of fire.
If smoke is observed, switch off or unplug the appliance and keep the door closed in order to stifle any flames.
Cookware & Utensils Guide
It is important to use the correct containers and utensils when cooking in your microwave oven. The table below will help you to make the right selection.
Materials that can be used in microwave ovens
| Aluminium foil | Shielding only. Small smooth pieces can be used to cover thin parts of meat or poultry to prevent overcooking. Arcing can occur if foil is too close to oven walls. The foil should be at least 1 inch (2.5cm) away from oven walls. |
| Browning dish Follow manufacturer's instructions. The bottom of browning dish must be at least 3/16 inch (5mm) above the tumtable. Incorrect usage may cause the tumtable to break. | |
| Dinnerware | Microwave-safe only. Follow manufacturer's instructions. Do not use cracked or chipped dishes. |
| Glass jars Always remove lid. Use only to heat food until just warm. Host glass jars are not heat resistant and may break. | |
| Oven cooking bags | Follow manufacturer's instructions. Do not close with metal tie. Make slits to allow steam to escape. |
| Paper plates and cups | Use for short-term cooking/warming only. Do not leave oven unattended while cooking. |
| Paper towels | Use to cover food for reheating and absorbing fat. Use with supervision for a short-term cooking only. |
| Parchment paper | Use as a cover to prevent splattering or a wrap for steaming. |
| Plastic | Microwave-safe only. Follow the manufacturer's instructions. Should be labelled "Microwave Safe". Some plastic containers soften, as the food inside gets hot. "Boiling bags" and tightly closed plastic bags should be slit, pierced or vented as directed by package. |
| Plastic wrap | Microwave-safe only. Use to cover food during cooking to retain moisture. Do not allow plastic wrap to touch food. |
| Thermometers | Microwave-safe only (meat and candy thermometers). |
| Wax paper | Use as a cover to prevent splattering and retain moisture. |
If still in doubt, a test can be performed to confirm that the container or utensil is safe for microwave oven use. Please follow the instructions below:
- Fill a 1-cup glass measure with cool water and place it in the microwave alongside the empty container or utensil to be tested;
- Cook on maximum power for 1 minute (do not exceed one minute cooking time);
- If the container or utensil is microwave oven safe, the container should remain comfortably cool, the water in glass measure should be hot;
- If the container is hot, it has absorbed some microwave energy and should NOT be used. This test cannot be used for plastic containers.
Materials to be avoided in microwave oven
| Aluminium tray | May cause arcing. Transfer food into microwave-safe dish. |
| Food carton with metal handle | May cause arcing. Transfer food into microwave-safe dish. |
| Metal or metal trimmed | Metal shields the food from microwave energy. Metal trim may cause arcing. |
| Metal twist ties | May cause arcing and could cause a fire in the oven. |
| Paper bags | May cause a fire in the oven. |
| Plastic foam | Plastic foam may melt or contaminate the liquid inside when exposed to high temperature. |
| Wood | Wood will dry out when used in the microwave oven and may split or crack. |
Product Specifications
| Dimensions W535 x D400 x H388mm | |
| Voltage / Frequency 220 240V - / 50Hz | |
| Rated Power 1450W | |
| Microwave Power 1100W (Grill) | |
| Capacity 28L | |
Product Overview
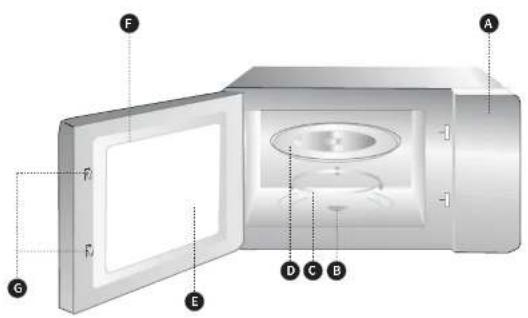

Grill Rack (Only be used in grill function and be placed on the glass tray)
A - Control Panel
B - Turntable Shaft
C - Turntable Ring Assembly
D - Glass Tray
E - Glass Window
F - Door Assembly
G - Safety Interlock System
Control Panel
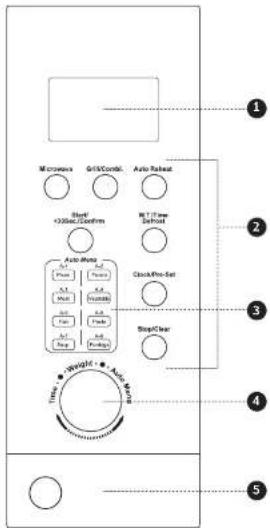
- Display Window
- Power Level/Defrost/Clock Timer/
Grill/Auto Reheat/Start-Stop Buttons - Auto Cooking Menu Options
- Time/Weight/Auto Menu Dial
- Door Release Button
DUAL FEATURES

flowchart
graph TD
    A["Time"] --> B["Weight"]
    B --> C["Auto Menu"]
TIME CHOICE
When in standby mode, rotate the dial counter-clockwise to activate the cooking menu time then rotate the dial clockwise to increase the cooking time and rotate the dial counter-clockwise to decrease the cooking time.
AUTO MENU CHOICE
When in standby mode, rotate the dial clockwise to activate the auto cooking menu options then rotate the dial in either direction to select the Auto Cooking function desired.
WEIGHT CHOICE
After selecting the desired auto cooking option or defrost function, rotate the dial clockwise to increase the food weight and rotate the dial counter-clockwise to decrease the weight.
DISPLAY WINDOW

-
Microwave Function
-
Grill Function
-
Defrost
-
Child Lock
-
Auto Cooking Function
-
Weight (grams)
Operating Instructions
WARNING // Do not attempt to operate this microwave oven with the door open as it can result in harmful exposure to microwave energy. Safety interlocks must not be defeated or tampered with.
Important Safety Instructions
- Only use utensils that are suitable for use in microwave ovens. (Guide on page 4)
- Eggs in their shell and whole hard-boiled eggs, liquids in narrow neck bottles and other foods in sealed containers should not be heated in the microwave ovens since they may explode, even after microwave heating has ended.
- Microwave heating of beverages can result in delayed eruptive boiling; therefore handle container with care Liquids, such as water, coffee, or tea can be overheated beyond the boiling point without appearing to be boiling. Visible bubbling when the container is removed from the microwave oven is not always present. This could result in very hot liquids suddenly boiling over when the container is disturbed or a utensil is inserted into the liquid.
To reduce this risk of injury to persons:
• Stir the liquid both before and halfway through the heating process.
- Do not heat water and oil, or fats together. The film of oil will trap steam, and may cause a violent eruption.
- Do not use straight-sided containers with
eye on the oven, beware of the possibility of ignition.
• The contents of feeding bottles and baby food jars need to be stirred or shaken and the temperature checked before consumption, in order to avoid burns.
- Remove wire twist-ties and metal handles from paper or plastic bags/containers before placing them in the microwave oven.
- Do not cook directly on the turntable. It can crack, cause injury or damage to the oven.
- Do not use the oven cavity for storage purposes.
• After heating, allow the container to rest in the microwave oven for a short time before removing it.
- Do not operate the oven empty. The microwave energy will reflect continuously throughout the oven causing overheating and damage, if food or water is not present to absorb energy.
- Do not operate the oven without the roller ring and the turntable in place.
NOTE // If an operation is set but the Start button is not pressed, after 1 (one) minute, microwave oven will automatically cancel the operation. The display will revert back to clock or colon mode.
NOTE // After using the microwave oven, the fan may stay on to cool the electric components. The food can be removed from the microwave while the fan is operating.
1. Adjusting the Clock
After connecting the unit to the power, a long beep will be emitted and the zero hour '0:00' will be visible on the display.
- Press 'Clock/Pre-set', the symbol will appear and the hour digits will flash.
- Rotate the Dial to adjust the hour (24h style).
- Press 'Clock/Pre-set' once again and, this time, the minute digits will flash.
- Rotate the Dial to adjust the minutes setting (0-59min).
- Press 'Clock/Pre-set' to finish setting the clock. The colon ":" should now be flashing.
2. Microwave Cooking
- Push 'Microwave', "P100" will be flashing on the display window indicating that the cooking power is currently 100% of the maximum possible power.
- Rotate the Dial in either direction or push 'Microwave' multiple times to select between 100, 80, 50, 30 or 10% of the maximum possible power.
- Push 'Start/+30sec/Confirm' to confirm The power selected will be displayed (not flashing).
NOTE // Time counts up in different increments as the cooking time is being increased by turning the Dial.
0 – 1 minute time counts up in 5 seconds.
1 – 5 minutes time counts up in 10 seconds.
5 – 10 minutes time counts up in 30 seconds.
10 – 20 minutes time counts up in 1 minute.
10 - 30 minutes time counts up in 1 minute. 30 - 95 minutes time counts up in 5 minutes
3. Quick Start
Using the 'Start/+30sec/Confirm' button:
- When in standby mode, press 'Start/+30sec/Confirm' to start cooking for 30 seconds with the power level adjusted to 100%.
- If desired, the cooking time can be increased in increments of 30 seconds by pressing 'Start/+30sec/Confirm' multiple times.
Using the dial:
-
When in standby mode, rotate the Dial counter clockwise to activate the cooking time settings.
-
Adjust the cooking time by rotating the Dial in either direction. The power level is adjusted to 100% by default.
-
Press 'Start/+30sec/Confirm' to start the programme.
-
If desired, the cooking time can be increased in increments of 30 seconds by pressing 'Start/+30sec/Confirm' during the cooking process.
4. Defrost by Weight
- Press 'W.T./Time Defrost' once.
being cooked (100-2000g).
- Press 'Start/+30sec/Confirm' to start the programme.
NOTE // The cooking time for the "Defrost by weight" function is automatically calculated based on the information provided and no extra time can be added during the cooking programme.
5. Defrost by Time
- Press 'Defrost' twice. "dEF2" and the symbol should be displayed.
- Rotate the Dial in either direction to adjust the defrosting time (5sec - 95min).
- Press 'Start/+30sec/Confirm' to start the programme. The power level for defrosting mode is 30% by default.
- If desired, the cooking time can be increased in increments of 30 seconds by pressing 'Start/+30sec/Confirm' during the cooking process.
6. Multi-function Cooking
Defrost and Microwave Cooking functions can be set to work consecutively. For example, a defrost programme can be set for 5 minutes and soon after it finishes the microwave cooking programme automatically starts and operates for 7 minutes.
Setting the multi-function cooking:
- Press 'W.T./Time Defrost' twice. "dEF2" and the symbol should be displayed.
- Rotate the Dial in either direction to adjust the defecation (see 50 min)
is currently 100% of the maximum
possible power.
- Rotate the Dial in either direction or press 'Microwave' multiple times to select between 100, 80, 50, 30 or 10% of the maximum possible power.
- Press Start/+30sec/Confirm* to confirm. The power select will be displayed (not flashing).
- Rotate the Dial to adjust the cooking time (5sec - 95min). E.g., 1min 30sec (1:30).
- Press 'Start/+30sec/Confirm' to start the multi-programme.
NOTE // A short beep will be heard once the defrosting programme is finished and the microwave cooking starts.
7. Automatic Start and Cooking Function
Auto Start allows you to set the microwave to start and stop a cooking function automatically at a set time.
NOTE // Multi-function Cooking can also be set to start automatically.
NOTE // The clock must have been adjusted before setting an Auto Start cooking. Please refer to "Adjusting the clock" on page 10.
Setting the cooking start time:
-
Push 'Microwave', "P100" will be flashing on the display window indicating that the cooking power is currently 100% of the maximum possible power.
-
Rotate the Dial in either direction or push 'Microwave' multiple times to select between 100, 80, 50, 30 or 10% of the maximum possible power.
- Push 'Start/+30sec/Confirm' to confirm. The power selected will be displayed (not flashing).
- Rotate the Dial do adjust the cooking time (5sec - 95min). E.g., 1min 30sec (1:30)DO NOT press 'Start/+30sec/Confirm', otherwise it will start the programme immediately.
- Press 'Clock/Pre-Set', the clock symbol (INCLUDE CLOCK SYMBOL) will appear and the hour digits will flash.
- Rotate the Dial to select the hour for the cooking to start (24h style).
- Press 'Clock/Pre-Set' once again and, this time, the minute digits will flash.
- Rotate the Dial to select the minute settings (0-59min).
- Press 'Start/+30sec/Confirm' to finish the settings. Ensure that the door is closed and the cooking programme will automatically start at the time selected. Two short beeps will be heard once the programme starts.
Auto Cooking allows you to cook foods without selecting times and power levels. The Auto Cooking provides different pre-set menus for 8 different types of dishes and foods. (See table A)
8. Auto Cooking Function
Setting the Auto Cooking function:
-
Rotate the Dial clockwise to activate the Auto Cooking menu. The symbol AUTO COOM should appear on the display.
-
Rotate the Dial in either direction to select between B different cooking options (A-1 to A-R). Please refer to the
table below for details of each one of the available pre-set menus.
-
Press 'Start/+30sec/Confirm' to confirm the selection of the desired pre-set menu. The menu selected will be displayed (not flashing).
-
Rotate the Dial in either direction to select the approximate weight of the food being cooked.
-
Press 'Start/+30sec/Confirm' to start the auto-cooking programme.
9. Child Lock
To set the Child Lock:
- When in standby mode, press and hold for 2 seconds 'Step/Clear'
- A long beep will be heard indicating that the Child Lock has been activated.
- The key symbol should be visible on the display window.
- If the time hasn't been set up, the following configuration 0.1.2 be displayed also indicating that the Child Lock has been activat
To cancel the Child Lock:
- When in Child Lock mode, press and hold for the "Stop/Clean button for 3 seconds."
- A long beep will be heard indicating that the Child Lock has been deactivated.
10. Inquiring the Power Level or the Current Time
During any cooking programme, the power level set for the ongoing programme or the time can be displayed for 3 seconds by pressing 'Microwave' or 'Clock/Pre-set', respectively.
11. Grill and Combination Cooking
Your microwave is fitted with a grill element that can be used separately or in combination with a microwave function.
Setting Grill or Combi. Function:
-
Press 'Grill/Combi.' "G" will be flashing and the symbol [grill symbol] will be displayed.
-
Press 'Grill/Combi.' multiple times to select between "G"(grill), "C-1"(combi. 1) and "C-2"(combi. 2).
- Push 'Start/+30sec/Confirm' to confirm selection. The option select will be displayed without flashing.
- Rotate the Dial do adjust the cooking time (5sec - 95min). E.g., 1min 30sec (1:30).
- Press 'Start/+30sec/Confirm' to start the programme.
Settings for Grill or Combi. Functions
| OPTION MICROWAVE POWER GRILL POWER | ||
| G - grill | 0 100% | |
| C-1 - grill and microwave | 55% 45% | |
| C-2 - grill and microwave | 36% 64% | |
(Table A) - Auto Cooking Function Table
| A-1 (Pizza) | 200g, 400g |
| A-2 (Potato) | 200g, 400g and 600g |
| A-3 (Meat) | 250g, 350g and 450g |
| A-4 (Vegetable) | 200g, 200g and 400g |
| A-5 (Fish) | 250g, 350g and 450g |
| A-6 (Pasta) | 50g(with 450 cold water) and 100g(with 450 cold water) |
| A-7 (Soup) | 200g and 400g |
| A-8 (Porridge) | 550g, 1100g |
Maintenance
ATTENTION // Before cleaning your
microwave oven, or performing
maintenance, turn the appliance off and disconnect it from the power supply.
WARNING // Repairs must be done only by a qualified service person.
The microwave oven should be cleaned regularly and any food deposits removed. Cleaning your oven frequently will extend its life.
When cleaning your oven:
- Check the condition of the microwave door on a regular basis. The door guarantees the great performance of your appliance and protection against microwave energy.
- Avoid using abrasive products or objects that can damage the door surfaces.
- Should it become damaged, please contact customer care (contact details available on the back page of the cover of this manual.
- Do not use a steam cleaner.
- To protect against the risk of electrical shock, do not immerse the unit, cord or plug in water or other liquids.
- Do not clean the appliance while it is still but. The internal and external surfaces
- Wash all accessories in hot soapy water, wipe dry with a paper or cloth towel before returning them to the appliance.
- Dry the condensation, which may be formed when the microwave oven is used for an extended period of time, using a soft cloth.
IMPORTANT // Failure to maintain the oven in a clean condition could lead to deterioration of the surface that could adversely affect the life of the appliance and possibly result in a hazardous situation.
ATTENTION // After cleaning your microwave oven, ensure to replace the turntable ring assembly and glass tray in the proper position and press 'Stop/Reset' to clear the display window.
Maintenance Troubleshooting
Before requesting service, these occurrences are normal:
| Microwave oven is interfering TV reception | Some radio or TV interference might occur when you cook with the microwave oven. This interference is similar to the interference caused by small appliances such as mixers, vacuums, hair dryers, etc. It does not indicate a problem with your appliance. |
| Dim microwave oven light | In low power level of microwave cooking, the oven light may be dimmed. |
| Steam is accumulating on the oven door and warm air comes out the oven vents | During cooking, steam and warm air are given off from food. Most of the steam and warm air is removed from the microwave oven by the air that circulates in the oven cavity. However, some steam will condense on cooler surface such as the oven door. |
| Microwave oven was accidentally set to operate without any food in it | Running the oven empty for a short time will not damage the oven. However, we do not recommend this. |
The directions in the table below can be followed to solve simple problems with your appliance before requesting service.
| Problem | Possible Cause | Action |
| Microwave oven will not turn on Power cord not plugged in properly | Unplug the power cord, wait for 10 seconds and then plug it again | |
| Circuit breaker or fuse is tripped or blown | Reset circuit breaker or replace fuse | |
| Damaged outlet Plug another appliance into the outlet to check if the outlet is working. | ||
| Microwave will not start a programme | The door is not fully closed | Ensure the door is securely closed |
| Another programme has already been set | Press 'Stop/Clear' to cancel previous programme and program microwave oven again | |
| Turntable makes noises when microwave oven operates | Dirty turntable ring assembly or bottom of microwave oven cavity | Refer to the section on previous page (Page 15) on how to clean dirty parts |
| The symbol "shows up on the display and controls do not work | The child lock is activated and the clock isn't set up | Deactivate Child Lock by pressing and holding for 3 seconds 'Stop/Clear' |
Installation
IMPORTANT // This appliance must be installed by a qualified professional and in accordance with the instructions presented in the manual, as well as any industry standard guidelines. The manufacturer will not be held responsible for any damage caused by incorrect installation.
ATTENTION // Before installing the appliance, ensure that the power supply is turned off.
IMPORTANT // it must be possible to disconnect the microwave from the supply after installation. The disconnection may be achieved by having the plug accessible or by incorporating a switch in the fixed wiring in accordance with the wiring rules.
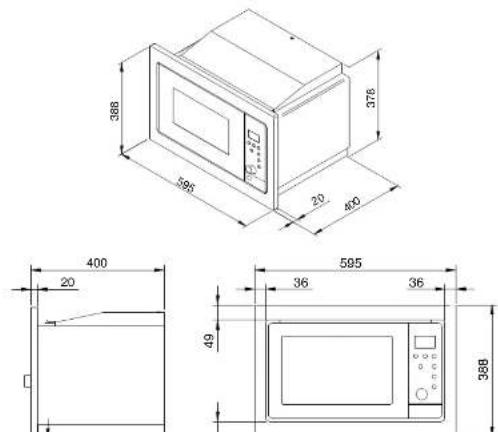
FITTING THE MICROWAVE OVEN INTO THE KITCHEN CABINET
IMPORTANT // This appliance can be installed as an under bench unit or into an oven tower cabinet. The figures below present the dimensions of the appliance and cabinet cutout for installation of the built-in microwave.
IMPORTANT // In order to function correctly, the microwave oven requires an adequate supply of cool air.
There should be a gap of approximately 45mm at the rear of the shelf on which the microwave oven rests. The shelf should not touch the wall behind it.
TOWER CABINET

UNDER BENCH


- This appliance is intended to be used built-in and must not be placed in a cabinet with doors.
- This appliance must be grounded. Connect only to a properly grounded outlet. Do not cover or block any ventilation openings of the appliance.
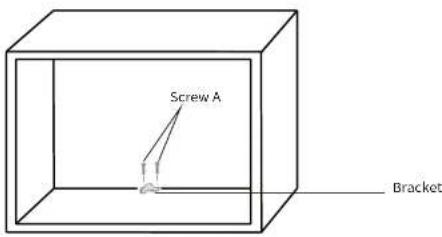
Read the instructions on the screw-positioning template provided with the appliance ("Bottom Cabinet Template"). This template is used to mark the position of the screws that will hold the anti-tilting bracket.

5crew A

Bracket

After marking the position of the screws (A) as per the template instructions, remove the template and install the anti-tilting bracket as indicated on the next page.
Carefully slide the microwave oven into position making sure that the anti-tilting bracket is locked into the back of the microwave oven. Ensure that the power cord is not taped on kinked.

natural_image
Technical line drawing of a double-door oven and its internal compartment, showing front and side views with no text or symbols.Open the microwave door; install the fixing screw as shown on the image below.

Installation Hole
Notes
Notes
CONTACT DETAILS
AUSTRALIA
ARISIT PTY LIMITED
40-44 Mark Anthony Drive, Dandenong South, VIC 3175, Australia
© P // 1300 762 219
F // 03 9768 0838
consumer.care@arasit.com
NEW ZEALAND
ARISIT PTY LIMITED
PO Box 68-140 Newton, Auckland 1145, New Zealand
© P // 09 306 1020
F // 09 302 0077
sales@aristinappliances.co.nz
THIS BASIS COUMTED TO CHSING RESEARCH AND DEVELOPMENT. THIS ELEMENT HAS BEEN VALIDED TO INSUR ALL INFORMATION IN THIS USER MANUAL IS CORRECT AT TIME OF GOING TO PRINT. DIMENSIONS SHOULD BE USED AS A REFERENCE ONLY AND ACTUAL DIMENSIONS SHOULD BE TAKEN FROM THE PHYSICAL PRODUCT ONLY. MANUFACTURER RESERVES THE RIGHT TO CHANGE SPECIFICATIONS WITHOUT NOTICE.

- Contents
- Warning & Safety Instructions
- Cookware & Utensils Guide
- Product Overview
- TIME CHOICE
- AUTO MENU CHOICE
- WEIGHT CHOICE
- Operating Instructions
- Adjusting the Clock
- Microwave Cooking
- Quick Start
- Using the 'Start/+30sec/Confirm' button:
- Using the dial:
- Defrost by Weight
- Defrost by Time
- Multi-function Cooking
- Setting the multi-function cooking:
- Automatic Start and Cooking Function
- Setting the cooking start time:
- Auto Cooking Function
- Setting the Auto Cooking function:
- Child Lock
- To set the Child Lock:
- To cancel the Child Lock:
- Inquiring the Power Level or the Current Time
- Grill and Combination Cooking
- Maintenance
- When cleaning your oven:
- Maintenance Troubleshooting
- Installation
- Notes
- CONTACT DETAILS
Brand : Tisira
Model : TMW228X
Category : Microwave