AR 900-OBS - Cooker Parmco - Free user manual and instructions
Find the device manual for free AR 900-OBS Parmco in PDF.


| Product Type | Freestanding Gas Cooker |
| Model | AR 900-OBS |
| Brand | Parmco |
| Width | 900 mm |
| Height | 900 - 960 mm (adjustable legs) |
| Number of Gas Burners | 4 + 1 wok burner |
| Burner Types | Auxiliary (small), Semi-rapid (medium), Fish burner, Wok (triple flame) |
| Oven Capacity | Multi-function oven (approx. 70 L) |
| Oven Modes | Conventional, Fan Forced, Grill, Fan Assisted Grill, Defrost, Top Bake, Bottom Bake |
| Energy Source | Natural Gas (G20) or LPG (G30/G31) |
| Gas Pressure | Natural: 2 kPa; LPG: 2.75 kPa |
| Ignition | Automatic via control knob |
| Safety Features | Flame failure thermocouple, anti-tilt restraint chain, child lock (not specified) |
| Cleaning | Catalytic liners, removable oven door, easy-clean shelf supports |
| Oven Light | Yes, replaceable |
| Cooling Fan | Automatic, continues after use |
| Warranty | 7 years (subject to terms) |
| Weight | Approx. 60-70 kg (estimated) |
Frequently Asked Questions - AR 900-OBS Parmco
User questions about AR 900-OBS Parmco
0 question about this device. Answer the ones you know or ask your own.
Ask a new question about this device
Download the instructions for your Cooker in PDF format for free! Find your manual AR 900-OBS - Parmco and take your electronic device back in hand. On this page are published all the documents necessary for the use of your device. AR 900-OBS by Parmco.
USER MANUAL AR 900-OBS Parmco
Installation and Operating Instructions
Models:
FS 600
FS 600-LEG
FS 600-OBS
FS 600-WHT
AR 900
AR 900-LEG-1
AR 900-OBS

Parmco Appliances extended 7 year warranty
The Warranty:
- This appliance is intended for domestic use in the owners' home. Use of the appliance for commercial purposes will limit the warranty period (please see Parmco website for commercial details).
- Subject to the terms and conditions contained within this warranty, if the product is not of Acceptable Quality (as defined in the Consumer Guarantees Act) within 7 years of the date of original purchase, then Parmco Sales undertakes to repair or, at it's sole discretion, replace the product.
- The warranty does not cover the costs of transport, mileage or travelling time if the product is located beyond 30km of a recognised Service Agent.
• This warranty is offered as an extra benefit, and does
p: 09 573 5678
t: 09 573 5699
e: sales@parmco.co.nz
w: www.parmco.co.nz

The Warranty is not valid:
- If the product is not installed and operated in accordance with the operating instructions.
• If the product is not installed to comply with the electrical, gas, plumbing and other Regulations and Codes of Practice in New Zealand. - If the product is operated on voltages or frequencies outside the normal range for domestic appliances in New Zealand.
• If the product is not used in normal domestic use, or if it is used in a business as defined in the Consumer Guarantees Act.
• If any serial number has been removed or defaced. - If proof of date of purchase is not supplied, except at the sole discretion of Parmco Sales. Proof of purchase can be for the product itself, or if installed with a kitchen or house then proof of purchase can be from a Parmco reseller of products supplied by Parmco.
- If the products are purchased in a second hand condition from other parties (including but not limited to TradeMe, Sella, etc.)

PARMCO
Dear Valued Customer,
Thank you and congratulations on purchasing your new Parmco appliance.
All Parmco products are made to the highest quality and design standards. We are sure you will enjoy your new appliance.
As a note, please read through these instructions carefully. These will assist you in gaining a complete understanding of the functions and features offered by your appliance. Please take special note of all detailed technical information and installation instructions. It is essential that you follow these instructions to ensure the safety and reliability of this appliance.
Furthermore, not using appropriate personnel to install this appliance may affect any future warranty claims lodged, so please check with Parmco Appliances before any installation is carried out.
We hope you enjoy your new appliance. If you would like to find out more about this product or any other products in Parmco's extensive range, visit us online at www.parmco.co.nz.
INDEX
| PAGE | ||
| Warranty | 2 | |
| Important Safety Information | ||
| Before using this appliance | 4 | |
| For your safety | 4 | |
| Use and care | 6 | |
| Product Description | ||
| Description of the appliance | 7 | |
| Using the cooktop | 11 | |
| Using the oven | 13 | |
| Electronic timer | 14 | |
| Cooking modes | 17 | |
| Practical cooking advise | 18 | |
| Cooking guide | 19 | |
| Care and Maintenance | 20 | |
| Installation Instructions | 25 | |
A
IMPORTANT SAFETY INFORMATION
For best performance and to extend the life of your appliance, we recommend that you read the instructions in this owner's manual thoroughly before using your new appliance. It will provide you with all the information you need to ensure its safe installation, proper use and maintenance. Keep this owner's manual for future reference.
To maintain the efficiency and safety of this appliance, we recommend the following:
BEFORE USING THIS APPLIANCE
Read the instructions thoroughly.
- Remove all plastic protective films on the appliance before operating the appliance.
- Remove the plastic film on the oven glass door (when provided).
- To prepare the appliance for its first use, heat the empty oven at maximum temperature for 45 minutes. This allows unpleasant smells and smoke from protective oils used during manufacture and from new thermal insulation to burn off.
- Allow the unit to cool off and wash the oven with soapy water and then rinse.
DANGER
DO NOT PLACE ALUMINIUM FOIL OR SIMILAR ON THE FLOOR OF THIS OVEN
FOR YOUR SAFETY
- This appliance is designed for non-commercial, household use only and must not be altered in any way.
- This appliance can only be used safely when it is correctly connected to an efficient earthing

- During use, the appliance becomes hot. Care should be taken to avoid touching heating elements inside the oven.
- Keep the appliance thoroughly cleaned. Food residues may cause fire risks.
- Do not use a steam cleaner to clean this appliance.
- When the gas burners are lit, check the flame is always regular.
- WARNING: Accessible parts may become hot during use. To avoid burns, young children should be kept away.
- Do not use pans with unstable or deformed bottoms as this may cause overturning and spilling.
- Never line the oven with aluminium sheets, trays, tins or utensils as doing so may damage the enamel and elements and cause the appliance to malfunction.
- Do not use harsh abrasive cleaners or sharp metal scrapers to clean the oven door glass since they can scratch the surface, which may result in the glass shattering.
• After using the appliance, please ensure that all controls are in the "OFF" position. - Avoid touching the oven with wet body parts.
- Avoid improper or dangerous use of this appliance.
- Do not obstruct the ventilation or heat dissipation slots.
- Do not allow power cables of other appliances to come into contact with hot parts of this appliance.
- This appliance is intended for indoor use only. Avoid exposing the appliance to atmospheric elements such as direct sunlight and rain.
- Do not spray aerosols in the vicinity of this appliance while it is in operation.
- DO NOT USE OR STORE FLAMMABLE MATERIALS IN THE APPLIANCE OR NEAR THIS APPLIANCE.
For any enquiries please contact Parmco Appliances (09) 573 5678.
USE AND CARE USE AND CARE
How to use your oven
We recommend that you read the instructions in this owner's manual carefully before use. It will provide you with all the instructions you require to ensure safe installation, use and maintenance. Always keep this owner's manual close to hand since you may need to refer to it in the future. Place the spare serial number sticker on the front of this manual for future reference as you will need the serial number should this appliance need servicing.
It is important to remember that this oven may perform differently to the way your previous appliance worked. To obtain the best cooking results please experiment with the temperature, rack height and cooking times. As a guide to help you with this process please refer to the "Cooking Mode Table".
This multi-function oven combines the advantages of traditional convection ovens with those of the more modern fan assisted models in a single appliance. It is an extremely versatile.
Steam and Condensation
Often owners of new ovens will see a higher level of steam and condensation than they are used to in their previous appliance. This is normal and contributes to keeping the food moist during cooking. The amount of steam and condensation will depend on the type of food (fresh, defrosted, frozen) being cooked. The style of cooking (water baths) will also contribute to the amount of steam and condensation generated. Climatic conditions also contribute to the generation of condensation.
When food is heated it produces steam in the same way a boiling kettle does. When steam comes into contact with the oven door glass it will condensate and produce droplets. To reduce
PRODUCT DESCRIPTION
Description of appliance
AR 900s
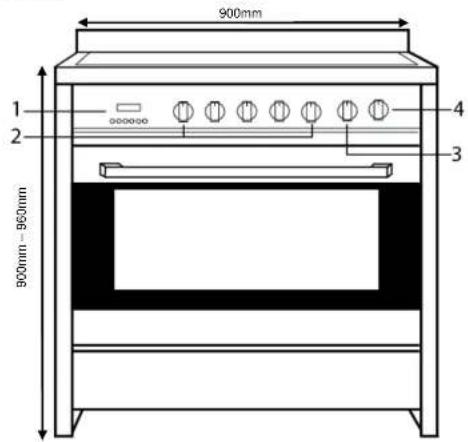
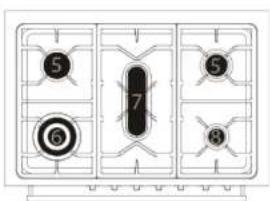
FS 600s

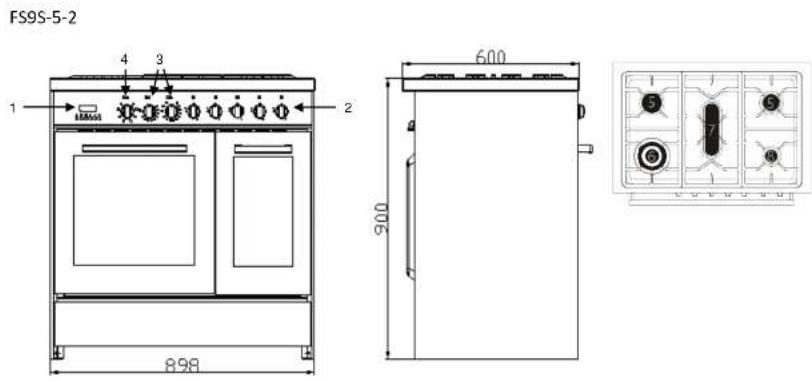
- Electronic clock
- Control knobs (cooktop burners)
- Cooking temperature selection knob
- Cooking mode selection knob
- Semi-rapid burner (medium)
-
Wok burner
-
Fish burner
-
Auxiliary burner (small)
Oven and Accessories
The appliance is supplied with easy clean shelf supports which offer a range of shelf heights. The oven contains two wire racks, one roasting dish, and a grill rack insert.
Controls
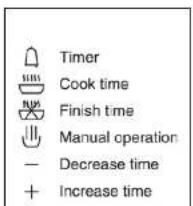
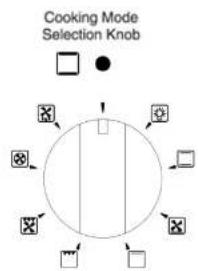
flowchart
graph TD
    A["Box"] --> B["Circle"]
    C["Box"] --> B
    D["Box"] --> B
    E["Box"] --> B
    F["Box"] --> B
    G["Box"] --> B
    H["Box"] --> B
    I["Box"] --> B
    J["Box"] --> B
    K["Box"] --> B
    L["Box"] --> B
    M["Box"] --> B
    N["Box"] --> B
    O["Box"] --> B
    P["Box"] --> B
    Q["Box"] --> B
    R["Box"] --> B
    S["Box"] --> B
    T["Box"] --> B
    U["Box"] --> B
    V["Box"] --> B
    W["Box"] --> B
    X["Box"] --> B
    Y["Box"] --> B
    Z["Box"] --> B
    AA["Box"] --> B
    AB["Box"] --> B
    AC["Box"] --> B
    AD["Box"] --> B
    AE["Box"] --> B
    AF["Box"] --> B
    AG["Box"] --> B
    AH["Box"] --> B
    AI["Box"] --> B
    AJ["Box"] --> B
    AK["Box"] --> B
    AL["Box"] --> B
    AM["Box"] --> B
    AN["Box"] --> B
    AO["Box"] --> B
    AP["Box"] --> B
    AQ["Box"] --> B
    AR["Box"] --> B
    AS["Box"] --> B
    AT["Box"] --> B
    AU["Box"] --> B
    AV["Box"] --> B
    AW["Box"] --> B
    AX["Box"] --> B
    AY["●"] --> AZ["●"]
    BA["●"] --> BB["●"]
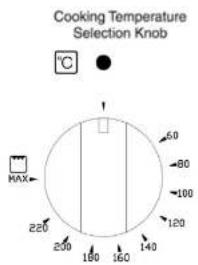
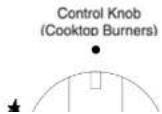
Igniting the Gas Cooktop

Front

Rear

Centre

Rear

Front

Off
Oven and Half Freestander (FS9S-5-2)

This symbol above the control knob selects the controls for the larger multifunction oven.

This symbol above the control knob selects the controls for the smaller conventional oven
Half Oven control (FS9S-5-2)
Turn off anti-clockwise

natural_image
Simple curved arrow pointing right, no text or symbols present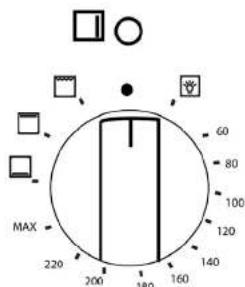
USING THE COOKTOP
Lighting the Cooktop Burners
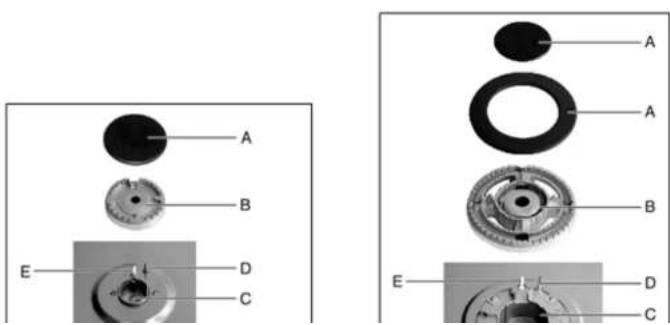
A - Burner cap
B - Burner body
C - Burner base
D - Flame failure thermocouple
E - Ignition candle
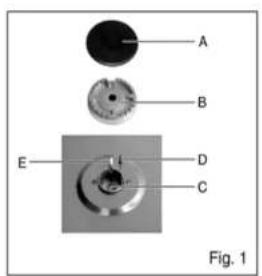
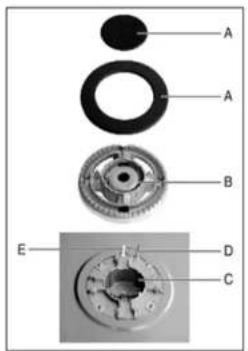
MAY VERY SLIGHTLY IN STYLE FOR DIFFERENT MODELS
To light the burner, press the control knob down and continue to hold the knob down before rotating the knob anti-clockwise to the high flame position. The ignition of the burner is integrated into the control knob and is automatically activated by pushing down on the control knob.
Correct Use of the Cooktop
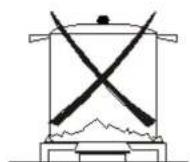
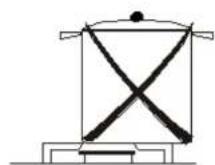
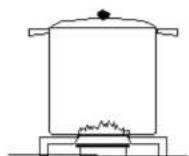
For lower gas consumption and better heating performance, use only flat bottom pots and pans of suitable dimensions for the burners. Please refer to the table below. As soon as liquid comes to boil, ensure that the flame is turned down to a level that keeps the liquid just boiling.
It is important that pots are placed centrally over the burners.
| POT SIZE | ||
| Burner | Minimum Diameter | Maximum Diameter |
| Small (auxiliary) | 80mm | 160mm |
| Medium (semi-rapid) | 120mm | 200mm |
| Large (rapid) | 180mm | 220mm |
| Triple flame (wok) | 220mm | 260mm |
| Fish burner | 310x140mm | 380x230mm |
USING THE OVEN
This multi-function oven combines the advantages of traditional conventional ovens with a modern fan assisted oven, all in a single appliance. It is extremely versatile, and allows you to choose easily and safely between different modes. The various cooking modes are selected using the cooking mode selection knob, located on the control panel.
It is important to remember that this oven may perform differently than your previous appliance may have. To obtain the best cooking results, please experiment with temperature, rack height, and cooking times.
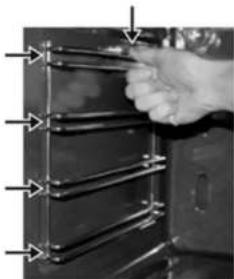
Fit the trays and shelves between the two closest wires as shown on the right.
natural_image
Close-up of a hand holding three metal trays with arrows pointing to them (no text or symbols visible)To remove the side support racks, push down on the wire below the locking pin and pull away from the oven wall until you can release the bottom of the support from the holes in the oven wall. To replace, reverse this procedure.
To operate this oven:
- Ensure that the manual mode is selected.
- Turn the cooking mode selection knob to the desired cooking mode.
• Turn the temperature selection knob to the desired temperature. - If grilling, turn the temperature selection knob to MAX.
ELECTRONIC TIMER
NOTE: The clock must be set in order for the oven to operate.
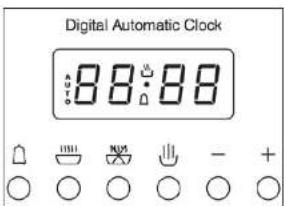
6 BUTTON DIGITAL CLOCK (only available on certain models)
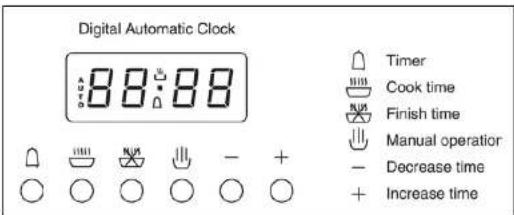
This appliance has a digital display 24 hour clock with six control buttons. When the power is connected, the screen displays 3 flashing numbers and "AUTO".
Adjusting the Digital Clock
To set the correct time, press the 📄 button first and then the + or - button to increase or decrease until the correct time is displayed.
Manual Operation Setting
If "AUTO" is flashing, automatic or semi automatic program has been set. Press the button. "AUTO" will clear from the display and the oven can be operated manually.
For Example: If cooking time takes 45 minutes and you want it to finish at 14:00:
- Press button, set the cooking time to 45 minutes with the + and - buttons.
- Press 📋 button, set finish time to 14:00 with + and - buttons.
- Set cooking temperature and cooking mode by turning the thermostat knob and mode selector knob.
After the above setting, the current time is displayed and "AUTO" will flash, indicating that the automatic cooking feature is set. When the clock displays 13:15, the oven will
start cooking automatically. While cooking, "AUTO" and will flash. When the clock displays 14:00, the oven automatically stops cooking. The alarm will ring and
"AUTO" will flash. Press the button and the ringing will stop.
Semi Automatic Setting
- Press button, set cooking finish time with + and - buttons. (Up to 23 hours and 59 minutes).
- Set cooking temperature and cooking mode by turning the thermostat knob and mode selector knob.
The oven starts immediately, and "AUTO" will flash. At the finish time reached, the oven automatically stops cooking. The alarm will ring and "AUTO" will flash. Press the alarm bell to stop the ringing.
When the button is pressed during semi-automatic cooking, the set cooking time is displayed. If the button is pressed and the time set back to 0, the semi-
The Oven Light
Set the cooking mode selection knob to 📋 switch on the oven light/s. The oven light/s will stay on while the oven is operating.
Cooling / Ventilation
In order to keep the exterior of the appliance cool, the appliance is fitted with a cooling fan that operates automatically. When the oven is on, the cooling fan turns on and you will notice a flow of air exiting between the door and control panel.
NOTE: When cooking is finished, the cooling fan will continue operating until the oven has cooled down. The cooling fan will then turn off automatically.
COOKING MODES
| Symbol | Function description |
 | Defrost: When Defrost is selected, the fan located at the back of the oven circulates room temperature air around the oven. This is recommended for defrosting all types of food, but is particularly effective at defrosting delicate food items. It is possible to accelerate the defrosting process by selecting a multi-cooking mode and setting the temperature between 80°C and 100°C. |
 | Conventional Bake: When set to Conventional mode, the top and bottom heating elements will operate together like a ‘normal’ conventional oven. Conventional bake is best suited for traditional baking and roasting. You should only use one shelf at a time, otherwise the heat will be unevenly distributed. You can balance the amount of heat between the top and the bottom of the dish by selecting a different shelf height. If you want more heat at the top of the dish, place the dish on the top or second shelf. For more heat on the bottom of the dish, place the dish on the third of fourth shelf |
| [GBWG] | Fan Assisted Bottom Bake: When set to Fan Assisted Bottom Bake cooking mode, the bottom element and the fan will operate. This mode is suitable for pastries, cakes, and non-dry sweets in baking tins or moulds that require heat from the bottom. |
 | Top Bake: When set to Top Bake mode, the top heating element will operate. This mode can be used to brown food at the end of cooking. |
 | Grill: When Grill is selected, the top element operates. Set the temperature to MAX when using the grill function. The extremely high and direct temperature of the grill makes it possible to brown the surface of meats and roasts while locking in the juices to keep them tender. Grill can also be used for dishes that require a high temperature on the surface of the dish, such as steak ribs, fillets, hamburgers, etc. Grill the food with the oven door slightly ajar. |
| Fan Assisted Grill: When the Fan Assisted Grill mode is selected, the inner element and the fan will operate. This mode increases the circulation of the heated air throughout the oven, |
PRACTICAL COOKING ADVICE
FOR THE OVEN
The oven offers a wide range of settings which allows you to cook any type of food in the best way possible. With time and experimentation, you will learn the heat settings, cooking modes, and shelf heights that will deliver you the results that best matches your cooking style. The advice given below is a guideline only which may be varied according to your personal experience.
Pre-Heating of Oven
If the oven needs to be preheated, the convection mode — or baking mode should be selected. These are the most efficient modes, which will reach the desired temperature as quickly as possible using the least amount of energy. Once the oven has been pre heated and the cooking mode selected, the food should be placed in the oven.
Multi-Shelf Cooking
If you want to cook food on several shelves, select the "Baking (Fan Forced)" mode. This is the only mode that allows you to cook on multi-shelves at the same time.
Baking Results
Please note that baking results will vary between different brands of stoves/ovens and your usual baking style may need adjusting in order to get the best results out of your Parmco oven. Recipes may state the use of certain cooking functions and temperatures, but due to the variance in cooking ingredients worldwide it is in your best interests to adapt the recipe if results were not as expected by trialling different functions and temperatures.
Models that have a fan force function generally will have a "hotspot" in the cavity; this is due to the rotation of the fan motors distributing the heat. It is important to use only the trays supplied or appropriately sized baking trays (which we sell), as any tray that is oversized or has baking paper lining the tray surface must not block the designed airflow path circulated by the fan motor. In some instances if certain areas of the oven are found to be browning foods more than others then tray rotation may be required. Alternatively reducing the amount of items on a single tray and dividing them between 2 trays
1.4 r r 1 r + 1 + 1 1
COOKING GUIDE
| Selector Knob Setting Conventional Bake | Food to be Cooked | Level from below | Temperature °C | Time in Minutes |
| First Courses | ||||
| Lasagne | 2 - 3 | 210 - 230 | 30 | |
| Oven Baked Pasta | 2 - 3 | 210 - 230 | 40 | |
 | Meat | |||
| Roast Veal | 2 | 175 - 200 | 30 - 40 /kg | |
| Roast Beef | 2 | 210 - 240 | 30 - 40 /kg | |
| Roast Pork | 2 | 170 - 200 | 30 - 40 /kg | |
| Roast Lamb | 2 | 170 - 200 | 15 / kg | |
| Pizza | 1 | 210 - 240 | 40 - 45 | |
| Meringue | 1 - 2 | 50 - 70 | 60 - 90 | |
| Temperature with preheated oven | ||||
| Selector Knob Setting Fan Forced Cooking | Food to be Cooked | Level from below | Temperature °C | Time in Minutes |
| First Courses | ||||
| Lasagne | 2 | 190 - 210 | 20 - 25 | |
 | Sponge Cake | 2 - 3 | 190 - 220 | 25 - 35 |
| Strudel | 1 - 2 | 150 | 25 - 35 | |
| Bread | 2 - 3 | 190 - 210 | 40 | |
| Toast | 1 - 2 | 220 - 240 | 7 | |
| Grilling | First Surface | Second Surface | ||
 | Pork Chops | 4 | 7 - 9 | 5 - 7 |
| Fillet of Pork | 3 | 9 - 11 | 5 - 9 | |
| Fillet of Beef | 3 | 9 - 11 | 9 - 11 | |
| Liver | 4 | 2 - 3 | 2 - 3 | |
| Fan Assisted Grill | Half Chicken | 3 | 9 - 14 | 9 - 11 |
| [D2WS] | Sausages | 4 | 7 - 9 | 5 - 6 |
| Meat Balls | 4 | 7 - 9 | 5 - 6 | |
| Fish Fillets | 4 | 5 - 6 | 3 - 4 | |
CARE AND MAINTENANCE
Do not use a steam cleaner to clean the appliance.
Cleaning the Oven
GENERAL CLEANING
Before cleaning your appliance or performing maintenance, make sure that the cooking mode selection knob and the cooking temperature selection knob is set to the "OFF" position.
To extend the life of your oven, it must be cleaned frequently:
- For best results the oven should be cleaned immediately after use, while still warm.
- The enamelled or stainless steel parts should be washed with hot soapy water. Do not use abrasive or corrosive substances as it will damage them. For tough stains use special products available on the market. After cleaning, rinse thoroughly and dry.
• Never use a steam cleaner for cleaning inside of the oven.
There is a seal surrounding the oven opening which guarantees its optimum performance. Check the condition of this seal on a regular basis.
Should it become damaged, please contact Parmco Appliances. This may or may not be covered under warranty.

Never place anything (including foil and oven trays) on the bottom of the oven when it is in operation as this will result in damage to the enamel.
Clean the glass door using non abrasive products or sponges and dry it with a soft cloth.
Cleaning the Front Panels
To clean the front panels, use hot soapy water. Use of abrasive cleaners, powders, pads, etc will remove the printed graphics prematurely.
Cleaning the Ignition Candle
Automatic burner ignition is provided by a ceramic "candle" (E) and a metal electrode. Periodically clean these parts of the cooktop thoroughly. To avoid ignition difficulties, check that the cavities in the burner are not obstructed (B). To remove deposits in the burner, remove the burner caps (A). After cleaning, put the burner heads and caps back together and put them correctly in their position. After washing, replace the pan trivets, checking that they are correctly positioned (see pictures below).
How to Remove the Oven door
For a more thorough clean, you can remove the oven door. Proceed as follows:
- Open the door to the full extent (Fig.1);
- Open the lever A completely on the left and right hinge (Fig.2);
- Hold the door as shown (Fig.3);
· Gently close the door until left and right hinge levers A are hooked to part B of the door (Dig.4);
Reassemble the door by following the above procedures backwards.
Fig.1
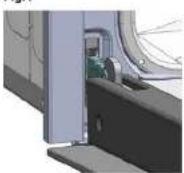
Fig.2
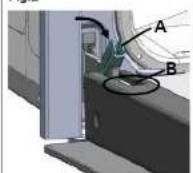
Fig.3
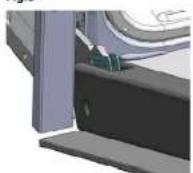
Fig.4
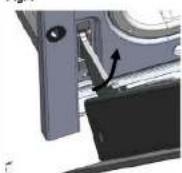
To dismantle the oven door (two methods)
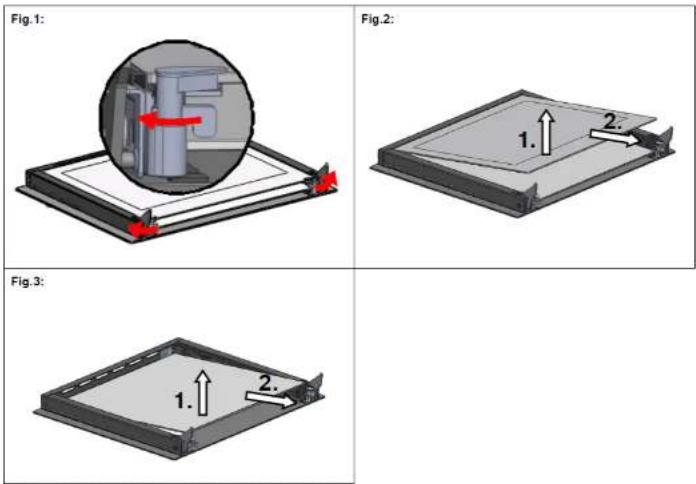
Method 1 remove and assemble procedure:
- Remove the seal A (Fig.2)、B、C(Fig.3) by push the no.2 rods of left and right sides(fig.1)
· Gently pull out the inner and middle panes of glass(fig.4)
- Clean the glass and other components with an appropriate cleaner. Dry thoroughly, and place on
a soft surface.
Reassemble the door by following the above procedures backwards.
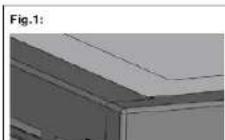
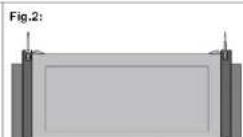
Reassemble the door by following the above procedures backwards.
Replacing the Oven Lamps

WARNING: Ensure that the appliance is turned off before replacing the oven lamp/s to avoid the possibility of electric shock.
Remove the glass cover of the lamp-holder as shown below.
For more detailed information about treatment, recovery and recycling of this product, please contact your local City Council office.
Routine Maintenance
The gas pipes and pressure regulator (if installed) should be checked periodically to ensure they are in good working condition. If anomalies are found, contact an authorised service agent.
To ensure good working performance and safety, the gas regulator taps must be greased periodically by authorised personnel only!
Abnormal Operation
Any of the following are considered to be abnormal operation and may require servicing.
• Yellow tipping of the burner flame
• Sooting up of cooking utensils
- Burners not igniting properly
- Burners failing to remain alight
- Burners extinguished by closing cupboard doors
• Gas valves being difficult to turn

Service and Parts
Before leaving the factory, this appliance was tested and adjusted by specialist and skilled staff to give the best operating results. Any subsequent necessary repairs or adjustments must be carried out with the greatest care and attention by authorized personnel. For this reason, we strongly advise you to contact Parmco Service department, specifying the nature of the problem, the model, and the serial number of the appliance. This data is provided on the data label adhered to the base of the appliance and on the duplicate data label in the appliance information pack.
INSTALLATION INSTRUCTIONS
- Installation of this appliance and its connection to the electrical mains must only be carried out by authorized personnel. Before any service procedure, it is important to ensure that the appliance is DISCONNECTED from the electrical mains.
- Do not modify this appliance.
- After removing the appliance from the packaging, make sure it is undamaged. In the unlikely event this occurs, contact Parmco before operating this appliance.
• Make sure that this appliance is adequately ventilated. - Make sure that the appliance is supplied with the type of gas indicated on the data label and the gas type label next to the connection point.
- Use of gas cooking appliances produces heat and moisture in the room in which it is installed. Ensure that the room is well ventilated by keeping the air intakes free of obstruction and in good working order, and/or by installing a ventilation extraction system.
- If the appliance is used intensively for a long time, the effectiveness of the ventilation will need to be increased, for example, by opening a window or increasing the power of the ventilation fan.
NOTES TO THE AUTHORIZED INSTALLER
This appliance shall only be installed by an authorized person. This appliance shall only be installed in complete accordance with the Gas and Electrical Standards of New Zealand. All local regulations,

building code requirements, and all other statutory requirements must be met.
Data Label
The data label is located at the rear of the appliance. A duplicate label is supplied for you to adhere to a suitable accessible area next to the appliance. The data label on the appliance must NEVER be removed. This appliance is suitable for use with both Natural Gas and LPG. A label is
Combustible Surfaces

The appliance shall be installed in accordance with the New Zealand standards relating to the installation of domestic cooking appliances.
In general, any adjoining wall surface within 200mm from the edge of any burner must be of a suitable non-combustible material to a height of 150mm, for the entire length of the appliance. Any combustible construction (e.g. cabinetry) must be a minimum of 750mm above this appliance. If a combustible bench top is within 200mm of any burner, then the appliance top should be a minimum of 10mm above the bench top. Any ventilation product supplied by Parmco Appliances should be a minimum of 650mm above this appliance.
Installing Units on a Plinth
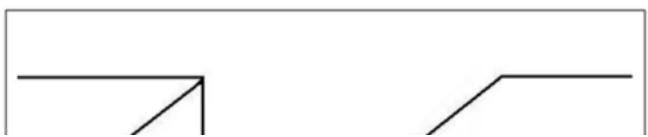
It is possible to install the FS 600, AR 900, FS 600-LEG, FS 600-OBS, FS 600-WHT, AR 900-LEG-1 and AR 900-OBS units on a "plinth" if required. Special ventilation is required in this application. Please refer to the diagram below.
- The appliance should be placed on a plinth constructed of material suitable to carry the full weight of the appliance.
• The base of the plinth should be constructed of a suitable non-combustible material. - A 40mm air gap must be provided at the rear of the plinth.
- 6 air gaps of 100mm wide x 10mm high must be provided in the front face of the plinth.
natural_image
Pure geometric lines forming two right angles with no text or symbolsAnti-Tilt/Hose Restraint Chain
Each appliance is supplied with a restraint chain. The restraint chain prevents strain being applied to the hose when the appliance is pulled forward and prevents the appliance from tilting forward.
The chain should restrict the appliance movement to no more than 80% of the hose length. The chain should be connected to a suitable anchor point as close to the behind of the appliance as possible. If the appliance is installed between two cabinets, drill holes into the cabinetry and secure the chains inside the cupboards.
WARNING: Ensure the chains are correctly anchored to prevent the appliance from tilting forward and to prevent strain on the hose when the appliance is pulled forward.

MAKE SURE THE ANTI-TILTING CHAINS ARE TAUT WHEN ANCHORED TO PREVENT THE APPLIANCE FROM TILTING.
FS 600-LEG and AR 900-LEG-1 Models
These models have extendable legs that you can use to raise and lower the appliance to the desired installation height. It is important not to over extend these legs as the appliance can become unstable.
- Lay the appliance on its back, being careful not to damage the appliance. It is advisable that two people carry out this operation.
- Extend the legs to the desired height.
- Screw the legs into the base, ensuring that the legs are hand tightened only.
- With two people, lift the appliance back upright. Take extra care during this process to avoid placing excess stress on the back legs as this may result in the full weight of the appliance landing on the legs and bending the bottom plate of the appliance.
CONNECTION TO THE GAS SUPPLY
Conversion to LPG
LPG jets are included with this appliance. To convert the unit to LPG, replace the jets with a size 7 socket. Ensure that the injector jets are matched with the burner size as per the technical data table below.
An LPG regulator is not supplied with this appliance and will need to be supplied and fitted by the authorized installer. The LPG regulator needs to meet all the relevant New Zealand standards.
Minimum Flame Setting
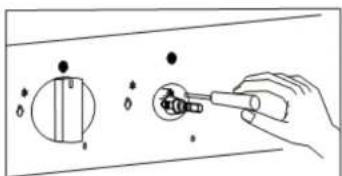
The minimum flame adjustment bypass screw is located above left of the gas valve shaft and can be accessed by removing the control knob. Using a thin blade screwdriver, turn the bypass screw fully clockwise and then turn it anti clockwise. 1 turn for the wok burner, 12 of a turn for the semi-rapid burner, and 3/8 of a turn for the auxiliary burners. This should result in a small, stable, flame that is uniform around the entire burner ring. If not, continue adjusting the bypass screw anti-clockwise in small increments until the desired low level flame is achieved.
natural_image
Illustration of a hand using a tool to adjust a small component, with no visible text or symbols.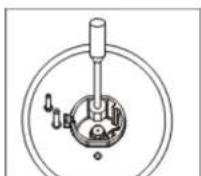
Cleaning
Cleaning by hand. Make sure the oven is cool before cleaning.
The catalytic liners should be cleaned using a solution of hot water and washing-up liquid applied with a soft nylon brush. Do not wash these liners in the dishwasher.
Do not use abrasive cleaning agents, hard brushes, scouring pads or cloths, steel wool, knives or other abrasive materials. Do not use oven spray on catalytic enamel as the chemicals used in oven sprays will damage catalytic liners and render them unusable.
If using oven sprays on the interior oven surfaces, the catalytic liners must first be removed from the oven.
Should the panels become heavily soiled, they will need to be taken out of the oven and cleaned by hand. They should be soaked in warm, soapy water for at least 2 hours and then wiped clean with a soft cloth.
Cleaning with high temperatures
Before cleaning the catalytic liners using high oven temperatures make sure that all interior oven surfaces have been cleaned as described above. Otherwise, the high temperatures can bake deposits onto the interior oven surfaces and make them impossible to remove.
Note that deposits of spices, syrups and similar substances are not removed by this process. These should be removed by hand with a mild solution of hot water and washing-up liquid applied with a soft brush.
- Remove all accessories from the oven.
• Set the oven to conventional function.
• Set the heat to 250 °C. - Run the oven for approximately 1 hour. The length of time will depend on the degree of soiling.
It is a good idea to set the finish time for the process using the end time setting, in case you forget to switch the oven off at the end.
Any remaining soil will gradually disappear with each subsequent use of the oven at high temperatures. The stains on the catalytic liners caused by grease, fats and oils from cooking are completely normal and will not be able to be completely removed. Catalytic liners are a consumable item and can be replaced with
CATALYTIC LINER INSTALLATION
Remove the side racks and fitting side catalytic liners
Unclip the bottom of the side rack from the lug.
Lift the side rack up to disengage the hooks.
The side rack should now be free to be pulled in towards the centre of the oven.
Repeat process for the other side.
Place catalytic liner on the side wall of the oven aligning the holes at the top.
Refit the side racks by inserting the top of the rack into the holes through the catalytic liner.
Clip bottom of rack into position over lug.
Removing and installing the catalytic fan cover
- Remove the 4 retaining screws on the top and bottom edge of the rear fan cover.
- Remove cover
Note: The fan cover must be replaced after cleaning
• To refit, place the fan cover back into position by lining up the screw holes in each corner.
- Insert screws firmly into appropriate holes
• The fan cover must not be loose
ELECTRICAL CONNECTION
The appliance comes fitted with an approved supply cord and can be connected to an appropriately rated plug that is compatible with the socket-outlet that is fitted to the final sub-circuit in the fixed wiring that is intended to supply this appliance. It is necessary that all installation and connections are carried out by qualified personnel and that the connections meet all New Zealand regulatory requirements.
Connection of Feed Cable to Mains

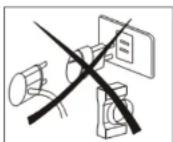
In the case of direct connection to the mains (hardwired without plug), it is necessary to insert a suitable omnipolar switch before the appliance, with a minimum opening of 3mm between the contacts – the grounding wire should not be interrupted by the switch.
Before connecting to the mains, make sure that:
- The electrical counter, the circuit breaker, feed cable, and socket are suitable to withstand the maximum load requirements as detailed on the rating label.
- The supply system is regularly grounded as per New Zealand regulations.
- The socket or omnipolar switch can easily be reached after the appliance is installed.
- After connection of the appliance to the mains, make sure no wires come into contact with any parts of the appliance subjected to heating.
- Never use reductions, shunts or adapters which can cause overheating or burning.


TECHNICAL DATA
| Natural Gas (G20) 2kPa | ||||
| Product Code | No. of burners x Injector size | |||
| Auxiliary | Semi-Rapid | Fish Burner | Wok | |
| FS 600 | 1 x 0.9 | 2 x 1.16 | 0 | 1 x 1.75 |
| FS 600-LEG | 1 x 0.9 | 2 x 1.16 | 0 | 1 x 1.75 |
| FS 600-OBS | 1 x 0.9 | 2 x 1.16 | 0 | 1 x 1.75 |
| FS 600-WHT | 1 x 0.9 | 2 x 1.16 | 0 | 1 x 1.75 |
| Nominal Gas consumption per burner | ||||
| 3.96 MJ/h | 6.48 MJ/h | - | 13.7 MJ/h | |
| AR 900 | 1 x 0.72 | 2 x 0.97 | 1 x 1.15 | 1 x 1.40 |
| AR 900-LEG-1 | 1 x 0.72 | 2 x 0.97 | 1 x 1.15 | 1 x 1.40 |
| AR 900-OBS | 1 x 0.72 | 2 x 0.97 | 1 x 1.15 | 1 x 1.40 |
| FS9S-5-2 | 1 x 0.72 | 2 x 0.97 | 1 x 1.15 | 1 x 1.40 |
| Nominal Gas consumption per burner | ||||
| 3.6 MJ/h | 6.3 MJ/h | 10.08 MJ/h | 13.7 MJ/h | |
| General Product LPG (G30/G31) 2.75kPa | ||||
| Product Code | No. of burners x Injector size | |||
| Auxiliary | Semi-Rapid | Fish Burner | Wok | |
| FS 600 | 1 × 0.57 | 2 × 0.71 | 0 | 1 × 1.05 |
| FS 600-LEG | 1 × 0.57 | 2 × 0.71 | 0 | 1 × 1.05 |
| FS 600-OBS | 1 × 0.57 | 2 × 0.71 | 0 | 1 × 1.05 |
| FS 600-WHT | 1 × 0.57 | 2 × 0.71 | 0 | 1 × 1.05 |
| Nominal Gas consumption per burner | ||||
Nominal Gas consumption per burner
- Installation and Operating Instructions
- Parmco Appliances extended 7 year warranty
- The Warranty is not valid:
- PARMCO
- IMPORTANT SAFETY INFORMATION
- BEFORE USING THIS APPLIANCE
- FOR YOUR SAFETY
- USE AND CARE USE AND CARE
- How to use your oven
- Steam and Condensation
- PRODUCT DESCRIPTION
- Oven and Accessories
- Igniting the Gas Cooktop
- Oven and Half Freestander (FS9S-5-2)
- Half Oven control (FS9S-5-2)
- USING THE COOKTOP
- Lighting the Cooktop Burners
- Correct Use of the Cooktop
- USING THE OVEN
- To operate this oven:
- ELECTRONIC TIMER
- BUTTON DIGITAL CLOCK (only available on certain models)
- Adjusting the Digital Clock
- Manual Operation Setting
- Semi Automatic Setting
- The Oven Light
- Cooling / Ventilation
- COOKING MODES
- PRACTICAL COOKING ADVICE
- FOR THE OVEN
- Pre-Heating of Oven
- Multi-Shelf Cooking
- Baking Results
- CARE AND MAINTENANCE
- Cleaning the Front Panels
- Cleaning the Ignition Candle
- How to Remove the Oven door
- To dismantle the oven door (two methods)
- Replacing the Oven Lamps
- Routine Maintenance
- Abnormal Operation
- Service and Parts
- INSTALLATION INSTRUCTIONS
- NOTES TO THE AUTHORIZED INSTALLER
- Data Label
- Combustible Surfaces
- Installing Units on a Plinth
- Anti-Tilt/Hose Restraint Chain
- FS 600-LEG and AR 900-LEG-1 Models
- CONNECTION TO THE GAS SUPPLY
- Conversion to LPG
- Minimum Flame Setting
- Cleaning
- Cleaning by hand. Make sure the oven is cool before cleaning.
- Cleaning with high temperatures
- CATALYTIC LINER INSTALLATION
- Removing and installing the catalytic fan cover
- ELECTRICAL CONNECTION
- Connection of Feed Cable to Mains
Brand : Parmco
Model : AR 900-OBS
Category : Cooker