
Jazzy Select - Wheelchair Shoprider - Free user manual and instructions
Find the device manual for free Jazzy Select Shoprider in PDF.


| Product Type | Power Wheelchair |
| Brand / Model | Shoprider Jazzy Select |
| Maximum Speed | Up to 4 mph (6.44 km/h) |
| Range (per charge) | Up to 15 miles (24.14 km) |
| Weight Capacity | 300 lbs (136 kg) |
| Maximum Safe Incline | 6° (10.5%) |
| Drive Wheels | 10 in (25.4 cm) solid |
| Caster Wheels | 6 in (15.24 cm) solid, rear-mounted |
| Anti-Tip Wheels | 5 in (12.7 cm) solid, front-mounted |
| Suspension | Active-Trac |
| Brakes | Intelligent Braking (electronic regenerative, disc park brake) |
| Batteries | Two 12V, U-1 deep-cycle (AGM or Gel-Cell) |
| Battery Charger | 3-amp, off-board (indoor use only) |
| Drivetrain | Two motor, mid-wheel drive |
| Turning Radius | Approx. 29 in (73.7 cm) |
| Overall Dimensions (approx.) | Width 26 in (66 cm), Length 47.5 in (121 cm) |
| Ground Clearance | See owner's manual figure 30 |
| Warranty (Frame) | 5 years limited |
| Warranty (Electronics) | 1 year limited |
| Warranty (Batteries) | 6 months (by manufacturer) |
Frequently Asked Questions - Jazzy Select Shoprider
User questions about Jazzy Select Shoprider
0 question about this device. Answer the ones you know or ask your own.
Ask a new question about this device
Download the instructions for your Wheelchair in PDF format for free! Find your manual Jazzy Select - Shoprider and take your electronic device back in hand. On this page are published all the documents necessary for the use of your device. Jazzy Select by Shoprider.
USER MANUAL Jazzy Select Shoprider
natural_image
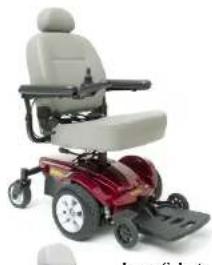
Exterior view of a modern electric motor with red and gray body (no text or symbols visible)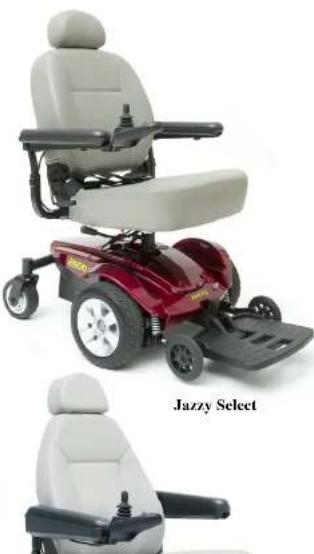
natural_image
Exterior view of a modern electric vehicle with a red and beige body, labeled 'Jazzy Select' (no other text or symbols visible)OWNER'S MANUAL
SAFETY GUIDELINES

WARNING! An authorized Pride Provider or a qualified technician must perform the initial setup of this power chair and must perform all of the procedures in this manual.
The symbols below are used throughout this owner's manual and on the power chair to identify warnings and important information. It is very important for you to read them and understand them completely.

WARNING! Indicates a potentially hazardous condition/situation. Failure to follow designated procedures can cause either personal injury, component damage, or malfunction. On the product, this icon is represented as a black symbol on a yellow triangle with a black border.

MANDATORY! These actions should be performed as specified. Failure to perform mandatory actions can cause personal injury and/or equipment damage. On the product, this icon is represented as a white symbol on a blue dot with a white border.

PROHIBITED! These actions are prohibited. These actions should not be performed at any time or in any circumstances. Performing a prohibited action can cause personal injury and/or equipment damage. On the product, this icon is represented as a black symbol with a red circle and red slash.
Quick Reference Information
Authorized Pride Provider:
Address:
Phone Number:
Purchase Date :
CONTENTS
I. INTRODUCTION 4
II. SAFETY 5
III. YOUR POWER CHAIR 17
IV. ASSEMBLY 23
V. COMFORT ADJUSTMENTS 26
VI. BATTERIES AND CHARGING 33
VII. CARE AND MAINTENANCE 37
VIII.WARRANTY 44
APPENDIX I - SPECIFICATIONS....46
I. INTRODUCTION
SAFETY
WELCOME to Pride Mobility Products (Pride). The power chair you have purchased combines state-of-the-art components with safety, comfort, and styling in mind. We are confident that these design features will provide you with the conveniences you expect during your daily activities. Once you understand how to safely operate and care for your power chair, it should give you years of trouble-free operation and service.
Read and follow all instructions, warnings, and notes in this manual before attempting to operate your power chair for the first time. You must also read all instructions, warnings, and notes contained in any supplemental instructional booklets for the controller, front riggings, and/or seating system that accompanied your power chair before initial operation. Your safety depends upon you, as well as your provider, caretaker, or healthcare professional in using good judgement.
If there is any information in this manual which you do not understand, or if you require additional assistance for setup or operation, please contact your authorized Pride Provider. Failure to follow the instructions in this manual and those located on your power chair can lead to personal injury and/or damage to the power chair, and may void the warranty.
PURCHASER'S AGREEMENT
By accepting delivery of this product, you promise that you will not change, alter, or modify this product or remove or render inoperable or unsafe any guards, shields, or other safety features of this product; fail, refuse, or neglect to install any retrofit kits from time to time provided by Pride to enhance or preserve the safe use of this product.
SHIPPING AND DELIVERY
Before using your power chair, make sure your delivery is complete as some components may be individually packaged. If you do not receive a complete delivery, please contact your authorized Pride Provider immediately. Where damage has occurred during transport, either to the packaging or content, please contact the delivery company responsible.
INFORMATION EXCHANGE
We want to hear your questions, comments, and suggestions about this manual. We would also like to hear about the safety and reliability of your new power chair, and about the service you received from your authorized Pride
II. SAFETY
PRODUCT SAFETY SYMBOLS
The symbols below are used on the power chair to identify warnings, mandatory actions, and prohibited actions. It is very important for you to read and understand them completely.

Read and follow the information in the owner's manual.

Do not allow unsupervised children to play near the power chair while the batteries are charging.
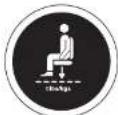
Maximum seat weight.
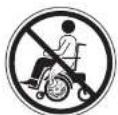
Keep your hands away from the tires when driving. Be aware that loose fitting clothing can become caught in drive tires.
II. SAFETY
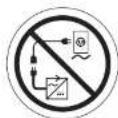
Do not connect an extension cord to the AC/DC converter or the battery charger.
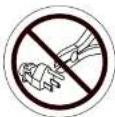
Removal of grounding prong can create electrical hazard. If necessary, properly install an approved 3-pronged adapter to an electrical outlet having 2-pronged plug access.

Wear safety goggles.

Corrosive chemicals contained in battery.
II. SAFETY

Explosive conditions exist!

Use only AGM or Gel-Cell batteries to reduce the risk of leakage or explosive conditions.
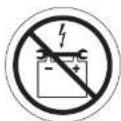
Keep tools and other metal objects away from battery terminals. Contact with tools can cause electrical shock.
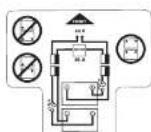
Battery Set Configuration:
+ = Positive (Red) Terminal Post
- = Negative (Black) Terminal Post
Connect Red wire to Red Positive (+) Terminal Post.
Connect Black wire to Black Negative (-) Terminal Post.
II. SAFETY

Battery charger for indoor use only.

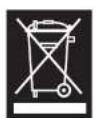
Disposal and recycling — contact your authorized Pride Provider for information on proper disposal and recycling of your Pride product and its packaging.
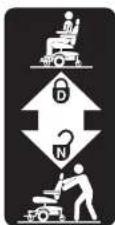
Locked and in drive mode.
Unlocked and in freewheel mode.
II. SAFETY
GENERAL GUIDELINES

MANDATORY! Do not operate your new power chair for the first time without completely reading and understanding this owner's manual.
Your power chair is a state-of-the-art life-enhancement device designed to increase mobility. Pride provides an extensive variety of products to best fit the individual needs of the power chair user. Please be aware that the final selection and purchasing decision regarding the type of power chair to be used is the responsibility of the power chair user, who is capable of making such a decision, and his/her healthcare professional (i.e., medical doctor, physical therapist, etc.).
The contents of this manual are based on the expectation that a mobility device expert has properly fitted the power chair to the user and has assisted the prescribing healthcare professional and/or the authorized Pride Provider in the instruction process for the use of the product.
There are certain situations, including some medical conditions, where the power chair user will need to practice operating the power chair in the presence of a trained attendant. A trained attendant can be defined as a family member or care professional specially trained in assisting a power chair user in various daily living activities.
As you begin using your power chair during daily activities, you will probably encounter situations in which you will need some practice. Simply take your time and you will soon be in full and confident control as you maneuver through doorways, on and off of elevators, up and down ramps, and over moderate terrain.
Below are some precautions, tips, and other safety considerations that will help you become accustomed to operating your power chair safely.
Modifications
Pride has designed and engineered your power chair to provide maximum mobility and utility. A wide range of accessories is available from your authorized Pride Provider to further customize your power chair to better suit your needs and/or preferences. However, under no circumstances should you modify, add, remove, or disable any feature, part, or function of your power chair.

WARNING! Do not modify your power chair in any way not authorized by Pride. Do not use
II. SAFETY
Weight Limitations
Your power chair is rated for a maximum weight capacity. Please refer to the specifications table for this limit. Keep in mind that the maximum weight capacity includes the combined weight of the user and any accessories mounted to the power chair.

MANDATORY! Stay within the specified weight capacity of your power chair. Exceeding the weight capacity voids your warranty. Pride will not be held responsible for injuries and/or property damage resulting from failure to observe weight limitations.

WARNING! Do not carry passengers on your power chair. Carrying passengers on your power chair may affect the center of gravity, resulting in a tip or a fall.
Tire Inflation
If your power chair is equipped with pneumatic tires, you should check or have the air pressure checked regularly. Proper inflation pressures will prolong the life of your tires and help ensure the smooth operation of your power chair.

WARNING! It is important that the psi/bar/kPa air pressure rating indicated on the tire be maintained in pneumatic tires at all times. Do not underinflate or overinflate your tires. Low pressure may result in loss of control, and overinflated tires may burst. Failure to maintain the psi/bar/kPa air pressure rating indicated on the pneumatic tires at all times may result in tire and/or wheel failure.
WARNING! Inflate your power chair drive tires from a regulated air source with an available pressure gauge. Inflating your tires from an unregulated air source could overinflate them, resulting in a burst tire.
NOTE: If the tire on your power chair lists the psi rating only, use the following conversion formulas to find the bar or kPa rating: bar = psi x 0.06895; kPa = psi x 6.89476.
Incline Information
More and more buildings have ramps with specified degrees of inclination, designed for easy and safe access. Some ramps may have turning switchbacks (180-degree turns) that require you to have good cornering skills on your power chair.
■ Proceed with extreme caution as you approach the downgrade of a ramp or other incline.
Take wide swings with your power chair's front wheels around any tight corners. If you do that, the power chair's rear wheels will follow a wide arc, not cut the corner short, and not bump into or get hung up on any railing corners.
II. SAFETY

WARNING! If your power chair is equipped with a reclining seatback, do not attempt to negotiate inclines with the seat in a reclined position. Do not attempt to negotiate obstacles with the seat in a reclined position unless an attendant is present to help stabilize the chair. Failure to heed could result in the power chair tipping over.
WARNING! Even though your power chair is capable of climbing slopes greater than those illustrated in figure 1, do not, under any circumstances, exceed the incline guidelines or any other specifications presented in this manual. Doing so could cause instability in your power chair.
Pride recommends that the maximum slope of an incline you attempt to safely ascend or descend on your power chair does not exceed 6^ (10.5%). See figure 1.

WARNING! Any attempt to climb or descend a slope steeper than 6° (10.5%) may put your power chair in an unstable position and cause it to tip.

Figure 1. Maximum Recommended Safe Slope (Ascending and Descending)
Freewheel Mode
Your power chair is equipped with two manual freewheel levers to allow for manual maneuverability by a trained attendant. For more information about how to place your power chair into and out of freewheel mode, see III. "Your Power Chair."

WARNING! Do not use your power chair in freewheel mode without an attendant present.
WARNING! Do not attempt to personally place your power chair in freewheel mode while seated on it. Ask an attendant for assistance if necessary.
WARNING! Do not place your power chair in freewheel mode while on an incline or decline. This could save the chair to sell uncertellable on its own
II. SAFETY
Public Streets and Roadways

WARNING! You should not operate your power chair on public streets and roadways. Be aware that it may be difficult for traffic to see you when you are seated on your power chair. Obey all local pedestrian traffic rules. Walt until your path is clear of traffic, and then proceed with extreme caution.
Outdoor Driving Surfaces
Your power chair is designed to provide optimum stability under normal driving conditions — dry, level surfaces composed of concrete, blacktop, or asphalt. However, Pride recognizes that there will be times when you will encounter other surface types. For this reason, your power chair is designed to perform admirably on packed soil, grass, and gravel. Feel free to use your power chair safely on lawns and in park areas.
■ Avoid driving on uneven terrain and/or soft surfaces.
■ Avoid tall grass that can entangle the running gear.
■ Avoid loosely packed gravel and sand.
■ Do not use your power chair in fresh or salt water.
■ Do not use your power chair at the edge of a stream, lake, or ocean.
■ If you feel unsure about a driving surface, avoid that surface.
Inclement Weather Precautions
Exposure of your power chair to inclement weather conditions should be avoided whenever possible. If suddenly caught up in rain, snow, severe cold or heat while operating your power chair, proceed to shelter at the earliest opportunity. Thoroughly dry your power chair before storing, charging, or operating your power chair.

PROHIBITED! Operating in rain, snow, salt, mist/spray conditions, and on icy/slippery surfaces can have an adverse effect on the electrical system. Maintain and store your power chair in a dry and clean condition.

WARNING! Prolonged exposure to hot or cold conditions may affect the temperature of upholstered and non-upholstered items on the power chair, possibly resulting in skin irritation. Exercise caution when using the power chair in extremely hot or cold conditions or when exposing your power chair to direct sunlight for prolonged periods of time.
Stationary Obstacles (Steps, Curbs, etc.)
Proceed with extreme caution when driving near raised surfaces, unprotected ledges, and/or drop-offs (curbs, porches, stairs, etc.). Be sure your power chair is traveling perpendicular to any curb you may be required to navigate.
II. SAFETY
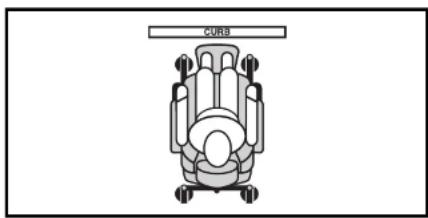
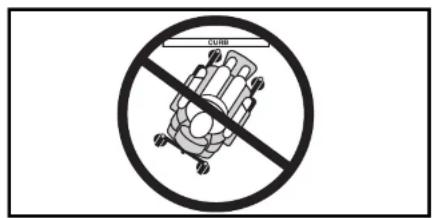
Figure 2. Correct Curb Approach Figure 3. Incorrect Curb Approach
Stairs and Escalators
Power chairs are not designed to travel up or down stairs or escalators. Always use an elevator.

WARNING! Never use your power chair to negotiate steps or escalators.
Doors
■ Determine if the door opens toward or away from you.
■ Drive your power chair gently and slowly forward to push the door open. Or drive your power chair gently and slowly backward to pull the door open.
Elevators
Modern elevators have a door edge safety mechanism that, when pushed, reopens the elevator door(s).
If you are in the doorway of an elevator when the door(s) begin to close, push on the rubber door edge or allow the rubber door edge to contact the power chair and the door will reopen.
■ Use care that pocketbooks, packages, or power chair accessories do not become caught in elevator doors.
Lift System/Elevation Products
If you will be traveling with your power chair, you may find it necessary to use a vehicle-mounted lift system or elevation product to aid in transportation. Pride recommends that you closely review the instructions, specifications, and safety information set forth by the manufacturer of the lift/elevation product before using that product.
II. SAFETY
Positioning Belts
Your authorized Pride Provider, therapist(s), and other healthcare professionals are responsible for determining your requirement for a positioning belt in order to operate your power chair safely.

WARNING! If you require a positioning belt to safely operate your power chair, make sure it is fastened securely in order to reduce the possibility of a fall from the power chair.
WARNING! The positioning belt is not designed for use as a seat belt in a motor vehicle. Nor is your power chair suitable for use as a seat in any vehicle. Anyone traveling in a vehicle should be properly belted into seats approved by the vehicle manufacturer.
Batteries
In addition to following the warnings below, be sure to comply with all other battery handling information. For more information about your power chair's batteries, see VI. "Batteries and Charging."


MANDATORY! Battery posts, terminals, and related accessories contain lead and lead compounds. Wear goggles and gloves when handling batteries and wash hands after handling.
WARNING! Power chair batteries are heavy. See specifications table. If you are unable to lift that much weight, be sure to get help. Use proper lifting techniques and avoid lifting beyond your capacity.

WARNING! Always protect the batteries from freezing and never charge a frozen battery. Charging a frozen battery may result in damage to the battery.
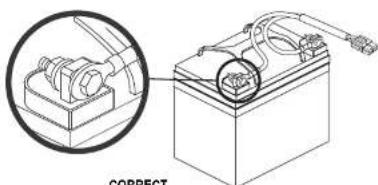
WARNING! Connect the battery harnesses in the proper manner. RED (+) cables must be connected to positive (+) battery terminals/posts. BLACK (-) cables must be connected to negative (-) battery terminals/posts. Protective caps should be installed over all battery terminals. REPLACE cables immediately if damaged.
Removable Parts

WARNING! Do not attempt to lift or move a power chair by any of its removable parts, including the armrests, seat, front riggings, controller, and shrouds.
Preventing Unintended Movement
II. SAFETY
Transfers
Transferring onto and off of your power chair requires a good sense of balance. Always have an attendant or healthcare professional present while learning to properly transfer yourself.
To eliminate the possibility of injury, Pride recommends that you or a trained attendant perform the following tasks before attempting a transfer:
■ Turn off the power to the controller.
■ Ensure your power chair is not in freewheel mode. See III. "Your Power Chair."
■ Turn the caster wheels toward the transfer destination to improve power chair stability during transfer.
■ Make sure both armrests are flipped up or removed from your power chair.
■ Flip up the foot platform or move the leg rests aside; this will help to keep your feet from getting caught on the front rigging during the transfer.
■ Reduce the distance between your power chair and the object you are transferring onto.
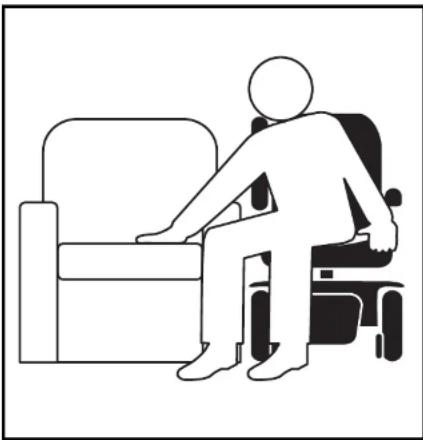
natural_image
Silhouette of a person sitting on a chair, no text or symbols presentFigure 4. Ideal Transfer Position
WARNING! Before transferring, position yourself as far back as possible in the power chair seat to prevent the power chair from tipping forward during transfer.
WARNING! Avoid putting all of your weight on the power chair armrests and do not use the armrests for weight bearing purposes, such as transfers. Such use may cause the power chair to tip, resulting in a fall from the power chair and personal injury.

WARNING! The controller and controller bracket are non-load bearing items in your power chair. Do not use the controller or controller bracket for weight bearing purposes, such as transfers. Such use may cause damage to these components, resulting in a fall from the power chair and personal injury.
II. SAFETY
Alcohol/Smoking
The power chair user must exercise care and common sense when operating his/her power chair. This includes awareness of safety issues while under the influence of alcohol or while smoking.
WARNING! Do not operate your power chair while you are under the influence of alcohol, as this may impair your ability to operate your power chair in a safe manner.

WARNING! Pride strongly recommends that you do not smoke cigarettes while seated in your power chair, although the power chair has passed the necessary testing requirements for cigarette smoking. You must adhere to the following safety guidelines if you decide to smoke cigarettes while seated in your power chair.
■ Do not leave lit cigarettes unattended.
- Keep ashtrays a safe distance from the seat cushions.
■ Always make sure cigarettes are completely extinguished before disposal.
Electromagnetic and Radio Frequency Interference (EMI/RFI)

WARNING! Laboratory tests have shown that electromagnetic and radio frequency waves can have an adverse effect on the performance of electrically-powered mobility vehicles.
Electromagnetic and Radio Frequency Interference can come from sources such as cellular phones, mobile two-way radios (such as walkie-talkies), radio stations, TV stations, amateur radio (HAM) transmitters, wireless computer links, microwave signals, paging transmitters, and medium-range mobile transceivers used by emergency vehicles. In some cases, these waves can cause unintended movement or damage to the control system. Every electrically-powered mobility vehicle has an immunity (or resistance) to EMI. The higher the immunity level, the greater the protection against EMI. This product has been tested and has passed at an immunity level of 20 V/m.

WARNING! Be aware that cell phones, two-way radios, laptops, and other types of radio transmitters may cause unintended movement of your electrically-powered mobility vehicle due to EMI. Exercise caution when using any of these items while operating your mobility vehicle and avoid coming into close proximity of radio and TV stations.

WARNING! The addition of accessories or components to the electrically-powered mobility vehicle can increase the susceptibility of the vehicle to EMI. Do not modify your power chair in any way not authorized by Pride.
WARNING! The electrically-powered mobility vehicle itself can disturb the performance of other
III. YOUR POWER CHAIR
THE JAZZY SELECT SERIES POWER CHAIR
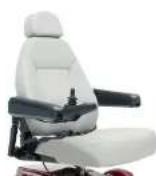
The Jazzy Select Series Power Chair has two main assemblies: the seat assembly and the power base assembly. See figure 5. Typically, the seat assembly includes the armrests, scatback, and seat basc. The power base assembly includes two motor/brake assemblies, two drive wheels, two batteries, and wiring harnesses. The Select power base will also include two rear caster wheels and two front anti-tip wheels, while the Select 6 and Select 6 with Power Seat will include four caster wheels. See figures 5, 6, 7, 8, 9, and 10.
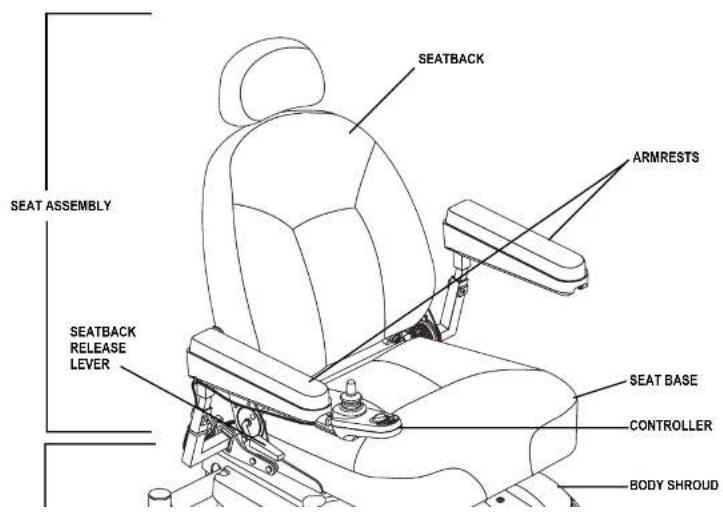
III. YOUR POWER CHAIR
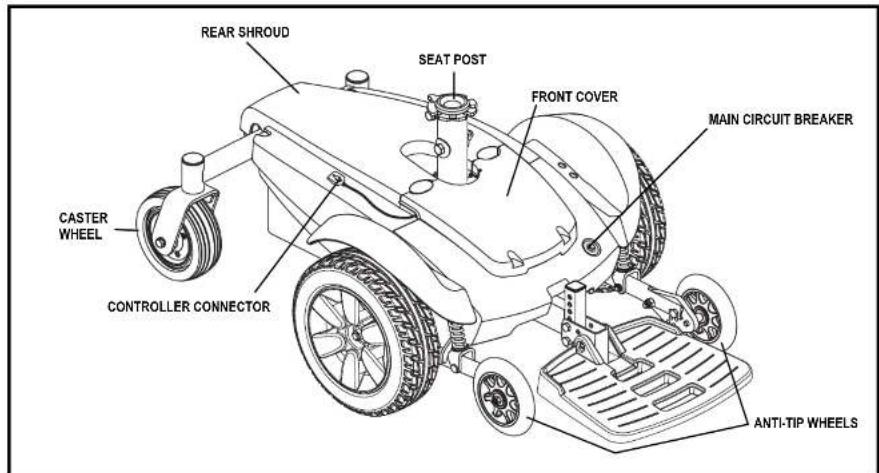
Figure 6. The Jazzy Select Power Base

III. YOUR POWER CHAIR
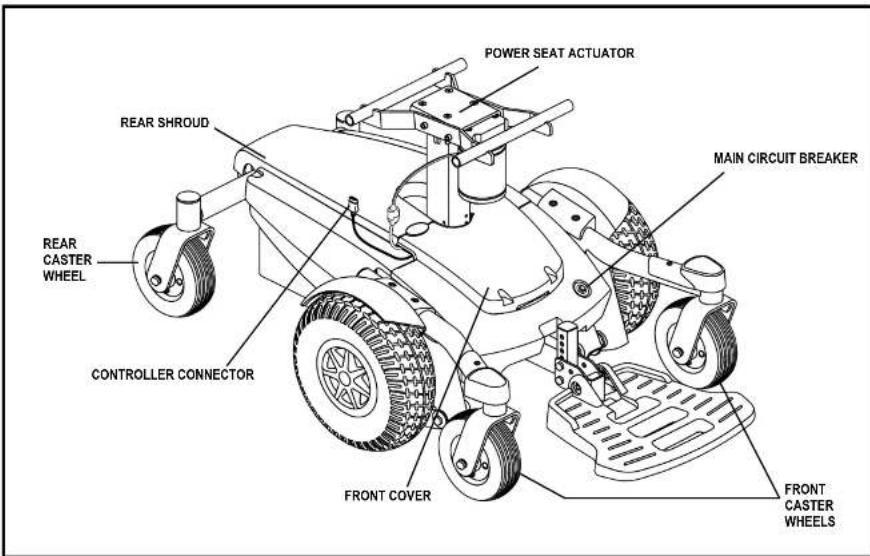
Figure 8. The Jazzy Select 6 with Power Seat
III. YOUR POWER CHAIR
Electrical Components
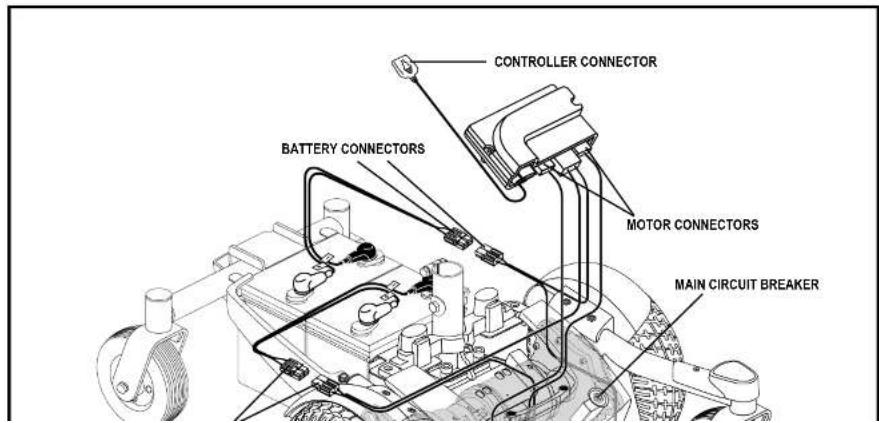
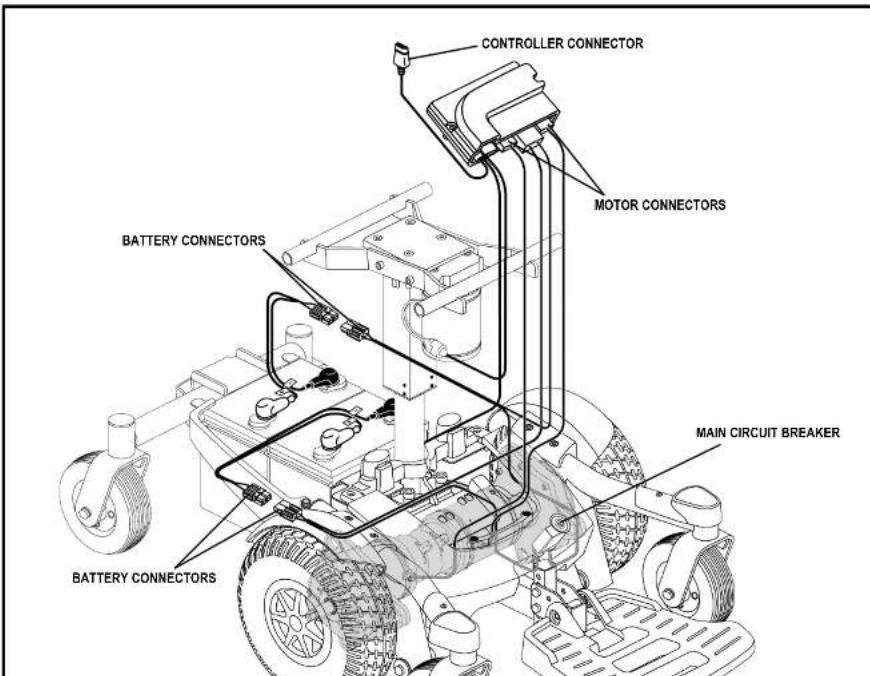
The electrical components are located either on or inside the power base. The main circuit breaker is located on the front of the power base. The power module is located under the front cover. See figures 9 and 10.
Main Circuit Breaker: The main circuit breaker is a safety feature built into your power chair. When the batteries and the motors are heavily strained (e.g., from excessive loads), the main circuit breaker trips to prevent damage to the motors and the electronics. If the circuit trips, allow your power chair to "rest" for approximately one minute. Next, push in the circuit breaker button, turn on the controller, and continue normal operation. If the main circuit breaker continues to trip repeatedly, contact your authorized Pride Provider.
Power Module: Provides connection between the joystick module and the motors, batteries, and off-board charger.
III. YOUR POWER CHAIR
III. YOUR POWER CHAIR
Manual Freewheel Levers
Your power chair has a manual freewheel lever on each motor. Manual freewheel levers enable you to disengage the drive motors from the gearboxes and maneuver the chair manually.

WARNING! Do not use the power chair while the drive motors are disengaged! Do not disengage the drive motors when the power chair is on an incline or decline, as the unit could roll on its own. Only engage the freewheel mode when on a level surface.
WARNING! It is important to remember that when your power chair is in freewheel mode, the braking system is disengaged.
To engage or disengage the drive motors:
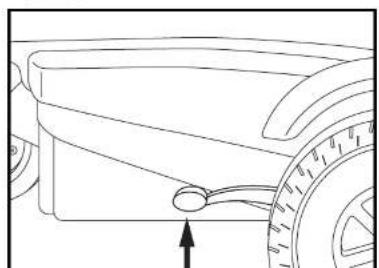
- Locate the lever on each side of the power base.
- Pull both levers upward to engage the drive motors (drive mode). See figure 11.
- Push both levers downward to disengage the drive motors (freewheel mode). See figure 12.
If a lever is difficult to move in either direction, slightly rock the power chair back and forth. The lever should then move to the desired position.

WARNING! Do not use the freewheel lever handles as tie-down points to secure this product.
natural_image
Line drawing of a vehicle's front wheel and side panel, showing tire and handle (no text or symbols)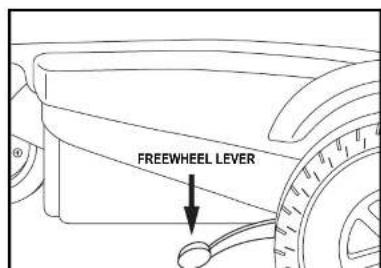
IV. ASSEMBLY
INITIAL ASSEMBLY
Your power chair may require some assembly either before initial use or after transportation.
NOTE: Any nylon insert lock nut removed during the disassembly or adjustment of the power chair must be replaced with a new nylon insert lock nut. Nylon insert lock nuts should not be reused as it may cause damage to the nylon insert, resulting in a less secure fit. Replacement nylon insert lock nuts are available at local hardware stores or through your authorized Pride Provider.
Seat Installation (Select and Select 6 only)
It may be necessary to install the seat either prior to initial operation or after transporting your power chair.

WARNING! Do not pick up the seat frame by the armrests. They are free to pivot, and you may lose control of the seat if they do so.
To install the seat:
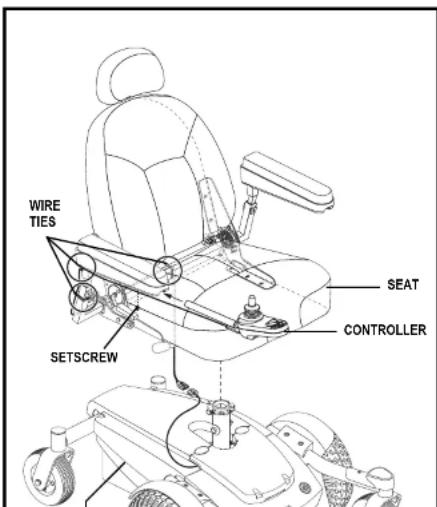
- Slide the seat down onto the power base. See figure 13.
- Install the controller into one of the armrests. Tighten the setscrew with the supplied hex key. See figure 13.
- Lift the armrest straight up, then route the controller harness and secure with wire ties as shown in figure 13.
NOTE: It is important that the armrest be lifted straight up prior to securing the controller harness with wire ties.
MANDATORY! Prevent controller harness damage! Avoid routing the controller harness on the outside of
IV. ASSEMBLY
Seat Installation (Select 6 with Power Seat only)
It may be necessary to install the seat either prior to initial operation or after transporting your power chair. Most seats are attached to the power base with the Universal Mounting System (UMS). The UMS consists of universal parts that may be attached to any medium-back or high-back seat, regardless of seat width or seat depth. The two main components are aluminum extrusions mounted to the seat base. These extrusions attach to a pair of trapezc bars that are mounted to the power base. See figure 14.

WARNING! Do not pick up the seat frame by the armrests. They are free to pivot, and you may lose control of the seat if they do so.
To install the power seat:
- Tilt the seat back and slide the rear extrusion onto the power seat base.
- Lower the front extrusion onto the power seat base until the seat locks into place.
- Flip down the seat latch safety. See figure 15.
- Connect the power seat connector to the power base. See figure 14.
- Lift the armrest straight up, then route the controller harness and secure with wire ties as shown in figure 16.
NOTE: It is important that the armrest be lifted straight up prior to securing the controller harness with wire ties.
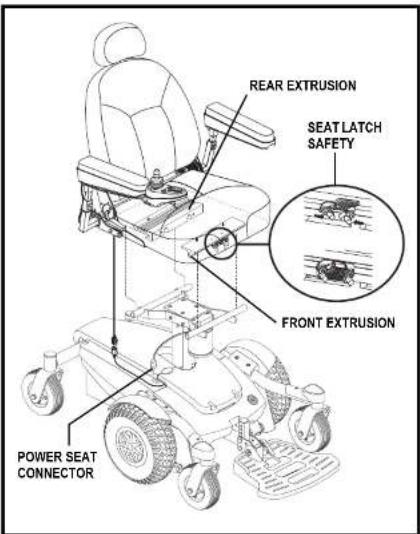
Figure 14. Universal Mounting System on Select 6 with Power Seat
IV. ASSEMBLY
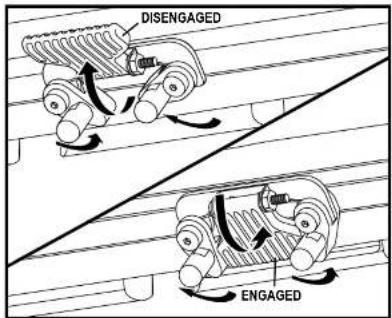
Figure 15. Seat Latch Safety
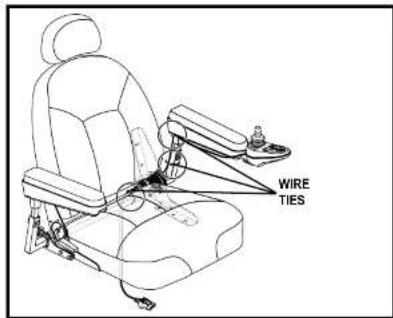
Figure 16. Select 6 with Power Seat Controller Routing
V. COMFORT ADJUSTMENTS
COMFORT ADJUSTMENTS
After becoming familiar with your power chair's operation, you may find the need to make some adjustments to increase your comfort, such as seat height, armrest angle, foot platform height and angle, and controller position. Refer to the following information before making comfort adjustments.
NOTE: If your power chair is equipped with an optional seating system, please refer to the information provided in separate manuals.

WARNING! The center of gravity of your power chair was factory set to a position that meets the needs of the demographic majority of users. Your authorized Pride Provider has evaluated your power chair and made any necessary adjustments to suit your specific requirements. Do not change your seating configuration without first contacting Pride Mobility Products or your authorized Pride Provider.
WARNING! Some power chair components are heavy. You may need assistance to lift or carry them. Please refer to the specifications table for specific component weights before you disassemble the power chair.
WARNING! Remove the occupant from the power chair before making any adjustments.
Seat Height Adjustment (Select and Select 6 Only)
You can change the seat height to one of three positions in 1-in. (2.5-cm) increments.
To change the seat height:
- Turn off the power to the controller.
- Ensure the power chair is in drive mode. See figure 11.
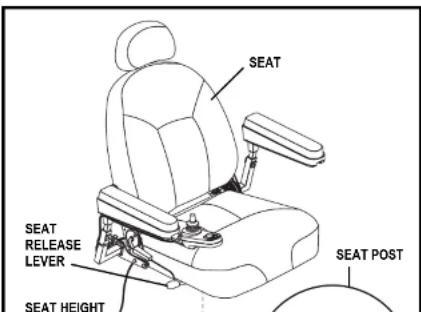
- Disconnect the controller connector from the power base. See figure 17.
- Disengage the seat release lever. See figure 17.
- While holding the lever, swivel the seat left or right and then pull it up and off of the power base.
- Loosen the hardware at the rear of the seat post. See Figure 17
V. COMFORT ADJUSTMENTS
Seat Height Adjustment (Select 6 with Power Seat Only)
Your power chair is equipped with a power elevating seat. You can change the seat height through the controller.
To change the seat height:
- Push the on/off key to power on the chair and the controller. See figure 18.
- Push the desired actuator key to select actuator mode. See figure 18.
- Push the joystick forward to raise the seat to the desired position
- Pull the joystick backward to lower the seat to the desired position.
- Push the on/off key to return to drive mode. See figure 18.

WARNING! Do not allow the motor to run more than a few seconds after the mechanism reaches the top or bottom limit.
NOTE: For more information on operating the power elevating seat, contact your authorized Pride Provider.

WARNING! The power elevating seat option is intended for use on a level surface only. Never raise the seat from its lowest position on an inclined surface. Failure to heed this warning can result in the power chair tipping over.
WARNING! Never raise the seat from its lowest position when operating your power chair on bumpy or uneven surfaces. Failure to heed this warning can result in the power chair tipping over.
WARNING! Never raise the power elevating seat while your power chair is in the freewheel mode.
WARNING! Always fasten the positioning belt when operating the power elevating seat.
WARNING! Pinch Point Hazard! Keep area around actuator clear when lowering power seat.
NOTE: The power elevating seat option is equipped with a system that reduces the speed of the power chair by two-thirds when the seat is elevated more than approximately 0.75 in. (19 mm). Always check to be sure this system is operating properly before using your power chair.
V. COMFORT ADJUSTMENTS
NOTE: The most common configuration of the seat adjustment hardware is shown in figure 19. Your product may be equipped with a different configuration. All configurations operate in a similar manner.
Manual Recline Seatback Adjustment
If your power chair is equipped with a manual recline seatback, you can adjust the seatback angle with the seatback release lever. The lever is located on the right side of the seat base. See figure 19.
To adjust the recline angle:
- Pull up on the seatback release lever.
- Lean forward or backward to the desired position.
- Release the lever.
Seatback Angle Adjustment
If your power chair is equipped with a limited-recline seatback, you can adjust it to four (4) different angles: 90^ , 102^ , 105^ , or 107^ .
To adjust the seatback angle:
- Remove the adjusting screws from each seat hinge.
- Set the seatback at the desired angle.
- Reinstall the adjusting screws to each seat hinge and tighten.
Armrest Width Adjustment
You can change each armrest's width independently of the other.
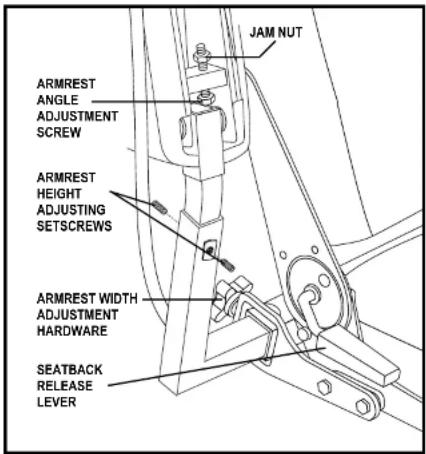
Figure 19. Armrest and Seatback Adjustments
V. COMFORT ADJUSTMENTS
Armrest Height Adjustment
To change the armrest height:
- Loosen the setscrews on the armrest. See figure 19.
- Raise or lower the armrest to the desired height.
- Tighten the setscrews to secure the armrest.
Controller Position
You can move the controller in toward or out away from the armrest, or change the position of the controller for either left-hand or right-hand use.

WARNING! Do not place the controller harness so that it can be pinched in the seat frame or the power base frame.
To extend the controller:
- Flip up the armrest so it is perpendicular to the floor.
- Loosen the setscrew on the controller bracket. See figure 20.
- Slide the controller into or out of the armrest to the desired position.
- Tighten the setscrew to secure the controller.
To change the controller position:
- Turn off the power to the controller.
- Unplug the controller harness from the power base.
- Cut the wire tie(s) that secure the controller harness to the armrest and seat.
- Flip up the armrests.
- Loosen the setscrew on the underside of each armrest. See figure 20.
- Slide the controller out of the armrest.
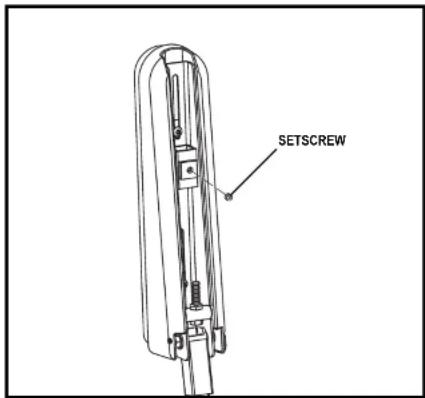
Figure 20. Underside of Armrest
V. COMFORT ADJUSTMENTS
Foot Platform Height Adjustment
The foot platform height is easily adjusted to different heights in 0.5-in. (1.27-cm) increments.
To raise or lower the foot platform:
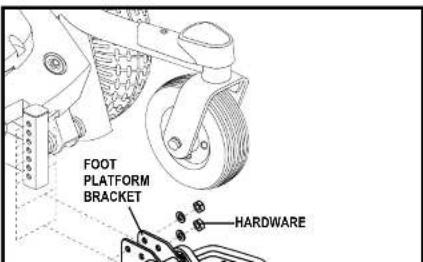
- Remove the hardware from the foot platform bracket. See figure 21 or 22.
- Raise or lower the foot platform to the desired height.
- Reinstall the hardware into the foot platform bracket and tighten.
Foot Platform Depth Adjustment
To adjust the foot platform depth:
- Remove the hardware from the foot platform bracket. See figure 21 or 22.
- Move the foot platform in or out to the desired depth.
- Reinstall the hardware into the foot platform bracket and tighten.
Foot Platform Angle Adjustment
You can adjust the angle of the foot platform. See figure 21 or 22.
To adjust the foot platform angle:
- Flip up the foot platform and locate the adjustment screw.
- Turn the adjustment screw to raise or lower the front of the foot platform.
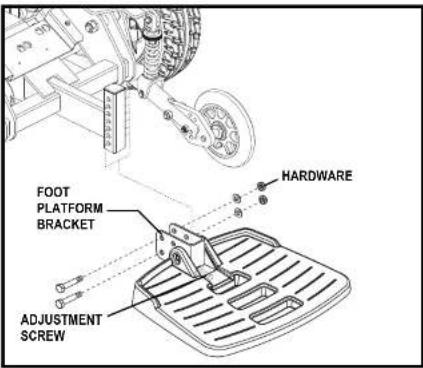
Figure 21. Select Foot Platform Adjustment
V. COMFORT ADJUSTMENTS
Swing-away Footrests
Swing-away Footrests (SFRs) enable you to rotate the footrests to the side before you transfer onto or off of your power chair. See figure 23.
To rotate the SFRs:
- Push in the release lever.
- Rotate the SFRs.
To adjust the SFR length:
- Remove the adjustment screws from the footrest extension.
- Slide the footrest up or down to the desired length.
- Reinstall the two adjustment screws.
Elevating Leg Rests
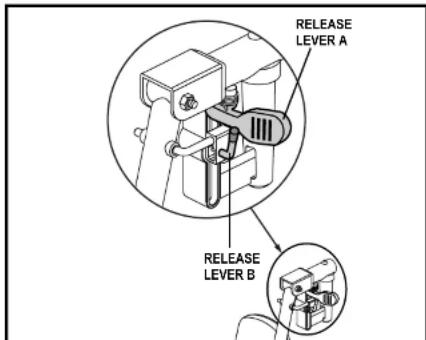
Elevating Leg Rests (ELRs) offer an infinite range of adjustment for the leg angle and a footrest adjustment range of 12-19 in. (30.48-48.26 cm). See figure 24.
To rotate the ELRs:
- Push in release lever A.
- Rotate the ELRs.
To adjust the ELR angle:
- Push down release lever B.
- Move the leg rest to the desired angle.
To adjust the ELR length:
- Remove the two adjustment screws from the side of each leg rest extension.
- Slide the leg rest up or down to the desired length.
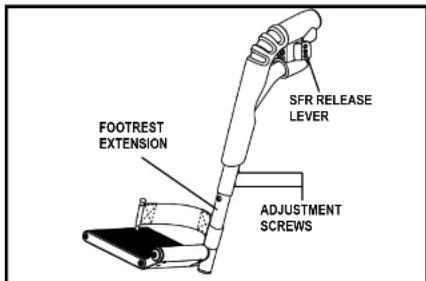
Figure 23. Swing-Away Footrests
Anti-Tip Wheels (Select Only)
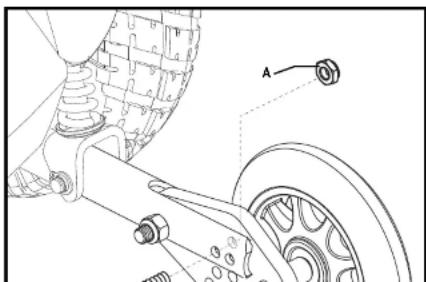
The anti-tip wheels are designed to give your power chair increased stability on rough surfaces. The anti-tip wheels arc preset at the factory for smooth surfaces or indoor use only. If you plan on using your power chair on rough surfaces, it may be necessary to adjust the anti-tip wheels to better suit your needs. The anti-tip wheels may need adjustment if the following occurs:
■ When coming to a stop, your power chair tips forward excessively.
■ The anti-tip wheels constantly rub the ground.

WARNING! Consult your authorized Pride Provider before attempting to change the anti-tip wheel height! Changing the anti-tip wheel height affects handling under acceleration!

WARNING! The higher you raise the anti-tip wheels, the more you increase your power chair's tendency to tilt forward while decelerating. You can compensate for this by having your authorized Pride Provider make a small adjustment to the pre-programmed deceleration setting in the controller or by moving the seat assembly farther to the back of your power chair.
PROHIBITED! Do not remove the anti-tip wheels.
NOTE: Each drive tire must be inflated to the psi/bar/kPa air pressure rating indicated on the tire for pneumatic tires. The user must also be seated in the power chair in order to properly adjust the anti-tip wheels.
To adjust the anti-tip wheels:
- Loosen nut A. See figure 25.
- Remove bolt B.
- Raise or lower the anti-tip wheel. Each hole is in 0.5-in. (1.27-cm) increments.
- Reinstall bolt B.
- Tighten nut A.
- Raise or lower the other anti-tip wheel so that it is at the same height.
natural_image
Technical line drawing of a mechanical assembly with springs and a wheel (no text or symbols)VI. BATTERIES AND CHARGING
BATTERIES AND CHARGING
Your power chair uses two long-lasting, 12-volt, deep-cycle batteries. These batteries are sealed and maintenance free. Since they are sealed, there is no need to check the electrolyte (fluid) level. Deep-cycle batteries are designed to handle a longer and deeper discharge. Though they are similar in appearance to automotive batteries, they are not interchangeable. Automotive batteries are not designed to handle a long, deep discharge, and also are unsafe for use in power chairs.


MANDATORY! Battery posts, terminals, and related accessories contain lead and lead compounds. Wear goggles and gloves when handling batteries and wash hands after handling.
PROHIBITED! Always use two batteries of the exact same type, chemistry, and amph-hour (Ah) capacity. Refer to the specifications table in this manual and in the manual supplied with the battery charger for recommended type and capacities.
WARNING! Contact your authorized Pride Provider if you have any questions regarding the batteries in your power chair.
Charging the Batteries
The battery charger is essential in providing long life for your power chair batteries. It is designed to optimize your power chair's performance by charging the batteries safely, quickly, and easily. The battery charger is only functional when the charger power cord is plugged into an electrical outlet.


PROHIBITED! Removal of grounding prong can create electrical hazard. If necessary, properly install an approved 3-pronged adapter to an electrical outlet having 2-pronged plug access.
PROHIBITED! Never use an extension cord to plug in your battery charger. Plug the charger directly into a properly wired standard electrical outlet.
PROHIBITED! Do not allow unsupervised children to play near the power chair while the batteries are charging. Pride recommends that you do not charge the batteries while the power chair is occupied.
MANDATORY! Read the battery charging instructions in this manual and in the manual supplied with the battery charger before charging the batteries.
WARNING! Evolusive space may be generated while charging the batteries. Keep the
VI. BATTERIES AND CHARGING
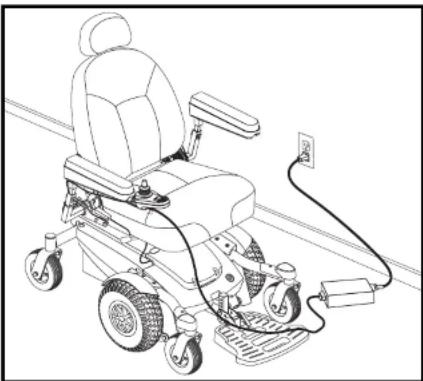
To charge the batteries using the off-board charger:
- Position the front of your power chair next to a standard electrical outlet.
- Be certain the controller power is turned off and the freewheel levers are in the engaged position. See III. "Your Power Chair."
- Plug the off-board charger into the off-board charger/programming socket on the controller. See figure 26.
- Plug the off-board charger into the electrical outlet.
NOTE: The LED lights on the charger indicate different charger conditions at various times: charger power on, charging in progress, and charging complete. Refer to the manual supplied with the charger for a complete explanation of these indicators.
- When the batteries are fully charged, unplug the off-board charger from the electrical outlet and then from the controller.
natural_image
Line drawing of a motorized wheelchair with attached electrical outlet (no text or symbols)Figure 26. Battery Charging (Select 6 Shown)
Battery Break-in
To break in new batteries for maximum efficiency:
- Fully recharge any new battery prior to its initial use. This brings the battery up to about 90% of its peak performance level.
- Operate your power chair throughout the house and yard. Move slowly at first, and do not travel too far until you become accustomed to the controls and break in the batteries.
- Give the batteries another full charge of 8 to 14 hours and operate your power chair again. The batteries will now perform at over 90% of their potential.
- After four or five charging cycles, the batteries will top off at 100% charge and last for an extended period.
Frequently Asked Questions (FAQs)
VI. BATTERIES AND CHARGING
Daily Use
If you use your power chair on a daily basis, charge the batteries as soon as you are finished using your power chair. Your power chair will be ready each morning to give you a full day's service. It is recommended that you charge the batteries 8 to 14 hours after daily use.
■ Infrequent Use
If you use your power chair infrequently (once a week or less), you should charge the batteries at least once per week for 12 to 14 hours.
NOTE: Your power chair may be equipped with a battery charge reminder feature. If your power chair is driven for 8 hours or more, powered off and not charged, then the charge reminder feature becomes activated when the power chair is powered back on.
The charge reminder is displayed when the power chair is powered off again. The left red LED on the battery condition meter will flash 4 times in 0.5-second intervals. This will happen every time the power chair is powered off until the charge reminder is reset by charging the batteries.
NOTE: Keep your batteries fully charged and avoid deeply discharging your batteries. Do not charge the batteries for more than 24 hours at a charging cycle.
How can I get maximum range or distance per charge?
Rarely do you have an ideal driving situation such as smooth, flat, hard terrain with no wind, hills, or curves. More often you are presented with hills, sidewalk cracks, uneven and loosely packed surfaces, curves, and wind. All of these factors will affect the distance or running time per battery charge. Below are a few suggestions for obtaining the maximum range per charge:
■ Always charge the batteries fully prior to your trip.
■ Plan your trip in advance to avoid inclines if possible.
■ Limit baggage weight to essential items.
■ Try to maintain an even speed and avoid stop-and-go driving.
What type of batteries should I use?
We recommend deep-cycle batteries that are sealed and maintenance free. Both AGM and Gel-Cell are deep-cycle
VI. BATTERIES AND CHARGING
It might take a few days for the temperature of the battery to stabilize and adjust to its new ambient temperature. More importantly, it will take a few “charging cycles” (a partial drain — then a full recharge) to establish the critical chemical balance that is essential to the battery’s peak performance and long life. It will be well worth it to take the time to break in your battery properly.
How can I ensure maximum battery life?
A fully charged deep-cycle battery will provide reliable performance and extended battery life. Keep your power chair's batteries fully charged whenever possible. Batteries that are regularly and deeply discharged, infrequently charged, or stored without a full charge may be permanently damaged, causing unreliable power chair operation and limited battery life.
NOTE: The useful life of a battery is quite often a reflection of the care it receives.
How should I store my power chair and its batteries?
If you do not use your power chair regularly, we recommend maintaining battery vitality by charging the batteries at least once per week.
If you do not plan on using your power chair for an extended period, fully charge the batteries prior to storage. Disconnect the battery harnesses and store the power chair in a warm, dry environment. Avoid temperature extremes, such as freezing and excessively hot conditions, and never attempt to charge a frozen battery. A cold or frozen battery should be warmed for several days prior to recharging.
What about public transportation?
AGM and Gel-Cell batteries are designed for application in power chairs and other mobility vehicles. These batteries are Federal Aviation Administration (FAA) approved, allowing safe transportation on aircraft, buses, and trains, as there is no danger of spillage or leakage. We suggest you contact the carrier's ticket counter in advance to determine that carrier's specific requirements.
What about shipping?
If you wish to use a freight company to ship your power chair to your final destination, repack your power chair in the original shipping container and ship the batteries in separate boxes.
VII. CARE AND MAINTENANCE
CARE AND MAINTENANCE
Your Jazzy is a sophisticated power chair. Like any motorized vehicle, it requires routine maintenance checks. You can perform some of these checks, but others require assistance from your authorized Pride Provider. Preventive maintenance is very important. If you follow the maintenance checks in this section as scheduled, you can help ensure that your power chair gives you years of trouble-free operation. If you have any doubt as to your power chair's care or operation, contact your authorized Pride Provider.

WARNING! Do not service the power chair when the seat is occupied.
Your power chair, like most electrical equipment, is susceptible to damage from the elements. Avoid damp areas of any kind.


WARNING! Direct or prolonged exposure to water or dampness could cause the power chair to malfunction electronically and mechanically. Water can cause electrical components to corrode and the chair's frame to rust. Power chairs should be examined periodically for signs of corrosion caused by water exposure, bodily fluids exposure, or incontinence. Damaged components should be replaced or treated immediately.
Should your power chair come in contact with water:
- Dry your power chair as thoroughly as possible with a towel.
- Allow your power chair to sit in a warm, dry place for 12 hours to allow unseen water to evaporate.
- Check the joystick operation and the brakes before using your power chair again.
- If any inconsistencies are found, take your power chair to your authorized Pride Provider. Power chairs that are frequently exposed to sources of water, such as incontinence, should be inspected often for corrosion and electronic components may need to be replaced frequently.
Temperature
■ Some of the parts of your power chair are susceptible to extreme changes in temperature. Always keep your power chair between the temperatures of 18^ F ( -8^ C) and 122^ F ( 50^ C).
In extremely cold temperatures the batteries may freeze. The specific temperature at which they freeze depends on a number of factors, such as battery charge, usage, and composition of the batteries (e.g., AGM or Gel-Cell).
■ Temperatures above 122°F (50°C) may cause your power chair to operate at a reduced speed. This reduced
VII. CARE AND MAINTENANCE
■ All wheel bearings are prelubricated and sealed. They require no subsequent lubrication.
The body shroud has been sprayed with a clear sealant coating. You can apply a light coat of car wax to help it retain its high-gloss appearance.
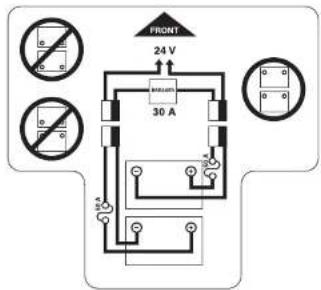
Check all electrical connections. Make sure they are tight and are not corroded. Batteries must sit flat within the battery well frame with the battery terminals facing inward toward each other. Refer to the battery wiring label for the correct wiring layout.


WARNING! Even though the power chair has passed the necessary testing requirements for ingress of liquids, you should keep electrical connections away from sources of dampness, including direct exposure to water or bodily fluids and incontinence. Check electrical components frequently for signs of corrosion and replace as necessary.
Daily Checks
■ With the controller turned off, check the joystick. Make sure it is not bent or damaged and that it returns to the neutral position when you release it. Check the rubber boot around the base of the joystick for damage. Visually inspect the boot. Do not handle or try to repair it. See your authorized Pride Provider if there is a problem.
■ Visually inspect the controller harness. Make sure that it is not frayed, cut, or has any wires exposed. See your authorized Pride Provider if there is a problem.
■ Check for flat spots on solid tires. Flat spots could adversely affect stability.
■ Inspect the armrests for loose hardware, stress points, or damage. See your authorized Pride Provider if there is a problem.
Weekly Checks
■ Disconnect and inspect the controller harness and the charger harness from the power base. Look for corrosion. Contact your authorized Pride Provider if necessary.
■ Ensure that all parts of the controller system are securely fastened to your power chair. Do not overtighten any screws.
- Check for proper tire inflation. Maintain but do not exceed the psi/bar/kPa air pressure rating indicated on each tire for pneumatic tires. If a tire does not hold air, see an authorized Pride Provider for replacement of the tube.
Check the brakes. This test should be carried out on a level surface with at least 3 feet (1 meter) of clearance around your power chair.
VII. CARE AND MAINTENANCE
Yearly Checks
Take your power chair to your authorized Pride Provider for yearly maintenance, especially if you use your power chair on a daily basis. This helps ensure that your power chair is functioning properly and helps prevent future complications.
Storage
Your power chair should be stored in a dry place, free from temperature extremes. When storing, disconnect the batteries from the power chair. See VI. "Batteries and Charging."

WARNING! If you fail to store the unit properly, the frame can rust and the electronics can be damaged.
Batteries that are regularly and deeply discharged, infrequently charged, stored in extreme temperatures, or stored without a full charge may be permanently damaged, causing unreliable performance and limited service life. It is recommended that you charge the batteries periodically throughout periods of prolonged storage to ensure proper performance.
You may wish to place several boards under the frame of your power chair to raise it off of the ground during periods of prolonged storage. This takes the weight off the tires and reduces the possibility of flat spots developing on the areas of the tires contacting the ground.
Disposal of Your Power Chair
Your power chair must be disposed of according to applicable local and national statutory regulations. Contact your local waste disposal agency or authorized Pride Provider for information on proper disposal of power chair packaging, metal frame components, plastic components, electronics, batteries, neoprene, silicone, and polyurethane materials.
Cleaning and Disinfection
■ Use a damp cloth and mild, non-abrasive cleanser to clean the plastic and metal parts of your power chair. Avoid using products that may scratch the surface of your power chair.
If necessary, clean your product with an approved disinfectant. Make sure the disinfectant is safe for use on your product before application.
VII. CARE AND MAINTENANCE
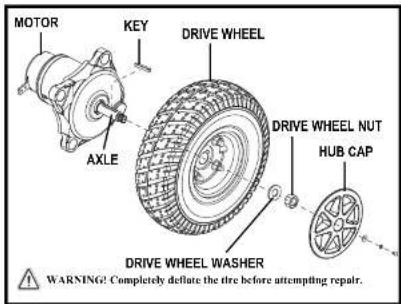
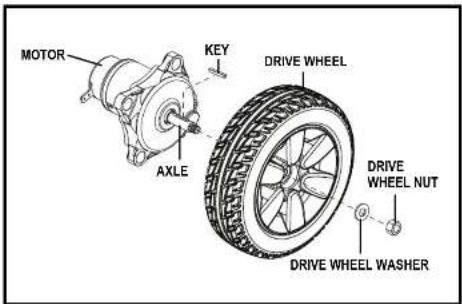
Figure 27. Jazzy Select 6 and Select 6 with Power Seat Figure 28. Jazzy Select Drive Wheel Removal Drive Wheel Removal
WARNING! The wheels on your power chair should only be serviced or replaced by an authorized Pride Provider or a qualified technician.

WARNING! Be sure that the power to the controller is turned off and the power chair is not in freewheel mode before performing this procedure.
WARNING! When changing a tire, remove only the center lug nut and washer, then remove the wheel. If any further disassembly is required, deflate the tire completely or it may explode.
Follow these easy steps for a quick and safe repair for both pneumatic and solid tires:
- Turn off the power to the controller.
- Make sure that the power chair is in drive mode. See figure 11.
- Raise and support the power base so that the wheel is at least 1 in. (2.5 cm) off of the ground.
- If you are changing a pneumatic tire, completely deflate it before removing the wheel.
- Remove the hub cap, if equipped. See figure 27.
- Remove the drive wheel nut and washer from the axle. See figure 27 or 28.
- Remove the drive wheel from the axle. Make sure that you keen the key.
VII. CARE AND MAINTENANCE
Battery Replacement
A battery wiring diagram is printed on a decal located on the power base. See VI. "Batteries and Charging" for correct battery specifications.


MANDATORY! Battery posts, terminals, and related accessories contain lead and lead compounds. Wear goggles and gloves when handling batteries and wash hands after handling.
WARNING! The batteries in your power chair should only be serviced or replaced by an authorized Pride Provider or a qualified technician.
WARNING! Do not replace batteries when seat is occupied.

WARNING! Power chair batteries are heavy. See specifications table. If you are unable to lift that much weight, be sure to get help. Use proper lifting techniques and avoid lifting beyond your capacity.

WARNING! Do not mix old and new batteries. Always replace both batteries at the same time.
PROHIBITED! Keep tools and other metal objects away from the battery terminals. Contact with tools can cause electrical shock.
You may need the following to replace your batteries:
■ metric/standard socket set and ratchet
■ adjustable wrench
To replace the batteries:
-
Turn off power to the controller.
-
Make sure that the power chair is in drive mode. See figure 11.
-
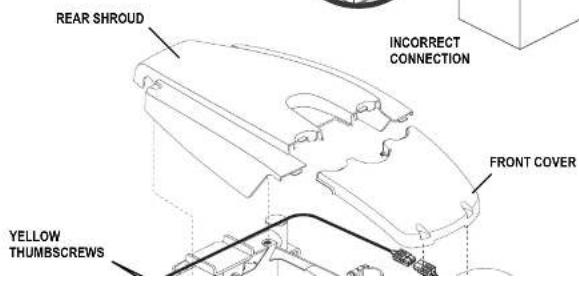
Remove the rear shroud. See figure 29.
-
Loosen the yellow thumbscrews and remove the side cover.
-
Disconnect the rear battery harness from the power base. See figure 29.
-
Slide the rear battery out of the power base.
-
Slide the front battery rearward.
-
Disconnect the front battery harness from the power base. See figure 29.
-
Slide the front button out of the reverse knob
VII. CARE AND MAINTENANCE
natural_image
Technical line drawing of a battery with a correct assembly view showing internal components (no text or symbols)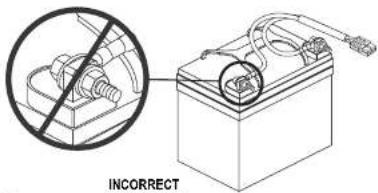
VII. CARE AND MAINTENANCE
When to See Your Authorized Pride Provider for Service
The following symptoms could indicate a serious problem with your power chair. If necessary, contact your authorized Pride Provider. When calling, have the model number, serial number, nature of the problem, and the error code if available.
Motor noise
■ Frayed harnesses
■ Cracked or broken connectors
■ Uneven wear on any of the tires
■ Jerky motion
■ Pulling to one side
■ Bent or broken wheel assemblies
■ Does not power up
■ Powers up, but does not move
Corrective Maintenance
If the battery condition meter does not light up when you turn on the power:
■ Check the harness connections. Make sure they are tight.
■ Check the circuit breaker. Reset it if necessary.
■ Check the battery connections.
If the above conditions prove normal, you can load test the batteries with a battery load tester. These testers are available at automotive parts stores. Disconnect both batteries before load testing and follow the directions that come with the load tester. If either one of the batteries fails the load test, replace both of them. If your power chair still does not power up, contact your authorized Pride Provider.
VIII. WARRANTY
FIVE-YEAR LIMITED WARRANTY
For five (5) years from the date of purchase, Pride will repair or replace at our option to the original purchaser, free of charge, any of the following parts found upon examination by an authorized representative of Pride to be defective in material and/or workmanship:
Structural frame components, including:
■ Main frame ■ Seat post
ONE-YEAR LIMITED WARRANTY
For one (1) year from the date of purchase, Pride will repair or replace at our option to the original purchaser, free of charge, any of the following parts found upon examination by an authorized representative of Pride to be defective in material and/or workmanship:
Electronic components, including: Main frame assemblies, including:
- Charger assembly
■ Controller
Joystick
■ Anti-tip forks ■ Caster forks
■ Metal seat framing ■ Accessories
[Non-Text]
Other components, including:
■ Brakes (electronic function ONLY) ■ Motor/gearbox assembly
■ Bearings and bushings ■ Front rigging mounting brackets
■ Electrical harness
SIX-MONTH LIMITED WARRANTY
Batteries
The batteries are covered by a separate six-month warranty, provided by the battery manufacturer. The batteries are not warranted by Pride.
RECONDITIONED UNITS WARRANTY
All reconditioned units are covered by a six-month warranty from Pride effective from the date of purchase.
VIII. WARRANTY
SERVICE CHECKS AND WARRANTY SERVICE
Warranty service must be performed by an authorized Pride Provider. Do not return faulty parts to Pride without prior written authorization. All transportation costs and shipping damage incurred while submitting parts for repair or replacement are the responsibility of the purchaser.
Failure to follow the instructions, warnings, and notes in the owner's manual and those located on your Pride product can result in personal injury or product damage and will void Pride's product warranty.
There is no other express warranty.
IMPLIED WARRANTIES
Implied warranties, including those of merchantability and fitness for a particular purpose, are limited to one (1) year from the date of purchase and to the extent permitted by law. Any and all other implied warranties are excluded. This is the exclusive remedy. Liabilities for consequential damages under any and all warranties are excluded.
Some states do not allow limitations on how long an implied warranty lasts or do not allow the exclusion or limitation of incidental or consequential damages. The above limitation or exclusion may not apply to you.
This warranty gives you specific rights, and you may also have other rights which vary from state to state.
Please fill out and return the product registration card to Pride. This will aid Pride in providing the best possible technical and customer service.
APPENDIX I - SPECIFICATIONS
| SPECIFICATIONS | |
| Suspension: Jazzy Select: Active-TracJazzy Select 6 and Jazzy Select 6 with Power Seat: Active-Trac with Mid-Wheel 6 Technology | |
| Drive Wheels: 10 in. (25.4 cm), solid | |
| Caster Wheels: Jazzy Select: 6 in. (15.24 cm), solid, rear-mountedJazzy Select 6 and Jazzy Select 6 with Power Seat: 6 in. (15.24 cm), solid, front- and rear-mounted | |
| Anti-tip Wheels: Jazzy Select only: 5 in. (12.7 cm), solid, front-mounted | |
| Maximum Speed: ^1 | Up to 4 mph (6.44 km/h) |
| Range: ^1,4 | Up to 15 miles (24.14 km) |
| Brakes: "Intelligent Braking" electronic regenerative, disc park brake | |
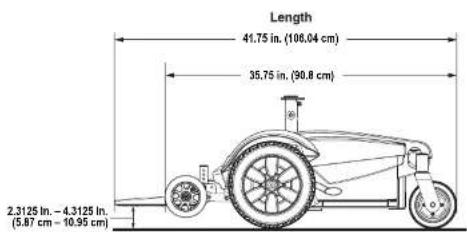
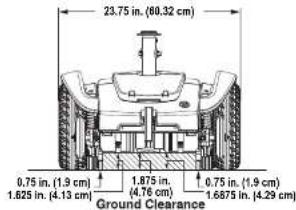
| Ground Clearance: ^2 | Jazzy Select: See figure 30.Jazzy Select 6 and Jazzy Select 6 with Power Seat: See figure 31. |
| Maximum Allowable Incline: 6° (10.5%) | |
| Turning Radius: ^2 | Jazzy Select: See figure 30.Jazzy Select 6 and Jazzy Select 6 with Power Seat: See figure 31. |
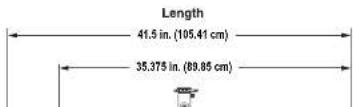
| Overall Size: ^2 | Jazzy Select: See figure 30.Jazzy Select 6 and Jazzy Select 6 with Power Seat: See figure 31. |
| Drivetrain: Jazzy Select: Two motor, Mid-wheel driveJazzy Select 6 and Jazzy Select 6 with Power Seat: with Two motor, Mid-wheel-6 drive | |
| Batteries: ^3 | Two 12-volt, U-1 batteries |
| Battery Charger: 3-amp, off-board | |
| Weight Capacity: 300 lbs. (136 kn) | |
APPENDIX I - SPECIFICATIONS
Width
Turning Radius
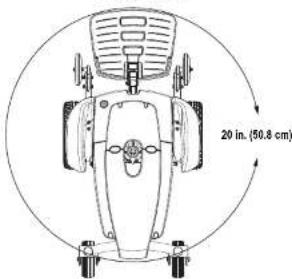
Figure 30. Jazzy Select Dimensions and Ground Clearance
NOTES
NOTES
NOTES
Quality Control – Jazzy Select Series

Inclusion of all Parts
Joystick Serial Number
Controller Serial Number
Left Motor Serial Number
Right Motor Serial Number

Fit and Finish

Performance
natural_image
Exterior view of a modern office building (no signage)Lamp Select
- SAFETY GUIDELINES
- Quick Reference Information
- CONTENTS
- INTRODUCTION
- SAFETY
- PURCHASER'S AGREEMENT
- SHIPPING AND DELIVERY
- INFORMATION EXCHANGE
- SAFETY
- PRODUCT SAFETY SYMBOLS
- GENERAL GUIDELINES
- Modifications
- Weight Limitations
- Tire Inflation
- Incline Information
- Freewheel Mode
- Public Streets and Roadways
- Outdoor Driving Surfaces
- Inclement Weather Precautions
- Stationary Obstacles (Steps, Curbs, etc.)
- Stairs and Escalators
- Doors
- Elevators
- Lift System/Elevation Products
- Positioning Belts
- Batteries
- Removable Parts
- Transfers
- Alcohol/Smoking
- Electromagnetic and Radio Frequency Interference (EMI/RFI)
- YOUR POWER CHAIR
- THE JAZZY SELECT SERIES POWER CHAIR
- Electrical Components
- Manual Freewheel Levers
- ASSEMBLY
- INITIAL ASSEMBLY
- Seat Installation (Select and Select 6 only)
- To install the seat:
- Seat Installation (Select 6 with Power Seat only)
- To install the power seat:
- COMFORT ADJUSTMENTS
- COMFORT ADJUSTMENTS
- Seat Height Adjustment (Select and Select 6 Only)
- To change the seat height:
- Seat Height Adjustment (Select 6 with Power Seat Only)
- Manual Recline Seatback Adjustment
- To adjust the recline angle:
- Seatback Angle Adjustment
- To adjust the seatback angle:
- Armrest Width Adjustment
- Armrest Height Adjustment
- To change the armrest height:
- Controller Position
- To extend the controller:
- To change the controller position:
- Foot Platform Height Adjustment
- To raise or lower the foot platform:
- Foot Platform Depth Adjustment
- To adjust the foot platform depth:
- Foot Platform Angle Adjustment
- To adjust the foot platform angle:
- Swing-away Footrests
- To rotate the SFRs:
- To adjust the SFR length:
- Elevating Leg Rests
- To rotate the ELRs:
- To adjust the ELR angle:
- To adjust the ELR length:
- Anti-Tip Wheels (Select Only)
- To adjust the anti-tip wheels:
- BATTERIES AND CHARGING
- BATTERIES AND CHARGING
- Charging the Batteries
- To charge the batteries using the off-board charger:
- Battery Break-in
- Daily Use
- ■ Infrequent Use
- How can I get maximum range or distance per charge?
- What type of batteries should I use?
- How can I ensure maximum battery life?
- How should I store my power chair and its batteries?
- What about public transportation?
- What about shipping?
- CARE AND MAINTENANCE
- CARE AND MAINTENANCE
- Should your power chair come in contact with water:
- Temperature
- Daily Checks
- Weekly Checks
- Yearly Checks
- Storage
- WARNING! If you fail to store the unit properly, the frame can rust and the electronics can be damaged.
- Disposal of Your Power Chair
- Cleaning and Disinfection
- Battery Replacement
- To replace the batteries:
- When to See Your Authorized Pride Provider for Service
- Corrective Maintenance
- WARRANTY
- FIVE-YEAR LIMITED WARRANTY
- ONE-YEAR LIMITED WARRANTY
- SIX-MONTH LIMITED WARRANTY
- RECONDITIONED UNITS WARRANTY
- SERVICE CHECKS AND WARRANTY SERVICE
- IMPLIED WARRANTIES
- APPENDIX I - SPECIFICATIONS
- Quality Control – Jazzy Select Series
Brand : Shoprider
Model : Jazzy Select
Category : Wheelchair