
A6TMC2 X AUS - Cooker Ariston Thermo - Free user manual and instructions
Find the device manual for free A6TMC2 X AUS Ariston Thermo in PDF.


| Product Type | Gas hob and electric oven (cooker) |
| Brand | Ariston Thermo |
| Model | A6TMC2 X AUS |
| Dimensions (HxWxD) | 93 x 59.5 x 59.5 cm |
| Gas Type | Natural Gas (1.0 kPa) or ULPG (2.75 kPa) – convertible |
| Number of Hob Burners | 4 (Auxiliary, Semi-Rapid, Rapid, Wok) |
| Total Gas Consumption (Natural Gas) | 31.2 MJ/h |
| Total Gas Consumption (ULPG) | 30.7 MJ/h |
| Oven Functions | Traditional, Baking, Fast Cooking, Grill, Gratin, Defrosting, Pizza |
| Oven Cleaning | Steam-assisted cleaning; removable door glass for easy access |
| Safety Features | Flame failure safety device on burners, anti-tilt wall bracket |
| Electrical Supply | 230 V ~ 50 Hz (required for oven and ignition) |
| Gas Connection | 1/2" BSP male thread |
| Oven Light Bulb | 25 W, E14 cap, 230 V |
| Included Accessories | Grill rack, dripping pan, anti-tilt bracket, gas regulator |
| Spare Parts Availability | Genuine accessories and spare parts available from Ariston |
Frequently Asked Questions - A6TMC2 X AUS Ariston Thermo
User questions about A6TMC2 X AUS Ariston Thermo
0 question about this device. Answer the ones you know or ask your own.
Ask a new question about this device
Download the instructions for your Cooker in PDF format for free! Find your manual A6TMC2 X AUS - Ariston Thermo and take your electronic device back in hand. On this page are published all the documents necessary for the use of your device. A6TMC2 X AUS by Ariston Thermo.
USER MANUAL A6TMC2 X AUS Ariston Thermo
Operating Instructions
COOKER AND OVEN
GB
English,1
Contents
Warning, 2
Installation, 3-9
Positioning and levelling
Mounting a Power Supply Cable
Electrical connection
Gas connection
Adapting to different types of gas
Post Installation Checks
Technical specifications
Table of characteristics
GB
Description of the appliance, 10
Overall view
Control panel
A6TMC2 C (X) AUS
Start-up and use, 11-14
Using the hob
Using the oven
Using the cooking timer
Cooking modes
Oven cooking advice table
Precautions and tips, 15-16
General Appliance Warnings
Installation Warnings
Safety With The Cooktop
Maintenance Warnings
Gas And Electrical Safety
Respecting and conserving the environment
WARNING
GB
WARNING: The appliance and its accessible parts become hot during use.
Care should be taken to avoid touching heating elements. Children less than 8 years of age shall be kept away unless continuously supervised.
This appliance can be used by children aged from 8 years and above and persons with reduced physical, sensory or mental capabilities or lack of experience and knowledge if they have been given supervision or instruction concerning use of the appliance in a safe way and understand the hazards involved. Children shall not play with the appliance. Cleaning and user maintenance shall not be made by children without supervision.
WARNING: Unattended cooking on a hob with fat or oil can be dangerous and may result in fire.
NEVER trv to extinguish a fire with
Do not close the glass cover (if present) when the gas burners or electric hotplates are still hot.
WARNING: Ensure that the appliance is switched off before replacing the lamp to avoid the possibility of electric shock.
CAUTION: the use of inappropriate hob guards can cause accidents.
! When you place the rack inside, make sure that the stop is directed upwards and in the back of the cavity.
Installation

ARISTON
This appliance must be installed by an authorised person in accordance with this instruction manual AS/NZS 5601.1 – Gas installations (installation and pipe sizing), local gas fitting regulations, local electrical regulations, Building Code of Australia and any other government authority.
! Before operating your new appliance please read this instruction booklet carefully. It contains important information concerning the safe installation and operation of the appliance.
! Please keep these operating instructions for future reference. Make sure that the instructions are kept with the appliance if it is sold, given away or moved.
! The appliance must be installed by a qualified professional according to the instructions provided.
This cooktop must be installed in accordance with the requirements of local gas and electrical authorities, as well as the latest published versions of the following standards:
• AS/NZS 5601 Gas Installation code
- SAA Wiring Rules.
! Any necessary adjustment or maintenance must be performed after the cooker has been disconnected from the electricity supply.
Adjacent room Room requiring ventilation
A = 3 × T, where
A = the minimum free ventilation area (cm²) T = the total gas consumption of all appliances (MJ/h)
The minimum vertical dimension of any free ventilation opening shall be 6 mm.
NOTE 1 When used In this Clause, the term When used in 'directly to outside' means any one of the directly to out following options, provided that the following options, pre-ventilation path is unobstructed by buildingventilation p material or insulation:material or insulation:
(a) Directly through an outside wall (preferred option).
(b) Through to an outside wall but offset.
(c) Into a cavity ventilated to outside.
(d) Into an underfloor space ventilated to outside.
(e) Into a roof space ventilated to outside.
NOTE 2 The two openings may be combined. The two open provided that the top and bottom of the provided that the opening reach the limits set by this Clause opening read
Natural ventilation via adjacent room Natural ventilation
Two permanent openings shall be provided in the room or enclosure. The openings shall be located to ensure the distance between the top of the upper opening and the ceiling of the room or enclosure, and the distance between the bottom of the lower opening and the floor of the room or enclosure does
GB
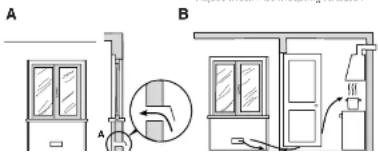
The appliance may only be installed in permanently-ventilated rooms, in accordance with current national legislation. The room in which the appliance is installed must be ventilated adequately so as to provide as much air as is needed by the normal gas combustion process (the flow of air must not be lower than 2m^3 /n per kW of installed power). The air inlets, protected by grilles, should have a duct with an inner cross section of at least 100~cm^2 and should be positioned so that they are not liable to even partial obstruction (see figure A). These inlets should be enlarged by 100% - with a minimum of 200~cm^2 - whenever the surface of the hob is not equipped with a flame failure safety device. When the flow of air is provided in an indirect manner from adjacent rooms (see figure B), provided that these are not communal parts of a building, areas with increased fire hazards or bedrooms, the inlets should be fitted with a ventilation duct leading outside, as described above.
! After prolonged use of the appliance, it is advisable to open a window or increase the speed of any fans used.
! The liquefied petroleum gases are heavier than air and collect by the floor, therefore all rooms containing LPG cylinders must have openings leading outside so that any leaked gas can escape easily. LPG cylinders, therefore, whether partially or completely full, must not be installed or stored in
- If the cooker is installed underneath a wall cabinet, there must be a minimum distance of 420 mm between this cabinet and the top of the hob.
This distance should be increased to 700 mm if the wall cabinets are flammable (see figure).
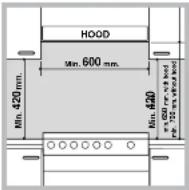
The following minimum clearances to combustible materials must be observed:
- Minimum clearance from edge of burner to side wall must be 200 mm.
- Minimum clearance from edge of burner to rear wall must be 200 mm.
- Do not position blinds behind the cooker or less than 200 mm away from its sides.
Range hoods
Range hoods and overhead exhaust fans must be installed according to manufacturers' instructions but in no case shall clearance from hob burners be less than 600 mm for range hoods and 750 mm for overhead exhaust fans.
If the hood is installed below a wall cabinet, the latter must be at least 700 mm (millimetres) above the surface of the hob.

ARISTON
a washer should be used. Concrete wall requires the screw of at least 8mm of diameter, and 60mm of length. Ensure that the chain is fixed to the rear wall of the cooker and to the wall, as shown in figure, so that after installation it is tensioned and parallel to the ground level.
Levelling
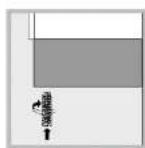
If it is necessary to level the appliance, screw the adjustable feet into the places provided on each corner of the base of the cooker (see figure).
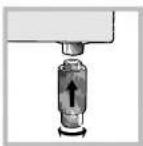
The legs* fit into the slots on the underside of the base of the cooker.
Mounting a Power Supply Cable
Opening the terminal board:
- Using a screwdriver, prise on the side tabs of the terminal board cover.
- Pull open the cover of the terminal board.
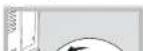
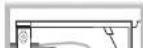
Connecting the power supply cable to the mains.
Fit a normalized plug to the cable, which corresponds to the load indicated on the data plate; if the cooker is connected directly to the mains, an omnipolar circuit-breaker with a minimum opening of 3 mm between the contacts, suitable for the load indicated and complying with current directives, must be installed between the appliance and the mains (the earthing wire must not be interrupted by the circuit-breaker). The power supply cable must be positioned so that it does not exceed room temperature by 50°C at any point of its length. Before making the connection check that:
- the limiter valve and the home system can support appliance load (see data plate):
- the power supply system has an efficient earthing connection which compiles with the provisions of current regulations and the law;
- there is easy access to the socket or the omnipolar circuit-breaker once the cooker has been installed.
! Do not use reducers, adapters or shunts as these could cause heating or burning.
How to connect an alternative plug
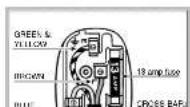
The wires in this mains lead are coloured in accordance with the following code:
BLUE "NEUTRAL"BLUE "NEUTR
GB
! The manufacturer declines any liability should these safety measures not be observed.
Gas connection
! This appliance is suitable for use withThis applia either a flexible connection or rigid coppereither a connection.connection.
Check The Gas Type
WARNING: Before installation, check that the gas type (natural gas or LPG/Universal of the cooker is suitable for the gas type available to the installation. It is extremely dangerous to use the wrong gas type with any appliance, as fire or serious injury can result.
This cooker is supplied from the factory already set for Natural Gas. To convert the cooker to LPG (or back to Natural Gas from LPG), follow the directions later in this section.
Fit regulator supplied for Natural Gas (if applicable) at rear of appliance, and as close as practicable to the appliance.
It is recommended that an isolating valve and union be fitted, to enable simple disconnection for servicing. These are to be in an accessible location.
! Check that the pressure of the gas supply is consistent with the values indicated in the "Technical specifications", p6. This will ensure the safe operation and durability of your appliance while maintaining efficient energy consumption
right gas connection, the cap should be inverted and the seal supplied with the appliance should be replaced when changing the connection.
If a flexible hose is used, it should be as short as possible with a maximum length of 1.2 metres;nce is suitable for use with
flexible connection, or rigid copper
- the flexible connection must be approved to class B or D of AS/NZS1869 as a minimum.
- it should not be bent, kinked or compressed;
- it should not be in contact with the rear wall of the appliance or in any case with parts which may reach a temperature of 50°C;
- it should not come into contact with pointed parts or sharp corners;
- it should not be subject to any pulling or twisting forces;
- it should be easy to inspect along its entire length in order to be able to check its condition.
- The supply connection point must be accessible with the appliance installed.
- The inner diameters of the pipe are as follows: 8 mm for LPG; 13 mm for Natural Gas.
Upon completion of installation, check the gas circuit, the internal connections and the taps for leaks using a soapy solution (never a flame). Also check that the connecting pipe cannot come into contact with moving parts which could damage or crush it. Make sure that the natural gas pipe is adequate for a sufficient supply to the appliance when all the burners are lit
Duplicate Data Plate
Where the data plate is obscured by cabinetry when the cooker is in the installed position, place a duplicate data plate on a surface of the cabinetry adjacent to the cooker.
Adapting to different types of gas
It is possible to adapt the appliance to a type of gas other than the default type (this is indicated on the rating label on the cover).
Adapting the hob
Replacing the nozzles for the hob burners:
- Remove the hob grids and slide the burners off their seats.
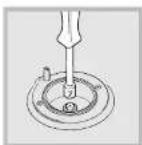
- Unscrew the nozzles using a 7 mm socket spanner (see figure), and replace them with nozzles suited to the new type of gas
- Replace all the components by following the above instructions in reverse.
Adjusting the hob burners' minimum setting:
-
Turn the tap to the minimum position.
-
Remove the knob and adjust the regulatory screw, which is positioned inside or next to the lap pin, until the flame is small but steady.
! If the appliance is connected to a liquid gas supply, the regulatory screw must be fastened as
! Should the gas pressure used be different (or vary slightly) from the recommended pressure, a suitable pressure regulator must be fitted to the inlet hose in accordance with current national regulations relating to "regulators for channelled gas".
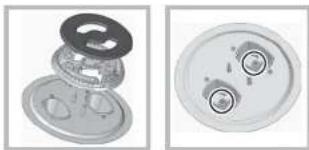
Replacing the Triple ring burner nozzles
-
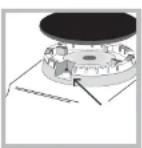
Remove the pan supports and lift the burners out of their housing. The burner consists of two separate parts (see pictures).
-
Unscrew the nozzles using a 7 mm socket spanner. Replace the nozzles with models that are configured for use with the new type of gas (see Table 1). The two nozzles have the same hole diameter.
-
Replace all the components by completing the above operations in reverse order.
natural_image
Two views of a mechanical component showing internal parts and housing (no text or symbols visible)- Adjusting the burners' primary air :
Does not require adjusting.
- Setting the burners to minimum:
-
Turn the tap to the low flame position.
-
Remove the knob and adjust the adjustment screw, which is positioned in or next to the tap pin, until the
GB
Post Installation Checks
Perform post installation checks and ensure proper and safe operation before leaving. Test all burners individually and in combination.
Leak Check
- Ensure all gas control knobs are in the Off position.
- Ensure the gas supply is switched on.
- Spray a solution of soapy water onto all gas joints as well as the full length of any flexible hoses.
UNDER NO CIRCUMSTANCES USE A NAKED FLAME IN CHECKING FOR LEAKS.
If bubbles appear anywhere, turn the gas supply off, check all connections and retest. If satisfactory operation cannot be achieved, contact place of purchase or their appointed agent for service.
Flame check
Turn each burner on, and ensure that the flame is blue with minimal yellow tipping. If there is significant yellow tipping, flame lift off or excessive noise, check pressure and adjust at the regulator if necessary.
If satisfactory operation cannot be achieved, contact place of purchase or their appointed agent for service.
Igniter operation
Check that the igniter for each burner successfully ignites the one.
For other minor adjustments or if the appliance does not perform correctly: contact Arisit Pty Ltd 1300 762 219
Anti-tilt Wall Bracket
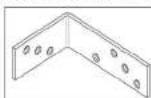
! In order to prevent accidental tipping of the appliance, for example by a child climbing onto the oven door, the supplied "anti-tilt bracket" MUST be installed!
To install the Anti-Tilt Wall Bracket: To install the Anti-Tilt W
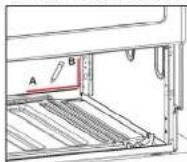
- Fit the cooker between the cabinets and adjust the height of the appliance (if necessary) by means of adjustable feet.
- Take out the lower compartment.
- On the wall behind the cooker draw a line along the horizontal edge A and then along the vertical edge B so that the lines cross (see figures below).
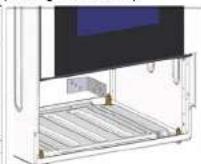
- Pull the cooker out of the space between cabinets and attach the Anti-tilt Bracket with (its shorter arm
Technical specifications
The product was tested in accordance with AS4551 standard
Gas Consumption
| Natural Gas (1.0 kPa) | ULPG (2.75 kPa) | |||
| Injector Diameter | Gas Input | Injector Diameter | Gas Input | |
| Auxiliary Burner | 0.85 mm 3.5 | MJ/h 0.55 mm | 3. | 7 MJ/h |
| Semi Rapid Burner | 1.10 mm 6.0 | MJ/h 0. | 65 mm 5.5 | MJ/h |
| Rapid Burner | 1.25 mm 8.2 | MJ/h 0. | 80 mm 8.5 | MJ/h |
| Wok BurnerWok Burner | 1.19 mm×43. | 5 MJ/h 0. | 70 mm 1 (×2) | 3.0 MJ/h |
| Total | 31.2 | MJ/h | 30.7 MJ/h | |
Connections
| Gas Inlet Fitting 1/2” BSP (male) thread | |
| Location of gas inlet | at rear of cooker185 mm from top of cooker85 mm from left edge of cooker |
TECHNICAL DATA
Appliance
dimensions
(HxWxD)
93x59.5x59.5 cm
Description of the appliance
GB
Overall view
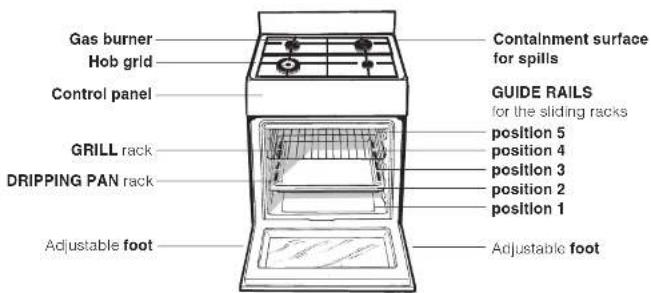
Control panel

Start-up and use

ARISTON
Using the hob
Lighting the burners
For each BURNER knob there is a complete ring showing the strength of the flame for the relevant burner. To light one of the burners on the hob:
- Bring a flame or gas lighter close to the burner.
-
Press the BURNER knob and turn it in an anticlockwise direction so that it is pointing to the maximum flame setting ⬆.
-
Adjust the intensity of the flame to the desired level by turning the BURNER knob in an anticlockwise direction. This may be the minimum setting , the maximum setting or any position in between the two.
If the appliance is fitted with an electronic lighting device ^4 (see figure), press the BURNER knob and turn it in an anticlockwise direction, towards the maximum flame setting, until the burner is lt. The burner may be
extinguished when the knob is released. If this occurs, repeat the operation, holding the knob down for a longer period of time.
! If the flame is accidentally extinguished, switch off the burner and wait for at least 1 minute before attempting to relight it.
If the appliance is equipped with a flame failure safety device*, press and hold the BURNER knob for approximately 3-7 seconds to keep the flame alight and to activate the device.
to replicate the flame intensity and to identify easily the preferred level for different cooking operations.
GB
NOTE: Failure to follow these lighting and NOTE: Failure shut down procedures might lead to ashut down procedure hazardous condition hazardous condition
Lighting the burners for the first time
If the appliance is being used for the first time, or if it has not been used for a long period of time, it may be necessary to purge the gas lines of excess air before you can successfully light the burners.
To do this, turn each burner to High for 10-15 seconds and press the ignition button several times. If the burner does not light, repeat this procedure twice more. Walt 1-2 minutes for any gas build up to disperse before allowing any further gas flow.
Practical advice on using the burners
For the burners to work in the most efficient way possible and to save on the amount of gas consumed, it is recommended that only pans that have a lid and a flat base are used. They should also be suited to the size of the burner:
| Burner | Cookware Diameter (cm) |
| Fast (R) 24 - 26 | |
| Semi Fast (S) 16 - 20 | |
| Auxiliary (A) 10 - 14 |
! Never put objects directly on the bottom of the oven; this will avoid the enamel coating being damaged.
-
Select the desired cooking mode by turning the SELECTOR knob.
-
Select the recommended temperature for the cooking mode or the desired temperature by turning the THERMOSTAT knob.
A list detailing cooking modes and suggested cooking temperatures can be found in the relevant table (see Oven cooking advice table).
During cooking it is always possible to:
- Change the cooking mode by turning the SELECTOR knob.
- Change the temperature by turning the THERMOSTAT knob.
- Stop cooking by turning the SELECTOR knob to the "0" position.
! Always place cookware on the rack(s) provided.
THERMOSTAT Indicator light
When this is illuminated, the oven is generating heat. It switches off when the inside of the oven reaches the selected temperature. At this point the light illuminates and switches off alternately, indicating that the thermostat is working and is All if maintaining the temperature at a constant level.
OPERATION indicator light
When this is illuminated, the oven is generating heat.
Oven light
! To use the oven manually, in other words when you do not wish to use the end of cooking timer, turn the COOKING TIMER knob until it reaches the ⏻ symbol.
Cooking modes
! A temperature value can be set for all cooking modes between 60°C and Max, except for the following modes
• GRILL (recommended: set only to MAX power level)
• GRATIN (recommended: do not exceed 200°C).

TRADITIONAL OVEN mode
Both the top and bottom heating elements will come on. When using this traditional cooking mode, it is best to use one cooking rack only. If more than one rack is used, the heat will be distributed in an uneven manner.

BAKING mode
The rear heating element and the fan are switched on, thus guaranteeing the distribution of heat in a delicate and uniform manner throughout the entire oven. This mode is ideal for baking and cooking temperature sensitive foods (such as cakes that need to rise) and for the preparation of pastries on 3 shelves simultaneously.

FAST COOKING mode
The heating elements and the fan come on, guaranteeing

ARISTON

GRILL mode
The central part of the top heating element is switched on. The high and direct temperature of the grill is recommended for food that requires a high surface temperature (veal and beef steaks, fillet steak and entrecôte). This cooking mode uses a limited amount of energy and is ideal for grilling small dishes. Place the food in the centre of the rack, as it will not be cooked properly if it is placed in the corners.

GRATIN mode
The top heating element and the rolisserie (where present) are activated and the fan begins to operate. This combination of features increases the effectiveness of the unidirectional thermal radiation provided by the heating elements through forced circulation of the air throughout the oven. This helps prevent food from burning on the surface and allows the heat to penetrate right into the food.
! The GRILL and GRATIN cooking modes must be performed with the oven door shut.

DEFROSTING mode
The fan located on the bottom of the oven makes the air circulate at room temperature around the food. This is recommended for the defrosting of all types of food, but in particular for delicate types of food which do not require heat, such as for example: ice cream cakes, cream or custard desserts, fruit cakes. By using the Ian, the defrostina time is approximately halved. In the case of
! In the GRILL cooking mode, place the dripping pan in position 1 to collect cooking residues (fat and/or grease).
GRILL
- Insert the rack in position 3 or 4. Place the food in the centre of the rack.
- We recommend that the power level is set to maximum. The top heating element is regulated by a thermostat and may not always operate constantly.
PIZZA
- Use a light aluminium pizza pan. Place it on the rack provided.
For a crispy crust, do not use the dripping pan as it prevents the crust from forming by extending the total cooking time. - If the pizza has a lot of toppings, we recommend adding the mozzarella choose on top of the pizza halfway through the cooking process.
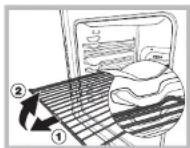
WARNING! The oven is provided with a stop system to extract the racks and prevent them from coming out of the oven.(1) As shown in the drawing, to extract them completely, simply lift the racks, holding them on the front
GB
Oven cooking advice table
| Cooking modes | Foods | Weight (in kg) | Rack Position | Pre-heating time (minutes) | Recommended temperature | Cooking time (minutes) |
| Traditional Oven | Duck | 1 | 3 | 15 | 200 | 65-75 |
| Roast veal or beef | 1 | 3 | 15 | 200 | 70-75 | |
| Pork roast | 1 | 3 | 15 | 200 | 70-80 | |
| Biscuits (short pastry) | - | 3 | 15 | 180 | 15-20 | |
| Tarts | 1 | 3 | 15 | 180 | 20-25 | |
| Baking Mode | Tarts | 0.5 | 3 | 15 | 180 | 20-30 |
| Fruit cakes | 1 | 2 or 3 | 15 | 180 | 40-45 | |
| Plum cake | 0.7 | 3 | 15 | 180 | 40-50 | |
| Sponge cake | 0.5 | 3 | 15 | 180 | 25-30 | |
| Stuffed pancakes (on 2 racks) | 1.2 | 2 and 4 | 15 | 200 | 30-35 | |
| Small cakes (on 2 racks) | 0.6 | 2 and 4 | 15 | 190 | 20-25 | |
| Cheese puffs (on 2 racks) | 0.4 | 2 and 4 | 15 | 210 | 15-20 | |
| Cream puffs (on 3 racks) | 0.7 | 1 and 3 and 5 | 15 | 180 | 20-25 | |
| Biscuits (on 3 racks) | 0.7 | 1 and 3 and 5 | 15 | 180 | 20-25 | |
| Moringues (on 3 racks) | 0.5 | 1 and 3 and 5 | 15 | 90 | 180 | |
| Fast cooking | Frozen food | |||||
| Pizza | 0.3 | 2 | - | 250 | 12 | |
| Courgette and prawn pie | 0.4 | 2 | - | 200 | 20 | |
| Country style spinach pie | 0.5 | 2 | - | 220 | 30-35 | |
| Turnovers | 0.3 | 2 | - | 200 | 25 | |
| Lasagne | 0.5 | 2 | - | 200 | 35 | |
| Golden Rolls | 0.4 | 2 | - | 180 | 25-30 | |
| Chicken mussels | 0.4 | 2 | - | 220 | 15-20 | |
| Pre-cooked food | ||||||
| Golden chicken wings | 0.4 | 2 | - | 200 | 20-25 | |
| Fresh Food | ||||||
| Biscuits (short pastry) | 0.3 | 2 | - | 200 | 15-18 | |
| Plum cake | 0.6 | 2 | - | 180 | 45 | |
| Cheese puffs | 0.2 | 2 | - | 210 | 10-12 | |
| Multi-cooking | Pizza (on 2 racks) | 1 | 2 and 4 | 15 | 230 | 15-20 |
| Lasagne | 1 | 3 | 10 | 180 | 30-35 | |
| Lamb | 1 | 2 | 10 | 180 | 40-45 | |
| Roast chicken + potatoes | 1+1 | 2 and 4 | 15 | 200 | 60-70 | |
| Mackerel | 1 | 2 | 10 | 180 | 30-35 | |
| Plum cake | 1 | 2 | 10 | 170 | 40-50 | |
| Cream puffs (on 2 racks) | 0.5 | 2 and 4 | 10 | 190 | 20-25 | |
| Biscuits (on 2 racks) | 0.5 | 2 and 4 | 10 | 180 | 10-15 | |
| Sponge cake (on 1 rack) | 0.5 | 2 | 10 | 170 | 15-20 | |
| Sponge cake (on 2 racks) | 1 | 2 and 4 | 10 | 170 | 20-25 | |
| Savoury pies | 1.5 | 3 | 15 | 200 | 25-30 |
Precautions and tips

ARISTON
! This appliance has been designed and manufactured in compliance with international safety standards. The following warnings are provided for safety reasons and must be read carefully.
General Appliance Warnings
- Read the recommendations in this instruction booklet carefully, as they give important advice regarding safe installation, use and maintenance. Keep this booklet in a safe place for further reference when required.
- This appliance is not suitable for marine craft, caravans or recreational vehicles.
- This appliance has been designed for private, nonprofessional use in normal dwellings.
- This appliance is not intended for use by persons (including children) with reduced physical, sensory or mental capabilities, or lack of experience and knowledge, unless they have been given supervision or instruction concerning the use of the appliance by a person responsible for their safety.
•Children should be supervised to ensure they do not play with this appliance.
•Always make sure the knobs are in the OFF position when the appliance is not in use. - The openings used for ventilation and dispersion of heat must never be covered.
- During operation, the oven glass door, adjacent parts of the appliance and the internal sections of the appliance become hot. Care should be taken
provided, and should be used for the purpose for which it was designed. Any other purpose (for example, heating the room) constitutes improper use of the cooker and is dangerous. The manufacturer shall not be held responsible for any harm caused to persons or animals or for any damage to property resulting from incorrect installation, or caused as a result of improper, incorrect or unreasonable use of the appliance.
- The electrical safety of this appliance is only guaranteed when it has been correctly connected to an efficient earthed electricity supply in compliance with current electrical safety regulations. This is a fundamental safety requirement that must be checked and, if there is any doubt, you should ask a professionally qualified technician to carry out a thorough check of the supply system. The manufacturer may not be held responsible for any damage caused by a mains supply that has not been earthed correctly.
- Before connecting the appliance, make sure its rating (which can be found on the appliance itself and/or on the packaging) corresponds to the gas and electrical power supply.
- Make sure that the mains supply and the electrical sockets can withstand the maximum power of the appliance, which is indicated on the serial number plate. If there is any doubt, contact a professionally qualified technician.
- Some parts are covered with a removable scratch-proof film. Before using the appliance the film should be removed and the underlying part
GB
- Use dry utensil holders. Wet pot holders can build up steam. Do not use towels or other large pieces of cloth to pick up cooking utensils, as these may touch the heating element and catch fire.
- Do not allow pot handles to overhang other burners that are in use, as this will cause scorching of the handle, and potential handling burns.
•Always make sure that pan handles are turned towards the centre of the hob in order to avoid accidental burns.
Maintenance Warnings
• DO NOT MODIFY THIS APPLIANCE.
- When you have removed the packing, check that the appliance is not damaged. If you have any doubts, do not use the appliance and contact your nearest Ariston Service Centre.
- There are no user serviceable parts within this appliance. For any service, contact the place of purchase or the nominated service agent. Do not attempt repairs yourself.
- Do not touch hot surfaces. Allow hob to cool before wiping spillage.
- Do not attempt to replace the power supply cable yourself. If the cable is damaged or needs replacing, contact a technical assistance centre that has been authorised by the manufacturer.
•Always disconnect the appliance from the mains supply (either by unplugging it or by shutting off
- Gas appliances require a regular air supply to maintain efficient operation. Always ensure that the kitchen is adequately ventilated whilst the appliance is in use.
Respecting and conserving the environment
- You can help to reduce the peak load of the electricity supply network companies by using the oven in the hours between late afternoon and the early hours of the morning.
- Always keep the oven door closed when using the TOP OVEN, GRILL and GRATIN modes: This will achieve improved results while saving energy (approximately 10% ).
- Check the door seals regularly and wipe them clean to ensure they are free of debris so that they adhere properly to the door, thus avoiding heat dispersion.
Assembling the sliding rack kit
To assemble the sliding racks:
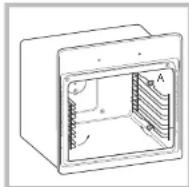
- Remove the two frames, lifting them away from the spacers A (see figure).
Care and maintenance

ARISTON
Switching the appliance off
Disconnect your appliance from the electricity supply before carrying out any work on it.
DO NOT TOUCH HOT SURFACES. ALLOW COOKTOP AND ALL OVEN SURFACES TO COOL COMPLETELY BEFORE CLEANING
Cleaning the appliance
! Never use steam cleaners or pressure cleaners on the appliance.
- The stainless steel or enamel-coated external parts and the rubber seals may be cleaned using a sponge that has been soaked in lukewarm water and neutral soap. Use specialised products for the removal of stubborn stains. After cleaning, rinse well and dry thoroughly. Do not use abrasive powders or corrosive substances.
- The hob grids, burner caps, flame spreader rings and burners may be removed to make cleaning easier; wash them in hot water and non-abrasive detergent, making sure all burnt-on residue is removed before drying them thoroughly.
- Clean the terminal part of the flame failure safety devices' frequently.
- The inside of the oven should ideally be cleaned after each use, while it is still lukewarm. Use hot water and detergent, then rinse well and dry with a soft cloth. Do not use abrasive products.
Replacing the oven light bulb
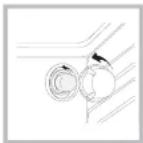
- After disconnecting the oven from the electricity mains, remove the glass lid covering the lamp socket (see figure).
-
Remove the light bulb and replace it with a similar one: voltage 230 V, wattage 25 W, cap E 14.
-
Replace the lid and reconnect the oven to the electricity supply.
! Do not use the oven lamp as/ for ambient lighting.
Cleaning The Cooktop
• Always wipe spills up when they occur. Do not leave spills to dry onto the surface of the hob.
- It is usually enough to wash the hob with a damp sponge and dry it with absorbent kitchen roll.
- NOTE: Do not put hot components in cold water. The sudden temperature shock could cause the component to crack.
- Do not use abrasive or corrosive detergents such as stain removers, anti-rust products, powder detergents or sponges with abrasive surfaces; these may scratch the surface beyond repair.
Burners
- Wait for the cookton to cool completely. Remove
GB
cold and wipe off with a clean, dry cloth. The enamel could dull if cleaned while still hot.
Stainless steel and chromed parts
- Stainless steel can be marked by hard water that has been left on the surface for a long time, or by aggressive detergents containing phosphorus. After cleaning, rinse and dry any remaining drops of water.
- Use commercial products designed for cleaning stainless steel and chromed steel, and follow the maker's instructions. Care should be taken when cleaning around graphics.
- Never use steam cleaners or pressure cleaners on the appliance.
Grill Plate
• We recommend that the grill plate be cleaned while it is still hot, using the knobs provided to move it from the cooking rack to the sink. Wash the grill plate with hot water and non-abrasive detergent.
Gas tap maintenance
Over time, the taps may become jammed or difficult to turn. If this occurs, the tap must be replaced.
! This procedure must be performed by a qualified technician authorised by the
Removing and fitting the oven door:
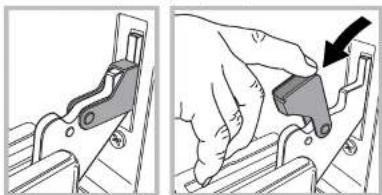
- Open the door
- Make the hinge clamps of the oven door rotate backwards completely (see photo)
natural_image
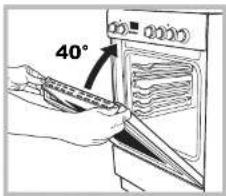
Two-step diagram showing a hand using a tool to adjust or install a mechanical component, with no visible text or symbols.- Close the door until the clamps stop (the door will remain open for 40° approx.) (see photo)
-
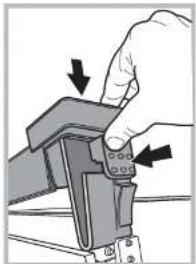
Press the two buttons on the upper profile and extract the profile (see photo)
-
Replace the glass.
WARNING! Oven must not be operated with inner door glass removed!
WARNING! When reassembling the inner door glass insert the glass panel correctly so that the text written on the panel is not reversed and can be easily legible.
- Replace the profile, a click will indicate that the part is positioned correctly.
8.Open the door completely. - Close the supports (see photo).
natural_image
Hand holding a mechanical component with arrows indicating force direction (no text or symbols)- Now the door can be completely closed and the oven can be started for normal use.
Steam-Assisted Oven Cleaning
This method of cleaning is recommended especially after cooking very fatty (roasted)meals.
This cleaning process allows to facilitate the removal of dirt of the walls of the oven by the generation of steam that is created inside the oven cavity for easier cleaning.
! Important! Before you start steam -cleaning:
-Remove any food residue and grease from the bottom of the oven.
- Remove any oven accessories (grids and drip pans).
Perform the above operations according to the following procedure:
- pour 300ml of water into the baking tray in the oven, placing it in the bottom shelf. In the models where the drip pan is not present, use a baking shoot and place it on the grill at the bottom shelf;
- select the function of the oven BOTTOM and set the temperature to 100 °C;
- keep it in the oven for 15min
- turn off the oven;
- Once cooled the oven, you can open the door to complete the cleaning with water and a damp cloth;
- eliminate any residual water from the cavity after finishing cleaning
When the steam cleaning is done, after cooking especially fatty foods, or when grease is difficult to remove, you may need to complete the cleaning with the
GB
07/2013 - 195116247.01 XEROX FABRIANO
GB
ARISTON PRIORITY SERVICE ARISTON PRIORITY SERVICE
If you are not completely satisfied with your
appliance or require service call:
Australia
Phone: 1300 815 589
New Zealand
Phone: (09) 306 1020
GENUINE ACCESSORIES & SPARE PARTS
A wide range of genuine accessories are available
for your appliance call:
Australia
Phone: 03 9768 0888
New Zealand
Phone: (09) 306 1020
AUSTRALIA
40-44 Mark Anthony Drive, Dandenong South,
VIC 3175, Australia
Fax: Service & Sales (03) 9768 0838
Email: consumer.care@arisit.com
NEW ZEALAND
- Operating Instructions
- COOKER AND OVEN
- Contents
- Warning, 2
- Installation, 3-9
- Description of the appliance, 10
- Start-up and use, 11-14
- Precautions and tips, 15-16
- WARNING
- Installation
- ARISTON
- Range hoods
- Mounting a Power Supply Cable
- Connecting the power supply cable to the mains.
- How to connect an alternative plug
- Gas connection
- Check The Gas Type
- Duplicate Data Plate
- Adapting to different types of gas
- Adapting the hob
- Replacing the Triple ring burner nozzles
- Post Installation Checks
- Leak Check
- Flame check
- Igniter operation
- Anti-tilt Wall Bracket
- Technical specifications
- TECHNICAL DATA
- Description of the appliance
- Start-up and use
- Using the hob
- Lighting the burners
- Lighting the burners for the first time
- Practical advice on using the burners
- THERMOSTAT Indicator light
- OPERATION indicator light
- Cooking modes
- TRADITIONAL OVEN mode
- BAKING mode
- FAST COOKING mode
- GRILL mode
- GRATIN mode
- DEFROSTING mode
- GRILL
- PIZZA
- Precautions and tips
- General Appliance Warnings
- GB
- Maintenance Warnings
- Respecting and conserving the environment
- Assembling the sliding rack kit
- Care and maintenance
- Switching the appliance off
- Cleaning the appliance
- Replacing the oven light bulb
- Cleaning The Cooktop
- Burners
- Stainless steel and chromed parts
- Grill Plate
- Gas tap maintenance
- Removing and fitting the oven door:
- Steam-Assisted Oven Cleaning
- ARISTON PRIORITY SERVICE ARISTON PRIORITY SERVICE
- GENUINE ACCESSORIES & SPARE PARTS
Brand : Ariston Thermo
Model : A6TMC2 X AUS
Category : Cooker