
BTBM385 - Bread maker Bellini - Free user manual and instructions
Find the device manual for free BTBM385 Bellini in PDF.


| Product Type | Multifunction Bread Maker |
| Model | BTBM385 |
| Brand | Bellini |
| Maximum Loaf Size | 900 g |
| Minimum Loaf Size | 700 g |
| Number of Programs | 11 (Basic, French, Wholemeal, Quick, Sweet, Gluten Free, Dough, Cake, Sandwich, Dessert, Bake) |
| Crust Color Settings | Light, Medium, Dark |
| Delay Timer | Up to 13 hours |
| Keep Warm Function | Up to 60 minutes |
| Power Consumption | 550 W |
| Power Supply | 220-240 V ~ 50 Hz |
| Display | LCD with backlight |
| Viewing Window | Yes |
| Bread Pan | Removable, non-stick coating |
| Kneading Paddle | Removable, non-stick coating |
| Accessories Included | Measuring cup, measuring spoon, metal hook |
| Dishwasher Safe Parts | Bread pan and kneading paddle |
| Power Failure Memory | Up to 10 minutes |
| Gluten Free Program | Yes |
| Bake Only Function | Yes (program 11, adjustable 10-60 min) |
Frequently Asked Questions - BTBM385 Bellini
User questions about BTBM385 Bellini
0 question about this device. Answer the ones you know or ask your own.
Ask a new question about this device
Download the instructions for your Bread maker in PDF format for free! Find your manual BTBM385 - Bellini and take your electronic device back in hand. On this page are published all the documents necessary for the use of your device. BTBM385 by Bellini.
USER MANUAL BTBM385 Bellini
Multifunction Bread Maker

natural_image
White Bollini brand rice cooker with visible branding and control panel (no text or symbols on body)ellini
Important Safeguards
When using electrical appliances, in order to reduce the risk of fire, electric shock, and/or injury to persons, basic safety precautions should always be followed, including:
For Your Safety
Read all instructions carefully, even if you are quite familiar with the appliance.
- To protect against the risk of electric shock, DO NOT IMMERSE the appliance, cord set or plug in water or any other liquid.
- The apparatus shall not be exposed to dripping or splashing and no objects filled with liquids, such as vases, shall be placed on the product. To prevent fire or shock hazard, DO NOT expose this appliance to rain or moisture.
- This appliance is not intended for use by persons (including children) with reduced physical, sensory and mental capabilities, or lack of experience and knowledge, unless they have been given supervision or instruction concerning use of the appliance by a person responsible for their safety.
• Children should be supervised to ensure that they do not play with the appliance. Children should be closely supervised when using this appliance. Keep this unit out of the reach of the children.
- Never leave this appliance unattended when in use.
- Switch off and remove plug from the power outlet before cleaning or when not in use. To unplug, grasp the plug and pull from the power outlet. Never pull the cord. Never carry the appliance by the cord.
- The appliance should always be operated on a dry, level, heat-resistant surface. Do not operate on sinks, draining boards.
• Always use protective oven gloves when removing cooked bread from the bread maker. Follow the instructions elsewhere in this booklet. Avoid contact with steam that may be emitted from the back and sides of the appliance while bread is cooking.
- Dangerous high voltages are present inside this enclosure. To avoid electric shock, Do not attempt to repair, disassemble or modify the appliance by yourself. There are no user-serviceable parts. Repairs should only be performed by qualified personnel in order to avoid a hazard.
- Do not allow the power cord to hang over the edge of a table or counter, or touch hot surfaces, always ensure that hands are dry before handling the plug.
- Do not use outdoors. Store indoors in a dry location.
- Do not use with an extension lead.
- Do not operate any appliance with a damaged cord or plug; after the appliance malfunctions or if it has been dropped or damaged in any way.
- Do not operate the appliance beneath curtains, or within the vicinity of any flammable materials.
- Do not operate this appliance on, or near any hot surfaces (such as a gas or electric burner).
- Never use harsh, abrasive, caustic or oven cleaners to clean this appliance. Allow to cool before cleaning.
- Do not reach for an appliance that has fallen into water. Switch off at the power outlet and unplug immediately.
- Do not use this product for anything other than its intended use. This product is intended for household use only, it is not for commercial use.
- The use of attachments or applications
- Do not touch the moving parts of the bread maker while it is operating.
- During operation the bread maker will get HOT. Ensure there is sufficient distance between the bread maker and other items on the work surface, or sufficient distance between the bread maker and the confines of the area in which it is situated. We recommend a minimum clearance around all faces (including the lid when it is opened) of at least 10cm.
- If the operating buttons are depressed unintentionally, it may affect the program in use at that time.
- Never attempt to remove the bread pan during operation.
- The maximum quantities of bread flour and yeast for making bread must be used according to a suitable recipe. Don't overfill. This will affect the final result of the bread and may damage the bread maker, since a hazard may occur if ingredients spill over the pan as the bread rises during cooking.
- Do not switch the appliance on without the bread pan in place or when it is empty as serious damage may result.
- Appliances are not intended to be operated by means of an external timer or separate remote-control system.
- This appliance must be earthed. Only connect it to a suitable earthed AC 240V\~50Hz mains socket.
• This appliance is intended to be used in household and similar applications such as: - Staff kitchen areas in shops, offices and other working environments;
- By clients in hotels, motels and other residential type environments;
- Bed and breakfast type environments.
- Read this user manual carefully before use and save it for future reference
Compulsory Warning
If the supply cord is damaged, the cord must be replaced by the manufacturer, its service agent or similarly qualified persons in order to avoid a hazard.
This product has not been designed for any uses other than those specified in this booklet.

Coutlon: The surfaces are liable to get
Save These Instructions

[Non-Text]

[Non-Text]

[Non-Text]

[Non-Text]

[Non-Text]

[Non-Text]

[Non-Text]

[Non-Text]

[Non-Text]

[Non-Text]

[Non-Text]

[Non-Text]

[Non-Text]

[Non-Text]

[Non-Text]

[Non-Text]

[Non-Text]

[Non-Text]

[Non-Text]

[Non-Text]

[Non-Text]

[Non-Text]

[Non-Text]

[Non-Text]

[Non-Text]

[Non-Text]

[Non-Text]

[Non-Text]

[Non-Text]

[Non-Text]

[Non-Text]

Features of Your Multifunction Bread Maker
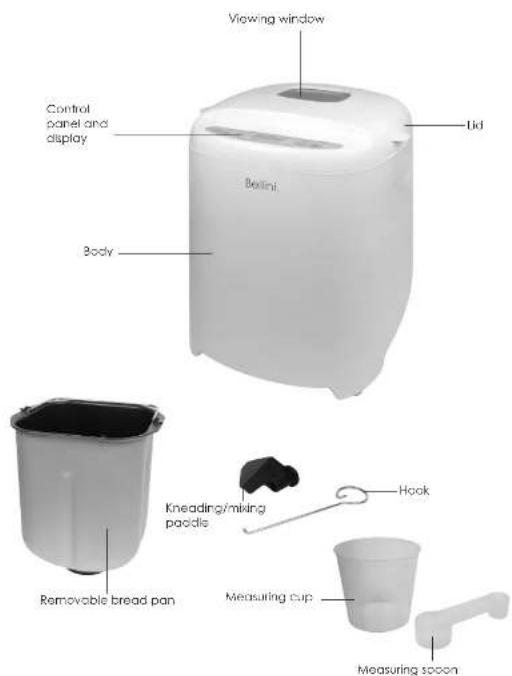
Introduction
A home mode loaf costs less than half the price of a premium branded shop-bought loaf. Home mode means cheaper, but it also means that you have the satisfaction of knowing exactly what goes into the food you and your family eat, and where it comes from.
Your bread maker will automatically mix, knead and bake giving you delicious fresh bread with the minimum of fuss. The automatic timer feature of your bread maker means you can have freshly baked bread every morning.
Key features Include:
- Adjustable crust setting - light, medium or dark.
• Two loaf size-small 700g, large 900g.
• Automatic start - set a delay timer for up to 13 hours. - Bread and dough programs - you can use your bread maker to make dough for pizzas, or to be shaped into bread rolls, breadsticks, etc., which you can then bake in your own oven.
Memory
It power supply has been cut off during the course of bread making, the process of bread making will continue automatically within 10 minutes, even without pressing bread Start/Stop button. If the break time exceeds 10 minutes the memory cannot be kept and the bread maker must be restarted, but if the dough is not further than the kneading phase when power supply cuts off, you can press the Start/Stop button straight to continue the program from the beginning.
If the power supply cut-off period is too long or if the program has past rise, the ingredients will have to be discarded and you must start again with fresh ingredients.
Control Panel and Display

1 LCD display
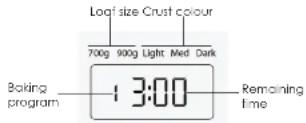
The display shows the Baking program, Crust Colour, Leaf size and Remaining time. Once you press the "Start/Stop" button to begin, the display will show the remaining time until the cycle is completed. When the display reads "0:00", the bread is baked and the process is completed.
2 Time+ button
Used when setting the delay timer to increase the time in 10 minute increments
3 Loaf Size button
Selects the loaf size 700g,900g
4 Colour button
Selects the crust colour Light. Medium or Dark.
5 Menu button
Press this button repeatedly to select the desired baking program from 1 to 11. Each lime you press the button you will hear a beep. The display shows a number for each setting.
- BASIC 2. FRENCH 3. WHOLEMEAL 4.
Start/Stop
This button is used for starting and slooping the selected baking program. To start a program, press the Start/Stop button once. A short beep will sound, the colon symbol [g] in the time display will flash and the program will start. All the other buttons on the control panel will be deactivated except the Start/Stop button when the program has begun. To stop the program, press and hold the Start/Stop button for approximately two seconds. A beep will sound indicating that the program has been switched off.
Menu Select
This button is used to select the different programs. Each time it is pressed a short beep will sound and the selected program will change.
-
Basic: This program is primarily used for breads that use white flour, although some recipes may include small quantities of wholemeal flour. The bread will be slightly denser than French or Sweet breads, as there are fewer rising cycles and the overall cycle time is shorter.
-
French: Traditionally, French bread has a crispier crust and lighter texture than basic breads. These recipes do not usually include additional fats or milk. This program will knead, rise and bake within a longer rise lime. The bread baked in this menu usually will have a crispier crust and light texture.
-
Wholemeal: This program is used for recipes which contain significant amounts of Wholemeal or rye flour, oats or bran, begins with a rest period during which the flours and grains absorb the liquid - this softens the ingredients and helps them to combine property. The program also incorporates an additional rise cycle which helps the heavier wheat and grains to expand.
-
Quick: This program kneads, rises and bakes a loaf in less time than the Basic bread program, but the bread baked on this selling is usually smaller with a dense
-
Gluten Free: For use with those breads that are gluten free, this program will knead, raise and bake gluten free bread. You may also add ingredients to increase flavor.
- Dough: This program only makes the dough and will not bake the final bread only kneading, and rise. This dough setting is suitable for pizza bases, doughnuts, etc. Remove the dough to shape and bake in a conventional oven (or, in the case of doughnuts, deep fried)
- Cake: This program can be used for recipes that contain baking powder or baking soda in place of yeast. The bread baked on this setting is usually smaller with a moist dense texture.
- Sandwich: This program will knead, raise and bake sandwich bread, for baking light texture brand with a bigger crust.
- Dessert: This program can knead, raise and bake dessert. The loaf size and delay time are not applicable.
- Bake: This program has a baking function only, no kneading or rinse. The loaf size and delay time are not applicable. This setting will bake the bread up to 1 hour and the operating time can be adjusted by pressing the TIME+ button. The adjustable lime range is 10-60 minutes. This setting can be used to complete the bread baking process in case of a power failure.
The colour button allows you to select the colour of the loaf's crust. Choose from LIGHT, MEDIUM or DARK. The default crust colour is medium. The selected crust colour will be indicated on the display.
This button allows you to select your intended loaf size - 700g or 900g. Note that the total cooking time will vary depending on the size of loaf being cooked. The default setting is 900g. The selected loaf size will be indicated
Colour button
Loaf Size
Time+
This buttons allow you to select a delay time period if you don't want your bread maker to start cooking immediately. You must decide how long it will be before your bread is ready by pressing the "Time4". please note the delay time should include the baking time of program, that is, at the completion of delay time not bread is available. At first the program and degree of colour must be selected, then press "Time4". To increase the delay time in increments of 10 minutes, the maximum delay is 13 hours.
Note:1.This button is not applicable for the programs Dessert and Bake. 2.For time delay baking,do not use any easily perishable ingredients such as eggs,fresh milk,fruits,onlons,etc.
Keep warm
Bread can be automatically kept warm for 60 Minutes after baking, if you would like to take the bread out, switch the program off with the Start/Stop button.
Using Your Bread Maker
Getting to know Your Bread Maker
Congratulations on the purchase of your new Bread Maker. Before first using your Bread Maker, it is important that you read and follow the instructions. In this use and care booklet, even if you feel your ore quite familiar with this type of appliance.
Your attention is drawn particularly to the section dealing with IMPORTANT SAFEGUARDS. Find a place and keep this booklet handy for future reference.
This appliance has been designed to operate from a standard domestic power outlet. It is not intended for industrial or commercial use.
Before first use
Before using your bread maker for the first lime, check if all parts and accessories are complete and free of damage, wash the inside of the bread pan and the kneading paddle with hot soapy water. Rinse and dry thoroughly.
Using a clamp cloth or sponge, wipe the interior of the bread maker, the inside of the lid and the exterior of the bread maker. Use only a mild detergent solution.
Wash the measuring spoon and measuring cup with hot soapy water, then rinse and dry them thoroughly.
Using
Note: Never exceed the maximum capacity of your bread maker (900g). Place your bread maker away from direct sunlight, draughts, or heating appliances and radiators. These can adversely affect the operation of your bread maker and spoil the results.
- Hold the bread pan and turn it anti-clockwise direction as "unlock" mark indicated on bread maker oven chamber, then lift the bread pan out of the bread maker using its handle.

-
Fit the kneading/mixing paddle onto the shaft in the bottom of the bread pan. The shaft has a flattened side to grip the paddle when it is rotating. Align the paddle with the flat on the shaft and press it down.
-
Pour the liquid ingredients into the bread pan. Acid the rest of the ingredients to the bread pan in the order listed in the recipe. Please reference bread recipe in page 16-12. Weigh all of your Ingredients accurately because incorrect measures will produce poor results. Do not let the yeast come into contact with the salt or water prior to making, as this will prevent the dough from rising properly (the water will activate the yeast before the ingredients are properly mixed and kneaded). When using the delay timer, make a small well in the mound of flour and put the dry yeast into it.

- Fit the bread pan into the oven chamber ret, the "unlock" mark and turn the pan clockwise direction to locking it into position as "locking" mark indicated on bread maker chamber wall. Lay the handle flat toward the side of the bread pan and close the lid.

natural_image
Line drawing of a washing machine interior with control panel and buttons (no text or symbols)-
Plug your bread maker into the mains supply socket. Your bread maker will beep and select the default program (program 1).
-
Press the Menu button until the required program is selected. If the program permits, select the loaf size and crust colour using the Loaf Size and Colour buttons.
-
Press the Start/Stop button. Your bread maker will start to run the selected program. To stop or cancel the program press the Start/Stop button for approximately 2 seconds.
- At the end of the baking program the machine will beep 10 times and the Bread Maker will automatically switch to a Keep Warm cycle for 60 minutes.
- The bread can be removed from the baking pan at the end of the baking program or any time during the Keep-Warm cycle. Simply press the Start/Stop button for approximately 2 seconds to end the Keep-Warm period and unplug the bread maker.
- Take care when removing the bread. The bread is very hot. To remove the bread pan, open the lid of the unit and use oven gloves to remove the pan from the baking chamber. Using the handle, simply twist the pan counter-clockwise to unlock the baking pan and lift out.
- Allow the broad to cool in the baking pan for 10 minutes before removing. Turn the pan upside down and snake until the bread slides out. It necessary, use a plastic spatula to loosen bread from the sides of the pan.
- Before slicing the loaf, be sure to remove the kneading blade from the broad with the supplied metal hook. The loaf is hot and never uses the hand to remove the kneading blade.
- Allow the bread to cool on a wire rack for at least 30 minutes before slicing. For easy slicing we recommend the use of an electric knife or a quality bread knife.
Caution: The baking pan and bread may be very hot! Always handle with care. Do not handle the machine while it is operating. Do not open the lid while the bread maker is baking bread. Do not put your face or bare skin near the lid when
Quick Bake bread program
The Quick bread program(4) can bake a loaf within 2 hours and 10 Minutes, please note that you must use hot water of 40-50 °C. Use a cooking thermometer to measure the temperature. The influence of temperature is very critical to the performance of baking. If water temperature is too low, the bread will not rise to its expected size. If the water temperature is too high the yeast will be killed before rising.
Using the delay timer
If you are using the bread maker in hot or humid weather with a delay time greater than 2 hours, there is a danger of the bread rising too quickly. To prevent this, reduce the liquid by one or two tablespoons, Increase the salt 1/4 to 1/8 teaspoons and reduce the sugar by up to one half of the amount indicated in the recipe.
Don't use the delay limor for long delay periods if you are using ingredients that do not keep well at room temperatures e.g. milk, eggs, cheese, fruit, onions and etc.
Your bread maker has a built in timer that allows you to delay operation for up to 13 hours. The delay timer cannot be used on certain programs such as the Dessert,Bake etc.
- Prepare your bread maker and add the ingredients as previously described.
- Make the required settings for program, loaf size and crust colour.
- Set the timer. Press the "Time+" buttons until the required time is displayed.
For example, if the time is 8:30 PM and you want the bread to be ready at 7:00 AM, you need to set the timer for a 10 hour 30 minute delay. Press "Time+ button" until 10:30 appears on the display.
- When the timer is set, press the Start/Stop button. The display will start to count
Keep warm function
The automatic keep warm function prevents the bread from getting soggy by keeping the baked bread warm for up to one hour after the program has ended. The function stops when the Start/Stop button is pressed or the bread maker is unplugged from the supply socket.
Power interruption program protection
Your Bread Maker features a 10 minute Power Interruption Protection that protects the Program memory. In the event of power surges, or short term power failure (block-out), this means that if there is a power interruption during your bread making, the machine will retain its memory for about 10 minutes and continue cooking when the power supply returns. This feature is applicable whether the machine is in the Kneading, Baking or Delay cycle. Without this feature the machine would reset and the bread making cycle would stop. If you experience a power failure longer than 10 minutes you may need to discard your Ingredients and start again.
Program Times
| Menu No. | Menu Dellaull lime | Load size | ||
| 700g | 100g | |||
| 1 Basic 2:53 3:00 | ||||
| 2 | French | 3:40 | 3:50 | |
| 3 | Wholemeal | 3:32 | 3:40 | |
| 4 | Quick | 2:10 | / | / |
| 5 | Sweet | 2:50 | 2:55 | |
| 6 | Gluten free | 2:50 | 2:55 | |
| 7 | Dough | 1:30 | / | / |
| 8 | Cake | 1:30 | / | / |
| 9 | Sandwich | 2:55 | 3:00 | |
| 10 | Dosserl | 1:38 | / | / |
| 11 | Bake | 1:00(10.60Mn) | / | / |
Hints and Tips
General
Always add the ingredients in the order shown in the recipe. It's important to keep the yeast away from the liquids. Use the ingredients at room temperature (20-25 °C). The temperature can affect yeast activity and will affect the quality of the bread.
Important measuring tips
Each ingredient in the loaf of bread plays a specific role, so it is extremely important to measure the ingredients correctly to get the best results.
Always use the measuring spoon and cup supplied with your bread maker. Never use household cutlery because they can vary greatly in size and will lead to the inaccurate measuring of ingredients.
Wherever possible we recommend weighing bulk ingredients such as flour on a kitchen scale. However, for your convenience, if kitchen scales are not available, the recipes also include volumes by cup. Other dry ingredients can be measured using the spoon and cup provided, and some butter wrappers provide weight guidelines.
Liquids
Fill the spoon or cup provided to the level indicated. Check your cup measurements by placing the measuring cup on a flat surface and reading the measurement at eye level.
Solid Fats
When using butter and margarine it is important to chop the ingredients into cubes before adding to the bread pan. Butter and margarine should be added at room temperature. Use unsalted butter or margarine.
Adding Fruit and Nuts
Dry Ingredients
Use the spoon or cup provided (don't use labware spoons or cups). Put the dry ingredients loosely into the spoon or cup and level off with a flat knife. This is particularly important with flour. Do not pack dry Ingredients down into the cup, unless otherwise stated in the recipe.
Freshness
Ensure oil ingredients are fresh and used before the specified use-by-date. Avoid using perishable ingredients such as milk, yoghurt, eggs or cheese with the lime delay function. Store dry ingredients in airlight containers, to prevent drying out.
Slicing Bread
For best results, wait at least 10 minutes before slicing, as the bread needs time to cool. Place load on its side and cut in a sawing motion with a seroted bread knife. For easy and even slicing we recommend using a bread knife or electric knife.
Freezing Bread
Make sure the bread has completely cooled. Slice and wrap the bread in plastic, before freezing.
Toppings
Ingredients such as herbs, sesame seeds and chopped bacon can be added to the top of the bread during the baking stage. Open the lid of the Bread maker, gently brush the top of the loaf with a little milk or egg yolk and sprinkle with lapping (do not allow ingredients to fall outside the pan). Close the fo and allow baking to continue.
This step needs to be done quickly to prevent the bread from sinking. The Bread maker gets very hot during baking, always caution to prevent injury.
Using Bread Improver
Ingredients Used in Bread Making
Yeast
Yeast is a vital ingredient when bread making, without it the bread will not rise. Your bread maker maintains the optimum temperature for the yeast to take effect, during the bread making process.
Only use instant or fast acting yeast - sometimes called easy bake.
Some yeast may require the use of a bread improver. A bread improver will provide additional gluten to the flour to produce a better loaf. If the weather is hot and humid, by reducing the amount of yeast by 1/4 teaspoon to prevent the dough from over rising.
Flour
In order for the bread to rise, the flour used has to have a sufficiently high protein content. We recommend the use of a good quality strong plain or bread flour.
Liquids
When liquids are mixed with flour, gluten is formed. Gluten is necessary for the bread to rise. Most recipes use dry milk and water, but other liquids such as fresh milk and fruit juice can be used.
Salt
In small amounts salt adds flavour and controls yeast action. Too much salt will inhibit the yeast and the bread will not rise properly.
When adding ingredients to the bread pan, yeast and salt should be kept separate. Other ingredients used in bread making:
- Bread improver
- Dried fruit and nuts
• Fats (i.e. butter, margarine, all) - Sugar
Sugar
Sugar is very important ingredient to increase sweet and colour of bread. And it is also considered as nourishment in the yeast bread, white sugar is largely used. Brown sugar, powder sugar or cotton sugar may be used by special requirement.
Egg
Adding egg to the mixture will improve the bread texture and taste.
Cleaning
Always ensure the bread maker is switched off, has cooled down and is unplugged from the mains supply before cleaning. Do not immerse the bread maker or power cord and plug in water or any other liquid.
Exterior
- Wipe the body with a damp cloth and dry thoroughly.
Interior
• After use, ensure the interior has cooled and use a damp cloth to wipe out any crumbs or flour.
Bread pan
- Wipe the bread pan with a clamp cloth, then dry thoroughly.
- If necessary fill the bread pan with warm, soapy water and leave it to soak for an hour. Rinse and dry thoroughly.
• Alternatively, wash the bread pan and kneeding paddle in the dishwasher.
Measuring cup and spoon
• To make cleaning easier, rinse the measuring spoon and cup in warm, soapy water immediately after use.
Do Not Use Any of These When Cleaning
Paint thinner; Benzine; Steel wool pads; Polishing powder; Chemical dustcloth.
Special Care for the Non-Stick Finish
Avoid damaging the coating. Do not use metal ulensils such as metal spatulas, knives or forks.
The coating may change colour after long use, this is only caused by heat and moisture and will not affect the performance of the unit or quality of your bread.
The hole in the centre of the krooding Paddle should be cleaned. Then add a drop of cooking oil and replace it on the spindle in the baking pan. This will prevent sticking of the blade.
Keep all air vents and openings clear of dust.
Storing the Unit
Be sure to dry all parts before storing including wiping any moisture from the viewing window. Close the lid and do not store anything on top of the lid.
Specifications:
Power supply: 220-240V\~50Hz Power Consumption: 550W
Troubleshooting
| Questions and answer on bread maker | Problem Cause Solution | ||
| Smoke comes out of the baking compartment or of the vents | The ingredient slick to the baking compartment or on the outside of the baking pan | Pull out the plug and clean the outside of the baking pan or the baking compartment | |
| The bread goes down in the middle and is moist on the bottom | The bread is left to long in the pan after baking and warming | Take the bread out of the baking pan before the warming function is over | |
| It is difficult to take the bread out of the baking pan | The bottom of the loaf is stuck to the kneading paddle | Clean the kneading paddle and shaft after the baking, if necessary, fill the baking pan with warm water for 30 minutes, then the kneading paddle can be easily removed and cleaned. | |
| The ingredient are not mixed or bread is not baked correctly | Incorrect program setting Check the selected menu and the other settings | ||
| The Star/Stop button was touched while the machine was working | Do not use the ingredients and start over again | ||
| The lid opened several times while the machine was working | Do not open the lid during operation and allow it to complete it cycle | ||
| Power blackout while the machine was working | Do not use the ingredients and start over again | ||
| The rotation of kneading paddle has ceased | Check if kneading paddle's rotation is obstructed by grains etc. Take out baking pan , remove obstructions around paddle and ensure drive shaft rotates freely. | ||
| The appliance does not start. The display shows HHH | The appliance is still hotmaster the previous baking procedure | Pull out the plug, take out the baking pan and leave it to cool at room temperature, then insert the plug and start again | |
| Error with the prescriptions | Problem Cause Solution | ||
| The bread rises too fast | Too much yeast, too much flour, salt not enough | a/b | |
| or several of those causes | |||
| The bread does not rise at all or not enough | No yeast at all or too little a/b | ||
| old or stale yeast e | |||
| liquid too hot c | |||
| the yeast has come into contact with the liquid | d | ||
| wrong flour type or stale flour o | |||
| too much or not enough liquid a/b/g | |||
| not enough sugar a/b | |||
| The dough rises too much and soils over the baking pan | If the water is too soft the yeast ferments more | f | |
| too much milk affects the formen/lation of the yeast | c | ||
| The bread goes down in the middle | The dough volume is larger than the pan and the bread goes down | a/f | |
| The fermentation is too short or too fast owing to the excessive temperature of the water or the baking chamber or to the excessive moistness | c/h/i | ||
| Heavy, lumpy, structure | Too much flour or not enough liquid a/b/g | ||
| not enough yeast or sugar a/b | |||
| too much fruit, wholemeal or of one of the other Ingredients | b | ||
| old or stale flour, warm liquids make the dough rise too quickly | e | ||
| and loaf fall in before looking | |||
| no salt or not enough sugar | |||
| too much liquid | |||
| The bread is not baked in the center | too much or not enough liquid a/b/g | ||
| too much humidity h | |||
| recipes with moist ingredients, e.g. yogurt | g | ||
| Open or coarse structure or too many holes | too much water g | ||
| no salt b | |||
| 1000 gm midday water too hot b/f | |||
| Solution and code | |||
| (a) Measure the ingredients correctly. | |||
| (b) Adjust the ingredient doses and check that all the ingredients have been added. | |||
| (c) Use another liquid or leave it to cool at room temperature, add the ingredients specified in the recipe in the right order, make a small ditch in the middle of the flour and cut in the crumbled yeast or the dry yeast, avoid letting the yeast and the liquid come into direct contact. | |||
| (d) Use only fresh and correctly stored ingredients. | |||
| (e) Reduce the total amount of the ingredients, do not use more than the specified mount of flour, reduce of the ingredients by 1/3. | |||
| (f) Correct the amount of liquid. If ingredients containing water are used, the dose of the liquid to be added must be duly reduced. | |||
| (g) In case of every humid weather remove 1-2 tablespoons of water. | |||
| (h) In case of warm weather do not use the timing function. Use cold liquids. | |||
| (i) Take the bread out of the pan immediately after baking and leave it on the gird to cool for at least 15 minutes before cutting it. | |||
| (j) Reduce the amount of yeast or of all the ingredient doses by 1/4. | |||
| (k) Never grease the pan | |||
Recipes
Important note
If your bread isn't coming out the way you like, try changing the recipe slightly. Don't be afraid
to experiment and before long you'll be baking perfect loaves each and every time.
Bread recipe
Basic Bread:
| Ingredients 700g 900g | ||||
| Water 280 ml 280g 340 ml 340g | ||||
| Oil 2 tablespoons 24g 3 tablespoons 36g | ||||
| Salt 1 teaspoons 7g 1.5 teaspoons 10g | ||||
| Sugar 2 tablespoons 24g 3 tablespoons 36g | ||||
| Flour 3 cups 420g | 3 1/2 cups | 490g | ||
| Yecs1 | 1 teaspoons | 3g | 1 teaspoons | 3g |
French Bread:
| Ingredients | 200g 900g | |||
| Water 280 ml 280g 340 ml 340g | ||||
| Oil 2 tablespoons 24g 3 tablespoons 36g | ||||
| Salt | 1.5 teaspoons | 10g | 2 teaspoons | 14g |
| Sugar | 1.5 tablespoons | 18g | 2 tablespoons | 24g |
| Flour 3 cups 420g | 3 1/2 cups | 490g | ||
| Yeast | 1 teaspoons | 3g | 1 teaspoons | 3g |
Wholemeal Bread:
| Ingredients 700g 900g | ||||
| Water 260 ml 260g 340 ml 340g | ||||
| Oil 2 tablespoons 24g 3 tablespoons 36g | ||||
| Salt 1 teaspoons 7g 2 teaspoons 14g | ||||
| Wholemeal 1 cups 110g | 2 cups | 220g | ||
| Flour | 2 cups | 280g | 2 cups | 280g |
| Brown Sugar | 2 tablespoons | 18g | 2.5 tablespoons | 23g |
| Milk Powder | 2 tablespoons 14g 3 tablespoons 21g | |||
| Yeast | 1 teaspoons 3g 1 teaspoons | 3g | ||
Quick Bread:
| Ingredients | P30g | |
| Water[40-50 Degree C]: 320 ml | 320g | |
| Oil | 2 tablespoons | 24g |
| Soil | 1.5 teaspoons 10g | |
| Sugar | 2 tablespoons 24g | |
| Flour | 3 1/2 cups | 490g |
| Yeast | 1.5 teaspoons | 4.5g |
Sweet Bread:
| Ingredients 70g 90g | ||||
| Water 280 ml 280g 340 ml 340g | ||||
| Vegetable Oil 2 tablespoons 24g 3 tablespoons 36g | ||||
| Salt 1.5 teaspoons 10g 2 teaspoons 14g | ||||
| Sugar 3 tablespoons 36g 4 tablespoons 48g | ||||
| Flour 3 cups 420g | 3 1/2 cups | 490g | ||
| Milk powder | 2 tablespoons 14g 2 tablespoons 14g | |||
| Yeast | 1 teaspoons | 3g | 1 teaspoons | 3g |
Gluten free Bread:
| Ingredients | 700g | 900g | ||
| Water | 280 ml 280g | 340 ml | 340g | |
| Oil | 2 tablespoons | 24g | 3 tablespoons | 36g |
| Salt | 1 teaspoons | 7g | 1 1/2 teaspoons | 16g |
| Gluten free flour | 3 cups | 420g | 4 cups | 560g |
| Sugar | 2 tablespoons | 24g | 2 tablespoons | 24g |
| Yeast | 1,5 teaspoons | 4.5g | 1.5 teaspoons | 4.5g |
Dough:
| Ingredients | 900g | |
| Water | 360 ml | 360g |
| Oil | 2 tablespoons | 24g |
| Salt | 1.5 teaspoons | 10g |
| Refined flour | 4 cups | 560g |
| Sugar | 2 tablespoons | 24g |
Cake:
| Ingredients / | ||
| Cake oil 2 tablets | spoons 24g | |
| Sugar 8 tablets | spoons 96g | |
| Egg 6 270g | ||
| Self-raising flour 250 g | 250g | |
| Favouring essence 1 teaspoon 2g | ||
| Lemon juice 1.3 tablespoons 10g | ||
| Yeast 1 teaspoons 3g | ||
Sandwich Bread:
| Ingredients 700g | 900g | |||
| Water 270 ml | 270g | 350 ml | 350g | |
| Buller or margarine | 1.5 tablaspoons | 18g | 2 tablaspoons | 24g |
| Salt | 1.5 teaspoons | 10g | 2 teaspoons | 14g |
| Sugar | 1.5 tablespoons | 18g | 2 tablespoons | 24g |
| Dry milk | 1.5 tablespoons | 10g | 2 tablespoons | 14g |
| Bread flour | 3 cups | 420g | 4 cups | 560g |
| Dry Yeast | 1 teaspoons | 3g | 1 teaspoons | 3g |
Dessert(Apple Crisp):
| medium cooking apples | 6 pcs |
| Lemon juice | 1 teaspoons |
| Packed brown sugar | 1/2 cup |
| all-purpose flour | 1/2 cup |
| quick cooking oats | 1/3 cup |
| butter or margarine (softened) | 6 tablespoon |
Bake: Bake function, bake kneaded dough.
- Multifunction Bread Maker
- Important Safeguards
- For Your Safety
- Compulsory Warning
- Save These Instructions
- Introduction
- Memory
- Control Panel and Display
- LCD display
- Time+ button
- Loaf Size button
- Colour button
- Menu button
- Start/Stop
- Menu Select
- Colour button
- Loaf Size
- Time+
- Keep warm
- Using Your Bread Maker
- Getting to know Your Bread Maker
- Before first use
- Using
- Quick Bake bread program
- Using the delay timer
- Keep warm function
- Power interruption program protection
- Hints and Tips
- General
- Important measuring tips
- Liquids
- Solid Fats
- Adding Fruit and Nuts
- Dry Ingredients
- Freshness
- Slicing Bread
- Freezing Bread
- Toppings
- Using Bread Improver
- Ingredients Used in Bread Making
- Yeast
- Flour
- Salt
- Sugar
- Egg
- Cleaning
- Exterior
- Interior
- Bread pan
- Measuring cup and spoon
- Do Not Use Any of These When Cleaning
- Special Care for the Non-Stick Finish
- Storing the Unit
- Specifications:
- Recipes
- Important note
- Bread recipe
Brand : Bellini
Model : BTBM385
Category : Bread maker