
NS-DWR2SS8 - Dishwasher INSIGNIA - Free user manual and instructions
Find the device manual for free NS-DWR2SS8 INSIGNIA in PDF.


| Product Type | Built-in Dishwasher |
| Brand | Insignia |
| Model | NS-DWR2SS8 |
| Finish | Stainless Steel |
| Place Settings | 12 |
| Dimensions (W x H x D) | 23.9 x 33.9 x 24.6 inches |
| Weight | 75 lbs |
| Power Supply | 120 V, 60 Hz, 15 A |
| Energy Star Certified | Yes |
| Wash Cycles | 5 cycles: Normal, Heavy, Light, Rinse, Quick |
| Number of Wash Arms | 3 |
| Tub Material | Stainless Steel |
| Noise Level | 52 dBA |
| Delay Start | Up to 24 hours |
| Child Lock | Yes |
| Filter Type | Self-cleaning |
| Dispenser | Detergent and rinse aid |
| Installation | Built-in, undercounter |
| Accessories Included | Upper rack, lower rack, silverware basket, cutlery tray |
| Warranty | 1 year limited |
Frequently Asked Questions - NS-DWR2SS8 INSIGNIA
User questions about NS-DWR2SS8 INSIGNIA
0 question about this device. Answer the ones you know or ask your own.
Ask a new question about this device
Download the instructions for your Dishwasher in PDF format for free! Find your manual NS-DWR2SS8 - INSIGNIA and take your electronic device back in hand. On this page are published all the documents necessary for the use of your device. NS-DWR2SS8 by INSIGNIA.
USER MANUAL NS-DWR2SS8 INSIGNIA
natural_image
Simple line drawing of a rectangular box with a horizontal line above it, no text or symbols present.
natural_image
Simple line drawing of a rectangular container with a handle and side legs (no text or symbols)INSIGNIA
Contents
Introduction....3
IMPORTANT SAFETY INSTRUCTIONS ....3
Package contents 6
Main components 6
Installing and setting up your dishwasher....7
Before using your dishwasher....7
Finding a suitable location ....../
Providing a proper power supply ....../
Understanding your dishwasher's features....7
Wash cycle selections....7
Filter system 8
Smart wash system 8
Using your dishwasher....9
Using the control panel 9
Basic operation 11
Preparing and loading dishes ....12 Adding a dish ....19
Adding a dish....18
Filling the detergent dispenser....19 Filling the rince aid disponer....20
Filling the rinse aid disperser....20
ctors affecting performance....21 Using xino aid....21
Using rinse aid....21 Water temperature....21
Water temperature: 21
Maintaining your dishwasher....22
Cleaning the stainless steel panel....22
Cleaning the control panel 22
Cleaning the stainless steel inner door and tub 22
Cleaning the filters....22
Cleaning the door and tub gaskets 24
Cleaning the air gap 25
Protecting your dishwasher for long periods....25
Troubleshooting 26
Troubleshooting 26
Error codes 26
Specifications 29
Top Control Dishwasher
Introduction
Congratulations on your purchase of a high-quality Insignia product. Your NS-DWH2BS8/NS-DWH2SS8/NS-DWR2BS8/NS-DWR2WH8/NS-DWR2SS8 represents the state of the art in dishwasher design and is designed for reliable and trouble-free performance.
IMPORTANT SAFETY INSTRUCTIONS

This symbol indicates that dangerous voltage constituting a risk of electric shock is present within your dishwasher.

This symbol indicates that there are important operating and maintenance instructions in the literature accompanying your dishwasher.
WARNING - When using your dishwasher, follow basic safety precautions, including the following:
1Read these instructions.
2Keep these instructions.
3Heed all warnings.
4Follow all instructions.
5Clean only with a damp cloth.
6Do not block any ventilation openings. Install in accordance with the manufacturer's instructions.
7 Make sure that the available AC power matches the voltage requirements of this appliance.
ARefer all servicing to qualified service personnel. Servicing is required
INSIGNIA
NS-DWH2B58/NS-DWH2S58/NS-DWR2B58/
NS-DWR2WH8/NS-DWR2SS8

WARNING
Electric Shock Hazard
Failure to follow these instructions can result in electric shock, fire, or death.
1 WARNING-DANGER — Never allow children to play with, operate, or crawl inside the dishwasher.
2Turn off the dishwasher before carrying out user maintenance on it.
3If a component part is damaged, it must be replaced by the manufacturer, its service agent, or similar qualified persons in order to avoid a hazard.
4This appliance is intended to be used in household and similar environments.
Basic precautions before use:
- Read all instructions before using the dishwasher.
- The manual does not cover every possible condition and situation that may occur.
- Use the dishwasher only for intended function as described in this manual.
- When loading items to be washed:
- Load sharp items and knives so that they are not likely to damage the door seal and tub.
- Load sharp items and knives with the handles up to reduce the risk of cut-type injury.
- Do not wash plastic items unless they are marked dishwasher safe or the equivalent, if not marked, check with manufacture for recommendation, items that are not dishwasher safe may melt and create a potential fire hazard.
- If the dishwasher drains in to a garbage disposal, make sure disposal is completely empty before running dishwasher.
• Do not tamper with the controls - Do not operate your dishwasher unless all enclosure panels are properly in place.
- Do not touch the heating element during or immediately after use, especially if the sanitize option has been selected.
- Do not let children abuse, sit, or stand on door or racks of the dishwasher.
• Under certain conditions, hydrogen gas may be produced in a hot water system that has not been used for two weeks or more. HYDROGEN GAS IS
Top Control Dishwasher
- Do not store or use combustible materials, gasoline or other flammable vapors and liquids in the vicinity of this or any other appliance.
- Use only detergents or rinse agents recommended for use in a dishwasher and keep them out of the reach of children.
- Keep young children and infants away from dishwasher when it is operating.
- Do not use the dishwasher if it has a damaged power line or plug, and do not plug the dishwasher into a damaged outlet, failure to observe these instructions may result in electrical shock.
- Remove the door to the washing compartment when removing an old dishwasher from service or discarding it.
• To reduce the risk of injury, do not allow children to play in or on a dishwasher.
SAVE THESE INSTRUCTIONS
INSIGNIA
NS-DWH12B58/NS-DWH2S58/NS-DWR2B58/
NS-DWR2WH8/NS-DWR2SS8
Package contents
• Dish washer
- H o s e
- Installation kits
• U s e r G u i d e
• Installation Guide
Main components
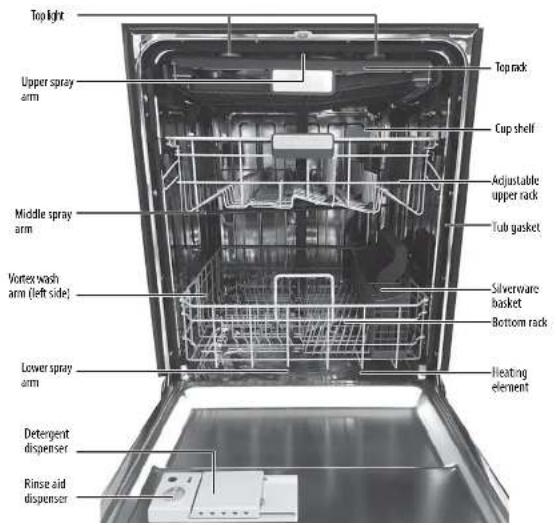
Top Control Dishwasher
Installing and setting up your dishwasher
1 Water supply temperature should be between 120°F and 149°F (49°C and 65°C).
2 Dispose of the discarded appliance and packing material properly.
3The dishwasher must be grounded or it can result in a risk of electric shock.
4If there is any damage of the contact to the dishwasher, please contact Customer Service. Do to attempt to repair or replace any part by yourself.
For information on installing and setting up your dishwasher, refer to the Installation Guide provided.
Before using your dishwasher
1Remove the Interior packing.
2Clean the interior surface with lukewarm water using a soft cloth.
Finding a suitable location
• This dishwasher is designed to be built-in.
- The dishwasher door must be able to swing fully open.
Providing a proper power supply
Check your local power source. This dishwasher requires a 120V, 60Hz power supply.
Refer to the Installation Guide for additional information.
Understanding your dishwasher's features
How your dishwasher cleans
The dishwasher fills with water, covering the filter area at the bottom. Water is then pumped through the various filter and spray arms, spraying a mixture of hot water and detergent against the soiled surfaces of your dishes and silverware. Soil particles are separated and go down the drain as the dirty water is drained and replaced with clean water. The number of water fills is determined by the cycle selected.
Wash cycle selections
INSIGNIA
NS-DWH2B58/NS-DWH2S58/NS-DWR2B58/
NS-DWR2WH8/NS-DWR2SS8
An automatic sensor checks the incoming water temperature and, if it is not hot enough, the timer will be delayed to allow for the water to heat for the main wash of all cycles. This happens even when hi-temp wash is selected, so that higher temperature will be available to handle heavier soil loads.
Filter system
Your dishwasher has a multiple filter system which includes four separate filter meshes. It separates dirty water and clean water into different chambers. The multiple filter system helps your dishwasher to get better performance with less water and less energy.
Smart wash system
Your dishwasher has a smart wash system under the normal wash program which selects the wash cycle based on how large and how soiled the load, permitting your dishwasher to clean more efficiently every time. When a partial load of lightly soiled dishes is placed in the unit, a short wash cycle is automatically selected. When a full load of heavily soiled dishes is placed in the unit, a heavy wash cycle is automatically selected.
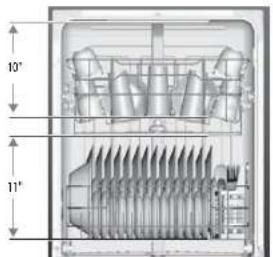
Adjustable upper rack
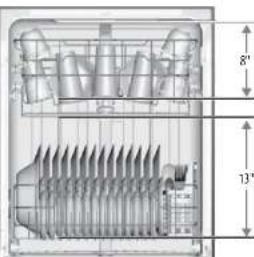
The upper rack of your dishwasher can be raised or lowered to accommodate loading dishes of varying heights in either rack. After removing the 3rd rack, the upper rack clearance height can be adjusted from 8" to 10". The lower rack clearance height can be adjusted from 11" to 13". See "Adjusting the upper rack" on page 15.
Top Control Dishwasher
Using your dishwasher
Using the control panel
Your dishwasher's control panel is located on the top edge of the door.
The door must be opened to make settings and operate the dishwasher.
Cycles
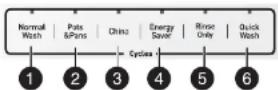
Select a cycle based on the type of dishes to be washed and the level of soil on the dishes.
Cycle times are approximate and will vary with options selected. The timer will be delayed to allow for the water to heat for the main wash of all cycles if the sensor detects the water is not hot enough. Below is water use and cycle times under standard conditions.
| # | CYCLE DESCRIPTION WATER USE | CYCLE TIME (MINUTES) | ||
| 1 | Normal Wash | Use for regularly soiled dinner dishes or silverware. | 2.85 - 6.1 gal. (10.8 - 23.0 l) | 105 - 140 |
| 2 | Pots & Pans | Use for hard-to-clean, heavily soiled dishes, pots, and pans. | 6 gal. (22.8 l) 140 | |
| 3 | China | Use for lightly soiled china and crystal. | 5.1 gal. (19.3 l) | 120 |
| 4 | Energy Saver | Use for lightly soiled or pre-rinsed dishes and silverware. | 5.1 gal. (19.3 l) | 105 |
| 5 | Rinse Only | Use for pre-rinsing dishes or glasses.This is only a rinse that keeps food from drying on your dishes and reduces odor buildup in your dishwasher until you are ready to wash a full load. Do not use detergent. | 2.1 gal. (8 l) 20 | |
| 6 | Quick Wash | Use for lightly soiled and pre-rinsed dishes and silverware. | 4.1 gal. (15.5 l) | 60 |
INSIGNIA
NS-DWH2B58/NS-DWH2S58/NS-DWR2B58/
NS-DWR2WH8/NS-DWR2SS8
Functions

flowchart
graph LR
    A["Air Exchange"] --> B["7"]
    C["Steam Wash"] --> D["8"]
    E["Vortier Wash"] --> F["9"]
    G["Heating Dry"] --> H["10"]
    I["Sanifier"] --> J["11"]
    K["Hi Temp Wash"] --> L["12"]
    M["Entry"] --> N["13"]
    O["START/Correct"] --> P["14"]
    Q["Rise Air"] --> R["15"]
    S["Satisfied"] --> T["16"]
    U["Clean"] --> V["17"]
    W["7"] --> X["8"]
    Y["10"] --> Z["11"]
    AA["13"] --> AB["14"]
    AC["15"] --> AD["16"]
    AE["18"] --> AF["17"]
    AG["19"] --> AH["18"]
Functions can add enhancements to the cycle selected.
- 7 - Air Exchange—Use to exchange the air in your dishwasher every six hours to keep the air in the dishwasher fresh.
- 8 - Steam Wash—Use for heavily soiled items. This option adds additional time to the cycle time and is available with the Pots & Pans, Normal Wash, and Energy Saver cycles.
- 9 - Child lock — Use to lock all controls to prevent children from accidentally changing the dishwasher cycle or starting the dishwasher. Press the Steam Wash and Vortex Wash buttons at the same time to select or cancel the function. The indicator light turns on.
- 10 - Vortex Wash—Use when you want to wash pots and pans, durable serving bowls, and other large, very dirty, hard to clean dishes. Place the dishes face down in the lower rack directly above the vortex wash arm in the back left corner of your dishwasher. This function is not available for the rinse only cycle.
• 11 - Heating Dry—Use to heat-dry your dishes. This function is not available for rinse only cycle. - 12 - Sanitize—Use to sanitize your dishes and glassware. Maintains the water temperature at 158^ (70°C) max., and is available with the Pots & Pans, Normal Wash, and Energy Saver cycles.
| Notes |
| • Certified residential dishwashers are not intended for licensed food establishments.• The sanitize cycle is NSF certified. |
- 13 - Hi Temp Wash—Use to maintain the water temperature at 140^ F ( 60^ C) max. This option is available with the Pots & Pans, Normal wash, and Energy saver cycles.
Controls and indicators
- 14 - Delay—Press repeatedly to delay the start of the selected wash cycle until the delay time you want is shown on the display. You can select from one to 24 hours delay. After you select the delay time you want, press START/Cancel once, then close the door within four seconds. The delay
To cancel the delay and begin the cycle before the delay period is complete, open the door, then press and hold START/Cancel for three seconds.
- 15 - Display—Shows the remaining hours and minutes of the current cycle, delay hours remaining, and error codes (see "Error codes" on page 26).
Note
If the remaining time on the display suddenly increases or decreases by several minutes, it means that the Smart Sensor has checked the soil level or the water needs to be heated to reach the required temperature.
- 16 - START/Cancel—Press to start the dishwasher after you have selected a cycle and function (if desired). Close the door. The cycle indicator begins to blink and the function indicator turns on. If you don't close the door within four seconds of pressing START/Cancel, the dishwasher pauses. Press START/Cancel again to continue with the cycle.
To cancel a running cycle, open the door, then press and hold START/Cancel for three seconds. The dishwasher will return to standby status.
To load more dishes or pause the dishwasher while it's already running, open the door. A safety mechanism stops the cycle.
Caution
To avoid injury open the door slowly and carefully. There is a possibility of hot steam from inside the dishwasher.
You can add more dishes before the main wash cycle has started. To determine this, check the detergent dispenser in the door. If the detergent dispenser is still closed, you can add more dishes. If it is open, you can add dishes to the dishwasher if the dish quantity is small. If the quantity is large, restart the cycle.
• 17 - Clean—Turns on after a cycle finished. Turns off after 30 seconds when the door is opened.
• 18 - Sanitized—Turns on when a sanitized cycle is finished. Turns off after 30 seconds, when the door is opened.
• 19 - Rinse Aid—Turns on when you need to add rinse aid.
Basic operation
1 Load the dishwasher (See preparing and loading dishes).
NS-DWH2B58/NS-DWH2S58/NS-DWR2B58/
NS-DWR2WH8/NS-DWR2SS8
INSIGNIA
5Select the function you want. The indicator will light when the selection is made.
6 To start, press START/Cancel on the control pad.
7Close the door within four seconds and the wash cycle will begin.
Preparing and loading dishes
Preparing dishes for washing
- Scrape away large pieces of food, bones, pits, toothpicks, and similar items. The continuous filtered wash system will remove the remaining food particles.
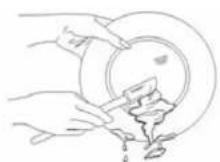
- Burned-on foods should be loosened before loading.
• Empty liquids from glasses and cups. - Foods such as mustard, mayonnaise, vinegar, lemon juice, and tomato-based products may cause discoloration of stainless steel and plastics if allowed to sit for a long period of time. Unless the dishwasher is to be operated at once, it is best to rinse off these types of foods.
- If the dishwasher drains into a garbage disposal, be sure the disposal is completely empty before starting dishwasher.
Top Control Dishwasher
Adjusting the top rack
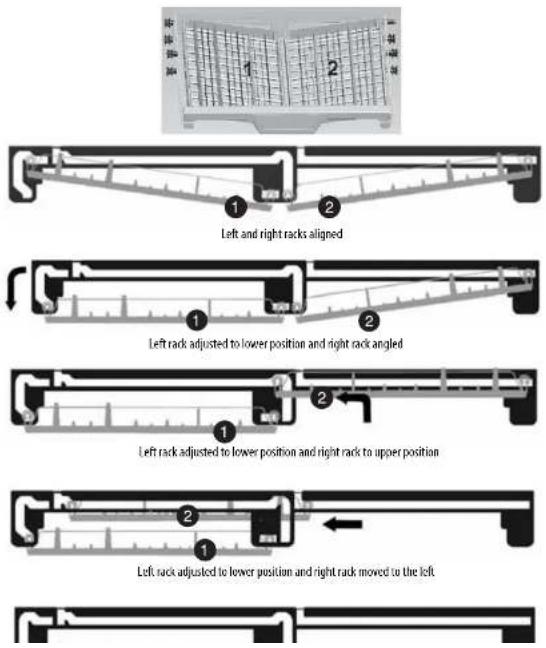
This dishwasher has a convenient top rack for silverware, cutlery, and small items. This rack can be adjusted to accommodate varying loads, as shown below.
INSIGNIA
NS-DWH2B58/NS-DWH2S58/NS-DWR2B58/
NS-DWR2WH8/NS-DWR2SS8
Loading the top rack
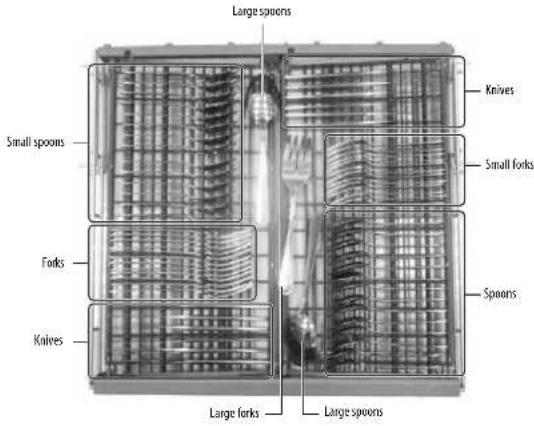
You can place the items in the top rack randomly or in an orderly fashion. The image below shows how to load the top rack for 16 place settings:
Top Control Dishwasher
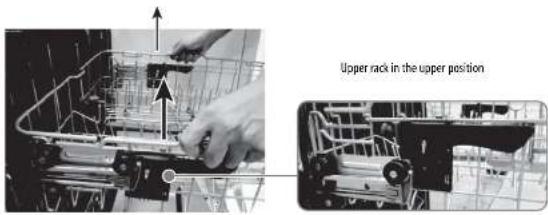
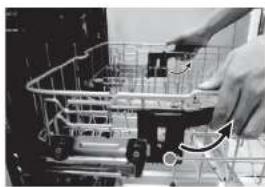
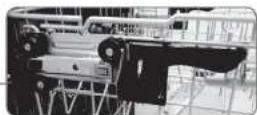
Adjusting the upper rack
The height of the upper rack can be adjusted to accommodate loading
taller dishes in either rack.
1 Lift the rack to move it to the upper position.
2Press the handle to move it to the lower position.
natural_image
Close-up of a hand operating a mechanical device with a cable inserted (no visible text or symbols)Upper rack in the lower position
Loading the upper rack
The upper rack is designed for cups, glasses, small plates, bowls, and plastic items marked dishwasher-safe. For best results, place the items with the soiled surface facing down or toward the center. Tilt them slightly for better drainage.
Note
Make sure the loaded dishes do not interfere with the rotation of the middle spray arm, which is located just below the upper
INSIGNIA
NS-DWH2B58/NS-DWH2S58/NS-DWR2B58/
NS-DWR2WH8/NS-DWR2SS8
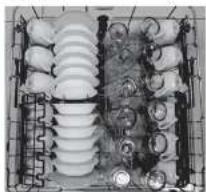
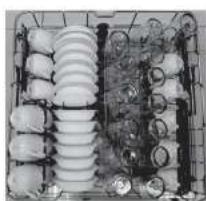
Loading suggestions are shown below:
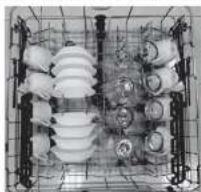
8 place settings
natural_image
Interior view of an electrical insulator assembly (no visible text or labels)12 place settings
natural_image
Interior view of a multi-tiered storage unit with circular components and metal racks (no visible text or labels)14 place settings
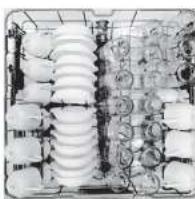
16 place settings
Top Control Dishwasher
Loading the bottom rack
The bottom rack is designed to accommodate plates, bowls, saucers, and cookware. The adjustable rack lets you load items up to 13 inches high. Large items should be placed along the edge, with the inside faces down, so they do not interfere with the middle or lower spray arms or prevent the detergent dispenser from opening.
The fold-down tines on the bottom rack are provided to support extra large and hard-to-f it items. The tines may be left up for normal use or folded down for more flexible loading of larger items.
Loading suggestions are shown below:
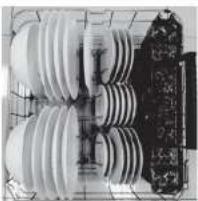
natural_image
Close-up of a metallic industrial structure with insulators and a vertical panel (no visible text or symbols)8 place settings 12 place settings
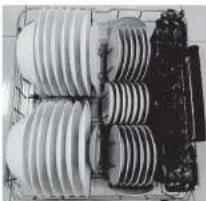
natural_image
Exterior view of a high-voltage transformer with multiple insulators (no visible text or labels)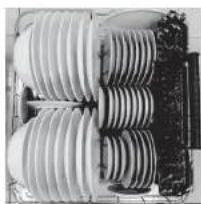
natural_image
Close-up of a mechanical component with multiple parallel insulators (no visible text or symbols)14 place settings
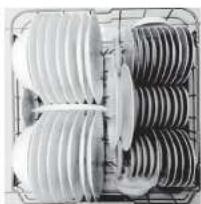
natural_image
Close-up of a mechanical component with multiple circular components arranged in a grid pattern (no visible text or symbols)16 place settings
INSIGNIA
NS-DWH2B58/NS-DWH2S58/NS-DWR2B58/
NS-DWR2WH8/NS-DWR2SS8
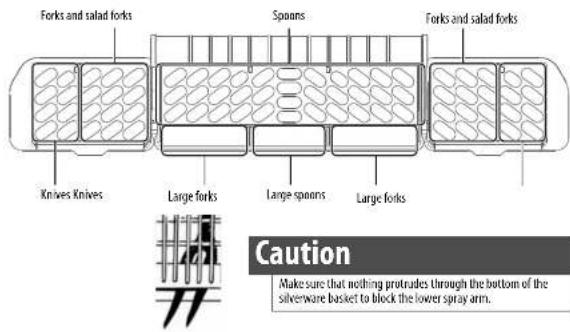
Loading the silverware basket
The silverware basket is divided into three separate sections, which can be placed in either the upper or lower racks.
Adding a dish
Caution
TO AVOID BURN INJURY: Open the door slowly and wait until the spray arms and wash action stop. Hot water may splash out of dishwasher. Failure to do so may result in injury.
Before adding dishes, refer to "Preparing and loading dishes" on page 12 for instructions on loading more dishes. Also see information on Start/cancel in the "Controls and Indicators" section on page 10. To add or remove items after the wash cycle starts: 1Open the door slightly and wait a few seconds until wash action stops before completely opening.
2Add the item, then close the door firmly.
Top Control Dishwasher
Filling the detergent dispenser
1 Push the detergent dispenser cover latch downwards to open the detergent cup.
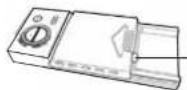
Open detergent cup
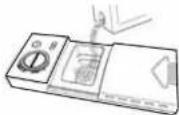
2Add detergent (dry powder, liquid, or packets) to the cup.
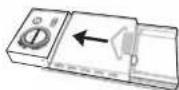
3Close the detergent dispenser cover.
The amount of detergent required depends on the cycle selected and the soil level on the dishes. Refer to the following table for the recommended amount.
| Cycle Soft Water (0-3 grains) | Medium Hard Water (4-8 grains) | Hard Water (9-12 grains) | Very Hard Water (over 12 grains) | |
| Normal Pots & Pans China Energy Saver Quick Wash | 2 tsp. (main wash cup 1/4 full) | 5 tsp. (main wash cup fill to line above regular) | 8 tsp. (main wash cup completely full) | Main wash cup completely full (water softener recommended) |
INSIGNIA
NS-DWH2B58/NS-DWH2S58/NS-DWR2B58/
NS-DWR2WH8/NS-DWR2SS8
Filling the rinse aid dispenser
Your dishwasher is designed to use a liquid rinse aid. The use of rinse aid greatly improves drying performance after the final rinse. Do not use a solid or bar-type rinse aid. Under normal conditions, the rinse aid will last approximately one month. Try to keep the dispenser full, but do not overfill it.
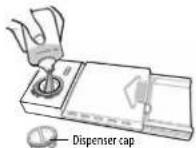
1Turn rinse aid dispenser cap 1/4 turn counterclockwise and lift it out.
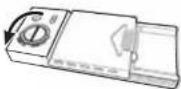
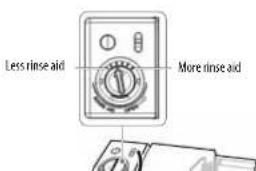
2Add rinse aid until liquid touches the indicated fill level. Do not overfill since this can cause oversudsing. Wipe up any spills with a damp cloth. The dispenser holds enough for 35 to 140 washes, depending on the dial setting.
Top Control Dishwasher
Factors affecting performance
Using rinse aid
Rinse aid greatly improves drying and reduces water spots and filming. Without rinse aid, your dishes and dishwasher Interior will have excessive moisture. In addition, the heated dry option will not perform as well without rinse aid. The rinse aid dispenser, located next to the detergent cup, automatically releases a measured amount of rinse aid during the last rinse.
If spotting and poor drying is a problem, increase the amount of rinse aid dispensed by rotating the dial to a higher number. The dial is located under the dispenser cap.
If the rinse aid is low, the rinse aid light turns on at the beginning and end of the cycle indicating that it is time to refill. Refer to "Filling the rinse aid dispenser" on page 20.
Water temperature
Hot water is required for optimum dishwashing and drying results. Water entering the dishwasher should be at least 120^ F ( 49^ C) to achieve satisfactory results.
To check water temperature entering dishwasher:
1Turn on the hot water faucet near the dishwasher and let it run for several minutes.
2Hold a thermometer (a candy or meat thermometer will work) in the water stream to check the temperature. If temperature is below 120^ F ( 49^ C), have a qualified person raise the hot water heater thermostat setting.
Important
To make sure that the water entering the dishwasher is hot, run hot water from the nearest hot water faucet to clear cool water from the pipe before starting the cycle.
Heat dry function
The heat dry function, when used with a rinse aid, enhances drying performance. If you do not choose the heat dry function, items in your load that will not be completely dry at the end of the cycle.
Water pressure
INSIGNIA
NS-DWH2B58/NS-DWH2S58/NS-DWR2B58/
NS-DWR2WH8/NS-DWR2SS8
Maintaining your dishwasher
Caution
TO AVOID BURN INJURY: Allow the heating element to cool before attempting to clean the interior of your dishwasher.
Cleaning the stainless steel panel
Clean the stainless steel door and handle regularly with a soft cloth and standard household cleaner to remove the debris
Caution
Do not use appliance wax, polish, bleach or products containing chlorine to clean the stainless steel door.
Cleaning the control panel
Clean the control panel gently with a soft, lightly dampened cloth.
Cleaning the stainless steel inner door and tub
The tub is made of stainless steel. It will not rust or corrode, even if the dishwasher should be scratched or dented.
Clean the spots on the steel inner door and tub with a damp non-abrasive cloth.
Cleaning the filters
The filters are designed to collect debris and need to be cleaned monthly to maximize wash performance.
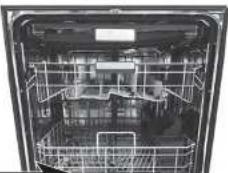
1Remove the bottom rack.
natural_image
Interior view of a kitchen appliance showing internal compartments and fixtures (no visible text or labels)Top Control Dishwasher
2Rotate the cylinder filter, then lift it out.
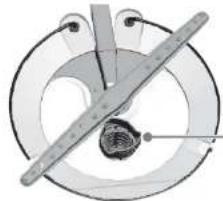
natural_image
Diagram of a mechanical device with a central rotating component and a ruler, no visible text or symbols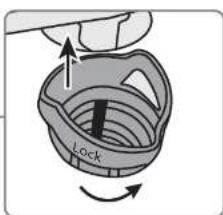
3Lift the fine filter from the bottom of the tub.
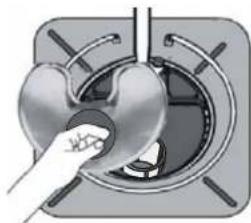
natural_image
Close-up of a hand pressing a button on a metallic mechanical component (no text or symbols visible)4Take out the fabric filter.
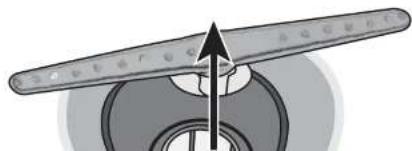
natural_image
Diagram of a propeller with a circular base and arrow indicating upward motion (no text or symbols)INSIGNIA
NS-DWH2B58/NS-DWH2S58/NS-DWR2B58/
NS-DWR2WH8/NS-DWR2SS8
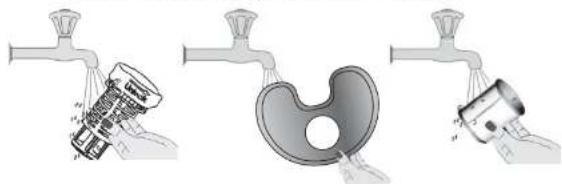
5Flush the filters by holding them under running water.
natural_image
Three-step diagram showing a hand washing a car, cleaning a circular object, and pouring liquid from a pipe (no text or symbols)6Replace the fabric filter.
7Replace the fine filter.
8Replace the cylinder filter.
9Replace the bottom rack.
Cleaning the door and tub gaskets
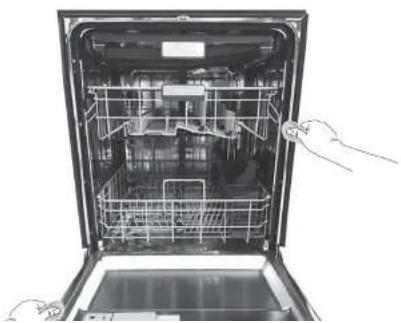
Clean the door gasket with a damp cloth to remove food particles regularly.
natural_image
Interior view of a kitchen appliance showing the door, front panel, and interior compartments (no text or symbols visible)Top Control Dishwasher
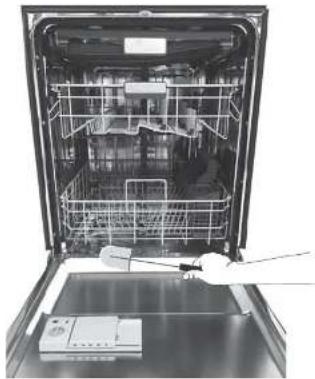
The inside of the dishwasher is self-cleaning under normal use. If needed, the tub gasket can be cleaned with a damp cloth. Use a brush to clean the opening in the end of the gasket.
natural_image
Interior view of a clean appliance with visible battery, rack, and door (no text or symbols)Cleaning the air gap
If there is an air gap installed with your dishwasher, make sure it is clean so the dishwasher will drain properly. Air gap is not part of your dishwasher. Before you clean the air gap, turn off the dishwasher, then remove the plastic air gap cover and clean with a toothpick.
Protecting your dishwasher for long periods
Your dishwasher should be protected from freezing if you plan to leave it for extended periods in an unheated place. Have a qualified person do the following:
NS-DWH2B58/NS-DWH2S58/NS-DWR2B58/
NS-DWR2WH8/NS-DWR2SS8
INSIGNIA
3Place a pan under the inlet valve, then disconnect water line from the inlet valve and drain it into a pan.
4Disconnect drain line from pump and drain the water into a pan.
To restore service:
1Reconnect the water, drain, and electrical power.
2Turn on water and electrical power supply.
3Fill the detergent cup and the rinse aid cup and run the dishwasher through a heated wash cycle.
4Check all connections to make sure they do not leak.
Troubleshooting
Refer to this table to correct minor issues before calling for service.
Error codes
| CODE MEANING POSSIBLE CAUSE | |
| E1 Longer inlet time • Fauret is not opened | • Water intake is restricted• Water pressure is too low |
| E4 Overflow A leak in the dishwasher | |
| E8 The orientation of the distributary valve not working. The wire is not connected correctly, or the distributary valve is broken. | |
| E9 A button has been touched for more than 30 seconds (by anything, including water). | Anything (including water) touching a button. |
Caution
- If an overflow occurs, turn off the main water supply before calling for service.
- If there is water in the base pan because of an overfill or small leak, the water should be removed before restarting the dishwasher.
Top Control Dishwasher
| PROBLEM POSSIBLE CAUSE POSSIBLE SOLUTION | ||
| The dishwasher won't start | The door may not be closed properly. | Make sure that the door is closed and latched. |
| The power is off or not connected. | Make sure that the power is connected and turned on. | |
| The delay start option is selected. | Refer to the "Delay" section under "Controls and indicators" on page 10. | |
| The child lack is activated. Deactivate the child lock. Refer to the "Child lack" section under "Functions" on page 10. | ||
| The dishwasher begins at the end of the cycle | This is normal and indicates that the wash cycle is complete. | |
| The rinse aid light is on The rinse aid level is low. And rinse aid. | ||
| The dishwasher runs too long | The dishwasher is connected to a cold water supply. | Make sure that the dishwasher is connected to a hot water supply. If not, change the water supply to a hot water source. |
| The cycle time varies, depending on the soil level of the dishes. | When heavy soil is detected, the wash times will be longer. | |
| Depends on the option selected. Some options will add time to the cycle. | ||
| The dishes are not clean enough | The water pressure is too low. Make sure that the water pressure is above 20 psi. Use your dishwasher when water demand is low. | |
| The inlet water temperature is too low. | Make sure that the dishwasher is connected to a hot water supply. If not, change the water supply to a hot water source. Use your dishwasher when hot water demand is low. | |
| Dishes are too close together. Reload the dishwasher as shown in "Preparing and loading dishes" on page 12. | ||
| Improper use of detergent. Add detergent depending on the water hardness and washing cycle you choose. Use fresh detergent. | ||
| The selected cycle is not suitable for the soil level on the dishes. | Choose a different cycle with a longer washing time. | |
| The spray arms are blocked. Make sure that the spray arms are not blocked and are free to rotate. | ||
| The dishes are not drying enough | The rinse aid dispenser is empty or the setting is too low. | Fill the rinse aid dispenser. Increase the rinse aid setting. |
| Dishes are loaded improperly. Reload the dishwasher as shown in "Preparing and loading dishes" on page 12. | ||
| The cycle you chose did not include drying. | Choose a cycle with drying. | |
NS-DWH2B58/NS-DWH2S58/NS-DWR2B58/
NS-DWR2WH8/NS-DWR2SS8
INSIGNIA
| PROBLEM | POSSIBLE CAUSE POSSIBLE SOLUTION | |
| Spots and filming on dishes | Water hardness is too high For extremely hard water, install a water softener. | |
| Dishes are loaded improperly. Reload the dishwasher as shown in "Preparing and loading dishes" on page '12. | ||
| Old or damp rinse aid power is used. | Use fresh, liquid rinse aid. | |
| The rinse aid dispenser is empty or the setting is too low. | Fill the rinse aid dispenser. Increase the rinse aid setting. | |
| Fritching Using too much detergent. Use less detergent if you have soft water. | ||
| The inlet water temperature exceeds 150°F (65.6°C). | Lower the inlet water temperature. | |
| Detergent left in dispenser cup | Detergent may be too old. Use fresh detergent. | |
| The spray arm is blocked. When you load the dishes, make sure that the spray arms are not blocked. | ||
| The detergent dispenser will not close | Improper operation of the detergent cover. | Add detergent and rinse aid only as indicated in this manual. See "Filling the detergent dispenser" and "Filling the rinse aid dispenser" on page 20. |
| Water remains in the dishwasher. | The previous cycle has not finished or has been interrupted. | Make sure that the current cycle is finished. |
| The dishwasher does not drain properly. | The drain is dlogged. Check the air gap (if so equipped). Make sure that the deposer is empty (if so connected). | |
| The drain hose is kinked. Make sure that the drain hose is not kinked and is properly connected. | ||
| Suds in the tub | Using improper detergent. | Make sure to use only automatic dishwasher detergent. |
| The dishwasher leaks Excessive suds caused by using improper detergent. | Make sure to use only automatic dishwasher detergent. | |
| The dishwasher is not level. | Level the dishwasher (refer to the installation Manual). | |
| There are black or gray marks on the dishes | Aluminium utensils have rubbed against the dishes. | Make sure that the water inlet temperature is not less than 120°F (49°C). |
| The interior of the tub is stained | Coffee or tea stains. Use a spot cleaner to remove the stains. | |
| Reddish stain. Some tomato products may cause this. Use of the rinse only cycle right after loading will help this. | ||
| Noises Detergent cup opening/drain pump. | This is normal. | |
| A hard object has entered the wash module. When the object is ground up the noise will stop. | ||
Top Control Dishwasher
Specifications
| Capacity Max 16 place settings | |
| Dimensions (Wx80ft) Bar handle unit - | 23.9 x 26.5 x 33.7 in. (606 x 674 x 857 mm)Recess handle unit - 23.9 x 24.5 x 33.7 in. (606 x 623 x 857 mm) |
| Weight Bar handle unit - 91.5 lbs. (41.5 kg) | Recess handle unit, 89.5 lbs. (40.6 kg) |
| Power requirements 120 V~60 Hz | |
| Current B 4 A | |
| Water pressure Between 20 and 120 psi | |
| Noise (dB) 46 dB |
INSIGNIA
NS-DWH2B58/NS-DWH2S58/NS-DWR2B58/
NS-DWR2WH8/NS-DWR2SS8
ONE-YEAR LIMITED WARRANTY
Definitions:
The Distributor* of Insignia branded products warrants to you, the original purchaser of this new Insignia-branded product ("Product"), that the Product shall be free of defects in the original manufacturer of the material or workmanship for a period of one (1) year from the date of your purchase of the Product ("Warranty Period").
For this warranty to apply, your Product must be purchased in the United States or Canada from a Best Buy branded retail store or online at www.bestbuy.com or www.bestbuy.ca and is packaged with this warranty statement.
How long does the coverage last?
The Warranty Period lasts for 1 year (365 days) from the date you purchased the Product. Your purchase date is printed on the receipt you received with the Product.
What does this warranty cover?
During the Warranty Period, if the original manufacture of the material or workmanship of the Product is determined to be defective by an authorized Insignia repair center or store personnel, Insignia will (at its sole option); (1) repair the Product with new or rebuilt parts; or (2) replace the Product at no charge with new or rebuilt comparable products or parts. Products and parts replaced under this warranty become the property of Insignia and are not returned to you. If service of Products or parts are required after the Warranty Period replace, you may pay for your products and parts charges. This warranty lasts as long as you own your Insignia product being the Warranty Period. Warranty coverage terminates if you sell or otherwise transfer the Product.
How to obtain warranty service?
If you purchased the Product at a Best Buy retail store location or from a Best Buy online website (www.bestbuy.com or www.bestbuy.ca), please take your original receipt and the Product to any Best Buy store. Make sure that you place the Product In its original packaging or packaging that provides the same amount of protection as the original packaging. To obtain warranty service, in the United States call 1-888-BESTBUY or in Canada call 1-866-BESTBUY. Call agents may diagnose and correct the issue over the phone.
Where is the warranty valid?
This warranty is valid only in the United States and Canada at Best Buy branded retail stores or websites to the original purchaser of the product in the county where the original purchase was made.
What does the warranty not cover?
This warranty does not cover:
- Customer instruction/education
- Installation - Setup adjustment - System output
- Damage due to weather, lightning, and other acts of God, such as power surges - Accidental damage
Top Control Dishwasher
- Modification of any part of the Product, including the antenna
• Display panel damaged by static (non-moving) images applied for lengthy periods
(burn-In).
• Damage due to incorrect operation or maintenance
• Connection to an incorrect voltage or power supply
- Attempted repair by any person not authorized by Insignia to service the Product
- Products sold "as is" or "with all faults"
- Consumables, including but not limited to batteries (i.e. AA, AAA, C, etc.)
- Products where the factory applied serial number has been altered or removed
- Loss or Theft of this product or any part of the product
• Display panels containing up to three (3) pixel failures (dots that are dark or incorrectly
illuminated) grouped in an area smaller than one tenth (1/10) of the display size or up
to five (5) pixel failures throughout the display. (Pixel based displays may contain a
limited number of pixels that may not function normally.)
• Failures or Damage caused by any contact including but not limited to liquids, gels or
pastes.
REPAIR REPLACEMENT AS PROVIDED UNDER THIS WARRANTY IS YOUR EXCLUSIVE REMEDY
FOR BREACH OF WARRANTY. INSIGNIA SHALL NOT BE LIABLE FOR ANY INCIDENTAL OR
CONSEQUENTIAL DAMAGES FOR THE BREACH OF ANY EXPRESS OR IMPLIED WARRANTY ON
THIS PRODUCT, INCLUDING, BUT NOT LIMITED TO, LOST DATA, LOSS OF USE OF YOUR
PRODUCT, LOST BUSINESS OR LOST PROFITS. INSIGNIA PRODUCTS MAKES NO OTHER
EXPRESS WARRANTIES WITH RESPECT TO THE PRODUCT, ALL EXPRESS AND IMPLIED WARRANTIES FOR THE PRODUCT INCLUDING BUT NOT LIMITED TO ANY IMPLIED
WARRANTIES FOR THE PRODUCT, INCLUDING BUT NOT LIMITED TO ANY IMPLIED WARRANTIES OF AND CONDITIONS OF MERCHANTABILITY AND FITNESS FOR A PARTICULAR
WARRANTIES OF AND CONDITIONS OF MERCHANTABILITY AND FITNESS FOR A PARTICULAR PURPOSE ARE LIMITED IN DURATION TO THE WARRANTY PERIOD SET EORTH ABOVE AND
NO WARRANTIES, WHETHER EXPRESS OR IMPLIED, WILL APPLY AFTER THE WARRANTY.
PERIOD. SOME STATES, PROVINCES AND JURISDICTIONS DO NOT ALLOW LIMITATIONS ON
HOW LONG AN IMPLIED WARRANTY LASTS, SO THE ABOVE LIMITATION MAY NOT APPLY TO
YOU. THIS WARRANTY GIVES YOU SPECIFIC LEGAL RIGHTS, AND YOU MAY ALSO HAVE OTHER
RIGHTS, WHICH VARY FROM STATE TO STATE OR PROVINCE TO PROVINCE.
Contact Insignia:
1-877-467-4289
www.insigniaproducts.com
INSIGNIA is a trademark of Best Buy and its affiliated companies.
^a Distributed by Best Buy Purchasing, LLC
7601 Penn Ave South, Richfield, MN 55423 U.S.A.
©2017 Best Buy. All rights reserved.
Made in China
INSIGNIA
- INSIGNIA
- Contents
- Introduction
- IMPORTANT SAFETY INSTRUCTIONS
- WARNING - When using your dishwasher, follow basic safety precautions, including the following:
- WARNING
- Basic precautions before use:
- SAVE THESE INSTRUCTIONS
- Package contents
- Installing and setting up your dishwasher
- Before using your dishwasher
- Finding a suitable location
- Providing a proper power supply
- Understanding your dishwasher's features
- How your dishwasher cleans
- Wash cycle selections
- Filter system
- Smart wash system
- Adjustable upper rack
- Using your dishwasher
- Using the control panel
- Functions
- Controls and indicators
- Note
- Caution
- Basic operation
- Preparing and loading dishes
- Preparing dishes for washing
- Adjusting the top rack
- Loading the top rack
- Adjusting the upper rack
- Loading the upper rack
- Loading the bottom rack
- Loading the silverware basket
- Adding a dish
- Filling the detergent dispenser
- Filling the rinse aid dispenser
- Factors affecting performance
- Using rinse aid
- Water temperature
- Important
- Heat dry function
- Water pressure
- Maintaining your dishwasher
- Cleaning the stainless steel panel
- Cleaning the control panel
- Cleaning the stainless steel inner door and tub
- Cleaning the filters
- Cleaning the door and tub gaskets
- Cleaning the air gap
- Protecting your dishwasher for long periods
- To restore service:
- Troubleshooting
- ONE-YEAR LIMITED WARRANTY
- Definitions:
- How long does the coverage last?
- What does this warranty cover?
- How to obtain warranty service?
- Where is the warranty valid?
- What does the warranty not cover?
- Top Control Dishwasher
Brand : INSIGNIA
Model : NS-DWR2SS8
Category : Dishwasher