
Ventura - Car seat Silver Cross - Free user manual and instructions
Find the device manual for free Ventura Silver Cross in PDF.


| Product Type | Infant car seat (Group 0+) |
| Model | Ventura Plus (Ventura) |
| Brand | Silver Cross |
| Weight Capacity | Up to 13 kg (29 lbs) from birth to approx. 9-12 months |
| Orientation | Rearward facing only |
| Harness Type | 3-point lap and diagonal seat belt (vehicle) with 3-point harness for child |
| Handle Positions | Stable, Storage, Carrying/Rocking, In-car |
| Sun/Wind Canopy | Yes, removable and adjustable |
| Apron | Yes, usable with pushchair but not in car |
| Head Support and Comfort Pad | Yes, adjustable and removable |
| Seat Cover | Removable, hand wash at max 30°C |
| Shell and Harness Cleaning | Mild soap and water; no detergents, solvents, or lubricants |
| Safety Features | Side impact protection, chest pads, crotch pad, harness must be used at all times |
| Compatibility | Universal to UN ECE Reg. 44.04; fits specified Silver Cross pushchairs |
| Airbag Warning | Do not use on a passenger seat fitted with an airbag |
| Additional Functions | Can be used as a rocking seat or baby seat on floor |
| Crotch Strap Buckle | Removable for cleaning |
| Storage Pocket | Yes, for instruction manual |
| Warranty | 12 months against faulty workmanship |
Frequently Asked Questions - Ventura Silver Cross
User questions about Ventura Silver Cross
0 question about this device. Answer the ones you know or ask your own.
Ask a new question about this device
Download the instructions for your Car seat in PDF format for free! Find your manual Ventura - Silver Cross and take your electronic device back in hand. On this page are published all the documents necessary for the use of your device. Ventura by Silver Cross.
USER MANUAL Ventura Silver Cross
Ventura Plus Instructions
Group 0+ Birth to 13kgs (29lbs)
Birth to approximately 9-12 months
natural_image
Two children engaged in a craft activity: one standing with a smiling face and waving, the other sitting on the floor with tools and drawings (no text visible)IMPORTANT, RETAIN FOR FUTURE REFERENCE: READ CAREFULLY
Keep in the pocket provided on your Ventura Plus
VERY IMPORTANT
Please read the whole of this instruction guide carefully. Failure to do so could put your child in deeper.
The Ventura Plus can be used from birth to 13kgs (29lbs), birth to approximately 9-12 months using a 3 point lap and diagonal seat belt.

*Do not use the Ventura Plus on a passenger seat fitted with an air bag!
Contents
3 Important: Safety Guide
4 Parts List
Get to know your Ventura Plus
5 Different handle positions
5 The head support and
comfort pad
6 Fitting and using the
sun/wind canopy
6 Fitting and using the apron
Before you install the Ventura
Plus in the car
7-8 Harness adjustment
Fitting and removing your child
9 Operating the harness
10 Removing your child from the
Ventura Plus
Installing and removing the
Ventura Plus
11-13 Using a lap and diagonal
seat belt
13 Removing the Ventura Plus
from the car
Troubleshooting
14 Common installation problems and possible solutions
15 Installing the Ventura Plus on a Silver CrossTravel System
15 Using the Venture Plus as
5 Using the rocking seat
15 Using the Venture Plus as a
baby seat
Looking after your Ventura Plus
15 Removing the cover
15 Refitting the cover
16 Cleaning the seat shell
and harness
16 Cleaning the cover, shoulder
pads and crotch pad
16 Removing and cleaning the
crotch strap buckle
- Final check list before
your journey
17 Warranty
7 Honunity
Important: Safety Guide
*Never use the Ventura Plus on a passenger seat fitted with an airbag. It is VERY dangerous and it is against the LAW
Read the whole instruction manual and make sure you fully understand how to install and use the Ventura Plus correctly.
Always keep your instruction manual in the pocket provided on the
Ventura Plus.
Do not place anything such as a towel or cushion under the Ventura Plus. This could affect the performance of the seat in an accident.
Never buy a second hand child seat.
Always replace the Ventura Plus after an accident. It may have unseen damage.
Always secure the Ventura Plus by the vehicle lap and diagonal seat belt when not in use.
All occupants in the vehicle must be correctly restrained.
Loose objects in the vehicle should be secured when travelling.
Cover the Ventura Plus if it is left in direct sun light. Plastic and metal surfaces get very hot and could burn. The car seat cover is also likely to fade. The safety harness must be used at all times when a child is in the Ventura Plus.
Before carrying the Ventura Plus make sure the handle is firmly locked in the carrying position.
Do not make unauthorised modifications or alterations to the Ventura Plus.
The Ventura Plus must never be used without the seat cover being correctly fitted. If you replace the cover, only use one recommended by the manufacturer.
It is very important that the harness chest pads and buckle pad are always fitted. They are an important safety feature.
Do not allow children to play with or adjust the Ventura Plus.
Do not leave children alone in your car. Do not place the Ventura Plus on a table or work top, always use the floor.
Never leave your child unattended in the Ventura Plus either in or outside the car.
Make sure your Ventura Plus does not become trapped in the door of the vehicle as by a folding passenger seat.
Vehicle of by a folding passenger seat. Make sure that all folding vehicle seats are securely latched.
Do not fit the Ventura Plus on a side or rear facing vehicle seat.
Always store the Ventura Plus in a safe, dry place when it is not being used.
Avoid storing the Ventura Plus near a direct heat source such as a radiator and do not place heavy objects on top of the Ventura Plus.
The lightest passenger should travel on the seat behind the Ventura Plus if seat belts are not fitted in the rear seats. A heavier person is more likely to injure your baby in an accident.
WARNING: Child car seats can mark vehicle seat upholstery, Silver Cross cannot not be held responsible for damage or marking to vehicle seats or seat belts.
Ventura Plus parts list
1 Handle in stable position
2 Push buttons for adjusting handle
3 Shoulder belts with comfort pads
4 Crotch strap with comfort pad
5 Harness buckle
6 Slots for shoulder straps
7 Harness release button
8 Harness adjuster strap
9 Harness attachment plate
10 Seat belt lap section guides
11 Seat belt diagonal section guides
12 Apron
13 Sun/wind canopy
14 Sun canopy connection guides
15 Head support and comfort pad
16 Instruction guide storage pocket
17 Chassis release handle


flowchart
graph TD
    A["A"] --> B["B"]
    B --> C["C"]
    C --> D["D"]
    D --> A
    style A fill:#f9f,stroke:#333
    style B fill:#ccf,stroke:#333
    style C fill:#cfc,stroke:#333
    style D fill:#fcc,stroke:#333

Get to know your Ventura Plus
Different handle positions
① Make sure you understand th
different handle positions and can correctly adjust the handle to
correctly adjust the handle to the required position.
A Stable position
B. Storage position
C Carrying and rocking position
D In car position
② Push on both handle adjusting
buttons located on the sides of the
handle (A). Move the handle to the
required position making sure it
clicks in to place.
The head support and comfort pad
The head support section is designed
to give extra side support for your
baby's head and can be adjusted as baby moves
BABY GONI.
The comfort pad provides a more
supportive and comfortable seating
position especially in the early stages of
using the venture Plus.
The head support and comfort pad can
be removed in the later stages of using
the Ventura Plus.
It is recommended that you use the
head support and comfort pad for as
long as it is suitable.

Get to know your Ventura Plus
Fitting and using the sun/wind canopy
③ Place the Venture Plus on a level floor surface with the handle in the stable position.
Remove your child from the Ventura Plus.
To fit the sun/wind canopy, slide the two attachment ratchets (A) on to the guides located on either side of the Venture Plus (B).
Make sure that the ratchets are securely attached to the Ventura Plus.
Holding the rim of the sun/wind canopy, gently pull the rear fabric of the canopy over the back of the seat until it is secure.
To move the sun canopy to the required position, gently pull the front frame of the canopy forward.
For use in the car the sun/wind canopy can only be fitted after the Ventura Plus has been installed with the vehicle lap and diagonal seat belt.
Before you install the Ventura Plus in the car
Harness adjustment
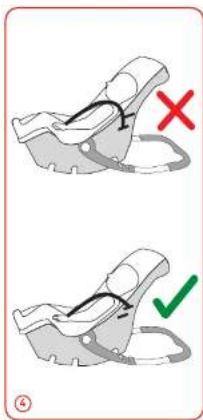
4 Before you install the Ventura Plus, it is very important that you make sure the shoulder straps are at the right height for your child. They should be level with or just below your child's shoulders.
Winter/Summer clothing can a make a difference to the size of your child Place the Ventura Plus on a level floor surface with the handle in the stable position.
Place your child in the Ventura Plus and identify the correct shoulder position. Remove your child from the Ventura Plus.
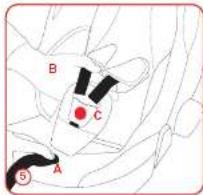
⑤ Slacken the shoulder straps by pressing the harness release button (A) at the same time, pulling both shoulder straps forward with your other hand (B).
Press the red release button (C) and undo the harness.
Fitting and using the apron
The apron is designed to be used when the Ventura Plus is attached to a Silver Cross pushchair.
The apron must not be used when the Ventura Plus is fitted into the car, as the buckle release button will be obscured.
The apron can be fitted by placing it over the fool end of the Ventura Plus, gently pull into position and secure using the Velcro taba.
natural_image
Technical line drawing of a mechanical assembly with two vertical supports and a central labeled component (A), no text or symbols present.Before you install the Ventura Plus in the car
Harness adjustment (cont)
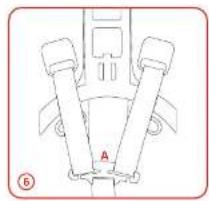
⑥Locate the metal plate at the back of the seat (A) and unhook the shoulder straps one at a time.
⑦ Pull each shoulder strap through the slots in the seat shell and cover and re-thread as required.
Carefully re-attach the shoulder straps back on to the metal plate, making sure you get them fully in to the slots. Check that there are no twists in the webbing.
Now place your child in the Ventura Plus and check that the shoulder straps are in the correct position for your child's shoulders.

Fitting and removing your child
Operating the harness
Your child must be fastened in the safety harness at all times when using the Ventura Plus
⑥ Place the Ventura Plus on a level floor surface with the handle in the stable position.
Slacken the shoulder straps by pressing the harness release button (A) and at the same time pull both shoulder straps forward with your other hand (B).
Unfasten the harness by pressing the red buckle release button (C) and place the shoulder straps over the sides of the seat.
⑥ Put your child in the Ventura Plus, place the harness over the child making sure there are no twists. Fit the two shoulder strap tongues (A) and (B) together and then push firmly into the crotch strap buckle (C) until you hear a click.
Pull the straps above and below to check they are secure.
The buckle is released by pressing the red buckle release button (D).
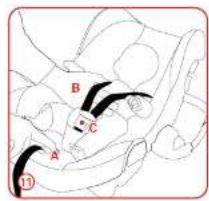
⑪ Tighten the harness straps by pulling the harness adjuster strap (A) until the child is secure.
NOTE: the harness must fit the child firmly but not make the child uncomfortable. It is important that the buckle rests low on the child's pelvic area and not on the stomach. Make sure the chest pads and buckle pad are in position. They are an IMPORTANT safety feature, and should always be used.

natural_image
Illustration of a hand holding a curved object with a red mark, no text or symbols present

Fitting and removing your child (cont)
Removing your child from the Ventura Plus
To remove your child from the Ventura Plus, slacken the shoulder straps by pressing the harness release button (A) and pull both shoulder straps with your other hand (B). Unfasten the harness by pressing the red buckle release button (C) and place the shoulder straps over the side of the seat

natural_image
Line drawing of a car seatbelt with a blue seat and gray bandage (no text or symbols)Installing and removing the Ventura Plus
Using a lap and diagonal seat belt
*Do not fit the Ventura Plus on a passenger seat fitted with an airbag!
⑫ The Ventura Plus must always be fitted rearward facing with your child facing the back of the car.
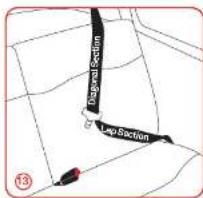
③The Ventura Plus must always be fitted using a lap and diagonal seat belt
NOTE: If fitting the Venture Plus in the front seat ^2 , adjust the vehicle seat as far back as possible. If you have a short seat belt, check if it is height adjustable and place in the lowest position. This will also help if you have a short seat belt.
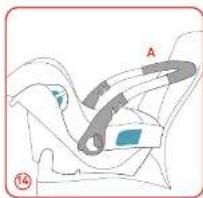
⑭ Place the Ventura Plus on the vehicle seat with your baby facing the back of the car.
Position the handle to the in-car position (A) making sure that it clicks into position.
natural_image
Line drawing of a car seatbelt with labeled component A (no text or symbols beyond label)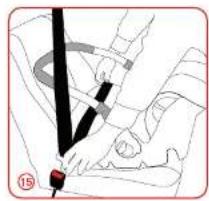
natural_image
Illustration of a car seatbelt buckle being lifted, showing hand positioning and seatbelt (no text or symbols)Installing and removing the Ventura Plus
Using a lap and diagonal seat belt (cont)
⑮ Slowly pull the seat belt out across the Ventura Plus placing the lap section underneath the handle. Fasten the seat belt.
⑯ Pass the lap section of the seat belt through both lap belt guides (A) (colour coded blue). Pull the diagonal section of the seat belt to remove any slack in the lap section.
⑰ Pull the diagonal section of the seat belt around the back of the Ventura Plus.
⑰ Pull the diagonal section of the seat belt around the back of the Ventura Plus.

Installing and removing the Ventura Plus
Using a lap and diagonal seat belt (cont)
B Place the belt into the diagonal belt guide (A) (colour coded - Blue) on the side furthest away from the seat belt buckle.
Position the Ventura Plus so that the handle rests against the back of the vehicle seat. Check the angle of the Ventura Plus is not too steep. Make sure the seat belt is not twisted.
Note: You only use one diagonal belt guide (colour coded - Blue) on the side furthest away from the seat belt buckle.
19 Holding the Ventura Plus firmly pull the diagonal section of the seat belt tight to remove any slack. Press firmly into the back of the Ventura Plus, it should feel tight and secure. There should be no excessive movement forward or to the side.


natural_image
Diagram of a car seatbelt mechanism with red arrows indicating motion direction (no text or symbols)Removing the Ventura Plus from the car
Remove the diagonal belt section from the diagonal belt guide (colour coded blue). Unfasten the seat belt and remove the belt out of the lap section guides taking care to hold the seat belt away from your child. Move the handle to the carry position making sure the handle clicks into position before you remove the Ventura Plus from your car.

natural_image
Illustration of a car seatbelt with a blue clip and black belt (no text or symbols)Troubleshooting Installing the Ventura
| Common Problems | Possible Solutions |
| Seat belt too short | Try different seating position* Adjust vehicle seat as far back as possible* Position seat belt adjuster to the lowest position (where fitted)Pull the seat belt tight removing any slack |
| Seat unstable or too upright due to shape of vehicle seatIMPORTANT: Do not try and alter the vehicle seat shape. For example: filling gaps, altering the angle of seat | Try different seating position |
| Seat belt buckle too long, cannot fully tighten lap section of seat bolt | Try different seating position |
| Seat belt buckle is too far forward | Try different seating position |
| For further advice:contact the retailer where you purchased the seat | |
Plus on a Silver Cross Travel System
The Ventura Plus is designed to fit specified Silver Cross pushchairs. Please refer to your pushchair instruction manual.
Using the Ventura Plus as a rocking seat
Place the Ventura Plus on a level floor surface. Move the handle making sure it clicks firmly into the rocking position. As your baby moves the Ventura Plus will start to rock.

Your baby must be harnessed into the seat and never left unattended.
Using the Ventura Plus as a baby seat
Place the Ventura Plus on a level floor surface. Move the handle making sure it clicks firmly into the stable position. You can now use the Ventura Plus as a baby seat.

Your baby must be harnessed into the seat and never left unattended.
Looking after your Ventura Plus
Removing the cover
Note: You must never use your Ventura Plus infant carrier without the cover it is an important safety feature of the seat.
To remove the cover, undo the harness and remove the head support and chest pads. (If you need help see adjusting harness section).
Unfasten the plastic pins attaching the sides of the cover (either side of handle) and then lift the plastic strips securing the top and bottom areas of the cover over the edge of the seat.
Thread the shoulder straps and crotch strap through the slots in the cover. Remove the cover from the seat shell. Note: Never remove the polystyrene head protection pad.
Refitting the cover
Pull the shoulder straps and crotch strap through the correct slots in the car seat cover. Carefully pull the seat cover over the top and bottom of the seat and secure the plastic strips firmly behind the fins on the shell. Fasten the plastic pins attached to the cover into the slots positioned on the sides of the seat either side of the handle adjusters. Pull the shoulder straps through the slots in the head support and refit the chest pads.
NOTE: It is very important that the chest pads are refitted. They are an important safety feature, and should always be used.
Make sure there are no twists in the harness.
Looking after your Ventura Plus (cont)
Cleaning the seat shell and harness
Wipe clean using a mild hand soap and warm water. You must not use detergents, solvents or strong soaps. This may weaken your seat shell or harness. You must not remove, dismantle or alter any part of the seat, shell or harness. You must not oil or lubricate any part of your seat shell or harness.
Cleaning the cover, chest pads and crotch pad
Hand wash only at a maximum of 30 degrees (see wash care label on the back of the Ventura Plus seat cover). Do not iron, dry clean or tumble dry. Dry flat away from direct heat and sunlight.
Removing and cleaning the crotch strap buckle
Locate the plastic plate holding your crotch strap in place underneath your seat. Twist the plastic plate and with your other hand gently pull the crotch strap buckle so that the plastic plate slides through the slot in the seat shell and cover. Clean the crotch strap buckle with a mild hand soap and water and then thoroughly rinse with warm water. Leave to dry. Do not oil or lubricate any part of the buckle.
Final checklist before journey
Check
- You have not fitted the Ventura Plus on a passenger seat fitted with an airbag. - You have adjusted the shoulder straps of the harness to the correct position. - The harness is the correct tension.
- The handle is in the in-car position (see page 6 position D). - You have correctly routed the lap and diagonal seat belt as illustrated in the manufacturers instructions.
- The Ventura Plus is tight and secure with no excessive movement forward or to the side.
Warranty
This Silver Cross product is guaranteed for a period of twelve months against faulty workmanship
Notice
-
This is a "Universal" child restraint. It is approved to Regulation No.44.04 series of amendments, for general use in vehicles and it will fit most, but not all, car seats.
-
A correct fit is likely if the vehicle manufacturer has declared in the vehicle handbook that the vehicle is capable of accepting a "Universal" child restraint for this age group.
-
This child restraint has been classified as "Universal" under more stringent conditions than those which applied to earlier designs which do not carry this notice.
-
If in doubt, consult either the child restraint manufacturer or the retailer.
-
Only suitable if the approved vehicles are fitted with 3 point static/with retractor safety-belts, approved to UN ECE Regulation No 16 or other equivalent standards.
Notes Notes

Silver Cross (UK) Ltd.
Micklethorn,
Broughtor
Skipton,
North Yorkshire BD23 3JA United Kingdom
United Kingdom
www.silvercross.co.uk
Tel:01756702412


SKVENPLUS9100708N
- VERY IMPORTANT
- Contents
- Troubleshooting
- Important: Safety Guide
- Ventura Plus parts list
- Get to know your Ventura Plus
- Different handle positions
- The head support and comfort pad
- Fitting and using the sun/wind canopy
- Before you install the Ventura Plus in the car
- Harness adjustment
- Fitting and using the apron
- Harness adjustment (cont)
- Operating the harness
- Fitting and removing your child (cont)
- Removing your child from the Ventura Plus
- Installing and removing the Ventura Plus
- Using a lap and diagonal seat belt
- Using a lap and diagonal seat belt (cont)
- Plus on a Silver Cross Travel System
- Using the Ventura Plus as a rocking seat
- Using the Ventura Plus as a baby seat
- Looking after your Ventura Plus
- Removing the cover
- Refitting the cover
- Looking after your Ventura Plus (cont)
- Cleaning the seat shell and harness
- Cleaning the cover, chest pads and crotch pad
- Removing and cleaning the crotch strap buckle
- Final checklist before journey
- Check
- Warranty
- Notice
Brand : Silver Cross
Model : Ventura
Category : Car seat