
FWV160 - Wine cellar CDA - Free user manual and instructions
Find the device manual for free FWV160 CDA in PDF.


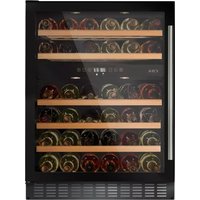
| Product Type | Wine Cooling Drawer |
| Brand | CDA |
| Model | FWV160 |
| Capacity | Up to 5 standard wine bottles, or 3 bottles + 2 champagne, or 4 champagne |
| Temperature Range | Approx. 5°C to 18°C (optimal storage 13–15°C) |
| Control Type | Electronic touch control with LED display |
| Lighting | Internal LED light (non-replaceable by user) |
| Installation Type | Built-in undercounter, requires fascia panel (140 mm) |
| Dimensions (W x D x H) | Approx. 590 x 550 x 160 mm |
| Weight | Approx. 15 kg |
| Power Consumption | Approx. 100 W |
| Voltage / Frequency | 220–240 V / 50 Hz |
| Current | 3 A (use 3A fuse) |
| Climate Class | N (normal ambient 16–32°C) |
| Refrigerant | R600a (assumed) |
| Noise Level | Approx. 38 dB (typical) |
| Color | Black (assumed) |
| Material | Metal and plastic |
| Warranty | 2 years (subject to correct installation and use) |
| Certifications | CE, RoHS (assumed) |
| Care and Cleaning | Disconnect power, clean interior with bicarbonate soda solution, exterior with mild soapy water |
| Safety | Double pole switched fuse spur outlet required; not for use by persons with reduced capabilities |
Frequently Asked Questions - FWV160 CDA
User questions about FWV160 CDA
0 question about this device. Answer the ones you know or ask your own.
Ask a new question about this device
Download the instructions for your Wine cellar in PDF format for free! Find your manual FWV160 - CDA and take your electronic device back in hand. On this page are published all the documents necessary for the use of your device. FWV160 by CDA.
USER MANUAL FWV160 CDA
FWV160 wine cooling drawer
Manual for Installation, Use and Maintenance
C|D|A|
Important
The CDA Group Ltd cannot be held responsible for injuries or losses caused by incorrect use or installation of this product. Please note that CDA reserve the right to invalidate the guarantee supplied with this product following incorrect installation or misuse of the appliance or use in a commercial environment.
This appliance is not designed to be used by people (including children) with reduced physical, seasonal or mental capacity, or who lack experience or knowledge about it, unless they have had supervision or instructions on how to use the appliance by someone who is responsible for their safety.
Under no circumstances should any external covers be removed for servicing or maintenance except by suitably qualified personnel.
Do not use the appliance if the plug, the mains cord or the appliance itself is damaged, if the mains cord is damaged, you must have it replaced by the manufacturer, or an authorised service centre or similarly qualified person in order to avoid a hazard. Children should be supervised to ensure that they do not play with the appliance. Keep the mains cord out of the reach of children. Do not let the mains cord hang over the edge of the table or worktop on which the appliance stands.
Appliance information:
Please enter the details on the appliance rating plate below for reference, to assist CDA Customer Care in the event of a fault with your appliance and to register your appliance for guarantee purposes.
Appliance Model
Serial Number
CE Declarations of Conformity:
This appliance has been designed, constructed and marketed in compliance with safety requirements of EEC Directive 2006/95/ FEC (Low voltage) and requirements of EMC Directive 2004/108/EEC.
IMPORTANT INFORMATION FOR CORRECT DISPOSAL OF THE PRODUCT IN ACCORDANCE WITH EC DIRECTIVE 2002/96/EC.
Please render the appliance unusable before disposal. This includes removing the plug and breaking the door fixtures to prevent children being trapped inside the appliance during play, or any other risk of injury.
Before first use
It is recommended that you remove all internal and external packaging and clean the interior of the appliance prior to first use, using a solution of bio-benate of soda and warm water and then thoroughly dry the interior.
The appliance may have an colour to it at first use. This will disappear as the appliance costs
Please note:
• The appliance will work continuously until it gets to the correct temperature.
- The LED display may not show the selected temperature whrs, the appliance first gets to the correct temperature. This is normal, and the display will be corrected automatically once the appliance has run for a few hours.
Use
- This appliance is intended to be used exclusively for the storage of wine.
- In the event of a power failure, leave the drawer closed as much as possible to maintain the internal working temperature. Should the power failure continue for a prolonged period, you should take steps to protect the contents of the wine drawer against a rise in temperature. The wine cooler will remember the selected temperature settings and revert to these settings once the power is restored.
• Only store wine in sealed containers positioned on the storage racks - Do not overload the drawer
• Only open the drawer when necessary
This appliance is suitable for use in an extended temperature climate (N) and has a normal operating ambient temperature of 16-32°C. Use of the appliance below 10°C or above 25°C may cause performance issues that are not indicative of a fault. Normal operation will resume once the appliance is within the specified range.
Use and Controls
To switch the power on/off
- Touch and hold the power button.
To change the temperature
- Press the up or down buttons until the required temperature is as shown on the display.
Optimal temperature selection
Whilst wine is best stored at temperatures between 13 and 15 C, your wine can also be stored at drinking temperature. For red wine this is between 15 and 17 C, and for white wine between 12 and 13 C.
The cooling drawer is designed to store:
- Either 5 standard bottles of wine
• Or 3 standard wine bottles and 2 champagne bottles
• Or 4 champagne bottles
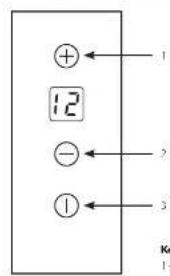
fig.1
Care and Cleaning
Always disconnect the appliance from the mains electrical supply before any cleaning or maintenance.
- Do not use abrasive products or detergents. After washing, rinse and dry thoroughly.
• The exterior of the appliance and the seal should be cleaned using mild, soapy water and dried thoroughly.
• The interior should be cleaned using a solution of bicarbonate of soda and lukewarm water. - Ensure that the cloth is only moist when cleaning the control panel and electrical parts, and that all water is thoroughly dried off before reconnecting the power.
- Once cleaning is complete, reconnect the mains electrical supply.
- If the appliance is not to be used for prolonged periods of time, unplug and clean the appliance thoroughly
The drawer should be left slightly ajar to prevent the formation of odours or condensation
Troubleshooting
If you have any problems with your appliance, you should check the troubleshooting guide prior to calling CDA Customer Care to prevent unnecessary service calls and potential cost.
If the appliance is not working, check
• There is power to the appliance
• The house fuses or circuit breakers are intact and the fuse in the plug has not blown.
• The plug socket is functioning correctly. To check this, plug another electrical appliance in to see if the socket is working.
• The ambient temperature is between 16° and 32°C.
The appliance is working, but not very well, check
• The appliance is not overloaded.
• The thermostat is set to an appropriate temperature.
• The drawer is closing properly.
• The drawer seal is sealing properly
• There is enough ventilation at the side and rear walls.
• The ambient temperature is between 16° and 32°C.
The appliance is noisy, check
• The appliance is level and stable.
The light does not work, check
• There is power to the appliance
• The house fuses or circuit breakers are intact and the fuse in the plug has not blown.
Please note:
The LED lighting cannot be replaced without a service call. If the light fails, contact CDA Customer Care.
The drawer will not close properly, check
• The appliance is level and stable
• If the drawer has been removed, it may not have been correctly refitted
• The drawer seal is clean
Installation
This appliance should be installed in a well ventilated, dry room.
This appliance must not be installed:
1. In direct sunlight
2. Adjacent to a heat source (oven or radiator)
3. Below a hob-unit
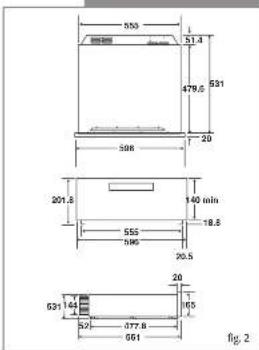
This appliance is intended to be built in to a standard kitchen under counter drawer unit. The standard gap between a worktop and the top of a fascia panel is 4mm. This product has been designed to work with fascia panels of 140mm
Ensure the fixings used are appropriate to support the weight of the unit when fully loaded.
Ensure that there is an adequate flow of air at the rear of the cabinet.
IMPORTANT: Failure to follow the instructions regarding installation and ventilation may invalidate the warranty supplied with your appliance.
To ensure the proper functioning of the appliance, air vents should never be blocked or covered.
Installing the appliance
- Remove the drawer of the cabinet and the top rail where the appliance is to be installed.
- Remove the two existing drawer guides
- Fasten the support brackets into position as shown in figure 3. Adjust the brackets so that the distance from the top of the bracket to the underside of the worktop is 160mm.
- Slide the unit into position on the brackets and fix to the units using two appropriate screws (not supplied).

Mounting the fascia
- Open the drawer and remove the screws located on either side, as shown in figure 5, to allow the drawer to be removed completely.
- Locate the fascia panel on the front of the appliance and secure with four screws, as shown in figure 6, ensuring that it aligns with adjacent fascia panels and that the lower edge of the fascia panel aligns with the lower edge of the drawer front (for 140mm fascia panels)
- Connect to the mains supply.

natural_image
Technical line drawing of a mechanical assembly with housing and rollers (no text or symbols)
Mains Electricity Connection
THIS APPLIANCE MUST BE CONNECTED TO THE MAINS SUPPLY BY A COMPETENT PERSON, USING FIXED WIRING VIA A DOUBLE POLE SWITCHED FUSE SPUR OUTLET AND PROTECTED BY A 3A FUSE.
We recommend that the appliance is connected by a qualified electrician, who is a member of the N.I.C.E.I.C. and who will comply with the I.E.E. and local regulations.
The wires in the mains lead of this appliance are coloured in accordance with the following code:
Green & Yellow = Earth, Blue = Neutral, Brown = Live.
As the colours of the wires in the mains lead for the appliance may not correspond with the coloured markings identifying the terminals connecting to the fuse spur, proceed as follows:
- The wire which is coloured green and yellow must be connected to the terminal marked E (Earth) or coloured green.
- The wire which is coloured blue must be connected to the terminal marked N (Neutral), or coloured black.
- The wire which is coloured brown must be connected to the terminal marked L (Live), or coloured red.
Note: Use a 3A Fuse
Assembly and electrical connection should be carried out by specialised personnel.
When installing this product we recommend you seek the help of another individual.
DOUBLE POLE SWITCHED
FUSE SPUR OUTLET

USE A 3 AMP FUSE
fig.6

bar
| Category | Value | |---|---| | Dark Gray Bar | 100 | | Light Gray Bar | 50 | | Medium Gray Bar | 75 | | Pale Gray Bar | 25 | | Light Grey Bar | 100 |
bar
| Category | Value | |---|---| | Dark Gray Bar | 100 | | Light Gray Bar | 50 | | Medium Gray Bar | 75 | | Pale Gray Bar | 25 | | Light Grey Bar | 100 |
natural_image
Abstract pattern of grayscale rectangular blocks with no text or symbols|C|D|A|


- Important
- Appliance information:
- CE Declarations of Conformity:
- Before first use
- Please note:
- Use
- Use and Controls
- To switch the power on/off
- To change the temperature
- Optimal temperature selection
- The cooling drawer is designed to store:
- Care and Cleaning
- Troubleshooting
- If the appliance is not working, check
- The appliance is working, but not very well, check
- The appliance is noisy, check
- The light does not work, check
- The drawer will not close properly, check
- Installation
- IMPORTANT: Failure to follow the instructions regarding installation and ventilation may invalidate the warranty supplied with your appliance.
- Installing the appliance
- Mounting the fascia
- Mains Electricity Connection
- Green & Yellow = Earth, Blue = Neutral, Brown = Live.
- Note: Use a 3A Fuse
Brand : CDA
Model : FWV160
Category : Wine cellar