Thunderblade V4 - External hard drive OWC - Free user manual and instructions
Find the device manual for free Thunderblade V4 OWC in PDF.


| Product Type | External Solid State Drive (SSD) Enclosure |
| Model | OWC ThunderBlade V4 |
| Interface | 2 x Thunderbolt 3 (USB-C) |
| SSD Bay Count | 4 x M.2 NVMe SSD slots (pre-installed) |
| Pre-installed Storage | 4 x M.2 NVMe SSDs (capacity varies by model) |
| RAID Support | Preconfigured as RAID 0 via SoftRAID XT (macOS); manual RAID 0 setup for Windows |
| Dimensions | Approximately 2.9 x 4.1 x 5.3 in (74 x 104 x 135 mm) |
| Weight | Approximately 1.0 lb (454 g) without cables |
| Power Supply | External AC adapter (included); input 100-240V, output 12V |
| Cable Included | 0.5 m (1.6 ft) Thunderbolt 3 cable |
| Operating Systems | macOS 10.13+, Windows 10+ (with Thunderbolt 3) |
| LED Indicator | 4-segment blue LED for power and per-SSD activity; ambient light sensor adjusts brightness |
| Display Output | Supports DisplayPort 1.2 via spare Thunderbolt 3 port (adapter needed for HDMI) |
| Cooling | Passive heatsink (no fan) |
| Software Included | SoftRAID XT license (for macOS RAID monitoring) |
| Form Factor | Portable enclosure with rubber feet |
| Construction | Aluminum alloy with heat-dissipating fins |
| Data Transfer Rate | Up to 2800 MB/s read/write (depending on SSDs and RAID configuration) |
| Safety | CE, FCC, RoHS compliant |
| Warranty | Limited 3-year warranty (check manufacturer for details) |
| Repairability | Not user-serviceable; contact OWC for repairs |
| Compliance | Plug-and-play (no drivers needed for basic use) |
Frequently Asked Questions - Thunderblade V4 OWC
User questions about Thunderblade V4 OWC
0 question about this device. Answer the ones you know or ask your own.
Ask a new question about this device
Download the instructions for your External hard drive in PDF format for free! Find your manual Thunderblade V4 - OWC and take your electronic device back in hand. On this page are published all the documents necessary for the use of your device. Thunderblade V4 by OWC.
USER MANUAL Thunderblade V4 OWC
natural_image
Black rectangular electronic device with a horizontal heat sink and a white LED indicator (no text or symbols visible)CONTENTS
Introduction....1
1.1 Minimum System Requirements
1.2 Package Contents
1.3 Getting Started
1.4 About This Manual
1.5 Front View
1.6 Rear View
Mac & PC Setup.... 3
2.1 Mac Formatting & SoftRAID Information
2.2 PC Formatting Process
Support Resources....10
3.1 Troubleshooting
3.2 About Data Backup
3.3 Contacting Technical Support
INTRODUCTION
1.1 Minimum System Requirements
• Mac: host with Thunderbolt™ 3 port running macOS 10.13 or later
• PC: host with Thunderbolt 3 port running Windows 10 or later
1.2 Package Contents
- OWC ThunderBlade V4
• 0.5m Thunderbolt 3 cable
• Power supply and cable
1.3 Getting Started
- To use the ThunderBlade V4, connect it to your computer via the included Thunderbolt 3 cable. Device drivers are not required, however use of SoftRAID XT (macOS only at the time of this writing) requires the SoftRAID driver and application.
- The LED indicator on the front of the device (see Section 1.5) will glow blue when the device is receiving power and is connected to an active host. The LED will glow white when the device is connected to a host that is in Sleep or hibernation mode, or when it has power but is not connected to a host. This LED is also connected to a light sensor on the back of the device; this enables the LED brightness to adjust automatically based on ambient lighting conditions.
- The LED has four segments, one for each installed M.2 SSD. When one or more of the SSDs are accessed for read/write operations, the corresponding segments will blink blue.
- While it is possible to connect a DisplayPort 1.2 display to the spare Thunderbolt 3 port on the device by using the appropriate cable or adapter, HDMI and other types of displays require an active display adapter with a USB-C host connection.
1.4 About This Manual
The images and descriptions may vary slightly between this manual and the unit shipped. Functions and features may change depending on the firmware version.
1.5 Front View
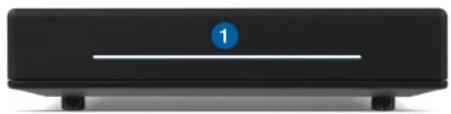
natural_image
Front view of a black electronic device with a blue circular indicator labeled '1' on the side (no text or symbols on the device body)- LED array (power and disk activity)
1.6 Rear View
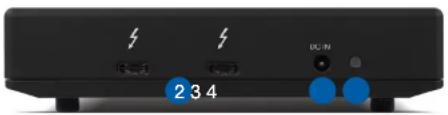
natural_image
Front view of a black electronic device with indicator lights and buttons (no readable text or symbols)- Dual Thunderbolt 3 ports
- Power input
- Ambient light sensor (do not cover)
MAC & PC SETUP
2.1 Mac Formatting & SoftRAID Information
The pre-installed SSDs have been formatted as a Jourmaled HFS+ volume for Mac, and configured as a RAID 0 using SoftRAID XT. While you can use the drive without SoftRAID XT installed on your Mac, we recommend you download the application at softtraid.com/srxt and install the latest version to get the best performance. The OWC ThunderBlade V4 ships with a license for SoftRAID XT; the serial number is on the bottom of the device.
2.2 PC Formatting Process
Note: all data on the ThunderBlade V4 will be lost when following the steps below. Back up all important data before proceeding.
- Connect the ThunderBlade V4 to a Windows 10 host using the included Thunderbolt 3 cable, then connect the included power supply.
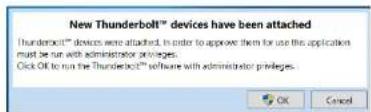
- When the 'New Thunderbolt devices...' dialog appears (shown below), click OK. Note: if you are using Windows via Bootcamp, the dialog box noted in this step may not appear. On some PC systems, a secondary dialog may appear after the 'New Thunderbolt devices' dialog and before the dialog shown in Step 3, asking if you want to allow 'Thunderbolt Software' to make changes to the device. Click 'Yes' in that case.
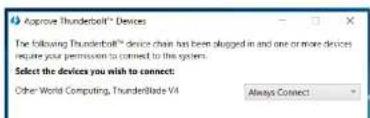
- The 'Approve Thunderbolt Devices' dialog will appear. Choose the 'Always Connect' option from the menu (shown below) and then click OK.
- Type 'Create' in the search field next to the Start menu. From the results, choose 'Create and format hard disk partitions' to open Disk Management.
First-time SSD Users
If you've never connected an SSD to your PC before, your Disk Management window will look like the one below (note only 1 of the 4 SSDs are shown - bottom panel). If you have connected SSDs before, skip ahead to the next page.
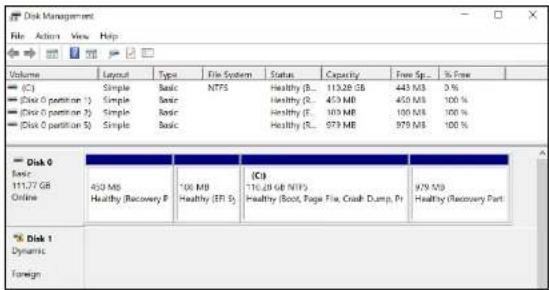
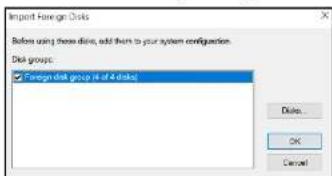
After a short time the 'Import Foreign Disks' dialog will appear. Click OK.
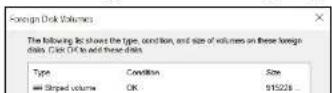
Next the 'Foreign Disk Volumes' dialog will appear. Click OK.
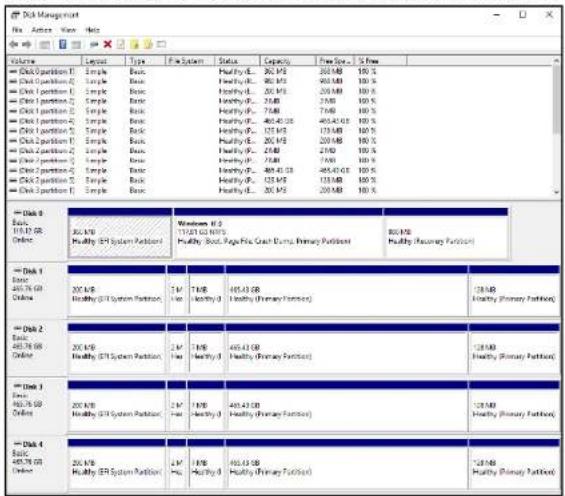
All four SSDs should appear as they do in the Disk Management window below.
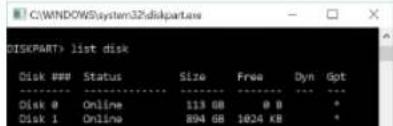
- Type 'Command' in the search field next to the Start menu, then select the Command Prompt result. In the Command Prompt, type (without the marks) 'diskpart' then press Enter. A new dialog box will appear; click 'Yes'. Next, at the DISKPART > prompt type 'list disk' — you should see a screen similar to the one below. Note the numbering of the four identical capacity disks.
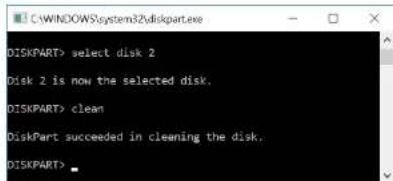
- You now need to clean the disks (this will require you to step through the same process four times). Start with the first disk in the series; in this example we'll use Disk 2 (i.e. the series is disks 2-5). At the DISKPART > prompt type 'select Disk 2' and press Enter. You should see a message that the disk has been selected (as shown below). Next, at the DISKPART > prompt type 'clean' and press Enter. You should see a message like the one below.
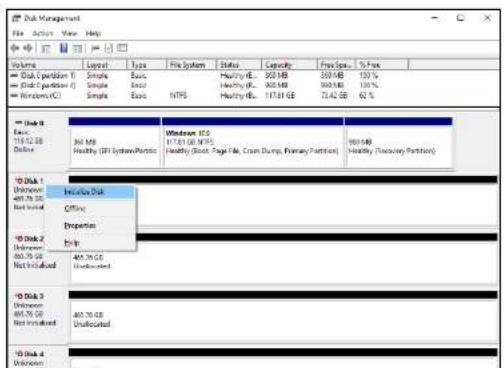
- Once you've repeated the clean command for all four disks, go back to the Disk Management window. Right-click on the first of the four disks listed in Disk Management and select 'Initialize Disk' from the context menu options.
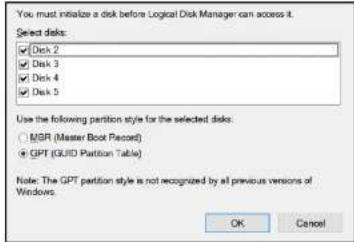
- From 'Initialize Disk' select all four disks and the 'GPT' option. Click OK.
- The 'New Striped Volume' wizard will appear. Click the 'Next' button. From the 'Select Disks' dialog, select all three of the disks in the 'Available' section...
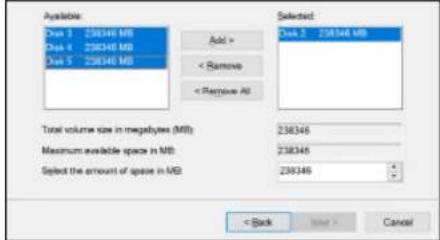
.... then click the 'Add' button, then click 'Next'.
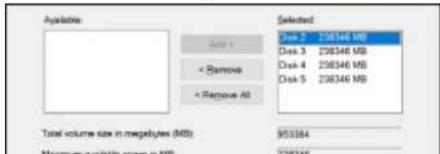
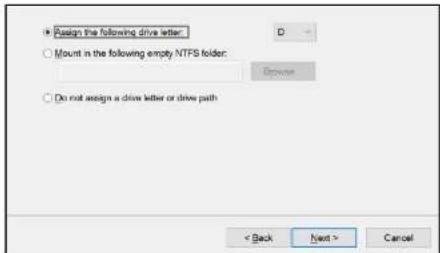
- From the 'Assign Drive Letter or Path' dialog, leave the default setting intact. A drive letter will automatically be chosen, then click the 'Next' button.
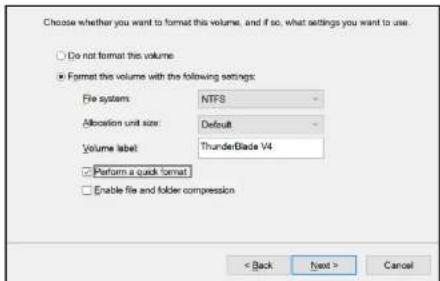
- From the 'Format Volume' dialog, choose the 'Format this volume with the following settings' option, then make sure the following are selected: File System: NTFS; Allocation unit size: Default (unless you have a specific reason to use a different setting); Volume label: type a name here; and 'Perform a quick format' should be checked as well. Do not enable compression. Click the 'Next' button.
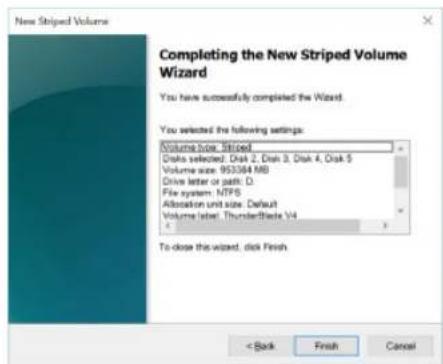
- The wizard's summary screen will appear. Click the 'Finish' button. You will then be asked by Disk Management if you are sure you want to continue. Click 'Yes'. Once the formatting process is complete, the ThunderBlade V4 will be visible in the Windows File Explorer. This concludes the PC formatting and RAID 0 setup process.
Notice: Windows 10 does not currently have a method of ejecting Thunderbolt storage devices. Before disconnecting the ThunderBlade V4 from the host computer, please check the LED on the front of the drive to make sure no disk activity is in progress.
SUPPORT RESOURCES
3.1 Troubleshooting
If your computer does not recognize the drive when it is connected, make sure the cable is attached securely. You can also try plugging the cable into a different Thunderbolt 3 port on your computer and/or trying a different Thunderbolt 3 cable.
PC users: if you have opened Disk Management but do not see the ThunderBlade V4 SSDs listed, make sure you followed all the steps in Section 2.2 from the start. Multiple permission steps are required for a PC to communicate properly with Thunderbolt 3 SSDs; skipping one or more of those steps may result in the disks not being visible in Disk Management.
3.2 About Data Backup
To ensure your files are protected and to prevent data loss, we strongly suggest that you keep two copies of your data: one copy on your OWC ThunderBlade V4 and a second copy on either your internal drive or another storage medium, such as an optical backup, or on another external storage unit. Any data loss or corruption while using the ThunderBlade V4 (including with SoftRAID XT) is the sole responsibility of the user, and under no circumstances may OWC, its parent, partners, affiliates, officers, employees, or agents be held liable for loss of the use of data including compensation of any kind or recovery of the data.
3.3 Contacting Technical Support

Phone: M-F, 8am-5pm Central Time (866) 692-7100 (N. America) | +1 (815) 338-4751 (Int'l)

Chat: M-F, 8am-8pm Central Time www.owcdigital.com/support

Email: Answered within 48 hours www.owcdigital.com/support
© 2018 Other World Computing, Inc. All Rights Reserved.
OWC and the OWC logo are trademarks of Other World Computing, Inc. registered in the U.S. Patent and Trademark Office and/or in Canada. ThunderBade is a trademark of Other World Computing, Inc. SoftRAID and the SoftRAID logo are registered trademarks of OWC Holdings, Inc. Apple, Mac, and macOS are trademarks of Apple Inc. registered in the U.S. and in other countries. The brandalt and the Thunderbolt logo are trademarks of Intel Corporation or its subsidiaries.
- CONTENTS
- Introduction....1
- Mac & PC Setup.... 3
- Support Resources....10
- INTRODUCTION
- Minimum System Requirements
- Package Contents
- Getting Started
- About This Manual
- Front View
- Rear View
- MAC & PC SETUP
- Mac Formatting & SoftRAID Information
- PC Formatting Process
- First-time SSD Users
- SUPPORT RESOURCES
- Troubleshooting
- About Data Backup
- Contacting Technical Support
Brand : OWC
Model : Thunderblade V4
Category : External hard drive