Sonic - Scooter de mobilité Pride - Free user manual and instructions
Find the device manual for free Sonic Pride in PDF.


| Product Type | Scooter de mobilité (Mobility Scooter) |
| Brand | Pride |
| Model | Sonic (Model Number: SC52) |
| Overall Length | 37 in (94 cm) |
| Overall Width | 21 in (53.3 cm) |
| Total Weight (without batteries) | 97.5 lbs (44.2 kg) |
| Heaviest Piece When Disassembled | 35 lbs (15.9 kg) |
| Turning Radius | 34 in (86.4 cm) |
| Maximum Speed | Variable up to 4.25 mph (6.8 km/h) |
| Range Per Charge | Up to 10 miles (16 km) with 12 AH batteries |
| Ground Clearance | 1.75 in (4.4 cm) |
| Weight Capacity | 300 lbs (136 kg) |
| Seat Dimensions | Width: 18 in (45.7 cm), Depth: 16 in (40.6 cm), Height: 14 in (35.6 cm) |
| Drive System | Rear-wheel drive, sealed transaxle, 24V DC motor |
| Braking System | Dual: electronic (regenerative) and electromechanical disc park brake |
| Tires | Solid: Front 2 in. x 7.5 in., Rear 2.5 in. x 7.5 in. |
| Battery Requirements | Two 12V deep-cycle AGM or Gel-Cell, 12 AH each, 9 lbs each |
| Battery Charger | Off-board charger (included) |
| Safety Features | Anti-tip wheels, manual freewheel lever, key switch, speed adjustment dial, horn, battery condition meter |
| Maintenance | Check tire pressure (30-35 psi if pneumatic), clean shroud with car wax, use rubber conditioner on tire sidewalls |
| Warranty | 3-year limited on frame; 3-year prorata on drivetrain; 1-year on other components |
| Disassembly | 4 parts: seat, front section, rear section, battery pack |
| Colors Available | Red, Blue |
Frequently Asked Questions - Sonic Pride
User questions about Sonic Pride
0 question about this device. Answer the ones you know or ask your own.
Ask a new question about this device
Download the instructions for your Scooter de mobilité in PDF format for free! Find your manual Sonic - Pride and take your electronic device back in hand. On this page are published all the documents necessary for the use of your device. Sonic by Pride.
USER MANUAL Sonic Pride
natural_image
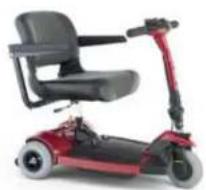
Red electric scooter with black seat and red articulated arm (no visible text or symbols)SAFETY GUIDELINES
The symbols below are used throughout this owner's manual and on the scooter to identify warnings and important information. It is very important for you to read them and understand them completely.

WARNING! Indicates a potentially hazardous condition/situation that can cause personal injury, equipment and/or property damage. (Black symbol on yellow triangle with black border).

MANDATORY! These actions should be performed as specified. Failure to perform mandatory actions can cause injury to personnel and/or damage to equipment (white symbol on blue dot).

PROHIBITED! These actions are prohibited; do not perform at any time or in any situation. Performing a prohibited action can cause personal injury and/or equipment damage (black symbol with red circle and red slash).
Please fill out the following information for quick reference:
Pride Provider:
Purchase Date:
Address:
Phone Number:
Serial Number:
CONTENTS
I. INTRODUCTION 4
II. SAFETY 5
III. EMI/RFI 16
IV. SPECIFICATIONS 18
V. YOUR SCOOTER 20
VI. BATTERIES AND CHARGING 23
VII. OPERATION 28
VIII. COMFORT ADJUSTMENTS 30
IX. DISASSEMBLY AND ASSEMBLY 32
X. BASIC TROUBLESHOOTING 35
XI. CARE AND MAINTENANCE 37
XII. WARRANTY 38
I. INTRODUCTION
SAFETY
WELCOME to Pride Mobility Products Corporation (Pride). The product you have purchased combines state of the art components with safety, comfort and styling in mind. We are confident the design features will provide you with the conveniences you expect during your daily activities. Understanding how to safely operate and care for this product should bring you years of trouble free operations and service.
Read and follow all instructions, warnings, and notes in this manual and all other accompanying literature before attempting to operate this product for the first time. In addition, your safety depends upon you, as well as your provider, caretaker, or healthcare professional in using good judgement.
If there is any information in this manual which you do not understand, or if you require additional assistance for setup or operation, please contact your authorized Pride Provider. Failure to follow the instructions, warnings, and notes in this manual and those located on your Pride product can result in personal injury or product damage and will void Pride's product warranty.
PURCHASER'S AGREEMENT
By accepting delivery of this product, you promise that you will not change, alter or modify this product or remove or render inoperable or unsafe any guards, shields, or other safety features of this product; fail, refuse or neglect to install any retrofit kits from time to time provided by Pride to enhance or preserve the safe use of this product.
INFORMATION EXCHANGE
We want to hear your questions, comments, and suggestions about this manual. We would also like to hear about the safety and reliability of your new scooter, and about the service you received from your authorized Pride Provider. Please notify us of any change of address, so we can keep you apprised of important information about safety, new products, and new options that can increase your ability to use and enjoy your scooter. Please feel free to contact us at the address below:
Pride Mobility Products Corporation
II. SAFETY
PRODUCT SAFETY SYMBOLS
The symbols below are used on the scooter to identify warnings, mandatory actions, and prohibited actions. It is very important for you to read and understand them completely.

Read and follow the information in the owner's manual.
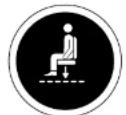
Maximum seating weight.

Pinch/Crush points created during assembly.
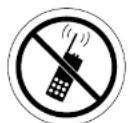
Do not use a cell phone, walkie/talkie, laptop, or other radio transmitter while operating.

Locked and in drive mode.
II. SAFETY

Corrosive chemicals contained in battery. Use only AGM or Gel-Cell batteries to reduce the risk of leakage or explosive conditions.

Explosive conditions.

Use only AGM or Gel-Cell batteries.
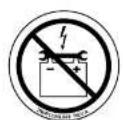
Contact with tools can cause electrical shock.

Do not remove anti-tip wheels.
II. SAFETY
GENERAL

MANDATORY! Do not operate your new scooter for the first time without completely reading and understanding this owner's manual.
Your scooter is a state-of-the-art life-enhancement device designed to increase mobility. Pride provides an extensive variety of products to best fit the individual needs of the scooter user. Please be aware that the final selection and purchasing decision regarding the type of scooter to be used is the responsibility of the scooter user who is capable of making such a decision and his/her healthcare professional (i.e., medical doctor, physical therapist, etc.).
There are certain situations, including some medical conditions, where the scooter user will need to practice operating the scooter in the presence of a trained attendant. A trained attendant can be defined as a family member or care professional specially trained in assisting a scooter user in various daily living activities.
As you begin using your scooter during daily activities, you will probably encounter situations in which you will need some practice. Simply take your time and you will soon be in full and confident control as you maneuver through doorways, on and off of elevators, up and down ramps, and over moderate terrain.
Below are some precautions, tips, and other safety considerations that will help the user become accustomed to operating the scooter safely.
MODIFICATIONS
Pride has designed and engineered your scooter to provide maximum mobility and utility. However, under no circumstances should you modify, add, remove, or disable any feature, part, or function of your scooter.

WARNING! Do not modify your scooter in any way not authorized by Pride. Unauthorized modifications may result in personal injury and/or damage to your scooter.
II. SAFETY
PRE-RIDE SAFETY CHECK
Get to know the feel of your scooter and its capabilities. Pride recommends that you perform a safety check before each use to make sure your scooter operates smoothly and safely. For details on how to perform these necessary inspections, see XI. “Care and Maintenance.”
Perform the following inspections prior to using your scooter:
■Check for proper tire inflation (if equipped with pneumatic tires).
■Check all electrical connections. Make sure they are tight and not corroded
■Check all harness connections. Make sure they are secured properly.
■Check the brakes
■Check battery charge.
If you discover a problem, contact your authorized Pride Provider for assistance.
TIRE INFLATION
If your scooter is equipped with pneumatic tires, you should check or have the air pressure checked at least once a week. Proper inflation pressures will prolong the life of your tires and help ensure the smooth operation of your scooter.

WARNING! It is critically important that 30-35 psi tire pressure be maintained in pneumatic tires at all times. Do not underinflate or overinflate your tires. Low pressure may result in loss of control, and overinflated tires may burst. Failure to maintain 30-35 psi tire pressure in pneumatic tires at all times may result in tire and/or wheel failure, causing serious personal injury and/or damage to your scooter.
WARNING! Inflate your scooter tires from a regulated air source with an available pressure gauge. Inflating your tires from an unregulated air source could overinflate them, resulting in a burst tire and/or personal injury.
WEIGHT LIMITATIONS
Your scooter is rated for a maximum weight capacity. Refer to the specifications table for information.
II. SAFETY
When climbing an incline, try to keep your scooter moving. If you must stop, start up again slowly, and then accelerate cautiously. When driving down an incline, do so by setting the speed adjustment dial to the slowest setting and driving in the forward direction only. If your scooter starts to move down the incline faster than you anticipated or desired, allow it to come to a complete stop by releasing the throttle control lever. Then push the throttle control lever forward slightly to ensure a safely controlled descent.
WARNING! When climbing an incline, do not zigzag or drive at an angle up the face of the incline. Drive your scooter straight up the incline. This greatly reduces the possibility of a tip or a fall. Always exercise extreme caution when negotiating an incline.
WARNING! Do not drive your scooter across the side of an incline or diagonally up or down an incline; do not stop, if possible, while driving up or down an incline.

WARNING! You should not travel up or down a potentially hazardous incline (i.e., areas covered with snow, ice, cut grass, or wet leaves).
WARNING! When on any sort of an incline or decline, never place the scooter in freewheel mode while seated on it or standing next to it.
WARNING! Even though your scooter is capable of climbing slopes greater than those illustrated in figure 1 do not, under any circumstances, exceed the incline guidelines or any other specifications presented in this manual. Doing so could cause instability in your scooter, resulting in personal injury and/or damage to your scooter.
Handicap public access ramps are not subject to government regulation in all countries, and therefore do not necessarily share the same standard percent of slope. Other inclines may be natural or, if man-made, not designed specifically for scooters. Figure 1 illustrates your scooter's stability and its ability to climb grades under various weight loads and under controlled testing conditions.
These tests were conducted with the scooter's seat in the highest position and adjusted rearward on the seat base to its farthest rearward position. Use this information as a guideline. Your scooter's ability to travel up inclines is affected by your weight, your scooter's speed, your angle of approach to the incline, and your scooter setup.
II. SAFETY
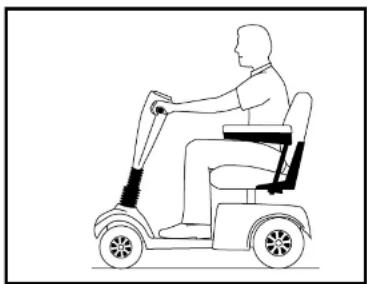
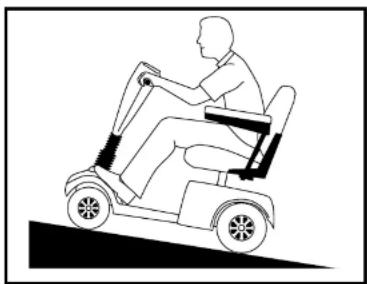
When you approach an incline, it is best to lean forward. See figures 2 and 2A. This shifts the center of gravity of you and your scooter toward the front of the scooter for improved stability.
NOTE: When negotiating ramps, if the throttle control lever is released while moving forward, the powered scooter may "rollback" approximately 1 foot before the brake engages. If the throttle control lever is released while moving in reverse, the powered scooter may "rollback" approximately 3 feet before the brake engages.
natural_image
Line drawing of a person riding an electric scooter (no text or symbols)Figure 2. Normal Driving Position
natural_image
Silhouette of a person riding a scooter on a slope (no text or symbols)Figure 2A. Increased Stability Driving Position
CORNERING INFORMATION
Excessively high cornering speeds can create the possibility of tipping. Factors which affect the possibility of tipping include, but are not limited to, cornering speed, steering angle (how sharply you are turning), uneven road surfaces, inclined road surfaces, riding from an area of low traction to an area of high traction (such as passing from a grassy area to a paved area — especially at high speed while turning), and abrupt directional changes. High cornering speeds are not recommended. If you feel that you may tip over in a corner, reduce your speed and
II. SAFETY
OUTDOOR DRIVING SURFACES
Your scooter is designed to provide optimum stability under normal driving conditions—dry, level surfaces composed of concrete, blacktop, or asphalt. However, Pride recognizes that there will be times when you will encounter other surface types. For this reason, your scooter is designed to perform admirably on packed soil, grass, and gravel. Feel free to use your scooter safely on lawns and in park areas.
■Reduce your scooter's speed when driving on uneven terrain and/or soft surfaces.
■Avoid tall grass that can become tangled in the running gear.
■Avoid loosely packed gravel and sand.
■If you feel unsure about a driving surface, avoid that surface
PUBLIC STREETS AND ROADWAYS

WARNING! You should not operate your scooter on public streets and roadways. Be aware that it may be difficult for traffic to see you when you are seated on your scooter. Obey all local pedestrian traffic rules. Wait until your path is clear of traffic, and then proceed with extreme caution.
STATIONARY OBSTACLES (STEPS, CURBS, etc.)
WARNING! Do not drive near raised surfaces, unprotected ledges, and/or drop-offs (curbs, porches, stairs, etc.).
WARNING! Do not attempt to have your scooter climb or descend an obstacle that is inordinately high. Serious personal injury and/or damage may result.

WARNING! Do not attempt to have your scooter proceed rearward down any step, curb, or other obstacle. This may cause the scooter to tip and cause personal injury.
WARNING! Be sure your scooter is traveling perpendicular to any curb you may be required to ascend or descend. See figures 3 and 3A.
WARNING! Do not attempt to negotiate a curb that has a height greater than 2 in.
II. SAFETY
INCLEMENT WEATHER PRECAUTIONS
Exposure of your scooter to inclement weather conditions should be avoided whenever possible. If suddenly caught up in rain, snow, severe cold or heat while operating your scooter proceed to shelter at the earliest opportunity. Thoroughly dry your scooter before storing, charging, or operating your scooter.

WARNING! Operating in rain, snow, salt, mist/spray conditions, and on icy/slippery surfaces can cause personal injury and/or damage to the scooter and electrical system. Maintain and store your scooter in a dry and clean condition.
FREEWHEEL MODE
Your scooter is equipped with a manual freewheel lever that, when pulled back, allows the scooter to be pushed. For more information about how to place your scooter into and out of freewheel mode, see V. "Your Scooter."

WARNING! When your scooter is in freewheel mode, the braking system is disengaged.
■ Disengage the drive motor only on a level surface.
■ Ensure the key is removed from the key switch.
■ Stand behind the scooter to engage or disengage freewheel mode. Never sit on a scooter to do this.
■ After you have finished pushing your scooter, always return it to the drive mode to lock the brakes.
Failure to heed the above could result in personal injury and/or damage to your scooter.
An added feature built into your scooter is “push-too-fast” protection which safeguards the scooter against gaining excessive speed while in freewheel mode.
"Push-too-fast" operates differently depending on which of two conditions exists:
If the key is switched "off" while in freewheel mode, the scooter's controller activates regenerative braking when the scooter is pushed faster than a maximum threshold which has been preprogrammed. In this case, the controller is acting as a speed governor.
If the key is switched "on" while in freewheel mode, you will encounter considerable resistance at any speed
II. SAFETY
ELEVATORS
Modern elevators have a door edge safety mechanism that, when pushed, reopens the door(s).
If you are in the doorway of an elevator when the door(s) begin to close, push on the rubber door edge or allow the rubber door edge to contact the scooter and the door will reopen.
■ Use care that pocketbooks, packages, or scooter accessories do not become caught in elevator doors.
LIFT/ELEVATION PRODUCTS
If you will be traveling with your scooter, you may find it necessary to use a lift/elevation product to aid in transportation. Pride recommends that you closely review the instructions, specifications, and safety information set forth by the manufacturer of the lift/elevation product before using that product.

WARNING! Never sit on your scooter when it is being used in connection with any type of lift/elevation product. Your scooter was not designed for such use, and any damage or injury incurred from such use is not the responsibility of Pride.
BATTERIES
In addition to following the warnings below, be sure to comply with all other battery handling information.

WARNING! Scooter batteries are heavy (refer to specifications table). Lifting weight beyond your capacity could result in personal injury. If necessary, get someone physically able to lift the scooter batteries for you.
WARNING! Battery posts, terminals, and related accessories contain lead and lead compounds. Wash hands after handling.
WARNING! Always protect the batteries from freezing and never charge a frozen battery. Charging a frozen battery may result in personal injury and/or damage to the battery.
WARNING! RED (+) cables must be connected to positive (+) battery terminals/posts. BLACK (-) cables must be connected to negative (-) battery terminals/posts. Failure to connect your battery cables in the proper manner may result in personal injury and/or damage to your scooter. REPLACE cables immediately if damaged.
II. SAFETY
MOTOR VEHICLE TRANSPORT
Currently, there are no standards approved for tie-down systems in a moving vehicle of any type to transport a person while seated in a scooter.
Although your scooter may be equipped with a positioning belt, this belt is not designed to provide proper restraint during motor vehicle transport. Anyone traveling in a motor vehicle should be properly secured in the motor vehicle seat with safety belts fastened securely.

WARNING! Do not sit on your scooter while it is in a moving vehicle. Personal injury and/or property damage may result.
WARNING! Always be sure your scooter and its batteries are properly secured when it is being transported. Failure to do so may result in personal injury and/or damage to your scooter.
PREVENTING UNINTENDED MOVEMENT

WARNING! If you anticipate being seated in a stationary position for an extended period of time, turn off the power. This will prevent unexpected motion from inadvertent throttle control lever contact. Failure to do so may result in personal injury.
GETTING ONTO AND OFF OF YOUR SCOOTER
Getting onto and off of your scooter requires a good sense of balance. Please observe the following safety tips when getting onto and off of your scooter:
■ Ensure that your scooter is not in freewheel mode. See V. "Your Scooter."
■ Make certain that the seat is locked into place and the key is removed from the key switch.
■Flip up the seat armrests to make getting onto and off of the scooter easier.
WARNING! Position yourself as far back as possible in the scooter seat to prevent the scooter from tipping and causing injury.

WARNING! Avoid using your arguments for weight-hanging numbers. Such use may prove
II. SAFETY
POSITIONING BELTS
Your authorized Pride Provider, therapist(s), and other healthcare professionals are responsible for determining your requirement for a positioning belt in order to operate your scooter safely.

WARNING! If you require a positioning belt to safely operate your scooter, make sure it is fastened securely. Serious personal injury may result if you fall from the scooter.
PRESCRIPTION DRUGS/PHYSICAL LIMITATIONS
The scooter user must exercise care and common sense when operating his/her scooter. This includes awareness of safety issues when taking prescribed or over-the-counter drugs or when the user has specific physical limitations.

WARNING! Consult your physician if you are taking prescribed or over-the-counter medication or if you have certain physical limitations. Some medications and limitations may impair your ability to operate your scooter in a safe manner.
ALCOHOL
The scooter user must exercise care and common sense when operating his/her scooter. This includes awareness of safety issues while under the influence of alcohol.

WARNING! Do not operate your scooter while you are under the influence of alcohol, as this may impair your ability to drive safely.
III. EMI/RFI
EMI/RFI WARNINGS
Laboratory tests performed by the Food and Drug Administration (FDA) have shown that radio waves can cause unintended motion of electric mobility vehicles. Radio waves are a form of electromagnetic energy (EM). When electromagnetic energy adversely affects the operation of an electrical device, that adverse effect is called Electromagnetic Interference (EMI) or Radio Frequency Interference (RFI).
EMI/RFI FREQUENTLY ASKED QUESTIONS (FAQS)
The following FAQs summarize what you should know about EMI/RFI. Use this information to minimize the risk that EMI/RFI will adversely affect your mobility vehicle.
Where do radio waves come from?
Radio waves are emitted from the antennas of cellular phones, mobile two-way radios (such as walkie-talkies and CBs), radio stations, TV stations, amateur radio (HAM) transmitters, wireless computer links, microwave sources, and paging transmitters. Radio waves are a form of electromagnetic energy (EM). EM is more intense closer to transmitting antennas, which are sources of emission. The greater the transmission strength, the greater the concern to electric mobility vehicle users.
If EMI/RFI affects my mobility vehicle, what kind of motion should I expect?
This is difficult to predict. The answer would depend on a number of factors:
■The strength of the radio waves.
■The construction of your particular mobility vehicle.
■ The location of your mobility vehicle (whether it is on the level ground or on an incline).
■Whether or not your mobility vehicle is in motion.
The motion of any electric mobility vehicle affected by EMI/RFI can be erratic. The mobility vehicle may come to a sudden stop or move in an uncontrolled manner. Also, it is possible for EMI/RFI to release the brakes of an electric mobility vehicle. Some intense EMI/RFI can even damage the control system components of an electric mobility vehicle.
Is there any way to know for certain whether or not radio waves are the cause of any unintended
III. EMI/RFI
Are all electric mobility vehicles susceptible to EMI/RFI?
Each make and model of electric mobility vehicle differs in its ability to resist EMI/RFI. Every mobility vehicle has a particular level of resistance to EMI/RFI. This resistance is measured in volts per meter (V/m). A higher resistance level offers greater protection against EMI/RFI. In other words, an electric mobility vehicle with a high resistance level is less likely to be affected by a strong radio source than is an electric mobility vehicle with a low resistance level.
What is the FDA doing about the problem?
The FDA has written to electric mobility vehicle manufacturers and requested that those manufacturers test their new mobility vehicle models to be certain that they provide a reasonable degree of resistance against EMI/RFI. The FDA has stated that all newly manufactured electric mobility vehicle models should have a resistance level of at least 20 V/m. This level of resistance provides a reasonable degree of protection against the common sources of EMI/RFI.
The FDA has also requested or recommended that:
Electric mobility vehicle manufacturers clearly label new products with their resistance level or state that the resistance level is not known.
The labeling or informational material supplied with new electric mobility vehicles must explain what the resistance level means and warn users about the possibility of EMI/RFI and how to avoid it.
Electric mobility vehicle manufacturers undertake an educational program to inform electric mobility vehicle users and their caregivers about the problems associated with EMI/RFI and about the actions they can take to minimize the risk of EMI/RFI.
■ While there is no exact way to tell if your mobility vehicle is totally safe, an immunity level of 20 V/m is generally achievable and useful. This product has been tested and passed at an immunity level of 20 V/m.
What can I do to find out if my mobility vehicle is likely to be affected by EMI/RFI?
If you have had your mobility vehicle for some time and have not experienced any unintended motion, it is not likely that you will have a problem in the future. However, it is always possible that EMI/RFI problems could arise if you are close to a source of radio waves. Therefore, it is very important for you to be alert to this possibility. The mobility vehicle meets or exceeds a resistance level of at least 20V / m .
IV. SPECIFICATIONS
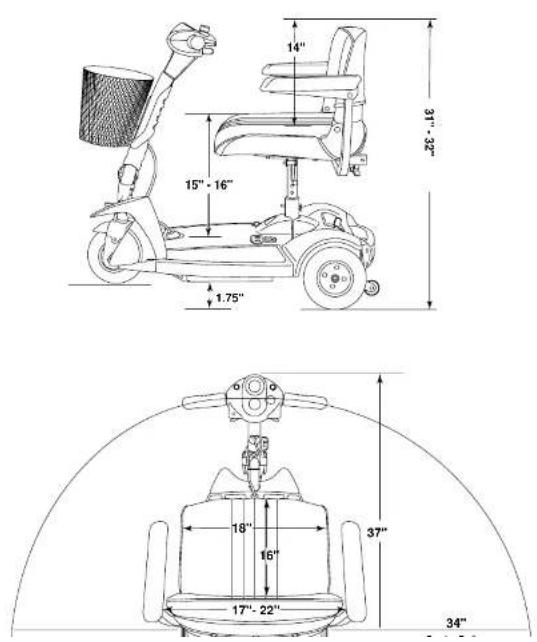
IV. SPECIFICATIONS
| Model Number | SC52 |
| Colors | Red, Blue |
| Overall Length | 37 in. |
| Overall Width | 21 in. |
| Total Weight Without Batteries | 97.5 lbs. |
| Heaviest Piece When Disassembled | 35 lbs. |
| Turning Radius | 34 in. |
| Speed (maximum) | Variable up to 4.25 mph |
| Range Per Charge* | (With 12 AH batteries) Up to 10 miles |
| Ground Clearance | 1.75 in. |
| Weight Capacity | 300 lbs. |
| Standard Seating | Type: Foldable molded plasticDimensions: 18 in. width16 in. depth (usable)14 in. height (usable)Material: Charcoal fabric |
| Drive System | Rear-wheel drive, sealed transaxle, 24 volt DC motor |
| Dual Braking System | Electronic, regenerative, and electromechanical |
| Tires | Type: solid: front: 2 in. x 7.5 inrear: 2.5 in. x 7.5 in. |
| Battery Requirements | Type: Two 12 volt, deep cycle (ACM or Gel-Cell)Size: 12 AHWeight: 9 lbs. each |
| Battery Charger | Off-board charger |
* Varies with user weight, terrain type, battery charge, battery condition, and tire condition.
V. YOUR SCOOTER
TILLER CONSOLE
The tiller console houses all controls needed to drive your scooter, including the speed adjustment dial, key switch, throttle control lever, battery condition meter, and horn button. See figure 6.

WARNING! Do not expose the tiller console to moisture. In the event that the tiller console does become exposed to moisture, do not attempt to operate your scooter until the tiller console has dried thoroughly.
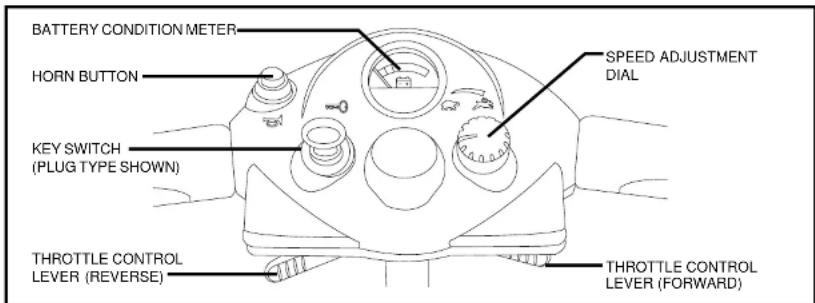
Figure 6. Tiller Console
Key Switch
Your scooter may be equipped with either of two key switches.
- Phono plug style—Insert the key fully into the phono plug jack to power up the scooter; remove the key completely to power down the scooter. Do not leave the key resting halfway in the jack.
- Key style—Insert the key into the key switch and turn clockwise to power up the scooter; turn the key counterclockwise and remove it from the key switch to power down the scooter. Although the key can be left in the key switch, we recommend removing it to prevent unauthorized use of your scooter.
V. YOUR SCOOTER
Horn Buttons
These buttons activate a warning horn. The scooter must be powered up for the horn to be operational. Do not hesitate to use the warning horn when doing so may prevent accident or injury.
Battery Condition Meter
The battery condition meter on the tiller console indicates the approximate strength of your batteries.
Speed Adjustment Dial
This dial allows you to preselect and limit your scooter's top speed.
■The image of the tortoise represents the slowest speed setting
■The image of the hare represents the fastest speed setting.
REAR SECTION
The manual freewheel lever, anti-tip wheels, and the motor/transaxle assembly are located on the rear section of your scooter. See figure 7.
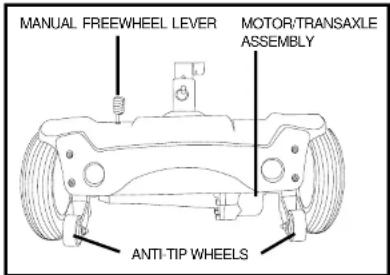
Figure 7. Rear Section
V. YOUR SCOOTER
Anti-Tip Wheels
The anti-tip wheels are an integral and important safety feature of your scooter. Do not, under any circumstances, remove the anti-tip wheels from your scooter.

WARNING! Do not remove the anti-tip wheels or modify your scooter in any way that is not authorized by Pride.
Motor/Transaxle Assembly
The motor/transaxle assembly is an electromechanical unit that converts electrical energy from your scooter's batteries into the controlled mechanical energy that drives the scooter's wheels.
BATTERY CHARGING COMPONENTS
The batteries, off-board battery charger port, and main circuit breaker (reset button) make up the battery charging components. See figure 8.
Batteries (Not Shown)
The batteries store the electrical energy needed to power the scooter. The scooter is equipped with an easy to remove battery pack located within the battery compartment. To view the battery pack, remove the battery compartment lid.
Off-board Battery Charger Port
The off-board battery charger plugs into your scooter by means of the off-board battery charger port.
Main Circuit Breaker (Reset Button)
When the voltage in your scooter's batteries becomes low or the scooter is heavily strained because of excessive loads or steep inclines, the main circuit breaker may trip to protect the motor and electronics from damage.
■The main circuit breaker reset button pops out when the breaker trips.
■When the breaker trips, the entire electrical system of your scooter shuts down.
- Allow a minute or two for your scooter's electronics to "rest"
VI. BATTERIES AND CHARGING
Your scooter requires two long-lasting, 12-volt, deep-cycle batteries that are sealed and maintenance free. They are recharged by an off-board battery charging system.
- Fully charge your scooter's batteries prior to using it for the first time.
- Keep the batteries fully charged to keep your scooter running smoothly.
READING YOUR BATTERY VOLTAGE
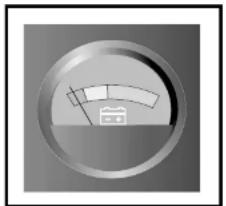
The battery condition meter on the tiller console indicates the approximate strength of your batteries using a color code. Green indicates fully charged batteries, yellow a draining charge, and red indicates that an immediate recharge is necessary. See figure 9. To ensure the highest accuracy, the battery condition meter should be checked while operating your scooter at full speed on a dry, level surface.
natural_image
Simple circular icon with a gauge or dial and a small icon inside, no text or symbols present.Figure 9. Battery Condition Meter
CHARGING YOUR BATTERIES

PROHIBITED! Never use an extension cord to plug in your battery charger. Plug the charger directly into a properly wired standard wall outlet.

PROHIBITED! Removal of the grounding prong can create an electrical hazard. If necessary, properly install an approved 3-pronged adapter to an electrical outlet having 2-pronged plug access. Failure to heed could result in personal injury and/or property damage.

WARNING! Ensure that both ends of the charger power cord are clean and dry before plugging the charger power cord into the off-board battery charger port or the wall socket.
Charging the batteries on the scooter:
- Position your scooter close to a standard wall outlet.
- Remove the key from the key switch
- Make certain that the manual freewheel lever is in the drive position.
- Plug the 3-pin charger power cord (see figure 10) into the battery charging port. See figure 8.
VI. BATTERIES AND CHARGING
CHARGING THE BATTERIES OFF THE SCOOTER
If you prefer to leave your scooter inside a vehicle or in a place where an electrical outlet is not available, you can remove the battery pack from the scooter and charge the batteries using the optional Y-harness.
- Remove battery pack. See IX. "Disassembly and Assembly."
- Place the battery pack near an electrical outlet.
- Connect the Y-harness to the battery harnesses that extend from the battery pack. See figure 11.
- Plug the appropriate end of the charger power cord into the mating end of the Y-harness.
- Plug the off-board charger power cord into an electrical outlet.
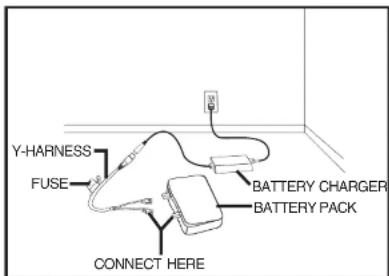
Figure 11. Off-Board Battery Charger
Follow these steps to properly break-in your scooter's new batteries for maximum efficiency and service life.
- Fully recharge any new battery prior to its initial use.
- Operate your new scooter in familiar and safe areas. Drive slowly at first, and do not travel too far from your home or familiar surroundings until you have become accustomed to your scooter's controls.
- Fully recharge the batteries.
- Operate your scooter again.
- Fully recharge the batteries again.
- After four or five charging cycles, the batteries are able to receive a charge of 100% of their peak performance level and are able to last for an extended period of time.
VI. BATTERIES AND CHARGING
FREQUENTLY ASKED QUESTIONS (FAQS)
How does the charger work?
When your scooter's battery voltage is low, the charger works harder, sending more electrical current to the batteries to bring up their charge. As the batteries approach a full charge, the charger sends less and less electrical current. When the batteries are fully charged, the current sent from the charger is at nearly zero amperage. Therefore, when the charger is plugged in, it maintains the charge on your scooter's batteries, but does not overcharge them. We do not recommend that you charge your scooter's batteries for more than 24 consecutive hours.
What if my scooter's batteries won't charge?
■ Ensure the red (+) and black (-) battery leads are connected properly to the battery terminals.
■Ensure both ends of the charger power cord are inserted fully
Can I use a different charger?
For the safest, most efficient, and balanced charging of your scooter's batteries, we prefer and highly recommend simultaneous charging of both batteries with the off-board battery charger supplied with yoru scooter.
How often must I charge the batteries?
Two major factors must be considered when deciding how often to charge your scooter's batteries:
■ All day scooter use on a daily basis.
■Infrequent or sporadic scooter use.
With these considerations in mind, you can determine how often and for how long you should charge your scooter's batteries. We designed the off-board battery charger so that it will not overcharge your scooter's batteries. However, you may encounter some problems if you do not charge your batteries often enough and if you do not charge them on a regular basis. Following the guidelines below will provide safe and reliable battery operation and charging
If you use your scooter daily, charge its batteries as soon as you finish using it for the day. Your scooter will be ready each morning to give you a full day of service. We recommend that you charge your scooter's batteries
VI. BATTERIES AND CHARGING
How can I get maximum range or distance per charge?
Rarely will you have ideal driving conditions—smooth, flat, hard driving surfaces with no wind or curves. Often, you will face hills, pavement cracks, uneven and loosely packed surfaces, curves, and wind, all of which affect the distance or running time per battery charge. Below are a few suggestions for obtaining the maximum range per battery charge.
■Always fully charge your scooter's batteries prior to daily use.
■ Maintain 30-35 psi in each tire.
■ Plan your route ahead to avoid as many hills, cracked, broken, or soft surfaces as possible.
■Limit your baggage weight to essential items.
■Try to maintain an even speed while your scooter is in motion.
■Avoid stop-and-go driving.
What type and size of battery should I use?
We recommend deep-cycle batteries that are sealed and maintenance free. Both AGM and Gel-Cell are deep-cycle batteries that are similar in performance. Do not use wet-cell batteries, which have removable caps.
NOTE: Sealed batteries are not serviceable. Do not remove the caps.

WARNING! Corrosive chemicals are contained in batteries. Use only AGM or Gel-Cell batteries to reduce the risk of leakage or explosive conditions.
Why do my newbatteries seem weak?
Deep-cycle batteries employ a different chemical technology than that used in car batteries, nickel-cadmium batteries (nicads), or in other common battery types. Deep-cycle batteries are specifically designed to provide power, drain down their charge, and then accept a relatively quick recharge.
We work closely with our battery manufacturer to provide batteries that best suit your scooter's specific electrical demands. Fresh batteries arrive daily at Pride and are shipped fully charged to our customers. During shipping, the batteries may encounter temperature extremes that may influence their initial performance. Heat diminishes the charge on the battery: cold slows the available power and extends the time needed to recharge the battery.
VI. BATTERIES AND CHARGING
BATTERY REPLACEMENT

WARNING! Battery posts, terminals, and related accessories contain lead and lead compounds. Wash hands after handling.
Battery Removal
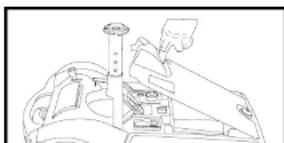
- Remove the battery compartment lid. See figure 12.
- Disconnect the battery harnesses. See figure 13.
- Remove the battery pack from the scooter. See figure 14.
- Unzip the battery pack and remove the battery or batteries.
- Disconnect the red (+) positive and black (-) negative battery leads from the battery terminals by pulling them gently from the battery terminals. See figure 15.
Battery Replacement
- Connect the two (2) battery leads to the new battery terminals. See figure 15.
■ Red lead to (+) positive terminal.
■ Black lead to (-) negative terminal.
- Put the battery or batteries back into the battery pack with the battery terminals facing up.
- Zip the battery pack and place it back into the battery compartment.
- Reconnect the battery harnesses.
- Replace the battery compartment lid.
natural_image
Technical line drawing of a mechanical assembly with no visible text or symbols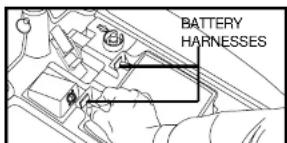
VII. OPERATION
BEFORE GETTING ONTO YOUR SCOOTER
■Have you fully charged the batteries? See VI. "Batteries and Charging."
Is the manual freewheel lever in the drive position? Never leave the manual freewheel lever in freewheel mode unless you are manually pushing your scooter.
Is the tiller lock knob in the unlocked position? See IX. "Disassembly and Assembly."
GETTING ONTO YOUR SCOOTER
- Make certain that the key is removed from the key switch.

WARNING! Never get onto or off of your scooter without first removing the key from the key switch. This will prevent the scooter from moving if accidental throttle control lever contact is made.
- Stand at the side of your scooter.
- Make certain that the seat is locked securely in position.
- Position yourself comfortably and securely in the seat.
- Make certain that your feet are safely on the floorboard.
PRE-RIDE ADJUSTMENTS AND CHECKS
■Are you positioned comfortably in the seat?
■Is the seat at the proper height?
■Is the seat securely in place?
Is the tiller at a comfortable setting and locked securely in place? See VIII. "Comfort Adjustments."
■ Is the key fully inserted into the key switch? See V. "Your Scooter."
■Does the scooter's horn work properly?
■Is your proposed path clear of people, pets, and obstacles?
■Have you planned your route to avoid adverse terrain and as many inclines as possible?
■Move the tiller to the center position to drive straight ahead.
■Release the throttle control lever to decelerate and come to a complete stop.
■ The electromechanical disc park brake automatically engages when your scooter comes to a stop.
NOTE: Your scooter's reverse speed is slower than that of the forward speed you preset with the speed adjustment dial.
GETTING OFF OF YOUR SCOOTER
- Bring your scooter to a complete stop.
- Remove the key from the key switch.
- Carefully and safely get out of the seat to either side of your scooter.
Your scooter is equipped with an energy saving automatic power down timer feature designed to preserve your scooter's battery life. If you mistakenly leave the key in the key switch and in the "on" position but do not use your scooter for approximately 20 minutes, the controller shuts down automatically. Although the controller is shut down, power will still be supplied to the lighting system.
If the power down timer feature takes effect, perform the following steps to resume normal operation.
1. Remove the key from the key switch.
2. Reinsert the key and power up your scooter.
VIII. COMFORT ADJUSTMENTS
TILLER ANGLE ADJUSTMENT

WARNING! Remove the key from the key switch before adjusting the tiller or the seat. Never attempt to adjust the tiller or the seat while the scooter is in motion.
Your scooter is equipped with an adjustable pivoting tiller.
- Turn the tiller adjustment knob counterclockwise to loosen the tiller. See figure 16.
- Move the tiller to a comfortable position.
- Turn the tiller adjustment knob clockwise to secure the tiller in position.
NOTE: In order to lower the tiller to the scooter deck, you must first remove the seat. Remove the seat by pulling it straight up and off of the scooter.
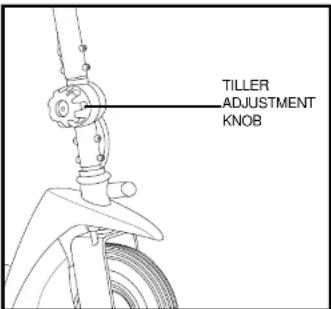
Figure 16. Tiller Adjustment
SEAT HEIGHT ADJUSTMENT
The seat can be repositioned to one of two different heights. See figure 17.
- Remove the seat from your scooter.
- Use the attached ring to pull and remove the detent pin from the lower seat post.
- Raise or lower the upper seat post to the desired seat height.
- While holding the upper seat post at that height, match up the adjustment holes in the upper and lower seat post
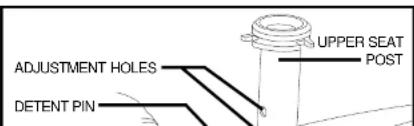
VIII. COMFORT ADJUSTMENTS
ARMREST WIDTH ADJUSTMENT
The armrest width can be adjusted inward or outward. See figure 17A.
- Remove the detent pins located near the adjustment knobs.
- Loosen the armrest adjustment knobs at the back of the seat frame.
- Slide the armrests in or out to the desired width.
- Reinsert the detent pins through the adjustment holes of both the seat frame and armrest frame.
- Tighten the armrest adjustment knobs as required.
The armrests can also pivot upward to aid in getting onto and off of your scooter.
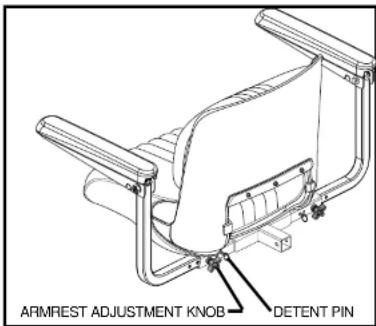
Figure 17A. Armrest Width Adjustment
IX. DISASSEMBLY AND ASSEMBLY
DISASSEMBLY
No tools are required to disassemble or assemble your scooter. Always disassemble or assemble your scooter on a level, dry surface with sufficient room for you to work. Keep in mind that the disassembled sections of a scooter take up more floor space than when assembled.
You can disassemble your scooter into four pieces: the seat, the front section, the rear section, and the battery pack. See figure 18.
Before disassembling the scooter, remove the key and place the manual freewheel lever in the drive (forward) position.
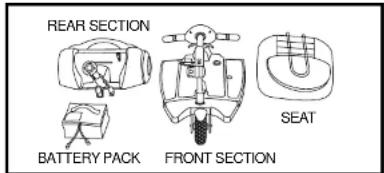
Figure 18. Disassembled Scooter

WARNING! Lifting weight beyond your physical capability may result in personal injury. Ask for assistance when necessary before disassembling or assembling your scooter.
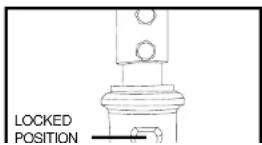
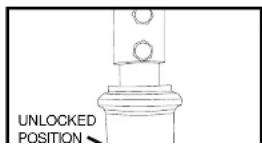
- Lock the tiller in place by pushing the tiller lock knob in and turning it clockwise 90°. See figure 19. The front wheel must face forward in order to lock the tiller.
- Remove the seat by pulling it straight upward.
- Remove the battery compartment lid and place it out of the way.
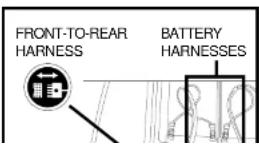
- Unplug the front-to-rear harness and both battery harnesses. See figure 20.
IX. DISASSEMBLY AND ASSEMBLY
Toggle Latch Release
- Push in the toggle latch release button while pulling back the toggle latch. See figure 21.
- Position the toggle latch buckle over the top of the toggle latch. See figure 22.
- Lower the tiller to the scooter floorboard and fully tighten the tiller adjustment knob.
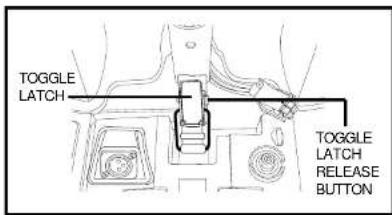
Figure 21. Toggle Latch (Latched)
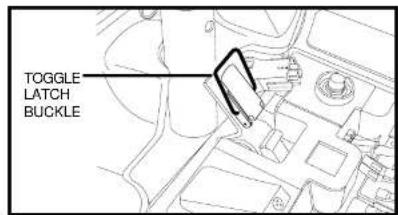
Figure 22. Toggle Latch (Unlatched)
Frame Separation
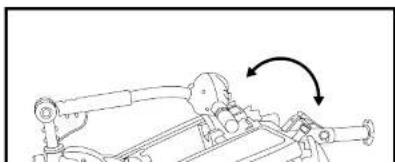
- Push back on the seat post to pivot the rear section backward until it is standing vertically on its end. See figure 23.
- Lift the front section up until the lower pegs are no longer in the slots. See figure 24.
- Carefully lift the front section vertically away from the rear section. See figure 25.
natural_image
Mechanical assembly diagram showing a lever mechanism with motion arrows (no text or labels)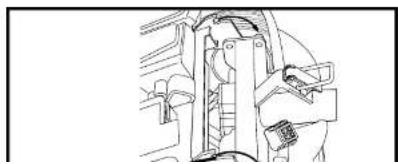
natural_image
Line drawing of a person operating machinery (no text or symbols visible)IX. DISASSEMBLY AND ASSEMBLY
ASSEMBLY
- Position the front and rear sections of your scooter as shown in figure 25.
- Use the tiller handle to lift the front section as you align the lower slots of the front section with the corresponding pegs on the front of the rear section. See figure 24.
- Holding the seat post, slowly pivot the rear section forward until the curved locking brackets are fully connected onto the top rear pegs. See figure 23.
- Raise the tiller and fully tighten the tiller adjustment knob.
- Secure the toggle latch. See figure 21.
■Lower the toggle latch buckle.
■Push back on the toggle latch so it locks into place. - Connect the front-to-rear harness and both battery harnesses. See figure 20.
- Replace the battery compartment lid.
- Replace the seat and rotate it until it locks into place.
- Unlock the front wheel by turning the tiller lock knob 90° counterclockwise. See figure 19A

WARNING! After assembling your scooter make absolutely certain the tiller lock knob is in the unlocked position before attempting to ride your scooter.
X. BASIC TROUBLESHOOTING
Any electromechanical device requires occasional troubleshooting. However, most problems that arise can usually be solved with a bit of thought and common sense. Many of these problems occur because the batteries are not fully charged or because the batteries are worn down and can no longer hold a charge.
DIAGNOSTIC BEEP CODES
The diagnostic beep codes for your scooter are designed to help you perform basic troubleshooting quickly and easily. A diagnostic beep code will sound in the event one of the conditions listed below develops.
NOTE: Your scooter will not run unless the beep code condition is resolved and the scooter has been turned off, then turned back on.
| BEEP CODE CONDITION SOLUTION | ||
| (2) | Battery voltage is too low to operate the scooter. | Charge fully until charger and any meters indicate completion. |
| (3) | Battery Voltage is too high to operate the scooter. | Call your authorized Pride Provider for assistance. |
| (5) | Solenoid brake trip. The manual freewheel lever may be in the freewheel position. | Remove the key, then push the manual freewheel lever to the drive position, restart your scooter. |
| (6) | Throttle trip. The throttle control lever may have been depressed while inserting the key. | Release the throttle control lever completely, then reinsert the key. |
| (7) | Throttle trip. Throttle potentiometer fault or speed potentiometer fault. | Call your authorized Pride Provider for assistance. |
| (8) | The scooter's motor is disconnected. | Call your authorized Pride Provider for assistance. |
| (9) | Possible controller trip. You may be attempting to install the battery pack while the key is inserted or the motor controller may be in overheat protective mode. | Shut down your scooter for a minimum of several minutes to allow the controller to cool. Or, try reinserting the key into the key switch. |
What if all the systems on my scooter seem to be "dead"?
■Make certain that the key is fully inserted into the key switch
X. BASIC TROUBLESHOOTING
What if the battery condition meter dips way down and the motor surges or hesitates when I press the throttle control lever?
■ Fully charge your scooter's batteries. See VI. "Batteries and Charging."
■Have your authorized Pride Provider load test each battery.
What if the main circuit breaker trips repeatedly?
- Charge the scooter's batteries more frequently. See VI. "Batteries and Charging."
If the problem persists, have both of your scooter's batteries load tested by your authorized Pride Provider.
■ See VI. "Batteries and Charging" or IV. "Specifications" for information about your scooter's battery type.
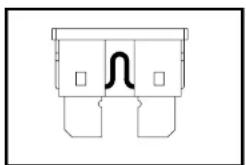
■Check the fuse located next to the circuit breaker button.
In the event the fuse ceases to work (blows):
■Remove the fuse by pulling it out of its slot.
■Examine the fuse to be sure it is blown. See figures 26 and 27.
■Insert a new fuse of the proper rating.
natural_image
Pure electrical circuit lines without any symbols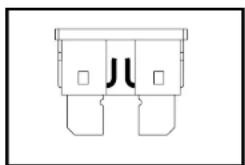
natural_image
Pure electrical circuit lines without any symbolsFigure 26. Working Fuse Figure 27. Blown Fuse
If you experience any problems with your scooter that you are not able to solve, contact your authorized Pride Provider for information, maintenance, and service.
XI. CARE AND MAINTENANCE
Your scooter requires a minimal amount of care and maintenance. If you do not feel confident in your ability to perform the maintenance listed below, you may schedule inspection and maintenance with your authorized Pride Provider. The following areas require periodic inspection and/or care and maintenance.
TIRE CONDITION AND TREAD WEAR
- Regularly inspect your scooter's tires for signs of wear.
- Use a rubber conditioner on your scooter's tire sidewalls to help to preserve them.

WARNING! Do not apply rubber conditioner on tire tread; this may cause the tires to become dangerously slippery.
EXTERIOR SURFACES
■ Bumpers and trim also benefit from an occasional application of a rubber or vinyl conditioner.

WARNING! Do not use a rubber or vinyl conditioner on the scooter's seat (if vinyl), floorboard, or tire tread. They will become dangerously slippery and result in personal injury and/or damage to your scooter.
The scooter shroud is made from durable ABS plastic and coated with an advanced formula urethane paint. A light application of car wax will help the shroud retain its high gloss.
WIRING HARNESSES
■Regularly check wiring harness insulation for wear or damage.
■ Have your authorized Pride Provider repair or replace any damaged connector, connection, or insulation that you find before using your scooter again.
AXLE BEARINGS AND THE MOTOR/TRANSAXLE ASSEMBLY
■These items are all prelubricated, sealed, and require no subsequent lubrication.
CONSOLE. CHARGER. AND ELECTRONICS
XII. WARRANTY
THREE-YEAR LIMITED WARRANTY
For three (3) years from the date of purchase, Pride will repair or replace at our option to the original purchaser, free of charge, any of the following parts found upon examination by an authorized representative of Pride to be defective in material and/or workmanship:
Structural frame components, including:
- Main Frame - Fork
- Seat Post
- Tiller Frame
THREE-YEAR PRORATA WARRANTY
Three-year prorata drivetrain warranty, including:
- Transaxle
- Motor Brake (electronic function ONLY)
- Brake
These components will be prorated on the following schedule:
- First year: 100% replacement of parts cost
• Second year: 67% replacement of parts cost
- Third year: 50% replacement of parts cost
NOTE: If there is an increase in the operational noise level in the transaxle, the warranty does not apply. An increase in operational noise level usually occurs due to abusive and excessive strain on the scooter.
ONE-YEAR LIMITED WARRANTY
For one (1) year from the date of purchase, Pride will repair or replace at our option to the original purchaser, free of charge, any of the following parts found upon examination by an authorized representative of Pride to be defective in material and/or workmanship:
- Bearings - Bushings
- Rubber Components
- Plastic components except body
XII. WARRANTY
●Circumstances beyond the control of Pride
- Labor, service calls, shipping, and other charges incurred for repair of the product, unless specifically authorized, IN ADVANCE, by Pride Mobility Products Corporation
●Repairs and/or modifications made to any part without specific consent from Pride
Exclusions also include components with damage caused by:
- Contamination
●Abuse, misuse, accident, or negligence
●Battery fluid spillage or leakage
●Commercial use, or use other than normal - Improper operation, maintenance, or storage
NOTE: Gradual deterioration in performance because the battery has been left in a discharged state, left in cold conditions for an extended period of time, or worn out through heavy use is not covered
SERVICE CHECKS AND WARRANTY SERVICE
Warranty service must be performed by an authorized Pride Provider. Do not return faulty parts to Pride without prior written authorization. All transportation costs and shipping damage incurred while submitting parts for repair or replacement are the responsibility of the purchaser. Please contact your authorized Pride Provider for information on the current cost associated with a service visit.
There is no other express warranty.
IMPLIED WARRANTIES
Implied warranties, including those of merchantability and fitness for a particular purpose, are limited to one (1) year from the date of original purchase and to the extent permitted by law. Any and all implied warranties are excluded. This is the exclusive remedy. Liabilities for consequential damages under any and all warranties are
Pride
Mobility Products Corp.
182 Susquehanna Ave.
- 10712
- SAFETY GUIDELINES
- CONTENTS
- INTRODUCTION
- SAFETY
- PURCHASER'S AGREEMENT
- INFORMATION EXCHANGE
- SAFETY
- PRODUCT SAFETY SYMBOLS
- GENERAL
- MODIFICATIONS
- PRE-RIDE SAFETY CHECK
- TIRE INFLATION
- WEIGHT LIMITATIONS
- CORNERING INFORMATION
- OUTDOOR DRIVING SURFACES
- PUBLIC STREETS AND ROADWAYS
- STATIONARY OBSTACLES (STEPS, CURBS, etc.)
- INCLEMENT WEATHER PRECAUTIONS
- FREEWHEEL MODE
- ELEVATORS
- LIFT/ELEVATION PRODUCTS
- BATTERIES
- MOTOR VEHICLE TRANSPORT
- PREVENTING UNINTENDED MOVEMENT
- GETTING ONTO AND OFF OF YOUR SCOOTER
- POSITIONING BELTS
- PRESCRIPTION DRUGS/PHYSICAL LIMITATIONS
- ALCOHOL
- EMI/RFI
- EMI/RFI WARNINGS
- EMI/RFI FREQUENTLY ASKED QUESTIONS (FAQS)
- Where do radio waves come from?
- If EMI/RFI affects my mobility vehicle, what kind of motion should I expect?
- Are all electric mobility vehicles susceptible to EMI/RFI?
- What is the FDA doing about the problem?
- What can I do to find out if my mobility vehicle is likely to be affected by EMI/RFI?
- SPECIFICATIONS
- YOUR SCOOTER
- TILLER CONSOLE
- Key Switch
- Horn Buttons
- Battery Condition Meter
- Speed Adjustment Dial
- REAR SECTION
- Anti-Tip Wheels
- Motor/Transaxle Assembly
- BATTERY CHARGING COMPONENTS
- Batteries (Not Shown)
- Off-board Battery Charger Port
- Main Circuit Breaker (Reset Button)
- BATTERIES AND CHARGING
- READING YOUR BATTERY VOLTAGE
- CHARGING YOUR BATTERIES
- Charging the batteries on the scooter:
- CHARGING THE BATTERIES OFF THE SCOOTER
- FREQUENTLY ASKED QUESTIONS (FAQS)
- How does the charger work?
- What if my scooter's batteries won't charge?
- Can I use a different charger?
- How often must I charge the batteries?
- How can I get maximum range or distance per charge?
- What type and size of battery should I use?
- Why do my newbatteries seem weak?
- BATTERY REPLACEMENT
- Battery Removal
- OPERATION
- BEFORE GETTING ONTO YOUR SCOOTER
- GETTING ONTO YOUR SCOOTER
- PRE-RIDE ADJUSTMENTS AND CHECKS
- GETTING OFF OF YOUR SCOOTER
- COMFORT ADJUSTMENTS
- TILLER ANGLE ADJUSTMENT
- SEAT HEIGHT ADJUSTMENT
- ARMREST WIDTH ADJUSTMENT
- DISASSEMBLY AND ASSEMBLY
- DISASSEMBLY
- Toggle Latch Release
- Frame Separation
- ASSEMBLY
- BASIC TROUBLESHOOTING
- DIAGNOSTIC BEEP CODES
- CARE AND MAINTENANCE
- TIRE CONDITION AND TREAD WEAR
- EXTERIOR SURFACES
- WIRING HARNESSES
- AXLE BEARINGS AND THE MOTOR/TRANSAXLE ASSEMBLY
- WARRANTY
- THREE-YEAR LIMITED WARRANTY
- Structural frame components, including:
- THREE-YEAR PRORATA WARRANTY
- ONE-YEAR LIMITED WARRANTY
- Exclusions also include components with damage caused by:
- SERVICE CHECKS AND WARRANTY SERVICE
- IMPLIED WARRANTIES
- Pride
Brand : Pride
Model : Sonic
Category : Scooter de mobilité