XQB60-M933 - Washing machine Stirling - Free user manual and instructions
Find the device manual for free XQB60-M933 Stirling in PDF.


| Type | 5.5kg Top Load Washing Machine |
| Model Number | XQB60-M933 |
| Dimensions (W x D x H) | 52 cm x 54.5 cm x 95.2 cm |
| Weight | 31 kg |
| Power Supply | 230-240 V ~ 50 Hz |
| Power Consumption | 330 W |
| Required Water Pressure | 0.03 MPa – 0.8 MPa |
| Water Volume (Max) | 50 L |
| Wash Programs | Custom, Normal, Heavy Duty, Quick, Blanket, Delicate |
| Water Level Settings | 8 levels (15 L to 50 L) |
| Temperature Options | Cold, Warm, Hot |
| Delay Start | 0–24 hours |
| Fuzzy Logic Control | Automatic load sensing for water level and wash/spin times |
| Child Lock | Yes |
| Memory Function | Save custom programs |
| Warranty | 3 years in-home |
| Compliance | AS/NZS 60335.1 & AS/NZS 60335.2.7 |
| Ingress Protection | IPX4 |
| Lint Filter Cleaning Interval | Every week |
| Drain Pump Filter Cleaning Interval | Once a month |
| Water Inlet Valve / Hose Filter Cleaning Interval | Every 6 months |
Frequently Asked Questions - XQB60-M933 Stirling
User questions about XQB60-M933 Stirling
0 question about this device. Answer the ones you know or ask your own.
Ask a new question about this device
Download the instructions for your Washing machine in PDF format for free! Find your manual XQB60-M933 - Stirling and take your electronic device back in hand. On this page are published all the documents necessary for the use of your device. XQB60-M933 by Stirling.
USER MANUAL XQB60-M933 Stirling
natural_image
White portable washing machine with control panel and digital display, set against a blue abstract background (no text or symbols on the device itself)5.5kg Top Load Washing Machine
Model Number XQB60-M933
INSTRUCTION MANUAL
Welcome
Congratulations on choosing to buy a STIRLING ^® product.
All products brought to you by STIRLING ^® are manufactured to the highest standards of performance and safety and, as part of our philosophy of customer service and satisfaction, are backed by our comprehensive 3 Year Warranty. We hope you will enjoy using your purchase for many years to come.
Contents
02 Welcome
04 Warranty Details
05 General Safety Instructions
09 Product Overview
10 Getting Started: Installation
14 Features
16 Instructions
23 FAQs and Troubleshooting
25 Other Useful Information
31 Repair and Refurbished Goods or Parts Notice

STIRLING®
5.5kg Top Load Washing Machine
Warranty Details
The product is guaranteed to be free from defects in workmanship and parts for a period of 36 months from the date of purchase. Defects that occur within this warranty period, under normal use and care, will be repaired, replaced or refunded at our discretion, solely at our option with no charge for parts and labour. The benefits conferred by this warranty are in addition to all rights and remedies in respect of the product that the consumer has under the Competition and Consumer Act 2010 and similar state and territory laws.
Our goods come with guarantees that cannot be excluded under the Australian Consumer Law. You are entitled to a replacement or refund for a major failure and to compensation for any other reasonably foreseeable loss or damage. You are also entitled to have the goods repaired or replaced if the goods fail to be of acceptable quality and the failure does not amount to a major failure.

General Safety Instructions
IMPORTANT SAFETY INSTRUCTIONS
READ CAREFULLY AND KEEP FOR FUTURE REFERENCE
Read this manual thoroughly before first use, even if you are familiar with this type of product. The safety precautions enclosed herein reduce the risk of fire, electric shock and injury when correctly adhered to.
Keep the manual in a safe place for future reference, along with the completed warranty card and purchase receipt. If applicable, pass these instructions on to the next owner of the appliance.
Always follow basic safety precautions and accident prevention measures when using an electrical appliance, including the following:

Warning
This heading indicates that there is a serious risk of injury if you do not adhere to the warning(s).

Caution
This heading indicates that care should be taken to avoid injury to persons or damage to property.

A tick in a circle accompanies a measure or action that you should do or follow.

A cross in a circle accompanies a measure or action that you should NOT do.
Electrical safety
- Before connecting and turning on the washing machine, ensure the electrical voltage and circuit frequency correspond to those indicated on the appliance.
- Only connect the washing machine to a grounded (earthed) electrical outlet.
- Do not insert any objects into the appliance.
- Do not kink or damage the power cord, and position it out of the way so no one steps on or places anything on the cord or against it.
- Do not overload the wall outlet. Overloading can result in fire or electric shock.
- If the supply cord is damaged, it must be replaced by the manufacturer or its service agent or a similarly qualified person in order to avoid a hazard.
- Never use this washing machine with a power adaptor or an extension cord.
- Unplug the washing machine from the power supply before cleaning, servicing, maintenance or moving the appliance. Pull by the plug, not by the cord.
- After use, always unplug the appliance and turn off the water.
General Safety Instructions (Cont.)
Installation
• Install the washing machine on a flat surface to avoid overturning during use.
- If the machine must be placed on carpet, make sure the ventilation openings in the base are not obstructed.
- Connect the washing machine to the water mains using new hose sets. Do not reuse old hose sets.
- Make sure that all water and electrical connections are made by qualified personnel only, observing local safety regulations and following the manufacturer's instructions (see “Getting Started: Installation” on pages 10 to 13).
- Improper installation may result in the risk of fire, electric shock and/or injury.
- We assume no liability for any eventual damages caused by improper installation.
Usage conditions and restrictions
- The appliance is designed for private domestic use only.
- Do not operate the appliance outdoors.
- This appliance is not intended for use by persons (including children) with reduced physical, sensory or mental capabilities, or lack of experience and knowledge, unless they have been given supervision or instruction concerning use of the appliance by a person responsible for their safety.
- Young children should be supervised to ensure they do not play with the appliance.
- Before loading the washing machine, always ensure no pet or young child has climbed into it.
- Make sure all pockets of clothing to be washed are empty. Hard, sharp objects such as coins, safety pins, bra wires, nails, screws or stones can cause extensive damage to the appliance and block the pump.
- Any damage or malfunction resulting from foreign objects is not covered by your warranty and may lead to expensive repairs.
- We assume no liability for any eventual damages caused by improper or faulty use.
Cleaning and maintenance
- Before cleaning or carrying out maintenance, always unplug the appliance from the power supply.
- Except for the filters that require regular cleaning, the unit has no user-serviceable parts contained within. Do not attempt to repair, disassemble or modify it. Repairs made by inexperienced or unqualified persons may cause injury and/or make more serious repairs to the appliance necessary.
- CAUTION: After each wash, check and clean the lint filter inside the drum. Also check and clean the lint filter at the back of the machine next to the drain hose outlet on a regular basis.
- This appliance should only be serviced by an authorised service centre, and only genuine spare parts should be used. Contact the after sales support line for advice.
General Safety Instructions (Cont.)

Warnings
Do not let children climb into the washing machine or peer into the rotating spin barrel.


natural_image
Simple cartoon drawing of a baby peeking out of a circular window (no text or symbols)Do not wash clothes that have residue of flammable materials.


Do not use the appliance if the power cord or plug is damaged to avoid an electric shock, short circuit or fire.

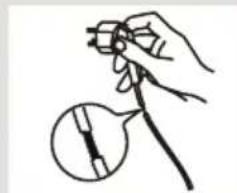
natural_image
Hand holding a tool with a magnified inset showing a small mechanical component (no text or symbols)Regularly clean the power plug to remove dust and dirt and avoid contact failure.

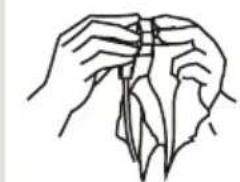
natural_image
Line drawing of two hands holding a thin object, possibly a tool or device (no text or symbols present)Turn the machine off before pulling out the plug from the socket if the machine
is not in use.


natural_image
Hand holding a plug inserted into an electrical outlet (no text or symbols visible)Do not place any flammable items on top of the washing machine.


natural_image
Simple line drawing of a box with a candle above it (no text or symbols)Insert the power plug securely.


natural_image
Line drawing of a hand inserting a plug into an electrical socket (no text or symbols)Use a 230-240V AC power source.


General Safety Instructions (Cont.)
To avoid electric shock, fire and malfunction, do not install this
machine in a damp place.

No dampness

natural_image
Illustration of a washing machine placed near a window with a grid pattern (no text or symbols)Do not pull out or insert the plug with wet hands to avoid electric shock.

No wet hands
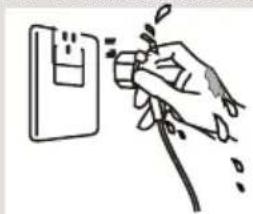
natural_image
Hand inserting a plug into a device (no text or symbols visible)
Cautions
Ensure the water inlet hoses are connected and the taps are turned on before washing a load.


Do not allow children to lay or sit on top of the washing machine.


Do not change the power cord. If it needs changing, contact a qualified electrician
or call the after sales support line.

Do not wash jackets, raincoats, fishing coats and similar clothes
in the washing machine.


Do not pull the power cord when removing the plug.


The water temperature should
not exceed 60°C when washing with warm water.


Product Overview
Scope of delivery
A Parts list
1 Lid
2 Control panel
3 Housing
4 Detergent box
5 Wash/spin tub
6 Softener dispenser
7 Lint filter
8 Pulsator
9 Adjustable leg (1)
11 Hose clip
12 Drain hose connection
13 Drain pump filter
10 Water supply hose connections
Top view

Inside view
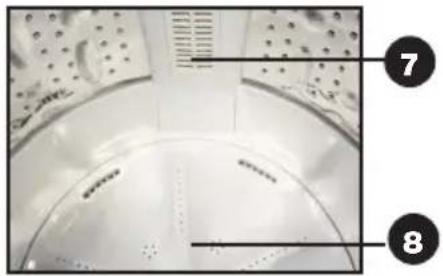
natural_image
Close-up of a white plastic container with perforated top and side surfaces, marked with numbered callouts (7 and 8) — no readable text or symbols beyond labels.

Front view

B Accessories included

natural_image
Three types of medical tubing with numbered labels (14, 15, 16) shown in black circles on white and gray surfaces respectively.14 Hot water supply hose
15 Cold water supply hose
16 Drain hose with elbow
Bottom cover and screw for attaching the bottom cover to the unit (not shown)
C Documentation (not shown)
Instruction manual, Quick start guide, Warranty certificate
Getting Started: Installation
Unpacking
- This product has been packaged to protect it against transportation damage. Keep the original packaging carton and materials in a safe place. It will help prevent any damage if the product needs to be transported in the future. In the event it is to be disposed of, please recycle all packaging materials where possible.
- Plastic wrapping can be a suffocation hazard for babies and young children, so ensure all packaging materials are out of their reach and disposed of safely.
- Unwind the power cord to its full length and inspect it for damage. Do not use the appliance if the appliance or its cord have been damaged or are not working properly. In case of damage, contact our after sales support line for advice on examination, repair or return of the damaged product.
- Read this manual to familiarise yourself with all the parts and operating principles of the washing machine. Pay particular attention to the safety instructions on the previous pages.
Installing the bottom cover
- Make sure the power cord is unplugged from the mains supply.
- Place some padding (such as a soft mat, blanket or thick towel) on the floor and gently lay the washing machine on the padding, back side down. Take care not to dent the housing.
- Insert the bottom cover into the hooks of the leg, pushing it straight until it reaches into the front hooks.
- Fasten the bottom cover with the supplied screw.
- Carefully set the washer upright.

Levelling the washer
• Install the washer on a stable and level surface, in a dry location, out of sunlight.
- If levelling is necessary, adjust the adjustable leg (at the front right side of the machine), as illustrated, right.
The maximum permissible inclination of the supporting surface is 2 degrees.
CAUTION: If you must install the washer on a carpeted floor, make sure not to block the ventilation openings on the bottom of the washer.

Getting Started: Installation (Cont.)
Connecting the water inlet hoses
Install the water inlet hoses to your hot and cold water taps, as described below.
- Check and ensure that the sealing washers are firmly in place.
- Attach the straight end of the hose to your water taps. Make sure to attach the hot water supply hose (with red markings) to the hot water tap and the cold water supply hose (with blue markings) to the cold water tap.
- Tighten the coupling nuts securely by hand, as illustrated below (the sealing washer is a part of and located inside the tap end).
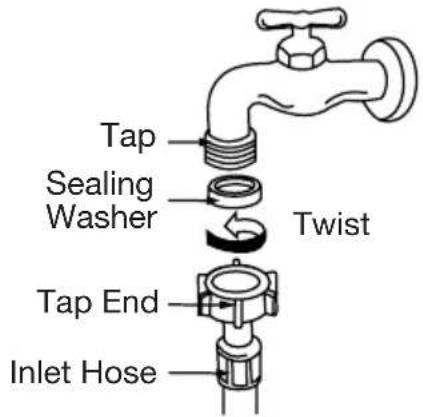
- Attach the curved end of the hose to the corresponding inlet valve of the washer.
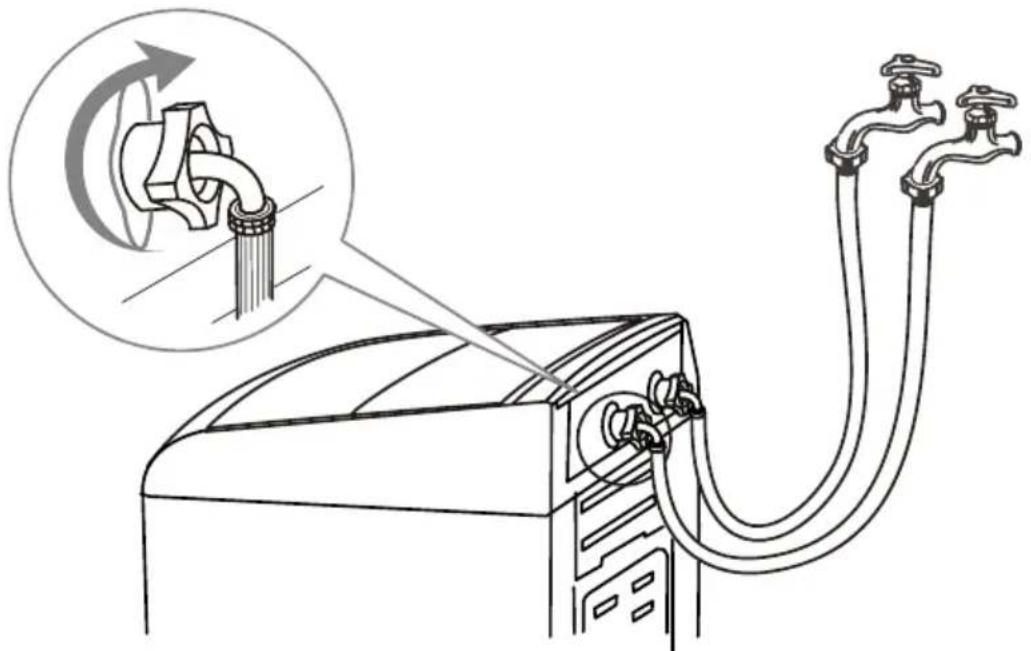
- Tighten the coupling nuts securely by hand, as illustrated below.
- Tighten the nut by turning it clockwise while holding the hose. (To detach the water supply hose, turn the nut anticlockwise after turning the tap off.)

- Turn on the taps and check for leaks. Tighten the coupling nuts firmly if there is any leakage. If your water pressure is strong, close the water tap completely, then open it slightly.
- Make sure your hot water from the tap is no hotter than 60°C.
IMPORTANT!
Both the hot water and cold water hoses must be connected to your taps.
NOTE:
The diagrams throughout this manual are for illustrative purposes only and may vary slightly from the appearance of the unit purchased.
Getting Started: Installation (Cont.)

CAUTION! When tightening the clamping nut, take care not to damage the water inlet valve joint. Apply force evenly and do not twist the water inlet valve.
natural_image
Diagram of a washing machine with faucet and valve, showing internal components and airflow direction (no text or labels)
CAUTION! Use only the new (supplied) hoses with your new appliance. Do not use a hose from an existing machine, or one that has been used previously.

CAUTION! In the event that the hoses are too short for your set-up, please seek advice from your local washing machine store to purchase a longer hose.
Installing the drain hose
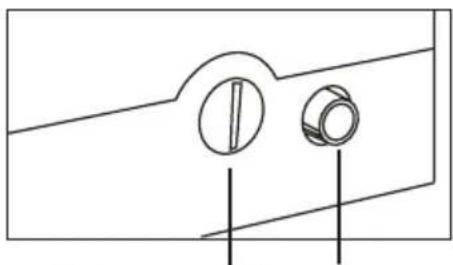
- The drain hose and drain pump filter are located at the back of the machine, as illustrated below, left.
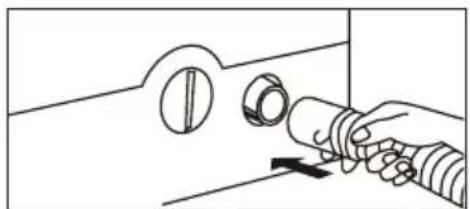
- Pinching the two bands of the clamp on the drain hose, connect it to the drain hose connection at the back of the washer, as illustrated below, right.
- Pull the drain hose upward and affix it to the hose clip at the back of the washer.
- When the washer is in use, put the drain hose into a drain spout (or into a sink/tub),
as illustrated on the opposite page.
natural_image
Pure technical line drawing of two circular components with vertical alignment lines, no text or symbols presentDrain pump with lint filter
Drain hose connection
natural_image
Line drawing of a hand holding a scroll with a knob, pointing to a button (no text or symbols)
natural_image
Hand holding a coiled hose with a circular valve, no text or symbols visibleGetting Started: Installation (Cont.)
CAUTION!
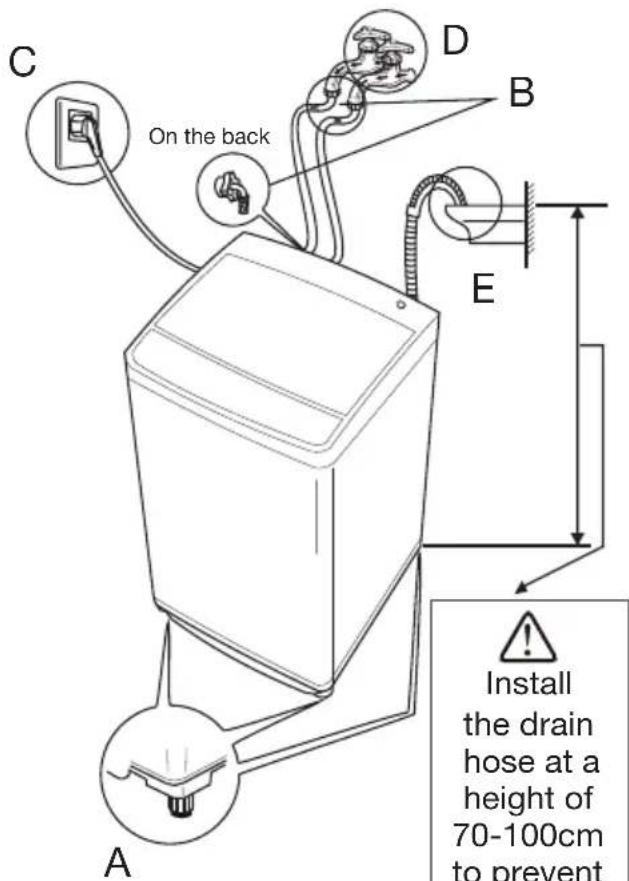
- While the washer is in use, ensure the height of the drain hose is at least 70cm, otherwise the washer will not work well, or water may flow out in the course of washing.
- Also ensure the drain hose is not higher than 1m above ground, otherwise the washer will not drain water well.
- Never lay down the drain hose, as water will be discharged.
- Be sure the drain hose is properly routed so it will not kink or lift off the sink.

WARNING: this appliance must be earthed
In the event of a malfunction or breakdown, earthing will reduce the risk of an electric shock by providing a path of least resistance for the electric current.
This appliance is equipped with a cord having an equipment-earthing conductor and an earthing plug. The plug must be plugged into an appropriate outlet that is installed and earthed in accordance with all local standards and requirements.
WARNING: Do not modify the plug under any circumstances. If the plug does not fit your outlet, consult a licensed electrician and have the outlet changed.
Features
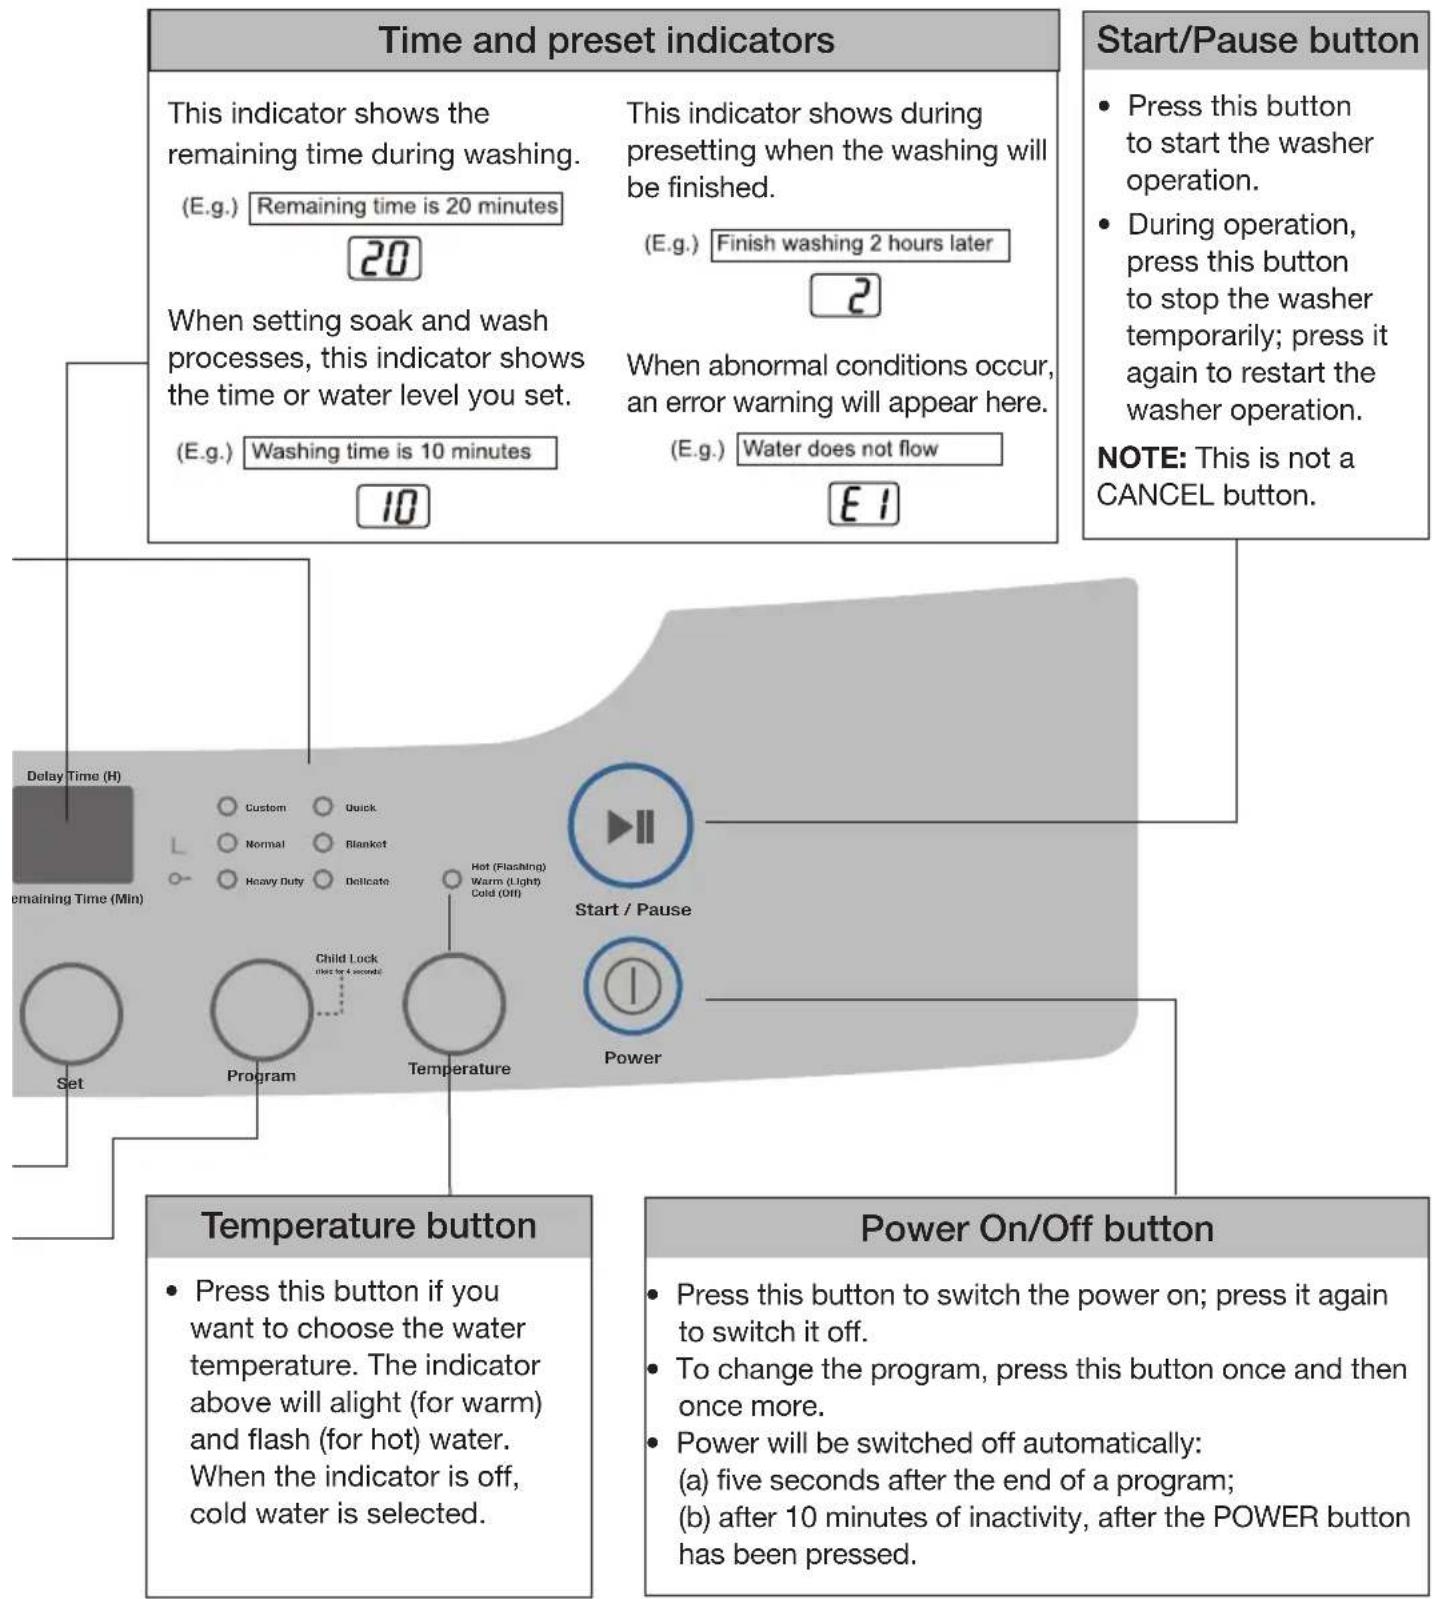
The control panel
Detergent indicators
• These indicate how much powder detergent to use.
• See ‘Detergent and load recommendations’, page 17, for details.

Indicator lights
- The wash process indicator lights indicate the current wash process (delay, soak, wash, rinse, spin).
- The program lights indicate the selected wash program (custom, normal, heavy duty, quick, blanket, delicate).
Water level button
- You can choose the appropriate water level that matches the load size.
- Different water levels for washing or rinsing are optional.
• See ‘Setting the water level ...’, page 21, for details.

STIRLING®
5.5KG WASHING MACHINE
Detergent

Delay

○ Rinse
Spin
Wash

Water Level

Process
Process button
- Press the PROCESS button to set a variety of wash processes: Delay, Soak, Wash, Rinse, or Spin.
- The indicator for the selected option will illuminate above.
Set button
- Press the SET button to set the Delay time and the Soak, Wash, Spin and Rinse times.
Program button
- Press the PROGRAM button to select the washing program.
- NOTE: For the NORMAL and HEAVY DUTY programs, the machine will automatically select the appropriate water level and wash and spin times.
Features (Cont.)
Instructions
Before you start washing
A Make sure the washer is stable and level. If necessary, adjust the adjustable leg to stabilise the washer (see page 10).
B Make sure the water inlet hoses are properly installed (see page 11).
C Plug the machine into a nearby power point.
D Open the water taps.
E Make sure the drain hose is properly installed. Hang the upper end of the hose over the laundry sink or into a drain spout (see page 12).
F Before using the washing machine for the first time, run a complete cycle without laundry items. Select the NORMAL program and run the machine until the end of the program.
Normal usage
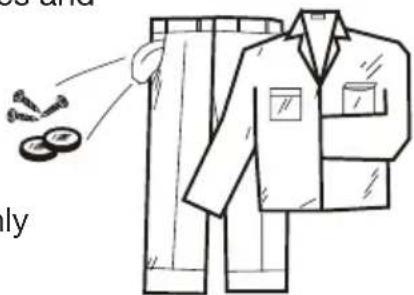
- Before washing, remove any coins, keys and other hard items from pockets. Close any zippers to prevent damaging your clothes and the wash tub. Brush dirt and sand off clothes and turn pockets inside out.
- Sort your washing into appropriate loads: whites, coloureds, cottons, delicates, heavily soiled, etc. Place delicate items into a wash bag for protection.
- Put your washing in the machine, loading items uniformly in the tub.
- Add washing detergent (see opposite for details).
- Press the POWER ON/OFF button.
- Refer to the Program Selection Guide (opposite) and select a suitable wash program. The machine will automatically choose the correct water level and wash and spin times for the NORMAL and HEAVY DUTY programs, and the correct water level for the CUSTOM and QUICK programs. Other parameters can be set individually (see page 18).
- Close the lid and press the START/PAUSE button.
NOTE: If the washer lid is not closed properly, the washer will sound an alarm and stop working before spinning.
natural_image
Illustration of a person in a suit jacket with two small items nearby (no text or symbols)Instructions (Cont.)
Program selection guide
| Program Suitable items | Default settings for wash processes | |||
| Wash time | Number of rinses | Spin time (minutes) | ||
| Custom | All kinds of clothes 10 minutes 2 5 minutes | |||
| Normal * | Normally soiled cottons | 5–12 minutes # | 2 | 5–6 minutes # |
| Heavy Duty | Heavily soiled cottons 7–14 minutes # 2 7–8 minutes # | |||
| Quick | Not very dirty clothes for daily wash | 5 minutes 1 3 minutes | ||
| Blanket | Blanket or bulky items | 12 minutes 2 8 minutes | ||
| Delicate | Delicate fabrics 6 minutes 2 2 minutes | |||
* This program has been used for energy testing (with warm water and on the highest water level setting).
The NORMAL and HEAVY DUTY programs are specially designed for 100% fuzzy control. As the wash and spin times are determined by the load sensor, there is no default display. If you do not adjust, the washer will run within the default interval, depending on the sensor result.
Detergent and load recommendations
- We suggest you use detergent in the amounts recommended below. Too much will affect rinse performance and too little will give poor washing results.
- Add detergent into the detergent box or put it directly into the tub (see p. 20).
- Dilute fabric softener with a little water and carefully add it to the softener dispenser on the balance ring for dispersion through the final rinse.
| Water level indicator | 15 | 20 | 24 | 28 | 32 | 38 | 45 | 50 |
| Water volume | 15L | 20L | 24L | 28L | 32L | 38L | 45L | 50L |
| Detergent indicator |  |  |  |  | ||||
| Amount of powder detergent | 10–20g | 20–28g 28– | 36g | 36– | 45g | |||
| Liquid detergent | When using a liquid detergent, follow the recommendations on the detergent packaging for a top load washing machine. | |||||||
Instructions (Cont.)
Customising a program
This washing machine is equipped with a fuzzy logic function that will automatically choose the correct water level and wash and spin times for the NORMAL and HEAVY DUTY programs, and the correct water level for the CUSTOM and QUICK programs. If you want to adjust these values yourself, proceed as follows:
- Prepare your washing according to points 1 to 4 on page 16.

- Press the POWER ON/OFF button.
- Press the PROGRAM button to select the washing program appropriate for your washing load.
- Press the PROCESS button to select the process; the relevant indicator light will illuminate when the option is selected. Then press the SET button and set the time.
- SOAK time options

Minutes
(Soak time cannot be adjusted for the DELICATE and BLANKET programs.)
- WASH time options

Minutes
- RINSE times options

(The number is the number of rinses.)
- SPIN time options

Minutes (For the DELICATE program, spin time can only be adjusted up to 3 minutes, as illustrated.)

Minutes (DELICATE)
- Press the WATER LEVEL button and choose an appropriate water level.
- Close the lid and press the START/PAUSE button for the washing program to start.
- At the end of the washing program, a buzzer will sound to alert you that the program has finished before the power is shut off automatically.
- Close the water taps and unplug the power plug from the wall outlet.
- If you want to use a particular customised program on a regular basis, you can program it to the machine's memory for easy access the next time you want to use the same program. See 'Memory function', page 22, for instructions.

22
Instructions (Cont.)
The blanket program
Use this program for washing blankets or other bulky items. It will automatically select the highest water level, but you can adjust this manually down to a lower level according to the size of your bulky item(s).
- Press the POWER ON/OFF button and open the washer lid.
- Press the PROGRAM button repeatedly and until the indicator for the BLANKET program flashes.
- Dissolve an appropriate amount of washing detergent with a little lukewarm water, then pour the detergent solution directly into the tub of the washing machine.
- Fold up the blanket and put it into the washing tub, as illustrated below.
1

2

3

4
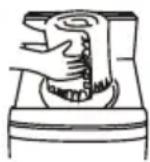

Fold in two by the Fold 4 times in the Roll up the blanket. Put it into the wash tub with long side. same direction. the edge downwards.
- Close the washer lid.
- Press the START/PAUSE button for the washing program to start.
-
At the end of the washing program, a buzzer will sound to alert you that the program has finished before the power is shut off automatically.
-
Close the water taps and unplug the power plug from the wall outlet.
-
We recommend cleaning the lint filter after washing a blanket (see page 25 for instructions).

NOTE: If you notice that the blanket floats up during the wash, press the START/PAUSE button, the washer will stop working temporarily. Push the blanket down and press the START/PAUSE button again to continue washing.
Selecting a wash cycle process
On occasion you may want to select a single wash cycle process (or two processes) instead of a complete program. For example, you may want to spin clothes that got wet from rain while hanging on the line, or rinse and spin clothes washed by hand.
- To set a spin cycle only, set the SOAK, WASH and RINSE options to "0" and then select a SPIN time (from 0-9 minutes). Then proceed as described opposite.
- To set a rinse and spin cycle, set the SOAK and WASH options to "0", then select a RINSE option (from 1 to 4) and a SPIN time (from 0-9 minutes). Then proceed as described opposite.
Instructions (Cont.)
Delayed washing
This washing machine has a 0–24 hour delay start function which you can set to determine the time when the washing program will finish.
NOTES:*This function is not available for the DELICATE program.
* To avoid water leakage when using this function, make sure the water taps are open, the drain hose is properly installed and the washing load and detergent are properly prepared.
- Put your washing in the machine, loading items uniformly in the tub.
- Press the POWER ON/OFF button.
- Select the required PROGRAM and/or PROCESS.
- Press the PROCESS button until the Delay indicator light flashes, then press the SET button to select the desired time period (in hours) for the wash to finish.
- Select the water level, if necessary.
- Add any detergents (see below and page 17 for details).
- Close the washer lid and press the START/PAUSE button.
- After setting the delay, the corresponding light will illuminate and all other lights will be switched off about one minute later. From this time on until the delayed time only the POWER and SET buttons will response when pressed.
- To check the delayed program, press the SET button: the program will be indicated for 5 seconds. During these 5 seconds you can press the WATER LEVEL button and set the water level.
- To cancel the delay, shut off the power.
- To change the delay time, first cancel the delay, then set it again.

Adding detergent to a delayed wash
When using the delayed wash, we recommend you do not add detergent directly to the wash tub but follow the instructions below:
- Powder detergent: either put powder detergent into the detergent box or, if you prefer to put it directly into the wash tub, wrap the powder in a small cloth.
- Liquid detergent and bleach: pour liquid detergent or bleach into the hole on the pulsator. Do not pour it directly into the tub as it may cause discolouration of your washing.
- Fabric softener: dilute the softener with twice the amount of water, then pour the solution into the softener dispenser on the balance ring.

Instructions (Cont.)
Other functions
Hot / cold / warm water wash
This top load washing machine must be connected to both a cold and a hot water tap. With both hoses connected to a cold and hot water tap, you can set the washer to use either just cold water for a cold water wash, or just hot water for a hot water wash, or both hot and cold water for a warm water wash.
To select the wash temperature, press the TEMPERATURE button.
- Cold wash: the indicator light is off.
- Warm wash: the indicator light is on.
- Hot wash: the indicator light is flashing.
Setting the water level and other processes
You can set the water level for wash and rinse processes. For example, if you are sensitive to detergent residues in your washing, you may want to select a higher water level for rinsing.
To set different water levels:
- Press the PROCESS button until the WASH light flashes; press the WATER LEVEL button to choose the appropriate water level (it will be shown on the display screen); press the SET button to set the wash time.
- Then press the PROCESS button until the RINSE light flashes; press the WATER LEVEL button to choose the appropriate water level; press the SET button to set the number of rinses.
To set other processes:
- Then press the PROCESS button until the SPIN light flashes; press the SET button to set the SPIN time.
- Finally press the START/PAUSE button: the washer will start operating according to the set values for wash and rinse water levels, number of rinses and spin time.
Instructions (Cont.)
Load sensor (fuzzy control)
This washing machine is equipped with a fuzzy logic function that will automatically detect the weight of your wash and choose the correct water level and wash and spin times for the NORMAL and HEAVY DUTY programs, and the correct water level for the CUSTOM and QUICK programs. You do not have to set these values; however, if you want adjust them yourself, see page 18 for how to customise processes.
Child lock
With the child lock activated, the machine will stop working automatically and sound an alarm if the washer lid is opened for 5 seconds.
To set the child lock:
- Press the POWER ON/OFF button to switch on the power, then press and hold the PROGRAM button for 4 seconds until a buzzer sounds. The child lock will be activated when the START/PAUSE button is pressed.
- To cancel the child lock, repeat the above steps.
Start of washing
The machine will start washing when the water inside the tub has reached two levels below the set level while the water will continue to flow in (see page 17 for the eight water levels).

17
This early start of washing will increase the wash time and allow the detergent to dissolve fully before the start of the set wash time.
This function will be ineffective:
- When the first two water levels (15L or 20L) are selected.
- When the DELICATE or BLANKET program is selected.
- When SOAK is selected, after the soaking process.
FAQs and Troubleshooting
Not all unusual incidents you may encounter with your washing machine are faults, or cause for concern. Check in the list below what issues may arise and why. Also check in the table on the following page for solutions to other common problems.
- The drain hose is leaking water during the first use. Does this indicate there is a problem?
No, this is normal; it is residual water from the performance test in the factory and no cause for concern.
• Why is there still some water intake during the wash or rinse cycle?
When the water level is low, the washing machine will automatically refill during the washing or rinsing process. This is no cause for concern.
- At the beginning of the spin cycle, why is the tub turning first and then stopping?
This is intermittent spinning and it results in better spinning performance.
- During the spin cycle, why is the machine spinning and then stopping suddenly and taking in water again?
If the washing is piled up at one side of the tub during the spin cycle, the washing machine automatically takes in more water to redistribute the load. Once the load is balanced again, the spin cycle will continue.
• Why is there a sound like water flowing after spinning?
This is the sound of the balancing liquid in the balance ring. This helps reduce vibration during spinning.
• Why is the control panel still warm after the power is switched off?
This is caused by the memory circuitry still working.
• The washer does not work at all. What could I have done wrong?
- Check and ensure that the washer is connected properly to the power supply and power is switched on at the outlet.
- If both are OK, first press the POWER ON/OFF button, then press the START/PAUSE button.
- If the machine still does not start the set program, check elsewhere in your home whether there has been a power failure, or whether the fuse or circuit breaker has been activated.
If none of the solutions offered above and on the following page help you solve the problem, contact our after sales support line for advice.
FAQs and Troubleshooting (Cont.)
Error messages
When the following problems occur, the microcomputer inside the washer will detect the abnormal condition. An electronic buzzer will sound for approximately 10 seconds, an error message will flash as shown below and the washer will stop operating.
| Type of problem | Error message Where to check | |
| Water does not flow into the wash/spin tub. | E1 | Turn on the water supply tap.Check whether the water supply has been cut off.Check whether the mesh filter of the water inlet is clogged. |
| Water does not drain out. | E2 | Check and make sure the drain hose is properly connected and installed.Check the drain hose for kinks or obstructions.Check whether the drain hose is clogged.Check whether the drain hose is installed too high off the ground.Check whether the filter of the drain pump is clogged.Check the lint bag filter inside the drum is clean (empty).Check the lint filter at the lower back of the machine is not obstructed. |
| The washer does not spin. | E3 | Check whether your washing is piled at one side of the tub. If so, redistribute the load evenly inside the tub.Check and make sure the washer is installed on an even, level surface. |
| E4 | Close the washer lid. | |
| The buzzer keeps buzzing. | E5 | Check whether the child lock is set.Close the washer lid. |
| Other problems. | EREC | Press the POWER ON/OFF button to turn off the power, then contact our after sales support line to arrange a service. |
NOTE: Press the START/PAUSE button once to release the emergency stop and cancel the error message; press it again to restart the operation.
Other Useful Information
Cleaning and care
To prolong the service life of the washing machine, keep it in good condition and perform regular maintenance. For any type of cleaning and maintenance, make sure the washing machine is disconnected from the mains power supply.
Cleaning the washing machine (when required)
Use a soft cloth to wipe any water or dirt off the washer lid and housing. If using a damp cloth, squeeze it almost dry to avoid leaving water residues.
- Do not use any chemical, alkaline or abrasive cleaning agents to avoid damaging the surface.
- Do not spray water directly onto the washer housing.
Cleaning the lint filter (suggested interval: every week)
Take out the lint filter as illustrated below. Open the filter and rinse it clean under running water, taking care not the damage any parts. Reinstall the filter, making sure it fits securely behind the cover clasp and latches and locks securely into place.

natural_image
Illustration of a hand inserting a card into a device, with an arrow indicating the fold (no text or symbols present)
natural_image
Diagram of a hand holding a device with an arrow indicating rotation (no text or symbols present)Cleaning the water inlet valve (suggested interval: every 6 months)
To avoid blockage of the mesh filter at the water inlet after long time use, detach the water inlet hose, making sure you have turned off the water supply at the taps beforehand. Take the mesh filter out of the water inlet valve and clean the filter with a soft brush. Then assemble the mesh filter back into the valve and reconnect the water inlet hose.

Cleaning the hose filter (suggested interval: every 6 months)
To avoid blockage of the hose filter after long time use, detach the water inlet hose, making sure you have turned off the water supply at the taps beforehand. Turn the nut anticlockwise to take off the hose, clean the filter under running water or with a soft brush, then reconnect the hose.

natural_image
Diagram showing a mechanical component being processed by a faucet, with no text or symbols present.Other Useful Information (Cont.)
Drain pump maintenance
We recommend that you clean the drain pump filter regularly (at least once a month) to avoid blockages created by bobby pins, coins and excess lint.
Proceed as follows:
- Disconnect the washer from the power source.
- If necessary, wait until the water has cooled down.
- Place a container underneath the pump opening to collect any spillage (see below, left).
- Turn the filter cap anticlockwise to take it out gently (see below, right). Always keep a rag nearby to dry up water spillage when removing the pump filter.

natural_image
Line drawing of a toaster oven with a bowl on top (no text or symbols)
natural_image
Line drawing of a toaster oven with a circular dial and a bowl on the front (no text or symbols)- To remove any objects from the filter, wash it thoroughly in a basin or under running water (see below, left).
- Put the cap back and place the filter back in its seat (see below, right).


natural_image
Diagram of a device with a circular component and directional arrows indicating rotation or movement (no text or symbols)Other Useful Information (Cont.)
Spare parts
Our after sales support centre stocks a wide range of spare parts for the XQB60-M933 STIRLING 5.5kg Top Load Washing Machine. To purchase a part, call the centre on 1300 886 649 or email us at info@tempo.org
- Adjuster assembly
- Air trip hose
- Bearing assembly
- Capacitor assembly (10μF/450V AC)
• Control circuit board, complete - Detergent tray
- Drain hose (inside)
- Drain hose assembly (outside)
- Drain pipe
- Feed hose assembly
- Hinge shaft
- Hose band (various)
- Leg
- Lid handle
- Lid spring
- Lint filter assembly
- Motor, complete
- Motor pulley assembly
- Panel sticker
- Pour inlet assembly
- Pulsator
- Pulsator screw
- Pulsator screw washer
- Pulsator washer
- Pump
- Reed switch
- Response switch (water level sensor)
- Safety device switch
- Spring damper base
- Suspension rod, complete
- Suspension rod, complete (motor side)
- Top plate
- Torque motor
• V-belt
• Water valve assembly - Water valve tie in
- Washer lid
- Washer lid, complete
Other Useful Information (Cont.)
Specifications and technical parameters
| Dimensions 52cm (W) x 54.5cm (D) x 95.2cm | (H) |
| Capacity (max. weight of dry wash load) 5.5kg | |
| Weight 31kg | |
| Water quantity (High) 50L | |
| Power source 230-240V, 50Hz | |
| Power consumption 330W | |
| Required water pressure 0.03MPa – 0.8MPa | |
| Liquid ingress protection IPX4 |
Compliance
This appliance has been fully tested and meets all requirements as set out by standards AS/NZS 60335.1 and AS/NZS 60335.2.7
Other Useful Information (Cont.)
Responsible disposal
- Packaging materials are recyclable. Please dispose of them responsibly for recycling.
- At the end of its working life, do not throw this appliance out with your household rubbish. Electrical and electronic products contain substances that can have a detrimental effect on the environment and human health if disposed of inappropriately. Observe any local regulations regarding the disposal of electrical consumer goods and dispose of it appropriately for recycling. Contact your local authorities for advice on recycling facilities in your area.
This page has been left blank intentionally.

STIRLING®
5.5kg Top Load Washing Machine
Repair and Refurbished Goods or Parts Notice
Unfortunately, from time to time, faulty products are manufactured which need to be returned to the supplier for repair.
Please be aware that if your product is capable of retaining user-generated data (such as files stored on a computer hard drive, telephone numbers stored on a mobile telephone, songs stored on a portable media player, games saved on a games console or files stored on a USB memory stick) during the process of repair, some or all of your stored data may be lost. We recommend you save this data elsewhere prior to sending the product for repair.
You should also be aware that rather than repairing goods, we may replace them with refurbished goods of the same type or use refurbished parts in the repair process.
Please be assured though, refurbished parts or replacements are only used where they meet ALDI's stringent quality specifications.
If at any time you feel your repair is being handled unsatisfactorily, you may escalate your complaint. Please telephone us on 1300 886 649 or write to us at:
Tempo (Aust) Pty Ltd ABN 70 106 100 252
PO BOX 6056 Frenchs Forest, Sydney, Australia NSW 2086
Telephone: 1300 886 649 (Aust) - Fax: (02) 9975 2688
Tempo Help Desk: 1300 886 649 (Aust)
(Operating Hours: Mon-Fri 08:30am to 06:00pm EST)
Email: info@tempo.org


Warranty returns
Should you for any reason need to return this product for a warranty claim, make sure to include all accessories with the product.
Product does not work?
If you encounter problems with this product, or if it fails to perform to your expectations, make sure to contact our After Sales Support Centre on 1300 886 649 before returning it to the store for a refund.
For an electronic copy of this manual, go to www.stirlingappliances.com.au and download a copy.
Instruction Manual Revision Index
Version No Issue Date Description
V1.0 15 April 2015 Original release
V1.1 05 May 2015 Minor updates
V2.0 06 June 2016 Second release


- Welcome
- Contents
- STIRLING®
- 5.5kg Top Load Washing Machine
- Warranty Details
- General Safety Instructions
- IMPORTANT SAFETY INSTRUCTIONS
- READ CAREFULLY AND KEEP FOR FUTURE REFERENCE
- Warning
- Caution
- Electrical safety
- General Safety Instructions (Cont.)
- Installation
- Usage conditions and restrictions
- Cleaning and maintenance
- Warnings
- Cautions
- Product Overview
- Scope of delivery
- A Parts list
- Top view
- Inside view
- Front view
- B Accessories included
- C Documentation (not shown)
- Getting Started: Installation
- Unpacking
- Installing the bottom cover
- Levelling the washer
- Getting Started: Installation (Cont.)
- Connecting the water inlet hoses
- IMPORTANT!
- NOTE:
- Installing the drain hose
- CAUTION!
- WARNING: this appliance must be earthed
- Features
- The control panel
- Detergent indicators
- Indicator lights
- Water level button
- Process button
- Set button
- Program button
- Features (Cont.)
- Instructions
- Before you start washing
- Normal usage
- Instructions (Cont.)
- The NORMAL and HEAVY DUTY programs are specially designed for 100% fuzzy control. As the wash and spin times are determined by the load sensor, there is no default display. If you do not adjust, the washer will run within the default interval, depending on the sensor result.
- Detergent and load recommendations
- Customising a program
- The blanket program
- Selecting a wash cycle process
- Delayed washing
- Adding detergent to a delayed wash
- Other functions
- Hot / cold / warm water wash
- Setting the water level and other processes
- To set different water levels:
- To set other processes:
- Load sensor (fuzzy control)
- Child lock
- Start of washing
- FAQs and Troubleshooting
- FAQs and Troubleshooting (Cont.)
- Error messages
- Other Useful Information
- Cleaning and care
- Cleaning the washing machine (when required)
- Cleaning the lint filter (suggested interval: every week)
- Cleaning the water inlet valve (suggested interval: every 6 months)
- Cleaning the hose filter (suggested interval: every 6 months)
- Other Useful Information (Cont.)
- Drain pump maintenance
- Spare parts
- Compliance
- Responsible disposal
- Repair and Refurbished Goods or Parts Notice
- Warranty returns
- Product does not work?
- Instruction Manual Revision Index
Brand : Stirling
Model : XQB60-M933
Category : Washing machine