Elliptical 2100 - Elliptical York Fitness - Free user manual and instructions
Find the device manual for free Elliptical 2100 York Fitness in PDF.


| Product Type | Elliptical Trainer |
| Model | York 2100 Elliptical Trainer |
| Maximum User Weight | 225 lbs (100 kg) |
| Required Clearance | At least 2 ft (60 cm) on each side |
| Assembly Time | 15–20 minutes |
| Tools Included | Multi-purpose spanners (one with screwdriver function), allen key |
| Computer Functions | Time, Distance, Calories, Pulse (ear clip), Scan, Alarm, Reset |
| Resistance Adjustment | Manual tension knob |
| Pedal Motion | Forward and reverse |
| Heart Rate Monitor | Earlobe pulse clip sensor |
| Display | LCD screen with mode selection |
| Power Supply | Automatic on/off when pedaling; no external power needed |
| Frame Warranty | 1 year (steel parts) |
| Vinyl/Upholstery Warranty | 30 days |
| Other Parts Warranty | 90 days |
| Care Instructions | Wipe with warm damp cloth and mild detergent |
| Safety Features | Stable stabilizers, emergency stop by stopping pedaling |
Frequently Asked Questions - Elliptical 2100 York Fitness
User questions about Elliptical 2100 York Fitness
0 question about this device. Answer the ones you know or ask your own.
Ask a new question about this device
Download the instructions for your Elliptical in PDF format for free! Find your manual Elliptical 2100 - York Fitness and take your electronic device back in hand. On this page are published all the documents necessary for the use of your device. Elliptical 2100 by York Fitness.
USER MANUAL Elliptical 2100 York Fitness
natural_image
Silhouette of people exercising with barbells and weights (no text or symbols)YORK®
FITNESS
EXERCISES
&
INSTRUCTION
MANUAL
05 / 2000 TWN
Product may vary slightly from pictured.
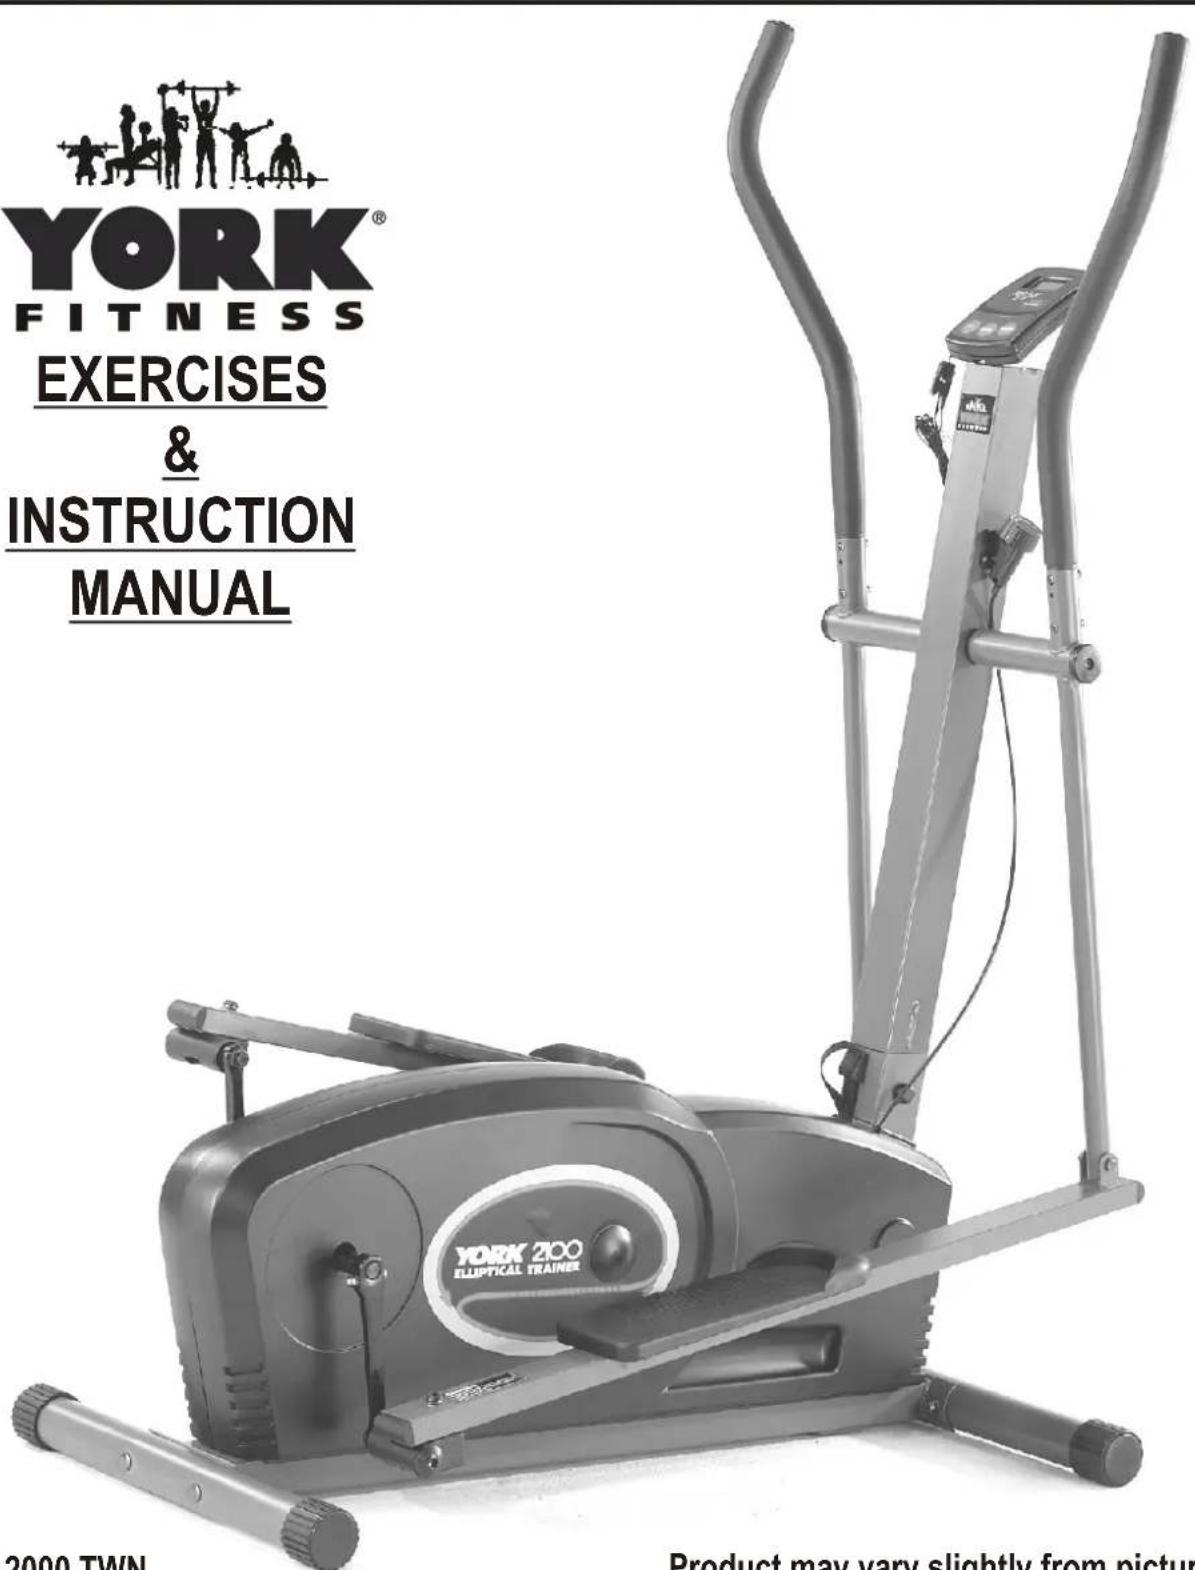
YORK 2100 ELLIPTICAL TRAINER
SAFETY GUIDELINES:
Please read and follow the following safety guidelines:
Before beginning any exercise program, you should consult with your doctor.
It is recommended that you undergo a complete physical examination.
Read this owner's manual and follow the instructions.
■ Assemble and operate the YORK 2100 ELLIPTICAL TRAINER on a solid, level surface.
- Keep the area behind the YORK 2100 ELLIPTICAL TRAINER clear.
■ Always use your YORK 2100 ELLIPTICAL TRAINER in adequate space e.g., at least 2 ft. (60cm) clearance on each side.
■ Never allow children on or near the YORK 2100 ELLIPTICAL TRAINER.
■ Always check the YORK 2100 ELLIPTICAL TRAINER before using it, in particular make sure all parts are assembled, and nuts and bolts are tightened.
■ Do not use the YORK 2100 ELLIPTICAL TRAINER if the unit is disassembled in any way.
- Keep hands away from moving parts.
■ The weight limit for this product is 225 lbs (100 kgs).
■ Wear proper workout clothing: Do not wear loose clothing.
- Do not wear shoes with leather soles or high heels. Tie all long hair back.
■ Remove jewellery, rings, chains and pins before exercising.
■ Do not rock the unit from side to side.
■ Care should be taken when mounting and dismounting the unit.
■ Do not place any liquids on any part of the Elliptical Trainer 2100.
- Do not use any accessories that aren't specifically recommended by the manufacturer, these might cause injuries or cause the unit to fail.
■ Always consult your doctor before undertaking any exercise programme.
■ Work within your recommended exercise level, do NOT work to exhaustion.
If you feel any pain or abnormal symptoms, STOP YOUR WORKOUT IMMEDIATELY. Consult your physician immediately.
The YORK 2100 ELLIPTICAL TRAINER is designed for the use and enjoyment of the serious trainer as well as the dedicated user. By following the above precautions and using good judgement and common sense, you will have safe and pleasurable exercise regimen with the YORK 2100 ELLIPTICAL TRAINER.
CARE AND MAINTENANCE
Use a warm damp cloth with mild detergent to keep your YORK 2100 ELLIPTICAL TRAINER clean.
TOOLS REQUIRED
The tools enclosed in the carton are two multi-purpose spanners (which one has a screwdriver function) and one allen key.
SHOULD YOU REQUIRE ANY ASSISTANCE REGARDING THIS PRODUCT PLEASE CONTACT YORK DIRECTLY.

GENERAL
REMOVE ALL THE PARTS OF YOUR ELLIPTICAL TRAINER 2100 FROM THE CARTON AND PLACE THEM ON THE FLOOR CAREFULLY. ASSEMBLING YOUR ELLIPTICAL TRAINER 2100 IS SIMPLE. FOLLOW THESE INSTRUCTIONS CAREFULLY AND IT SHOULD TAKE YOU AROUND 15\~20 MINUTES.
ASSEMBLY INSTRUCTION
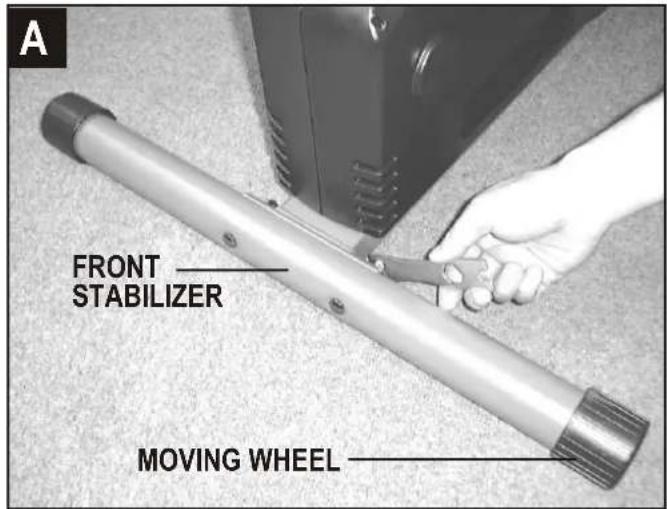
ATTACH THE STABILIZERS
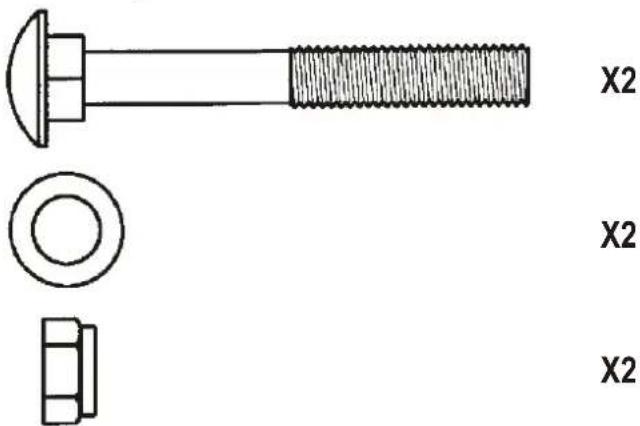
■ Fix the front stabilizer with moving wheels to the main frame and secure, using two carriage bolts, washers and locknuts.
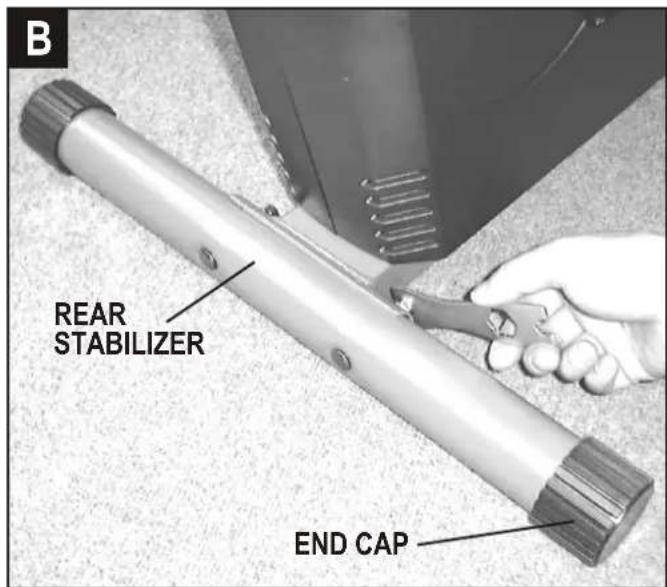
■ Fix the rear stabilizer to the main frame and secure, using two carriage bolts, washers and locknuts.
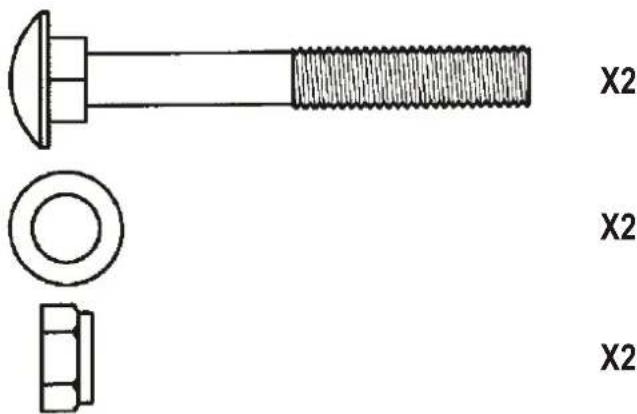
NOTE: Make sure you fasten the nuts & bolts securely for your safety and comfort when exercising.
2.
ATTACH THE FRONT POST
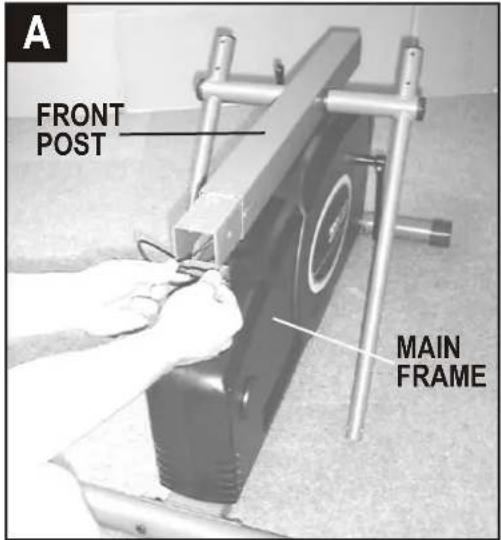
■ Rest the front post on the main frame carefully as shown.
■ Connect the sensor wire plug to the middle wire socket.
■ Check middle wire runs up the front post and out the top - later this will connect to the computer.
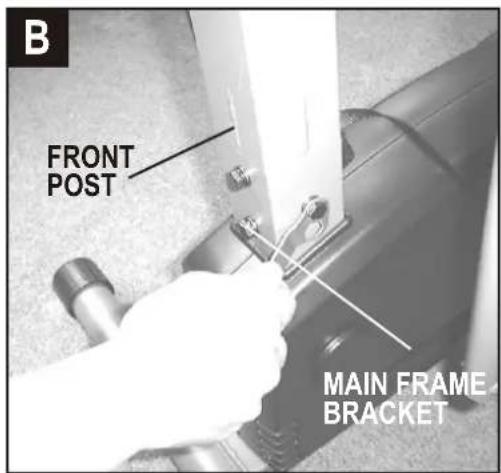
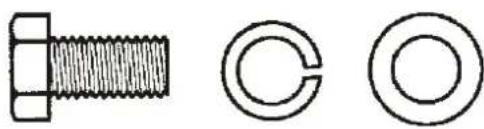
■ Insert the front post to the main frame in position and secure, using four hex head bolts, spring washers and washers as shown.
NOTE: TAKE CARE to ensure the middle wire does not get trapped when you attach the front post to the main frame.
natural_image
Three technical line drawings of a bolt and two circular features (no text or symbols)X4
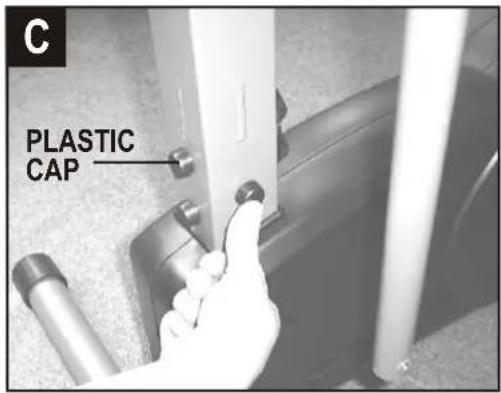
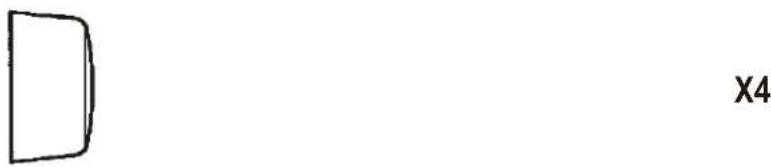
■ Fix the plastic cap onto the bolts head.
natural_image
Simple hand-drawn rectangle with a small square cutout and the number X4 in the corner (no text or symbols on the shape itself)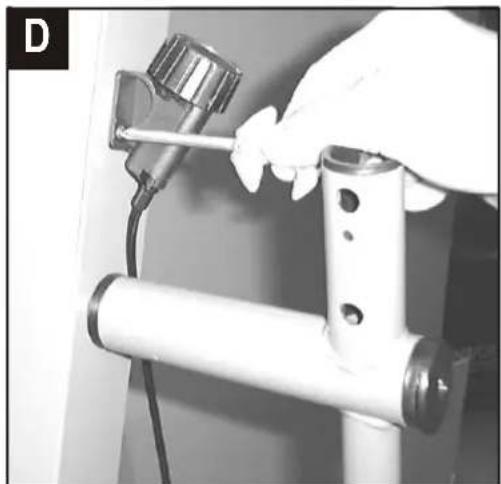
natural_image
Close-up of a hand using a tool to adjust or install a white cylindrical component (no visible text or symbols)■ Attach the tension control to the front post and secure, using two self tapping screws.

natural_image
Simple line drawing of a screw with no text or symbols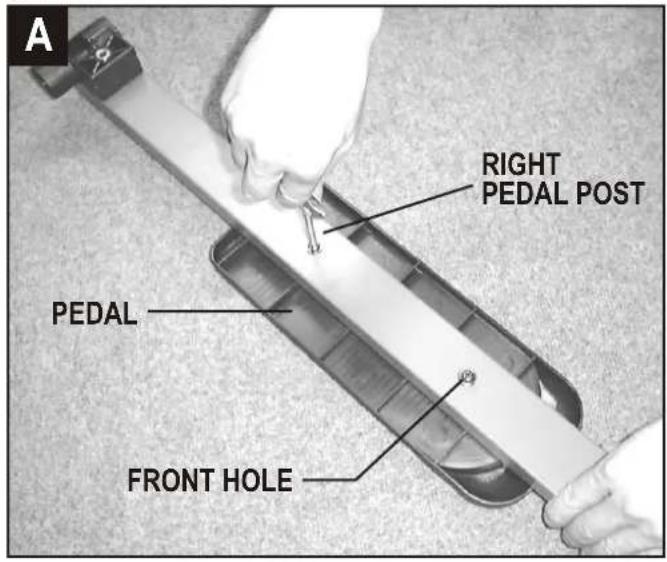
ATTACH THE PEDAL POSTS
■ Attach the pedal to the right pedal post and secure, using two machine screws and three thick washers as shown.
NOTE: Make sure you add two thick washers with the screw for front hole when assembling.
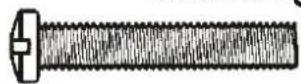
X2
X3
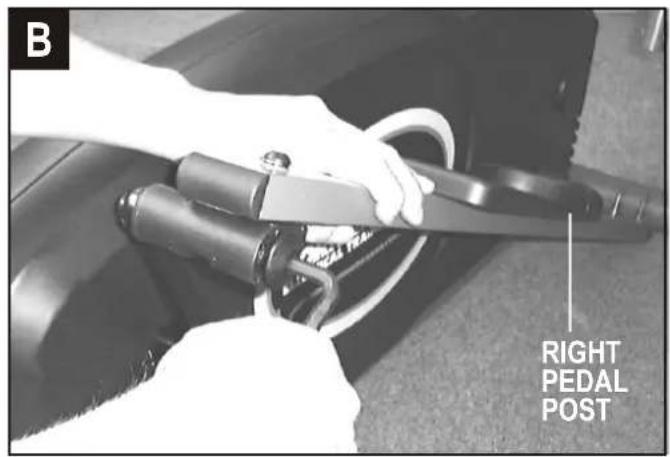
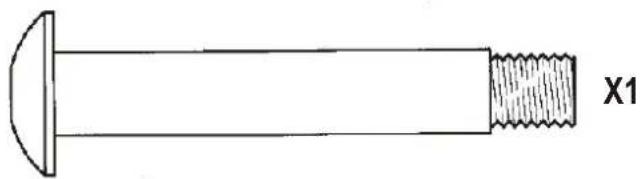
■ Fix the right pedal post to the right side crank arm and secure, using one allen head bolt as shown.
NOTE: The pedal posts are marked 'R' and 'L' (Right & Left).
natural_image
Simple line drawing of a bolt with a flanged head and threaded end (no text or symbols)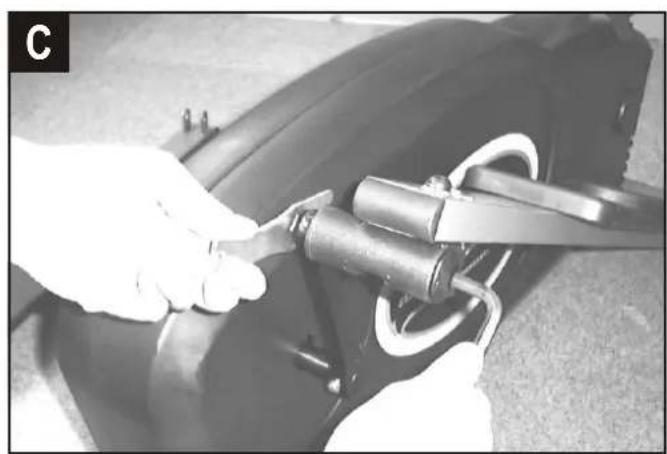
natural_image
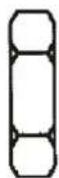
Close-up of hands using a tool to adjust or install a car tire component (no visible text or symbols)■ Tighten the allen head bolt to the crank then fasten the nut to the allen head bolt protruding through the crank arm. This will secure it in place.
X1
■ Repeat the same process for the left pedal post assembly.
NOTE: The right pedal post 'R' should be threaded on clockwise. The left pedal post 'L' should be threaded on clockwise.
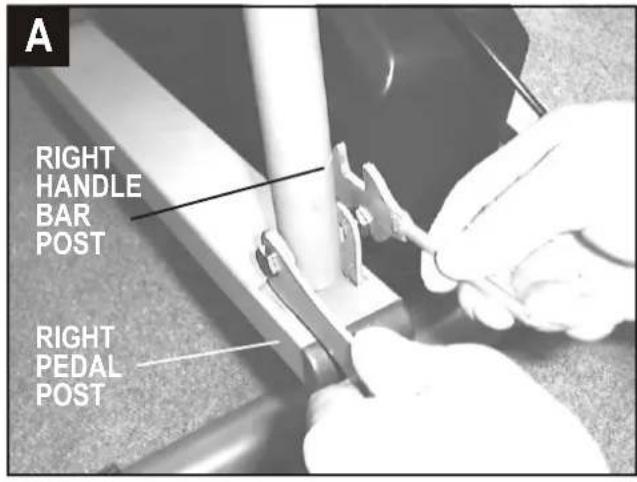
ATTACH THE HANDLE BARS
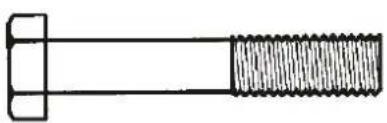
■ Fix the right pedal post to the right handle bar post and secure, using hex head bolt and locknut as shown.
natural_image
Simple line drawing of a bolt with a threaded shaft (no text or symbols)
X1
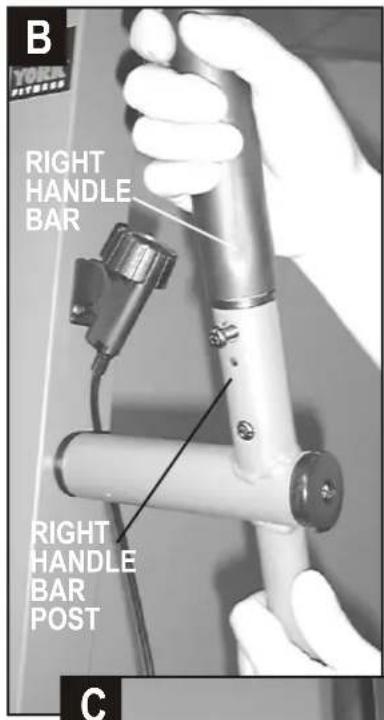
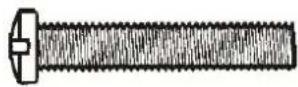
■ Attach the right handle bar to the right handle bar post and secure, using two machine screws, washers and locknuts.
X2
X2

X2
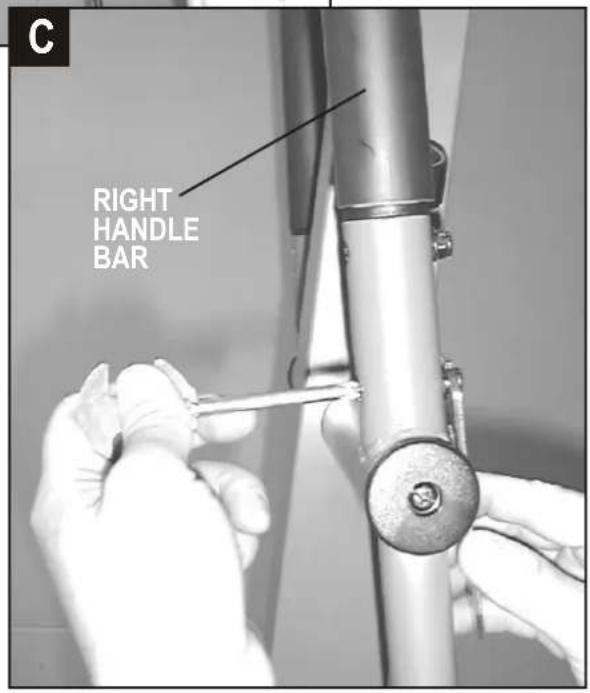
■ Repeat the same process for the left handle bar assembly.
NOTE: The handle bar end caps are marked 'R "and L" (Right & Left). Fix each handle bar to the matching handle bar post.
ATTACH THE COMPUTER
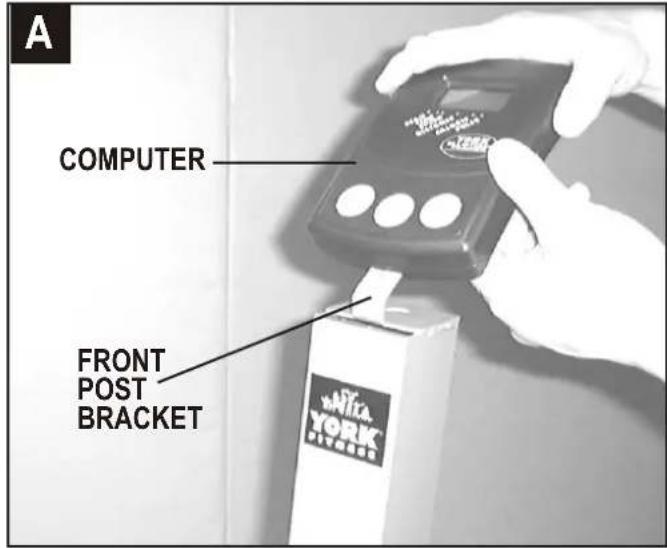
■ Attach the computer to the bracket on the front post as shown.
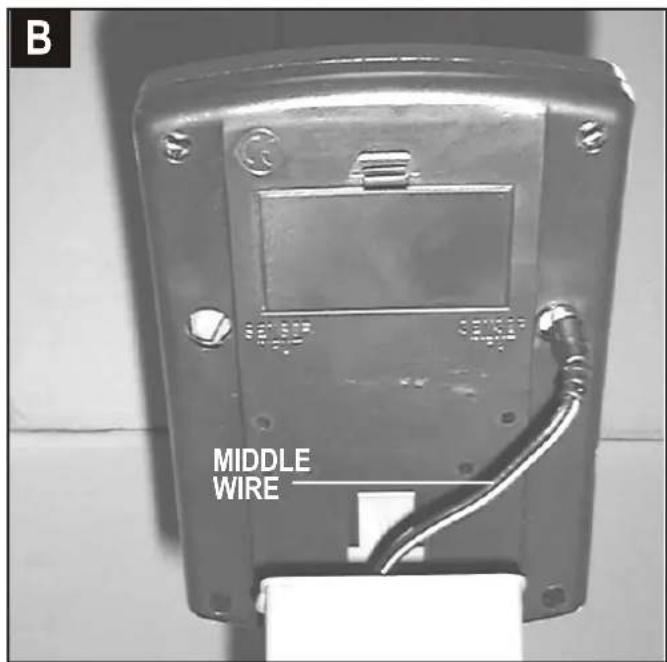
■ Connect the middle wire plug into the rear socket of the computer as shown.
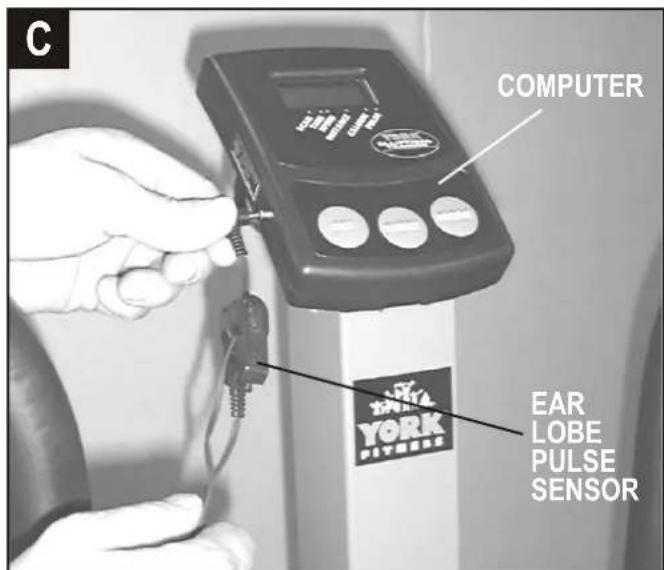
■ Connect the ear lobe pulse sensor plug to socket on the side of computer.
RECHECK THAT ALL THE BOLTS AND NUTS ARE TIGHTENED SECURELY FOR YOUR SAFETY & COMFORT.
* SHOULD YOU REQUIRE ANY ASSISTANCE REGARDING THIS PRODUCT PLEASE CONTACT YORK DIRECTLY*
DESCRIPTION
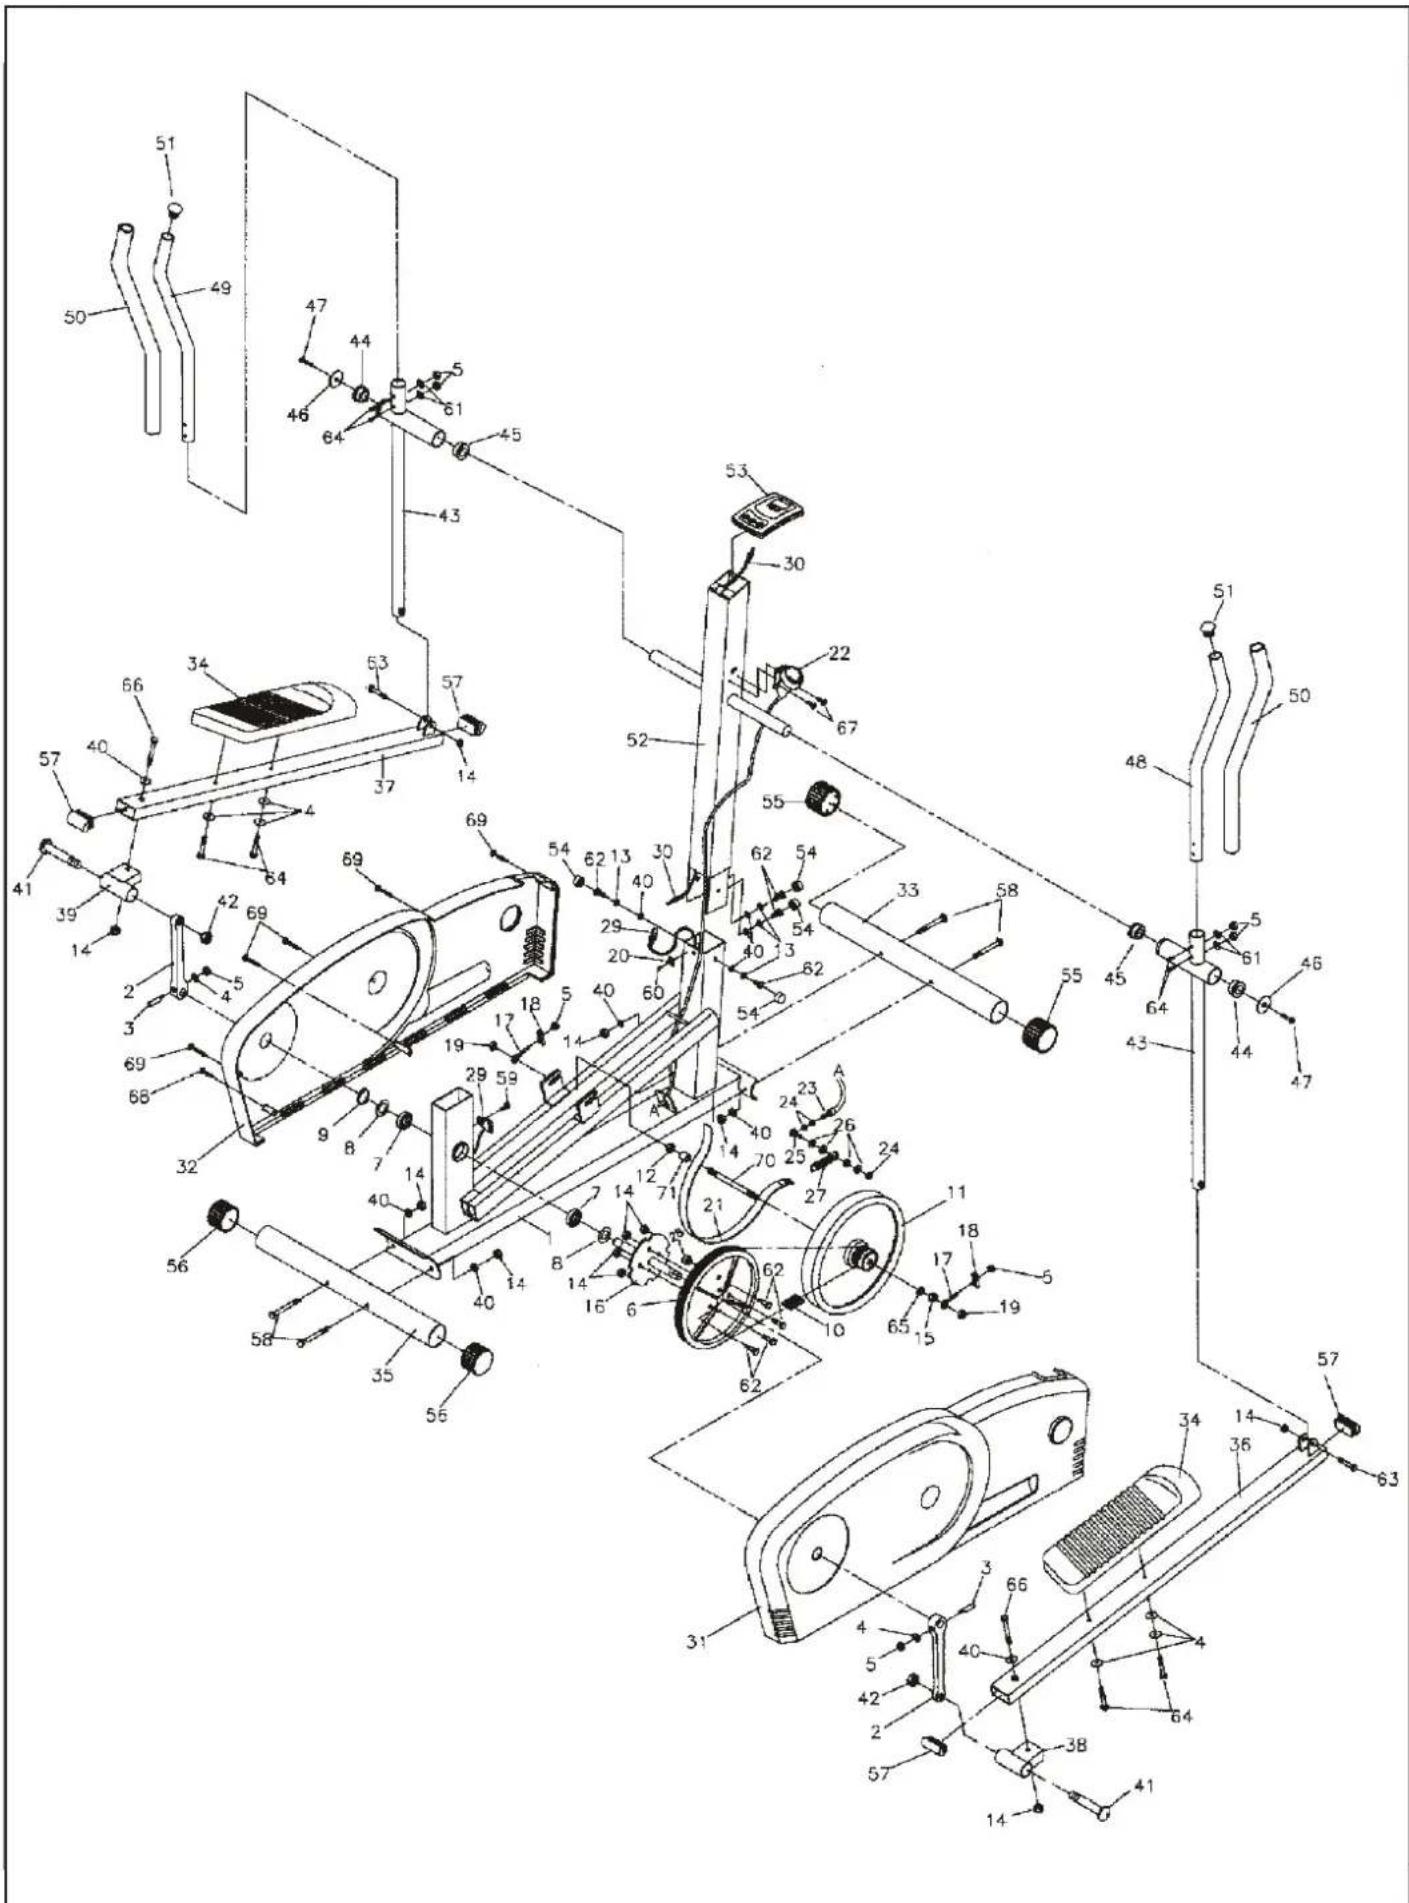
PARTS LIST
| KEY NO. | PART NO. Q'TY(PCS) DESCRIPTION | ||
| 1 8501 | -1 1 MAIN FRAME | ||
| 2 8501 | -2 2 CRANK | ||
| 3 8501 | -3 2 COTTER PIN | ||
| 4 | 8501-4 | 8 | THICK WASHER (6mm / t = 2mm) |
| 5 8501 | -5 8 NYLOCK NUT (M6 X 1) | ||
| 6 8501 | -6 1 SPROCKET / SHAFT | ||
| 7 8501 | -7 2 BEARING (20mm) | ||
| 8 8501 | -8 2 WASHER (20mm) | ||
| 9 8501 | -9 1 C RING (20mm) | ||
| 10 8501 | -10 1 DRIVE BELT | ||
| 11 8501 | -11 1 FLYWHEEL | ||
| 12 8501 | -12 1 NUT (M10 / t = 8mm) | ||
| 13 8501 | -13 4 SPRING WASHER (8 mm) | ||
| 14 8501 | -14 10 NYLOCK NUT (M8X 1.25) | ||
| 15 8501 | -15 1 NUT (M10 / t = 5mm) | ||
| 16 8501 | -16 1 SPROCKET SHAFT | ||
| 17 8501 | -17 2 EYE BOLT (M6 X 1 X 35mm) | ||
| 18 8501 | -18 2 TENSION BRACKET | ||
| 19 8501 | -19 2 FLANGE NUT (M10 X 1.25) | ||
| 20 8501 | -20 1 BUCKLE | ||
| 21 8501 | -21 1 TENSION STRAP | ||
| 22 8501 | -22 1 TENSION CONTROL | ||
| 23 | 8501-23 | 1 | CABLE STOP BOLT (M5 X 0.8 X 14mm) |
| 24 8501 | -24 3 NUT (M5 X 0.8) | ||
| 25 8501 | -25 1 CABLE CLIP BOLT (M5 X 0.8 X 12mm) | ||
| 26 8501 | -26 4 WASHER (5mm) | ||
| 27 8501 | -27 1 TENSION SPRING | ||
| 28 8501 | -28 1 MAGN | ET | |
| 29 8501 | -29 1 SENSOR WIRE | ||
| 30 8501 | -30 1 MIDDLE WIRE | ||
| 31 8501 | -31 1 RIGHT SHROUD | ||
| 32 8501 | -32 1 LEFT SHROUD | ||
| 33 8501 | -33 1 FRONT STAB | ILIZER | |
| 34 8501 | -34 2 PEDAL (R&L) | ||
| 35 8501 | -35 2 REAR STABILIZER | ||
| 36 8501 | -36 1 PEDAL POST (R) | ||
| 37 8501 | -37 1 PEDAL POST (L) | ||
| 38 | 8501-38 | 1 | RIGHT PEDAL POST CONNECTOR |
| 39 | 8501-39 | 1 | LEFT PEDAL POST CONNECTOR |
| 40 8501 | -40 8 WASHER (8mm / t = 2mm) | ||
| 41 | 8501-41 | 2 | SHAFT BOLT (9/16" - 20 X 3 9/16") |
| 42 8501 | -42 2 NUT (9/16" -20) | ||
| KEY NO. | PART NO. | Q'TY (PCS) | DESCRIPTION |
| 43 850 | 1-43 2 | HAND | LE BAR POST |
| 44 850 | 1-44 2 | PLASTIC BUSHING | |
| 45 850 | 1-45 2 | PLASTIC BUSHING | |
| 46 850 | 1-46 2 | BUSHING COVER | |
| 47 850 | 1-47 2 | MACHINE SCREW (M6 X 25mm) | |
| 48 850 | 1-48 1 | RIGHT HANDLE BAR | |
| 49 850 | 1-49 1 | LEFT HAND | LE BAR |
| 50 850 | 1-50 2 | FOAM GRIP | |
| 51 850 | 1-51 2 | END CAP | |
| 52 850 | 1-52 1 | FRONT POST | |
| 53 850 | 1-53 1 | COMPUTER | |
| 54 850 | 1-54 4 | HEX HEAD BOLT END CAP | |
| 55 850 | 1-55 2 | MOVING WHEEL | |
| 56 850 | 1-56 2 | STABILIZER END CAP | |
| 57 850 | 1-57 4 | PEDAL POST END CAP | |
| 58 | 8501-58 | 4 | CARRIAGE BOLT (M8 X 1.25 X 60mm) |
| 59 | 8501-59 | 1 | MACHINE SCREW (M5 X 20mm) |
| 60 850 | 1-60 1 | MACHINE SCREW (M5 X 12mm) | |
| 61 850 | 1-61 4 | WASHER (6mm / t = 1mm) | |
| 62 | 8501-62 | 8 | HEX HEAD BOLT (M8 X 16mm) |
| 63 850 | 1-63 2 | HEX HEAD BOLT (M8 X 45mm) | |
| 64 850 | 1-64 8 | MACHINE SCREW (M6 X 35mm) | |
| 65 850 | 1-65 1 | SPACER (L = 2mm) | |
| 66 | 8501-6610 | 2 | ALLEN HEAD BOLT (M10 X 70mm) |
| 67 850 | 1-67 2 | SCREW (M4 X 12mm) | |
| 68 850 | 1-68 1 | SCREW (M4 X 25mm) | |
| 69 850 | 1-69 5 | SCREW (M5 X 32mm) | |
| 70 850 | 1-70 1 | FLY WHEEL SHAFT | |
| 71 850 | 1-71 1 | SPACER (L = 14mm) | |
| 72 850 | 1-72 2 | NYLOCK NUT (M10 X 1.25) | |
| 73 850 | 1-73 2 | WASHER (10mm / t = 2mm) | |
WARM UP - COOL DOWN
Before and after exercising spend a few minutes slowly and gently stretching and warming up.

natural_image
Blank white image with no visible content, text, or symbolsSHOULDER STRETCH
Bring one arm across the front of your body at shoulder level. Grasp the elbow of the extended arm and gently pull until you feel a comfortable stretch in your shoulder: Hold for 10 seconds then repeat with other arm.

natural_image
Blank white image with no visible content, text, or symbolsCALF STRETCH
Place your hands on your thigh while you press the heel of the opposite leg behind you towards the floor. Hold for 10 seconds then repeat with other leg.

natural_image
Blank white image with no visible content, text, or symbolsARM STRETCH
Stand with feet slightly apart (shoulder width). Raise both arms above your head. Link fingers and gently press upwards with palms up: Hold 10 seconds.

natural_image
Blank white image with a thin black border (no text, symbols, or markings)BACK STRETCH
Stand with feet slightly apart (shoulder width). Grasp hands behind your back. Gently pressing away from your back: Hold for 10 seconds.

natural_image
Blank white image with no visible content, text, or symbolsTHIGH STRETCH
Stand with feet slightly apart (shoulder width). Bend one leg and grasp your ankle, bring it up as far as you can comfortably: Hold for 10 seconds then repeat with other leg.
HAMSTRING STRETCH
Extend one leg out in front of you. Remember to keep your knees slightly bent. Place your hands on the thigh of the opposite leg to help support your upper body. Bend forward from the waist until you feel the stretch in the back of your thigh. Your back should maintain its natural straight position and your upper body weight should be supported by your hands on your bent leg. Hold this stretch for at least 10 seconds then repeat with the other leg.
BEFORE EXERCISING CHECK:
■ You have adequate space ie. at least 2ft. (60cm) clearance on each side.
Check all bolts and locking pins are secured and not protruding. In particular check all the bolts and pins for wear, replace doubtful parts before using the equipment.
■ Always use your elliptical trainer on a flat, level, solid surface.
■ Always work within your exercise level, do not work to exhaustion.
If you feel pain or unwell STOP YOUR WORKOUT IMMEDIATELY.
Injuries to health may result from incorrect or excessive training.
Please make sure you have read the safety guidelines.
STEPPING ON
Make sure the nearest pedal to you is downwards. Grasp the handlebars securely with both hands.
Then step on. (Toes towards the front of the pedal).
Your body should be centred over the pedals, always remain in a vertical, upright position.
TENSION KNOB
Change the level of difficulty of your workout by adjusting the tension knob. Begin with low tension. Adjust resistance to intensify your workout according to your personal fitness level.
Product may vary slightly from pictured.

natural_image
Blank white image with a thin black border (no text, symbols, or markings)
natural_image
Blank white image with a thin black border (no text, symbols, or markings)
natural_image
Blank white image with a thin black border (no text, symbols, or markings)
natural_image
Blank white image with a thin black border (no text, symbols, or markings)FORWARD ELLIPTICAL MOTION
Tones quadriceps, buttocks, lower abdominal, hips and thighs. Select a lead foot and press down in a forward motion. Keep your knees slightly bent. Make 4 full cycles slowly then quickly. Repeat according to exercise intensity. Maintain a secure grip on handlebars and keep your feet firmly in position towards the front of the pedal.
ROUTINE: 4 FORWARD SLOW 4 FORWARD QUICK
Strengthens hamstrings, lower buttocks, hips, thighs and calves. Select a lead foot and press down in a reverse motion. Keep your knees slightly bent. Make 4 full cycles slowly then quickly. Repeat according to exercise intensity. Maintain a secure grip on handlebars and keep your feet firmly in position towards the front of the pedal.
ROUTINE: 4 REVERSE SLOW 4 REVERSE QUICK
Product may vary slightly from pictured.

natural_image
Blank white image with no visible content, text, or symbolsFORWARD & REVERSE ELLIPTICAL MOTION WORKOUT
Select a lead foot and press down in a forward motion. Keep your knees slightly bent. Make 2 full cycles slowly then quickly. Pause - then make 2 full cycles slowly then quickly in a reverse motion. Maintain a secure grip on the handlebars.
ROUTINE: 2 FORWARD SLOW
2 FORWARD QUICK
2 REVERSE SLOW
2 REVERSE QUICK

natural_image
Blank white image with a thin black border (no text, symbols, or markings)FORWARD SQUAT/KNEE BEND WORKOUT
Select a lead foot and press down in a forward motion. Keep your knees slightly bent, pedal slowly - whilst pedalling slowly lower your body (Approx 4 inches - 10cm) keep your back straight and vertical. In this position, make 8 full cycles. Return to normal body position and make 8 full cycles. Repeat for 4 cycles then 2 cycles.
ROUTINE: 8 FORWARD
(LOWERING YOUR BODY)
8 FORWARD
(NORMAL BODY POSITION)
REPEAT FOR 4 & 2 CYCLES. THEN
TRY THE WHOLE ROUTINE
PEDALLING IN REVERSE MOTION.
WORKOUTS: VARY YOUR WORKOUTS AND MAKE UP NEW ROUTINES.
YORK ELLIPTICAL TRAINER 2100 / COMPUTER INSTRUCTION
A. INSTRUCTION
Your computer is ideal for monitoring your performance and setting yourself targets.
By measuring your pulse rate you can ensure exercise safely.
At the same time you can monitor closely your improving condition and cardiovascular fitness.
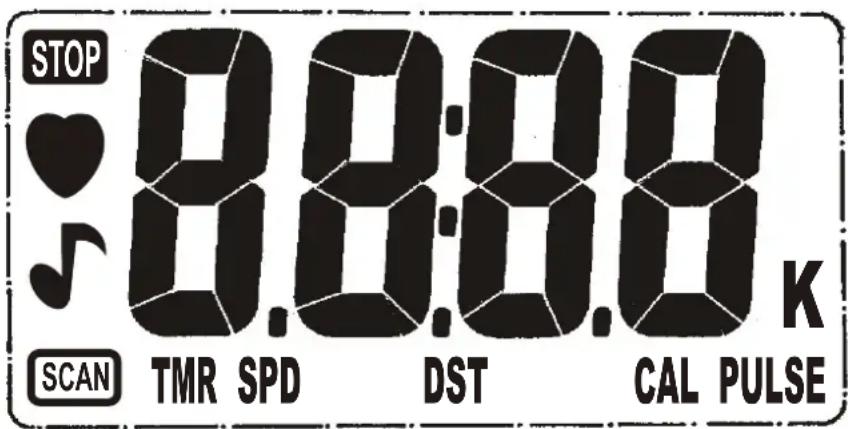
TO START/
Press SET button to activate unit.
The computer will automatically start/stop when you exercise.
B. POWER AND FUNCTIONS
Press the MODE key to alternate between options.
The selected function will be displayed on the screen.
The options are:
The computer will shut off if no signal is received after several minutes.
PULSE RATE SENSOR
FOR THE BEST RESULTS FOLLOW THESE INSTRUCTIONS:
1.) Remove any earrings etc.
2.) Rub your earlobe around 15 times to increase circulation.
3.) Make sure your ear is dry and keep your hair behind your ear so it dose not interfere.
4.) Clip the sensor to your earlobe as in (Diag. 2)
5.) Use the small clip to attach the wire to your shirt collar or other suitable place. Allow enough wire spare to move freely without pulling the sensor off your ear. (Diag.3)
CHECK
- Don't clip the sensor near holes pierced in your ear.
■ Try to avoid excessive vibration of the sensor or the sensor wire as this can lead to inaccurate results.
If you are wearing a shirt with a collar attach the clothes clip to your collar. This will help reduce excessive vibration.
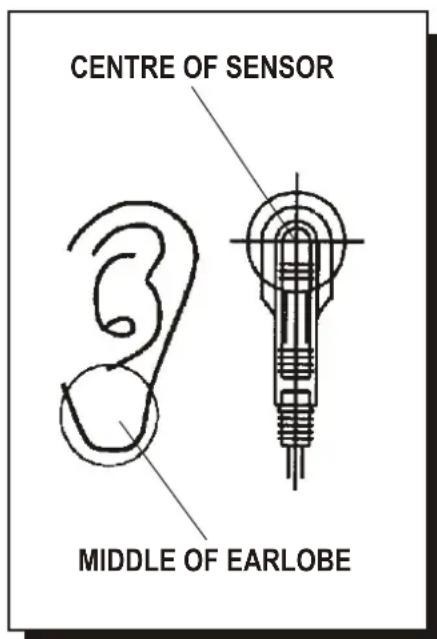
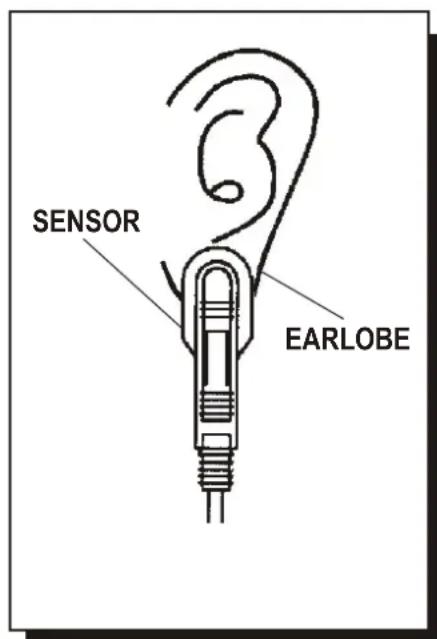
■ Clip the centre of the sensor to the middle of the earlobe.
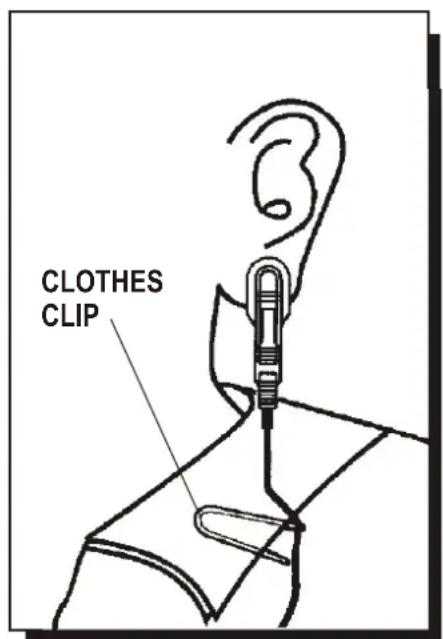
■ Clip the clothes clip to your collar (If you are wearing a shirt with a collar).
C. SETTING FUNCTIONS
| You can set a target time or distance on your computer.When you start exercising the computer will begin to count down from your target to zero.When it reaches zero an alarm will beep. | |
| SCAN/ | Automatically scans all functions in sequence displaying your progress without requiring you to press the mode key. |
| TIME/ | Counting commences when the ELLIPTICAL 2100 is active.To set timer countdown select’ TIME’ using MODE button.Enter required time target by pressing SET button. (Max 99:59 MIN). |
| DISTANCE/ | Distance is automatically displayed when the ELLIPTICAL 2100 is in use.To set target distance select’ DISTANCE’ function using MODE button.Enter desired distance by pressing SET button. (Max 99.99KM). |
| CALORIES/ | Approximate calories consumed is displayed, once the ELLIPTICAL 2100 is in use.To set target consumption select’ CALORIES’ using MODE button.Enter target calories to be consumed using SET button. (Max 999 CAL.) |
| PULSE/(USE THE STANDARD EAR CLIP) | When using the ,PULSE, function a ”♥ is displayed, and your current heart rate is shown. |
| ALARM/ | When targets/ limits have been reached an alarm will sound. |
| RESET/ | Resets single function (Press and hold for several seconds) for total reset. |
EXERCISE GUIDE
FITNESS
Many things contribute to fitness and well being but the most important factor is the condition of your heart and lungs and how efficient they are in delivering oxygen via your blood to your muscles.
Your muscles use this oxygen to provide enough energy for daily activity.
This is called aerobic activity (with oxygen).
When you are fit your heart and lungs work well and efficiently.
This means your heart will not have to work so hard. It will pump a lot fewer times per minute so reducing the wear and tear on your heart.
This in turn reduces the chances of your suffering heart disease.
Fitness also helps you control your weight and reduces the effects of aging and stress.
You come across the need for fitness continually in everyday life.
When you are fit you can walk briskly up hills and stairs without being too out of breath once at the top you recover quickly.
As you can see there are great advantages in being fit.
HOW TO IMPROVE YOUR FITNESS
Like any muscle in your body your heart can be strengthened by systematic physical exercise which requires an increased blood flow and heart rate.
You can measure your heart rate by taking a pulse reading.
Your heart of pulse rate corresponds directly to your exertion level and exercise efficiency.
To improve your fitness in a safe and effective way you need to exercise at a high enough level to improve your aerobic fitness.
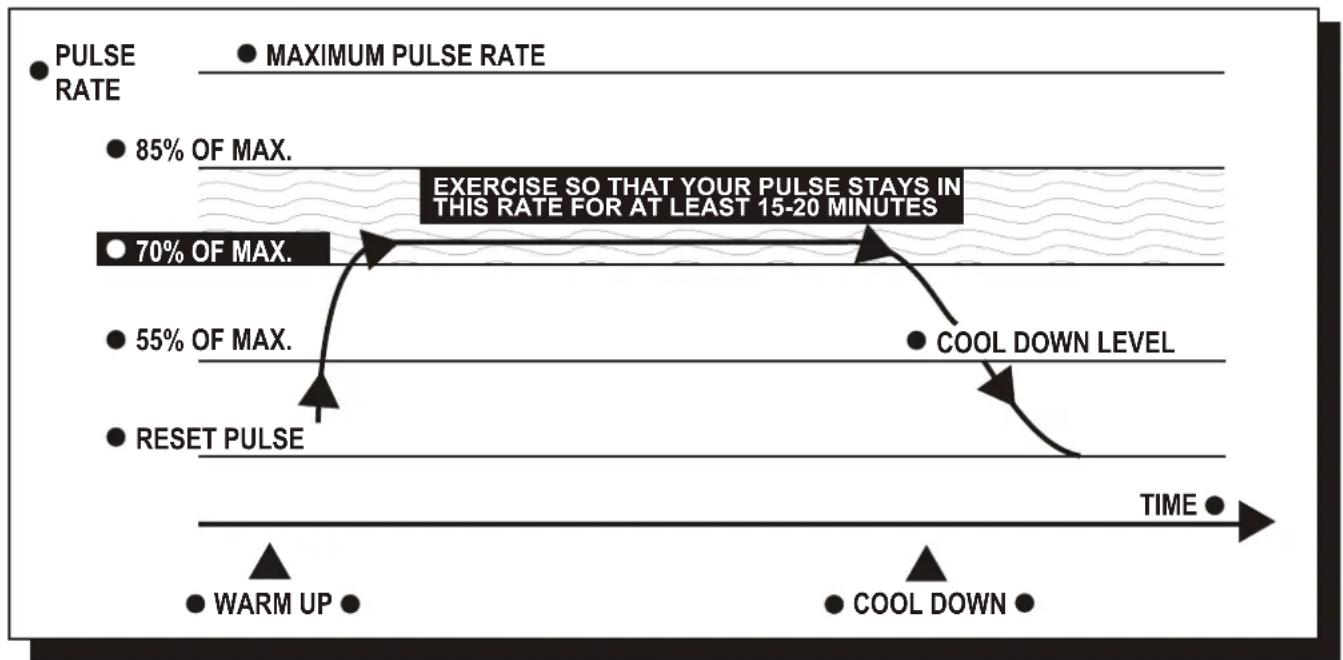
The area between these 2 levels is called the target zone.
It is important to exercise at the right intensity to stay within this zone.
For the best results you should exercise within the target zone and gradually increase the duration.
Ideally you should aim to exercise (within zone) for at least 15-20 minutes continuously,
3-4 times per week.
CAUTION
DO NOT TRY TO DO TOO MUCH TO QUICKLY START GRADUALLY AND BUILD UP.
IF YOU BECOME ILL, IF YOU ARE UNDER DOCTOR CARE, OR OVER 35-40 AND NOT CURRENTLY
TAKING REGULAR EXERCISE THEN WE WOULD ADVISE YOU NOT TO START TO EXERCISE WITHOUT CONSULTING YOUR DOCTOR.
TARGET ZONE
flowchart
graph TD
    A["PULSE RATE"] --> B["85% OF MAX."]
    B --> C["70% OF MAX."]
    C --> D["55% OF MAX."]
    D --> E["RESET PULSE"]
    E --> F["COOL DOWN LEVEL"]
    F --> G["WARM UP"]
    G --> H["COOL DOWN"]
    H --> I["TIME"]
    style A fill:#000,stroke:#fff,color:#fff
    style B fill:#000,stroke:#fff,color:#fff
    style C fill:#000,stroke:#fff,color:#fff
    style D fill:#000,stroke:#fff,color:#fff
    style E fill:#000,stroke:#fff,color:#fff
    style F fill:#000,stroke:#fff,color:#fff
    style G fill:#000,stroke:#fff,color:#fff
    style H fill:#000,stroke:#fff,color:#fff
    style I fill:#000,stroke:#fff,color:#fff
THIS IS HOW YOUR PULSE SHOULD BE HAVE DURING GENERAL FITNESS EXERCISE. REMEMBER TO WARM UP AND COOL DOWN FOR A FEW MINUTES.
line
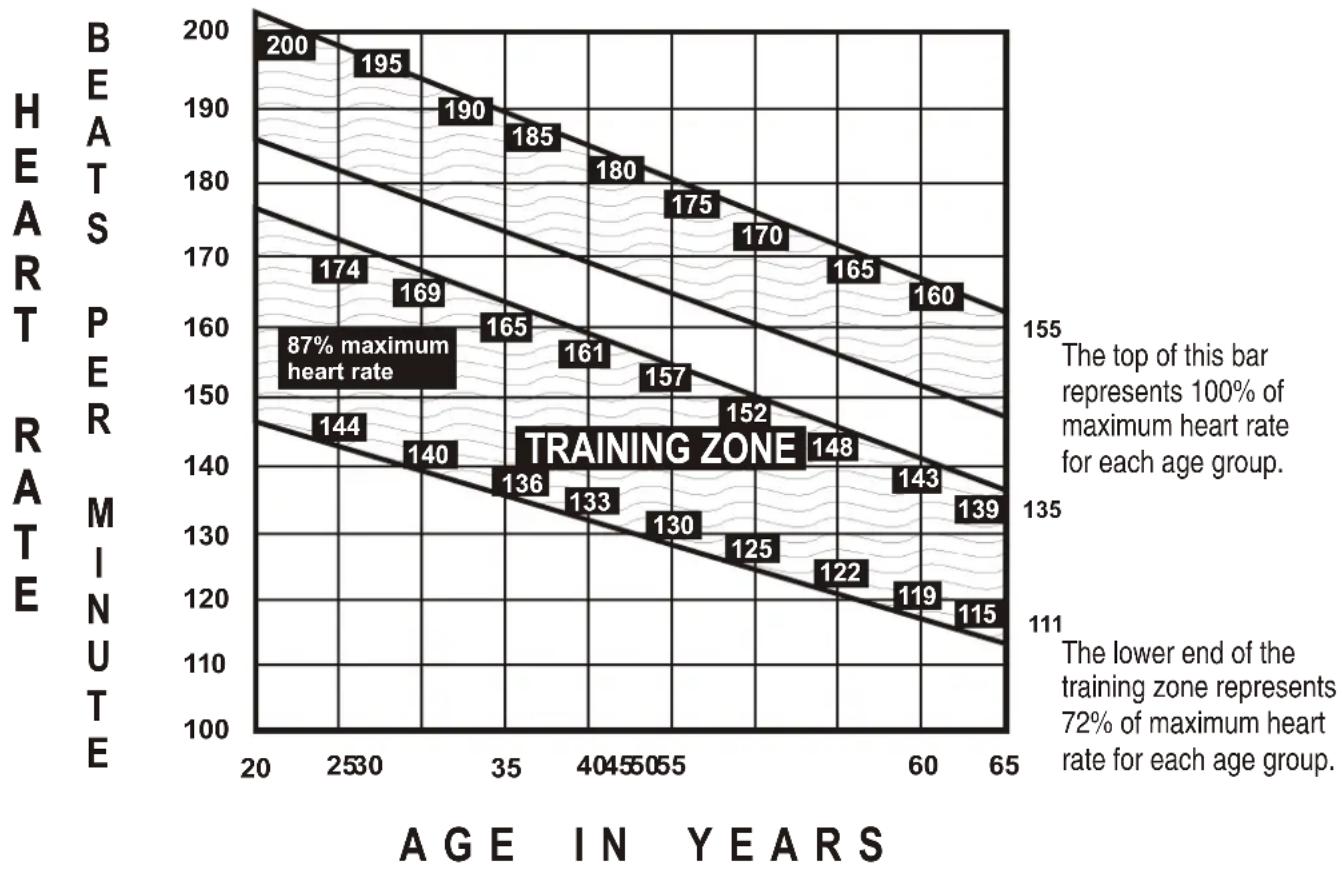
| AGE IN YEARS | HEARS PER MINUTE | HEARS PER MAX | | ------------- | ---------------- | -------------- | | 20 | 144 | 200 | | 2530 | 140 | 195 | | 35 | 136 | 190 | | 40 | 133 | 185 | | 45 | 130 | 180 | | 50 | 125 | 175 | | 55 | 122 | 170 | | 60 | 119 | 165 | | 65 | 115 | 160 |FIND YOUR OWN EXERCISE PULSE RATE RANGE BY MOVING UP THE VERTICAL LINE FOR YOUR AGE.
Example: Age 40, the vertical line meets the 70% level at about 128 and the 85% level at about 154, pulse rate should remain between these values. Use this graph to determine your personal target zone.
HOW TO MONITOR YOUR HEART RATE DURING EXERCISE
Now that you know where your training zone is, you'll I have to monitor yourself to be sure you're in it. Here's a simple rule, if you can't hold a conversation without gasping for breath you're probably above your training zone.
To know precisely where you're working - making sure you're getting all the benefits -
We recommend you check your heart rate periodically throughout your workout.
You can use the electronic pulse monitor which will count and display your heart rate for you.
CONTROL YOUR PULSE RATE TO KEEP WITHIN ZONE
How hard you exercise affects your pulse rate, it is determined by two thing:
- Rate: How fast you exercise.
e.g. Speed you cycle, run or step.
- Load: The resistance against which you exercise.
e.g. Tension you apply on cycle, step or run up hill.
THE PULSE RATE RULES
If your pulse rate is too low exercise faster or increase load.
If your pulse rate is too high exercise slower or decrease load.
If your pulse rate goes up towards the end of your exercise, you are trying to exercise for too long, shorten the time.
If your pulse rate does not quickly return to normal after exercise (5-10 minutes) you are not giving your body chance to recover, reduce how often you exercise.
REMEMBER - GENERAL FITNESS IS BEST IMPROVED BY INCREASING HOW LONG YOU EXERCISE RATHER THAN BY HOW HARD.
HOW LONG TO EXERCISE?
To qualify as a true aerobic exercise with all the benefits we're mentioned, you must maintain your heart rate within your training zone for at least 12 uninterrupted minutes.
If you exercise longer than 60 minutes the benefits are reduced and the risk of injury is increased.
If you're just starting out on a new exercise program we're recommend you stay at the 12 minute minimum for at least a week. When you feel you're ready to go longer, increase your time no more than 10% a week. Don't push yourself too hard.
You should never feel exhausted during or following exercise.
TEST YOUR FITNESS LEVEL AND CHECK YOUR PROGRESS
You can use your computer to control your exercise intensity and to monitor your progress.
The time it takes for your pulse to return to normal, after exercise, is an indicator of your fitness level. During the first minute of your cool-down phase you will experience a drop in your pulse rate.
The bigger the drop in that minute -- the fitter you are.
TO CHECK YOUR PROGRESS:
-
Monitor your pulse rate the moment you end the aerobic phase of your workout and note your pulse rate.
-
Begin slowing down for the cool down phase.
-
After 60 seconds note the rate again.
The bigger the drop in that minute-the fitter you are.
To check your progress repeat this test every few weeks using the same duration and exercise intensity each time.
Keep a record of the results to help you monitor your progress.
LIMITED WARRANTY
WARRANTY
YORK BARBELL LTD. warrants this product to be free from defects in workmanship and material, under normal use and conditions, for a period of one year on all steel parts, thirty days on all vinyl and upholstery, and ninety days on all other parts.
This warranty extends to the original purchaser only.
It is recommended that the original receipt be kept with the manual.
YORK BARBELL LTD. will provide a replacement part free of charge when a defect is found during the warranty period. If a repair is necessary, please contact our Customer Service Department.
Under no circumstances will YORK BARBELL LTD. be responsible for damages or failures that occur as a result of improper assembly, or failure to operate the product correctly.
This warranty does not cover misuse, abuse, freight damage and/or alterations or repairs not made by YORK BARBELL LTD. or a recommended service center.
In the event a return is necessary, call our Customer Service Department for further instructions.
Under no circumstances will returns be allowed without the Return Authorization by our
Customer Service Department.
Returns must be sent pre-paid, with the original packaging or equivalent.
This warranty does not apply when the product is used for rental or commercial use.
This warranty gives you specific legal rights, and you may also have other rights which vary from state to state.
REPLACEMENT PARTS
ORDERING
To order replacement parts, simply call our Customer Service Department.
Monday through Friday, 8:00am until 5:00pm (excluding holidays).
To help us assist you, please have the following information ready:
1) Model name or number from the cover of the manual.
2) Serial number located on the frame of the unit.
3) The part description and order number.
REGISTRATION
CONSUMER RESPONSIBILITY
In order to activate your warranty, you must mail in the supplied registration form found on the following page.
Failure to send in the registration form will void your warranty.
Fill in the form and send it to:
CUSTOMER SERVICE DEPARTMENT:

HELP LINE (8:30am- 5:00pm)
YORK BARBELL (U.K.) LTD.
CHURCHILL WAY,
DAVENTRY,
NORTHANTS, NN114YB
ENGLAND
TEL: (01327) 701-824
FAX: (01327) 706-704
E-MAIL: helpdesk@yorkfitness.co.uk

HELP LINE (8:30am- 5:00pm)
YORK BARBELL (AUST.) LTD.
UNIT 1, LOT 2,
SWAFFHAM ROAD,
MINTO, N.S.W. 2566
AUSTRALIA
TEL: (02) 9603-8444
FAX: (02) 9603-8555
E-MAIL: paulyork@ozemail.com.au

HELP LINE
(8:30am- 5:00pm)
YORK BARBELL (S.A.) (PTY) LTD.
P.O. BOX 14012,
WADEVILLE 1422
SOUTH AFRICA
TEL: (011) 827-0805/6
FAX: (011) 827-8983
E-MAIL: yorkfitness@icon.co.za
PARTS ORDER FORM
Enclose a check or money order with this form for replacement parts.
Date of purchase
Name of location where purchased
Model number of item purchased
Last name, First name
Telephone number
Address
City
State
Zip
| Part No. | Q'ty | Part Description | Unit Price | Total |
| Total of order | $ | |||
Send your order to:
YORK BARBELL (AUST.) LTD. UNIT 1, LOT 2, SWAFFHAM ROAD, MINTO N.S.W. 2566 AUSTRALIA
YORK BARBELL (U.K.) LTD. CHURCHILL WAY, DAVENTRY, NORTHANTS, ENGLAND, NN11 4YB
YORK BARBELL (S.A.) (PTY.) LTD. P.O. BOX 14012, WADEVILLE 1422 SOUTH AFRICA
- YORK 2100 ELLIPTICAL TRAINER
- SAFETY GUIDELINES:
- CARE AND MAINTENANCE
- TOOLS REQUIRED
- GENERAL
- ASSEMBLY INSTRUCTION
- ATTACH THE STABILIZERS
- ATTACH THE FRONT POST
- ATTACH THE PEDAL POSTS
- ATTACH THE HANDLE BARS
- ATTACH THE COMPUTER
- DESCRIPTION
- WARM UP - COOL DOWN
- SHOULDER STRETCH
- CALF STRETCH
- ARM STRETCH
- BACK STRETCH
- THIGH STRETCH
- HAMSTRING STRETCH
- BEFORE EXERCISING CHECK:
- STEPPING ON
- TENSION KNOB
- FORWARD ELLIPTICAL MOTION
- FORWARD & REVERSE ELLIPTICAL MOTION WORKOUT
- FORWARD SQUAT/KNEE BEND WORKOUT
- YORK ELLIPTICAL TRAINER 2100 / COMPUTER INSTRUCTION
- INSTRUCTION
- TO START/
- POWER AND FUNCTIONS
- PULSE RATE SENSOR
- FOR THE BEST RESULTS FOLLOW THESE INSTRUCTIONS:
- CHECK
- SETTING FUNCTIONS
- EXERCISE GUIDE
- FITNESS
- HOW TO IMPROVE YOUR FITNESS
- CAUTION
- HOW TO MONITOR YOUR HEART RATE DURING EXERCISE
- CONTROL YOUR PULSE RATE TO KEEP WITHIN ZONE
- THE PULSE RATE RULES
- HOW LONG TO EXERCISE?
- TEST YOUR FITNESS LEVEL AND CHECK YOUR PROGRESS
- TO CHECK YOUR PROGRESS:
- LIMITED WARRANTY
- WARRANTY
- Customer Service Department.
- REPLACEMENT PARTS
- ORDERING
- REGISTRATION
- CONSUMER RESPONSIBILITY
- CUSTOMER SERVICE DEPARTMENT:
- PARTS ORDER FORM
Brand : York Fitness
Model : Elliptical 2100
Category : Elliptical