340P - Elliptical bike York Fitness - Free user manual and instructions
Find the device manual for free 340P York Fitness in PDF.


| Product Type | Elliptical Trainer |
| Brand | York Fitness |
| Model | 340P |
| Dimensions (L x W x H) | Approx. 120 x 60 x 170 cm |
| Weight | Approx. 70 kg (154 lbs) |
| Max User Weight | 120 kg (265 lbs) |
| Resistance System | Magnetic with adjustable levels |
| Resistance Levels | 8 levels |
| Stride Length | Approx. 40 cm (15.7 in) |
| Display Type | LCD with time, distance, speed, calories, pulse |
| Power Supply | 2 AA batteries (not included) |
| Pulse Monitor | Hand grip sensors |
| Pedals | Oversized with non-slip surface |
| Handlebar Type | Fixed and moving handlebars |
| Transport Wheels | Yes, for easy mobility |
| Water Bottle Holder | Yes |
| Maintenance | Regular cleaning, lubricate moving parts as needed |
| Safety Features | Stable base, emergency stop brake (if applicable) |
| Spare Parts Available | Pedals, handlebars, console, resistance mechanism |
| Warranty | Usually 2 years frame, 1 year parts (check manual) |
Frequently Asked Questions - 340P York Fitness
User questions about 340P York Fitness
0 question about this device. Answer the ones you know or ask your own.
Ask a new question about this device
Download the instructions for your Elliptical bike in PDF format for free! Find your manual 340P - York Fitness and take your electronic device back in hand. On this page are published all the documents necessary for the use of your device. 340P by York Fitness.
USER MANUAL 340P York Fitness
03 / 2004 TWN
Product may vary slightly from the item pictured.
YORK ELLIPTICAL CROSS TRAINER 340P
SAFETY GUIDELINES:
Please read and follow the following safety guidelines: Read this owner's manual and follow the instructions.
■ Assemble and operate the YORK ELLIPTICAL CROSS TRAINER 340P on a solid, level surface.
- Keep the area behind the YORK ELLIPTICAL CROSS TRAINER 340P clear.
■ You will need at least one person to help you assemble this unit, two would be better.
■ Always use your YORK ELLIPTICAL CROSS TRAINER 340P in adequate space e.g., at least 2 ft. (60cm) clearance on each side.
■ Never allow children on or near the YORK ELLIPTICAL CROSS TRAINER 340P.
■ Always check the YORK ELLIPTICAL CROSS TRAINER 340P before using it, in particular make sure all parts are assembled, and nuts and bolts are tightened.
Do not use the YORK ELLIPTICAL CROSS TRAINER 340P if the unit is disassembled in any way.
WARNING: Injuries could occur particularly to young children if the guards are removed and not correctly reinstated.
WE DO NOT RECOMMEND THE REMOVAL OF THE GUARDS.
Always check the guards to ensure they are secured before use.
If guards are not secured tighten the screws on the guards.
- Keep hands away from moving parts.
■ The weight limit for this product is 136 kgs (300 lbs).
■ Wear proper workout clothing: Do not wear loose clothing.
■ Do not wear shoes with leather soles or high heels. Tie all long hair back.
■ Remove jewellery, rings, chains and pins before exercising.
■ Do not rock the unit from side to side.
■ Care should be taken when mounting and dismounting the unit.
■ Do not place any liquids on any part of the YORK ELLIPTICAL CROSS TRAINER 340P.
Do not use any accessories that aren't specifically recommended by the manufacturer, these might cause injuries or cause the unit to fail.
■ Always consult your doctor before undertaking any exercise programme.
■ Work within your recommended exercise level, do NOT work to exhaustion.
If you feel any pain or abnormal symptoms, STOP YOUR WORKOUT IMMEDIATELY.
Consult your physician immediately.
■ TAKE CARE TO PROTECT CARPETS AND FLOORS in case of leakages.
This product is a machine and contains moving parts which have been greased / lubricated and could leak.
The YORKS pipeline for Ais CROSEN TOMINER in 40E home
(NOT FOR COMMERCIAL USE). By following the above precautions and using good judgement and common sense, you will have a safe and pleasurable exercise regimen with the YORK ELLIPTICAL CROSS TRAINER 340P.
CARE AND MAINTENANCE
Use a warm damp cloth with mild detergent to keep your YORK ELLIPTICAL CROSS TRAINER 340P clean.
TOOLS REQUIRED
The tools enclosed in the carton are three allen keys (which one has a screwdriver function) and one multi-purpose spanner.
SHOULD YOU REQUIRE ANY ASSISTANCE REGARDING THIS PRODUCT PLEASE CONTACT HCI DIRECTLY.
U.K.

HELP LINE (8:30am- 4:30pm)
YORK BARBELL (U.K.) LTD.
CHURCHILL WAY. DAVENTRY
NORTHANTS, NN11 4YB ENGLAND
TEL: (01327) 701-824
FAX: (01327) 706-704
E-MAIL: helpdesk@yorkfitness.co.uk
AUSTRALIA

HELP LINE (8:00am- 4:00pm)
YORK BARBELL (AUST.) LTD
UNIT 1, LOT 2, SWAFFHAM ROAD,
MINTÓ. N.S.W. 2566 AUSTRALIA
TEL: (02) 9603-8444
FAX: (02) 9603-8555
E-MAIL: heathéryórk@ozemail.com.au
N.Z.

HELP LINE (8:30am- 4:30pm)
BERNSPORT (1995) LTD
PO BOX 33-973 TAKAPUNA
AUCKLAND NEW ZEALAND
TEL: +64-9-488-4750
FAX: +64-9-488-4759
E-MAIL: sales@bernsport.co.nz
GENERAL
WE RECOMMEND YOU HAVE SOMEONE ASSIST YOU IN LIFTING AND ASSEMBLING YOUR YORK ELLIPTICAL CROSS TRAINER 340P. REMOVE ALL THE PARTS OF YOURYORK ELLIPTICAL CROSS TRAINER 340P FROM THE CARTON AND PLACE THEM ON THE FLOOR CAREFULLY. FOLLOW THESE INSTRUCTIONS CAREFULLY AND IT WILL MAKE IT EASIER FOR YOU TO ASSEMBLE YOUR YORK ELLIPTICAL CROSS TRAINER 340P.
ASSEMBLY INSTRUCTION
NOTE: This equipment has been supplied with some Nylon Locknuts. It is essential that the nuts are fully tightened onto the bolts, so that the bolt penetrates through the nylon insert.
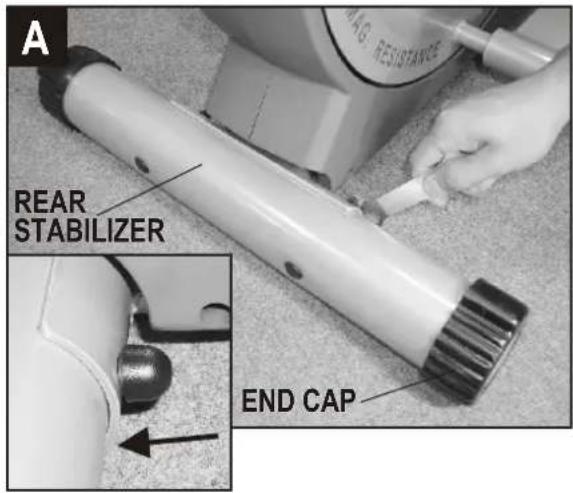
ATTACH THE REAR STABILIZER
■ The rear stabilizer has end caps that can vary in height to enable you to level the trainer on uneven floors.
■ Fix the rear stabilizer to the main frame and secure, using two carriage bolts, spring washers, washers and nylon locknuts.
■ Fix the plastic caps onto the locknut heads.
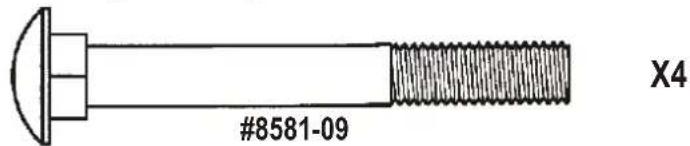
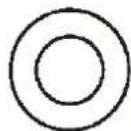
8581-10

8581-11
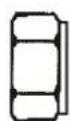
8581-12
8581-13
X4
ATTACH THE FRONT STABILIZER
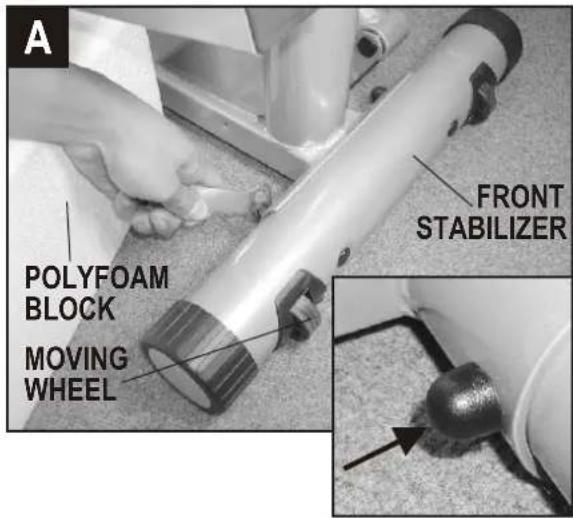
■ Front stabilizer has moving wheels near each end.
■ Find a polyfoam block from the carton and rest the right pedal post assembly on it as shown.
- Fix the front stabilizer to the main frame and secure, using two carriage bolts, washers, spring washers and nylon locknuts.
NOTE: MAKE SURE you fasten the nuts and bolts securely for your safety and comfort when pedalling.
■ Fix the plastic caps onto the locknut heads.
ATTACH THE PEDALS TO THE POSTS
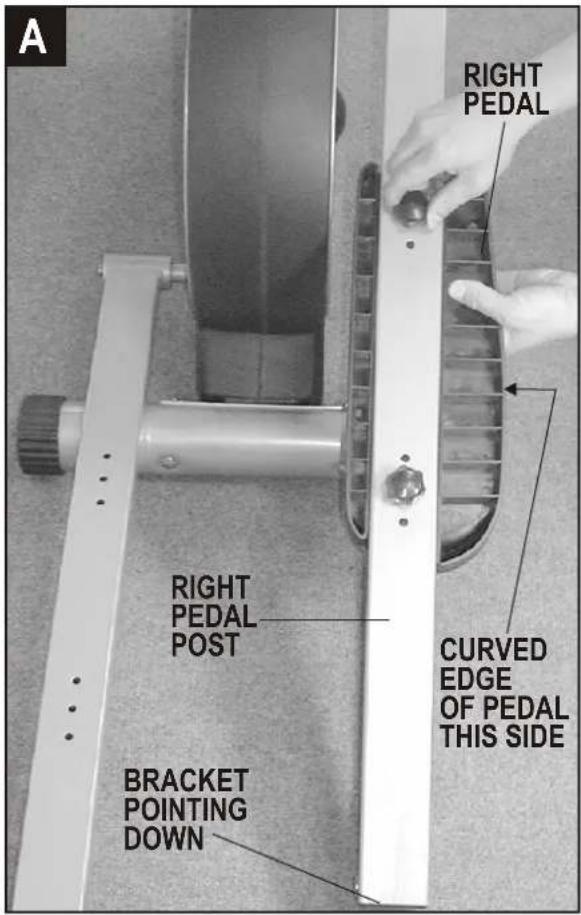
■ Rotate both pedal post assemblies backwards so that the pedal posts are resting on the floor as shown.
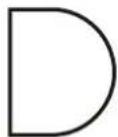
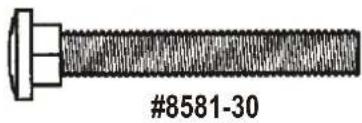
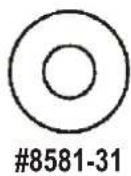
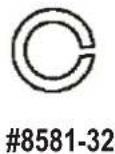
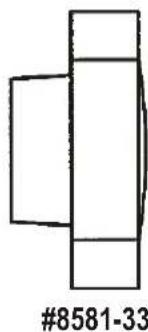
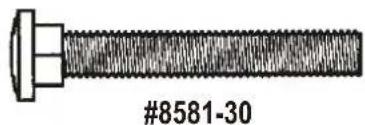
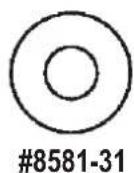
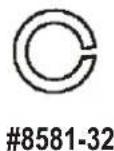
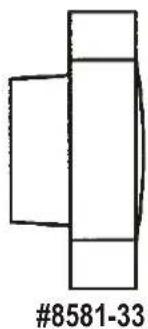
■ Attach the right pedal to the right pedal post and secure, using two carriage bolts, washers, spring washers and fixing knobs.
X2
natural_image
Simple line drawing of two stacked rectangular blocks with no text or symbolsX2
NOTE: The curved edge of each pedal must be fixed onto the pedal post facing outwards.
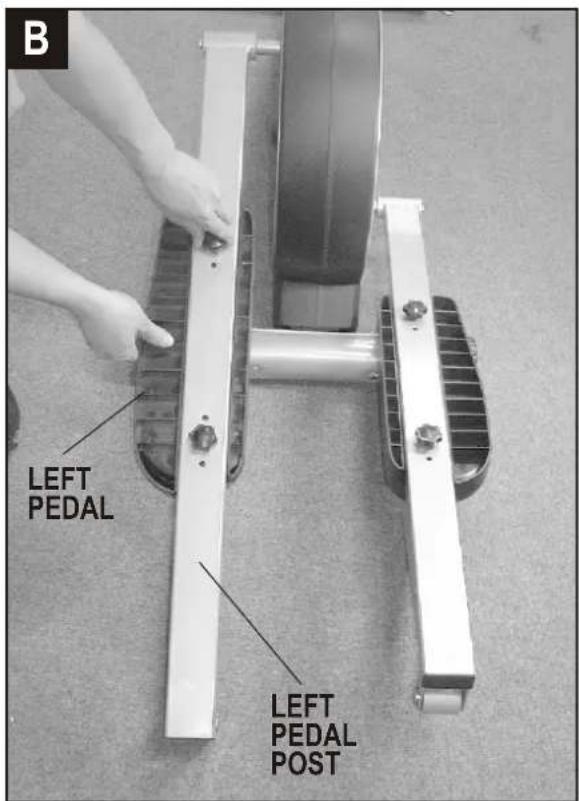
■ Attach the left pedal to the left pedal post and secure, using two carriage bolts, washers, spring washers & fixing knobs.
natural_image
Technical drawing of a bolt with threaded shaft and hexagonal head (no text or symbols on the object itself)X2
natural_image
Simple line drawing of a 3D rectangular block with no text or symbolsX2
NOTE: There are three adjustable holes on the pedal post for you to adjust the pedal to a suitable position.
MAKE SURE you fix both pedals into the same positions on the pedal posts.
ATTACH THE FRONT POSTS
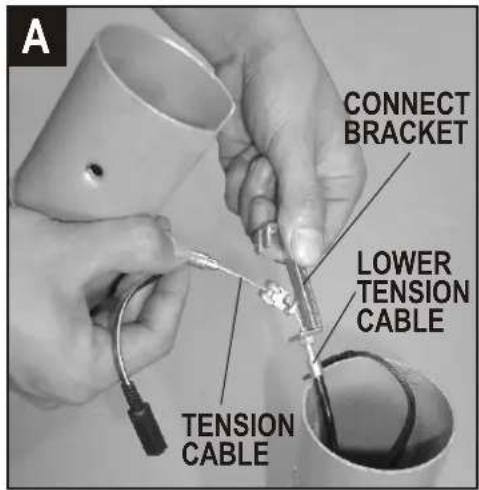
■ With one hand hold the front post and tension cable, with the other hold the connect bracket of the lower tension cable as shown.
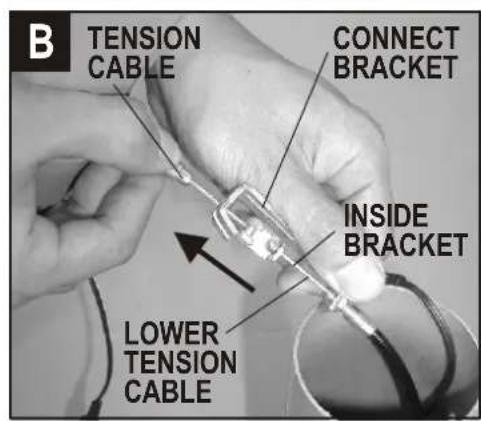
■ Connect the tension cable to the inside bracket of the lower tension cable.
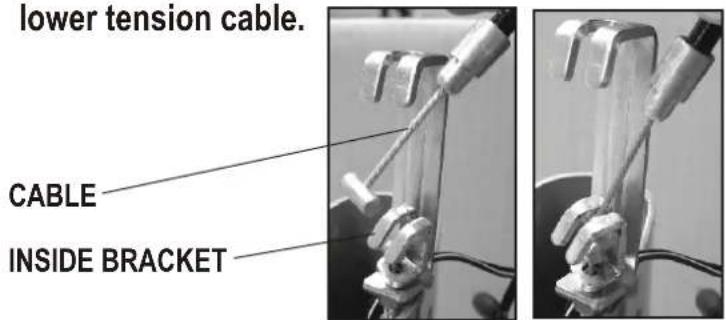
■ Once the cable is connected to the inside bracket, firmly pull the tension cable upwards above the connect bracket.
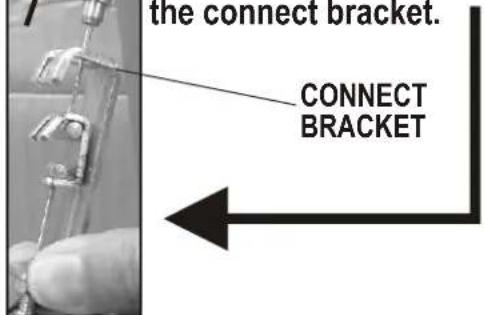
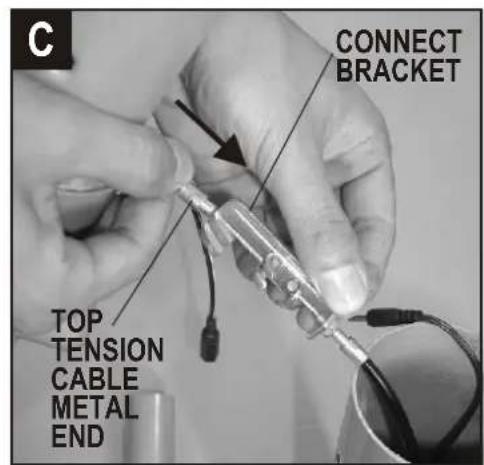
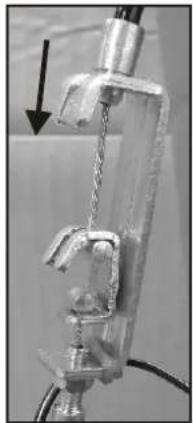
■ Position the top tension cable into the slot at the top of the connect bracket.
Engage the metal end into the slot as shown.
natural_image
Close-up of a mechanical clamp or spring assembly with a black arrow pointing to a component (no visible text or symbols)
natural_image
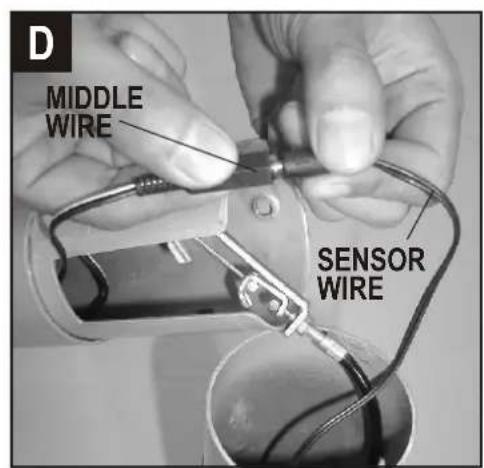
Simple black arrow pointing left and right (no text or symbols)■ Connect the sensor wire plug on the main frame to the middle wire socket protruding from the end of the front post.
■ Check the middle wire runs up the front post and out of the top - later this will connect to the computer.
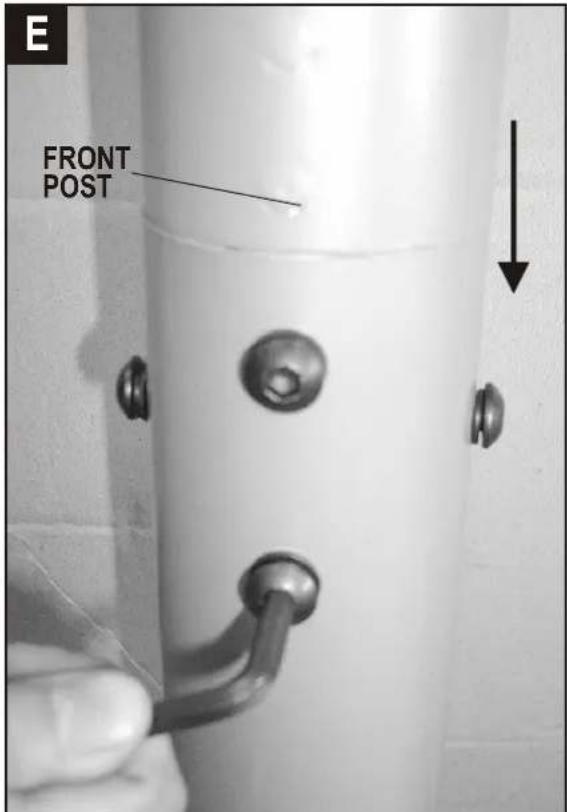
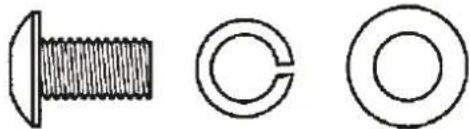
■ Insert the front post into the front post mounting tube and secure, using four allen head bolts, spring washers and washers.
natural_image
Three technical diagrams of a bolt and two circular components (no text or labels)8581-24 #8581-11 #8581-10
X4
NOTE: TAKE CARE to ensure that the wire does not get trapped when you attach the front post.
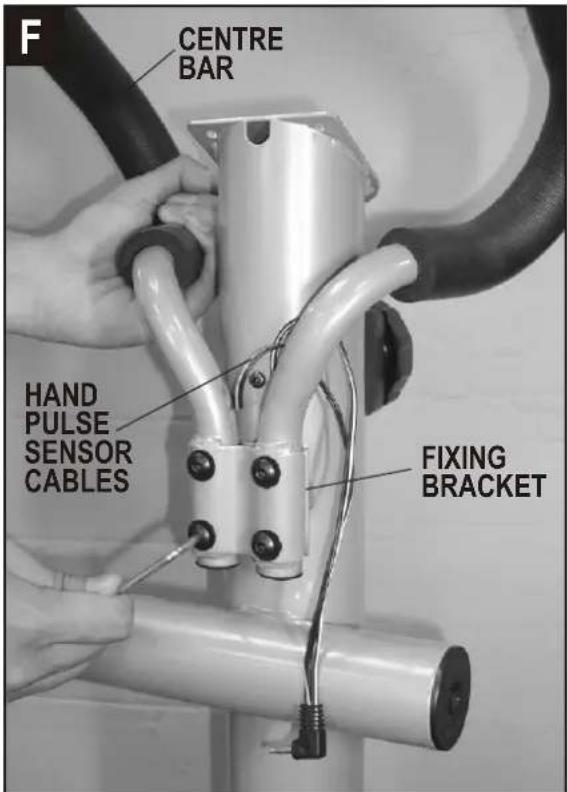
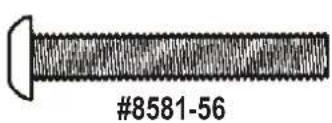
■ Fix the centre bar to the front post via the fixing bracket using four machine screws, spring washers and washers.
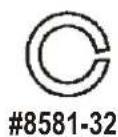
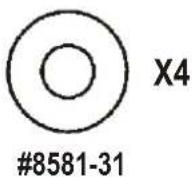
NOTE: TAKE CARE to ensure that the hand pulse sensor cables do not get trapped when you attach the centre bar.
MAKE SURE you fasten the screws securely for your safety and comfort when pedalling.
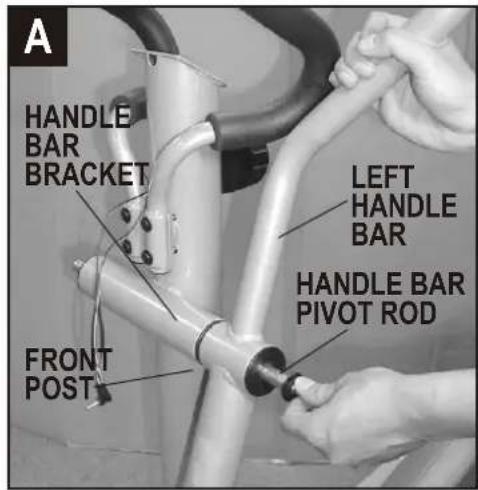
ATTACH THE HANDLE BAR POSTS
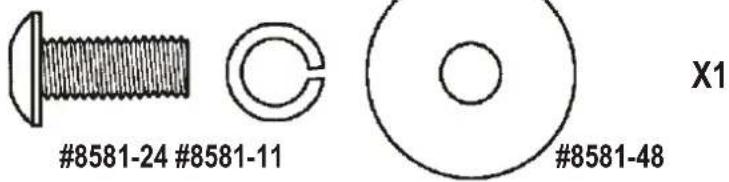
Thread one allen head bolt, spring washer and washer onto one end of the handle bar pivot rod.
■ Attach the left handle bar post to the handle bar on the front post with the handle bar pivot rod as shown.
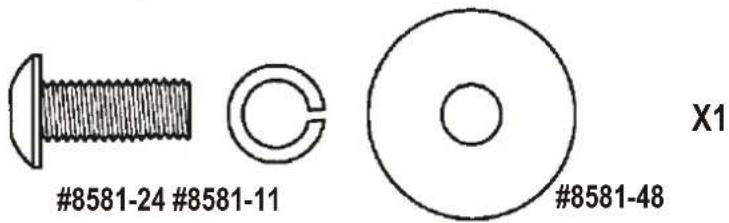
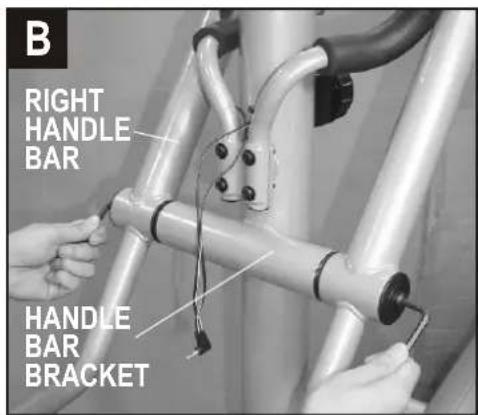
■ Attach the right handle bar post to the handle bar bracket and secure, using one allen head bolt, spring washer and washer.
NOTE: MAKE SURE you fasten both bolts securely for your safety and comfort when pedalling.
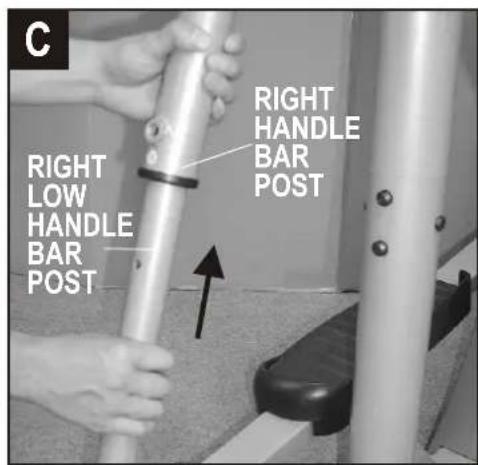
■ Turn the right handle bar post backwards.
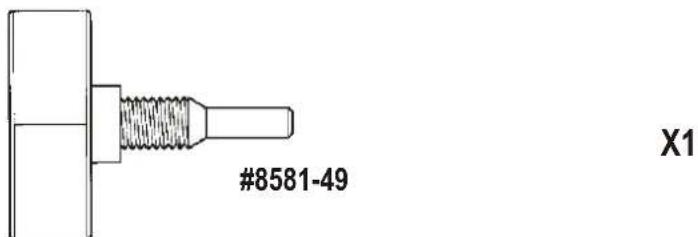
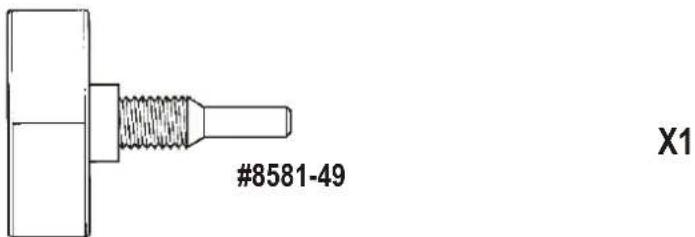
■ Slide the right low handle bar post into the right handle bar post and secure in position with the fixing knob.
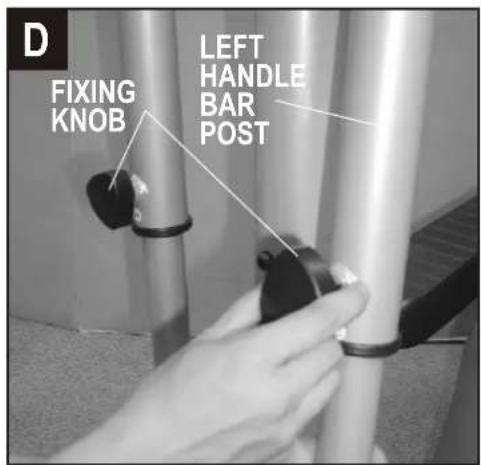
■ Rotate the left handle bar post downwards and slide the left low handle bar post into the handle bar post as shown.
Thread the fixing knob into the left handle bar post to secure the low handle bar post in position.
NOTE: MAKE SURE you fix both low handle bars in position securely.
6.
natural_image
Close-up of hands installing or adjusting a device component with visible internal structure (no text or symbols)ATTACH THE COMPUTER
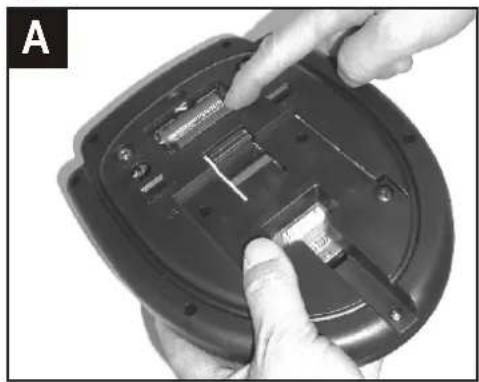
■ Insert two batteries (AA size 1.5V) into the compartment in the back of the computer.
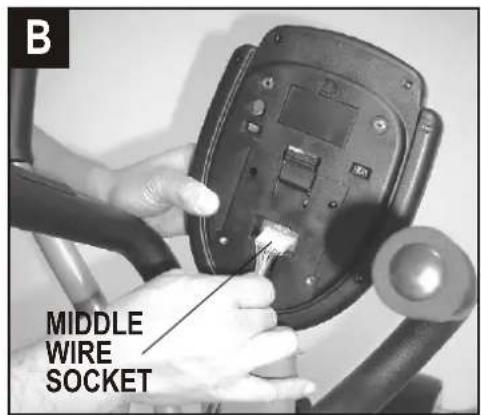
■ Connect the middle wire, that comes out of the front post, to the computer plug on the back of the computer console.
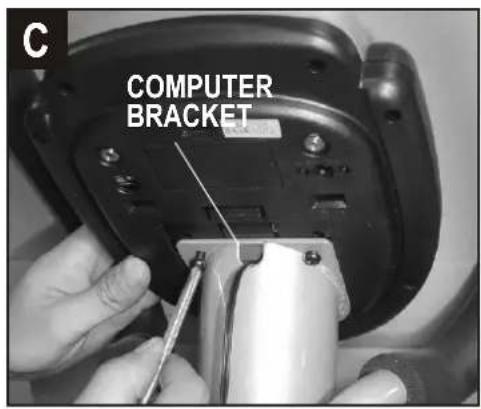
■ Attach the computer to the computer bracket by using two machine screws. (The machine screws are located in the back of the computer console.)
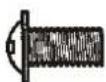
8581-51
X2
NOTE: TAKE CARE to ensure that the wire does not trapped when you attach the computer.get
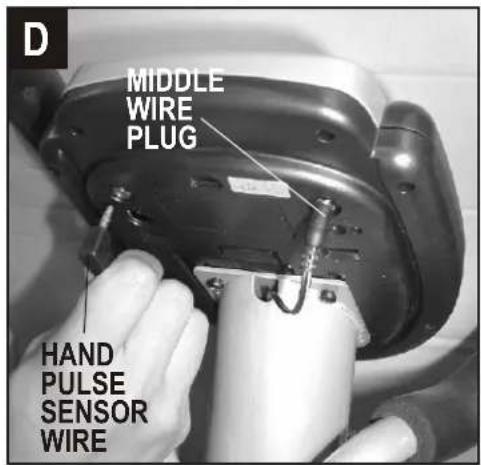
- Plug the hand pulse sensor into the left side socket on the back of the computer.
■ Plug the middle wire into the right side socket on the back of the computer.
7.
natural_image
Close-up of a hand holding a bicycle tire, no visible text or symbolsATTACH THE WATER BOTTLE HOLDER
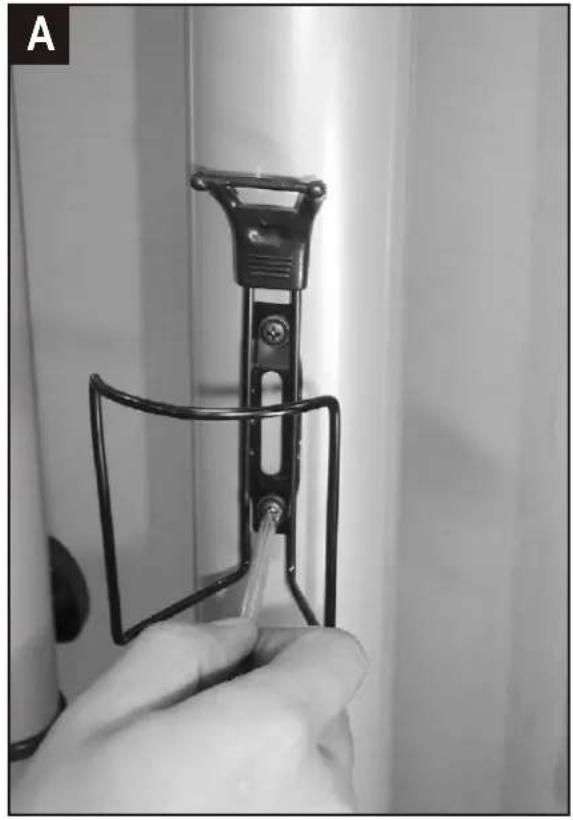
■ Fix the water bottle holder to the front post and secure, using two machine screws.
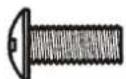
8581-58
X2
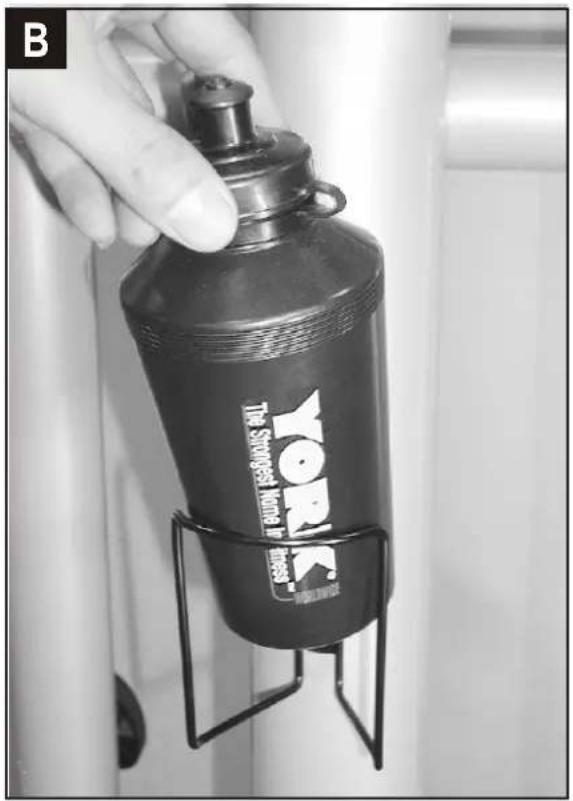
■ Slide the water bottle into the water bottle holder in position directly as shown.
RECHECK THAT ALL THE BOLTS AND NUTS ARE TIGHTENED SECURELY FOR YOUR SAFETY & COMFORT.
* SHOULD YOU REQUIRE ANY ASSISTANCE REGARDING THIS PRODUCT PLEASE CONTACT YORK DIRECTLY*
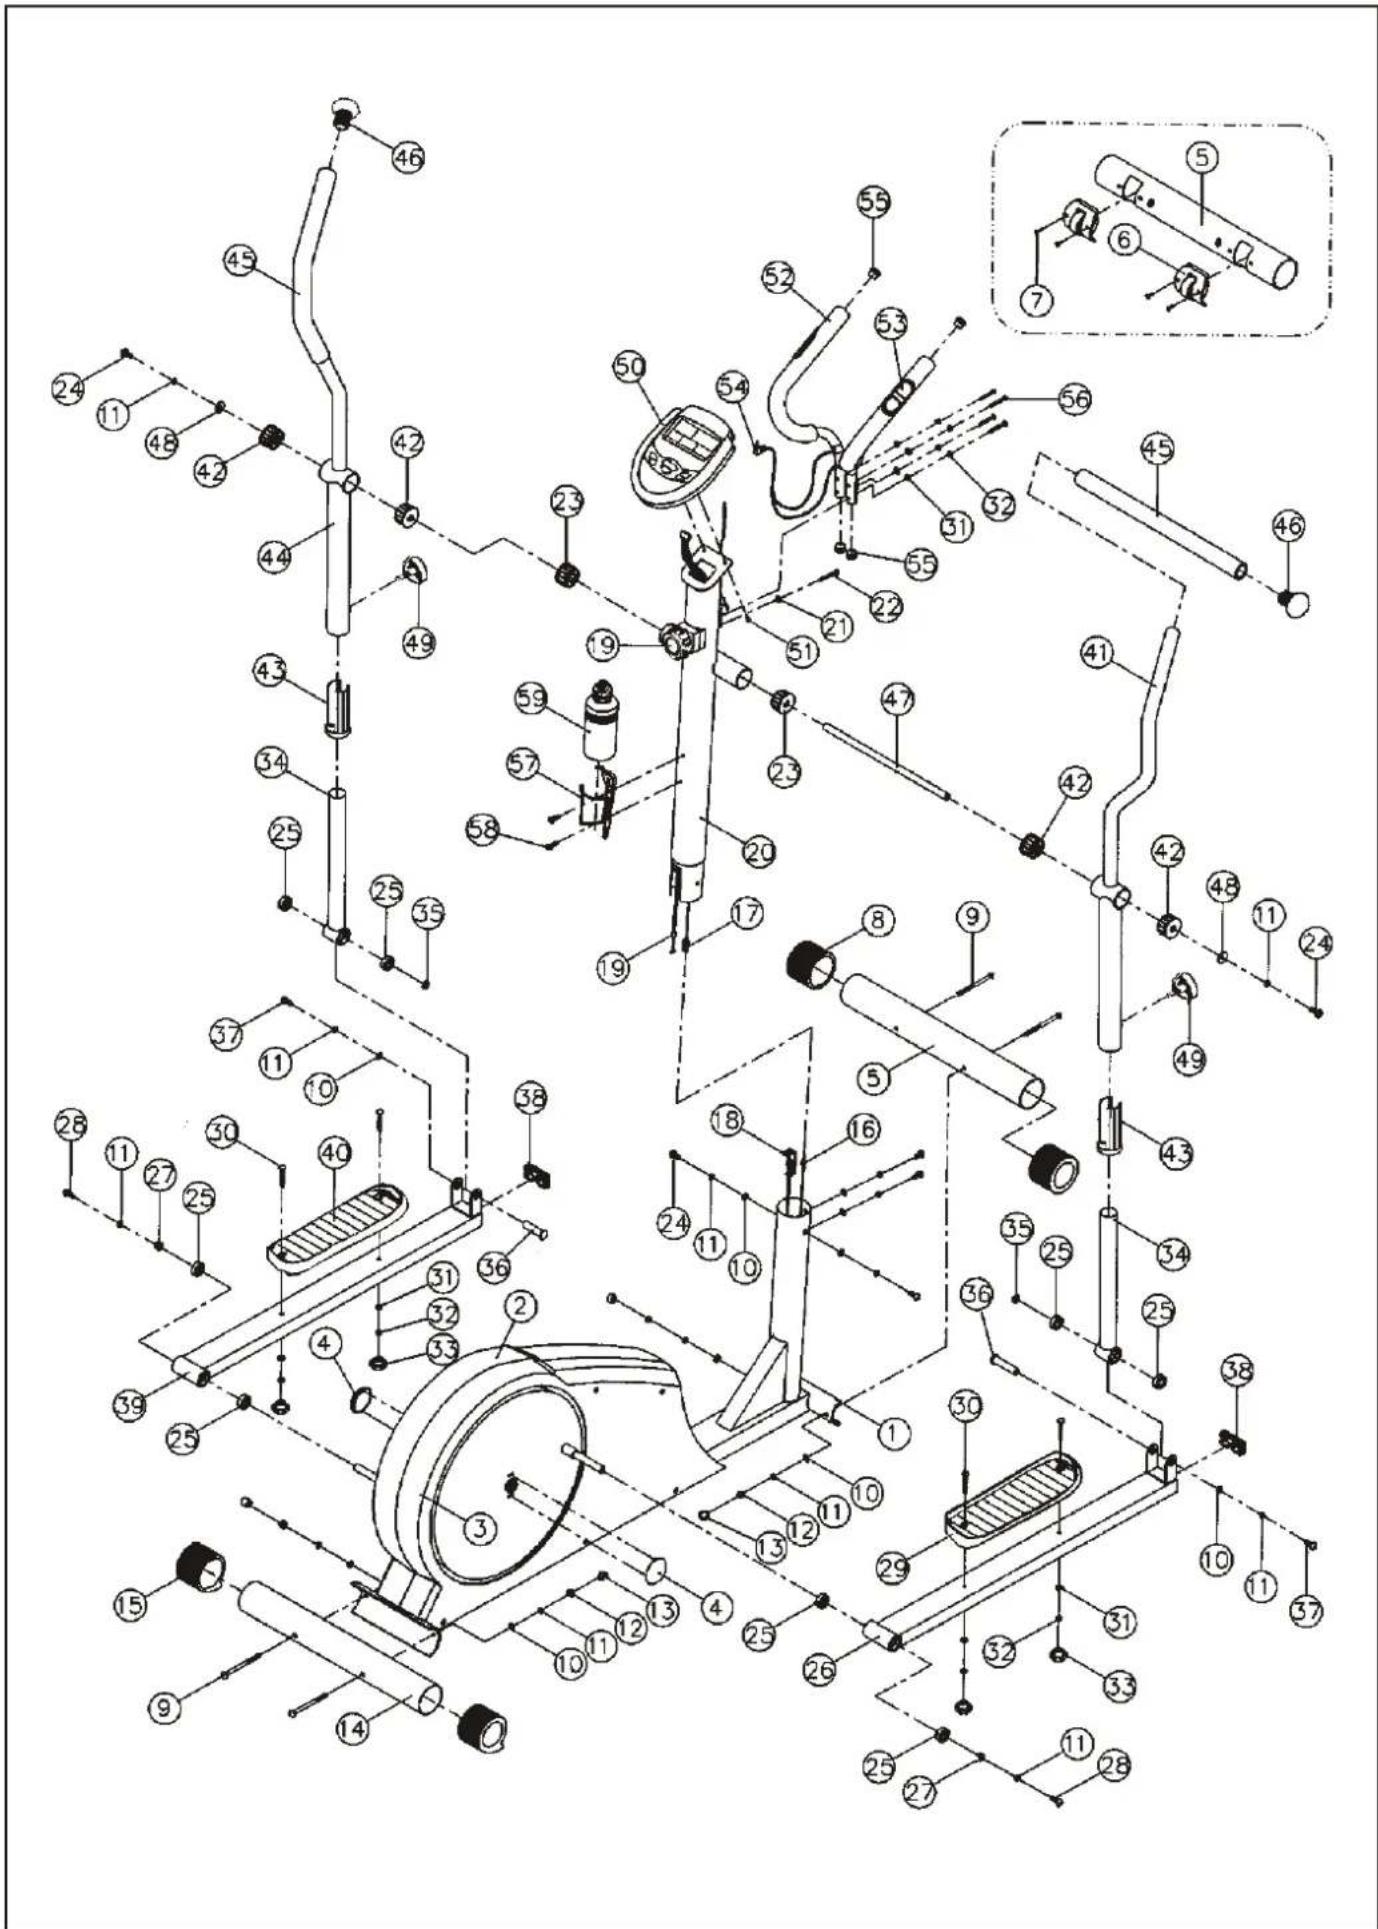
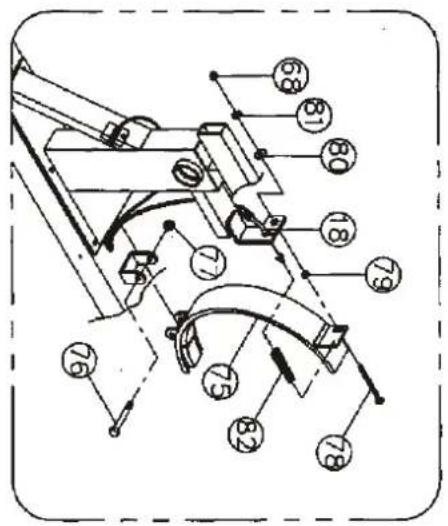
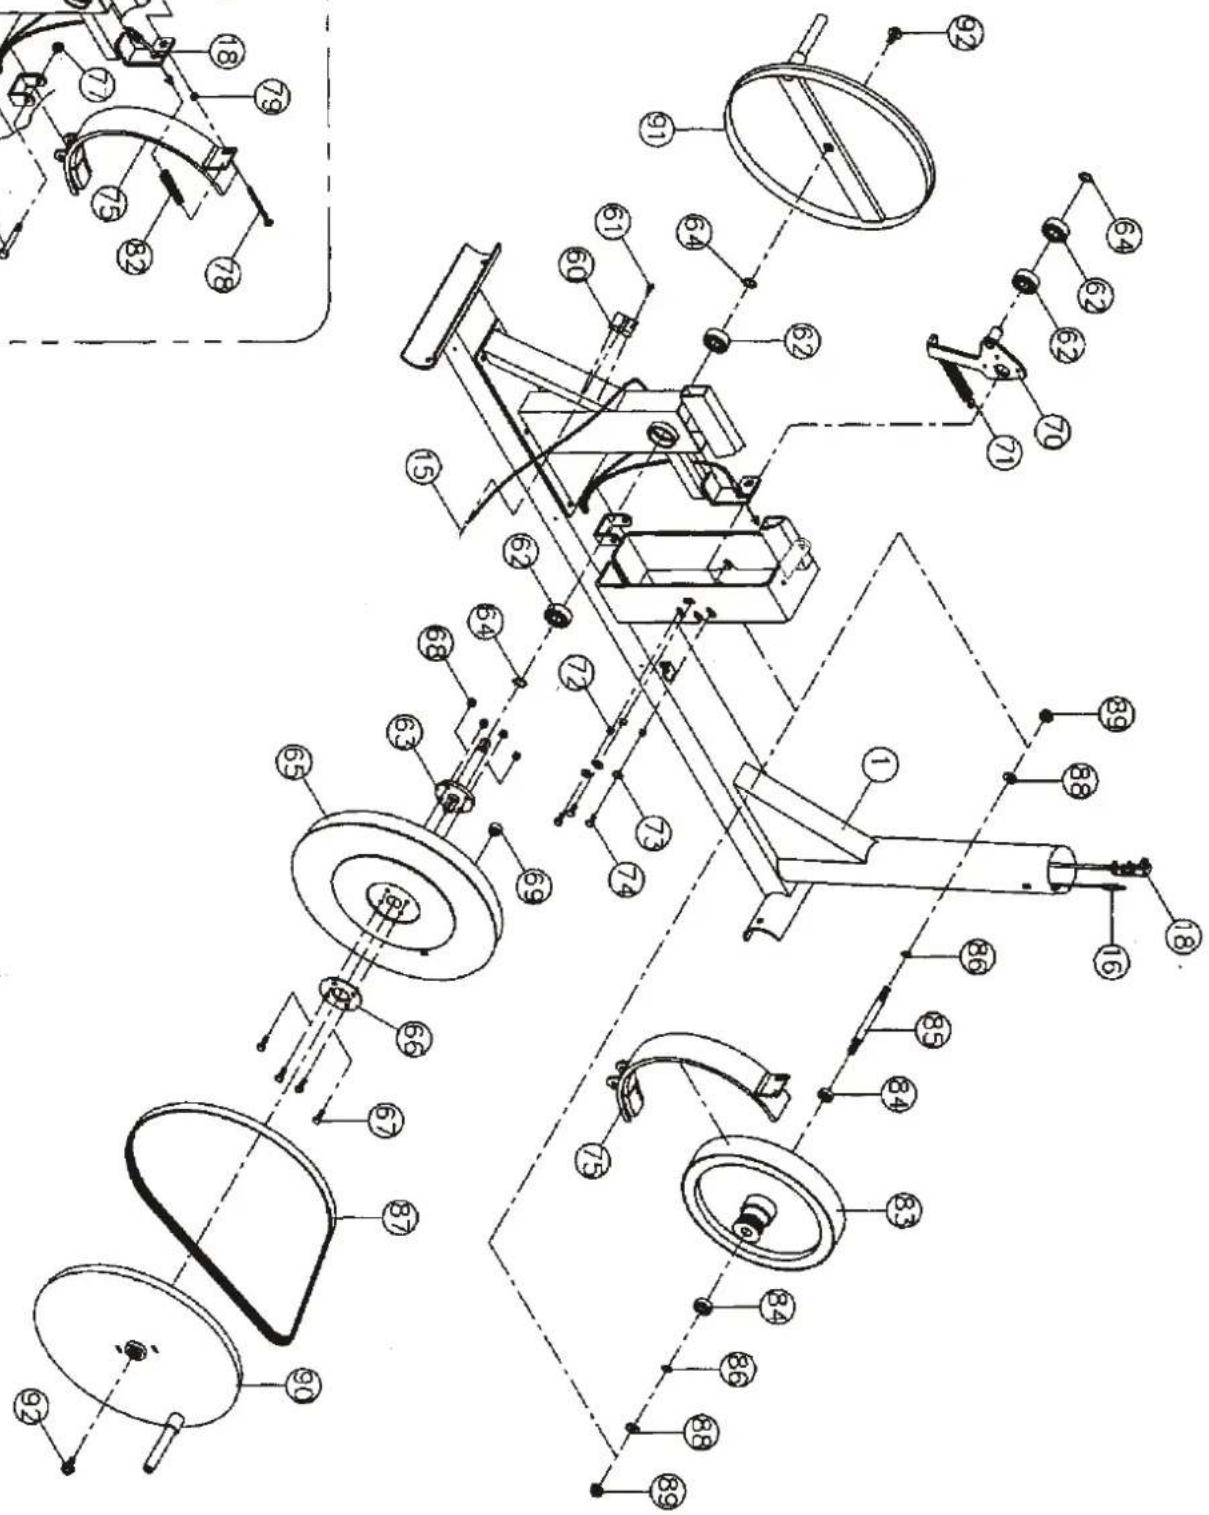
PARTS LIST
| KEY NO. PART NO. Q'TY(PCS) DESCRIPTION | ||
| 1 8581-01 1 MAIN FRAME | ||
| 2 8581-02 1 CHAIN COVER ( L ) | ||
| 3 8581-03 1 CHAIN COVER ( R ) | ||
| 4 8581-04 2 METAL DISC CAP | ||
| 5 8581-05 1 FRONT STABILIZER | ||
| 6 8581-06 2 MOVING WHEEL ASSEMBLY | ||
| 7 8581-07 4 8mm X 16mm FIXING SCREW | ||
| 8 8581-08 2 FRONT STABILIZER END CAP | ||
| 9 8581-09 4 M8 X 90mm CARRIAGE BOLT | ||
| 10 8581-10 10 M8 WASHER | ||
| 11 8581-11 14 M8 SPRING WASHER | ||
| 12 8581-12 4 M8 NYLON LOCKNUT | ||
| 13 8581-13 4 PLASTIC CAP | ||
| 14 8581-14 1 REAR STABILIZER | ||
| 15 8581-15 2 REAR STABILIZER END CAP | ||
| 16 8581-16 1 SENSOR WIRE | ||
| 17 8581-17 1 MIDDLE WIRE | ||
| 18 8581-18 1 TENSION CONNECT BRACKET | ||
| 19 8581-19 1 TENSION CONTROL W/ CABLE | ||
| 20 8581-20 1 FRONT POST | ||
| 21 8581-21 1 M5 WASHER | ||
| 22 8581-22 1 M5 X 45mm MACHINE SCREW | ||
| 23 8581-23 2 PIVOT ROD BUSH ( 48.4mm ) | ||
| 24 8581-24 6 M8 X 15mm ALLEN HEAD BOLT | ||
| 25 8581-25 8 PLASTIC BUSHING | ||
| 26 8581-26 1 RIGHT PEDAL POST | ||
| 27 8581-27 2 M8 X18mm X 2mm WASHER | ||
| 28 8581-28 2 M8 X 20mm ALLEN HEAD BOLT | ||
| 29 8581-29 1 RIGHT FOOT PEDAL | ||
| 30 8581-30 4 M6 X 45mm CARRIAGE BOLT | ||
| 31 8581-31 8 M6 WASHER | ||
| 32 8581-32 8 M6 SPRING WASHER | ||
| 33 8581-33 4 FIXING KNOB | ||
| 34 8581-34 2 LOWER HANDLE BAR POST | ||
| 35 8581-35 2 WAVE SPRING WASHER | ||
| 36 8581-36 2 PEDAL POST PIVOT SHAFT | ||
| 37 8581-37 2 M8 X 25mm ALLEN HEAD BOLT | ||
| 38 8581-38 2 PEDAL POST END CAP | ||
| 39 8581-39 1 LEFT PEDAL POST | ||
| 40 8581-40 1 LEFT FOOT PEDAL | ||
| 41 8581-41 1 HANDLE BAR ( R ) | ||
| 42 8581-42 4 PIVOT ROD BUSH ( 46mm ) | ||
| 43 8581-43 2 HANDLE BAR POST PLASTIC INSERT | ||
| 44 8581-44 1 HANDLE BAR ( L ) | ||
| 45 8581-45 2 HANDLE BAR FOAM GRIP | ||
| 46 8581-46 2 HANDLE BAR END CAP | ||
YORK ELLIPTICAL 340P / 11
| KEY NO. | PART NO. | Q'TY(PCS) | DESCRIPTION |
| 47 | 8581 | 47 1 PIVOT ROD | |
| 48 | 8581 | 48 2 M8 X 28mm WASHER | |
| 49 | 8581 | 49 2 FIXING TRI-KNOB | |
| 50 | 8581 | 50 1 COMPUTER CONSOLE | |
| 51 | 8581 | 51 4 M5 X 10mm MACHINE SCREW | |
| 52 | 8581 | 52 1 CENTRE BAR | |
| 53 | 8581 | 53 2 HAND PULSE SENSOR | |
| 54 | 8581 | 54 1 HAND PULSE SENSOR WIRE | |
| 55 | 8581 | 55 4 CENTRE BAR END CAP | |
| 56 | 8581 | 56 4 M6 X 45mm ALLEN HEAD BOLT | |
| 57 | 8581 | 57 1 WATER BOTTLE HOLDER | |
| 58 | 8581 | 58 2 M5 X 12mm MACHINE SCREW | |
| 59 | 8581 | 59 1 WATER BOTTLE | |
| 60 | 8581 | 60 1 SENSOR BRACKET | |
| 61 | 8581 | 61 1 M6 X 12mm FIXING SCREW | |
| 62 | 8581 | 62 4 BEARING ( 6203ZZ ) | |
| 63 | 8581 | 63 1 DISC WHEEL PULLEY AXLE | |
| 64 | 8581 | 64 3 CLIP - C17 | |
| 65 | 8581 | 65 1 DISC WHEEL PULLEY | |
| 66 | 8581 | 66 1 DISC WHEEL PULLEY WASHER | |
| 67 | 8581 | 67 4 M6 X 18mm FIXING SCREW | |
| 68 | 8581 | 68 5 M6 NYLON LOCKNUT | |
| 69 | 8581 | 69 1 MAGNET | |
| 70 | 8581 | 70 1 JOCKEY PULLEY BRACKET | |
| 71 | 8581 | 71 1 CARGE SPRING | |
| 72 | 8581 | 72 3 SPACER SLEEVE | |
| 73 | 8581 | 73 3 M6 WASHER ( =1.5mm ) | |
| 74 | 8581 | 74 3 M6 X 14mm FIXING SCREW | |
| 75 | 8581 | 75 1 MAGNET HOLDER | |
| 76 | 8581 | 76 1 M8 X 52mm FIXING BOLT | |
| 77 | 8581 | 77 1 M8 NYLON LOCKNUT | |
| 78 | 8581 | 78 1 M6 X 65mm FIXING SCREW | |
| 79 | 8581 | 79 1 M6 SELF-LOCKING NUT | |
| 80 | 8581 | 80 1 M6 NYLON WASHER | |
| 81 | 8581 | 81 1 M6 WASHER ( =1.2mm ) | |
| 82 | 8581 | 82 1 SPRING | |
| 83 | 8581 | 83 1 FLYWHEEL ASSEMBLY | |
| 84 | 8581 | 84 2 BEARING ( 6001ZZ ) | |
| 85 | 8581 | 85 1 FLYWHEEL AXLE | |
| 86 | 8581 | 86 2 CLIP - C12 | |
| 87 | 8581 | 87 1 DRIVE BELT - RIBBED | |
| 88 | 8581 | 88 2 M10 WASHER ( t=2mm ) | |
| 89 | 8581 | 89 2 3/8" WH NUT | |
| 90 | 8581 | 90 1 RIGHT METAL COVER | |
| 91 | 8581 | 91 1 LEFT METAL COVER | |
| 92 | 8581 | 92 2 M8 X 16mm HEX HEAD BOLT |
YORK ELLIPTICAL CROSS TRAINER 340P
COMPUTER INSTRUCTION
INTRODUCTION
Your computer is ideal for monitoring your performance and setting yourself targets. By measuring your pulse rate you can ensure you exercise within your range. At the same time you can monitor closely your improving condition and cardiovascular fitness.
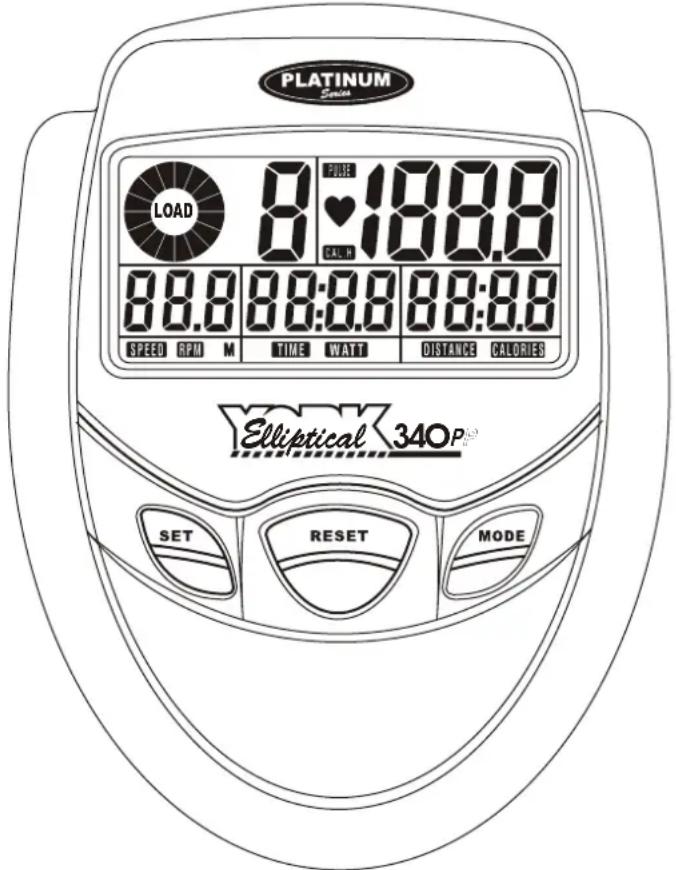
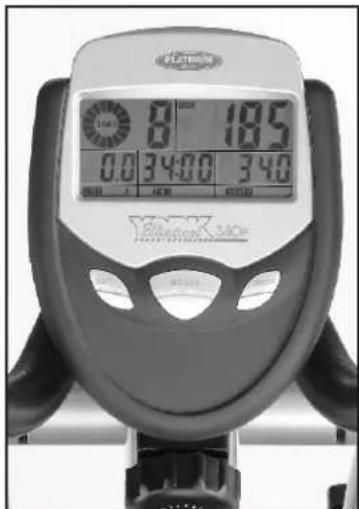
TO START/ Press SET button to activate unit.
The computer will automatically start/stop when you exercise.
B. FUNCTION BUTTONS
MODE: Guides you through each display function.
Your computer will change modes in the following order.
SET: Allows you to set the target values for TIME, DISTANCE, CALORIE& PULSE. Please make sure computer is in the "STOP" status, before using this key If you hold this key continuously for 2 seconds the digit value will increase quickly.
RESET: 1. Press RESET to reset each single mode from computer.
- Press and hold RESET for several seconds to reset all of the target values in the computer.
* SHOULD YOU REQUIRE ANY ASSISTANCE REGARDING THIS PRODUCT PLEASE CONTACT YORK DIRECTLY*
YORK ELLIPTICAL 340P / 13
C. SETTING FUNCTIONS
| You can set a target time, distance or calories on your computer.When you start exercising the computer will begin to count down from your target to zero.When it reaches zero an alarm will beep, then start to count up if you continue exercise. | |
| SCAN | Automatically scans all functions in sequence displaying your progress without requiring you to press the mode key.Your computer will change modes in the following order -TIME ▶ DISTANCE & PULSE ▶ CALORIE & CAL. / H |
| SPEED | The speed is shown in MPH, when the YORK ELLIPTICAL CROSS TRAINER 340P is in use. (Max 99:9 MPH). |
| TIME | Counting commences when the YORK ELLIPTICAL CROSS TRAINER 340P is active. (Max 99:59 MIN).To set timer countdown select 'TIME' using MODE button.Enter required time target by pressing SET button. (Max 99:00 MIN). |
| DISTANCE | Distance is automatically displayed in MILE,when the YORK ELLIPTICAL CROSS TRAINER 340P is in use. (Max 99.9MILE).To set target distance select 'DISTANCE' function using MODE button.Enter desired distance by pressing SET button. (Max 99.0MILE). |
| CALORIES | Approximate calories consumed is displayed, once the YORK ELLIPTICAL CROSS TRAINER 340P is in use. (Max 9999 CAL.)To set target consumption select "CALORIE" using MODE button.Enter target calories to be consumed using SET button. (Max 9990 CAL.) (This data is a rough guide for comparison of different exercise sessions which can not be used in medical treatment.) |
| PULSE(USING THE HAND PULSE SENSOR) | When using the 'PULSE' function a "♥" is displayed, and your current heart rate is shown.The user may also need to consult a doctor before using this equipment, the user can set a heart target with this information.To set target pulse select "PULSE" function using MODE button.Enter target pulse by pressing SET button. (Max. 240) |
HAND PULSE SENSOR
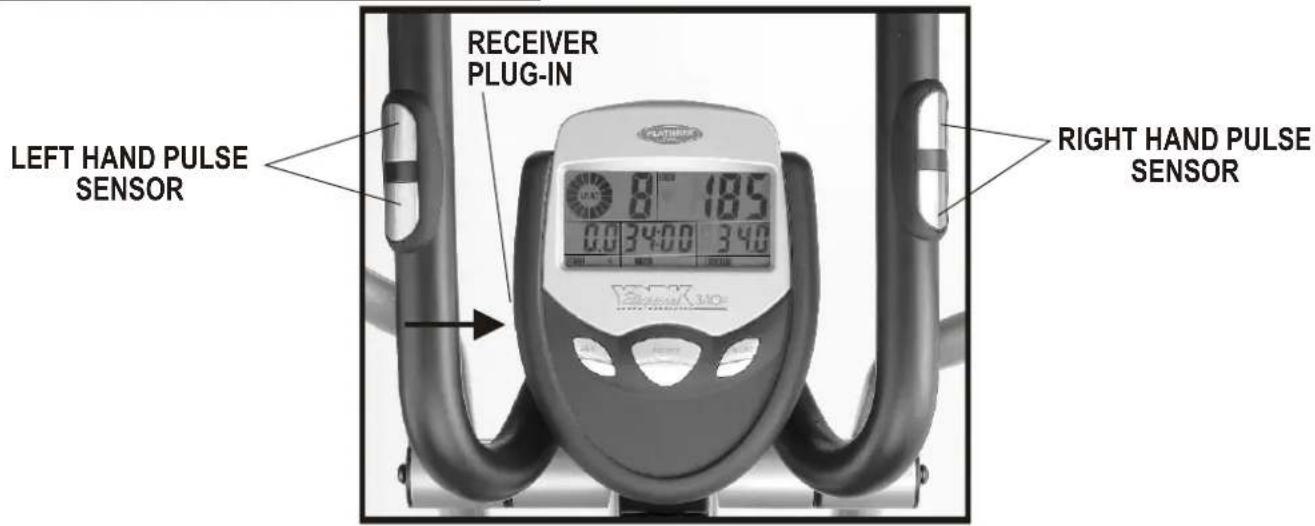
To obtain a pulse reading you must have your left and right hand holding the sensors at the same time.
Grip the hand sensors normally (NOT TOO TIGHT) during exercise and after a few seconds the computer will display your pulse reading.
Some people will not be able to obtain an accurate hand pulse reading e.g.due to hand skin or variations in circulation. We recommend you use a chest belt transmitter.
A chest belt transmitter, which can monitor the heart rate to ECG accuracy, can be purchased for use with this computer. The ultra lightweight transmitter is worn on the chest, a receiver plugs into the computer and the readout is displayed on the computer screen.
Contact the HCI Help Line or your local YORK Dealer and ask for item #5103 Plug In TELEMETRY SET PI-50.
SHOULD YOU REQUIRE ANY ASSISTANCE REGARDING THIS PRODUCT PLEASE CONTACT HCI DIRECTLY.
| U.K. | AUSTRALIA | N.Z. |
 HELP LINE (8:30am- 4:30pm)YORK BARBELL (U.K.) LTD.CHURCHILL WAY, DAVENTRY,NORTHANTS, NN11 4YB ENGLANDTEL: (01327) 701-824FAX: (01327) 706-704E-MAIL: helpdesk@yorkfitness.co.uk HELP LINE (8:30am- 4:30pm)YORK BARBELL (U.K.) LTD.CHURCHILL WAY, DAVENTRY,NORTHANTS, NN11 4YB ENGLANDTEL: (01327) 701-824FAX: (01327) 706-704E-MAIL: helpdesk@yorkfitness.co.uk |  HELP LINE (8:00am- 4:00pm)YORK BARBELL (AUST.) LTD.UNIT 1, LOT 2, SWAFFHAM ROAD,MINTO, N.S.W. 2566 AUSTRALIATEL: (02) 9603-8444FAX: (02) 9603-8555E-MAIL: heatheryork@ozemail.com.au HELP LINE (8:00am- 4:00pm)YORK BARBELL (AUST.) LTD.UNIT 1, LOT 2, SWAFFHAM ROAD,MINTO, N.S.W. 2566 AUSTRALIATEL: (02) 9603-8444FAX: (02) 9603-8555E-MAIL: heatheryork@ozemail.com.au |  HELP LINE (8:30am- 4:30pm)BERNSPORT (1995) LTD.PO BOX 33-973 TAKAPUNA,AUCKLAND NEW ZEALAND.TEL: +64-9-488-4750FAX: +64-9-488-4759E-MAIL: sales@bernsport.co.nz HELP LINE (8:30am- 4:30pm)BERNSPORT (1995) LTD.PO BOX 33-973 TAKAPUNA,AUCKLAND NEW ZEALAND.TEL: +64-9-488-4750FAX: +64-9-488-4759E-MAIL: sales@bernsport.co.nz |
NOTE:
- When targets / limits have been reached an alarm will sound.
- Without any signal for 5 minutes, the LCD display will shut off automatically, with all values set to zero. Press any key or start cycling to reactivate.
- The computer is equipped with an auto start / stop device. It will activate when you start to pedal and switch off some time after you stop pedalling.
- The mode function will only work when all activity has stopped.
- If the display becomes faint, replace the batteries.
- Battery spec: 2 AA size.
* SHOULD YOU REQUIRE ANY ASSISTANCE REGARDING THIS PRODUCT PLEASE CONTACT YORK DIRECTLY*
YORK ELLIPTICAL 340P / 15
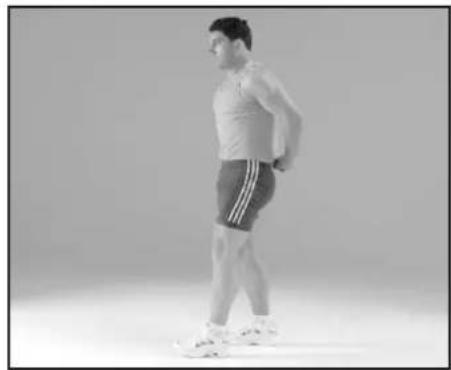
PECTORALS
Lace fingers and with abdominals pulled firmly in and knees slightly bent ease arms away from you. Hold for 8-10 seconds or until muscle eases.
natural_image
Side profile of a person standing in athletic pose (no text or symbols visible)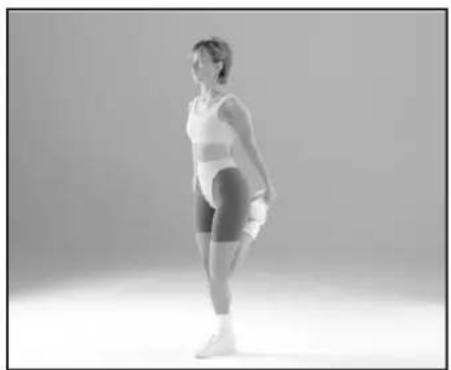
natural_image
Black-and-white photo of a woman in athletic wear performing a standing pose (no text or symbols visible)QUADRICEPS STRETCH
With one hand, hold lace of shoe, knees together, stand tall with abdominals engaged. Squeeze hips slightly forward to increase the stretch. Hold for 8-10 seconds or until muscle eases.
natural_image
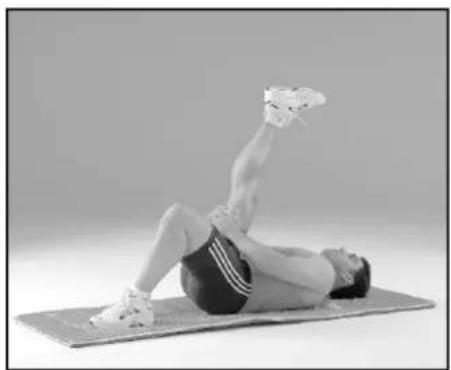
Person performing a leg raise exercise on a mat, no text or symbols visibleHAMSTRING STRETCH
Holding back of thigh with leg straight, gently ease leg towards chest hold and increase stretch gently. This stretch can be developed slowly 20-30 seconds.
natural_image
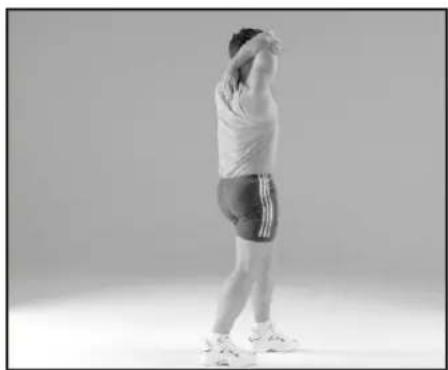
Person performing a stretching exercise (no text or symbols visible)TRICEP STRETCH
Engage abdominals and drop fingers down back pressing gently on fleshy part of arm until stretch is felt in tricep area. Avoid arching back.
natural_image
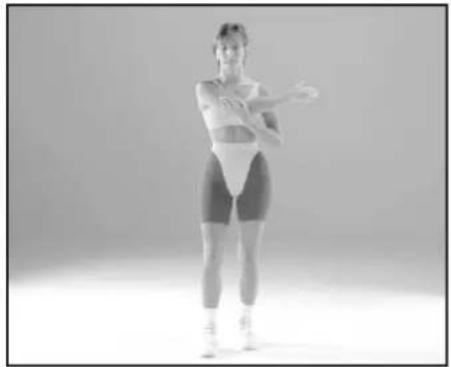
Person in athletic wear performing a standing pose with arms crossed (no text or symbols visible)DELTOID STRETCH
Take arm across body at shoulder height. Press gently on fleshy part of arm above elbow until you feel a stretch in shoulder area. Hold for 8-10 seconds.
natural_image
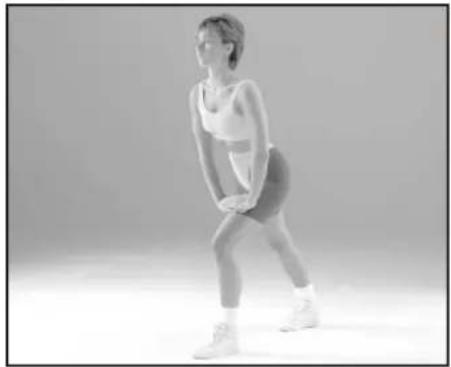
Person performing a squat exercise in athletic wear (no text or symbols visible)CALF STRETCH
Take leg back ensuring toe point in directly forward. Rest hands on thigh. Hold for 8-10 seconds or until muscle eases.
natural_image
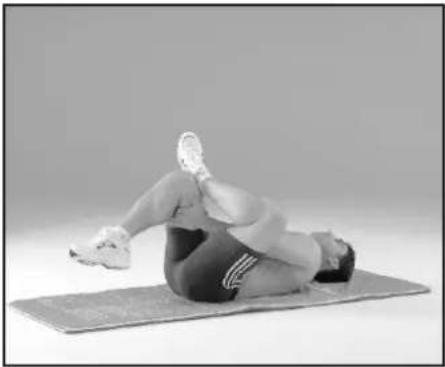
Person performing a sit-up exercise on a mat, lying supine with one leg raised (no text or symbols visible)GLUTEALS
Cross one ankle over opposite knee, using hands lift leg off floor to increase stretch if necessary. Hold for 8-10 seconds.
natural_image
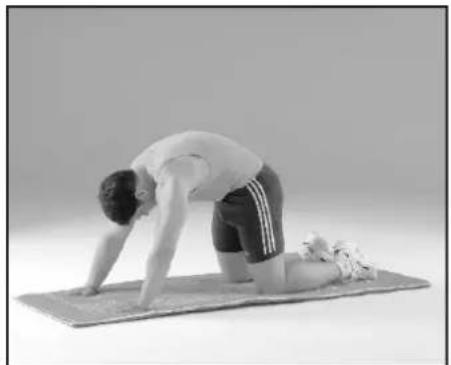
Person performing a yoga pose on a mat, viewed from the side (no text or symbols visible)CAT STRETCH
Starting with a neutral not arched spine lift back up towards ceiling hold for 8-10 seconds return to neutral spine.
natural_image
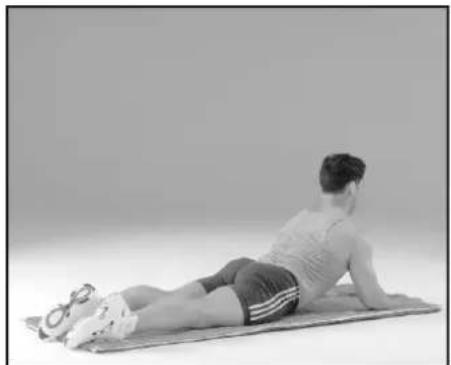
Person performing a prone exercise on a mat, viewed from the side (no text or symbols visible)ABDOMINAL STRETCH
Lengthen and gently lift upper body keeping head in line until stretch felt. Hold for 8-10 seconds.
natural_image
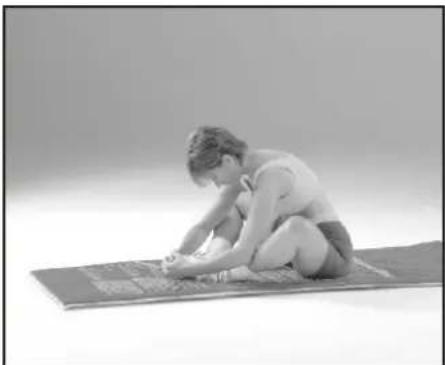
Person performing a seated yoga or stretching pose on a mat (no text or symbols visible)INNER THIGH & LOWER BACK STRETCH
Sit with soles of feet together. Sit tall and gently lean forwards until a stretch is felt. Hold of 8-10 seconds.
* SHOULD YOU REQUIRE ANY ASSISTANCE REGARDING THIS PRODUCT PLEASE CONTACT YORK DIRECTLY*
BEFORE EXERCISING CHECK:
■ You have adequate space ie. at least 2ft. (60cm) clearance on each side.
- Check all bolts and locking pins are secured and not protruding. In particular check all the bolts and pins for wear, replace doubtful parts before using the equipment.
■ Always use your elliptical trainer on a flat, level, solid surface.
■ Always work within your exercise level, do not work to exhaustion.
■ If you feel pain or unwell STOP YOUR WORKOUT IMMEDIATELY.
Injuries to health may result from incorrect or excessive training.
■ Please make sure you have read the safety guidelines.
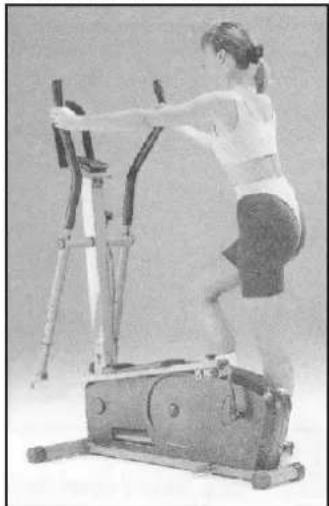
( These pictures shows the ELLIPTICAL TRAINER 2100 )
natural_image
Woman exercising on an outdoor fitness machine (no visible text or symbols)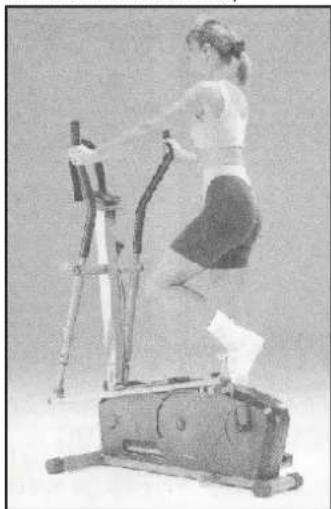
natural_image
Woman exercising on an outdoor fitness machine (no visible text or symbols)STEPPING ON
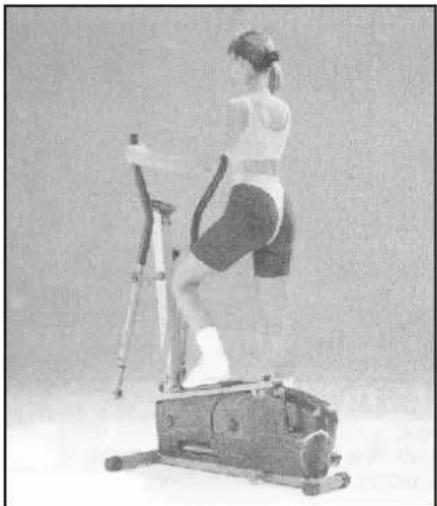
Make sure the nearest pedal to you is downwards. Grasp the handlebars securely with both hands. Then step on. (Toes towards the front of the pedal). Your body should be centred over the pedals, always remain in a vertical, upright position.
ADJUSTABLE TENSION
Change the level of difficulty of your workout by adjusting the tension knob. Begin with a low tension, and adjust the resistance to intensify out according to your personal fitness The resistance can be changed before or during a workout.
natural_image
Person performing a stationary exercise on an outdoor fitness machine (no visible text or symbols)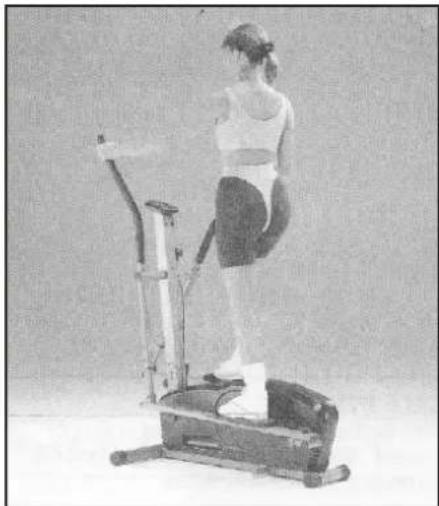
natural_image
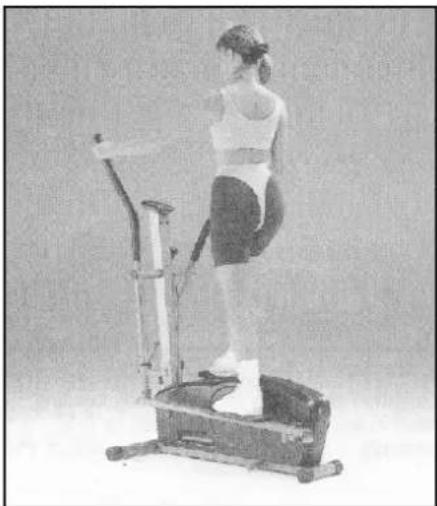
Woman standing on a stationary exercise machine (no visible text or symbols)FORWARD ELLIPTICAL MOTION
Tones quadriceps, buttocks, lower abdominal, hips and thighs.
Select a lead foot and press down in a forward motion.
Keep your knees slightly bent.
Repeat according to exercise intensity.
Maintain a secure grip on handlebars and keep your feet firmly in position.
* SHOULD YOU REQUIRE ANY ASSISTANCE REGARDING THIS PRODUCT PLEASE CONTACT YORK DIRECTLY*
YORK ELLIPTICAL 340P / 17
( These pictures shows the ELLIPTICAL TRAINER 2100 )
natural_image
Woman standing on a stationary exercise machine (no visible text or symbols)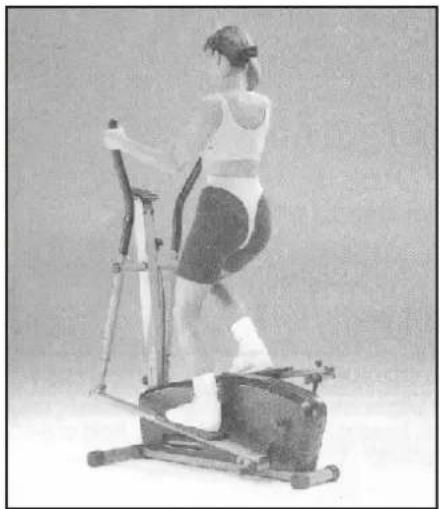
natural_image
Person performing a stationary exercise on an outdoor fitness machine (no visible text or symbols)Strengthens hamstrings, lower buttocks, hips, thighs and calves.
Select a lead foot and press down in a reverse motion.
Keep your knees slightly bent.
Repeat according to exercise intensity.
Maintain a secure grip on handlebars and keep your feet firmly in position.
VARY WORKOUTS: As well as the different programs to vary your workout you can also determine the forward and reverse elliptical motion, 5 minutes forward then 2 minutes reverse then 5 minutes forward etc.
Vary your workouts and make up new routines.
CAUTION:
When you wish to change direction; slow down until stopped then change direction. Do not try to suddenly change direction quickly as this will put stress on your knee joint.
STEPPING OFF
- Make sure that the left foot-platform is in the lowest position.
- Whilst grasping the handle bars, make sure your body is centred over both of the pedals.
- Step your right foot off of the left side, behind your left foot and onto the ground.
EXERCISE GUIDE
FITNESS
Many things contribute to fitness and well being but the most important factor is the condition of your heart and lungs and how efficient they are in delivering oxygen via your blood to your muscles. Your muscles use this oxygen to provide enough energy for daily activity.
This is called aerobic activity (with oxygen).
When you are fit your heart and lungs work well and efficiently.
This means your heart will not have to work so hard. It will pump a lot fewer times per minute so reducing the wear and tear on your heart.
This in turn reduces the chances of your suffering heart disease.
Fitness also helps you control your weight and reduces the effects of aging and stress.
You come across the need for fitness continually in everyday life.
When you are fit you can walk briskly up hills and stairs without being too out of breath once at the top you recover quickly.
As you can see there are great advantages in being fit.
HOW TO IMPROVE YOUR FITNESS
Like any muscle in your body your heart can be strengthened by systematic physical exercise which requires an increased blood flow and heart rate.
You can measure your heart rate by taking a pulse reading.
Your heart of pulse rate corresponds directly to your exertion level and exercise efficiency.
To improve your fitness in a safe and effective way you need to exercise at a high enough level to improve your aerobic fitness.
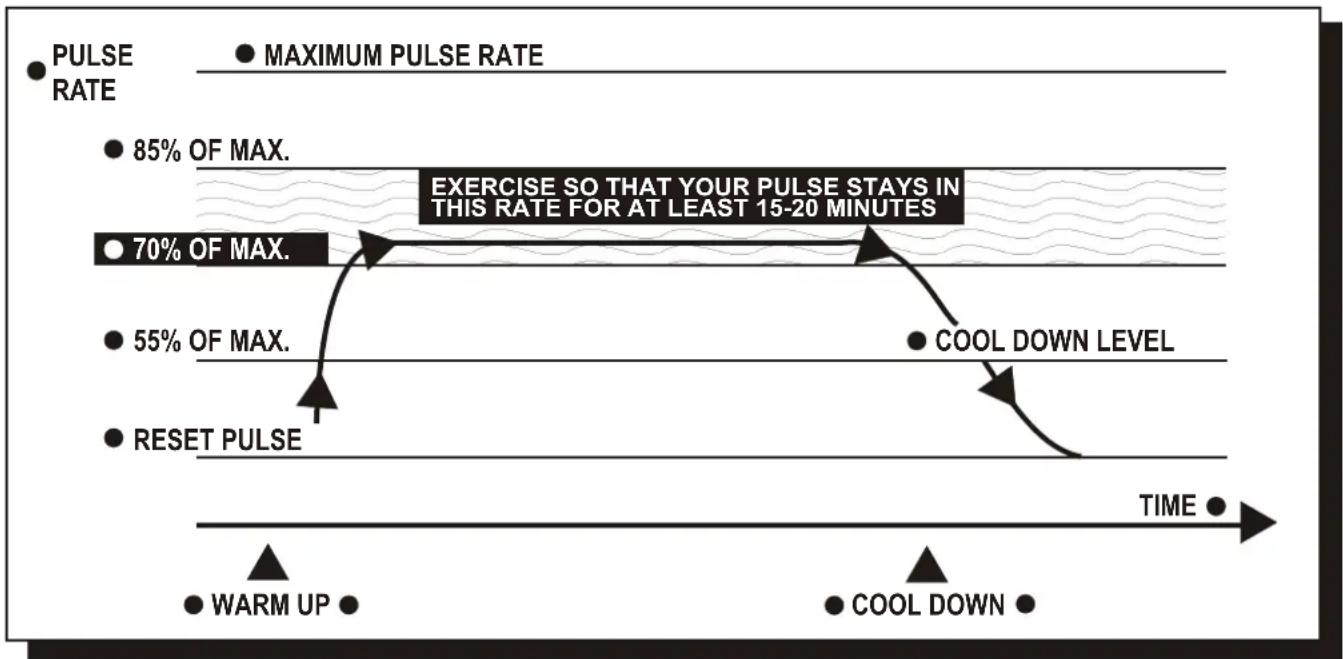
The area between these 2 levels is called the target zone.
It is important to exercise at the right intensity to stay within this zone.
For the best results you should exercise within the target zone and gradually increase the duration. Ideally you should aim to exercise (within zone) for at least 15-20 minutes continuously, 3-4 times per week.
CAUTION
DO NOT TRY TO DO TOO MUCH TO QUICKLY START GRADUALLY AND BUILD UP.
IF YOU BECOME ILL, IF YOU ARE UNDER DOCTOR CARE, OR OVER 35-40 AND NOT CURRENTLY TAKING REGULAR EXERCISE THEN WE WOULD ADVISE YOU NOT TO START TO EXERCISE WITHOUT CONSULTING YOUR DOCTOR.
TARGET ZONE
line
| Time Segment | Pulse Rate | Percentage of Peak | |----------------------|------------|--------------------| | Top Left | MAXIMUM PULSE RATE | 85% OF MAX. | | Middle Right | EXERCISE SO THAT YOUR PULSE STAYS IN THIS RATE FOR AT LEAST 15-20 MINUTES | 70% OF MAX. | | Bottom Right | COOL DOWN LEVEL | 55% OF MAX. | | Bottom Left | RESET PULSE | 55% OF MAX. | | Bottom Right | WARM UP | WARM UP | | Bottom Left | COOL DOWN | COOL DOWN |THIS IS HOW YOUR PULSE SHOULD BE HAVE DURING GENERAL FITNESS EXERCISE. REMEMBER TO WARM UP AND COOL DOWN FOR A FEW MINUTES.
HEART ZONE SELECTION GUIDELINES
In order to set your personal target heart zone, you will need to:
- Calculate your maximum heart rate.
- Select a zone based on your current fitness level.
Calculating your maximum heart rate
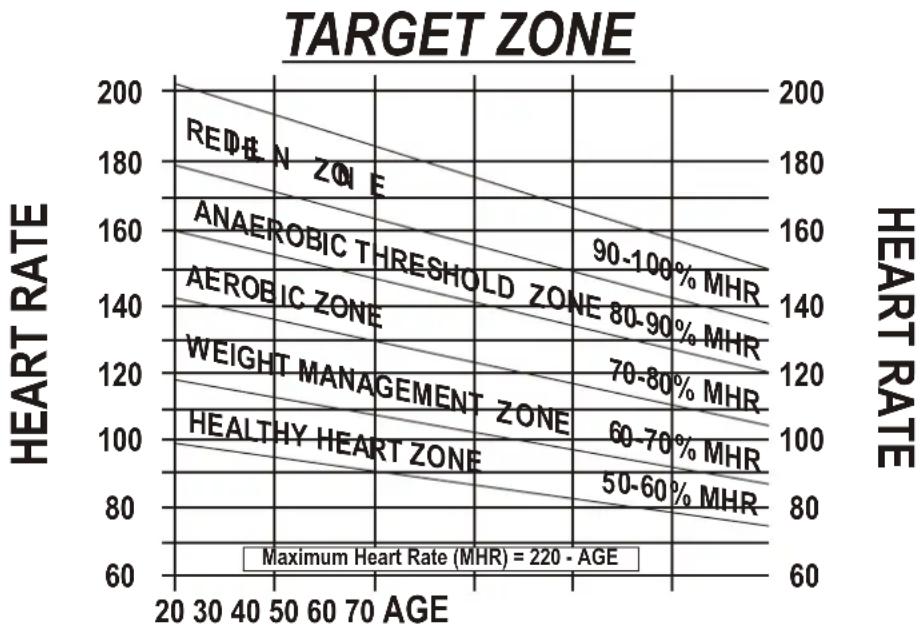
The standard method for calculating heart rate training zone is based on estimating maximum heart rate using the formula 220 minus the persons age in years. Some practitioners believe that a woman estimated maximum heart rate can be calculated more accurately by using 226 instead of 220.
The important issue with all estimating calculations is that in reality they can vary by plus or minus 15 bpm and at best are only an indication of actual results.
Estimated Maximum Heart Rate = 220 - Age (Year)
SELECTING THE ZONE
If you have not exercised for some time begin your exercise program in the Healthy Heart Zone. Start for the first few weeks, and gradually progress up to the zone that meets you personal fitness goal.
ZONE 1.- HEALTHY HEART - 50 to 59% of Max Heart Rate.
If you are a beginner with the goal of improving overall fitness, losing weight or reducing stress, exercise in this zone.
ZONE 2.- WEIGHT MANAGEMENT - 60 to 69% of Max Heart Rate.
If you already exercise regularly with the aim of losing body fat, exercise in this zone.
ZONE 3.- AEROBIC - 70 to 79% of Max Heart Rate.
Progress to this zone if your goal is to improve your aerobic conditioning.
ZONE 4.- ANAEROBIC THRESHOLD - 80 to 89% of Max Heart Rate.
This is the zone in which to improve anaerobic threshold. Exercising I this zone requires a high degree of fitness, and should not be used by those who are unfit.
ZONE 5.- RED LINE - 90 to 100% of Max Heart Rate.
For professional supervised athletes only.
line
| AGE | REDELN ZONE | ANAEROBIC THRESHOLD ZONE | AEROBIC ZONE | WEIGHT MANAGEMENT ZONE | HEALTHY HEART ZONE | | --- | --- | --- | --- | --- | --- | | 20-30 | 180 | 160 | 140 | 120 | 100 | | 30-40 | 160 | 140 | 120 | 100 | 90 | | 40-50 | 140 | 120 | 100 | 80 | 80 | | 50-60 | 120 | 100 | 80 | 60 | 70 | | 60-70 | 100 | 80 | 60 | 50 | 60 | | Maximum Heart Rate (MHR) = 220 - AGE| Percentage of Max Heart Rate (Beats per Minute) | ||||||
| Max HR | Age | Healthy Heart | Weight Loss | Aerobic | Anaerobic | Red line |
| 50 - 59% | 60 - 69% | 70 - 79% | 80 - 89% | 90 - 100% | ||
| 155 | 65 | 78 - 93 | 94 - 109 | 110 - 124 | 125 - 139 | 140 - 155 |
| 160 | 60 | 80 - 96 | 97 - 112 | 113 - 128 | 129 - 144 | 145 - 160 |
| 165 | 55 | 83 - 99 | 100 - 116 | 117 - 132 | 133 - 148 | 149 - 165 |
| 170 | 50 | 85 - 102 | 103 - 119 | 120 - 136 | 137 - 153 | 154 - 170 |
| 175 | 45 | 88 - 105 | 106 - 123 | 124 - 140 | 141 - 157 | 158 - 175 |
| 180 | 40 | 90 - 108 | 109 - 126 | 127 - 144 | 145 - 162 | 163 - 180 |
| 185 | 35 | 93 - 111 | 112 - 129 | 130 - 147 | 148 - 166 | 167 - 185 |
| 190 | 30 | 95 - 114 | 115 - 133 | 134 - 152 | 153 - 171 | 172 - 190 |
| 195 | 25 | 98 - 117 | 118 - 137 | 138 - 156 | 157 - 175 | 175 - 195 |
| 200 | 20 | 100 - 120 | 121 - 140 | 141 - 160 | 161 - 180 | 181 - 200 |
| 205 | <18 | 101 - 121 | 122 - 141 | 142 - 162 | 162 - 182 | 183 - 205 |
HOW TO MONITOR YOUR HEART RATE DURING EXERCISE
Now that you know where your training zone is, you'll I have to monitor yourself to be sure you're in it. Here's a simple rule, if you can't hold a conversation without gasping for breath you're probably above your training zone.
To know precisely where you're working - making sure you're getting all the benefits -
We recommend you check your heart rate periodically throughout your workout.
You can use the electronic pulse monitor which will count and display your heart rate for you.
CONTROL YOUR PULSE RATE TO KEEP WITHIN ZONE
How hard you exercise affects your pulse rate, it is determined by two thing:
- Rate: How fast you exercise.
e.g. Speed you cycle, run or step.
- Load: The resistance against which you exercise.
e.g. Tension you apply on cycle, step or run up hill.
THE PULSE RATE RULES
If your pulse rate is too low exercise faster or increase load.
If your pulse rate is too high exercise slower or decrease load.
If your pulse rate goes up towards the end of your exercise, you are trying to exercise for too long, shorten the time.
If your pulse rate does not quickly return to normal after exercise (5-10 minutes) you are not giving your body chance to recover, reduce how often you exercise.
REMEMBER - GENERAL FITNESS IS BEST IMPROVED BY INCREASING HOW LONG YOU EXERCISE RATHER THAN BY HOW HARD.
HOW LONG TO EXERCISE?
To qualify as a true aerobic exercise with all the benefits we're mentioned, you must maintain your heart rate within your training zone for at least 12 uninterrupted minutes.
If you exercise longer than 60 minutes the benefits are reduced and the risk of injury is increased.
If you're just starting out on a new exercise program we're commend you stay at the 12 minute minimum for at least a week. When you feel you're ready to go longer, increase your time no more than 10% a week. Don't push yourself too hard.
You should never feel exhausted during or following exercise.
TEST YOUR FITNESS LEVEL AND CHECK YOUR PROGRESS
You can use your computer to control your exercise intensity and to monitor your progress.
The time it takes for your pulse to return to normal, after exercise, is an indicator of your fitness level.
During the first minute of your cool-down phase you will experience a drop in your pulse rate.
The bigger the drop in that minute -- the fitter you are.
TO CHECK YOUR PROGRESS:
- Monitor your pulse rate the moment you end the aerobic phase of your workout and note your pulse rate.
- Begin slowing down for the cool down phase.
- After 60 seconds note the rate again.
The bigger the drop in that minute-the fitter you are.
To check your progress repeat this test every few weeks using the same duration and exercise intensity each time.
Keep a record of the results to help you monitor your progress.
YORK LIMITED WARRANTY
WARRANTY (DOMESTIC)
■ YORK BARBELL LTD. warrants this product to be free from defects in workmanship and material, under normal use and conditions, for a period of one year from date of original purchase. In addition, YORK BARBELL LTD. offer a lifetime frame / chassis warranty.
■ YORK BARBELL LTD. will not be responsible for damages or failures that occur as a result of improper assembly, adjustment or failure to operate the product correctly as detailed in this manual.
This warranty covers the product for home /domestic use only not commercial and / or rental.
This warranty does not cover misuse, abuse, freight damage and / or alterations or repairs not made by YORK BARBELL LTD. or a recommended service centre.
This warranty extends to the original purchaser only and we recommend that the original receipt be kept with the manual.
In the unlikely event of a problem occurring, please contact your local YORK BARBELL LTD. authorized dealer. Returns will not be accepted without a return authorization by YORK Customer Service Department.
REGISTRATION
■ YORK BARBELL LTD. recommend you complete the warranty card and return it to your authorized local YORK dealer.
THANK YOU FOR CHOOSING YORK - THE STRONGEST NAME IN FITNESS THE STR
U.K.

HELP LINE (8:30am- 4:30pm)
YORK BARBELL (U.K.) LTD.
CHURCHILL WAY, DAVENTRY,
NORTHANTS, NN11 4YB ENGLAND
TEL: (01327) 701-824
FAX: (01327) 706-704
E-MAIL: helpdesk@yorkfitness.co.uk
AUSTRALIA

HELP LINE (8:00am- 4:00pm)
YORK BARBELL (AUST.) LTD.
UNIT 1. LOT 2. SWAFFHAM ROAD.
MINTO, N.S.W. 2566 AUSTRALIA
TEL: (02) 9603-8444
FAX: (02) 9603-8555
E-MAIL: heathéryórk@ozemail.com.au
N.Z.

HELP LINE (8:30am- 4:30pm)
BERNSPORT (1995) LTD.
PO BOX 33-973 TAKAPUNA,
AUCKLAND NEW ZEALAND.
TEL: +64-9-488-4750
FAX: +64-9-488-4759
E-MAIL: sales@bernsport.co.nz
CANADA

HELP LINE (8:30am- 4:30pm)
YORK BARBELL CO., LTD.
1450 S. SERVICE ROAD WEST,
OAKVILLE (TORONTO), ONTARIO,
CANADA L6L 5T7
TEL: (905) 827-6362
FAX: (905) 827-9593
TOLL FREE: 800-361-0448
TAIWAN

HELP LINE (9:00am- 6:00pm)
YORK FITNESS (TAIWAN) LTD.
4F-3, NO.598, WEN SIN ROAD,
SEC. 2, TAICHUNG CITY, TAIWAN
TEL: +886-4-2319-3448
FAX: +886-4-2319-3449
E-MAIL: yorktwn@ms25.hinet.net
Authorized Dealer
WARRANTY REGISTRATION
Mail this portion with a copy of your receipt.
Date of purchase
Purchased from ( name of retailer )
Item Purchased
(see front cover of manual)
Name
Address
Telephone number
YOUR WARRANTY IS ONLY VALID IF YOU CAN PROVIDE PROOF OF THE ORIGINAL PURCHASE.
This can be the receipt, invoice, delivery note or internet confirmation.
MAIL THIS PAGE TO YOUR LOCAL YORK DEALERMAIL 1
U.K.

HELP LINE (8:30am- 4:30pm)
YORK BARBELL (U.K.) LTD.
CHURCHILL WAY, DAVENTRY,
NORTHANTS, NN11 4YB ENGLAND
TEL: (01327) 701-824
FAX: (01327) 706-704
E-MAIL: helpdesk@yorkfitness.co.uk
AUSTRALIA

HELP LINE (8:00am- 4:00pm)
YORK BARBELL (AUST.) LTD.
UNIT 1. LOT 2. SWAFFHAM ROAD,
MINTO, N.S.W. 2566 AUSTRALIA
TEL: (02) 9603-8444
FAX: (02) 9603-8555
E-MAIL: heatheryork@ozemail.com.au
N.Z.

HELP LINE (8:30am- 4:30pm)
BERNSPORT (1995) LTD.
PO BOX 33-973 TAKAPUNA,
AUCKLAND NEW ZEALAND.
TEL: +64-9-488-4750
FAX: +64-9-488-4759
E-MAIL: sales@bernsport.co.nz
CANADA

HELP LINE (8:30am- 4:30pm)
YORK BARBELL CO., LTD.
1450 S. SERVICE ROAD WEST,
OAKVILLE (TORONTO), ONTARIO,
CANADA L6L 5T7
TEL: (905) 827-6362
FAX: (905) 827-9593
TOLL FREE: 800-361-0448
TAIWAN

HELP LINE (9:00am- 6:00pm)
YORK FITNESS (TAIWAN) LTD.
4F-3, NO.598, WEN SIN ROAD,
SEC. 2, TAICHUNG CITY, TAIWAN
TEL: +886-4-2319-3448
FAX: +886-4-2319-3449
E-MAIL: yorktwn@ms25.hinet.net
Authorized Dealer

PLACE STAMP HERE
PARTS ORDER FORM
Enclose a check or money order with this form for replacement parts.
Date of purchase
Name of location where purchased
Model number
Last name, First name
Telephone number
Address____ City
State ____ Zip/Postcode
| Part No. | Q'ty | Part Description | Unit Price | Total |
| Total value of order | $ | |||
Send your order to:
YORK BARBELL (AUST.) LTD. UNIT 1, LOT 2, SWAFFHAM ROAD, MINTO N.S.W. 2566 AUSTRALIA
YORK BARBELL (U.K.) LTD. CHURCHILL WAY, DAVENTRY, NORTHANTS, ENGLAND, NN11 4YB
BERNSPORT (1995) LTD. PO BOX 33-973 TAKAPUNA, AUCKLAND NEW ZEALAND
YORK BARBELL (AUST.) LTD.
UNIT 1, LOT 2, SWAFFHAM ROAD,
MINTO N.S.W. 2566
AUSTRALIA

PLACE STAMP HERE
BERNSPORT (1995) LTD.
PO BOX 33-973 TAKAPUNA,
AUCKLAND NEW ZEALAND

PLACE STAMP HERE
YORK BARBELL (UK.) LTD.
CHURCHILL WAY,
DAVENTRY, NORTHANTS,
ENGLAND, NN11 4YB.
PARTS ORDER FORM
Enclose a check or money order with this form for replacement parts.
Date of purchase
Name of location where purchased
Model number
Last name, First name
Telephone number
Address____ City
State ____ Zip/Postcode
| Part No. | Q'ty | Part Description | Unit Price | Total |
| Total value of order | $ | |||
Send your order to:
YORK BARBELL (AUST.) LTD. UNIT 1, LOT 2, SWAFFHAM ROAD, MINTO N.S.W. 2566 AUSTRALIA
YORK BARBELL (U.K.) LTD. CHURCHILL WAY, DAVENTRY, NORTHANTS, ENGLAND, NN11 4YB
BERNSPORT (1995) LTD. PO BOX 33-973 TAKAPUNA, AUCKLAND NEW ZEALAND
YORK BARBELL (AUST.) LTD.
UNIT 1, LOT 2, SWAFFHAM ROAD,
MINTO N.S.W. 2566
AUSTRALIA

PLACE STAMP HERE
BERNSPORT (1995) LTD.
PO BOX 33-973 TAKAPUNA,
AUCKLAND NEW ZEALAND

PLACE STAMP HERE
YORK BARBELL (UK.) LTD.
CHURCHILL WAY,
DAVENTRY, NORTHANTS,
ENGLAND, NN11 4YB.
- YORK ELLIPTICAL CROSS TRAINER 340P
- SAFETY GUIDELINES:
- CARE AND MAINTENANCE
- TOOLS REQUIRED
- GENERAL
- ASSEMBLY INSTRUCTION
- ATTACH THE REAR STABILIZER
- 8581-10
- 8581-11
- 8581-12
- 8581-13
- ATTACH THE FRONT STABILIZER
- ATTACH THE PEDALS TO THE POSTS
- ATTACH THE FRONT POSTS
- 8581-24 #8581-11 #8581-10
- ATTACH THE HANDLE BAR POSTS
- ATTACH THE COMPUTER
- 8581-51
- ATTACH THE WATER BOTTLE HOLDER
- 8581-58
- RECHECK THAT ALL THE BOLTS AND NUTS ARE TIGHTENED SECURELY FOR YOUR SAFETY & COMFORT.
- COMPUTER INSTRUCTION
- INTRODUCTION
- FUNCTION BUTTONS
- SETTING FUNCTIONS
- HAND PULSE SENSOR
- NOTE:
- PECTORALS
- QUADRICEPS STRETCH
- HAMSTRING STRETCH
- TRICEP STRETCH
- DELTOID STRETCH
- CALF STRETCH
- GLUTEALS
- CAT STRETCH
- ABDOMINAL STRETCH
- INNER THIGH & LOWER BACK STRETCH
- BEFORE EXERCISING CHECK:
- STEPPING ON
- ADJUSTABLE TENSION
- FORWARD ELLIPTICAL MOTION
- CAUTION:
- STEPPING OFF
- EXERCISE GUIDE
- FITNESS
- HOW TO IMPROVE YOUR FITNESS
- CAUTION
- HEART ZONE SELECTION GUIDELINES
- Calculating your maximum heart rate
- SELECTING THE ZONE
- HOW TO MONITOR YOUR HEART RATE DURING EXERCISE
- CONTROL YOUR PULSE RATE TO KEEP WITHIN ZONE
- THE PULSE RATE RULES
- HOW LONG TO EXERCISE?
- TEST YOUR FITNESS LEVEL AND CHECK YOUR PROGRESS
- TO CHECK YOUR PROGRESS:
- YORK LIMITED WARRANTY
- WARRANTY (DOMESTIC)
- REGISTRATION
- U.K.
- AUSTRALIA
- N.Z.
- CANADA
- TAIWAN
- Authorized Dealer
- WARRANTY REGISTRATION
- YOUR WARRANTY IS ONLY VALID IF YOU CAN PROVIDE PROOF OF THE ORIGINAL PURCHASE.
- MAIL THIS PAGE TO YOUR LOCAL YORK DEALERMAIL 1
- PARTS ORDER FORM
- YORK BARBELL (AUST.) LTD.
- BERNSPORT (1995) LTD.
- YORK BARBELL (UK.) LTD.
Brand : York Fitness
Model : 340P
Category : Elliptical bike