
BFWM7 - Washing machine BLANCO - Free user manual and instructions
Find the device manual for free BFWM7 BLANCO in PDF.


| Product Type | Washing Machine |
| Brand | BLANCO |
| Model | BFWM7 |
| Capacity | 7 kg |
| Spin Speed | 1400 rpm |
| Energy Class | A+++ |
| Dimensions (H x W x D) | 85 cm x 60 cm x 60 cm |
| Weight | 72 kg |
| Power Supply | 230 V, 50 Hz |
| Power Consumption | 2000 W |
| Water Consumption | 50 L per cycle |
| Noise Level (Wash/Spin) | 55 dB / 75 dB |
| Wash Programs | Cotton, Synthetics, Delicates, Quick, Wool, Hand Wash, Eco, Rinse & Spin, Drum Clean |
| Additional Functions | Delay Start (1-24h), Child Lock, Temperature Selection, Spin Speed Adjustment, Extra Rinse |
| Installation Type | Freestanding |
| Door Opening | Left |
| Drum Material | Stainless Steel |
| Maintenance | Clean filter monthly, clean detergent drawer, run drum clean cycle |
| Safety Features | Overload protection, anti-flood system, child lock, unbalanced load detection |
| Spare Parts Availability | Belt, pump, motor, door seal, control board, drum bearings, filter |
| Repairability Index | 8.2/10 |
Frequently Asked Questions - BFWM7 BLANCO
User questions about BFWM7 BLANCO
0 question about this device. Answer the ones you know or ask your own.
Ask a new question about this device
Download the instructions for your Washing machine in PDF format for free! Find your manual BFWM7 - BLANCO and take your electronic device back in hand. On this page are published all the documents necessary for the use of your device. BFWM7 by BLANCO.
USER MANUAL BFWM7 BLANCO
Instructions for the Use and Care and Installation of
BFWM7
7Kg Front Load Washing Machine
Dear Customer
You will find that the clean lines and modern look of your Blanco Front Load Washing Machine blends in perfectly with your laundry décor. It is easy to use and performs to a high standard.
Blanco also makes a range of products that will enhance your kitchen – such as ovens, rangehoods, microwaves, sinks and taps.
Of course, we make every effort to ensure that our products meet all your requirements, and our Customer Relations Department is at your disposal, to answer all your questions and to listen to all your suggestions.
Please complete the warranty section of this manual and keep your receipt as proof of purchase. Retain all documents relating to the purchase of Blanco product.
Blanco is committed to providing increasingly efficient products that are easy to use, respect the environment and are attractive and reliable.
BLANCO
CONTENTS
Part 1:
Technical features.
Part 2:
Steps before operating Fullautomatic
Washing Machine and safety precautions.
Part 3:
Determining Location and Installation
Part 4:
Preparation
Part 5:
Program Selection and Washing Machine Operation
Part 6:
Care and Maintenance
Part 7:
Before Calling Service
General Warnings.
• The appliance is not intended for use by young children or infirm persons without supervision.
- Young children should be supervised to ensure that they do not play with the appliance.
- If the appliance installed above carpet, please ensure that the carpet does not obstruct the openings
- If the supply cord is damaged, it must be replaced by the manufacturer or its service agent or a similarly qualified person in order to avoid a hazard.
- CAUTION: If the appliance is supplied from a cord extension set or an electrical outlet device, the cord extension socket or electrical portable outlet device must be positioned so that it is not subject to splashing or ingress
Part 1: Technical features
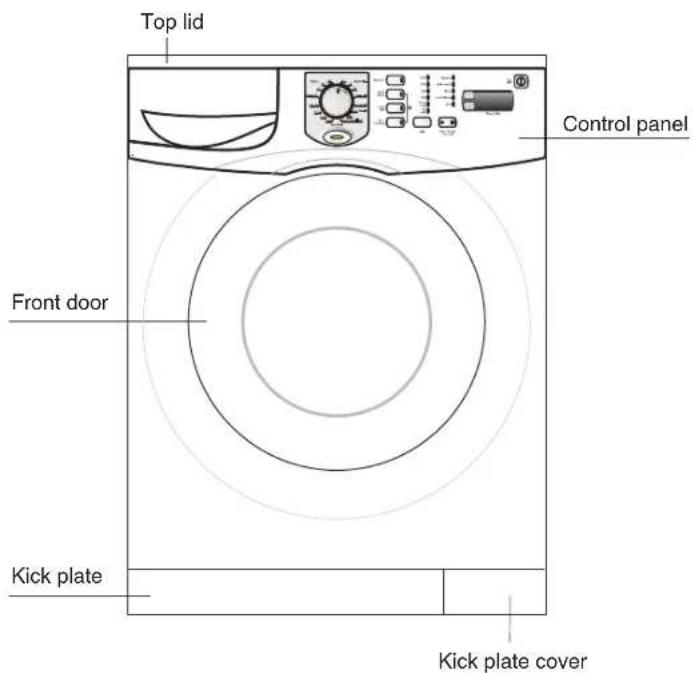
| Capacity (dry fabric) | 7 kg. |
| Height | 85 cm. |
| Width | 60 cm. |
| Depth | 59 cm. |
| Net weight | 76 kg. |
| Power requirement | 240 V, 50 Hz. |
| Nominal current | 10 A. |
| Power | 2350 Watts. |
| Washing speed | 52 rpm. |
| Spin speed | 1200 rpm. |

The appearance and specifications are subject to change without notice to raise the unit quality.
The graphics shown in the manual are schematic and it is possible that they not conform with your washing machine.
Part 2: Steps before operating Fullautomatic Washing Machine and safety precautions.
The current requirement in order for safe operation of this machine is 10 Amp
Your washing machine is set to 240 Volts.
Do not forget to check the grounding in all cases of use Our company will not be responsible for any damages caused by operations without grounding.
The performance of the washing machine depends on the effectiveness of the cleaning agent. Stains can be permanent if low quality detergents are used. Please take necessary effort to clean the stained clothes as described in following pages before washing them in the machine.
Your washing machine is designed only for domestic use.
If the power cord or the plug is damaged, please call a certified technician.
Always use new "water inlet hose" received within your machine.
Please perform the first wash with detergent, at COTTON 90 program and without placing your laundry inside the washing machine. This will ensure that the drum is free from any left over dirt from production.

Due to the quality control processes during production, there may be some water left over in your machine. This does not cause any damage to your product.
Part 3: Determining location and installation
1. Removing transport safety bolts at the rear of the machine

The transport safety bolts must be removed before any operation of the machine. Bolt heads, marked "C".

natural_image
Illustration of a hand holding a mechanical component with an arrow indicating upward motion and a labeled point 'C' (no text or symbols beyond the label)"C", should be turned in a anti clockwise direction until the bolt can be partially withdrawn.

Remove transport safety bolts and rubber bushes by pulling outwards. (A up/down action and a small squirt of washing up liquid should ease removal.)

natural_image
Illustration of a hand holding a circular object with an arrow indicating upward motion (no text or symbols)Plastic plugs, supplied inside the protective bag and designated as "P", should be placed in the safety bolt holes according to the direction shown.

Attention!
Please keep the safety bolts for future transportation and reinstate them before transporting your machine. Never transport your machine without the transport bolts in position.
Never place your machine on a carpet. This prevents air circulation. The electrical components of the machine may overheat and may cause damage.
2. Feet adjustment
In order for quiet and stable operation, the machine should be placed properly and levelled on its feet. Your machine comes with two adjustable feet. If the machine is unstable, loosen the plastic counternut and screw or unscrew the adjustable foot until the machine is levelled perfectly. After positioning, tighten the counternut for stability.

natural_image
Illustration of a hand holding a small object, possibly a knob or knob, with no visible text or symbols.3. Water connections
a) Water inlet hose
Cold water supply
For proper operation, the pressure of water should be between 100 kPa and 1000 kPa
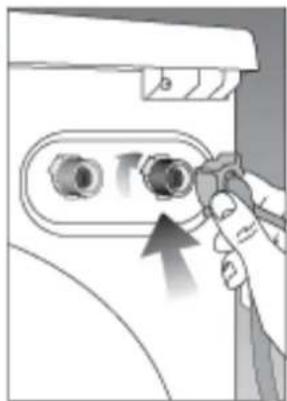
To prevent water leaks sealing washers are supplied with the water inlet hose inside the machine, place these on each of the hose ends and tighten both ends fully. In order to prevent any water leak damages, keep the water taps closed when not in use. Connect the cornered end of the hose to the machine water inlet.
Hot water supply (only for hot and cold water inlet machines)
Pressure: 100 -1000 kPa Temperature: 60°C max. A hot water supply fed from a separate cold water tank will normally be suitable. Open outlet gas or electric water heaters must not be used. Multipoint water heaters or combination boilers may be suitable if they are designed to supply washing machines. (Check your boilers operation instructions or supplier.)
natural_image
Hand holding a pen pointing to a button on a device (no text or symbols visible)
Connect the cold water using the hose with blue printing and connect the hot water using the hose with red printing.
b) Water drain hose
Water drain hose could be placed either at the side of the laundry tub, or directly to the drain. The hose should not be bent. Water drain hose should be secured with the elbow so that it would not fall down on the ground.

The hose should be placed between 40 and 100 cm. from the ground.

4. Electrical connection
Connect the power cord to the appropriate electrical system which is being supported by the maximum voltage and current rating indicated on the rating plate placed inside the kick plate.
Note! Page 1, Steps before operating fully automatic Washing Machine and safety precautions.
Part 4: Preparation
Attention! Before any operation of the machine check the following.
Did you close the front door?
Is the tap open?
Is water drain hose placed properly?
Is power connected?
Sorting laundry
Sort the laundry according to the following groups and wash them separately:
- white and resistant colored fabrics,
- colored fabrics,
- delicate fabrics (silk, rayon etc.),
- wool.
Be sure to empty pockets and remove any belts, buttons, pins, etc. from the clothing. You can place smaller garments (baby socks, etc) inside of pillow cases to avoid them slipping into the pump and filter. For stained fabrics, refer to the "Practical information" section of the operating manual.
To open the front door
press the "door open" button.
For your safety, front door can be opened only when the machine is off.

Loading the machine
Place the garments uniformly inside the machine. Hand knits should be placed inside out in the machine. Make sure that there is no clothing at the side of the door. Close the door by pushing lightly. If the door does not close completely, the machine could will not start, this is a safety measure. The door is locked until the end of the washing program and it cannot be re-opened until about 2 minutes following the end of the program.
Detergent and softener selection
Choose the appropriate detergent specifically used for FRONT LOAD washing machines. Suggested amount is given on the detergent cover.
Do not attempt to use detergents and bleaching elements that contain chlorine and sulphur. The amount of the detergent depends on the dirt level of fabric, the amount of fabric and the softness of the water.
Detergent Dispenser
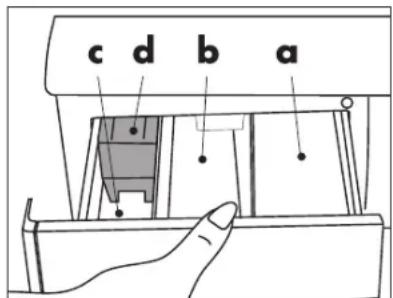
a. Compartment I. detergent compartment for prewash cycle.
b. Compartment II. detergent compartment for wash cycle.
c. " ✉" Compartment for fabric conditioner.
d. Siphon.

WARNING!
When the CURTAIN program is selected Pre-wash function is automatically set. Pre-wash can be operated even without detergent.

Attention! Fill the softener according to the supplier recommendation (app. <100 ml). Do not exceed the "MAX level" marked on the detergent dispenser.
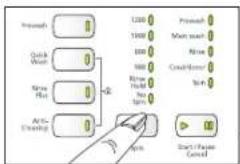
Control Panel
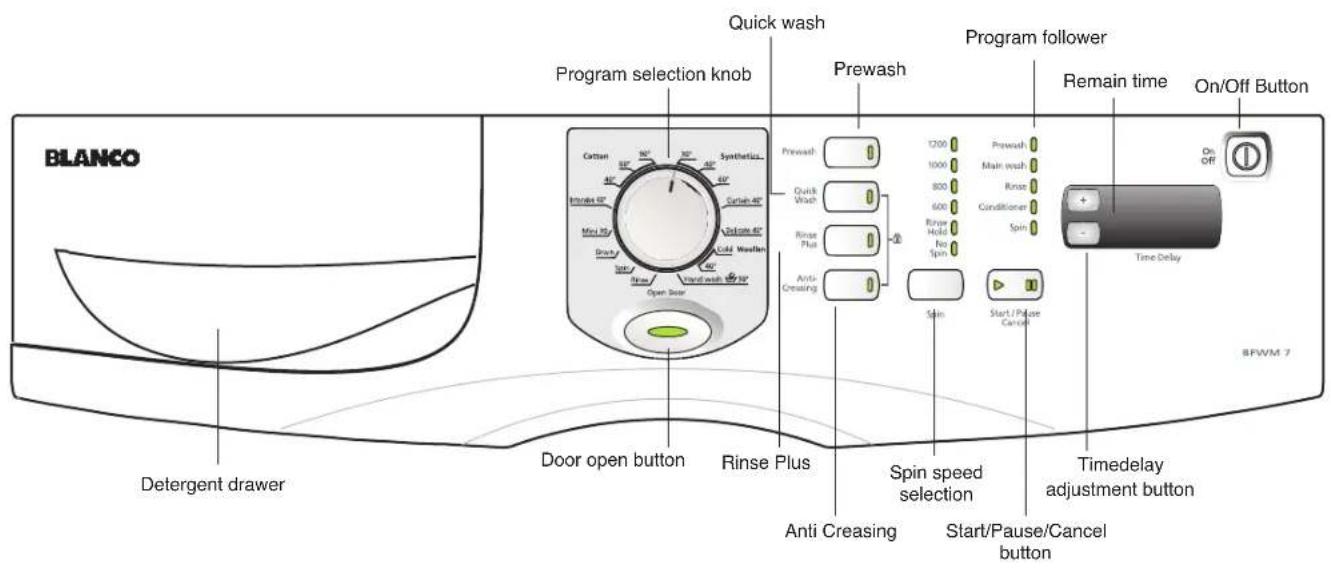
Functions
Prewash
A pre-wash is only worth while with heavily soiled laundry. Without prewash you save energy, water, washing powder and time.
Quick wash
Shortens washing time for lightly soiled fabrics. This function can be used for cotton and synthetic programs for temperatures below 60irc C.
Rinse plus
By using this function your machine will add another rinse process to the three rinse processes that it has already done. This additional rinse will reduce any affects on sensitive skin by washing leftover detergent.
Anti Creasing
To avoid wrinkling of your clothes, select this function. When Anti-Creasing is chosen please load less cloth, this way a special washing and spinning profile will reduce the wrinkles and your clothes will be easy to iron.
Spin Speed Selection
Using this button, you can select final spin speed up to 1200 rpm. If you do not want to apply spinning to your clothes, select "No Spin" option.
Rinse Hold
If you desire to leave your synthetic and wool fabrics in the machine after the wash program you may select the Rinse hold option to prevent them getting wrinkled. If you want to cancel the "Rinse Hold" function, you have to press on "Start/Pause/Cancel" button first, select the desired spin speed and then repress on the "Start/Pause/Cancel" button.
Part 5: Program Selection and Washing Machine Operation
Insert the plug. Press the On/Off button and then the Door Open button. Open the door. Place your laundry into the machine according to the recommended load capacity and close the front door.
Select the proper program according to the dirt strength and the thermostat value by means of Program Selection Table given on the following pages.
Turn the program selection knob and set the desired program. Select the spin speed according to the desired program. Select desired auxiliary functions.
Then, fill the fabric softener and the detergent into the related compartments, and close the detergent dispenser box. Push the Start/Pause button to operate your machine. In the mean time the Start/Pause LED will be on. You can follow the washing steps by means of the program follower.


natural_image
Diagram of a human ear with a shaded contrast area, no text or symbols present
natural_image
Illustration of a person using a magnifying glass to interact with a laptop (no text or symbols present)

flowchart
graph TD
    A["Product"] --> B["Quick Watch"]
    B --> C["Near Plus"]
    C --> D["AVG-Cleaning"]
    D --> E["Switch"]
    E --> F["Start/Pass Control"]
    G["1200"] --> H["Main touch"]
    H --> I["Main touch"]
    I --> J["Main touch"]
    J --> K["Main touch"]
    K --> L["Main touch"]
    L --> M["Main touch"]
    M --> N["Main touch"]
    N --> O["Main touch"]
    O --> P["Main touch"]
    P --> Q["Main touch"]
    Q --> R["Main touch"]
    R --> S["Main touch"]
    S --> T["Main touch"]
    T --> U["Main touch"]
    U --> V["Main touch"]
    V --> W["Main touch"]
    W --> X["Main touch"]
    X --> Y["Main touch"]
    Y --> Z["Main touch"]


natural_image
Simple line drawing of a boat being lifted by an upward arrow, no text or symbols present
flowchart
graph TD
    A["Process"] --> B["Quick Wash"]
    B --> C["Batch Plus"]
    C --> D["Auto-Cleaning"]
    D --> E["1200"]
    E --> F["1600"]
    F --> G["800"]
    G --> H["900"]
    H --> I["800"]
    I --> J["800"]
    J --> K["800"]
    K --> L["800"]
    L --> M["800"]
    M --> N["800"]
    N --> O["800"]
    O --> P["800"]
    P --> Q["800"]
    Q --> R["800"]
    R --> S["800"]
    S --> T["800"]
    T --> U["800"]
    U --> V["800"]
    V --> W["800"]
    W --> X["800"]
    X --> Y["800"]
    Y --> Z["800"]
11
Program selection
| Programme | Fabric type | Max Load (kg) | Program Duration (~min) | Water Consumption (l) | Energy Consumption (kWh) | Prewash | Quick Wash | Rinse Plus | Rinse Hold | Anti-Creasing | Detergent Dispenser |
| Cotton 90 | Heavy soiled fabrics made from cotton or linen, heat resistant | 7 | 139.5 | 2.26 | • | • | • | • | •(capacity 2.5kg) | I+II | |
| Cotton 60* | Normal soiled fabrics made from cotton or linen, heat resistant | 7 | 140.4 | 1.19 | • | • | • | • | •(capacity 2.5kg) | I+II | |
| Cotton 40 | Lightly soiled fabrics made from cotton, non-color fast | 7 | 142.4 | 0.50 | • | • | • | • | •(capacity 2.5kg) | I+II | |
| Intensive 60 | Heavy soiled fabrics made from cotton or linen, heat resistant | 7 | 175.7 | 1.35 | * | • | •(capacity 2.5kg) | II | |||
| Synthetics 60 | Normal soiled fabrics made from cotton/synthetics blended, heat resistant | 3 | 103.5 | 1.02 | • | • | • | • | •(capacity 1.5kg) | I+II | |
| Synthetics 40 | Lightly Soiled Easy care fabrics made from cotton, synthetics or blended fabrics (non-color fast) | 3 | 100.5 | 0.50 | • | • | • | • | •(capacity 1.5kg) | I+II | |
| Synthetics 30 | Very Lightly Soiled Easy care fabrics made from cotton, synthetics or blended fabrics (non-color fast) | 3 | 81.5 | 0.16 | • | • | • | • | •(capacity 1.5kg) | I+II | |
| Curtain 40 | Special programme for curtains | 2 | 115.6 | 0.55 | * | * | • | *(capacity 2kg) | I+II | ||
| Delicate 40 | Sensitive, easy care fabrics made from cotton, synthetics or blended fabrics | 2 | 62.6 | 0.35 | • | • | •(capacity 1kg) | II | |||
| Woollen 40 | Hand wash marked easy care, blended fabrics | 1.5 | 55.5 | 0.35 | • | • | II | ||||
| Woollen Cold | Hand wash marked wool and easy care, blended fabrics | 1.5 | 48.5 | 0.04 | • | • | II | ||||
| Handwash 30 | Special programme for Hand wash marked wool and silk | 1 | 40.4 | 0.15 | II | ||||||
| Mini 30 | Lightly Soiled less amount fabric | 2.5 | 30.5 | 0.15 | II | ||||||
| Rinse | Rinsing | 7 | 23.15 | 0.12 | - | ||||||
| Spin | Spinning | 7 | 19._0.1 | - | |||||||
| Drain | Draining | - | 2._ | - |
Depending on water, textile and ambient conditions the actual values given on or with the machine can deviate from the declared standard values, as they are tested according to the laboratory conditions
Child Lock

To prevent the knobs from being played with by your children you may activate "child lock" option. Activating the "Child Lock" option prevents any change from being made to a set program.
To activate child lock, press both on the second and the fourth auxiliary function buttons together for 3 seconds after the machine starts the washing operation.
After activating the Pre-wash auxiliary function, the LED will blinking.
Only On/Off button will be in operation when the child lock option is selected.
To deactivate child lock, re-press same auxiliary function buttons (second and fourth) for 3 seconds.
In order to open the door at the end of the washing program or to change program selection, child lock must be deactivated if selected.

When the machine is turned on, the LED of the selected program will light up. If there is no light on the program selection knob, it means that program selection knob is stuck between two programs. In that case, the knob should be adjusted on the correct program again.
If the program selection knob is turned while the machine is on and executing the selected program, all LED on the program selection knob will be off. When the knob is set to selected program again, related LED will be on.
On/Off
When you press the On/Off button, your machine is ready to select the desired program. The "door open" LED will be on and the door is ready to open. When the desired program is selected, related spin speed can be adjusted and the duration of the program can be observed on the display. To switch the machine off, repress the On/Off button.
Washing can only then be started when the ▶ button is pressed.


flowchart
graph TD
    A["Propath"] --> B["1200"]
    C["Chuck Mean"] --> D["1000"]
    E["New Max"] --> F["800"]
    G["Active Creating"] --> H["800"]
    H --> I["Clean transformer"]
    I --> J["New Max"]
    J --> K["No Spin"]
    K --> L["Spack"]
    L --> M["Prepared Control"]

Pressing the On/Off button does not mean that the washing operation is started! To start the washing, press the Start/Pause button!
Auxiliary Function Selection
It is not possible to activate all auxiliary functions in all wash programs. If any auxiliary function is selected, its LED will be on. It is restricted to select some auxiliary functions together. For example, if the cotton program is selected, "quick wash" and "pre-wash" functions can not be selected at the same time. If "Pre-wash" button is selected first and the "Quick wash" function next, the LED of the pre-wash function will be off as it is not active any more.
Program Follower
If the machine is on, a program can be followed by means of the program follower. If a washing step is over and the next step is started, the LED of the previous step will continue to light. It means if the washing operation is finished, all related washing steps on the program follower will be on. Pre-wash button LED will be on, only if this auxiliary function is selected.
Additional Laundry
Press the Start/Pause button. If the water level does not exceed the limitations, in 1 to 2 minutes door open LED will come on. It means the washing machine is ready to add laundry. If door open LED is not lit up after 1-2 minutes, it means the water level inside the machine is too high and you will not be able to open the door and add laundry. (Look at Program Cancelling).
If you change your mind and decide not to add laundry, press Start/Pause button again to let the program continue.
End of the Program
If all the wash programs are finished, all the LEDs on the program follower will be on . "1-2 minutes" for door open is displayed on remain time display. After 1-2 min door open LED will light up.


At the end of the washing, all related LEDs on the control panel will be on. Related duration time of the selected program is displayed and the machine is ready to start again.
To switch off the machine, press the On/Off button.
Unloading the machine
Machine stops automatically after all the programs are finished. Turn off the tap. In 1-2 min, after the door open LED lights up, press the door open button and open the door. Press the On/Off button to switch off the machine.
Unload the machine and leave the front door open. Check to see if there is any water left in the door hood. If so, remove with a soft cloth.
Time Delay
By using the time delay buttons, starting time of any program can be delayed. Time delay can be set at intervals of 30 min.
On the display, the delayed starting time is added to the duration of the program.
For example, if the program duration is 2 hours and 16 min and you delayed the program for 2 hours, the display will show "4:16". After the time delay is set, press Start/Pause button. The washing period will be started after 2 hours


flowchart
graph TD
    A["Initial Request"] --> B["Quick Sheet"]
    B --> C["Batch Plus"]
    C --> D["Anti-Cleaning"]
    D --> E["Product Output"]
    style A fill:#f9f,stroke:#333
    style B fill:#ccf,stroke:#333
    style C fill:#cfc,stroke:#333
    style D fill:#fcc,stroke:#333
    style E fill:#ffc,stroke:#333
    subgraph Product
        A1["100k"]
        A2["100k"]
        A3["500"]
        A4["500"]
        A5["500"]
        A6["500"]
        A7["500"]
        A8["500"]
        A9["500"]
        A10["500"]
        A11["500"]
        A12["500"]
        A13["500"]
        A14["500"]
        A15["500"]
        A16["500"]
        A17["500"]
        A18["500"]
        A19["500"]
        A20["500"]
        A21["500"]
        A22["500"]
        A23["500"]
        A24["500"]
        A25["500"]
        A26["500"]
        A27["500"]
        A28["500"]
        A29["500"]
        A30["500"]
        A31["500"]
        A32["500"]
        A33["500"]
        A34["500"]
        A35["500"]
        A36["500"]
        A37["500"]
        A38["500"]
        A39["500"]
        A40["500"]
        A41["500"]
        A42["500"]
        A43["500"]
        A44["500"]
        A45["500"]
        A46["500"]
        A47["500"]
        A48["500"]
        A49["500"]
        A50["500"]
        A51["500"]
        A52["500"]
        A53["500"]
        A54["500"]
        A55["500"]
        A56["500"]
        A57["500"]
        A58["500"]
        A59["500"]
        A60["500"]
        A61["500"]
        A62["500"]
        A63["500"]
        A64["500"]
        A65["500"]
        A66["500"]
        A67["500"]
        A68["500"]
        A69["500"]
        A70["500"]
        A71["500"]
        A72["500"]
        A73["500"]
        A74["500"]
        A75["500"]
        A76["500"]
        A77["500"]
        A78["500"]
        A79["500"]
        A80["500"]
        A81["500"]
        A82["500"]
        A83["500"]
        A84["500"]
        A85["500"]
        A86["500"]
        A87["500"]
        A88["500"]
        A89["500"]
        A90["500"]
        A91["500"]
        A92["500"]
        A93["500"]
        A94["500"]
        A95["500"]
        A96["500"]
        A97["500"]
        A98["500"]
        A99["500"]
Program Cancelling
If the program has not started yet, you can cancel the selected program by pressing Start/Pause button for 3 seconds. After 3 seconds the LED of the Start/Pause button will be off and the LED of the selected program will be on, where it is possible to set a new program
If the program has started and you want to cancel it, press Start/Pause button for 3 seconds. The program will move to the "spin" step and related LED on the program follower will be on. Machine will start to pump for draining and the door can be opened after the door open LED is on.

flowchart
graph TD
    A["Prenavs"] --> B["Quick Break"]
    B --> C["Nice Plan"]
    C --> D["Anti-Cleaning"]
    D --> E["New Plan"]
    E --> F["New Plan"]
    F --> G["New Plan"]
    G --> H["New Plan"]
    H --> I["New Plan"]
    I --> J["New Plan"]
    J --> K["New Plan"]
    K --> L["New Plan"]
    L --> M["New Plan"]
    M --> N["New Plan"]
    N --> O["New Plan"]
    O --> P["New Plan"]
    P --> Q["New Plan"]
    Q --> R["New Plan"]
    R --> S["New Plan"]
    S --> T["New Plan"]
    T --> U["New Plan"]
    U --> V["New Plan"]
    V --> W["New Plan"]
    W --> X["New Plan"]
    X --> Y["New Plan"]
    Y --> Z["New Plan"]
    Z --> AA["New Plan"]
    AA --> AB["New Plan"]
    AB --> AC["New Plan"]
    AC --> AD["New Plan"]
    AD --> AE["New Plan"]
    AE --> AF["New Plan"]
    AF --> AG["New Plan"]
    AG --> AH["New Plan"]
    AH --> AI["New Plan"]
    AI --> AJ["New Plan"]
    AJ --> AK["New Plan"]
    AK --> AL["New Plan"]
    AL --> AM["New Plan"]
    AM --> AN["New Plan"]
    AN --> AO["New Plan"]
    AO --> AP["New Plan"]
    AP --> AQ["New Plan"]
    AQ --> AR["New Plan"]
    AR --> AS["New Plan"]
    AS --> AT["New Plan"]
    AT --> AU["New Plan"]
    AU --> AV["New Plan"]
    AV --> AW["New Plan"]
    AW --> AX["New Plan"]
    AX --> AY["New Plan"]
    AY --> AZ["New Plan"]
    AZ --> BA["New Plan"]
    BA --> BB["New Plan"]
    BB --> BC["New Plan"]
    BC --> BD["New Plan"]
    BD --> BE["New Plan"]
    BE --> BF["New Plan"]
    BF --> BG["New Plan"]
    BG --> BH["New Plan"]
    BH --> BI["New Plan"]
    BI --> BJ["New Plan"]
    BJ --> BK["New Plan"]
    BK --> BL["New Plan"]
    BL --> BM["New Plan"]
    BM --> BN["New Plan"]
    BN --> BO["New Plan"]
    BO --> BP["New Plan"]
    BP --> BQ["New Plan"]
    BQ --> BR["New Plan"]
    BR --> BS["New Plan"]
    BS --> BT["New Plan"]
    BT --> BU["New Plan"]
    BU --> BV["New Plan"]
    BV --> BW["New Plan"]
    BW --> BX["New Plan"]
    BX --> BY["New Plan"]
    BY --> BZ["New Plan"]
Part 6: Care and maintenance

natural_image
Illustration of three steps of a hand operating a laptop, showing the process from opening to closing (no text or symbols present)Detergent dispenser
To clean the detergent residues, remove the detergent dispenser from its place by pressing on the area marked on siphon. Wash the dispenser with water and also clean the dispenser housing before inserting the dispenser to its place.
Leave the door slightly ajar when not in use. This preserves the door seal and prevents the formation of musty smells.
Siphon
Clean the siphon (coloured piece in the dispenser) every 30-40 washes. Pull out the siphon by holding from its edges. To prevent clogging, clean the softener residues thoroughly and make sure that the siphon fits into its place completely before any operation.

natural_image
Two-step diagram showing hands using a tool to adjust or install a component, no text or symbols present.Water intake filter
At the end of the water intake connection module and water inlet hose-tap side, there exists filters. These filters prevent any dirt and objects passing into the machine. It is advisable that these filters should be cleaned every 30-40 washes. To clean the filter, first turn the tap off. Then, disconnect the hose and clean the filter with a thin brush. If the filter is very dirty, you may clean it by pulling out with pliers. To clean the filter at the tap side of the hose, pull it out by hand and clean the filter under the tap water.
Hose
To prevent any leakage, have a technician replace the hoses every two years. If the machine is placed at cold ambient temperatures, the water remaining inside the pump and hoses should be removed from the filters. Also to prevent freezing, empty the water intake hoses by disconnecting from taps.
Drum
Do not leave any metal objects (pins, needles, etc.) inside the drum. These objects may cause rust on the drum surface. Do not clean the drum with scratching elements.
Cleaning the pump filter
Remove the electrical power plug. Open the open the Kick plate cover located at the bottom right side of the machine by pushing on the marked area shown beside.

Attention! Hot water danger! It is possible that app. 15 lt, 90°C hot water is inside. Be careful while taking out the filter!
Before taking out the filter, drain the water by means of pump drain hose. Take out the pump drain hose from its place. Place a shallow container under the pump hose to catch the water. Remove the drain pump hose plug and drain the water.
When all water is discharged, insert the plug into the pump hose again and replace the pump drain hose in its place.
Open the filter while turning it counterclockwise, drain the left water (max 30 ml) on to the filter cover. If there are any residual parts inside the filter, take them out and clean the filter before replacing it. Then, place the filter while turning it clockwise and at the end, close the filter cover by pushing on the marked area again.

Attention! The filter and hose plug must be replaced correctly. Ensure there is no lint around the seal of the filter which could cause leaking.

natural_image
Hand pointing at a device with a downward arrow (no text or symbols visible)
natural_image
Line drawing of a hand operating a kitchen appliance with a handle and lid (no text or symbols)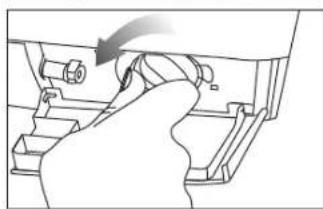
natural_image
Hand operating a mechanical device with a curved arrow indicating rotation (no text or symbols visible)
natural_image
Line drawing of a hand pressing a button on a rectangular object (no text or symbols)Part 7:
Before calling service

You turned the machine on, but the LEDs do not light up on the panel.
Check that the power cord is plugged in and power is turned on or a blown fuse. Check the front in closed properly closure.

Machine does not take water.
Check the front door for proper closure. Either taps are closed or water intake filters are clogged.

Taken water is directly discharged.
Check if the discharge hose placed as described in the users manual or not.

Water coming from beneath the machine.
Check the water intake and drain hoses. Tighten the connections.
The washers of the hoses may be worn out. If non of the two, the pump filter is not closed properly.

Foam coming out of the detergent dispenser.
Check whether your detergent is suitable for FRONT LOAD machines.
Next time use less detergent.

Pump does not drain water.
Clean the pump filter. Check whether the drain hose is bent or not. If there is need to clean the pump filter, refer to the pump filter cleaning section of the manual.
Descriptions of the international textile care label (ITCL) symbols

Washing temperature

Bleach can be used

Do not use bleach

Do not machine wash

Dry on horizontal surface

Do not wash Dry clean


Chemicals can be used

No dry cleaning

No spin

Can be washed at centrifugal machine
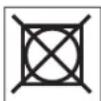
Do not wash centrifugal machine

Line dry

Iron permitted Do not iron


Warm iron
Blanco Contact Information.
NEW SOUTH WALES
Head Office, Sales & Marketing Office
104 Vanessa Street
Kingsgrove NSW 2208
Telephone: 02 9503 2888
Facsimile: 02 9503 2810
NSW Showroom*
40 Ebley Street
Bondi Junction NSW 2022
Telephone: 02 9386 1190
Facsimile: 02 9386 1671
Agent and Sales Office.
Hi –Performance Marketing
7 Coleman Street
Mascot NSW 2020
Telephone: 02 88354937
Facsimile: 02 90048739
Service and Spare Parts
All General Whitegoods Service
Telephone: 02 8788 8666
Facsimile: 02 9756 1091
AUSTRALIAN CAPITAL TERRITORY
Service and Spare Parts
Detlevs Appliance & Electrical Care
1/88 Sheppard Street
Hume
ACT 2905
Telephone: 02 6280 1033
Facsimile: 02 6260 1035
VICTORIA
State Office and Showroom*
35 Centre Road
Scoresby VIC 3179
Telephone: 03 8756 7888
Facsimile: 03 8756 7907
Service and Spare Parts
Advantage Appliances
Telephone: 03 9874 4222
Facsimile: 03 9874 6917
QUEENSLAND
State Office and Showroom*
148 Robinson Road - East
Geebung
QLD 4034
Telephone: 07 3259 2500
Facsimile: 07 3265 6933
Endeavour Appliances
Telephone: 07 3872 7444
Facsimile: 07 3852 2465
Platinum Appliance Service.
Telephone: 07 38621154
Facsimile: 07 38621114
SOUTH AUSTRALIA & NORTHERN TERRITORY
Agent and Sales Office
S C Lighting & Electrical Supplies
47 North Terrace
Hackney SA 5069
Telephone: 08 8362 4599
Facsimile: 08 8362 4591
Service and Spare Parts
Prestige Appliance Repair Centre
Telephone: 08 8352 2022
Facsimile: 08 8352 3044
WESTERN AUSTRALIA
Agent and sales Office
Elite Appliance Marketing Pty Ltd
Suite 4
14 Main Street
Osborne Park WA 6017
Telephone: 08 9201 0311
Facsimile: 08 9201 0366
Service and Spare Parts
Metropolitan Appliance Repairs
Telephone: 08 9330 1724
Facsimile: 08 9317 1296
TASMANIA
Agent and Sales Office
Mark Pearce Agencies
23 Tranmere Road
Howrah TAS 7018
Tel/Fax: 03 6247 9215
Service and Spare Parts
Electrical Equipment Service (Launceston)
Telephone: 03 6339 3873
Facsimile: 03 6339 4588
Baldocks Appliance Service (Hobart)
Telephone: 03 6234 5995
Facsimile: 03 6234 8134
BLANCO CUSTOMER SERVICE 1300 739 033
Website: www.meaappliances.com.au
* Showrooms open six days a week
- BFWM7
- Dear Customer
- BLANCO
- CONTENTS
- General Warnings.
- Part 1: Technical features
- Part 2: Steps before operating Fullautomatic Washing Machine and safety precautions.
- Part 3: Determining location and installation
- Removing transport safety bolts at the rear of the machine
- Attention!
- Feet adjustment
- Water connections
- a) Water inlet hose
- Cold water supply
- Hot water supply (only for hot and cold water inlet machines)
- b) Water drain hose
- Electrical connection
- Part 4: Preparation
- Detergent and softener selection
- Detergent Dispenser
- Control Panel
- Functions
- Prewash
- Quick wash
- Rinse plus
- Anti Creasing
- Spin Speed Selection
- Rinse Hold
- Part 5: Program Selection and Washing Machine Operation
- Program selection
- Child Lock
- On/Off
- Auxiliary Function Selection
- Program Follower
- Additional Laundry
- End of the Program
- Unloading the machine
- Time Delay
- Program Cancelling
- Part 6: Care and maintenance
- Siphon
- Water intake filter
- Hose
- Drum
- Cleaning the pump filter
- Part 7:
- Before calling service
- Descriptions of the international textile care label (ITCL) symbols
- Blanco Contact Information.
- NEW SOUTH WALES
- AUSTRALIAN CAPITAL TERRITORY
- VICTORIA
- QUEENSLAND
- SOUTH AUSTRALIA & NORTHERN TERRITORY
- WESTERN AUSTRALIA
- TASMANIA
- BLANCO CUSTOMER SERVICE 1300 739 033
Brand : BLANCO
Model : BFWM7
Category : Washing machine