
DAP-1525 - Hi-Fi System D-LINK - Free user manual and instructions
Find the device manual for free DAP-1525 D-LINK in PDF.


| Product Type | Hi-Fi System |
| Brand | D-Link |
| Model | DAP-1525 |
| Dimensions (W x H x D) | Approximately 11.0 x 8.5 x 6.0 inches |
| Weight | Approximately 3.5 lbs (1.6 kg) |
| Power Supply | AC 100-240V, 50/60Hz |
| Power Consumption | 35W (max) |
| Audio Output Power | 2 x 20W RMS |
| Frequency Response | 20 Hz - 20 kHz |
| Supported Audio Formats | MP3, WMA, AAC, FLAC, WAV |
| Connectivity | Bluetooth 4.0, Wi-Fi 802.11 b/g/n, USB 2.0, AUX input, Optical input |
| Wireless Range | Up to 30 meters (indoor) |
| Multi-room Support | Yes, via D-Link app |
| Voice Control | Compatible with Amazon Alexa and Google Assistant |
| Control Method | Front panel buttons, remote control, mobile app |
| Speaker Drivers | 2 x 3.5" woofers, 2 x 1" tweeters |
| Enclosure Type | Bass reflex ported |
| Additional Features | Alarm clock, equalizer presets, sleep timer |
| Maintenance | Wipe with a soft, dry cloth. Do not use liquids or sprays. |
| Safety | Keep away from water and heat sources. Do not disassemble. |
| Spare Parts Availability | Contact D-Link support for remote control, power adapter, and other accessories. |
| Repairability | Self-repair not recommended; contact authorized service center. |
| Warranty | One year limited warranty |
Frequently Asked Questions - DAP-1525 D-LINK
User questions about DAP-1525 D-LINK
0 question about this device. Answer the ones you know or ask your own.
Ask a new question about this device
Download the instructions for your Hi-Fi System in PDF format for free! Find your manual DAP-1525 - D-LINK and take your electronic device back in hand. On this page are published all the documents necessary for the use of your device. DAP-1525 by D-LINK.
USER MANUAL DAP-1525 D-LINK
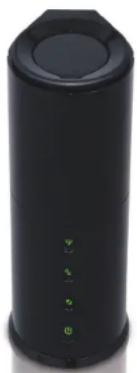
natural_image
Black cylindrical electronic device with control buttons and indicator lights (no visible text or symbols)User Manual
amPLiFi™ Wi-Fi Booster
DAP-1525
Table of Contents
Product Overview 4
Package Contents 4
System Requirements 4
Introduction 5
Features 6
Hardware Overview 7
Connections 7
LEDs 8
Front View 9
Installation....10
Before you Begin 10
Wireless Installation Considerations ....11
AP/Bridge 12
AP Mode 12
Bridge Mode 13
Create a Full MediaBand (5GHz wireless)
Network 14
One Touch AP Configuration ....15
Configuration for AP Mode ....16
Web-based Configuration Utility 16
Setup Wizard ....17
Wireless Setup Wizard 18
Add Wireless Device With WPS 20
Manual Configuration 22
Wireless Settings 22
LAN Setup 24
LAN Setup 25
Static IPv6 25
LAN Setup 26
Auto-configuration ......26
Advanced 27
MAC Address Filter 27
Advanced Network 28
Guest Zone 29
Schedule 30
Tools 31
Admin 31
Time 32
System 33
Language Pack Upgrade 34
Firmware 34
System Check 36
Status 37
Device Info 37
Wireless 38
Logs 39
Statistics 40
IPV6 41
Support 42
Configuration for Bridge Mode ....43
Web-based Configuration Utility 43
Table of Contents
Setup Wizard 44
Wireless 49
Wireless MAC Cloning 49
Lan Setup 50
Lan Setup 51
Static IPv6 ....51
Lan Setup 52
Auto-configuration ....52
Advanced ....53
Schedule 53
Tools 54
Admin ....54
Time 55
System 56
Language Pack 57
Firmware 57
System Check 59
Status 60
Device Info 60
Logs 61
IPv6 62
Support 63
Wireless Security 64
What is WPA? 64
Configure WEP (AP Mode) 65
Configure WPA-Personal (AP Mode) 66
Configure WPA-Enterprise (AP Mode) 67
Configure WEP (Bridge Mode) 68
Configure WPA-Personal (Bridge Mode) 69
Connect to a Wireless Network ....70
Using Windows ^® 7....70
Using Windows Vista ^® .....73
Configure Security 75
Using Windows ^® XP ....76
Configure Security ....77
Troubleshooting 79
Wireless Basics 83
What is Wireless? 84
Tips 86
Wireless Modes 87
Networking Basics 88
Check your IP address 88
Statically Assign an IP address 89
Technical Specifications 90
Contacting Technical Support 91
Warranty 92
Registration 98
Package Contents
• D-Link DAP-1525 Wi-Fi Booster
- Power Adapter
• CAT5 Ethernet Cable
• CD-ROM with User Manual
Note: Using a power supply with a different voltage than the one included with the DAP-1525 will cause damage and void the warranty for this product.
natural_image
Black cylindrical electronic device with green indicator lights (no visible text or symbols)System Requirements
- Computers with Windows ^ , Macintosh ^ , or Linux-based operating systems with an installed Ethernet adapter
- Internet Explorer Version 6.0 or higher, Firefox 3.0 or higher, Safari 3.0 or higher, or Chrome 2.0 or higher (for configuration)
Introduction
TOTAL PERFORMANCE
Combines award winning access point features and 802.11n wireless technology to provide the best wireless performance.
TOTAL SECURITY
The most complete set of security features including WPA2 and MAC Address Control to protect your network against outside intruders.
TOTAL COVERAGE
Provides greater wireless signal rates even at farther distances for best-in-class Whole Home Coverage.
ULTIMATE PERFORMANCE
The D-Link Wi-Fi Booster (DAP-1525) is a 802.11n compliant device that delivers real world performance of up to 650% faster than an 802.11g wireless connection (also faster than a 100Mbps wired Ethernet connection). Create a secure wireless network to share photos, files, music, video, printers, and network storage throughout your home. Connect the Wi-Fi Booster to router and share your high-speed Internet access with everyone on the network. In addition, this Wireless Bridge includes a Quality of Service (QoS) engine that keeps digital phone calls (VoIP) and online gaming smooth and responsive, providing a better Internet experience.
EXTENDED WHOLE HOME COVERAGE
Powered by smart beam technology, this high performance Wireless AP/Bridge provides superior Whole Home Coverage while reducing dead spots. The Wi-Fi Booster is designed for use in bigger homes and for users who demand higher performance networking. Add an Xtreme N® Duo notebook or desktop adapter and stay connected to your network from virtually anywhere in your home.
TOTAL NETWORK SECURITY
The Wi-Fi Booster supports all of the latest wireless security features to prevent unauthorized access, be it from over the wireless network or from the Internet. Support for WPA and WEP standards ensure that you'll be able to use the best possible encryption method, regardless of your client devices.
* Maximum wireless signal rate derived from IEEE Standard 802.11g, 802.11a and 802.11n specifications. Actual data throughput will vary. Network conditions and environmental factors, including volume of network traffic, building materials and construction, and network overhead, lower actual data throughput rate. Environmental conditions will adversely affect wireless signal range.
Features
- Faster Wireless Networking - The DAP-1525 provides up to 300Mbps* wireless connection with other 802.11n wireless clients. This capability allows users to participate in real-time activities online, such as video streaming, online gaming, and real-time audio. The performance of this 802.11n wireless access point gives you the freedom of wireless networking at speeds 650% faster than 802.11g.
- Compatible with 802.11a and 802.11g Devices - The DAP-1525 is still fully compatible with the IEEE 802.11a/g standard, so it can connect with existing 802.11a/g PCI, USB, and Cardbus adapters.
- Advanced Firewall Features - The Web-based user interface displays advanced network management features including Content Filtering, which allows easily applied content filtering based on MAC Address.
- WPS PBC- (Wi-Fi Protected Setup Push Button Configuration) Push Button Configuration is a button that can be pressed to add the device to an existing network or to create a new network. A virtual button can be used on the utility while a physical button is placed on the side of the device.
This easy setup method allows you to form a secured wireless link between the DAP-1525 and another WPS enabled device. A PC is no longer needed to log into the Web-based interface.
- WPS PIN - (Wi-Fi Protected Setup Personal Identification Number) A PIN is a unique number that can be used to add the access point to an existing network or to create a new network. The default PIN may be printed on the bottom of the access point. For extra security, a new PIN can be generated. You can restore the default PIN at any time. Only the Administrator ("admin" account) can change or reset the PIN.
- User-friendly Setup Wizard - Through its easy-to-use Web-based user interface, the DAP-1525 lets you control what information is accessible to those on the wireless network, whether from the Internet or from your company's server. Configure your access point to your specific settings within minutes.
Hardware Overview
Connections
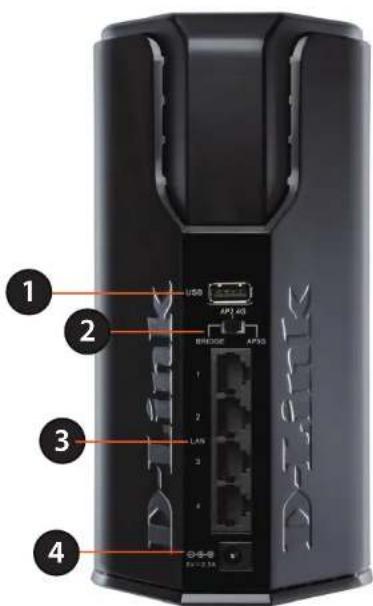
| 1USB Use this port to connect a USB 2.0 printer or a Storage Device | ||
| 2 | Mode Switch | Three-way switch used to select Bridge, AP 2.4GHz or AP 5GHz |
| 3 | LAN Ports (1-4) | Connect 10/100/1000 Ethernet devices such as computers, switches, and hubs |
| 4Power Receptor Receptor for the supplied power adapter | ||
LEDs
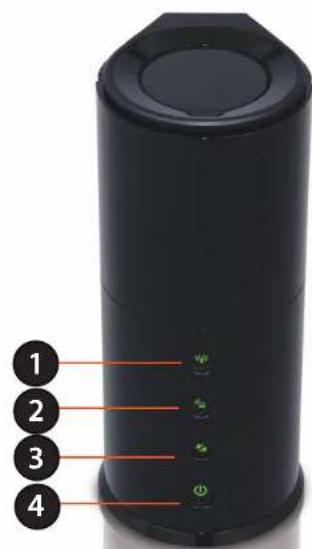
| 1 | Wireless LED (AP Mode) A solid green light will indicate that AP Mode is ON. | |
| 2 | Wireless LED (Bridge Mode) | A solid green light indicates a link has been established. A blinking green indicates the device is fail to connect to the AP. |
| 3 | WPS Button | Press the WPS button for 1 second to initiate the WPS process. The button will flash green while a WPS connection is being established. The button will light green for 5 seconds if a successful WPS connection has been made. |
| 4 | Power LED/Button | A solid light indicates a proper connection to the power supply and also use this button to power on/power off the device. |
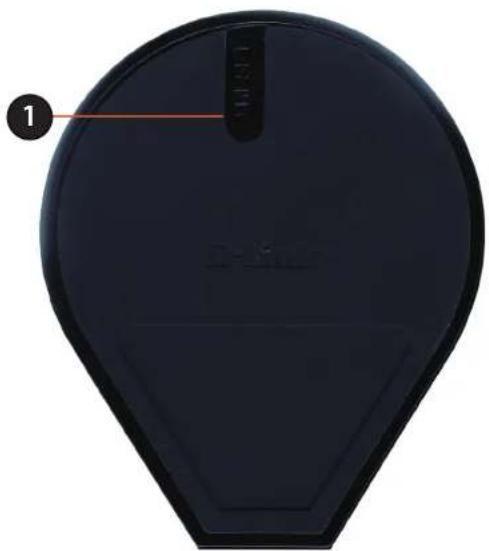
Front View
natural_image
Top-down view of a black circular device with a red indicator light and label '1' (no readable text or symbols on the device itself)1 Reset Button Press the button to restore the device to its original factory default settings.
Installation
This section will walk you through the installation process. Placement of the DAP-1525 is very important. Do not place the DAP-1525 in an enclosed area such as a closet, cabinet, or in the attic or garage.
Before you Begin
Please configure the Wireless Bridge with the computer that was last connected directly to your modem. Also, you can only use the Ethernet port on your modem. If you were using the USB connection before using the Wireless Bridge, then you must turn off your modem, disconnect the USB cable and connect an Ethernet cable to the Internet port on the Wireless Bridge, and then turn the modem back on. In some cases, you may need to call your ISP to change connection types (USB to Ethernet).
If you have DSL and are connecting via PPPoE, make sure you disable or uninstall any PPPoE software such as WinPoet, Broadjump, or Enternet 300 from your computer or you will not be able to connect to the Internet.
Wireless Installation Considerations
The D-Link wireless access point lets you access your network using a wireless connection from virtually anywhere within the operating range of your wireless network. Keep in mind, however, that the number, thickness and location of walls, ceilings, or other objects that the wireless signals must pass through, may limit the range. Typical ranges vary depending on the types of materials and background RF (radio frequency) noise in your home or business. The key to maximizing wireless range is to follow these basic guidelines:
- Keep the number of walls and ceilings between the D-Link access point and other network devices to a minimum. Each wall or ceiling can reduce your adapter's range from 3-90 feet (1-30 meters.) Position your devices so that the number of walls or ceilings is minimized.
- Be aware of the direct line between network devices. A wall that is 1.5 feet thick (.5 meters), at a 45-degree angle appears to be almost 3 feet (1 meter) thick. At a 2-degree angle it looks over 42 feet (14 meters) thick! Position devices so that the signal will travel straight through a wall or ceiling (instead of at an angle) for better reception.
- Building Materials make a difference. A solid metal door or aluminum studs may have a negative effect on range. Try to position access points, wireless access points, and computers so that the signal passes through drywall or open doorways. Materials and objects such as glass, steel, metal, walls with insulation, water (fish tanks), mirrors, file cabinets, brick, and concrete will degrade your wireless signal.
- Keep your product away (at least 3-6 feet or 1-2 meters) from electrical devices or appliances that generate RF noise.
- If you are using 2.4GHz cordless phones or X-10 (wireless products such as ceiling fans, lights, and home security systems), your wireless connection may degrade dramatically or drop completely. Make sure your 2.4GHz phone base is as far away from your wireless devices as possible. The base transmits a signal even if the phone is not in use.
AP/Bridge
Depending on how you want to use your DAP-1525 will determine which mode you use. This section will help you figure out which setting works with your setup.
AP Mode
If you already have a wired or wireless router, and want to add a MediaBand (5GHz wireless), to your network, you will need to move the switch on the back panel of the DAP-1525 to "AP 5GHz".
- Ensure you have a broadband Internet connector such as a cable or DSL client line that connects the
- Internet to your home or office.
- Connect the cable properly or install the modem.
- Connect the cable or modem with the broadband Access Point.
- Connect the DAP-1525's Ethernet port to your LAN.
- Move the switch to wireless 2.4GHz AP, or 5GHz AP Mode.
- Connect your PC or notebook to the DAP-1525 using the PC or notebook's wireless adapter.
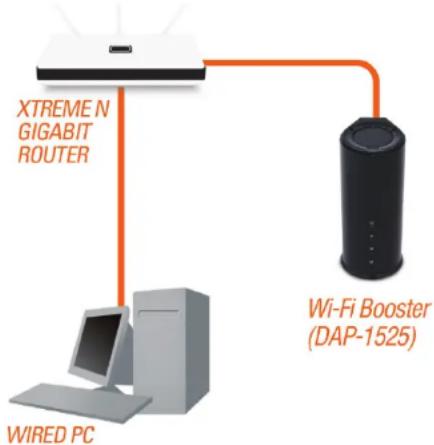
flowchart
graph TD
    A["XTREME N GIGABIT ROUTER"] --> B["Wi-Fi Booster (DAP-1525)"]
    C["WIRED PC"] --> B
Bridge Mode
If you want to wirelessly connect multiple Ethernet enabled devices such as game consoles, media players, or network attached storage devices you will need to move the switch on the back panel of the DAP-1525 to "Bridge".
To use the DAP-1525 in Bridge Mode, follow the steps below:
- Ensure you have a broadband Internet connector, such as a cable or DSL client line that connects the Internet to your home or office.
- Connect the cable properly or install the modem.
- Connect the cable or modem with the broadband Access Point.
- Move the switch to Bridge Mode.
- Connect your PC or notebook to the DAP-1525 using the PC or notebook's wireless adapter.
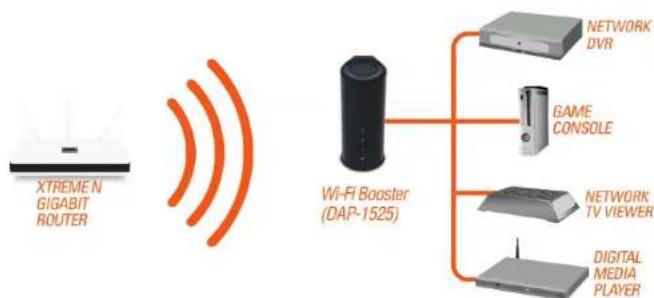
flowchart
graph LR
    A["XTREME N GIGABIT ROUTER"] --> B["Wi-Fi Booster (DAP-1525)"]
    B --> C["NETWORK DVR"]
    B --> D["GAME CONSOLE"]
    B --> E["NETWORK TV VIEWER"]
    B --> F["DIGITAL MEDIA PLAYER"]
Create a Full MediaBand (5GHz wireless) Network
If you have two DAP-1525 devices and want to create a wireless network with full MediaBand technology you will need to connect one Wireless Bridge to your router and move the switch on the back panel to "AP". The second Wireless Bridge will need to be placed next to your Ethernet-enabled devices and you will need to move the switch on the back panel to "Bridge".
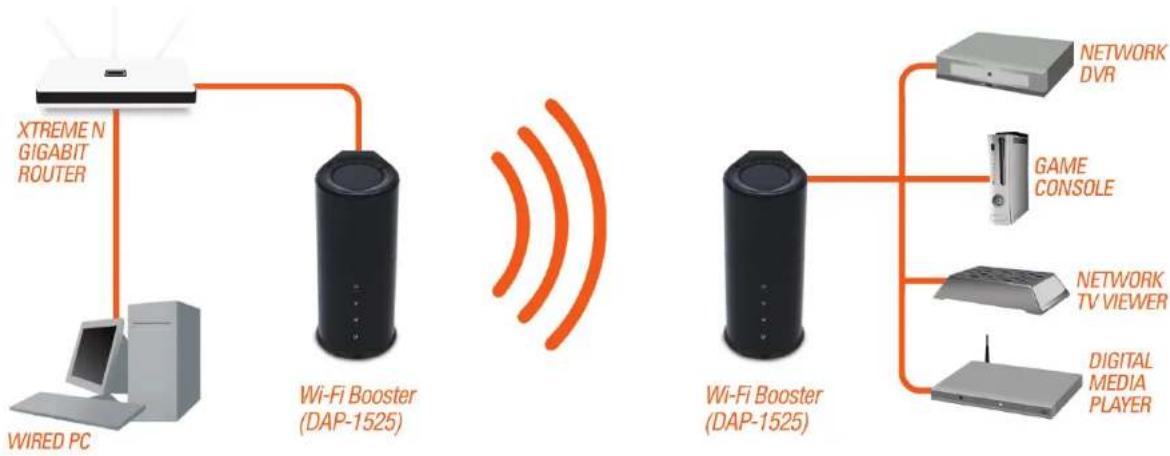
flowchart
graph LR
    A["XTREME N GIGABIT ROUTER"] --> B["Wi-Fi Booster (DAP-1525)"]
    C["WIRED PC"] --> B
    B --> D["Network DVR"]
    B --> E["GAME CONSOLE"]
    B --> F["NETWORK TV VIEWER"]
    B --> G["DIGITAL MEDIA PLAYER"]
One Touch AP Configuration
This feature makes the Wireless Access Point to have the ability to exchange/learn the Wireless Profile from another Wireless Router/Access Point.
- Press the WPS button on your existing Router or Access Point. WPS LED will flash on and off.
- Press WPS Push Button on the DAP-1525 and hold it for 5 seconds.
- When One click AP setup is complete, your DAP-1525 will have the same Wireless settings as your existing Router or AP.
Configuration for AP Mode
This section will show you how to configure your new D-Link wireless access point using the web-based configuration utility.
Web-based Configuration Utility
To access the configuration utility, open a web browser such as Internet Explorer and enter http://dlinkap or http://192.168.0.50 in the address field.
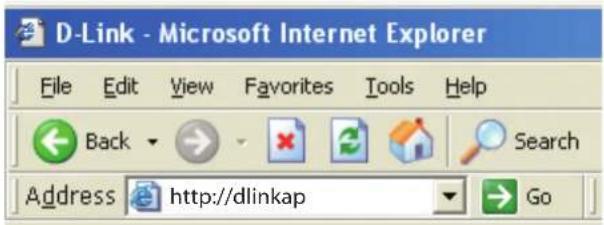
Select Admin from the drop-down menu and then enter your password. Leave the password blank by default.
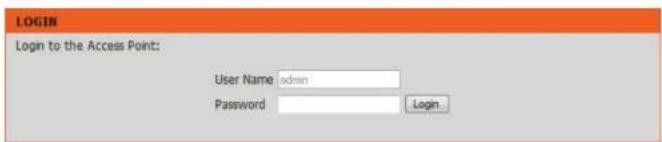
If you get a Page Cannot be Displayed error, please refer to the Troubleshooting section for assistance.
Setup Wizard
Click Launch Wireless Setup Wizard to quickly configure your access point.
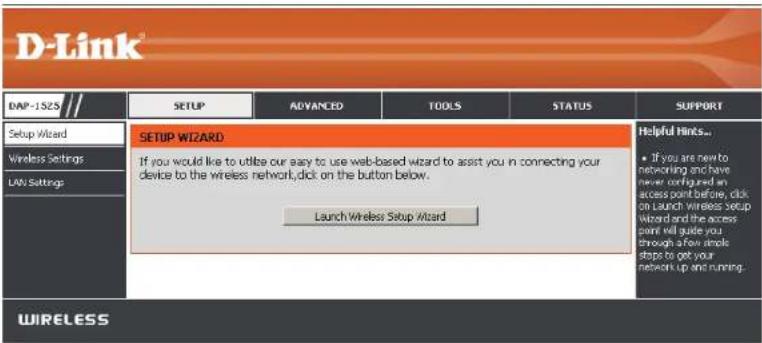
A welcome window appears. Click the Next button to continue.
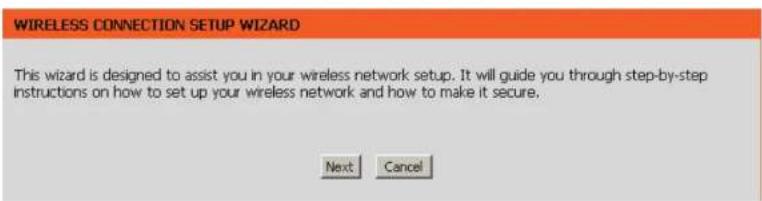
Wireless Setup Wizard
This Wizard is designed to assist you in connecting your wireless device to your access point. It will guide you through step-by-step instructions on how to get your wireless device connected.
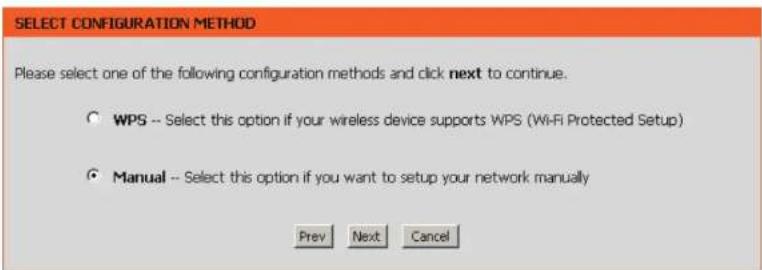
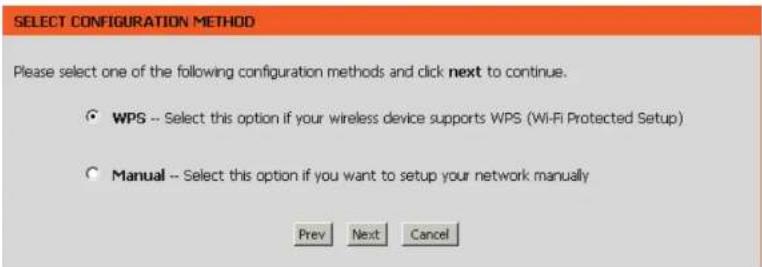
You may select either WPS or Manual for the configuration method. Select Manual as the configuration method to set up your network manually.
Refer to page 20 for WPS configuration.
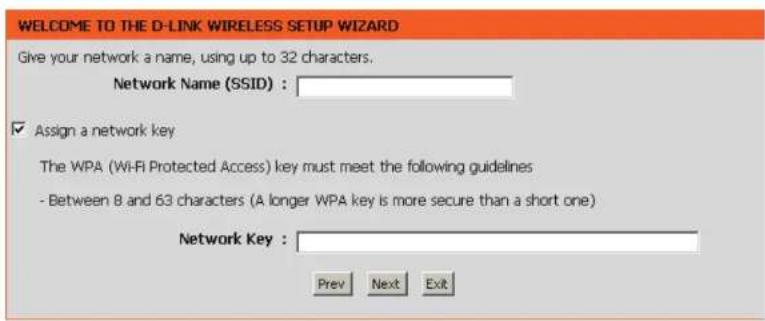
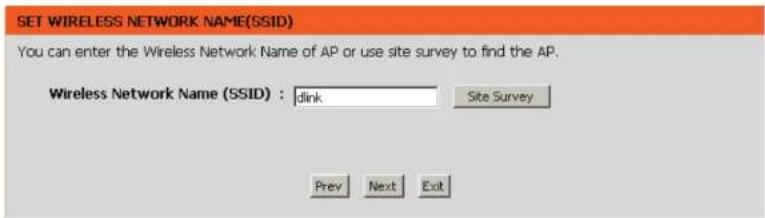
Enter a network name (SSID). Tick the Assign a network key check box to manually enter a WPA key between 8 and 63 characters. Deselect the Assign a network key check box to automatically assign a network key.
Click Next to continue.
Section 3 - Configuration
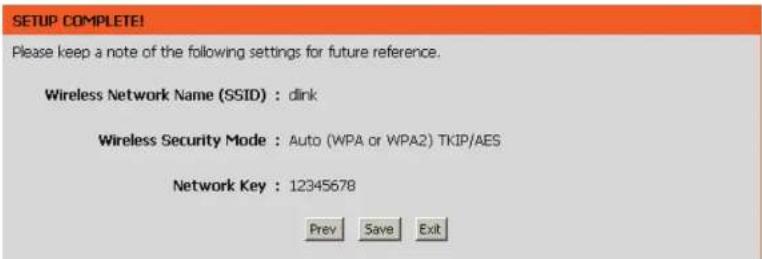
This window displays the settings.
Click Save to save your network settings.
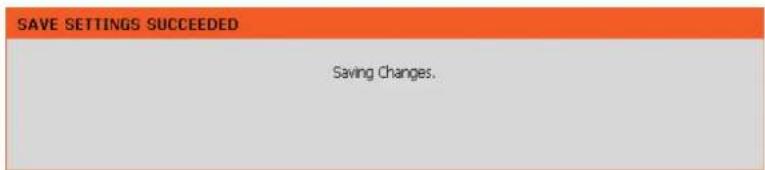
The following screen opens to indicate that you have successfully saved your new settings.
Add Wireless Device With WPS
This Wizard is designed to assist you in your wireless network setup. It will guide you through step-by-step instructions on how to set up your wireless network and how to make it secure.
Select WPS and click Next.
Select PIN to use your PIN number from your wireless device to connect to your network.
For PBC configuration, skip to page 18.
Click Connect to continue.
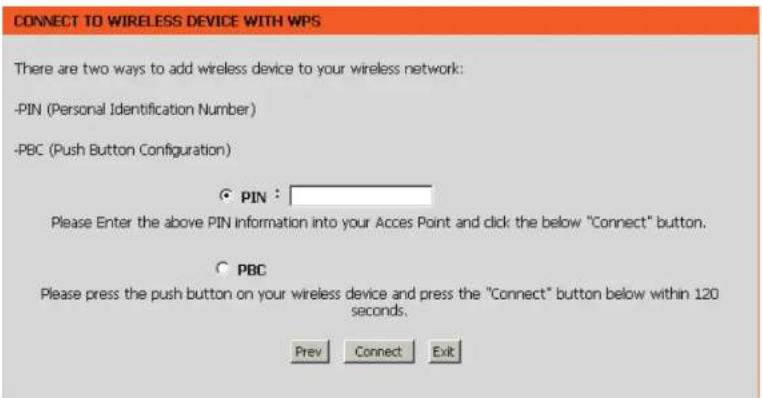
Section 3 - Configuration
Start WPS on the wireless device you are adding to your wireless network to complete the setup.
USING PIN NUMBER
Please start WPS on the wireless device you are adding to your network within 118 seconds.
Select PBC to use the Push Button Configuration in order to connect to your network.
Click Connect to continue.
CONNECT TO WIRELESS DEVICE WITH WPS
There are two ways to add wireless device to your wireless network:
-PIN (Personal Identification Number)
-PBC (Push Button Configuration)
C PIN
Please Enter the above PIN information into your Acces Point and click the below "Connect" button.
PBC
Please press the push button on your wireless device and press the "Connect" button below within 120 seconds.
Prev
Connect
Ex
Press down the Push Button on the wireless device that you are adding to your network to complete the setup.
VIRTUAL PUSH BUTTON
Please press down the Push Button (physical or virtual) on the wireless device you are adding to your wireless network within 117 second...
Manual Configuration Wireless Settings
Wireless Band: Displays the band you are using.
Enable Wireless: Check the box to enable the wireless function. If you do not want to use wireless, uncheck the box to disable all the wireless functions.
Wireless When you are browsing for available wireless networks, Network Name: this is the name that will appear in the list (unless Visibility Status is set to Invisible, see below). This name is also referred to as the SSID. For security purposes, it is highly recommended to change from the pre-configured network name.
Enable Auto The Auto Channel Scan setting can be selected to allow Channel Scan: the DAP-1525 to choose the channel with the least amount of interference.
Wireless Indicates the channel setting for the DAP-1525. The Channel: Channel can be changed to fit the channel setting for an existing wireless network or to customize the wireless network. If you enable Auto Channel Scan, this option will be grayed out.
Transmission Select the transmit rate. It is strongly suggested to select Rate: Best (automatic) for best performance.
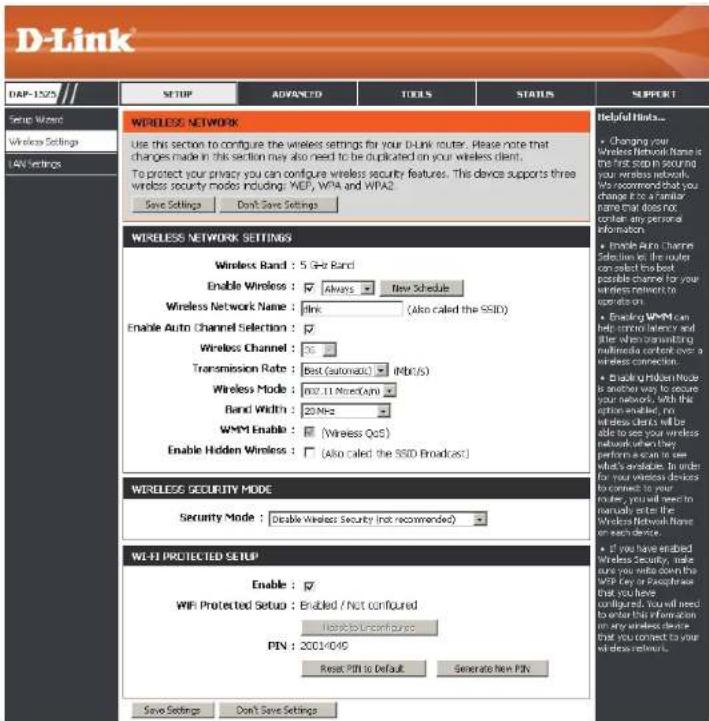
Wireless Mode: The current wireless mode is set to Access Point, it will create a wireless infrastructure network.
Band Width: Select the Band Width:
Auto 20/40 - Select if you are using both 802.11n and non-802.11n wireless devices. 20MHz - Select if you are not using any 802.11n wireless clients.
Section 3 - Configuration
WMM Enable: WMM (Wi-Fi Multimedia) is QoS for your wireless network. Tick this box to improve the quality of video and voice applications for your wireless clients. This feature is not available in 802.11n configurations.
Security Mode: Refer to page 69 for more information regarding the wireless security.
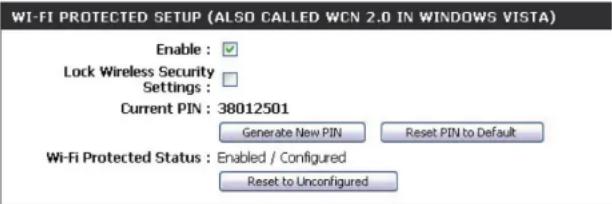
Enable: Enable the Wi-Fi Protected Setup feature.
PIN: Shows the current value of the access point's PIN.
Generate New Create a random number that is a valid PIN. This becomes the access point's PIN. You can then copy this PIN to the user interface PIN: of the user.
Reset PIN to Default: Restore the default PIN of the access point.
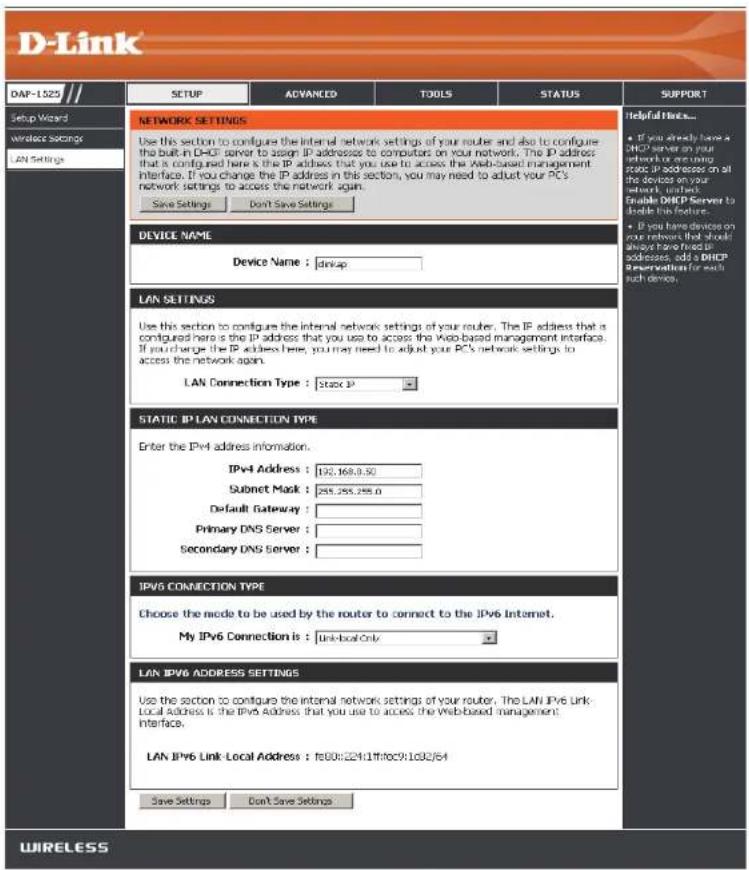
LAN Setup
This section will allow you to change the local network settings of the access point and to configure the DHCP settings.
Device Name: Enter the Device Name of the AP. It is recommended to change the Device Name if there is more than one D-Link device within the subnet.
LAN Connection Use the drop-down menu to select Static IP. Type:
IPv4 Address: If you change the IP address, once you click Save Settings, you will need to enter the new IP address in your browser to get back into the configuration utility.
Subnet Mask: Enter the subnet mask. The default subnet mask is 255.255.255.0.
Default Gateway: Enter the default gateway IP address.
Primary DNS
Server: Enter the primary DNS server IP address.
Secondary DNS Server: Enter the secondary DNS server IP address.
My IPv6 Use the drop-down menu to select the IPv6 mode Connection is: connected to the IPv6 Internet.
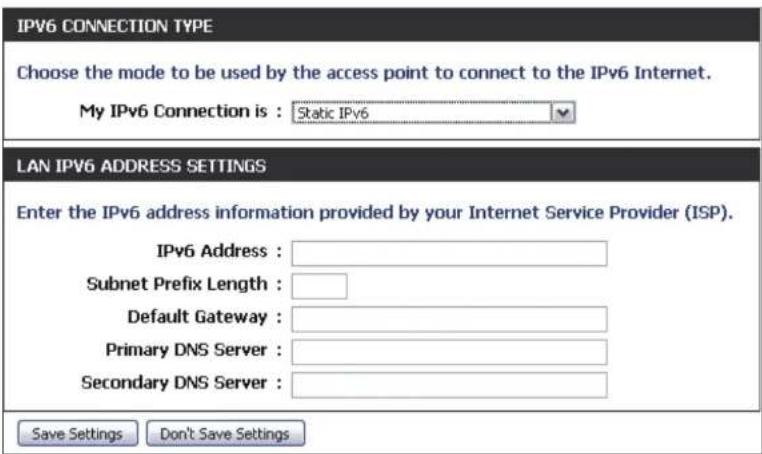
LAN Setup Static IPv6
When using the My IPv6 Connection is drop-down menu to select the IPv6 mode, the LAN IPv6 Address Settings section will vary based on the selected mode. Select Static IPv6 to see the following configuration.
IPv6 Address: Enter the static IPv6 address provided by your Subnet Prefix Internet Service Provider.
Length: Enter the IPv6 subnet prefix length. Default
Gateway: Enter the default gateway IP address.
Primary DNS Server: Enter the primary DNS server IP address.
Secondary DNS Server: Enter the secondary DNS server IP address.
LAN Setup Auto-configuration
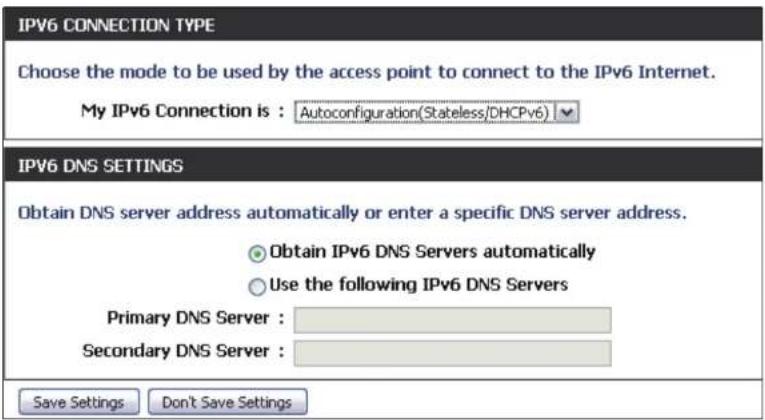
When using the My IPv6 Connection is drop-down menu to select the IPv6 mode, the LAN IPv6 Address Settings section will vary based on the selected mode. Select Autoconfiguration (Stateless/DHCPv6) to see the following configuration.
Obtain IPv6 Enter the static IPv6 address provided by your DNS Servers Internet Service Provider. automatically:
Use the following Enter the IPv6 subnet prefix length. IPv6 DNS Servers:
Primary DNS Enter the primary DNS server IP address. Server:
Secondary DNS Server: Enter the secondary DNS server IP address.
Advanced MAC Address Filter
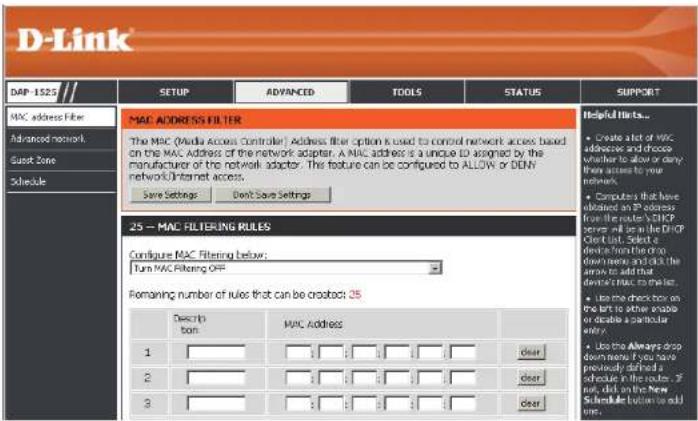
The MAC address filter section can be used to filter network access by machines based on the unique MAC addresses of their network adapter(s). It is most useful to prevent unauthorized wireless devices from connecting to your network. A MAC address is a unique ID assigned by the manufacturer of the network adapter.
Configure When Turn MAC Filtering OFF is selected, MAC MAC Filtering: addresses are not used to control network access. When Turn MAC Filtering ON and ALLOW computers listed to access the network is selected, only computers with MAC addresses listed in the MAC Address List are granted network access. When Turn MAC Filtering ON and DENY computers listed to access the network is selected, any computer with a MAC address listed in the MAC Address List is refused access to the network.
Rules: Enter a description of the filtering rule in the Description field and enter the MAC address to add the rule. Click the corresponding clear button to delete the rule.
Advanced Network
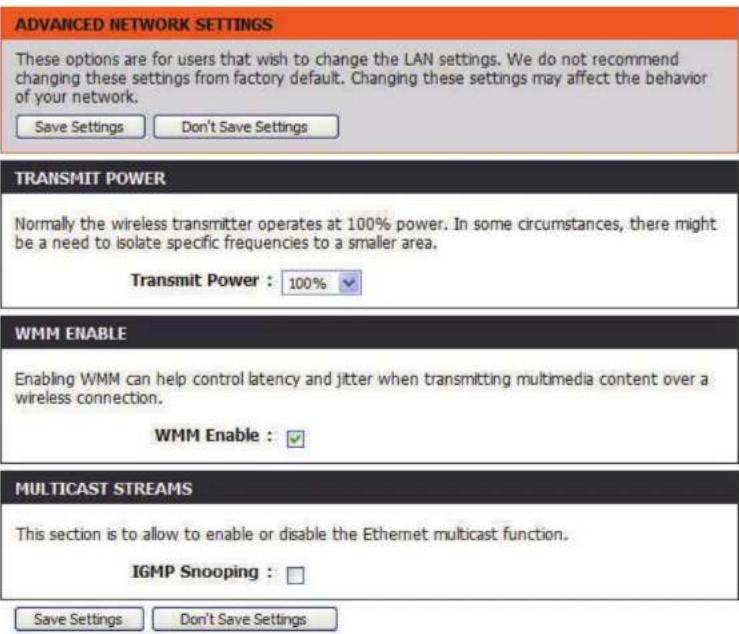
This window is used to change the advanced LAN settings.
Transmit Power: User the drop-down menu to select the transmit power of the antennas.
WMM Enable: WMM is QoS for your wireless network. This will improve the quality of video and voice applications for your wireless clients.
IGMP Snooping: This enables IGMP snooping for the wireless connection. We recommend enabling this if you often use multicast services such as video conference and streaming audio/video.
Guest Zone
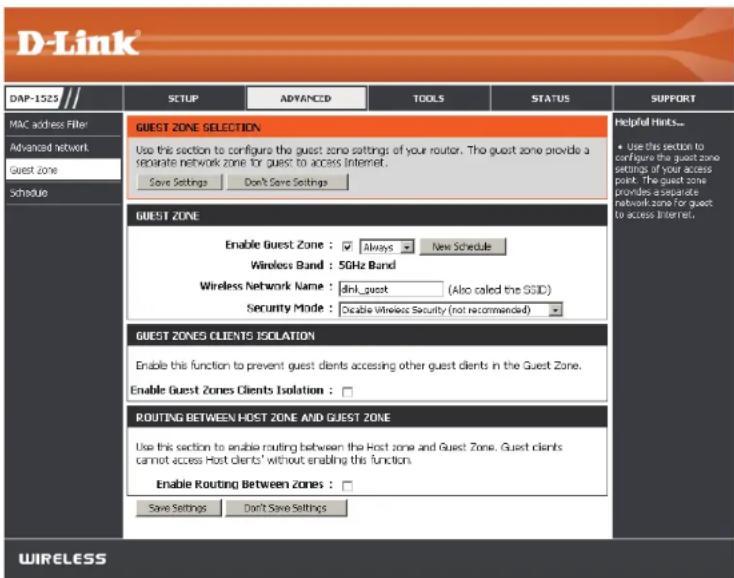
The Guest Zone feature will allow you to create temporary zones that can be used by guests to access the Internet. These zones will be separate from your main wireless network.
Enable Guest Zone: Check to enable the Guest Zone feature. Select the schedule of time when the Guest Zone will be active. The schedule may be set to Always, which will allow the particular service to always be enabled. You can create your own times in the Tools > Schedules section.
Wireless Band: Display the wireless band status.
Wireless Network Enter a wireless network name (SSID) that is Name: different from your main wireless network.
Security Mode: Refer to Section 4 - Wireless Security for more information regarding wireless security.
Enable Guest Tick the check box to prevent the guest clients Zones Clients from accessing other guests in the guest zone. Isolation:
Enable Routing Check to allow network connectivity between Between Zones: the different zones created.
Schedule
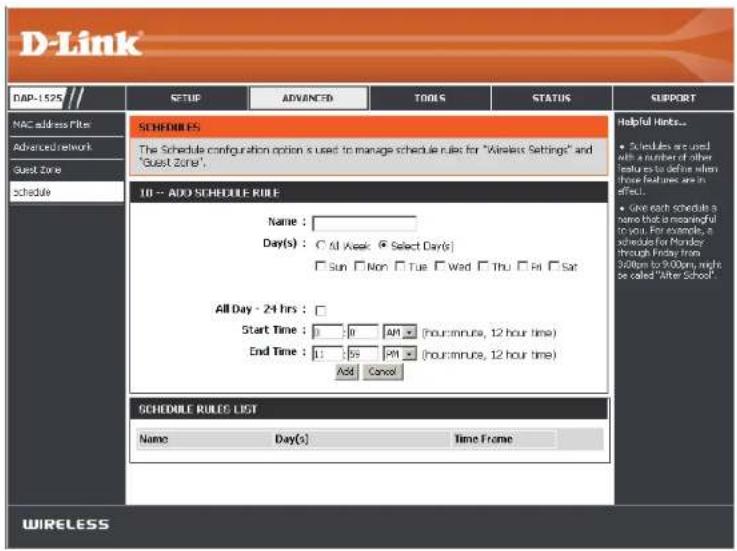
This section allows you to manage schedule rules for Wireless Settings and Guest Zone.
Name: Enter a name for your new schedule.
Days: Select a day, a range of days, or All Week to include every day.
All Day-24hrs: Check All Days or enter a start and end time for your schedule.
Add: Click Add to save your schedule. You must click Save Settings at the top for your schedules to go into effect.
Schedule Rules The list of schedules will be listed here. Click the List: Edit icon to make changes or click the Delete icon to remove the schedule.
Tools Admin
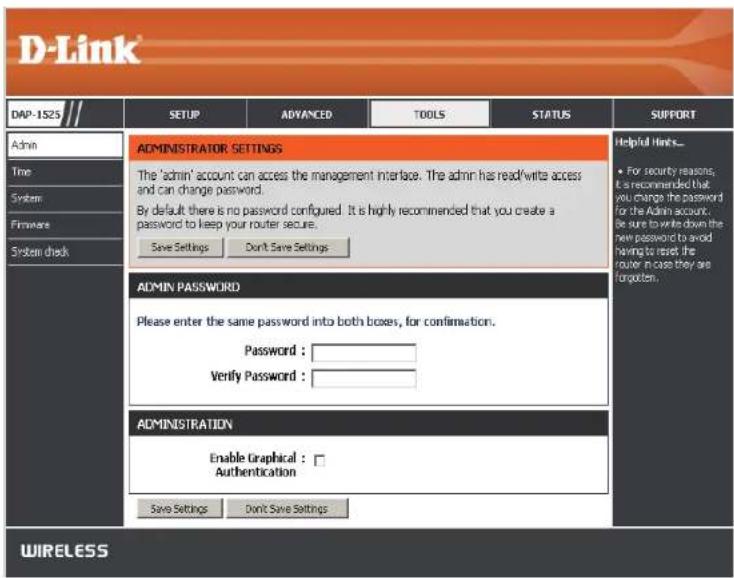
The "admin" account has the read and write access right. You can also enable Remote Management.
Password: Enter a new password for the Administrator Login Name. The administrator can make changes to the settings.
Verify Password: Enter the same password that you entered in the previous textbox in order to confirm its accuracy.
Enable Graphical Check to enable graphical authentication. Authentication:
Time
The Time Configuration option allows you to configure, update, and maintain the correct time on the internal system clock. From this section you can set the time zone that you are in. Daylight Saving can also be configured to automatically adjust the time when needed.
Time Zone: Select the Time Zone from the drop-down menu.
Enable To select Daylight Saving time manually, click the Daylight Enable Daylight Saving check box. Next use the drop-Saving: down menu to select a Daylight Saving Offset and then enter a start date and an end date for daylight saving time.
Sync your Click this button to set the device's time the computer's same to local PC. time settings:
Automatically Click the check box to enable the device to synchronize automatically synchronize with a D-Link NTP with D-Link's Server. NTP stands for Network Time Protocol. Internet time NTP synchronizes computer clock times in a server: network of computers. This will only connect to a server on the Internet, not a local server.
NTP Server Select one of the D-Link NTP Servers from the Used: drop-down menu. The DAP-1525 will then synchronize its clock to be the same time as the D-Link Internet time server. Click the Update Now button to synchronize with the D-Link Internet time server immediately.
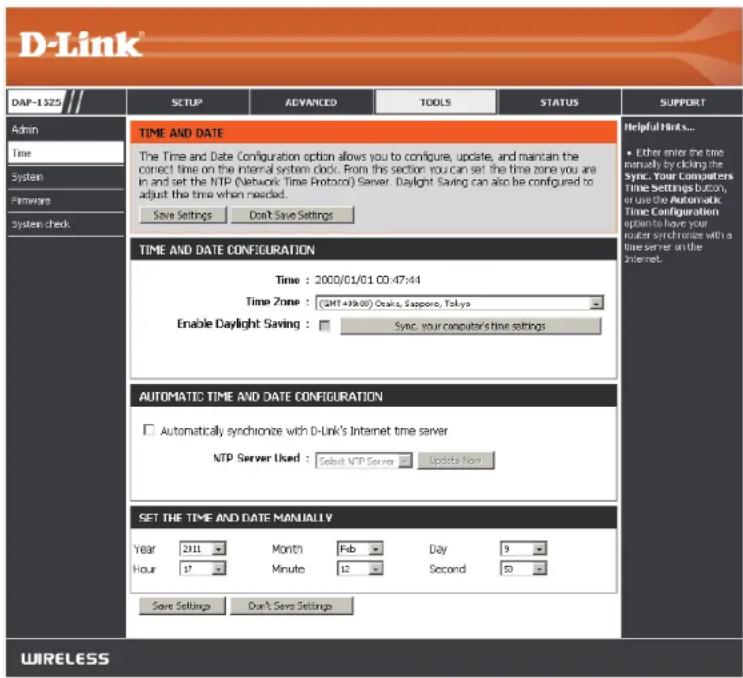
Set the Time To manually input the time, use the drop-down menus to enter the values in these fields for the Year, Month, Day, Hour, and Date Minute, and Second.
Manually:
Manual: Click the Save Settings button to save any changes made.
System
Save Settings Use this option to save the current access point to Local configuration settings to a file on the hard disk of the Hard Drive: computer you are using. First, click the Save button. You will then see a file dialog, where you can select a location and file name for the settings.
Load Settings Use this option to load previously saved access point from Local configuration settings. First, use the Browse control Hard Drive: to find a previously save file of configuration settings. Then, click the Load button to transfer those settings to the access point.
Restore This option will restore all configuration settings back to Factory to the settings that were in effect at the time the access Default point was shipped from the factory. Any settings that Settings: have not been saved will be lost, including any rules that you have created. If you want to save the current access point configuration settings, use the Save button above.
Note: Restoring the factory default settings will not reset the Wi-Fi Protected Status to Not Configured.
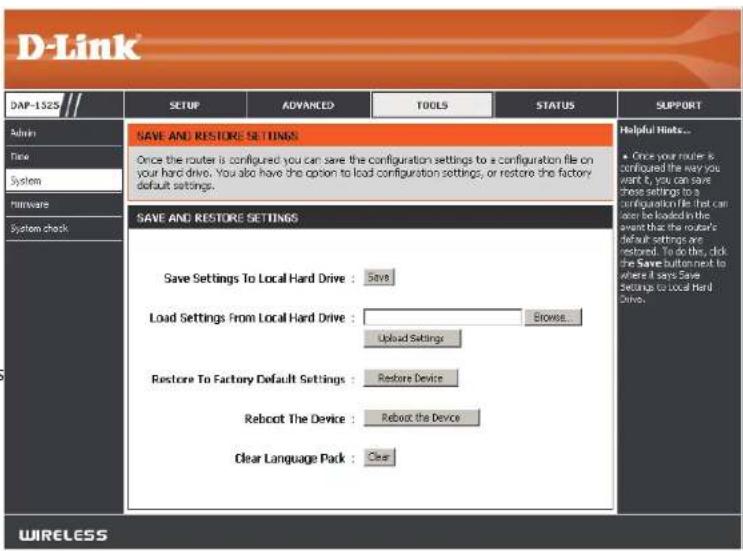
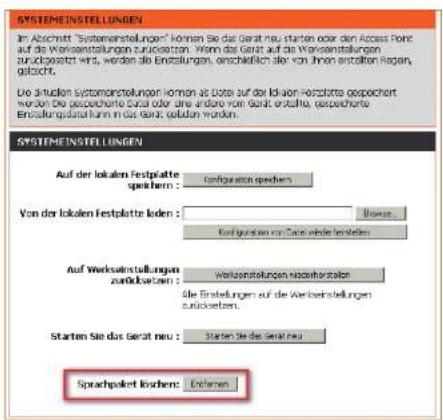
Reboot the Click to reboot the access point.
Device:
Clear Click to clear the language pack. This will put the web Language UI back to English. Pack:
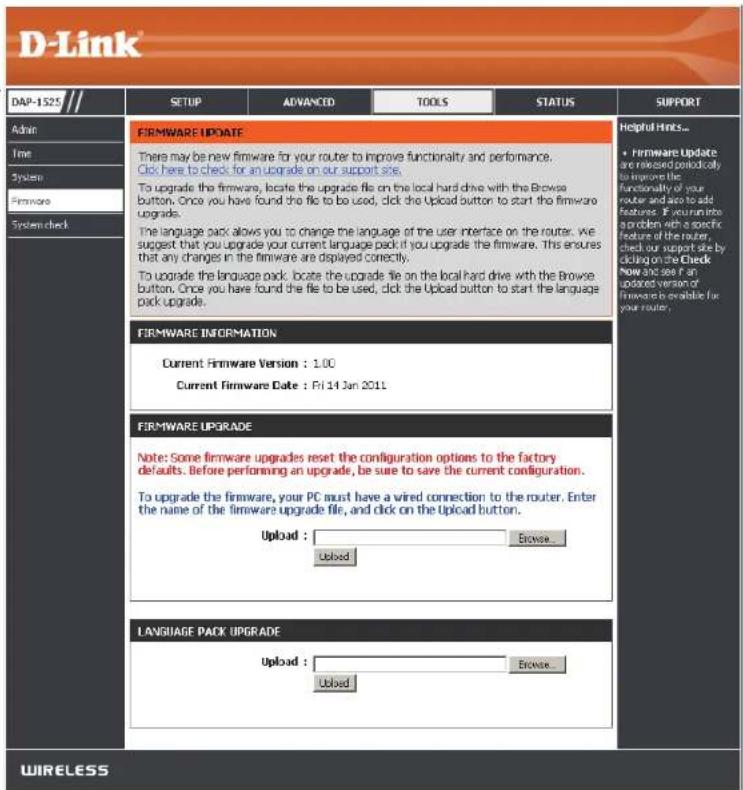
Firmware
You can upgrade the firmware of the access point here. Make sure the firmware you want to use is on the local hard drive of the computer. Click on Browse to locate the firmware file to be used for the update. Please check the D-Link support website for firmware updates at http://support.dlink.com. You can download firmware upgrades to your hard drive from this site.
Browse: After you have downloaded the new firmware, click Browse to locate the firmware update on your hard drive. Click Upload to complete the firmware upgrade.
Upload: Once you have a firmware update on your computer, use this option to browse for the file and then upload the information into the access point.
Language Pack Upgrade
You can change the language of the web UI by uploading available language packs.
Browse: After you have downloaded the new language pack, click Browse to locate the language pack file on your hard drive. Click Upload to complete the language pack upgrade.
Section 3 - Configuration
If you load a language pack and would like to go back to English, click Tools > System and click on Clear next to Clear Language Pack.
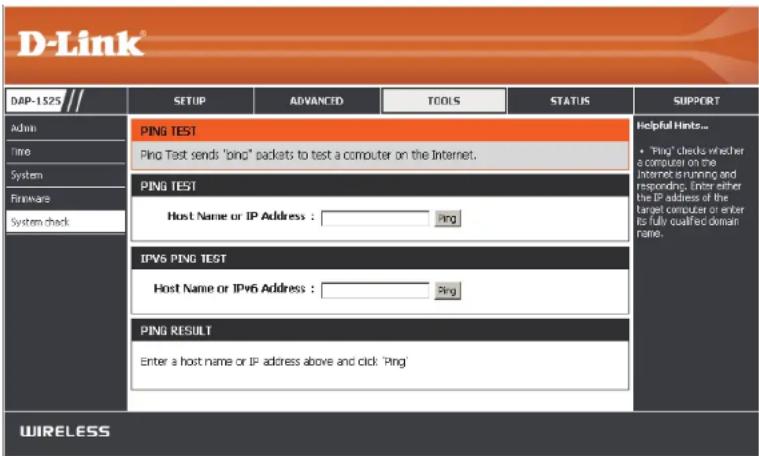
This sections Ping Tests by sending ping packets to test if a computer on the internet is running and responding.
Ping Test / The Ping Test / IPv6 Ping Test is used to send Ping packets to test if a computer is on the Internet. Enter the host name or IP/IPv6 address that you wish to Ping, and click Ping.
Ping Result: The results of your ping attempts will be displayed here.
Status Device Info
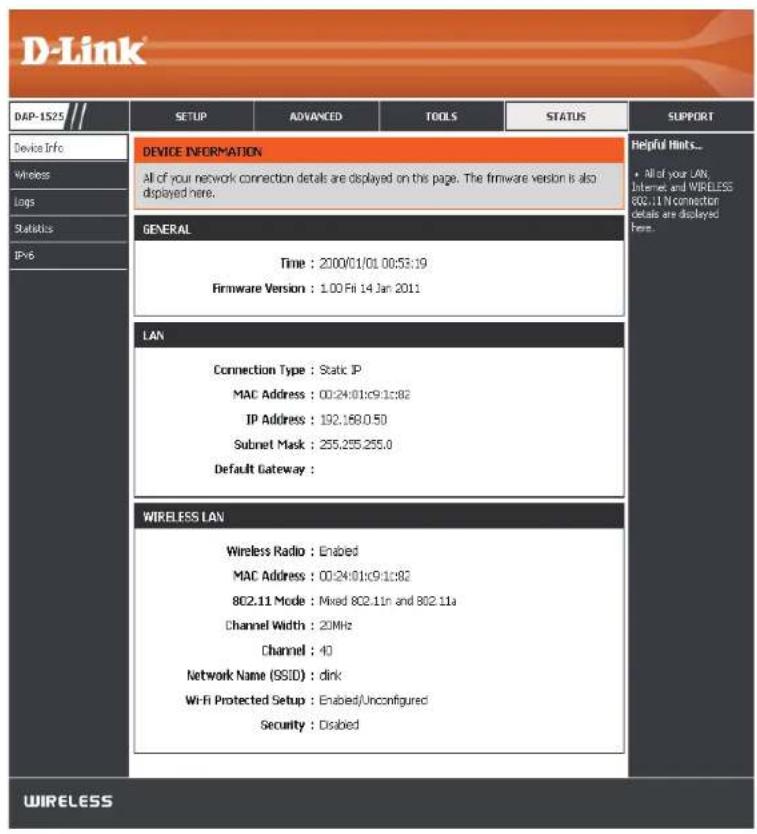
This page displays the current information for the DAP-1525. It will display the LAN and wireless LAN information.
General: Displays the access point's time and firmware version.
LAN: Displays the MAC address and the private (local) IP settings for the access point.
Wireless LAN: Displays the wireless MAC address and your wireless settings such as SSID and Channel.
Wireless
The wireless section allows you to view the wireless clients that are connected to your wireless access point.
SSID: Displays the name of the device connected to your network.
MAC Address: Will display the Ethernet ID (MAC address) of the wireless client.
UpTime: Displays the amount of time the wireless client has been connected to the access point.
Mode: The transmission standard being used by the client. Values are 11a, 11g, 11ng or 11na for 802.11a, 802.11g or 802.11n respectively.
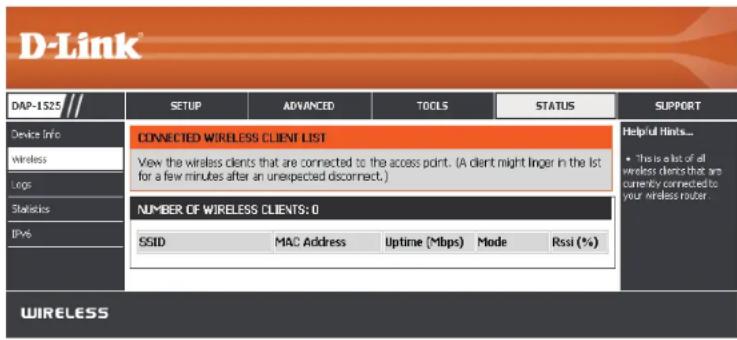
Rssi: This is a relative measure of signal quality. The value is expressed as a percentage of theoretical best quality. Signal quality can be reduced by distance, by interference from other radio frequency sources (such as cordless telephones or neighboring wireless networks), and by obstacles between the access point and the wireless device.
Logs
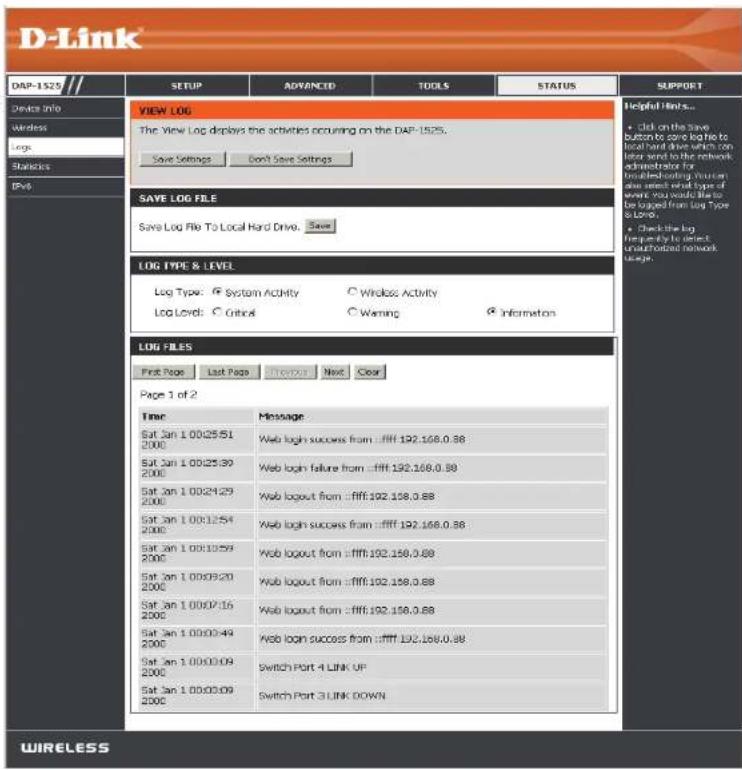
The access point automatically logs (records) events of possible interest in its internal memory. If there isn't enough internal memory for all events, logs of older events are deleted, but logs of the latest events are retained. The Logs option allows you to view the access point logs. You can define what types of events you want to view and the level of the events to view. This access point also has external Syslog Server support so you can send the log files to a computer on your network that is running a Syslog utility
Save log This option will save the access point to a log file on your computer
Log Type & Click the corresponding check box for the type(s) that Level: you want displayed in the log.
Use the radio buttons to select Log type and level.
Log Files: Displays log events. Click the Clear button to delete all the records.
Statistics
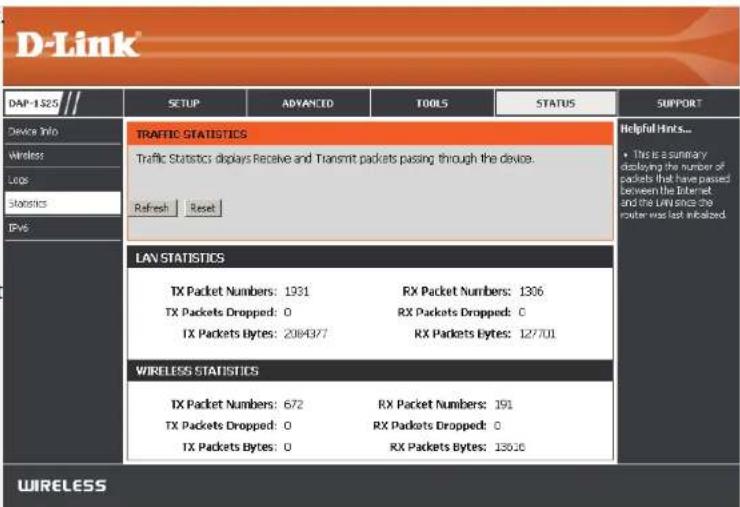
The Statistics page displays all of the LAN and Wireless packets transmit and receive statistics.
TX Packets: The total number of packets sent from the access point.
RX Packets: The total number of packets received by the access point.
TX Packets Displays the number of packets that were dropped Dropped: while sending, due to errors, collisions, or access point resource limitations.
RX Packets Displays the number of packets that were dropped Dropped: while receiving, due to errors, collisions, or access point resource limitations.
TX Bytes: Displays the number of bytes that were sent from the access point.
RX Bytes: Displays the number of bytes that were received by the access point.
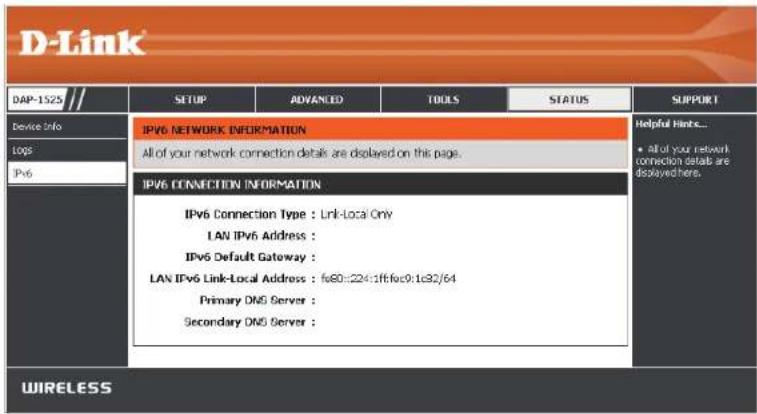
IPV6
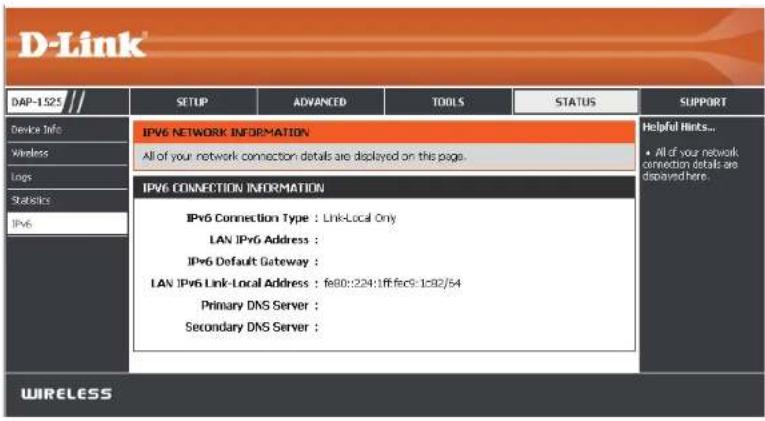
This page will display the IPv6 stats.
IPv6 Connection Displays IPv6 connection mode. Type:
LAN IPv6 Address: Displays LAN IPv6 address.
IPv6 Default Displays the IPv6 address of the default Gateway: gateway.
LAN IPv6 Link- Displays the LAN IPv6 link-local address. Local Address:
Primary DNS Server: Displays the IPv6 address of the primary DNS server.
Secondary DNS Displays the IPv6 address of the secondary Server: DNS server.
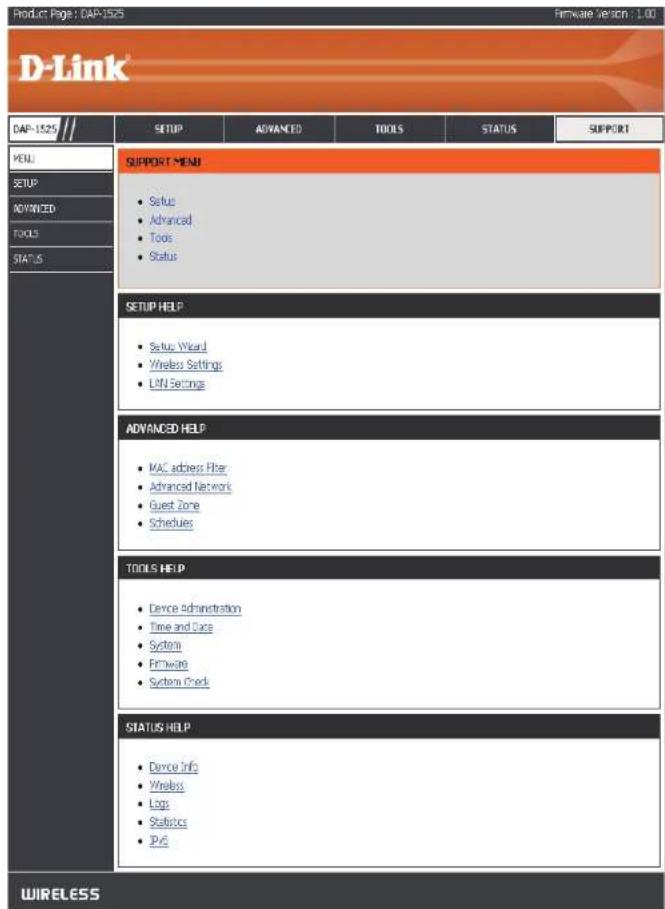
Support
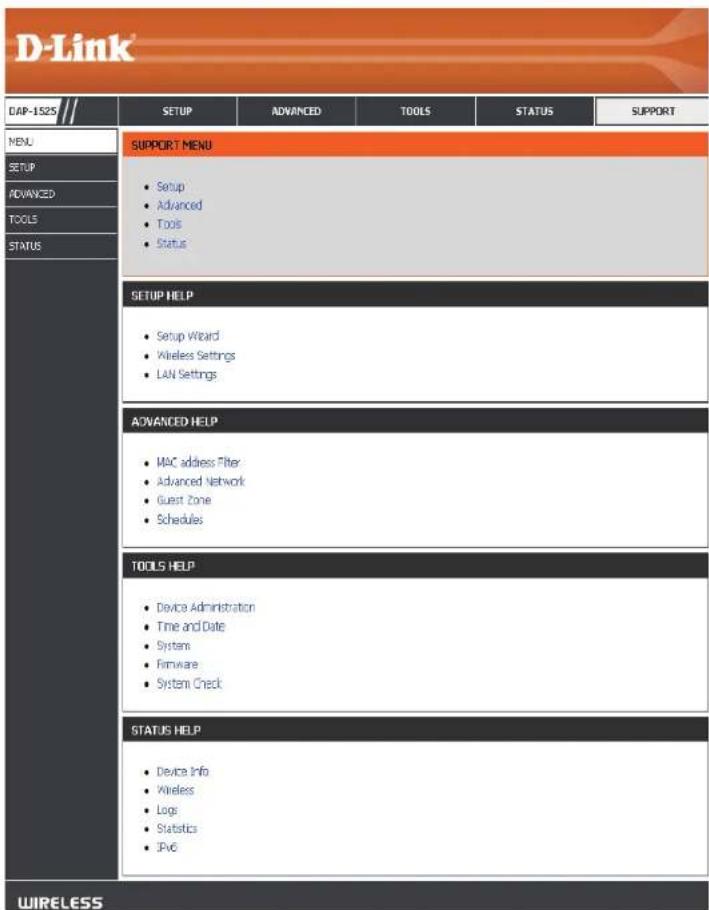
Configuration for Bridge Mode
This section will show you how to configure your new D-Link wireless MediaBridge using the web-based configuration utility.
Web-based Configuration Utility
To access the configuration utility, open a web-browser such as Internet Explorer and enter http://dlinkap or http://192.168.0.50 in the address field.
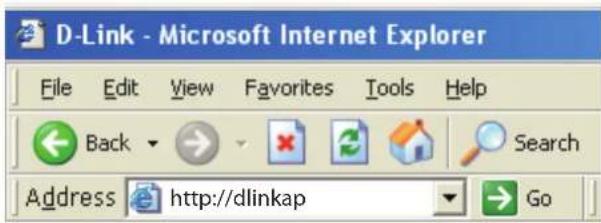
Select Admin from the drop-down menu and then enter your password. Leave the password blank by default.
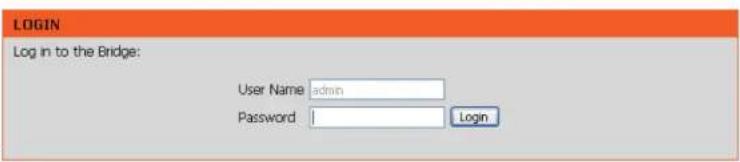
If you get a Page Cannot be Displayed error, please refer to the Troubleshooting section for assistance.
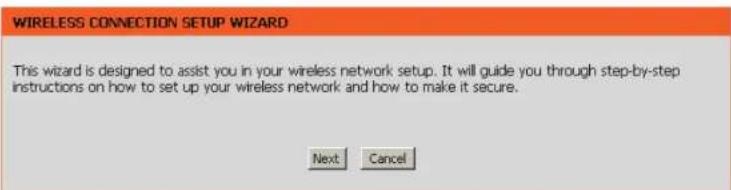
Setup Wizard
This wizard is designed to assist you in configuring the wireless settings for your bridge. It will guide you through step-by-step instructions on how to setup your wireless network.
Click Launch Wireless Setup Wizard
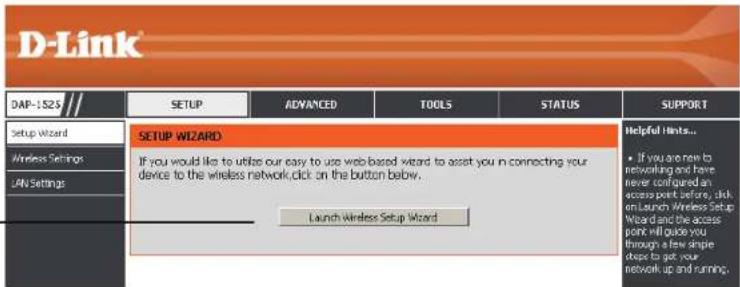
Click Next to continue.
Section 3 - Configuration
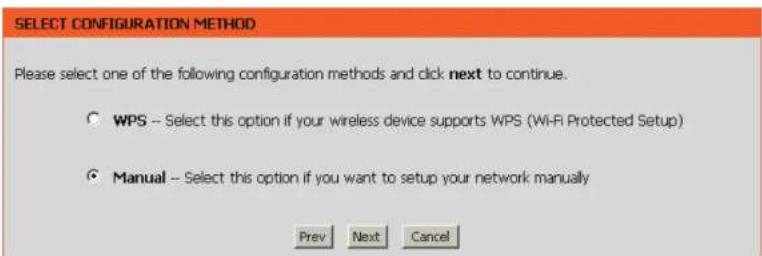
Click the WPS radio button if your wireless device supports Wi-Fi Protected Setup. Click the Manual radio button if you want to configure the network manually. For Manual configuration, skip to page 38.
Click the Next button to continue.
SELECT CONFIGURATION METHOD
Please select one of the following configuration methods and click next to continue.
WPS – Select this option if your wireless device supports WPS (Wi-Fi Protected Setup)
○ Manual – Select this option if you want to setup your network manually
Prev Next Cancel
Press the Push Button on the wireless device that you are adding to your network to complete the setup.
VIRTUAL PUSH BUTTON
Please press down the Push Button (physical or virtual) on the wireless device you are adding to your wireless network within 119 second...
Section 3 - Configuration
Select Manual as the configuration method to set up your network manually.
Click Next to continue.
Choose Manually assign a network key to create your own key.
Click Next to continue.
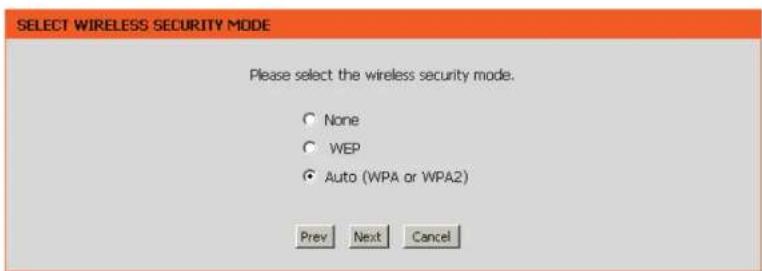
Select the wireless security mode you wold like to use. Select Auto and click Next.
Section 3 - Configuration
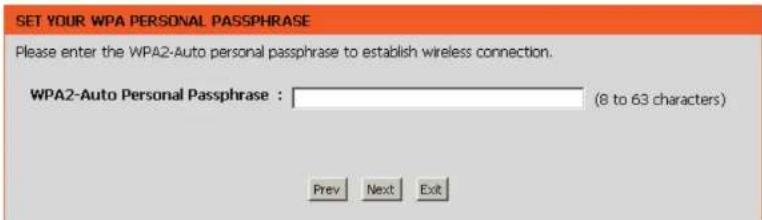
Enter the WP2-Auto personal passphrase to establish wireless connection.
Click Next to finish the Setup Wizard.
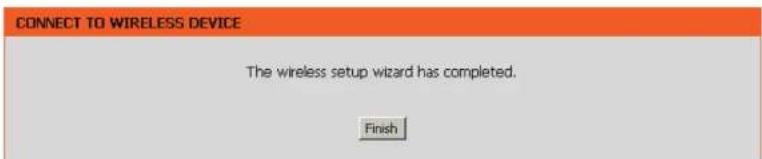
The wireless setup wizard is now completed click Finish.
Section 3 - Configuration
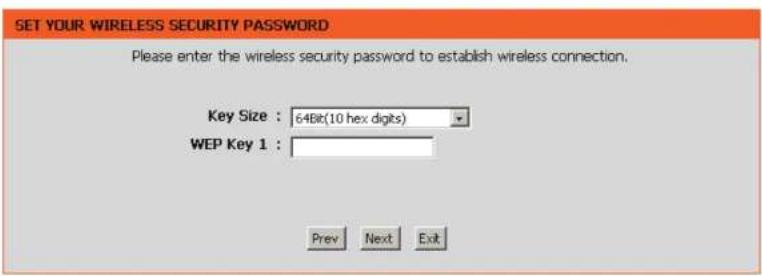
If you choose WEP, enter the wireless security password and click Next to complete the Setup Wizard.
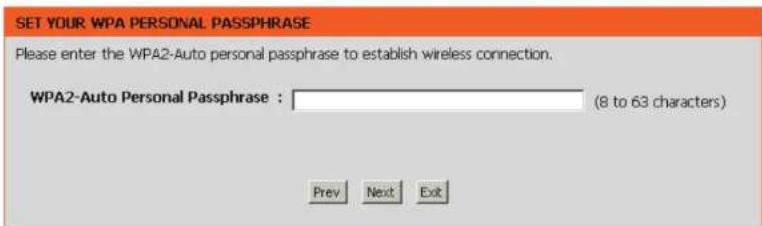
If you choose Auto (WPA or WPA2), enter the WPA2-Auto Personal Passphrase and click Next to complete the Setup Wizard.
This screen will appear once the wireless setup wizard is complete.
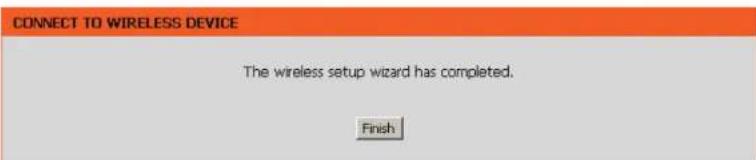
Click Finish.
Wireless
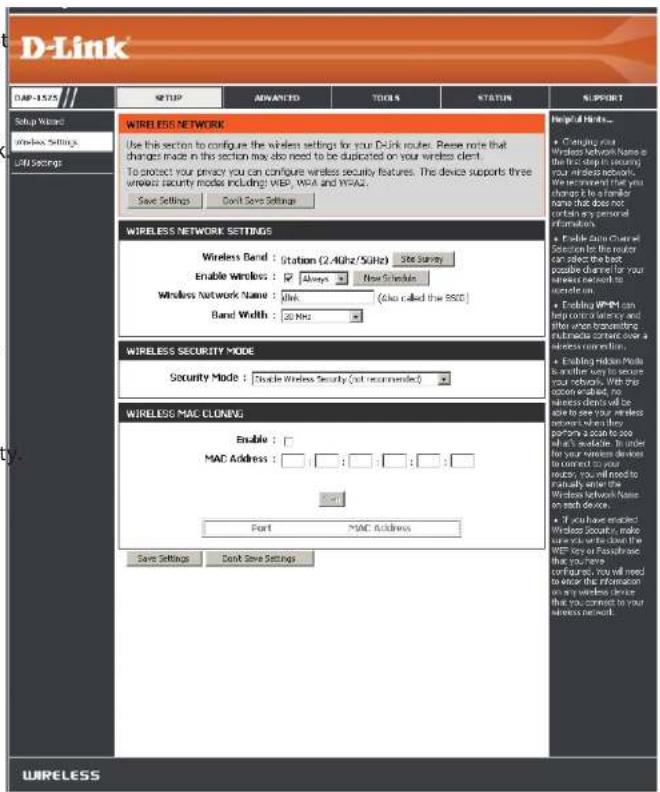
Enable Click the check box to enable the wireless function. If you do not Wireless: want to use wireless, uncheck the box to disable all the wireless functions.
Wireless Service Set Identifier (SSID) is the name of your wireless network Network Create a name using up to 32 characters. The SSID is case Name: sensitive.
Band Width: Select the Band Width:
Auto 20/40 - Select if you are using both 802.11n and non-802.11n wireless devices.
20MHz - Select if you are not using any 802.11n wireless clients.
Enable: Enable the Wi-Fi Protected Setup feature.
Security Refer to page 64 for more information regarding wireless security Mode:
Wireless MAC Cloning
Enabling this option allows the user to manually assign the source MAC address to packets forwarded by the DAP-1525. If not manually assigned, the packet's source MAC address field will be automatically selected as the DAP-1525's MAC address.
MAC Address: Enter the desired MAC address connected to your DAP-1525 to enable the clone function.
Scan: Click the Scan button to search for all available devices connected to your DAP-1525's Ethernet ports
Lan Setup
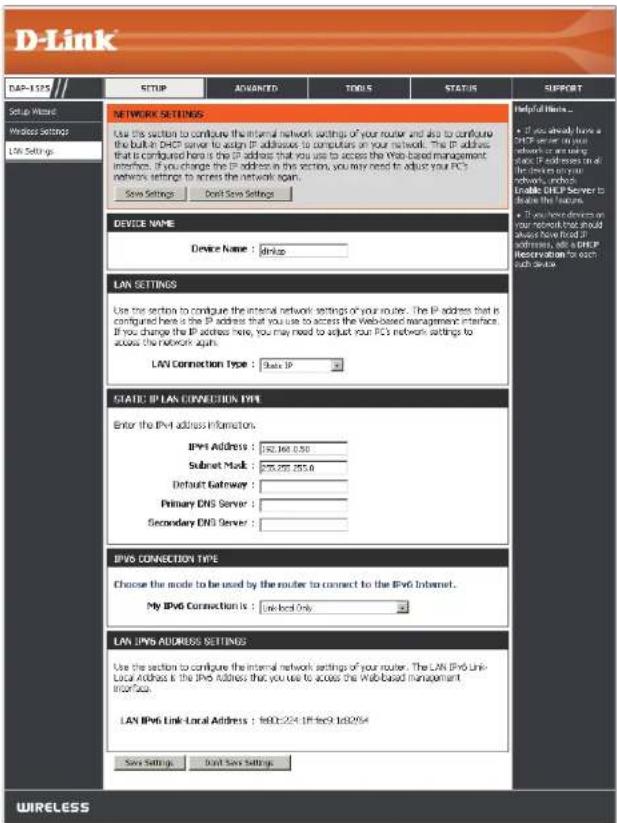
This section will allow you to change the local network settings of the bridge and to configure the Static settings.
Device Name: Enter the Device Name of the AP and click Next to continue. It is recommended to change the Device Name if there is more than one D-Link device within the subnet.
LAN Use the drop-down menu to select Static IP if your ISP Connection assigned you the IP address, subnet mask, gateway, Type: and DNS server addresses. Select Dynamic IP (DHCP) to automatically assign an IP address to the computers on the LAN/private network.
IPv4 Address: Enter the IP address assigned by your ISP.
Subnet Mask: Enter the Subnet Mask assigned by your ISP.
Default Enter the Gateway assigned by your ISP. Gateway:
Primary DNS Enter the primary DNS server IP address. Server:
Secondary DNS Enter the secondary DNS server IP address. Server:
My IPv6 Select the mode you would like the router to use to Connection: connect to the IPv6 Internet from the drop-down menu.
Lan Setup Static IPv6
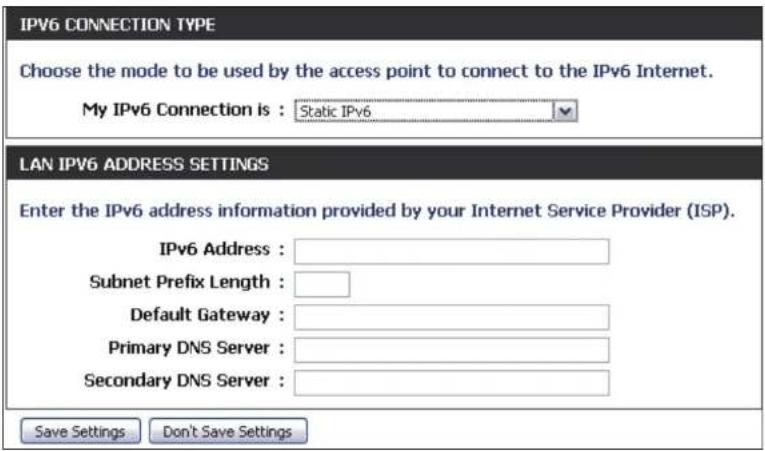
When using the My IPv6 Connection is drop-down menu to select the IPv6 mode, the LAN IPv6 Address Settings section will vary based on the selected mode. Select Static IPv6 to see the following configuration.
IPv6 Address: Enter the static IPv6 address provided by your Internet Service Provider.
Subnet Prefix Enter the IPv6 subnet prefix length. Length:
Default Enter the default gateway IP address. Gateway:
Primary DNS Server: Enter the primary DNS server IP address.
Secondary DNS Server: Enter the secondary DNS server IP address.
Lan Setup
Auto-configuration
When using the My IPv6 Connection is drop-down menu to select the IPv6 mode, the LAN IPv6 Address Settings section will vary based on the selected mode. Select Autoconfiguration (Stateless/DHCPv6) to see the following configuration.
Obtain IPv6 Enter the static IPv6 address provided by your DNS Servers Internet Service Provider. automatically:
Use the Enter the IPv6 subnet prefix length. following IPv6 DNS Servers:
Primary DNS Enter the primary DNS server IP address. Server:
Secondary DNS Enter the secondary DNS server IP address. Server:
IPV6 CONNECTION TYPE
Choose the mode to be used by the access point to connect to the IPv6 Internet.
My IPv6 Connection is : Autoconfiguration(Stateless/DHCPv6)
IPV6 DNS SETTINGS
Obtain DNS server address automatically or enter a specific DNS server address.
Obtain IPv6 DNS Servers automatically
○ Use the following IPv6 DNS Servers
Primary DNS Server :
Secondary DNS Server :
Save Settings Don't Save Settings
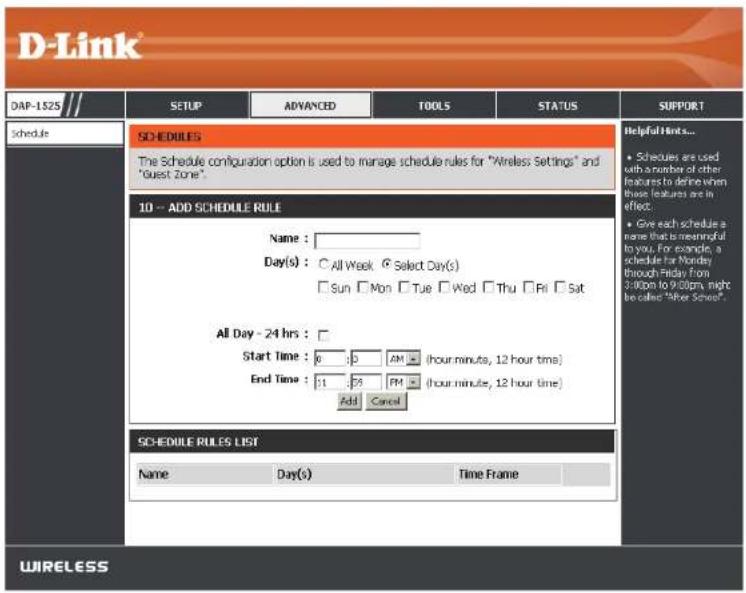
Advanced Schedule
This section allows you to manage schedule rules for Wireless Settings and Guest Zone.
Name: Enter a name for your new schedule.
Days: Select a day, a range of days, or All Week to include every day.
All Day- 24 Time: Check All Days or enter a start and end time for your schedule.
Add: Click Add to save your schedule. You must click Save Settings at the top for your schedules to go into effect.
Schedule Rules The list of schedules will be listed here. Click the List: Edit icon to make changes or click the Delete icon to remove the schedule.
Tools Admin
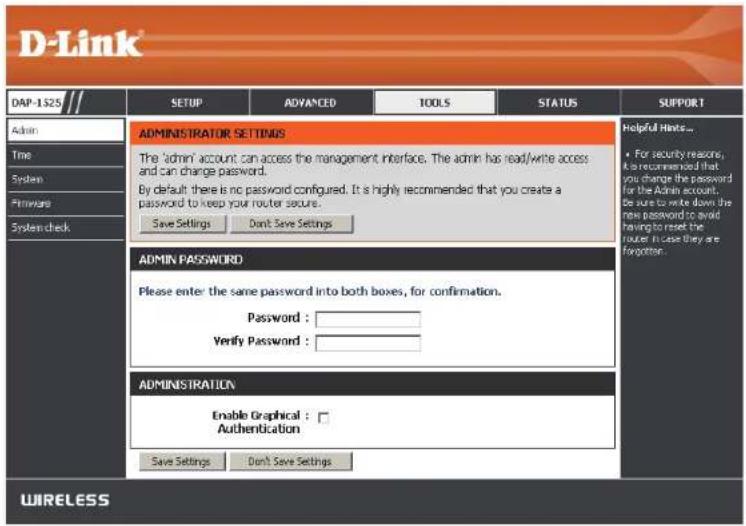
This page will allow you to change the Administrator password. Admin has read/write access.
Password: Enter a new password for the Administrator Login Name. The administrator can make changes to the settings.
Verify Enter the same password that you entered in the Password: previous textbox in order to confirm its accuracy.
Enable Click the check box to enable Graphical Graphical Authentication. Authentication:
Time
The Time Configuration option allows you to configure, update, and maintain the correct time on the internal system clock. From this section you can set the time zone that you are in. Daylight Saving can also be configured to automatically adjust the time when needed.
Time Zone: Select the Time Zone from the drop-down menu.
Enable Daylight To select Daylight Saving time manually, click the Saving: Enable Daylight Saving check box. Next use the drop-down menu to select a Daylight Saving Offset and then enter a start date and an end date for daylight saving time.
Sync your Click this button to set the device's time the computer's time same to local PC. settings:
Automatically synchronize with D-Link's Internet time server: Click the check box to enable the device to automatically synchronize with a D-Link NTP Server. NTP stands for Network Time Protocol. NTP synchronizes computer clock times in a network of computers. This will only connect to a server on the Internet, not a local server.
NTP Server Used: Enter the NTP server or select one from the drop-down menu.
Manual: To manually input the time, enter the values in these fields for the Year, Month, Day, Hour, Minute, and Second and then click Save Settings. You can also click the Copy Your Computer's Time Settings button at the bottom of the screen.
![D-Link DAP-1525 // SETUP ADVANCED TOOLS STATUS SUPPORT Admir Time System Firmware System check TIME AND DATE The Time and Date Configuration option allows you to configure, update, and maintain the correct time on the internal system clock. From this section you can set the time zone you are in and set the NTP (Network Time Protocol) Server. Daylight Saving can also be configured to adjust the time when needed. Save Settings Don't Save Settings Time AND DATE CONFIGURATION Time : 2000/01/01 18:47:44 Time Zone : [GRT+H1.80] Osaka, Sapporo, Tokyo Enable Daylight Saving : Sync your computer's time settings AUTOMATIC TIME AND DATE CONFIGURATION Automatically synchronize with D-Link's Internet, time server NTP Server Used : Select NTP Server Update Now SET THE TIME AND DATE MANUALLY Year 2011 Month Feb Day 0 Hour 10 Minute 51 Second 19 Save Settings Don't Save Settings WIRELESS](/content/2026/05/923096/images/fcdaeaefe85b2d46fc268fa372ab32d0b11c70aab3cf8038f0fef4edda54b3b3.jpg)
System
Save To Local Hard Use this option to save the current access point Drive: configuration settings to a file on the hard disk of the computer you are using. First, click the Save button. You will then see a file dialog, where you can select a location and file name for the settings.
Load From Local Hard Use this option to load previously saved access Drive: point configuration settings. First, use the Browse control to find a previously save file of configuration settings. Then, click the Load button to transfer those settings to the access point.
Restore To Factory This option will restore all configuration settings Default: back to the settings that were in effect at the time the access point was shipped from the factory. Any settings that have not been saved will be lost, including any rules that you have created. If you want to save the current access point configuration settings, use the Save button above.
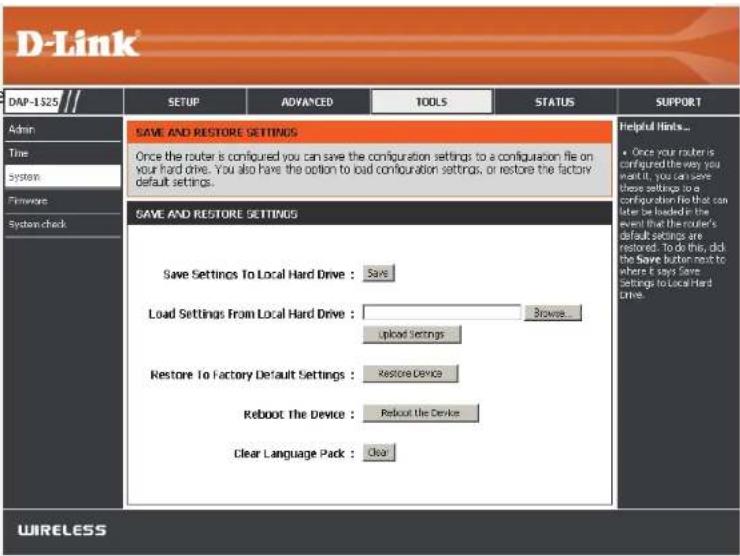
Reboot The Device: Click to reboot the bridge.
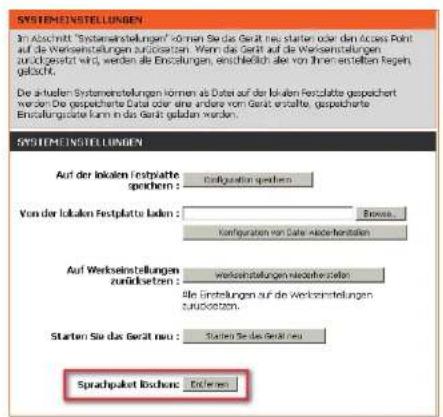
Clear Language Pack: Click to clear the language pack. This will put the web UI back to English.
Firmware
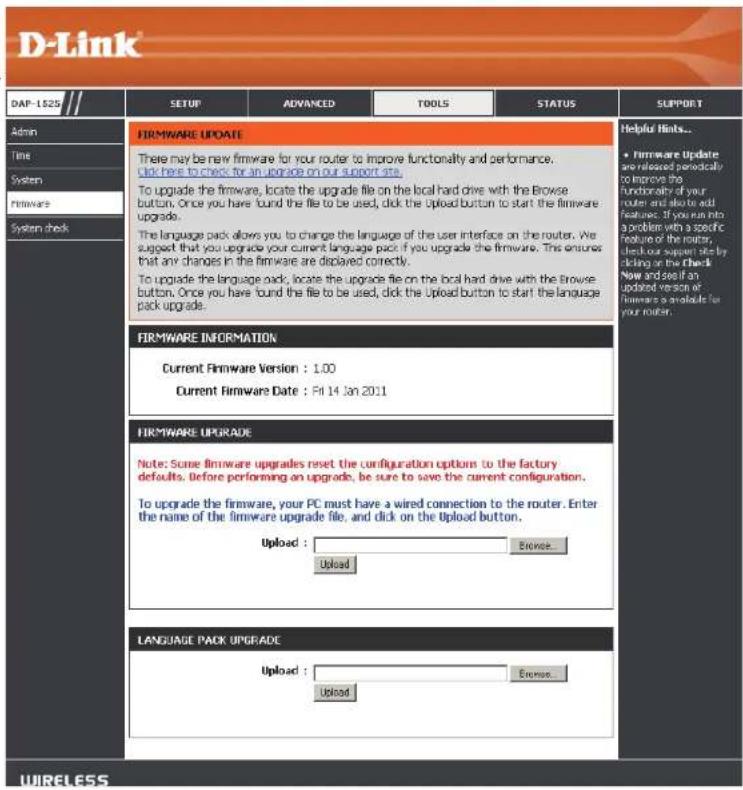
You can upgrade the firmware of the access point here. Make sure the firmware you want to use is on the local hard drive of the computer. Click on Browse to locate the firmware file to be used for the update. Please check the D-Link support site for firmware updates at http://support.dlink.com. You can download firmware upgrades to your hard drive from the D-Link support site.
Browse: After you have downloaded the new firmware, click Browse to locate the firmware update on your hard drive. Click Upload to complete the firmware upgrade.
Upload: Once you have a firmware update on your computer, use this option to browse for the file and then upload the information into the bridge.
Language Pack
You can change the language of the web UI by uploading available language packs.
Browse: After you have downloaded the new language pack, click Browse to locate the language pack file on your hard drive. Click Upload to complete the language pack upgrade.
Section 3 - Configuration
If you load a language pack and would like to go back to English, click Tools > System and click on Clear next to Clear Language Pack.
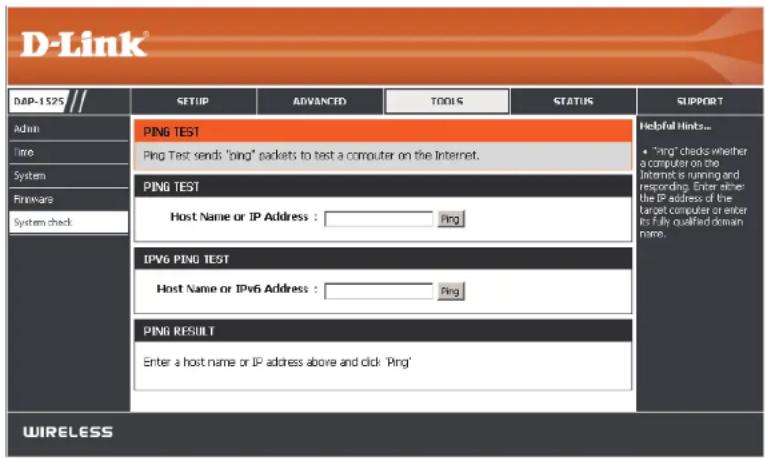
This sections Ping Tests by sending ping packets to test if a computer on the internet is running and responding.
Ping Test / The Ping Test / IPv6 Ping Test is used to send Ping packets to test if a computer is on the Internet. Enter the host name or IP/IPv6 address that you wish to Ping, and click Ping.
Ping Result: The results of your ping attempts will be displayed here.
Status Device Info
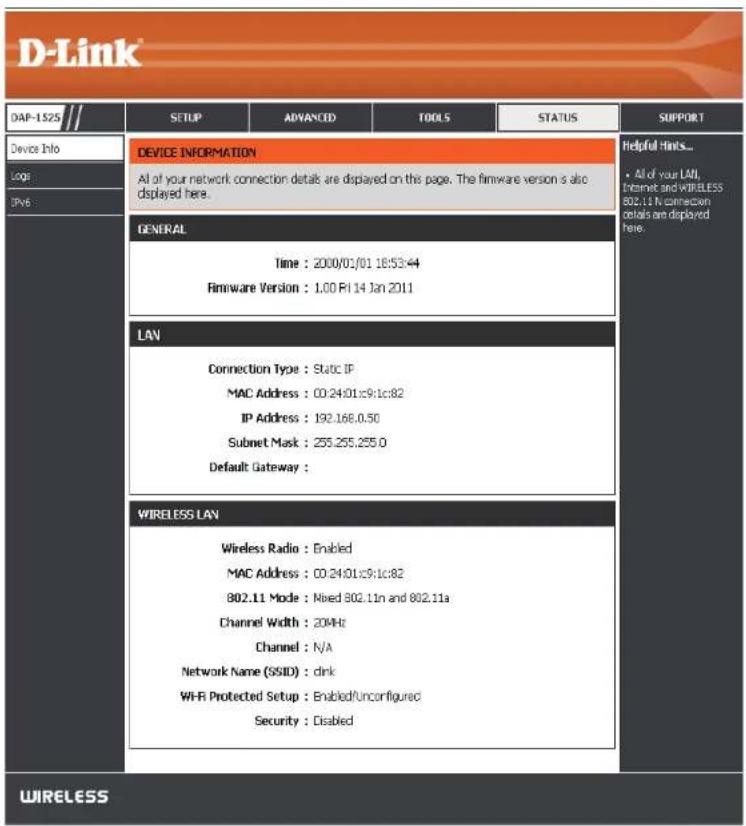
This page displays the current information for the DAP-1525. It will display the LAN and wireless LAN information.
General: Displays the access point's time and firmware version.
LAN: Displays the MAC address and the private (local) IP settings for the access point.
Wireless LAN: Displays the wireless MAC address and your wireless settings such as SSID and Channel.
Logs
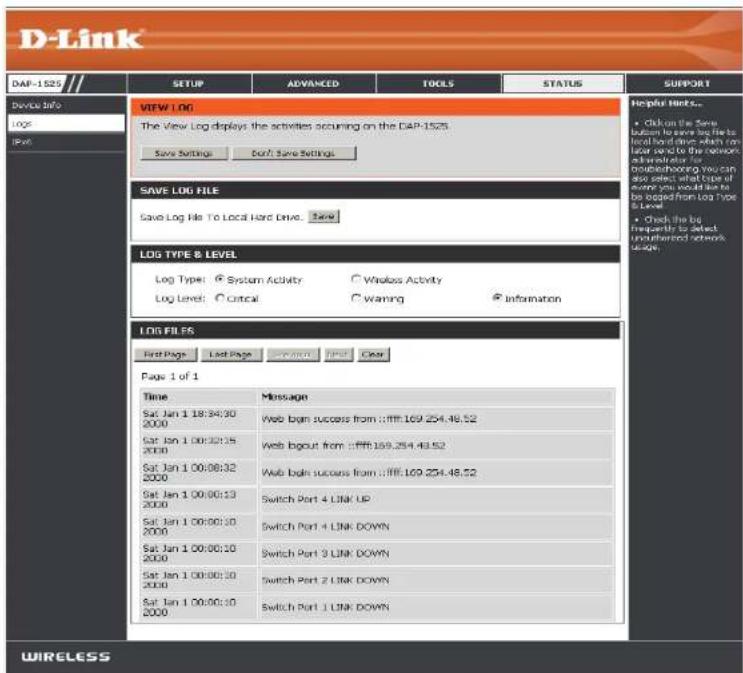
The access point automatically logs (records) events of possible interest in its internal memory. If there isn't enough internal memory for all events, logs of older events are deleted, but logs of the latest events are retained. The Logs option allows you to view the access point logs. You can define what types of events you want to view and the level of the events to view. This access point also has external Syslog Server support so you can send the log files to a computer on your network that is running a Syslog utility.
Save Log: This option will save the access point to a log file on your computer.
Log Type & Level: Use the radio buttons to select Log type and level.
Log Files: Displays log events. Click the Clear button to delete all the records.
IPv6
This page will display all your network connection details.
IPv6 Connection Displays IPv6 connection mode. Type:
LAN IPv6 Address: Displays LAN IPv6 address.
IPv6 Default Gateway: Displays the IPv6 address of the default gateway.
LAN IPv6 Link- Displays the LAN IPv6 link-local address. Local Address:
Primary DNS Displays the IPv6 address of the primary DNS Server: server.
Secondary DNS Displays the IPv6 address of the secondary Server: DNS server.
Support
Wireless Security
This section will show you the different levels of security you can use to protect your data from intruders. The DAP-1525 offers the following types of security:
• WEP (Wireless Security Basic)
• WPA2(Wireless Security enhanced)
• WPA (Wi-Fi Protected Access)
What is WPA?
WPA, or Wi-Fi Protected Access, is a Wi-Fi standard that was designed to improve the security features of WEP (Wired Equivalent Privacy).
The 2 major improvements over WEP:
- Improved data encryption through the Temporal Key Integrity Protocol (TKIP). TKIP scrambles the keys using a hashing algorithm and, by adding an integrity-checking feature, ensures that the keys haven't been tampered with. WPA2 is based on 802.11i and uses Advanced Encryption Standard (AES) instead of TKIP.
- User authentication, which is generally missing in WEP, through the extensible authentication protocol (EAP). WEP regulates access to a wireless network based on a computer's hardware-specific MAC address, which is relatively simple to be sniffed out and stolen. EAP is built on a more secure public-key encryption system to ensure that only authorized network users can access the network.
WPA-PSK/WPA2-PSK uses a passphrase or key to authenticate your wireless connection. The key is an alpha-numeric password between 8 and 63 characters long. The password can include symbols (!?&_) and spaces. This key must be the exact same key entered on your wireless bridge or access point.
WPA/WPA2 incorporates user authentication through the Extensible Authentication Protocol (EAP). EAP is built on a more secure public key encryption system to ensure that only authorized network users can access the network.
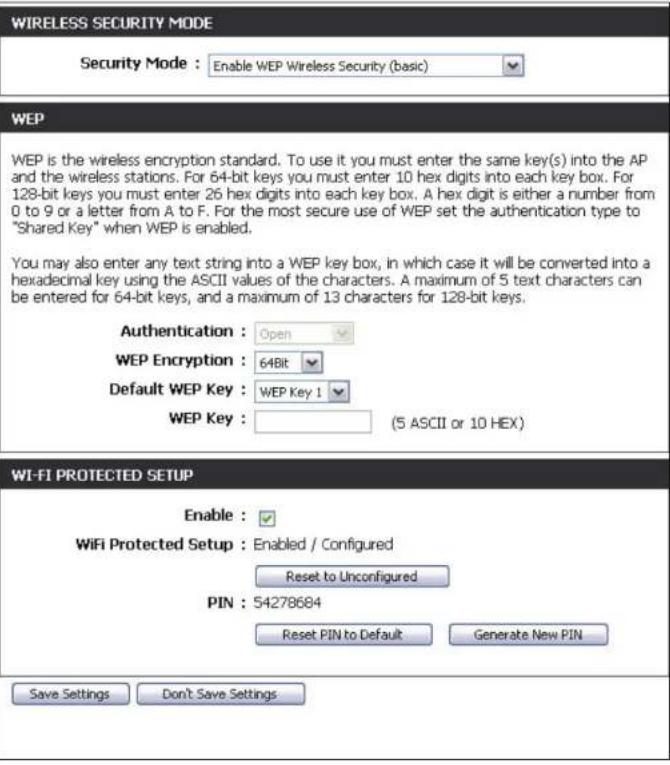
Configure WEP (AP Mode)
It is recommended to enable encryption on your wireless access point before your wireless network adapters. Please establish wireless connectivity before enabling encryption. Your wireless signal may degrade when enabling encryption due to the added overhead.
- Log into the web-based configuration by opening a web browser and entering the IP address of the access point (192.168.0.50). Click Setup and then Wireless Settings on the left side.
- Select Enable WEP Wireless Security (basic) in the Security Mode drop-down menu in the Wireless Security Mode section.
- Next to WEP Encryption in the WEP section, select the level of encryption (64-bit or 128-bit). Hex - (recommended) Letters A-F and numbers 0-9 are valid.
- Next to Default WEP Key and the first selection in the dropdown menu, WEP Key 1. Enter a WEP key that you create in the WEP Key value and Verify WEP Key value fields. Make sure you enter this key exactly on all your wireless devices. You may enter up to 4 different keys using the Default WEP Key drop-down menu.
- Select Open or Shared Key from the Authentication dropdown menu.
- Click Save Settings to save your settings. If you are configuring the access point with a wireless adapter, you will lose connectivity until you enable WEP on your adapter and enter the same WEP key as you did on the access point.
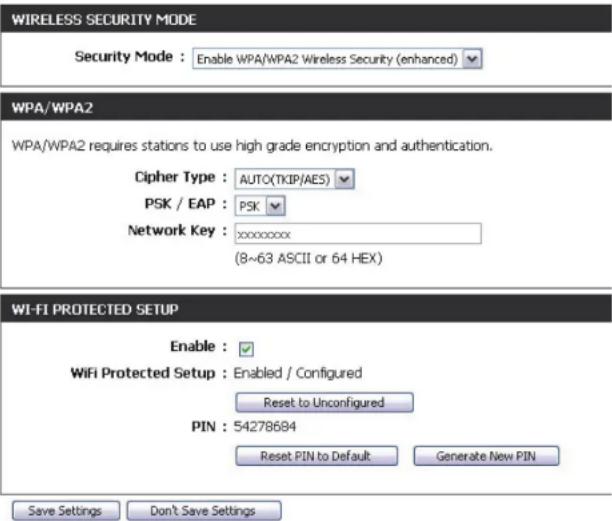
Configure WPA-Personal (AP Mode)
It is recommended to enable encryption on your wireless access point before your wireless network adapters. Please establish wireless connectivity before enabling encryption. Your wireless signal may degrade when enabling encryption due to the added overhead.
-
Log into the web-based configuration by opening a web browser and entering the IP address of the access point (192.168.0.50). Click on Setup and then click Wireless Settings on the left side.
-
Select Enable WPA/WPA2 Wireless Security (enhanced) from the Security Mode drop-down menu.
-
Select Auto(TKIP/AES), TKIP, or AES from the Cipher Type dropdown menu. If you have wireless clients that use both types, use TKIP/AES.
-
Select either PSK or EAP from the drop-down menu.
-
Enter your Network key in the Network Key section. The key is entered as a pass-phrase in either ASCII or HEX format. If using ASCII format the pass-phrase must be between 8-63 characters. If using HEX format the pass-phrase must be 64 characters. The ASCII or HEX pass-phrase must be the same at both ends of the wireless connecti
-
Click on Enable to enable the Wi-Fi Protected Setup.
-
Click Save Settings at the top of the window to save your settings.
Configure WPA-Enterprise (AP Mode)
It is recommended to enable encryption on your wireless access point before your wireless network adapters. Please establish wireless connectivity before enabling encryption. Your wireless signal may degrade when enabling encryption due to the added overhead.
- Log into the web-based configuration by opening a web browser and entering the IP address of the bridge (192.168.0.50). Click on Setup and then click Wireless Settings on the left side.
- Next to Security Mode in the Wireless Security Mode section, select Enable WPA/WPA2 Wireless Security.
- Select Auto(TKIP/AES), TKIP, or AES from the Cipher Type dropdown menu. If you have wireless clients that use both types, use TKIP/AES.
- Select EAP from the PSK / EAP drop-down menu
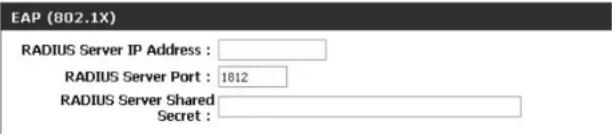
- Enter the IP Address of your RADIUS server in the RADIUS Server IP Address field.
- Enter the port you are using with your RADIUS server in the Port field.
- Enter the security key in the Shared Secret field.
- Click Save Settings at the top of the window to save your settings. If you are configuring the access point with a wireless adapter, you will lose connectivity until you enable WPA on your adapter and enter the same passphrase as you did on the access point.


Configure WEP (Bridge Mode)
It is recommended to enable encryption on your wireless access point before your wireless network adapters. Please establish wireless connectivity before enabling encryption. Your wireless signal may degrade when enabling encryption due to the added overhead.
- Log into the web-based configuration by opening a web browser and entering the IP address of the access point(192.168.0.50). Click Setup and then Wireless Settings on the left side.
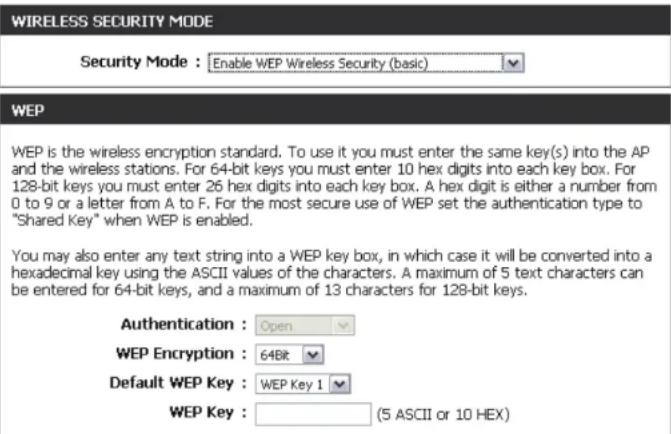
- Select Enable WEP Wireless Security (basic) in the Security Mode drop-down menu in the Wireless Security Mode section.
- Next to WEP Encryption in the WEP section, select the level of encryption (64-bit or 128-bit). Hex - (recommended) Letters A-F and numbers 0-9 are valid.
- Next to Default WEP Key and the first selection in the drop-down menu, WEP Key 1. Enter a WEP key that you create in the WEP Key value and Verify WEP Key value fields. Make sure you enter this key exactly on all your wireless devices. You may enter up to 4 different keys using the Default WEP Key drop-down menu.
- Select Open or Shared Key from the Authentication drop-down menu.
- Click Save Settings to save your settings. If you are configuring the access point with a wireless adapter, you will lose connectivity until you enable WEP on your adapter and enter the same WEP key as you did on the access point.
Configure WPA-Personal (Bridge Mode)
It is recommended to enable encryption on your wireless Access Point before your wireless network adapters. Please establish wireless connectivity before enabling encryption. Your wireless signal may degrade when enabling encryption due to the added overhead.
-
Log into the web-based configuration by opening a web browser and entering the IP address of the access point (192.168.0.50). Click Setup and then Wireless Settings on the left side.
-
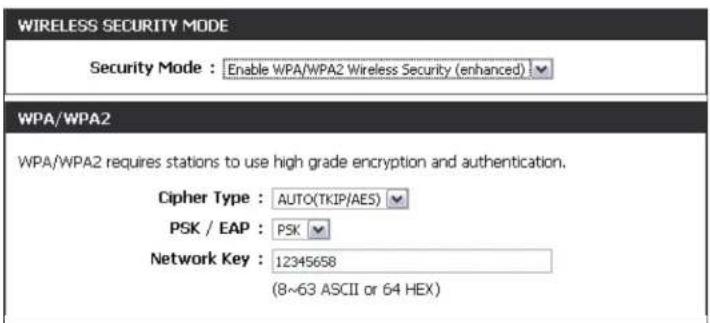
Select Enable WPA/WPA2 Wireless Security (enhanced) from the Security Mode drop-down menu.
-
Select TKIP, or AES from the Cipher Type drop-down menu.
-
Select PSK from the PSK / EAP drop-down menu.
-
Enter a key (passphrase) in the Network Key field. The key is entered as a pass-phrase in either ASCII or HEX format. If using ASCII format the pass-phrase must be between 8-63 characters. If using HEX format the pass-phrase must be 64 characters. The ASCII or HEX pass-phrase must be the same at both ends of the wireless connection.
-
Click Save Settings to save your settings. If you are configuring the Access Point with a wireless adapter, you will lose connectivity until you enable WPA-PSK on your adapter and enter the same passphrase as you did on the Access Point.
Connect to a Wireless Network Using Windows® 7
It is recommended to enable wireless security (WPA/WPA2) on your access point before configuring your wireless adapter. If you are joining an existing network, you will need to know the security key or passphrase being used.
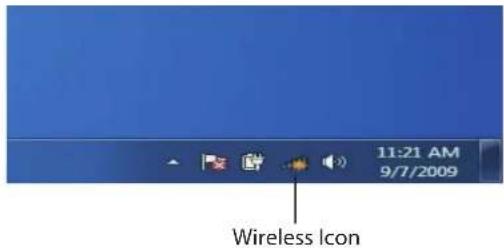
- Click on the wireless icon in your system tray (lower-right corner).
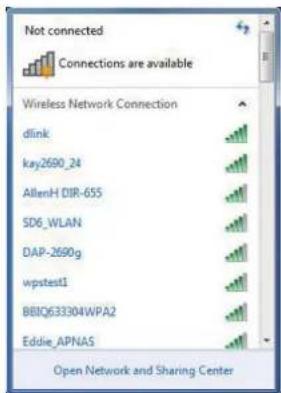
- The utility will display any available wireless networks in your area.
Section 5 - Connecting to a Wireless Network
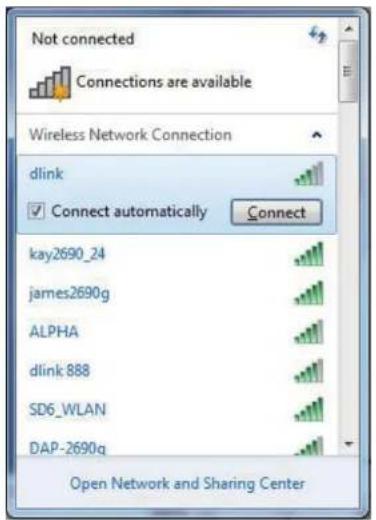
- Highlight the wireless network (SSID) you would like to connect to and click the Connect button.
If you get a good signal but cannot access the Internet, check your TCP/IP settings for your wireless adapter. Refer to the Networking Basics section in this manual for more information.
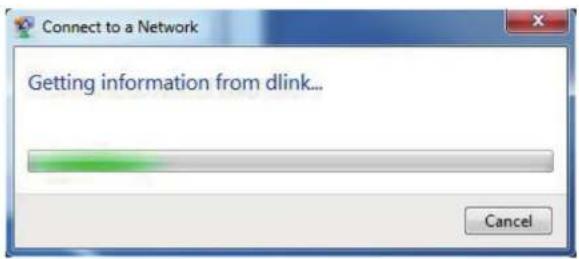
- The following window appears while your computer tries to connect to the router.
Section 5 - Connecting to a Wireless Network
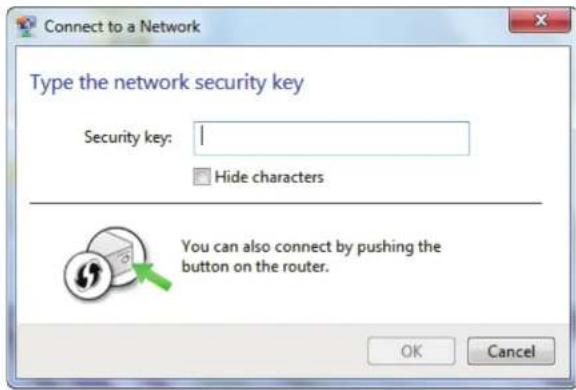
- Enter the same security key or passphrase that is on your access point and click Connect. You can also connect by pushing the WPS button on the router.
It may take 20-30 seconds to connect to the wireless network. If the connection fails, please verify that the security settings are correct. The key or passphrase must be exactly the same as on the wireless router.
Connect to a Wireless Network Using Windows Vista®
Windows Vista ^® users may use the convenient, built-in wireless utility. Follow these instructions:
From the Start menu, go to Control Panel, and then click on Network and Sharing Center.
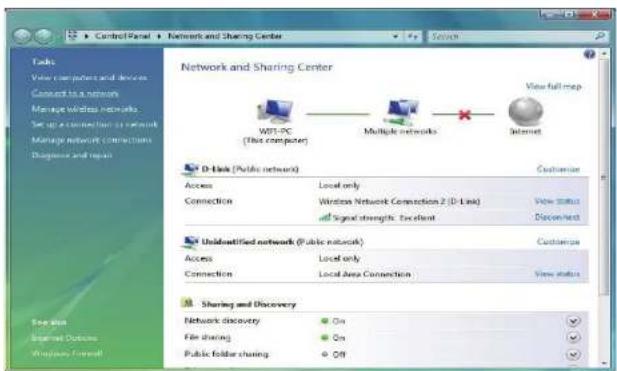
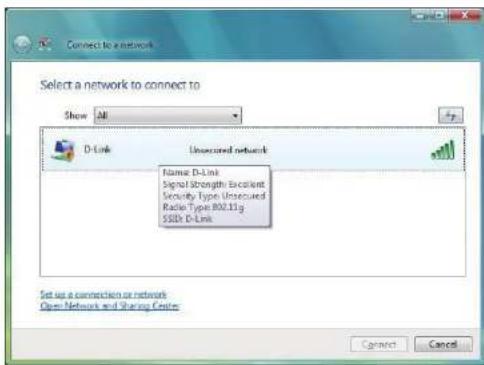
The utility will display any available wireless networks in your area. Click on a network (displayed using the SSID) under Select a network to connect to and then click the Connect button.
Section 5 - Connecting to a Wireless Network
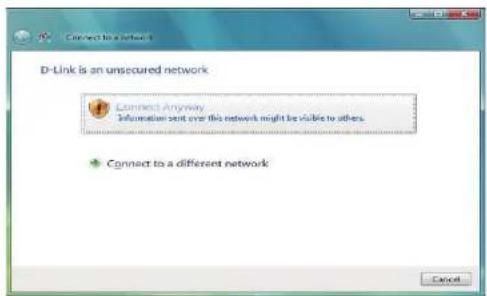
Click Connect Anyway to continue.
The utility will display the following window to indicate a connection is being made.
The final window indicates the establishment of a successful connection.
The next two pages display the windows used to connect to either a WEP or a WPA-PSK wireless network.
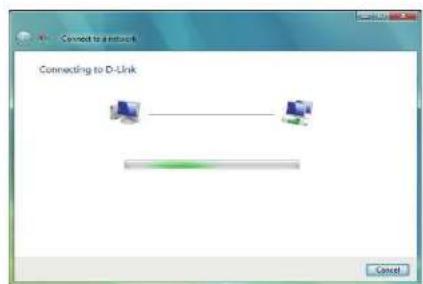
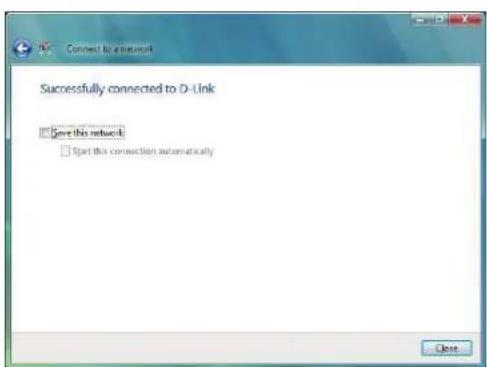
Configure Security
It is recommended to enable wireless encryption on your wireless bridge or access point before configuring your wireless adapter. If you are joining an existing network, you will need to know the security key being used.
Select a network to connect to and then click the Connect button.
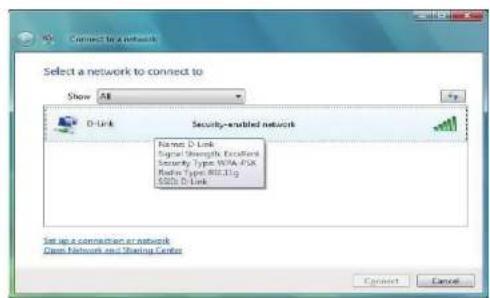
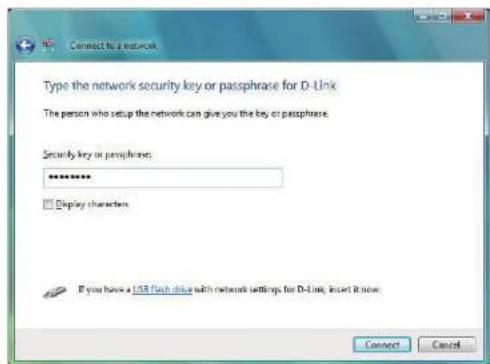
Enter the appropriate security key or passphrase in the field provided and then click the Connect button.
Connect to a Wireless Network Using Windows® XP
Windows XP users may use the built-in wireless utility (Zero Configuration Utility). The following instructions are for Service Pack 2 users. If you are using another company's utility or Windows 2000, please refer to the user manual of your wireless adapter for help with connecting to a wireless network. Most utilities will have a "site survey" option similar to the Windows XP utility as seen below.
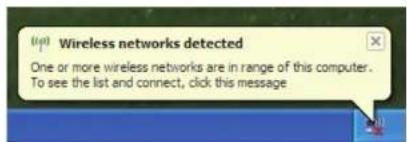
If you receive the Wireless Networks Detected bubble, click on the center of the bubble to access the utility.
or
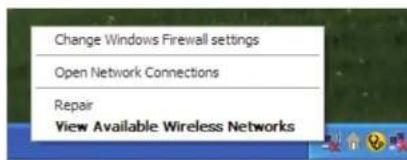
Right-click on the wireless computer icon in your system tray (lower-right corner next to the time). Select View Available Wireless Networks.
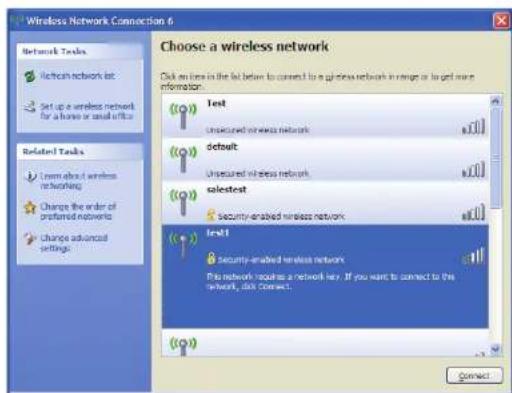
The utility will display any available wireless networks in your area. Click on a network (displayed using the SSID) and click the Connect button.
If you get a good signal, but cannot access the Internet, check you TCP/IP settings for your wireless adapter. Refer to the Networking Basics section in this manual for more information.
Configure Security
It is recommended to enable wireless security on your wireless bridge or access point before configuring your wireless adapter. If you are joining an existing network, you will need to know the security key being used.
-
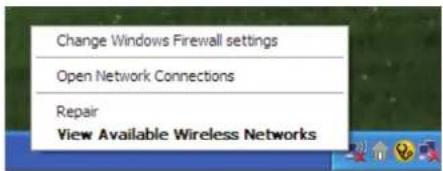
Open the Windows XP Wireless Utility by right-clicking on the wireless computer icon in your system tray (lower-right corner of screen). Select View Available Wireless Networks.
-
Highlight the wireless network (SSID) you would like to connect to and click Connect.
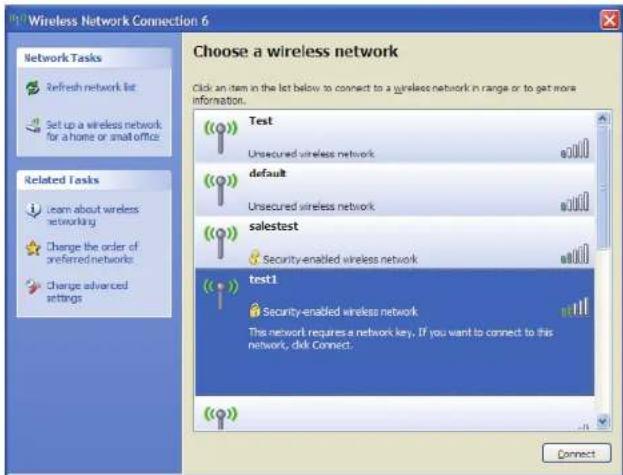
Section 5 - Connecting to a Wireless Network
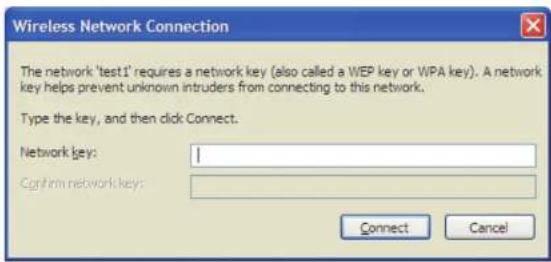
3. The Wireless Network Connection box will appear. Enter the security passphrase and click Connect.
It may take 20-30 seconds to connect to the wireless network. If the connection fails, please verify that the security settings are correct. The WPA-PSK passphrase must be exactly the same as on the wireless access point.
Troubleshooting
This chapter provides solutions to problems that can occur during the installation and operation of the DAP-1525. Read the following descriptions if you are having problems. (The examples below are illustrated in WindowsXP. If you have a different operating system, the screenshots on your computer will look similar to the following examples.)
1. Why can't I access the web-based configuration utility?
When entering the IP address of the D-Link access point (192.168.0.50 for example), you are not connecting to a website on the Internet or have to be connected to the Internet. The device has the utility built-in to a ROM chip in the device itself. Your computer must be on the same IP subnet to connect to the web-based utility.
- Make sure you have an updated Java-enabled web browser. We recommend the following:
- Microsoft Internet Explorer 6.0 and higher
- Mozilla Firefox 3.0 and higher
- Google Chrome 2.0 and higher
-
Apple Safari 3.0 and higher
-
Verify physical connectivity by checking for solid link lights on the device. If you do not get a solid link light, try using a different cable or connect to a different port on the device if possible. If the computer is turned off, the link light may not be on.
- Disable any internet security software running on the computer. Software firewalls such as Zone Alarm, Black Ice, Sygate, Norton Personal Firewall, and Windows XP firewall may block access to the configuration pages. Check the help files included with your firewall software for more information on disabling or configuring it.
- Configure your Internet settings:
- Go to Start > Settings > Control Panel. Double-click the Internet Options Icon. From the Security tab, click the button to restore the settings to their defaults.
- Click the Connection tab and set the dial-up option to Never Dial a Connection. Click the LAN Settings button. Make sure nothing is checked. Click OK.
- Go to the Advanced tab and click the button to restore these settings to their defaults. Click OK three times.
-
Close your web browser (if open) and open it.
-
Access the web management. Open your web browser and enter the IP address of your D-Link access point in the address bar. This should open the login page for your the web management.
- If you still cannot access the configuration, unplug the power to the access point for 10 seconds and plug back in. Wait about 30 seconds and try accessing the configuration. If you have multiple computers, try connecting using a different computer.
2. What can I do if I forgot my password?
If you forgot your password, you must reset your access point. Unfortunately this process will change all your settings back to the factory defaults.
To reset the access point, locate the reset button (hole) on the rear panel of the unit. With the access point powered on, use a paperclip to hold the button down for 10 seconds. Release the button and the access point will go through its reboot process. Wait about 30 seconds to access the access point. The default IP address is 192.168.0.50. When logging in, the username is admin and leave the password box empty.
3. Why can't I connect to certain sites or send and receive emails when connecting through my access point?
If you are having a problem sending or receiving email, or connecting to secure sites such as eBay, banking sites, and Hotmail, we suggest lowering the MTU in increments of ten (Ex. 1492, 1482, 1472, etc).
Note: AOL DSL+ users must use MTU of 1400.
To find the proper MTU Size, you'll have to do a special ping of the destination you're trying to go to. A destination could be another computer, or a URL.
- Click on Start and then click Run.
- Windows® 95, 98, and Me users type in command (Windows\$NT, 2000, and XP users type in cmd) and click Enter (or click OK).
- Once the window opens, you'll need to do a special ping. Use the following syntax:
ping [url] [-f] [-l] [MTU value]
Example: ping yahoo.com -f -l 1472
You should start at 1472 and work your way down by 10 each time.
![C:\>ping yahoo.com -f -l 1482 Pinging yahoo.com [66.94.234.13] with 1482 bytes of data: Packet needs to be fragmented but DF set. Packet needs to be fragmented but DF set. Packet needs to be fragmented but DF set. Packet needs to be fragmented but DF set. Ping statistics for 66.94.234.13: Packets: Sent = 4, Received = 0, Lost = 4 (100% loss), Approximate round trip times in milli-seconds: Minimum = 0ms, Maximum = 0ms, Average = 0ms C:\>ping yahoo.com -f -l 1472 Pinging yahoo.com [66.94.234.13] with 1472 bytes of data: Reply from 66.94.234.13: bytes=1472 time=93ms TTL=52 Reply from 66.94.234.13: bytes=1472 time=109ms TTL=52 Reply from 66.94.234.13: bytes=1472 time=125ms TTL=52 Reply from 66.94.234.13: bytes=1472 time=203ms TTL=52 Ping statistics for 66.94.234.13: Packets: Sent = 4, Received = 4, Lost = 0 (0% loss), Approximate round trip times in milli-seconds: Minimum = 93ms, Maximum = 203ms, Average = 132ms C:\>](/content/2026/05/923096/images/a37820bb35c208f760e5ab27b02c804cd998b7d86a02b75d3c0676a1aee0d5b0.jpg)
Once you get a reply, go up by 2 until you get a fragmented packet. Take that value and add 28 to the value to account for the various TCP/IP headers. For example, lets say that 1452 was the proper value, the actual MTU size would be 1480, which is the optimum for the network we're working with (1452+28=1480).
Once you find your MTU, you can now configure your access point with the proper MTU size.
To change the MTU rate on your access point follow the steps below:
- Open your browser, enter the IP address of your access point (192.168.0.50) and click OK.
- Enter your username (admin) and password (blank by default). Click OK to enter the web configuration page for the device.
- Click on Setup and then click Manual Configure.
- To change the MTU enter the number in the MTU field and click Save Settings to save your settings.
- Test your email. If changing the MTU does not resolve the problem, continue changing the MTU in increments of ten.
Wireless Basics
D-Link wireless products are based on industry standards to provide easy-to-use and compatible high-speed wireless connectivity within your home, business or public access wireless networks. Strictly adhering to the IEEE standard, the D-Link wireless family of products will allow you to securely access the data you want, when and where you want it. You will be able to enjoy the freedom that wireless networking delivers.
A wireless local area network (WLAN) is a cellular computer network that transmits and receives data with radio signals instead of wires. Wireless LANs are used increasingly in both home and office environments, and public areas such as airports, coffee shops and universities. Innovative ways to utilize WLAN technology are helping people to work and communicate more efficiently. Increased mobility and the absence of cabling and other fixed infrastructure have proven to be beneficial for many users.
Wireless users can use the same applications they use on a wired network. Wireless adapter cards used on laptop and desktop systems support the same protocols as Ethernet adapter cards.
Under many circumstances, it may be desirable for mobile network devices to link to a conventional Ethernet LAN in order to use servers, printers or an Internet connection supplied through the wired LAN. A Wireless Access point is a device used to provide this link.
What is Wireless?
Wireless or Wi-Fi technology is another way of connecting your computer to the network without using wires. Wi-Fi uses radio frequency to connect wirelessly, so you have the freedom to connect computers anywhere in your home or office.
D-Link is the worldwide leader and award winning designer, developer, and manufacturer of networking products. D-Link delivers the performance you need at a price you can afford. D-Link has all the products you need to build your network.
How does wireless work?
Wireless works similar to how cordless phone work, through radio signals to transmit data from one point A to point B. But wireless technology has restrictions as to how you can access the network. You must be within the wireless network range area to be able to connect your computer. There are two different types of wireless networks Wireless Local Area Network (WLAN), and Wireless Personal Area Network (WPAN).
Wireless Local Area Network (WLAN)
In a wireless local area network, a device called an Access Point (AP) connects computers to the network. The access point has a small antenna attached to it, which allows it to transmit data back and forth over radio signals. With an indoor access point as seen in the picture, the signal can travel up to 300 feet. With an outdoor access point the signal can reach out up to 30 miles to serve places like manufacturing plants, industrial locations, college and high school campuses, airports, golf courses, and many other outdoor venues.
Wireless Personal Area Network (WPAN)
Bluetooth is the industry standard wireless technology used for WPAN. Bluetooth devices in WPAN operate in a range up to 30 feet away.
Compared to WLAN the speed and wireless operation range are both less than WLAN, but in return it doesn't use nearly as much power which makes it ideal for personal devices, such as mobile phones, PDAs, headphones, laptops, speakers, and other devices that operate on batteries.
Who uses wireless?
Wireless technology as become so popular in recent years that almost everyone is using it, whether it's for home, office, business, D-Link has a wireless solution for it.
Home
• Gives everyone at home broadband access
- Surf the web, check email, instant message, etc.
- Gets rid of the cables around the house
- Simple and easy to use
Small Office and Home Office
- Stay on top of everything at home as you would at office
- Remotely access your office network from home
- Share Internet connection and printer with multiple computers
- No need to dedicate office space
Where is wireless used?
Wireless technology is expanding everywhere not just at home or office. People like the freedom of mobility and it's becoming so popular that more and more public facilities now provide wireless access to attract people. The wireless connection in public places is usually called "hotspots".
Using a D-Link Cardbus Adapter with your laptop, you can access the hotspot to connect to Internet from remote locations like: Airports, Hotels, Coffee Shops, Libraries, Restaurants, and Convention Centers.
Wireless network is easy to setup, but if you're installing it for the first time it could be quite a task not knowing where to start. That's why we've put together a few setup steps and tips to help you through the process of setting up a wireless network.
Tips
Here are a few things to keep in mind, when you install a wireless network.
Centralize your access point or Access Point
Make sure you place the bridge/access point in a centralized location within your network for the best performance. Try to place the bridge/access point as high as possible in the room, so the signal gets dispersed throughout your home. If you have a two-story home, you may need a repeater to boost the signal to extend the range.
Eliminate Interference
Place home appliances such as cordless telephones, microwaves, wireless speakers, and televisions as far away as possible from the bridge/access point. This would significantly reduce any interference that the appliances might cause since they operate on same frequency.
Security
Don't let your next-door neighbors or intruders connect to your wireless network. Secure your wireless network by turning on the WPA or WEP security feature on the access point. Refer to product manual for detail information on how to set it up.
Wireless Modes
There are basically two modes of networking:
- Infrastructure – All wireless clients will connect to an access point or wireless bridge.
- Ad-Hoc – Directly connecting to another computer, for peer-to-peer communication, using wireless network adapters on each computer, such as two or more wireless network Cardbus adapters.
An Infrastructure network contains an Access Point or wireless bridge. All the wireless devices, or clients, will connect to the wireless bridge or access point.
An Ad-Hoc network contains only clients, such as laptops with wireless cardbus adapters. All the adapters must be in Ad-Hoc mode to communicate.
Networking Basics
Check your IP address
After you install your new D-Link adapter, by default, the TCP/IP settings should be set to obtain an IP address from a DHCP server (i.e. wireless router) automatically. To verify your IP address, please follow the steps below.
Click on Start > Run. In the run box type cmd and click OK. (Windows ^® 7/Vista ^® users type cmd in the Start Search box.)
At the prompt, type ipconfig and press Enter.
This will display the IP address, subnet mask, and the default gateway of your adapter.
If the address is 0.0.0.0, check your adapter installation, security settings, and the settings on your access point. Some firewall software programs may block a DHCP request on newly installed adapters.
If you are connecting to a wireless network at a hotspot (e.g. hotel, coffee shop, airport), please contact an employee or administrator to verify their wireless network settings.
![C:\WINDOWS\system32\cmd.exe Microsoft Windows XP [Version 5.1.2600] (C) Copyright 1985-2001 Microsoft Corp. C:\Documents and Settings>ipconfig Windows IP Configuration Ethernet adapter Local Area Connection: Connection-specific DNS Suffix . : dlink IP Address . . . . . . . . . . . . . : 10.5.7.114 Subnet Mask . . . . . . . . . . . . : 255.255.255.0 Default Gateway . . . . . . . . . . . : 10.5.7.1 C:\Documents and Settings>](/content/2026/05/923096/images/876513f556b376617eb2672d253f4c68b3989c04a4e3cd89ff66255b308a3edd.jpg)
Statically Assign an IP address
If you are not using a DHCP capable gateway/router, or you need to assign a static IP address, please follow the steps below:
Step 1
Windows® 7 - Click on Start > Control Panel > Network and Internet > Network and Sharing Center.
Windows Vista® - Click on Start > Control Panel > Network and Internet > Network and Sharing Center > Manage Network Connections.
Windows® XP - Click on Start > Control Panel > Network Connections.
Windows® 2000 - From the desktop, right-click My Network Places > Properties.
Step 2
Right-click on the Local Area Connection which represents your D-Link network adapter and select Properties.
Step 3
Highlight Internet Protocol (TCP/IP) and click Properties.
Step 4
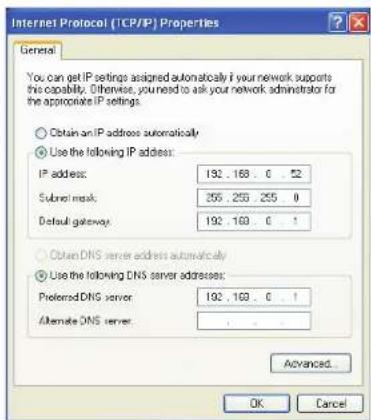
Click Use the following IP address and enter an IP address that is on the same subnet as your network or the LAN IP address on your router.
Example: If the router's LAN IP address is 192.168.0.1, make your IP address 192.168.0.X where X is a number between 2 and 99. Make sure that the number you choose is not in use on the network. Set Default Gateway the same as the LAN IP address of your router (192.168.0.1).
Set Primary DNS the same as the LAN IP address of your router (192.168.0.1). The Secondary DNS is not needed or you may enter a DNS server from your ISP.
Step 5
Click OK twice to save your settings.
Technical Specifications
Standards
• IEEE 802.11n
• IEEE 802.11a
• IEEE 802.11g
• IEEE 802.3
• IEEE 802.3u
• IEEE 802.3ab
Security
• WPA-Personal
• WPA2-Personal
• WPA-Enterprise
• WPA2-Enterprise
Wireless Signal Rates ^1
• 300Mbps • 108Mbps
• 54Mbps • 48Mbps
• 36Mbps • 24Mbps
• 18Mbps • 12Mbps
• 11Mbps • 9Mbps
• 6Mbps • 5.5Mbps
• 2Mbps • 1Mbps
Modulation
• 11a/g: BPSK, QPSK, 16QAM, 64QAM, OFDM
• 11n: BPSK, QPSK, 16QAM, 64QAM, OFDM, MCS
^1 Maximum wireless signal rate derived from IEEE Standard 802.11g, 802.11a and 802.11n specifications. Actual data throughput will vary. Network conditions and environmental factors, including volume of network traffic, building materials and construction, and network overhead, lower actual data throughput rate. Environmental conditions will adversely affect wireless signal range.
^2 Range varies depending on country's regulation.
^3 The DAP-1525 doesn't include 5.25-5.35GHz & 5.47\~5.725GHz.
^1 Maximum wireless signal rate derived from IEEE Standard 802.11g, 802.11a and 802.11n specifications. Actual data throughput will vary. Network conditions and environmental factors, including volume of network traffic, building materials and construction, and network overhead, lower actual data throughput rate. Environmental conditions will adversely affect wireless signal range.
^2 Range varies depending on country's regulation.
^3 The DAP-1525 doesn't include 5.25-5.35GHz & 5.47\~5.725GHz.
Frequency Range ^2
• 2.4GHz to 2.483GHz • 5.15GHz\~5.825GHz ^3
LEDs
- Power - Bridge
• WPS • AP
Operating Temperature
• 32°F to 104°F (0°C to 40°C)
Humidity
• 90% maximum (non-condensing)
Safety & Emissions
• FCC • CE
- IC - C-Tick
Dimensions
• L = 4.53 inches
• W = 3.74 inches
• H = 7.5 inches
Contacting Technical Support
U.S. and Canadian customers can contact D-Link technical support through our web site or by phone.
Before you contact technical support, please have the following ready:
• Model number of the product (e.g. DAP-1525)
- Hardware Revision (located on the label on the bottom of the access point (e.g. rev A1))
- Serial Number (s/n number located on the label on the bottom of the access point).
You can find software updates and user documentation on the D-Link website as well as frequently asked questions and answers to technical issues.
For customers within the United States:
Phone Support:
(877) 453-5465
For customers within Canada:
Phone Support:
(800) 361-5265
Internet Support:
http://support.dlink.com
Internet Support:
http://support.dlink.ca
Warranty
Subject to the terms and conditions set forth herein, D-Link Systems, Inc. ("D-Link") provides this Limited Warranty:
- Only to the person or entity that originally purchased the product from D-Link or its authorized reseller or distributor, and
- Only for products purchased and delivered within the fifty states of the United States, the District of Columbia, U.S. Possessions or Protectorates, U.S. Military Installations, or addresses with an APO or FPO.
Limited Warranty:
D-Link warrants that the hardware portion of the D-Link product described below ("Hardware") will be free from material defects in workmanship and materials under normal use from the date of original retail purchase of the product, for the period set forth below ("Warranty Period"), except as otherwise stated herein.
- Hardware (excluding power supplies and fans): One (1) year
• Power supplies and fans: One (1) year - Spare parts and spare kits: Ninety (90) days
The customer's sole and exclusive remedy and the entire liability of D-Link and its suppliers under this Limited Warranty will be, at D-Link's option, to repair or replace the defective Hardware during the Warranty Period at no charge to the original owner or to refund the actual purchase price paid. Any repair or replacement will be rendered by D-Link at an Authorized D-Link Service Office. The replacement hardware need not be new or have an identical make, model or part. D-Link may, at its option, replace the defective Hardware or any part thereof with any reconditioned product that D-Link reasonably determines is substantially equivalent (or superior) in all material respects to the defective Hardware. Repaired or replacement hardware will be warranted for the remainder of the original Warranty Period or ninety (90) days, whichever is longer, and is subject to the same limitations and exclusions. If a material defect is incapable of correction, or if D-Link determines that it is not practical to repair or replace the defective Hardware, the actual price paid by the original purchaser for the defective Hardware will be refunded by D-Link upon return to D-Link of the defective Hardware. All Hardware or part thereof that is replaced by D-Link, or for which the purchase price is refunded, shall become the property of D-Link upon replacement or refund.
Limited Software Warranty:
D-Link warrants that the software portion of the product ("Software") will substantially conform to D-Link's then current functional specifications for the Software, as set forth in the applicable documentation, from the date of original retail purchase of the Software for a period of ninety (90) days ("Software Warranty Period"), provided that the Software is properly installed on approved hardware and operated as contemplated in its documentation. D-Link further warrants that, during the Software Warranty Period, the magnetic media on which D-Link delivers the Software will be free of physical defects. The customer's sole and exclusive remedy and the entire liability of D-Link and its suppliers under this Limited Warranty will be, at D-Link's option, to replace the non-conforming Software (or defective media) with software that substantially conforms to D-Link's functional specifications for the Software or to refund the portion of the actual purchase price paid that is attributable to the Software. Except as otherwise agreed by DLink in writing, the replacement Software is provided only to the original licensee, and is subject to the terms and conditions of the license granted by D-Link for the Software. Replacement Software will be warranted for the remainder of the original Warranty Period and is subject to the same limitations and exclusions. If a material non-conformance is incapable of correction, or if D-Link determines in its sole discretion that it is not practical to replace the non-conforming Software, the price paid by the original licensee for the non-conforming Software will be refunded by D-Link; provided that the non-conforming Software (and all copies thereof) is first returned to D-Link. The license granted respecting any Software for which a refund is given automatically terminates.
Non-Applicability of Warranty:
The Limited Warranty provided hereunder for Hardware and Software portions of D-Link's products will not be applied to and does not cover any refurbished product and any product purchased through the inventory clearance or liquidation sale or other sales in which D-Link, the sellers, or the liquidators expressly disclaim their warranty obligation pertaining to the product and in that case, the product is being sold "As-Is" without any warranty whatsoever including, without limitation, the Limited Warranty as described herein, notwithstanding anything stated herein to the contrary.
Submitting A Claim:
The customer shall return the product to the original purchase point based on its return policy. In case the return policy period has expired and the product is within warranty, the customer shall submit a claim to D-Link as outlined below:
- The customer must submit with the product as part of the claim a written description of the Hardware defect or Software nonconformance in sufficient detail to allow DLink to confirm the same, along with proof of purchase of the product (such as a copy of the dated purchase invoice for the product) if the product is not registered.
- The customer must obtain a Case ID Number from D-Link Technical Support at 1-877-453-5465, who will attempt to assist the customer in resolving any suspected defects with the product. If the product is considered defective, the customer must obtain a Return Material Authorization ("RMA") number by completing the RMA form and entering the assigned Case ID Number at https://rma.dlink.com/.
Appendix E - Warranty
- After an RMA number is issued, the defective product must be packaged securely in the original or other suitable shipping package to ensure that it will not be damaged in transit, and the RMA number must be prominently marked on the outside of the package. Do not include any manuals or accessories in the shipping package. DLink will only replace the defective portion of the product and will not ship back any accessories.
- The customer is responsible for all in-bound shipping charges to D-Link. No Cash on Delivery ("COD") is allowed. Products sent COD will either be rejected by D-Link or become the property of D-Link. Products shall be fully insured by the customer and shipped to D-Link Systems, Inc., 17595 Mt. Herrmann, Fountain Valley, CA 92708. D-Link will not be held responsible for any packages that are lost in transit to D-Link. The repaired or replaced packages will be shipped to the customer via UPS Ground or any common carrier selected by D-Link. Return shipping charges shall be prepaid by D-Link if you use an address in the United States, otherwise we will ship the product to you freight collect. Expedited shipping is available upon request and provided shipping charges are prepaid by the customer. D-Link may reject or return any product that is not packaged and shipped in strict compliance with the foregoing requirements, or for which an RMA number is not visible from the outside of the package. The product owner agrees to pay D-Link's reasonable handling and return shipping charges for any product that is not packaged and shipped in accordance with the foregoing requirements, or that is determined by D-Link not to be defective or non-conforming.
What Is Not Covered:
The Limited Warranty provided herein by D-Link does not cover:
Products that, in D-Link's judgment, have been subjected to abuse, accident, alteration, modification, tampering, negligence, misuse, faulty installation, lack of reasonable care, repair or service in any way that is not contemplated in the documentation for the product, or if the model or serial number has been altered, tampered with, defaced or removed; Initial installation, installation and removal of the product for repair, and shipping costs; Operational adjustments covered in the operating manual for the product, and normal maintenance; Damage that occurs in shipment, due to act of God, failures due to power surge, and cosmetic damage; Any hardware, software, firmware or other products or services provided by anyone other than D-Link; and Products that have been purchased from inventory clearance or liquidation sales or other sales in which D-Link, the sellers, or the liquidators expressly disclaim their warranty obligation pertaining to the product.
While necessary maintenance or repairs on your Product can be performed by any company, we recommend that you use only an Authorized D-Link Service Office. Improper or incorrectly performed maintenance or repair voids this Limited Warranty.
Disclaimer of Other Warranties:
EXCEPT FOR THE LIMITED WARRANTY SPECIFIED HEREIN, THE PRODUCT IS PROVIDED "AS-IS" WITHOUT ANY WARRANTY OF ANY KIND WHATSOEVER INCLUDING, WITHOUT LIMITATION, ANY WARRANTY OF MERCHANTABILITY, FITNESS FOR A PARTICULAR PURPOSE AND NONINFRINGEMENT.
IF ANY IMPLIED WARRANTY CANNOT BE DISCLAIMED IN ANY TERRITORY WHERE A PRODUCT IS SOLD, THE DURATION OF SUCH IMPLIED WARRANTY SHALL BE LIMITED TO THE DURATION OF THE APPLICABLE WARRANTY PERIOD SET FORTH ABOVE. EXCEPT AS EXPRESSLY COVERED UNDER THE LIMITED WARRANTY PROVIDED HEREIN, THE ENTIRE RISK AS TO THE QUALITY, SELECTION AND PERFORMANCE OF THE PRODUCT IS WITH THE PURCHASER OF THE PRODUCT.
Limitation of Liability:
TO THE MAXIMUM EXTENT PERMITTED BY LAW, D-LINK IS NOT LIABLE UNDER ANY CONTRACT, NEGLIGENCE, STRICT LIABILITY OR OTHER LEGAL OR EQUITABLE THEORY FOR ANY LOSS OF USE OF THE PRODUCT, INCONVENIENCE OR DAMAGES OF ANY CHARACTER, WHETHER DIRECT, SPECIAL, INCIDENTAL OR CONSEQUENTIAL (INCLUDING, BUT NOT LIMITED TO, DAMAGES FOR LOSS OF GOODWILL, LOSS OF REVENUE OR PROFIT, WORK STOPPAGE, COMPUTER FAILURE OR MALFUNCTION, FAILURE OF OTHER EQUIPMENT OR COMPUTER PROGRAMS TO WHICH D-LINK'S PRODUCT IS CONNECTED WITH, LOSS OF INFORMATION OR DATA CONTAINED IN, STORED ON, OR INTEGRATED WITH ANY PRODUCT RETURNED TO D-LINK FOR WARRANTY SERVICE) RESULTING FROM THE USE OF THE PRODUCT, RELATING TO WARRANTY SERVICE, OR ARISING OUT OF ANY BREACH OF THIS LIMITED WARRANTY, EVEN IF D-LINK HAS BEEN ADVISED OF THE POSSIBILITY OF SUCH DAMAGES. THE SOLE REMEDY FOR A BREACH OF THE FOREGOING LIMITED WARRANTY IS REPAIR, REPLACEMENT OR REFUND OF THE DEFECTIVE OR NONCONFORMING PRODUCT. THE MAXIMUM LIABILITY OF D-LINK UNDER THIS WARRANTY IS LIMITED TO THE PURCHASE PRICE OF THE PRODUCT COVERED BY THE WARRANTY. THE FOREGOING EXPRESS WRITTEN WARRANTIES AND REMEDIES ARE EXCLUSIVE AND ARE IN LIEU OF ANY OTHER WARRANTIES OR REMEDIES, EXPRESS, IMPLIED OR STATUTORY.
Governing Law:
This Limited Warranty shall be governed by the laws of the State of California. Some states do not allow exclusion or limitation of incidental or consequential damages, or limitations on how long an implied warranty lasts, so the foregoing limitations and exclusions may not apply. This Limited Warranty provides specific legal rights and you may also have other rights which vary from state to state.
Trademarks:
D-Link is a registered trademark of D-Link Corporation/D-Link Systems, Inc. Other trademarks or registered trademarks are the property of their respective owners.
Copyright Statement:
No part of this publication or documentation accompanying this product may be reproduced in any form or by any means or used to make any derivative such as translation, transformation, or adaptation without permission from D-Link Corporation/D-Link Systems, Inc., as stipulated by the United States Copyright Act of 1976 and any amendments thereto. Contents are subject to change without prior notice.
Copyright ©2009-2010 by D-Link Corporation/D-Link Systems, Inc. All rights reserved.
CE Mark Warning:
This is a Class B product. In a domestic environment, this product may cause radio interference, in which case the user may be required to take adequate measures.
Federal Communication Commission Interference Statement
This equipment has been tested and found to comply with the limits for a Class B digital device, pursuant to Part 15 of the FCC Rules. These limits are designed to provide reasonable protection against harmful interference in a residential installation. This equipment generates, uses and can radiate radio frequency energy and, if not installed and used in accordance with the instructions, may cause harmful interference to radio communications. However, there is no guarantee that interference will not occur in a particular installation. If this equipment does cause harmful interference to radio or television reception, which can be determined by turning the equipment off and on, the user is encouraged to try to correct the interference by one of the following measures:
- Reorient or relocate the receiving antenna.
- Increase the separation between the equipment and receiver.
- Connect the equipment into an outlet on a circuit different from that to which the receiver is connected.
- Consult the dealer or an experienced radio/TV technician for help.
This device complies with Part 15 of the FCC Rules. Operation is subject to the following two conditions: (1) This device may not cause harmful interference, and (2) this device must accept any interference received, including interference that may cause undesired operation.
FCC Caution: Any changes or modifications not expressly approved by the party responsible for compliance could void the user's authority to operate this equipment.
For operation within 5.15 \~ 5.25GHz frequency range, it is restricted to indoor environment.
802.11g operation of this product in the U.S.A. is firmware-limited to channels 1 through 11.
IMPORTANT NOTE:
FCC Radiation Exposure Statement:
This equipment complies with FCC radiation exposure limits set forth for an uncontrolled environment. This equipment should be installed and operated with minimum distance 20cm between the radiator & your body.
This transmitter must not be co-located or operating in conjunction with any other antenna or transmitter.
Industry Canada Statement
This device complies with RSS-210 of the Industry Canada Rules. Operation is subject to the following two conditions:
1) this device may not cause interference and
2) this device must accept any interference, including interference that may cause undesired operation of the device
This device has been designed to operate with an antenna having a maximum gain of 2dBi.
Antenna having a higher gain is strictly prohibited per regulations of Industry Canada. The required antenna impedance is 50ohms.
To reduce potential radio interference to other users, the antenna type and its gain should be so chosen that the EIRP is not more than required for successful communication.
Caution:
The device for the band 5150-5250 MHz is only for indoor usage to reduce potential for harmful interference to co-channel mobile satellite systems.
Because high power radars are allocated as primary users (meaning they have priority) in 5250-5350 MHz and 5650-5850 MHz, these radars could cause interference and/or damage to license exempt LAN devices.
IMPORTANT NOTE:
IC Radiation Exposure Statement:
This equipment complies with IC radiation exposure limits set forth for an uncontrolled environment. This equipment should be installed and operated with minimum distance 20cm between the radiator and your body.
The availability of some specific channels and/or operational frequency bands are country dependent and are firmware programmed at the factory to match the intended destination. The firmware setting is not accessible by the end user.
For detailed warranty information applicable to products purchased outside the United States, please contact the corresponding local D-Link office.
Registration
Register your product online at support.dlink.com/register

natural_image
Woman in red dress using a laptop on a white sofa (no visible text or symbols)Product registration is entirely voluntary and failure to complete or return this form will not diminish your warranty rights.
Version 1.0
February 18, 2010
- Table of Contents
- Product Overview 4
- Installation....10
- AP/Bridge 12
- Configuration for AP Mode ....16
- Configuration for Bridge Mode ....43
- Package Contents
- System Requirements
- Introduction
- TOTAL PERFORMANCE
- TOTAL SECURITY
- TOTAL COVERAGE
- ULTIMATE PERFORMANCE
- EXTENDED WHOLE HOME COVERAGE
- TOTAL NETWORK SECURITY
- Features
- Installation
- Before you Begin
- Wireless Installation Considerations
- AP/Bridge
- AP Mode
- Bridge Mode
- Create a Full MediaBand (5GHz wireless) Network
- One Touch AP Configuration
- Configuration for AP Mode
- Web-based Configuration Utility
- Setup Wizard
- Wireless Setup Wizard
- Section 3 - Configuration
- Add Wireless Device With WPS
- USING PIN NUMBER
- CONNECT TO WIRELESS DEVICE WITH WPS
- VIRTUAL PUSH BUTTON
- Manual Configuration Wireless Settings
- LAN Setup
- LAN Setup Static IPv6
- LAN Setup Auto-configuration
- Advanced MAC Address Filter
- Advanced Network
- Guest Zone
- Schedule
- Tools Admin
- Time
- System
- Firmware
- Language Pack Upgrade
- Status Device Info
- Wireless
- Logs
- Statistics
- IPV6
- Support
- Configuration for Bridge Mode
- SELECT CONFIGURATION METHOD
- Wireless MAC Cloning
- Auto-configuration
- IPV6 CONNECTION TYPE
- IPV6 DNS SETTINGS
- Advanced Schedule
- Language Pack
- Wireless Security
- What is WPA?
- Configure WEP (AP Mode)
- Configure WPA-Personal (AP Mode)
- Configure WPA-Enterprise (AP Mode)
- Configure WEP (Bridge Mode)
- Configure WPA-Personal (Bridge Mode)
- Connect to a Wireless Network Using Windows® 7
- Section 5 - Connecting to a Wireless Network
- Connect to a Wireless Network Using Windows Vista®
- Configure Security
- Connect to a Wireless Network Using Windows® XP
- The Wireless Network Connection box will appear. Enter the security passphrase and click Connect.
- Troubleshooting
- Why can't I access the web-based configuration utility?
- What can I do if I forgot my password?
- Why can't I connect to certain sites or send and receive emails when connecting through my access point?
- Note: AOL DSL+ users must use MTU of 1400.
- Example: ping yahoo.com -f -l 1472
- Wireless Basics
- What is Wireless?
- How does wireless work?
- Wireless Local Area Network (WLAN)
- Wireless Personal Area Network (WPAN)
- Who uses wireless?
- Home
- Small Office and Home Office
- Where is wireless used?
- Tips
- Centralize your access point or Access Point
- Eliminate Interference
- Security
- Wireless Modes
- Networking Basics
- Check your IP address
- Statically Assign an IP address
- Step 1
- Step 2
- Step 3
- Step 4
- Step 5
- Technical Specifications
- Standards
- Wireless Signal Rates 1
- Modulation
- Frequency Range 2
- LEDs
- Operating Temperature
- Humidity
- Safety & Emissions
- Dimensions
- Contacting Technical Support
- For customers within the United States:
- For customers within Canada:
- Warranty
- Limited Warranty:
- Limited Software Warranty:
- Non-Applicability of Warranty:
- Submitting A Claim:
- Appendix E - Warranty
- What Is Not Covered:
- Disclaimer of Other Warranties:
- Limitation of Liability:
- Governing Law:
- Trademarks:
- Copyright Statement:
- CE Mark Warning:
- Federal Communication Commission Interference Statement
- IMPORTANT NOTE:
- Industry Canada Statement
- Caution:
- Registration
Brand : D-LINK
Model : DAP-1525
Category : Hi-Fi System