
DVR8-4550 - Voice recorder SWANN - Free user manual and instructions
Find the device manual for free DVR8-4550 SWANN in PDF.


| Product Type | Digital Voice Recorder |
| Brand | Swann |
| Model | DVR8-4550 |
| Dimensions (H x W x D) | 4.5 x 2.5 x 0.8 inches |
| Weight | 3.0 oz |
| Power Source | Built-in rechargeable Li-ion battery, USB charging |
| Battery Life | Up to 20 hours continuous recording |
| Storage Capacity | 8GB internal memory, expandable via microSD up to 32GB |
| Recording Format | WAV (PCM), MP3 |
| Recording Modes | Voice Activated, Continuous, Scheduled |
| Playback Options | Speaker, Earphone jack, USB transfer to PC |
| Key Functions | One-touch recording, voice activation, password protection, timestamp, A-B repeat |
| Maintenance & Care | Keep dry; clean surface with soft cloth; avoid extreme temperatures |
| Security | Password lock for files and device access |
| Spare Parts & Repairability | Battery replaceable by professional; no other user-serviceable parts |
| General Information | Compatible with Windows and macOS; includes USB cable, earphone, manual |
Frequently Asked Questions - DVR8-4550 SWANN
User questions about DVR8-4550 SWANN
0 question about this device. Answer the ones you know or ask your own.
Ask a new question about this device
Download the instructions for your Voice recorder in PDF format for free! Find your manual DVR8-4550 - SWANN and take your electronic device back in hand. On this page are published all the documents necessary for the use of your device. DVR8-4550 by SWANN.
USER MANUAL DVR8-4550 SWANN
Professional HD Security System
Instruction Manual
Important Information
FCC Verification
This equipment has been tested and found to comply with the limits for Class B digital device, pursuant to part 15 of the FCC Rules. These limits are designed to provide reasonable protection against harmful interference in a residential installation. This equipment generates, uses and can radiate radio frequency energy and, if not installed and used in accordance with the instructions, may cause harmful interference to radio or television reception, which can be determined by turning the equipment off and on, the user is encouraged to try to correct the interference by one or more of the following measures:
- Reorient or relocate the receiving antenna
- Increase the separation between the equipment and the receiver
- Connect the equipment into an outlet on a circuit different from that to which the receiver is connected
- Consult the dealer or an experienced radio/TV technician for help These devices comply with part 15 of the FCC Rules. Operation is subject to the following two conditions:
• These devices may not cause harmful interference - These devices must accept any interference received, including interference that may cause undesired operation
Important Notice: All jurisdictions have specific laws and regulations relating to the use of cameras. Before using any camera for any purpose, it is the buyer's responsibility to be aware of all applicable laws and regulations that prohibit or limit the use of cameras and to comply with the applicable laws and regulations.
FCC Regulation (for USA): Prohibition against eavesdropping
Except for the operations of law enforcement officers conducted under lawful authority, no person shall use, either directly or indirectly, a device operated pursuant to the provisions of this Part for the purpose of overhearing or recording the private conversations of others unless such use is authorized by all of the parties engaging in the conversation.
Warning: Changes or modifications made to this device not approved expressly by the party responsible for compliance could void the user's authority to operate the equipment.
Important Safety Instructions
- Make sure product is fixed correctly and stable if fastened in place
- Do not operate if wires and terminals are exposed
- Do not cover vents on the side of the device and allow adequate space for ventilation
- Only use the power adapter supplied with your DVR
Password Information
This DVR does not have a default password. A password is created during the Setup Wizard. If password protection has been enabled and you have forgotten your password, you can enter a super password. Click "Forgot Password" then input your DVR's MAC address without the colons, for example, EC71DBE32877.
Your DVR's Mac address can be obtained using SwannView Link for Windows. Please download it from our website: support.swann.com.
About this Manual
This instruction manual is written for the DVR-1580, 4550, 4750 and 5000 models and was accurate at the time it was published. However, because of our on-going efforts to constantly improve our products, additional features and functions may have been added since that time. We encourage you to visit our website to check for the latest updates and product announcements.
Contents
Important Information 2
Contents 3
Contents (cont.) 4
Live View 5
Menu 6
Menu Layout 7
Camera Configuration 8
Display: Camera 9
Creating a Privacy Mask 10
Recording: Encode (720p Models) 11
Recording: Encode (1080p Models) 12
Recording: Encode (3MP Models) 13
Alarm: Motion 14
Motion Detection 15
Motion Detection Schedule 16
Motion Detection Tips 17
Alarm: Video Loss 18
Video Loss Schedule 19
Device: PTZ 20
Controlling a PTZ Camera 21
Creating a Preset 22
Creating a Patrol 23
Recording Configuration 24
Recording: Encode 25
Recording: Option 26
Recording: Schedule 27
Playback & Backup 28
Search: Playback 29
The Playback Interface 30
The Playback Interface (cont.) 31
Search: Event 32
Search: Backup 33
Contents (cont.)
System Configuration 34
System: General 35
System: User 36
System: Maintenance 37
Alarm: Exception 38
Device: HDD 39
Display: Output 40
Network: General 41
Network: Advanced 42
System Status 43
Search: Log Search 44
Network: Status 45
Device: S.M.A.R.T 46
System: System Information 47
Glossary 48
Glossary (cont.) 49
Glossary (cont.) 50
Warranty Information 51
Helpdesk & Technical Support 52
Live View
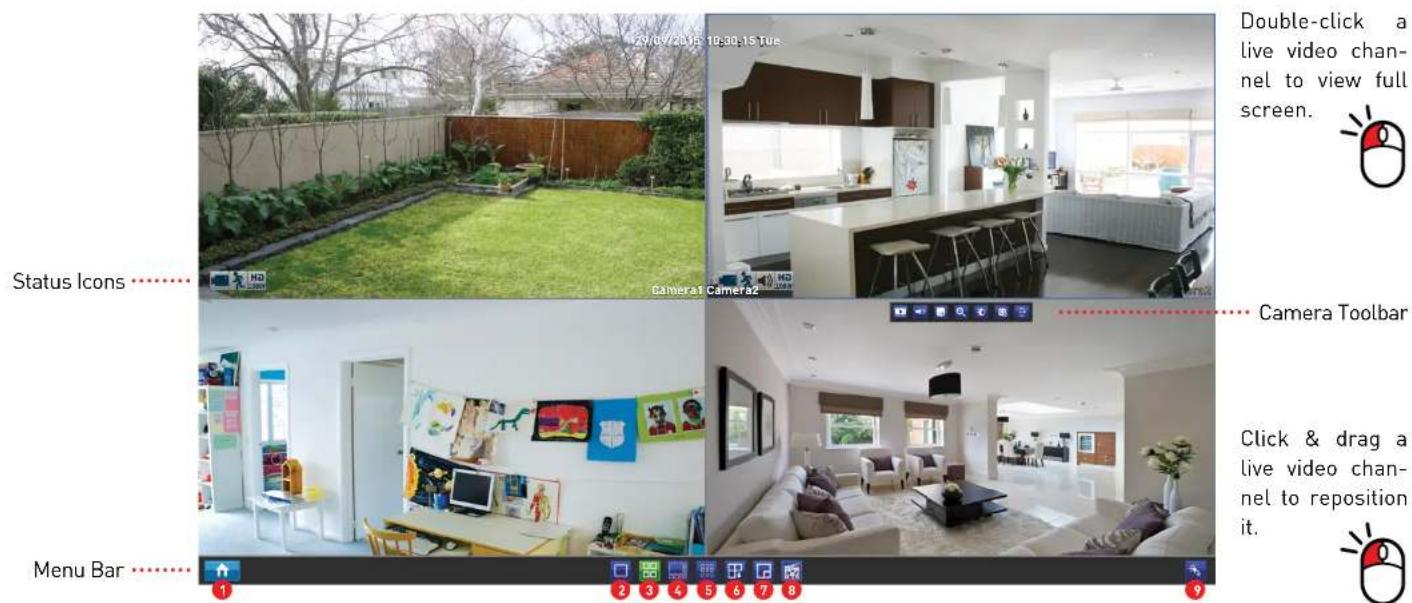
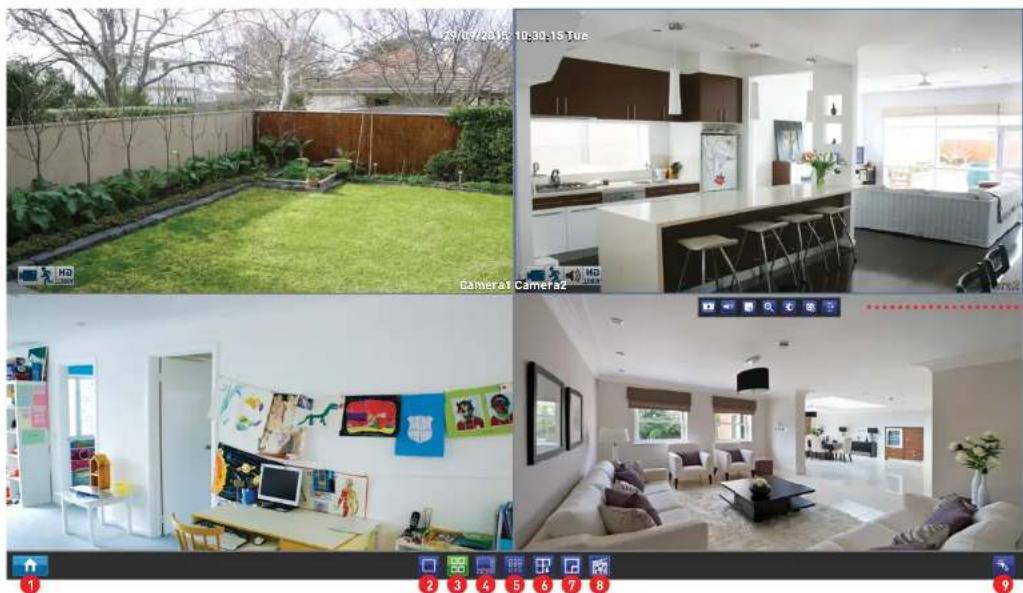
Live View is the default display mode for your DVR. Each camera connected will be displayed on-screen. You can check the status or operation of your DVR and cameras using the icons and Menu Bar on the Live View screen. Right-click the mouse to access the Menu Bar.
natural_image
Four-panel collage showing a garden, kitchen interior, living room, and camera view (no visible text or symbols)Double-click a live video channel to view full screen.

Click & drag a live video channel to reposition it.

- Opens the Menu.
- Click to view a single camera.
- Click to view four cameras.
-
Click to view eight cameras.
-
Click to view nine cameras.
- Click to view the next screen in single or four camera view.
-
Click to enable PIP mode.
-
Click to manually record the selected camera.
- Click to access the Setup Wizard.
Menu
The Menu is where you control the various actions and options that are available on your DVR. You can also access previously recorded video for playback and to export to a USB storage device such as a flash drive. To maintain system integrity, a firmware upgrade can be performed when available and access to the shutdown menu to restart or safely turn off your DVR.
Back to top
Menu Layout
The various actions and options that are available, are categorised on the left-hand side of the Menu.
Clicking each category will reveal a number of tabs or sub-categories that can be changed from their default value.
To exit or access the previous menu, right-click the mouse.

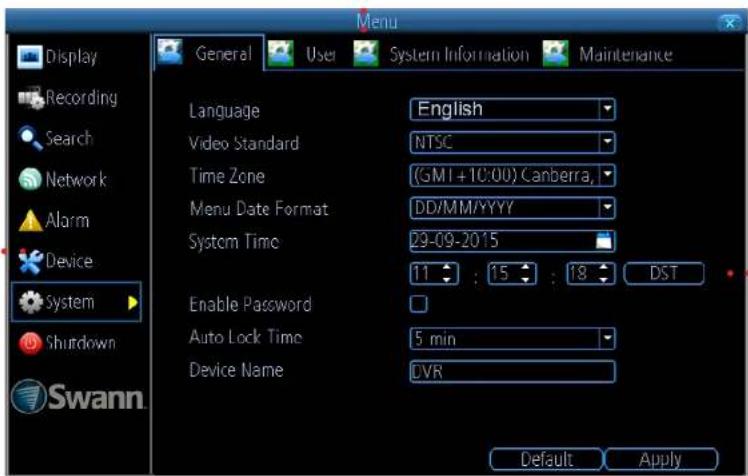
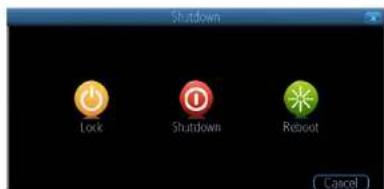
To shutdown, reboot or lock your DVR, click the "Shutdown" button. To ensure the integrity of your data and recordings, always select "Shutdown" when powering off.
Some options may have additional menus that can be accessed.
Back to top
Camera Configuration
The majority of the camera configuration options available are in the “Display”, “Recording”, “Alarm” and “Device” menus that are accessible from the Menu. You can change the resolution and bitrate settings as well as the image settings for brightness and contrast. Your DVR has several controls for Motion Detection, Video Loss and the ability to create one or more privacy masks.
Back to top
Display: Camera
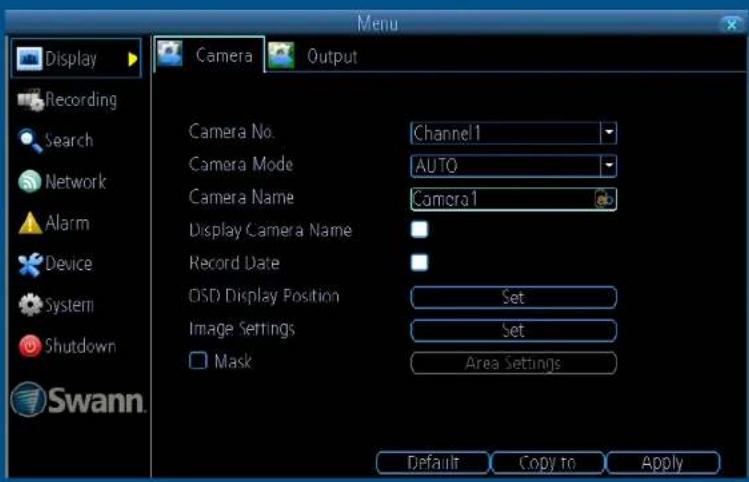
The configuration options available allow you to name each camera relevant to where it has been installed as well as the ability to adjust image settings such as brightness and contrast. The Camera Mode option sets the type of camera between AHD and TVI, AUTO will set the DVR to match the supported camera signal and is recommended.
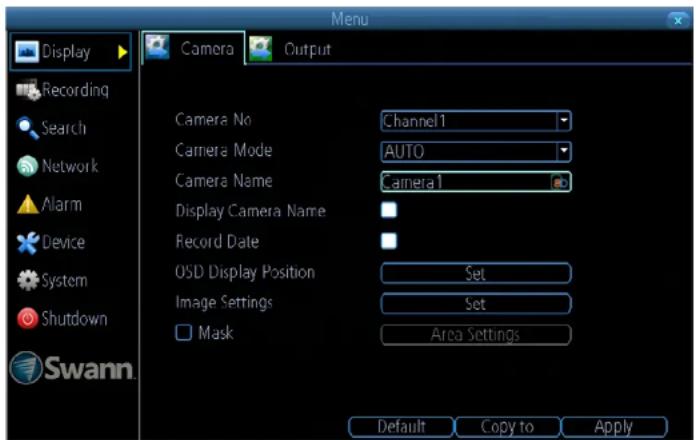
Camera No.: Select a camera that you would like to configure.
Camera Mode: Choose the type of camera from AUTO, TVI and AHD.
Camera Name: Select a name for the camera you've selected. It can be up to 16 characters in length.
Display Camera Name: Leave this enabled if you would like to display the camera name on the Live View screen, otherwise click to disable.
Record Date: It's recommended to leave this enabled as it creates an inseparable record of exactly when the footage was captured.
OSD Display Position: Click the "Set" button to change the position of the camera name on the Live View screen. Use the mouse to reposition the camera name. Right-click the mouse then click "Save" to exit.
Image Settings: This gives you access to the image adjustment tools.
Click the "Set" button to change then click "OK" when finished.
Brightness: This changes how light the image appears to be.
Contrast: This increases the difference between the blackest black and the whitest white in the image.
Saturation: This alters how much colour is displayed in the image. The higher the saturation, the more bright and vivid colours will appear.
Hue: This changes the colour mix of the image.
Mask: Click the checkbox to enable then click "Area Settings" to create one or more privacy masks - click here for more information.
- Use the "Copy to" button to apply all settings to the other cameras.
- Don't forget to click "Apply" to save settings.
- Right-click the mouse to exit the Menu.
Creating a Privacy Mask
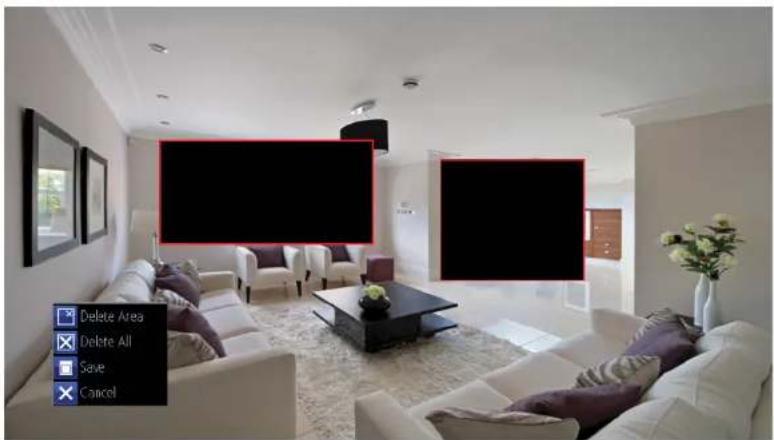
A privacy mask can be used if you want to obscure part of your image for privacy. You can also use this option to minimize false triggers for Motion Detection. You can create up to four areas per camera to mask. Any area obscured by a privacy mask won't be shown live or recorded.
natural_image
Interior view of a modern living room with white sofas, large windows, and a blackboard (no visible text or symbols)- Using the mouse, click & drag to select the area that you want to create a privacy mask for (as shown above). Up to four masks can be created.
-
To delete a mask, move the mouse pointer within the mask, right-click the mouse to access the sub-menu (as shown above) then click "Delete Area". Click "Delete All" to delete all masks. Click "Save" to save your mask or click "Cancel" to exit.
-
Click the "Default" button to revert back to default settings.
- Use the "Copy to" button to apply all settings to the other cameras.
- Don't forget to click "Apply" to save settings.
• Right-click the mouse to exit the Menu.
Back to top
Recording: Encode (720p Models)
The Encode function allows you to change the resolution and bitrate for each camera connected. The maximum Main Stream resolution is 720P (1280 x 720) at 15fps, which fits in with the capabilities of the provided cameras. The Sub stream resolution is Q720p (320 x 180).
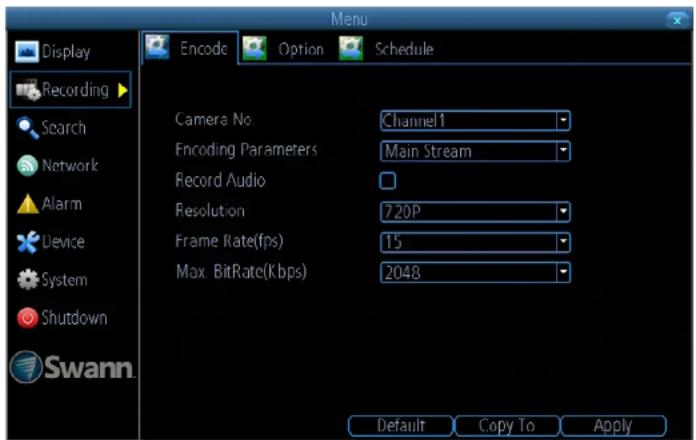
Camera No.: Select a camera that you would like to configure.
Encoding Parameters: Select which parameter that you would like to configure, Main Stream or Sub stream.
Record Audio: Click here for more information.
Resolution: The resolution is 720P for Main Stream and Q720p for Sub stream. By default, the SwannView Link app and Windows software utilises the Sub stream parameter to display an image from your DVR to your mobile device or computer.
Frame Rate(fps): The maximum frame rate is 15fps for Main Stream and 8fps for Sub stream. Change the Sub stream frame rate if you're having issues streaming to your mobile device or computer.
Max. BitRate(Kbps): The maximum bitrate is 2048Kbps for Main Stream
and 256Kbps for Sub stream. Change the Sub stream bitrate if you're having issues streaming to your mobile device or computer. By lowering the bitrate, you reduce the amount of data that is transmitted but you also lower the video quality if there is a lot of movement. Higher Main Stream bitrates will also consume the HDD space faster but can give you higher quality video if there is a lot of movement in the scene.
- Click the "Default" button to revert back to default settings.
- Use the "Copy to" button to apply all settings to the other cameras.
- Don't forget to click "Apply" to save settings.
• Right-click the mouse to exit the Menu.
Recording: Encode (1080p Models)
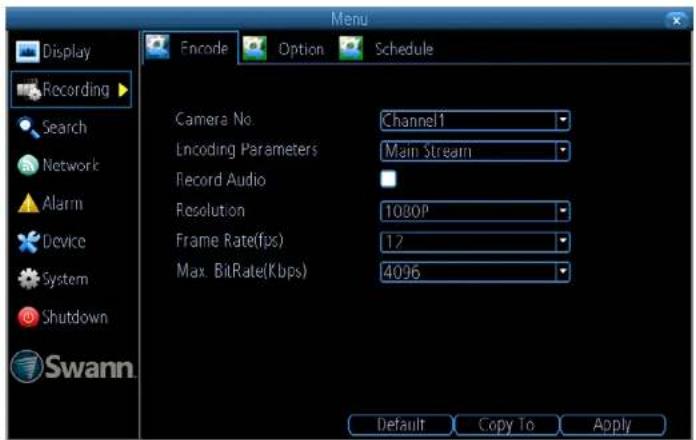
The Encode function allows you to change the resolution and bitrate for each camera connected. The maximum Main Stream resolution is 1080P (1920 x 1080) at 12fps, which fits in with the capabilities of the provided cameras. The Sub stream resolution is Q720p (320 x 180).
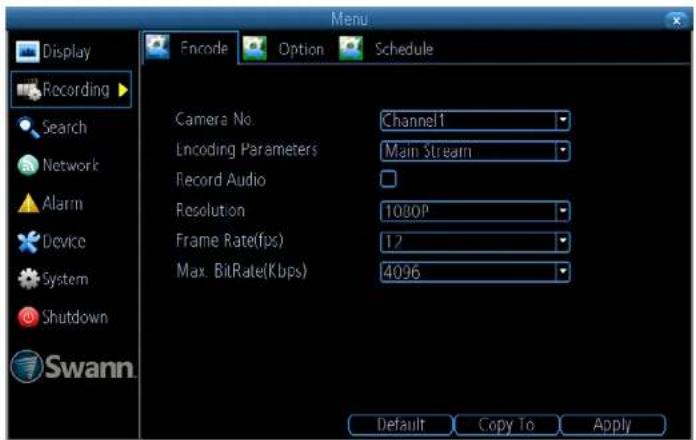
Camera No.: Select a camera that you would like to configure.
Encoding Parameters: Select which parameter that you would like to configure, Main Stream or Sub stream.
Record Audio: Click here for more information.
Resolution: The resolution is 1080P for Main Stream and Q720p for Sub stream. By default, the SwannView Link app and Windows software utilises the Sub stream parameter to display an image from your DVR to your mobile device or computer.
Frame Rate[fps]: The maximum frame rate is 12fps for Main Stream and 8fps for Sub stream. Change the Sub stream frame rate if you're having issues streaming to your mobile device or computer.
Max. BitRate(Kbps): The maximum bitrate is 4096Kbps for Main Stream
and 256Kbps for Sub stream. Change the Sub stream bitrate if you're having issues streaming to your mobile device or computer. By lowering the bitrate, you reduce the amount of data that is transmitted but you also lower the video quality if there is a lot of movement. Higher Main Stream bitrates will also consume the HDD space faster but can give you higher quality video if there is a lot of movement in the scene.
- Click the "Default" button to revert back to default settings.
- Use the "Copy to" button to apply all settings to the other cameras.
- Don't forget to click "Apply" to save settings.
• Right-click the mouse to exit the Menu.
Recording: Encode (3MP Models)
The Encode function allows you to change the resolution and bitrate for each camera connected. The maximum Main Stream resolution is 3MP (2048 x 1536) at 8fps, which fits in with the capabilities of the provided cameras. The Sub stream resolution is Q720p (320 x 180).
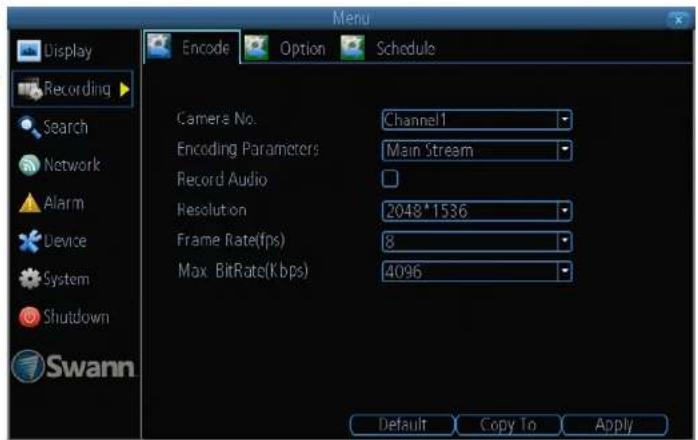
Camera No.: Select a camera that you would like to configure.
Encoding Parameters: Select which parameter that you would like to configure, Main Stream or Sub stream.
Record Audio: Click here for more information.
Resolution: The resolution is 3MP for Main Stream and Q720p for Sub stream. By default, the SwannView Link app and Windows software utilises the Sub stream parameter to display an image from your DVR to your mobile device or computer.
Frame Rate(fps): The maximum frame rate is 8fps for Main Stream and 8fps for Sub stream. Change the Sub stream frame rate if you're having issues streaming to your mobile device or computer.
Max. BitRate(Kbps): The maximum bitrate is 4096Kbps for Main Stream
and 256Kbps for Sub stream. Change the Sub stream bitrate if you're having issues streaming to your mobile device or computer. By lowering the bitrate, you reduce the amount of data that is transmitted but you also lower the video quality if there is a lot of movement. Higher Main Stream bitrates will also consume the HDD space faster but can give you higher quality video if there is a lot of movement in the scene.
- Click the "Default" button to revert back to default settings.
- Use the "Copy to" button to apply all settings to the other cameras.
- Don't forget to click "Apply" to save settings.
• Right-click the mouse to exit the Menu.
Alarm: Motion
Whether you're waiting for an expected event, hoping you don't spot an unwelcome visitor, or just curious about what happens when you're not around. Motion Detection can be configured to alert you and record video only when it detects motion. Motion Detection is enabled by default.
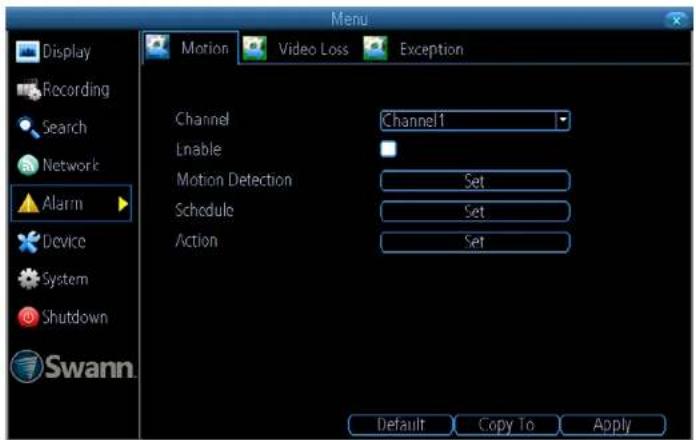
Channel: Select a camera that you would like to configure.
Enable: Motion Detection is enabled by default.
Motion Detection: Click the "Set" button to change the default Motion Detection area - Click here for more information.
Schedule: Click the "Set" button to change the default Motion Detection alarm schedule - Click here for more information.
Action: Click the "Set" button to enable an audio warning, to send an email and to trigger other cameras when motion is detected.
- Click the "Default" button to revert back to default settings.
- Use the "Copy to" button to apply all settings to the other cameras.
- Don't forget to click "Apply" to save settings.
• Right-click the mouse to exit the Menu.
Back to top
Motion Detection
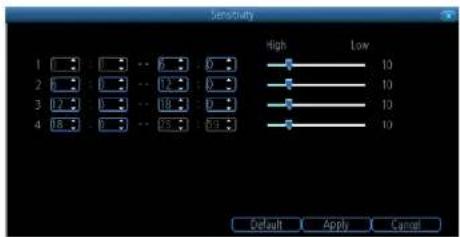
Using the "Sensitivity" function, you can change the motion sensitivity level for each time period available. The level is controlled by a slider, allowing you to set a value between 0 and 50. The lower the number, the more sensitive the Motion Detection will be.
Motion Detection is an essential part of your security system. It's the main method that detects when someone is in your home when they shouldn't be. When motion has been detected by one or more cameras, a signal is sent to your DVR, alerting you to a potential threat in your home. It does this in several ways such as activating an audio warning using its internal buzzer, sending an email and sending an alert to your smartphone or tablet. You can also configure your DVR so it triggers the other cameras to start recording.
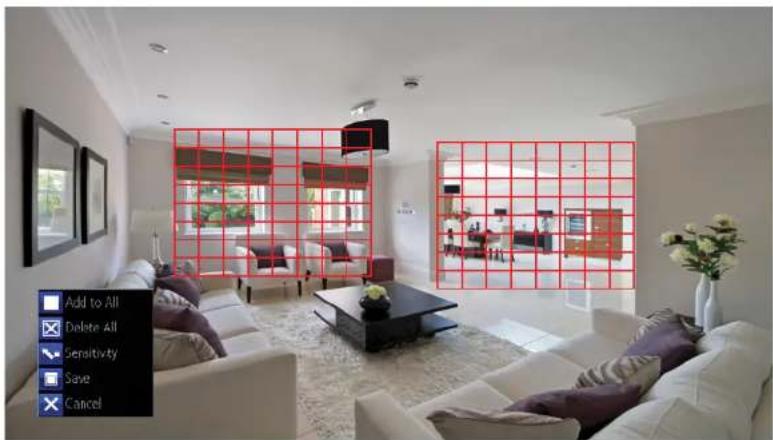
Motion Detection is the default recording mode for your DVR. The entire view of the camera is enabled to detect motion, however you can select certain areas if you wish. In the above example, a Motion Detection zone has been set up for the windows and dining room entrance. Movement outside of these zones will not be detected.
- Right-click the mouse to access the sub-menu then click "Delete All".
- Click & drag to select the area that you want to create a zone for. Multiple zones can be created. The same action also applies if you want to delete a zone that has been created.
- You can adjust the sensitivity level (see above) if required.
-
Right-click the mouse to access the sub-menu then click "Save" to save any changes that you have made. To revert back to default settings click "Add to All" or click "Cancel" to exit.
-
Click the "Default" button to revert back to default settings.
- Use the "Copy to" button to apply all settings to the other cameras.
- Don't forget to click "Apply" to save settings.
• Right-click the mouse to exit the Menu.
Motion Detection Schedule
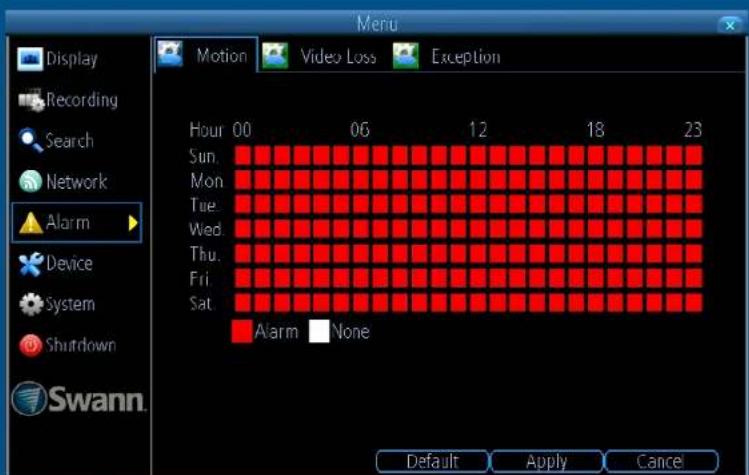
By default, a Motion Detection alarm schedule has been enabled for each connected camera. You can however change the schedule according to what fits in with your needs. The schedule is presented as a 24 hour 7 days a week grid and is colour coded to represent the event type.
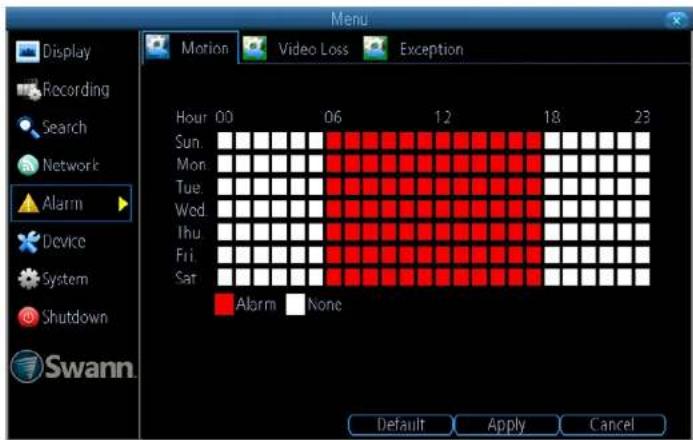
In the above example, a schedule has been created for 06:00 a.m. to 06:00 p.m. Sunday to Saturday. Using the mouse, click on a particular square or click & drag to change a section.
- Click the "Default" button to revert back to default settings.
- Don't forget to click "Apply" to save settings.
- Click "Cancel" to exit.
• Right-click the mouse to exit the Menu.
Motion Detection Tips
Placement of the cameras
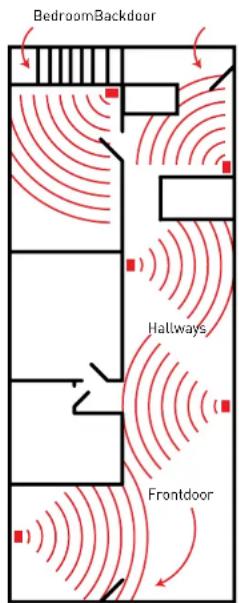
- Keep cameras 10 - 15 feet (3 - 4 metres) away from heating vents, where the sunlight shines in, and radiators. If a camera detects a swift change in motion, even that of a cloud passing quickly over direct sunlight shining into your living room, Motion Detection could be activated.
- Place cameras in areas where people have to walk through, like the stairwell, main hallway or entry door. That way, an intruder will activate Motion Detection regardless of where they are headed. Intruders usually go right for the master bedroom, so put a camera near that room or other rooms where you have valuables, like the study.
- Walk through your house and assess where intruders are most likely to enter, and what path they would take. Most burglars enter the home through a front or back door, so it's advisable to place the cameras near those areas.
- When installing cameras outside, it's important to keep your front and backyard well-lit for ideal night vision and the ability to detect motion. It's common for intruders to enter a home through an unlocked garage or by using a garage door opener in an unlocked car located in the driveway.
Avoiding false triggers
- A flag or foliage that is blown by the wind - Angle the camera so wind-blown objects are out of the camera's view.
- Pets moving in front of the camera - Lower the sensitivity level and/or point the camera into areas that are not particular high-traffic for your pets.
- Vehicles moving in the background - Angle the camera so as to avoid movement in the background.
- Moving air from a heater or air conditioner - Angle the camera away from heater and air conditioner sources.
- Movement reflected off smooth surfaces such as glass - Lower the sensitivity level and/or avoid pointing the camera directly at glass surfaces.
Alarm: Video Loss
Video Loss is regarded as a potential alarm event and is considered to occur any time your DVR doesn't receive an active video signal from any of its video inputs. When a video input has no incoming signal, a "VIDEO LOSS" message will appear on-screen.
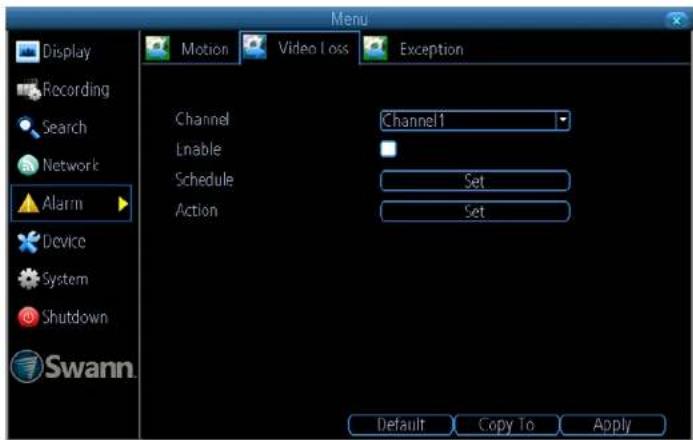
Channel: Select a camera that you would like to configure.
Enable: Click the checkbox to enable.
Schedule: Click the "Set" button to change the default Video Loss alarm schedule - Click here for more information.
Action: Click the "Set" button to enable an audio warning and to send an email.
- Click the "Default" button to revert back to default settings.
- Use the "Copy to" button to apply all settings to the other cameras.
- Don't forget to click "Apply" to save settings.
• Right-click the mouse to exit the Menu.
Video Loss Schedule
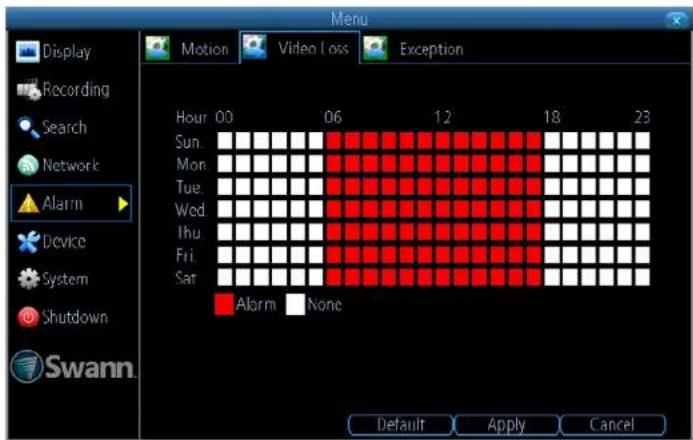
In the above example, a schedule has been created for 06:00 a.m. to 06:00 p.m. Sunday to Saturday. Using the mouse, click on a particular square or click & drag to change a section.
- Click the "Default" button to revert back to default settings.
- Don't forget to click "Apply" to save settings.
- Click "Cancel" to exit.
• Right-click the mouse to exit the Menu.
Device: PTZ
If you have a PTZ camera connected to your DVR, use this menu to configure settings for your device. Please consult the user manual included with your camera for specific configuration instructions.
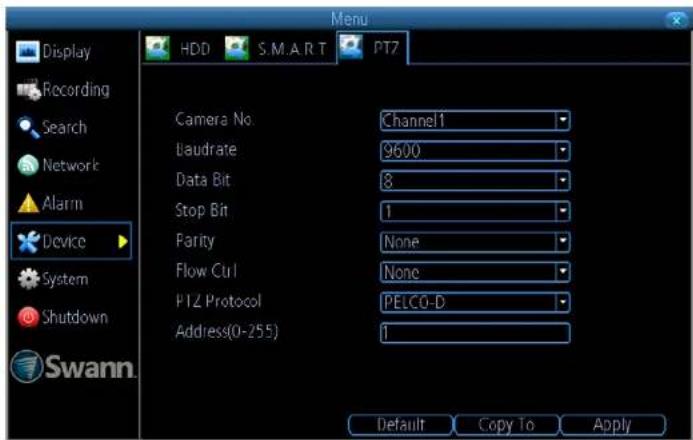
Camera No.: Select a camera that you would like to configure.
Baudrate: Most devices operate at 2400 or 9600.
Data Bit: Most devices operate at 8.
Stop Bit: Most devices operate at 1.
Parity: Most devices have the parity set to "None".
Flow Ctrl: Most devices have the parity set to "None".
PTZ Protocol: "PELCO-C, PELCO-D" and "PELCO-P" are popular camera control protocols used in the CCTV industry. This ensures that any PTZ camera you have purchased, will work with this DVR. For the best result, we recommend using a Swann branded PTZ camera.
Address(0-255): The command address of the device you want to associate with this channel.
- Click the "Default" button to revert back to default settings.
- Use the "Copy to" button to apply all settings to the other cameras.
- Don't forget to click "Apply" to save settings.
• Right-click the mouse to exit the Menu.

Please note: Don't use Motion Detection on channels with a PTZ camera connected. As a PTZ camera can pan, tilt & zoom, your DVR will detect this as motion instead of a moving object.
Controlling a PTZ Camera
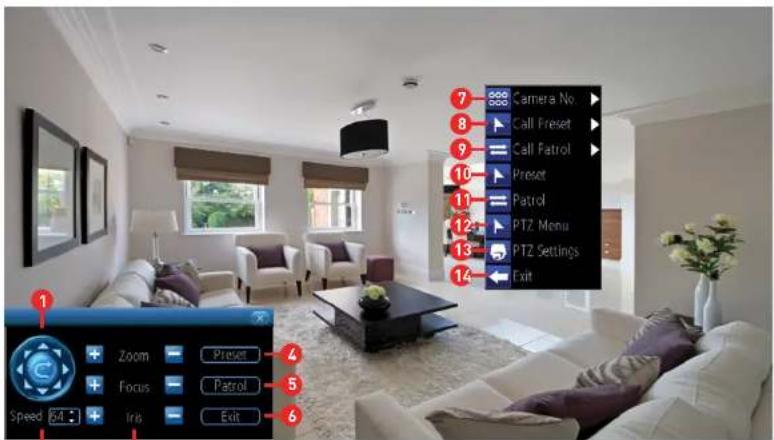
To control a PTZ camera, use the mouse and click the channel the camera is connected to. Click the "PTZ" button on the camera toolbar. The PTZ controls will appear on-screen.
- Click the directional buttons to move the camera in the direction selected.
- This determines how fast the camera will move. The lower the number the slower the camera will move (this does not affect the speed when the camera is in Patrol mode).
- The ability to zoom into an object and to control the level of focus (the "Iris" controls are not available).
To access the PTZ menu, right-click the mouse (as seen above).
- Click this to select a different channel.
- Click this to select a different Preset position.
- Click this to select a different Patrol mode.
10 (4). Click this to access the Preset menu - Click here for more information.
11 (5). Click this to access the Patrol menu - Click here for more information.
12. Click this to hide the PTZ controls. Click again to return.
13. Click this to access the PTZ settings menu.
14 [6]. Click this to exit. You will be taken back to the default Live View mode.
Creating a Preset
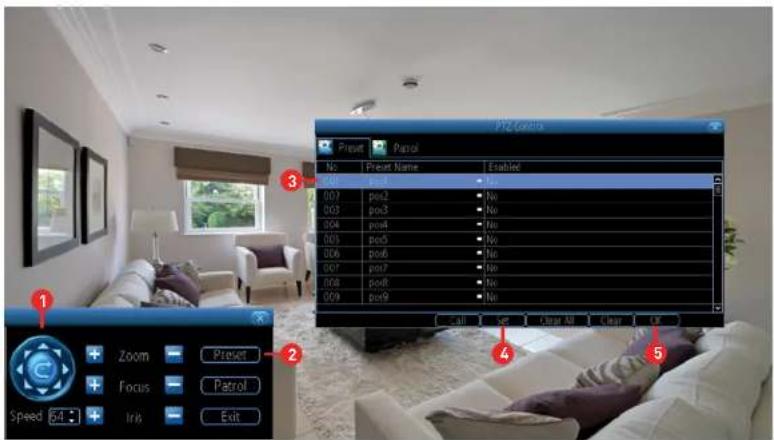
- Use the PTZ controls to move the camera to the desired focal position. The Zoom and Focus controls can also be used.
- Click the "Preset" button to access the Preset menu.
- Click the first Preset slot available then click "pos1" to change the name to something more relevant (you can leave the default name if you wish).
- Click the "Set" button to save (this will change from No to Yes).
- Click "OK" to exit.
Repeat the above steps to create multiple Preset positions. Make sure you change the Preset slot for each Preset that you want to create. Up to 128 different Preset positions can be created.
Call: Select a saved Preset slot then click this to move the camera to the Preset position.
Clear All: Click this to clear all Preset slots.
Clear: Select a saved Preset slot then click this to clear.
Creating a Patrol
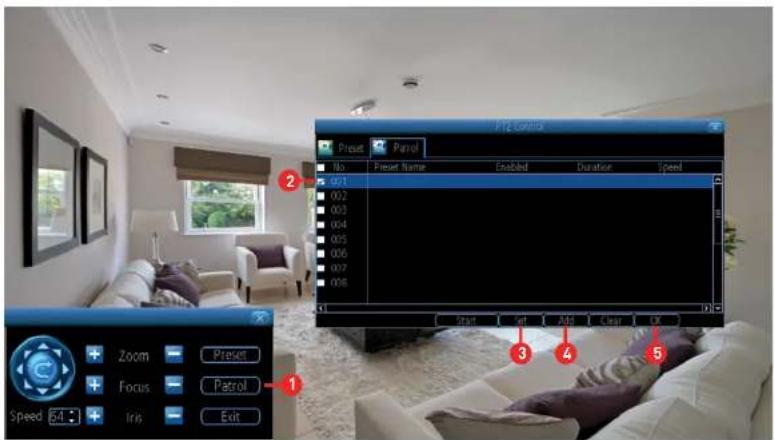
Patrol mode instructs your DVR to automatically move the camera according to the Preset positions that have been created.
- Click the "Patrol" button to access the Patrol menu.
- Click the first Preset slot available.
- Click the "Set" button, select from one of the available Preset positions that you created then click "OK".
Repeat the above steps to add multiple Preset positions. Select a different Preset slot for each Preset that you want to add. Up to 16 Preset positions can be added to the Patrol.
- When finished, click the "Add" button to add each Preset to the Patrol.
- Click the "OK" button to confirm then right-click to exit.
Back to top
Start: Click this to start a Patrol.
Clear: Select a saved Preset slot then click this to clear.

Please note: The duration and speed for each Preset position added cannot be changed.
Recording Configuration
The Recording Configuration options are available in the “Recording” menu. From here you can access and change the recording schedule for each camera connected as well as how your DVR will record video to the hard drive. You can also enable audio recording if you have a microphone or some other audio device connected to your DVR’s audio input.
Back to top
Recording: Encode
Record Audio: If you have a microphone or some other audio device connected to your DVR's audio input, click the checkbox to record audio. If you want to also hear audio on the app, change the Encoding Parameters option to Sub Stream and select audio here as well so that the stream will also include sound from your microphone that you can hear on your phone or tablet using the app.
To monitor what is being recorded, your DVR's audio output has to be enabled - Click here for more information.
- Click the "Default" button to revert back to default settings.
- Use the "Copy to" button to apply all settings to the other cameras.
- Don't forget to click "Apply" to save settings.
• Right-click the mouse to exit the Menu.
Note: 1080p menu shown as example.
Recording: Option
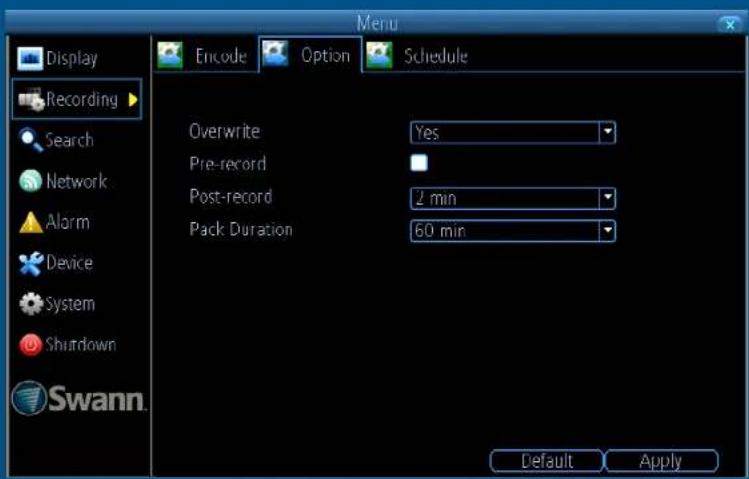
The options available here allow you to change various aspects of how your DVR will record video, such as recording before and after an event has occurred as well as the ability to record over existing video, to make room for new events on the hard drive.
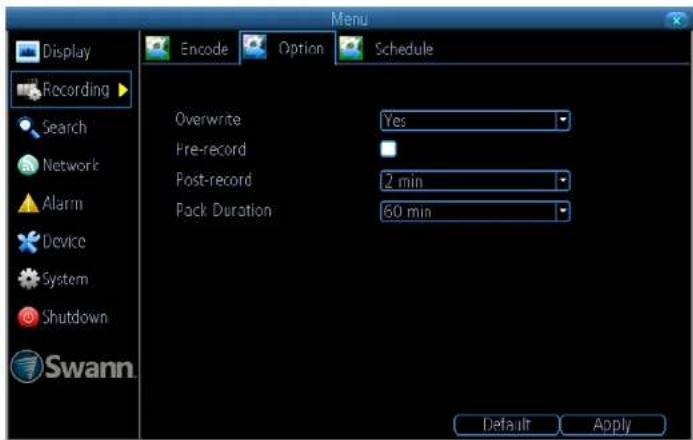
Overwrite: This option allows your DVR to overwrite the oldest video files on the hard drive when recording. This prevents your DVR from running out of storage space. It's recommended to leave this option enabled and to copy important events before they are overwritten.
Pre-record: It's recommended to leave this option enabled as it allows your DVR to record for a number of seconds before an event occurs.
Post-record: This option instructs your DVR to record for a set period of time after an event has occurred. The default setting will suit most day-to-day situations, but you can change according to your needs.
Pack Duration: This instructs your DVR to split the recording into discrete units. Even though the recording is broken up into separate units, your DVR will play it as one continual video. The default selection will suit most situations, but you can change according to your needs.
- Click the "Default" button to revert back to default settings.
- Don't forget to click "Apply" to save settings.
• Right-click the mouse to exit the Menu.
Recording: Schedule
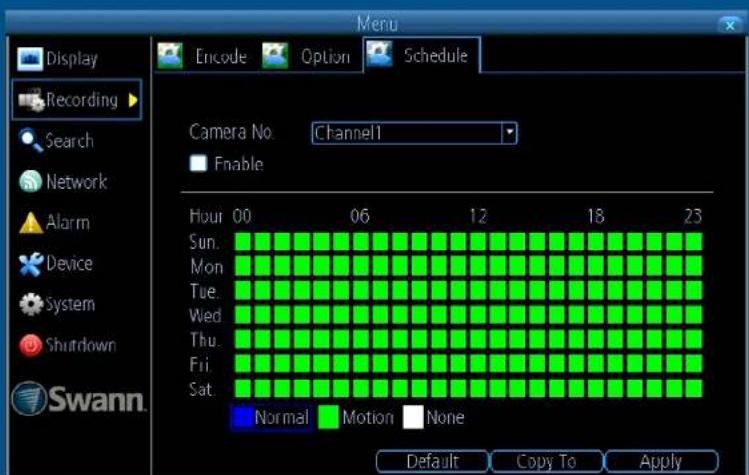
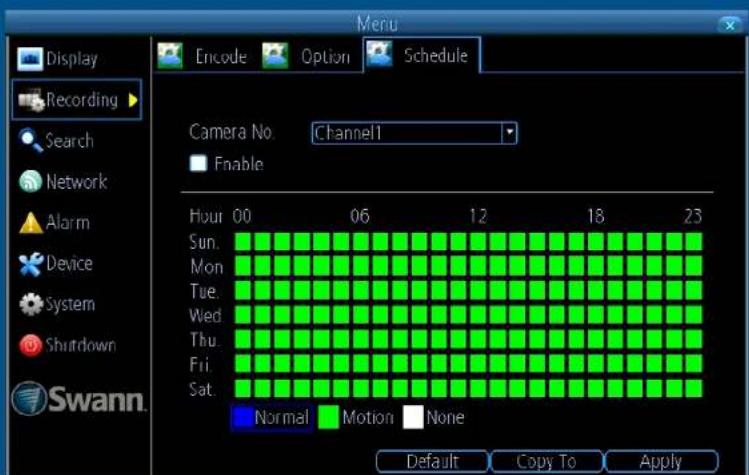
By default, a Motion Detection recording schedule has been enabled for each connected camera. You can however change the schedule according to what fits in with your needs. The schedule is presented as a 24 hour 7 days a week grid and is colour coded to represent the event type.
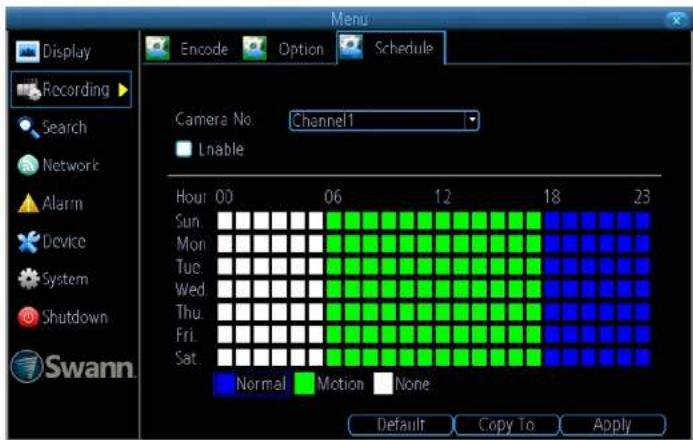
Camera No.: Select a camera that you would like to configure.
Enable: A Motion Detection recording schedule is enabled by default.
Normal: Your DVR will constantly record for a set period of time.
Motion: Your DVR will only record when motion has been detected from one or more cameras.
None: As the name suggests, your DVR will not record.
In the above example, a Motion Detection recording schedule has been created for 06:00 a.m. to 06:00 p.m. and a Normal recording schedule for 06:00 p.m. to 12:00 a.m. Sunday to Saturday. Using the mouse, you can click on a particular square or section to change or select the desired recording mode (Normal, Motion or None) then click & drag the mouse over the squares corresponding to your desired time period.
- Click the "Default" button to revert back to default settings.
- Use the "Copy to" button to apply all settings to the other cameras.
- Don't forget to click "Apply" to save settings.
• Right-click the mouse to exit the Menu.
Playback & Backup
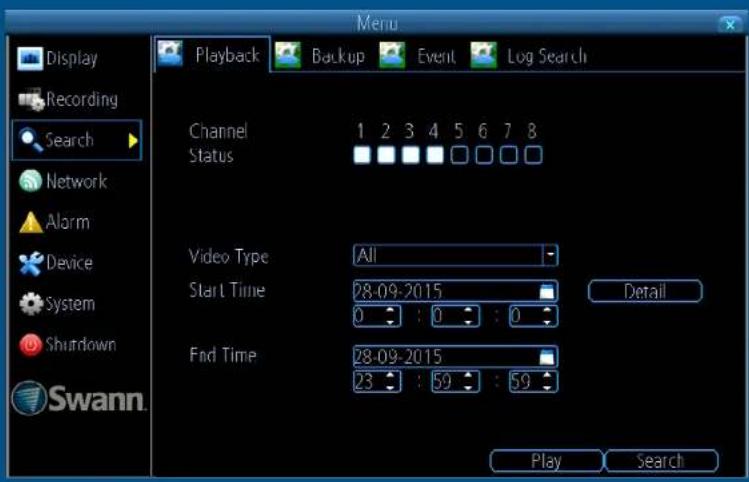
The Playback function gives you the ability to search and play previously recorded videos that are stored on your DVR's hard drive. You have the choice of playing video that matches your recording schedule, manual recordings or motion events only. The Backup function gives you the ability to save important events to a USB storage device such as a flash drive.
bar
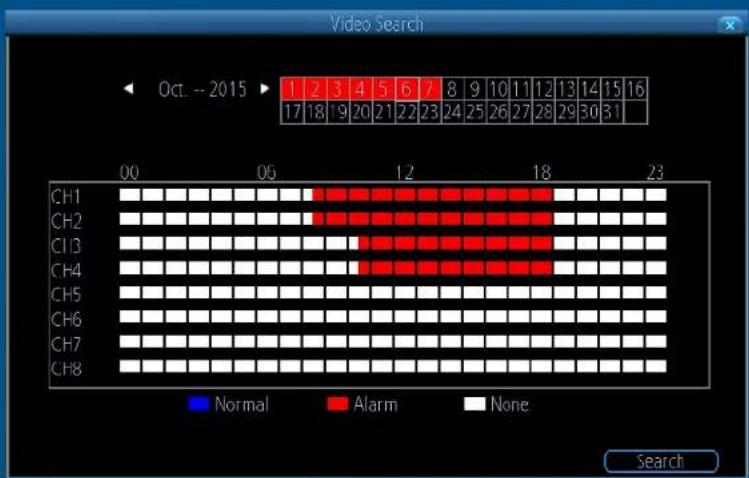
Video Search | Channel | Normal | Alarm | None | | :--- | :--- | :--- | :--- | | CH1 | 0 | 1 | 0 | | CH2 | 0 | 1 | 0 | | CH3 | 0 | 1 | 0 | | CH4 | 0 | 1 | 0 | | CH5 | 0 | 0 | 0 | | CH6 | 0 | 0 | 0 | | CH7 | 0 | 0 | 0 | | CH8 | 0 | 0 | 0 |Back to top
Search: Playback
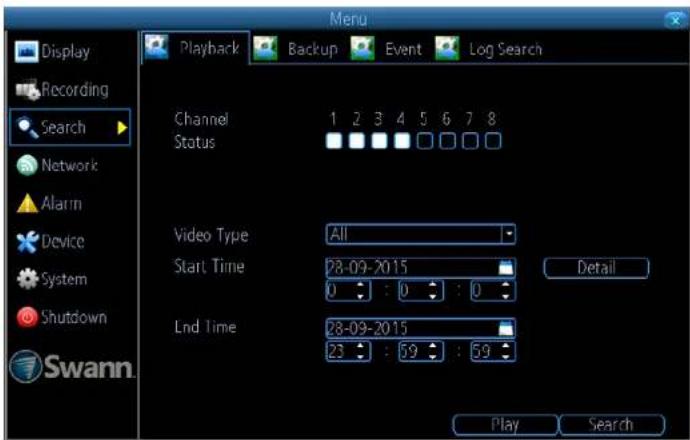
Channel Status: Select from one or more cameras for playback (up to 4 channels can be selected for playback at any one time).
Video Type: Select the video type that you want to search for. The options are "All", "Manual", "Schedule" and "Motion".
Start Time: Select your start date and time.
End Time: Select your end date and time.
Click the "Play" button to start playing or click "Search" to display a list of videos matching your search criteria - Click here for more information.
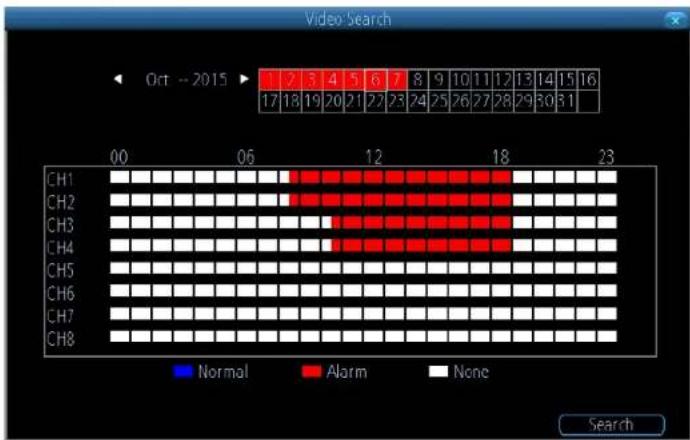
Detail: Clicking this option will give you an overview of video recorded on a particular day for a particular month for each video input on your DVR. You can select a different month and day to view. Both Normal and
bar
Video Search | Channel | Normal | Alarm | None | | :--- | :--- | :--- | :--- | | CH1 | 0 | 0 | 0 | | CH2 | 0 | 3 | 0 | | CH3 | 0 | 4 | 0 | | CH4 | 0 | 5 | 0 | | CH5 | 0 | 6 | 0 | | CH6 | 0 | 7 | 0 | | CH7 | 0 | 8 | 0 | | CH8 | 0 | 9 | 0 | | 17 | 18 | 19 | 20 | | 21 | 27 | 23 | 24 | | 25 | 26 | 27 | 28 | | 30 | 30 | 31 | 32 | Oct -- 2015Motion Detection recording types are colour coded. You can select to play video in 30 minute allotments (see above right example).
• Right-click the mouse to exit the Menu.

Please note: While using the Playback function, your DVR will continue to monitor and record as normal. Playback performance may be sacrificed to ensure reliable monitoring and recording.
The Playback Interface
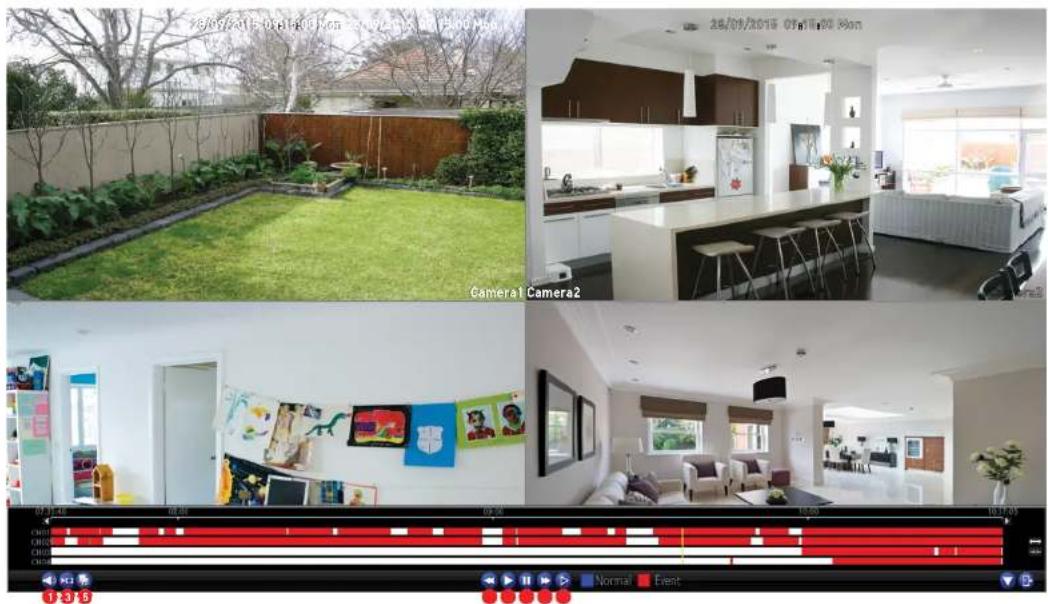
Double-click a video channel to view full screen.

- Mute: Mutes audio playback.
- Cut: This button allows you to make cuts in your video which you can then export to a USB storage device. When a video is playing, press this button then press and hold the mouse button while dragging along the timeline to set the mark in and out points. You will see a scissor
icon above the timeline indicating the mark in and out points. Multiple points can be created.
3. Copy: Click this to save to a USB storage device such as a flash drive.
4. Fast Rewind: Click this to play backwards. Click a number of times to increase speed.
5. Play: Click to play.
- Pause/Single Frame: Pauses playback. Subsequent presses will move a single frame forward in the video.
- Fast Forwards: Speeds up playback. Click a number of times to increase speed.
- Slow Forwards: Play video at reduced speed. Click a number of times to reduce the speed.
The Playback Interface (cont.)
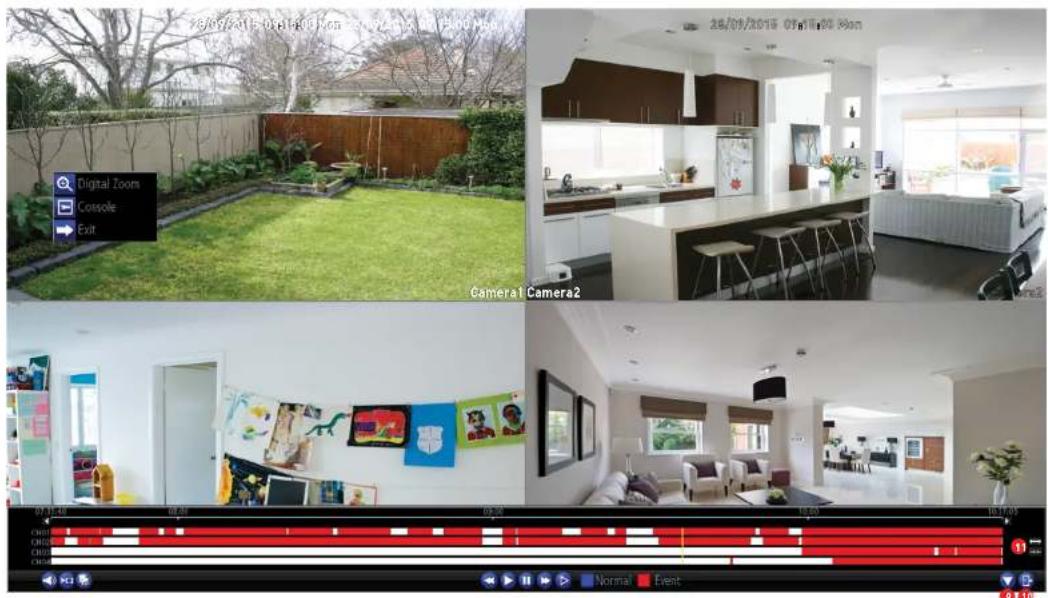
- Hide: Click this to hide the on-screen interface so you can maximise your viewing area.
- Exit: Click this to exit.
- Zoom In/Out: Zoom in and out of the timeline for precise control.
You can access the sub-menu to enter Digital Zoom mode (see above example). Right-click
the mouse over the channel you want to view then click "Digital Zoom". The channel will display full screen and the zoom controls will appear on-screen. From left to right, here are the descriptions for each button:
Zoom In: Click this to zoom into the video. Keep clicking to zoom further (6x zoom available).
Zoom Out: Click this to zoom out of the video.
Region Zoom: Click this to zoom into a particular section of the video (6x zoom available). When zoomed, click and hold the mouse to scroll around.
Restore: Click this to restore the zoom level.
Exit: Click this to exit.
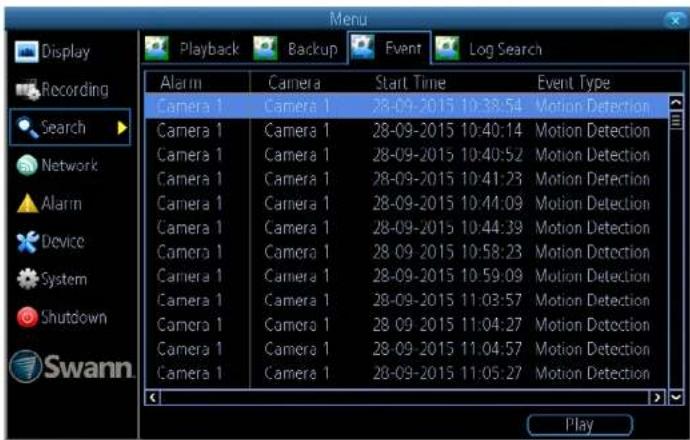
Search: Event
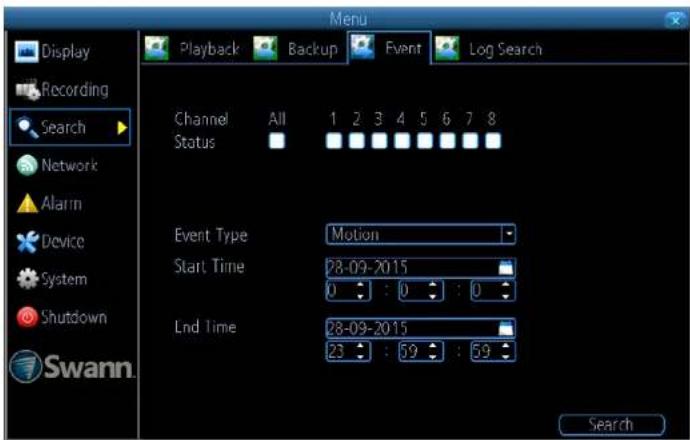
Channel Status: Select from one or more cameras or click "All" to select all cameras.
Event Type: As Motion is the sole event type, this cannot be changed.
Start Time: Select your start date and time.
End Time: Select your end date and time.
- Click "Search" to display a list of videos matching your search criteria.
- Select a video then click "Play". You have the choice of selecting one or more cameras for synchronous playback (up to 4 channels can be selected for playback at any one time).
- Click "OK" to play or click "Cancel" to exit.
• Right-click the mouse to exit the Menu.
Search: Backup
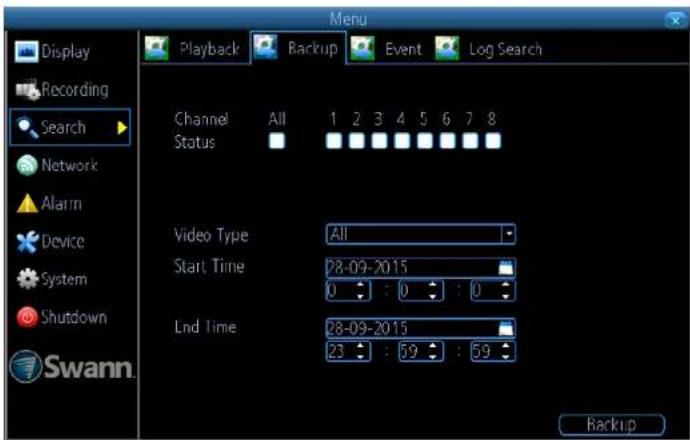
Channel Status: Select from one or more cameras to backup or click "All" to select all cameras.
Video Type: Select the video type that you want to search for. The options are "All", "Manual", "Schedule" and "Motion".
Start Time: Select your start date and time.
End Time: Select your end date and time.
- Click "Backup" to display a list of videos matching your search criteria.
- By default, each video listed has been selected for backup. If you don't want this, click the checkbox next to the "CH." heading then click the checkbox next to the video that you want to backup.
- You can also click "Play" to check that the video you have selected is
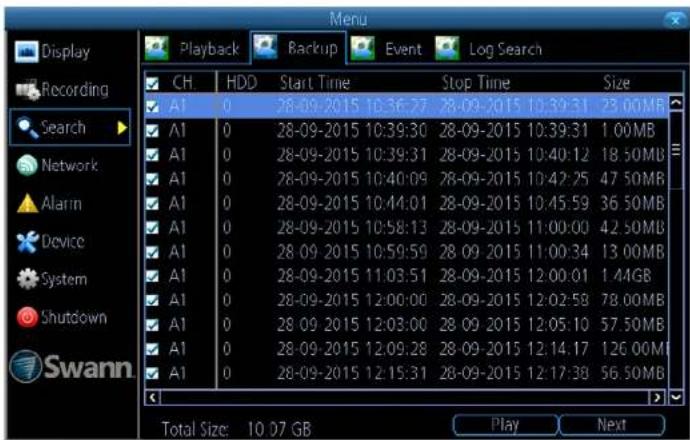
the one that you want to backup.
- Before proceeding, connect a USB flash drive to the spare port located at the rear of your DVR.
- Wait a short moment then click "Next".
- Select the location that you want to save to then click "Start". A progress bar will be displayed on-screen. You also have the option of deleting files and to format the storage device.
Depending on the number of files that have been selected, the backup process can be time consuming.
• Right-click the mouse to exit the Menu.
System Configuration
The options available here give you complete control on how your DVR is configured and how it operates. Some of the options such as screen resolution, email configuration, password creation and Daylight Saving Time are configured during the Setup Wizard, so they won't be covered in great detail here. You can also perform a firmware upgrade when available.
Back to top
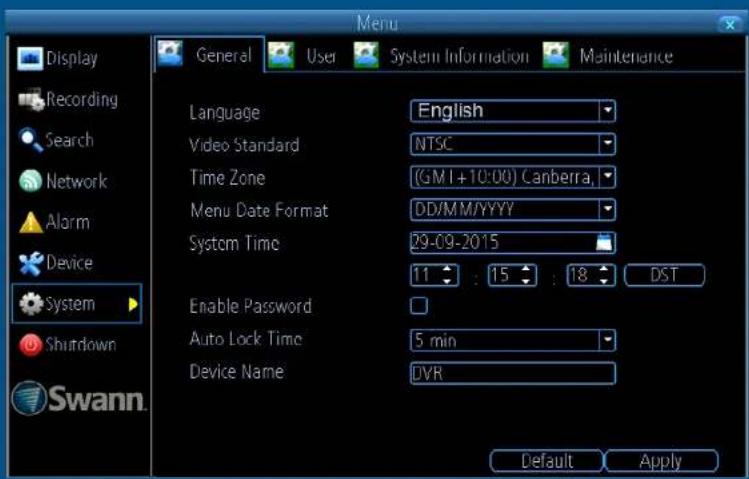
System: General
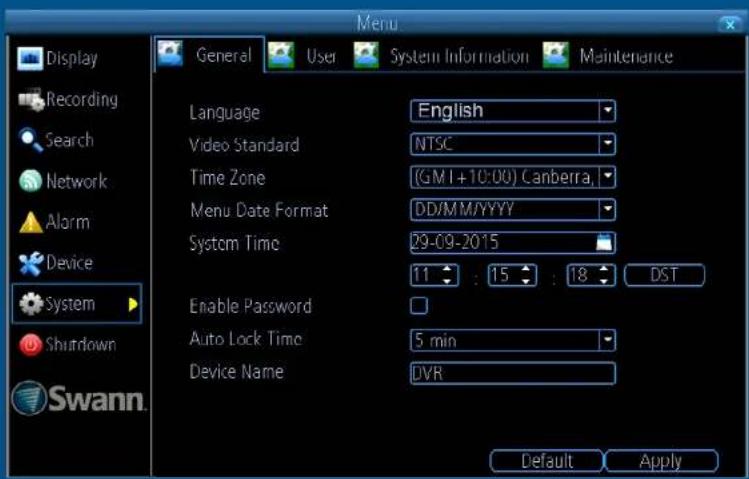
The settings for Language, Video Standard, Time Zone, Menu Date Format, System Time, enabling a password and renaming your device are configured during the Setup Wizard.
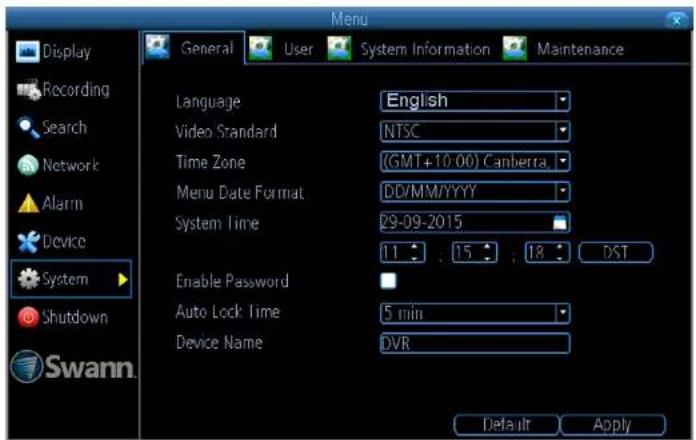
Language: Choose a language for the system menu.
Video Standard: Select the correct video standard for your country. USA, Canada and some Latin American countries is NTSC. UK and Australia is PAL.
Time Zone: Select the correct time zone relevant to your region.
Menu Date Format: Select a preferred display format.
System Time: Change the system time and date if required.
Enable Password: Enable this for added security when accessing the Menu.
Auto Lock Time: You can change this to alter the time your DVR will exit the Menu when idle.
Device Name: Give your DVR a relevant name.
- Click the "Default" button to revert back to default settings.
- Don't forget to click "Apply" to save settings.
• Right-click the mouse to exit the Menu.
System: User
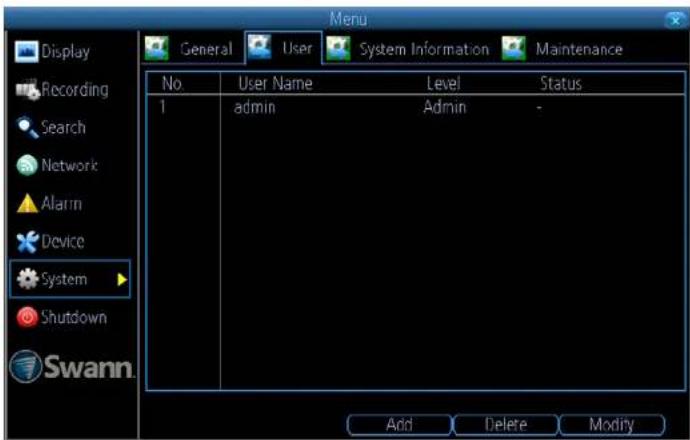
Add: Click this button to add a new user.
Delete: Delete an existing user (the Administrator cannot be deleted).
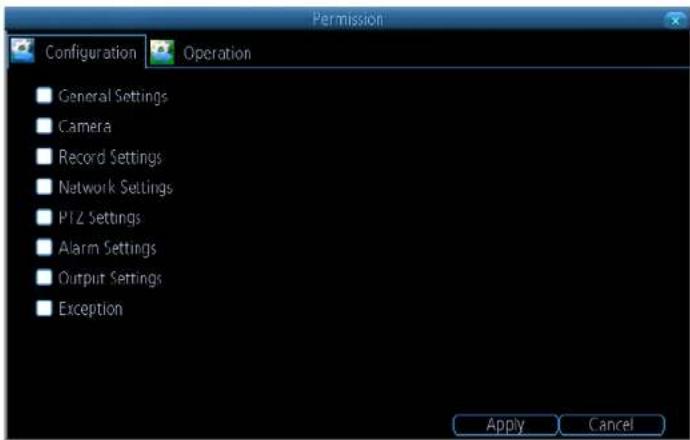
Modify: Modify an existing user's password. Click the "Permission" button to modify configuration and operation permissions (see above right example). The Administrator's permissions cannot be modified.
• Right-click the mouse to exit the Menu.
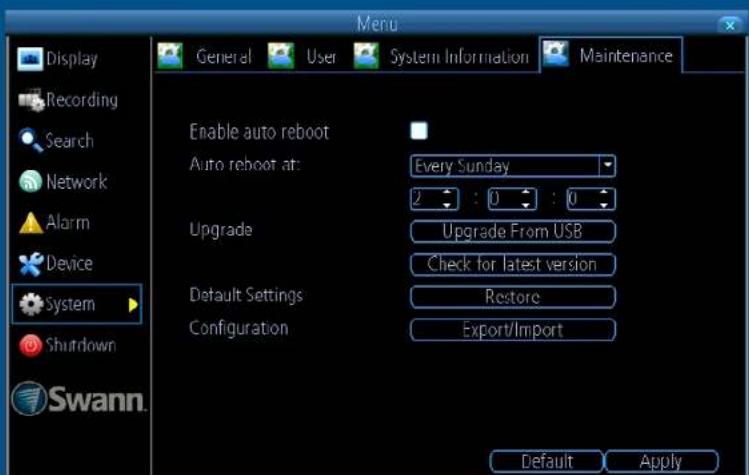
System: Maintenance
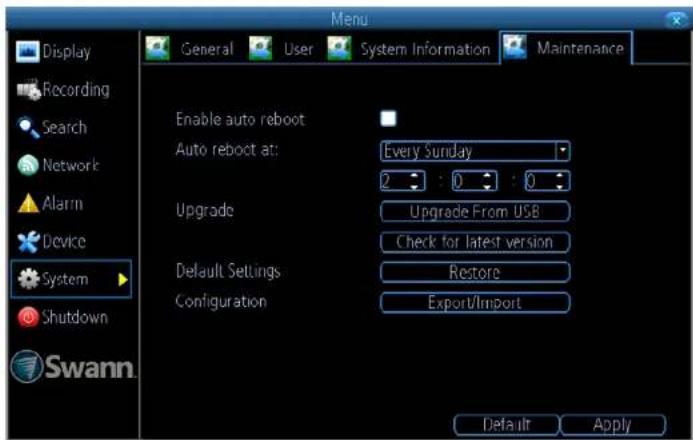
Enable auto reboot: It's recommended to leave this enabled as it maintains the operational integrity of your DVR.
Auto reboot at: Choose when you would like your DVR to reboot. Typically this will be a time when it's unlikely there will be any activity to record.
Upgrade From USB: Click this to upgrade the firmware from a local source such as a USB flash drive.
Check for latest version: Click this to check if an updated firmware is available using your Internet connection. A message will appear on-screen informing you if an update is available. Click the "Upgrade" button to proceed.
Default Settings: Click this to restore factory default settings.
Configuration: Click this to export or import a configuration file contain-
ing all the settings that you have customised.
- Click the "Default" button to revert back to default settings.
- Don't forget to click "Apply" to save settings.
• Right-click the mouse to exit the Menu.
Alarm: Exception
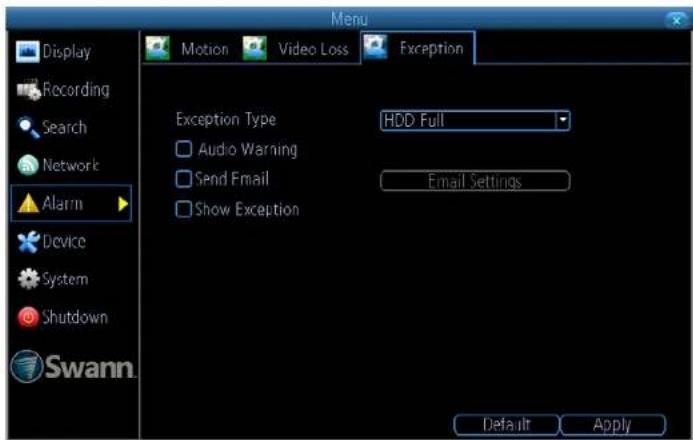
Exception Type: Select the type of exception that you would like to enable for notification.
Audio Warning: Click the checkbox to enable your DVR's internal buzzer.
Send Email: Click the checkbox to send an email notification. Click "Email Settings" if any changes are required to your email account.
Show Exception: Click the checkbox to display a message on-screen.
- Click the "Default" button to revert back to default settings.
- Don't forget to click "Apply" to save settings.
• Right-click the mouse to exit the Menu.
Device: HDD
This function gives you the option of formatting your DVR's hard drive, and it will be listed here for selection.
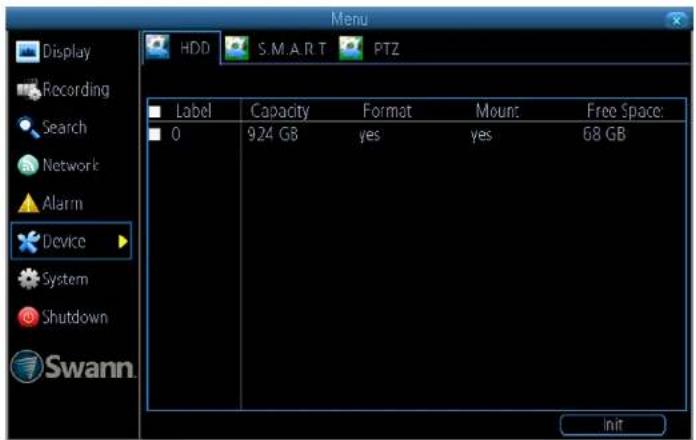
Init: Click the checkbox next to the hard drive that you want to format then click this button. Formatting the hard drive will remove all information that is stored on it. Use the Backup function before formatting - Click here for more information.
• Right-click the mouse to exit the Menu.
Note: That as per standard industry practice the usable size of the HDD will be somewhat smaller than the manufacturer's model size. As per the above screenshot, a 1TB HDD shows around 924GB of usable space.
Display: Output
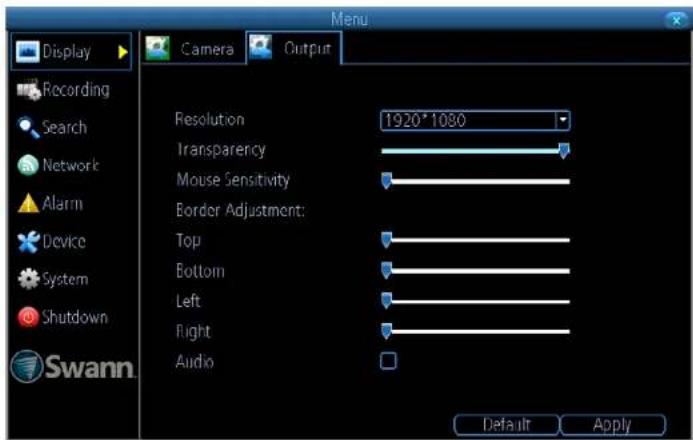
Resolution: Select a resolution that is suitable for your HDTV or monitor.
Transparency: Increase or decrease the transparency level for the on-screen menus.
Mouse Sensitivity: Increase or decrease the mouse sensitivity.
Border Adjustment: Adjust the top, bottom, left and right border if necessary for your HDTV or monitor.
Audio: Click the checkbox to enable audio monitoring in Live View mode.
- Click the "Default" button to revert back to default settings.
- Don't forget to click "Apply" to save settings.
• Right-click the mouse to exit the Menu.
Network: General
As SwannLink Peer-to-Peer technology is utilised to communicate with your network and mobile device, configuration of the network settings is not required. If you have networking expertise and require specific settings for your network, your DVR does have the ability to change them.
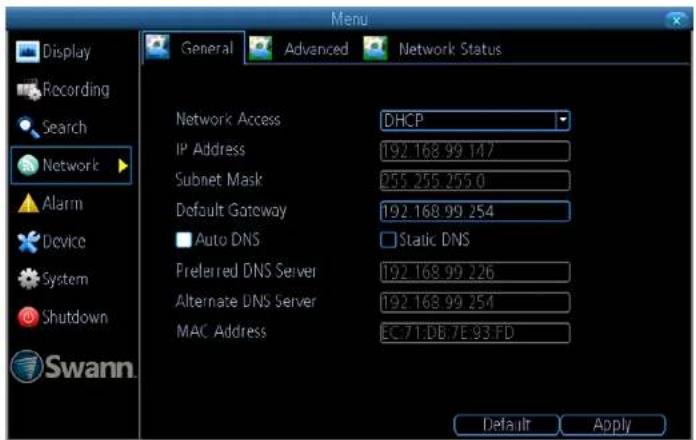
Network Access: You can select between three different network types that your DVR can be connected to. The three types are:
DHCP (Dynamic Host Configuration Protocol): This is a system where your router will automatically assign an IP address to each device connected to your network.
Static: This requires that all devices on your network have their IP address manually defined.
PPPoE: An advanced protocol that allows your DVR to be directly connected to a DSL modem.
IP Address: Each device on your network must have a unique IP address to identify itself. A typical address might be "192.168.1.24" or something similar.
Subnet Mask: This allows the flow of network traffic between hosts to be segregated based on a network configuration. A typical address might be "255.255.255.0" or something similar.
Default Gateway: This allows your DVR to connect to the Internet. This is typically the same IP address as your modem or router.
Auto DNS/Static DNS: Select how would like to define your DNS servers. It's recommended to leave this on Auto DNS.
- Click the "Default" button to revert back to default settings.
- Don't forget to click "Apply" to save settings.
• Right-click the mouse to exit the Menu.
Network: Advanced
Prior to developing our SwannLink Peer-to-Peer technology, our SwannDNS service was used to connect to your DVR remotely. This service is still active and we recommend creating an account as a means of backup.
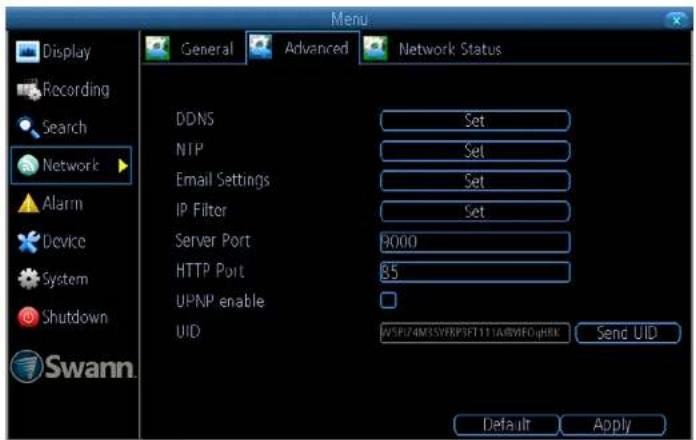
DDNS: Click the "Set" button to configure a DDNS service. Go to (mydvr.swanndvr.com) to create your account then input the details here.
NTP: The NTP (Network Time Protocol) function allows your DVR to automatically sync its clock with an on-line server. This gives it the ability to constantly have an accurate time setting.
Email Settings: Click the "Set" button if any changes are required to your email account.
IP Filter: An advanced feature which allows you to exercise precise control over what devices are allowed to communicate with your DVR.
Server Port: This is the port that your DVR will use to send information through. The default number will work in most situations.
HTTP Port: This port is used to log into your DVR from a remote location.
UPNP enable: This option allows your DVR and your router to open and close the necessary ports. Click the checkbox if required.
UID: This is your DVR's unique UID. Click "Send UID" to send this to your email address.
- Click the "Default" button to revert back to default settings.
- Don't forget to click "Apply" to save settings.
• Right-click the mouse to exit the Menu.
System Status
The various status tabs give you an overview of the various settings and options that have been selected for your DVR to function. Each action that your DVR performs as well as events detected are logged, which you can search and view. If you call our help-desk for assistance, our staff may ask you to access these tabs to assist them in solving any technical issues that you may be having.
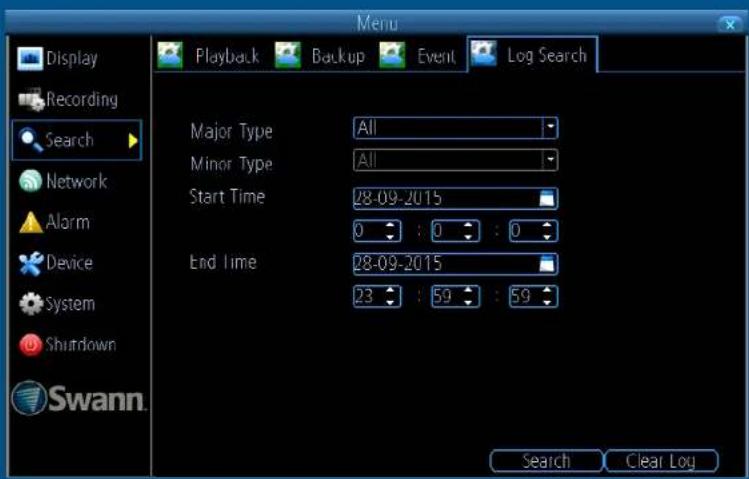
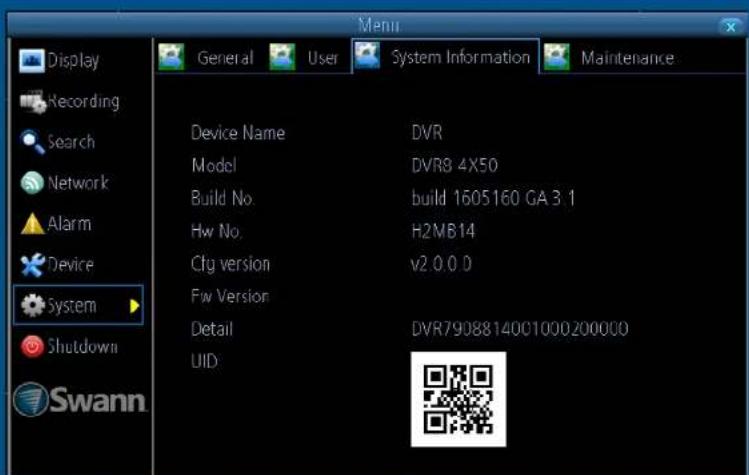
Note: DVR8-4X50 screen shown as example.
Back to top
Search: Log Search
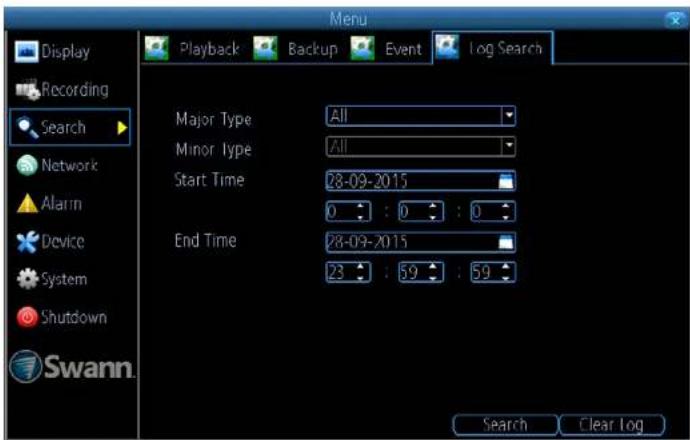
Major Type: Select the Major Type that you want to search for. The options are "All", "Manual", "Schedule" and "Motion".
Minor Type: Depending on the Major Type selected, you have various options to choose from.
Start Time: Select your start date and time.
End Time: Select your end date and time.
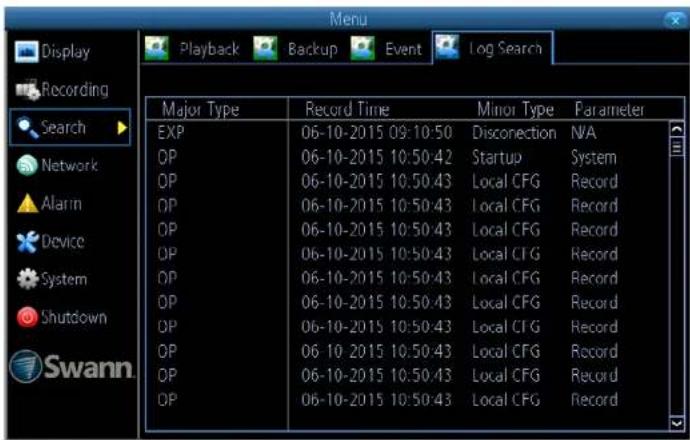
Search: Click this to commence the search. The logs matching your search criteria will be displayed (see above right example).
Clear Log: Click this to clear the system logs.
• Right-click the mouse to exit the Menu.
Network: Status
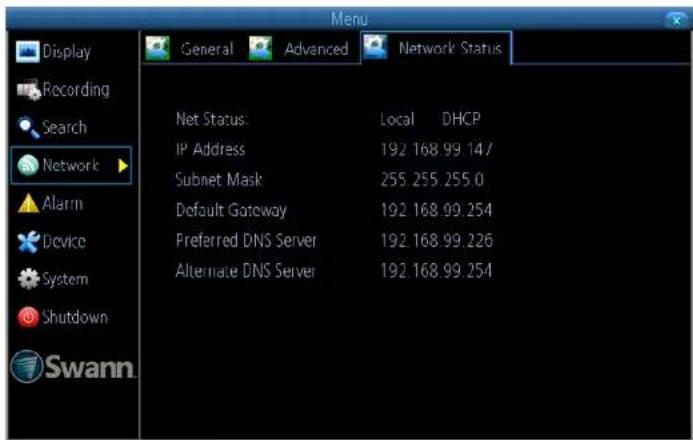
Displays the current network settings provided by your network.
• Right-click the mouse to exit the Menu.
Device: S.M.A.R.T
![Display Recording Search Network Alarm Device System Shutdown Swann. HDD SMART PTZ disk:0 [931 GB] No: WD-WCC1U5400 Firmware: 01 01A01 Status: Good Name Current Worst Threshold Status raw road error rate 200 200 51=yes spin-up-time 141 137 21=yes start-stop-count 100 100 0 n/a reallocated-sector-count 200 200 140=yes seek-error-rate 200 200 0 n/a power-on-hours 96 96 0 n/a spin-retry-count 100 100 0 n/a](/content/2026/05/921892/images/0f697ec0b82f58f889a4e9168b7763caadbe2badcda3c3cef41c5c4e947261fb.jpg)
Displays technical and performance information about the hard drive selected.
- Right-click the mouse to exit the Menu.
System: System Information
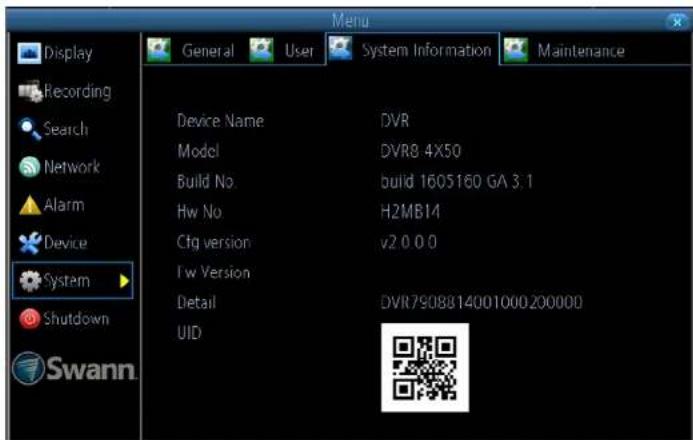
Displays technical information about your DVR.
• Right-click the mouse to exit the Menu.
Note: DVR8-4X50 screen shown as example.
Glossary
3D-Noise Filter - Is an enhanced form of digital noise reduction. The advancement in technology enables noise to be filtered even more effectively from the image, even in low light conditions.
50Hz - Is the mains frequency used in the UK, Australia and most European countries.
60Hz - Is the mains frequency used in the United States, Canada and some Latin American countries.
AGC (Automatic Gain Control) - In low light conditions, the camera will automatically boost the gain control so that people and objects can be seen more clearly. The advantage of this technique is that your camera will produce images in much lower light conditions. The downside is that the amplification will increase the video noise visible.
Anti-flicker - As Fluorescent lighting operates at the same frequency as your mains power, this will cause luminance flicker when viewed through the camera. Enabling the anti-flicker options available can reduce or eliminate the flicker that is visible.
Anti-smearing - A smear effect means that a bright vertical line originating from a bright light source appears in the image. This happens especially with back lighting. Enabling this allows people and objects to be seen correctly against a very bright background.
Auto DNS (Domain Name System) - A service that stores domain names and translates them into Internet protocol addresses. For example, www.google.com will have a DNS server address that is equivalent to 74.125.224.72. For this option, the DNS server is automatically provided by your Internet service provider.
Auto-focus - Will adjust the lens of your camera to focus on an object being viewed.
Bitrate - The amount of data that your DVR will use to record video or stream to the app. The higher the bitrate, the more space each recording will consume on the hard drive. Increasing this will also consume more bandwidth when streaming to apps and software.
BLC (Back Light Compensation) - Improves exposure of an object that is in front of a light source. It does this by splitting the whole image into different regions, and then applying separate exposure levels to those regions.
Brightness - This changes how light the image appears to be. Its value is different in darkness to that in daylight. For example, the lights from car headlights appears to be brighter at night.
CDS - This allows the image to be set by the camera's light sensor. A CDS sensor is basically a resistor that changes its resistive value (in ohms) depending on how much light is shining onto the sensor.
Contrast - This increases the difference between the blackest black and the whitest white in the image. Without contrast you wouldn't have an image because there wouldn't be any differentiation between light and dark.
DDNS (Dynamic DNS) - Is a service that converts IP addresses into host names (using a host name is a lot easier than trying to remember an IP address). This makes DDNS a good fit for home networks, which normally receives an IP address from the ISP that will change occasionally.
DHCP (Dynamic Host Configuration Protocol) - Uses an appropriate server or router to enable dynamic assignment of an IP address to a device connected to the network.
Display Resolution - Is the number of pixels supported by your HDTV or VGA monitor. 1920 x 1080 resolution will give you the best display quality.
Glossary (cont.)
DNS Server - Is a standard technology for managing public names of web sites and other Internet domains. DNS technology allows you to type names into your web browser which your computer will automatically find the address on the Internet.
DST (Daylight Saving Time) - Is the period of the year when clocks are moved one hour ahead.
Format - Is a command that prepares a storage device such as a USB flash drive or hard drive to hold data.
Frame Rate - The measurement of the rate that pictures are displayed to create a video feed. This is typically done as frames per second.
Gateway - Is a router that routes traffic from a device on your home network to the outside network that is providing access to the Internet.
HDD (Hard Disk Drive) - Is a storage device located inside your DVR. It is where all data is kept, saved and stored.
HTTP Port - It stands for Hypertext Transfer Protocol and is the port that is used to log into your DVR.
Hue - Is somewhat synonymous to what is usually referred to as colours. By altering the hue, you can change the colour mix of the image.
IP Address - The address of a device attached to the network. Each device on the network must use a unique address. IP addresses range from 0.0.0.0 to 255.255.255.255.
IP Channel - Is a list of cameras that are either directly connected to your DVR, or connected directly to your network. This will typically display the camera's name, IP address, channel number, status, user name and password.
Live View - Is the default display mode for your DVR. Each camera connected will be displayed on-screen.
MAC Address - Is a unique identifier for network devices. Can also be used as a super password if you have forgotten your current password.
Main Stream - Is the video feed that your DVR will display and record.
Mask - Is used to obscure part of your image for privacy. It can also be used to minimise false triggers when your DVR detects motion. Any area obscured won't be shown live or recorded.
Menu - Is where you control the various actions and options that are available on your DVR.
Motion Detection - Is the main method used by your DVR to detect motion and is an essential part of your security system. It does this by comparing one frame of video with the next. A certain amount of difference between these two frames is interpreted as motion.
NTP (Network Time Protocol) - Is used to synchronize your DVR's clock with a time based server.
NTSC - Is the video system used in North America, Canada and some Latin American countries. In NTSC, 30 frames are transmitted each second.
Optical Zoom - Is a true zoom feature. It allows you to zoom in (or out) on an object to get a closer view by using the camera's lens.
OSD (On-screen Display) - Display information from the camera such as time, date and camera name on-screen.
Pack Duration - Instructs your DVR to split recordings into discrete units. Each unit can be a maximum of 60 minutes in length. Your DVR will play these as one continual video.
PAL - Is the video system used in the United Kingdom, Australia and most European countries. In PAL, 25 frames are transmitted each second.
Glossary (cont.)
Post-record - Instructs your DVR to record for a set period of time after an event has occurred.
Pre-record - Allows your DVR to record for a number of seconds before an event occurs.
Resolution - The measure of detail that can be seen in an image. The higher the number, the greater the detail available.
Saturation - This alters how much colour is displayed in the image. The higher the saturation, the more bright and vivid colours will appear.
Server Port - Is a logical connection place and specifically, using the Internet protocol TCP/IP, the way a client program specifies a particular server program on a computer in a network. Your DVR will use this port to send information through.
SMTP Port - Is the port number used by a SMTP server. This is specified by your Internet service provider or by the email provider.
SMTP Server - It stands for Simple Mail Transfer Protocol and is the address used to send emails.
Static - Requires all devices on the network to have their IP addresses manually defined, as there is no device dedicated to automatically assigning addresses.
Static DNS - In some circumstances, your Internet service provider may require you to use a static DNS instead of an auto DNS on your router.
Sub Stream - Is the video stream that your DVR will send to remote devices via the network or Internet. Video quality is reduced to make it easier to send.
Subnet Mask - Is a method that allows one large network to be broken down into several smaller ones.
Time Server - Is a computer or server that reads the actual time from
reference clock and distributes the information to its clients on the network.
Time Zone - Is a region that observes a uniform standard time for legal, commercial, and social purposes. It is convenient for areas in close communication to keep the same time.
UID - It stands for Unique Identifier and is a numeric or alphanumeric string that is associated with a single entity within a given system. By entering your DVR's UID into the SwannView Link app and software, allows you to communicate with your DVR without having to remember IP addresses or port numbers.
Video Loss - Is regarded as a potential alarm event and is considered to occur any time your DVR doesn't receive an active video signal from any of its video inputs.
WDR (Wide Dynamic Range) - Is technology to balance out images that have a large dynamic range. An example of this situation would be if an indoor camera were pointing towards a window or building entrance. The image produced by the camera during the day would be extremely washed out due to the high brightness of the incoming light.
Warranty Information
USA
Swann Communications USA Inc.
12636 Clark Street
Santa Fe Springs CA 90670
USA
Australia
Swann Communications
Unit 13, 331 Ingles Street
Port Melbourne Vic 3207
Australia
United Kingdom
Swann Communications LTD.
Stag Gates House 63/64 The Avenue
S0171XS
United Kingdom
Warranty Terms & Conditions
Swann Communications warrants this product against defects in workmanship and material for a period of one (1) year from its original purchase date. You must present your receipt as proof of date of purchase for warranty validation. Any unit which proves defective during the stated period will be repaired without charge for parts or labour or replaced at the sole discretion of Swann. The end user is responsible for all freight charges incurred to send the product to Swann's repair centres. The end user is responsible for all shipping costs incurred when shipping from and to any country other than the country of origin.
The warranty does not cover any incidental, accidental or consequential damages arising from the use of or the inability to use this product. Any costs associated with the fitting or removal of this product by a tradesman or other person or any other costs associated with its use are the responsibility of the end user. This warranty applies to the original purchaser of the product only and is not transferable to any third party. Unauthorized end user or third party modifications to any component or evidence of misuse or abuse of the device will render all warranties void.
By law some countries do not allow limitations on certain exclusions in this warranty. Where applicable by local laws, regulations and legal rights will take precedence.
For Australia: Our goods come with guarantees which cannot be excluded under Australian Consumer Law. You are entitled to a replacement or refund for a major failure and for compensation for any other reasonably foreseeable loss or damage. You are also entitled to have the goods repaired or replaced if the goods fail to be of acceptable quality and the failure does not amount to major failure.
Helpdesk & Technical Support
Technical Support E-mail: tech@swann.com
Technical Support Website: support.swann.com
Telephone Helpdesk
USA Toll Free
1-800-627-2799
USA Parts & Warranty
1-800-627-2799
(M-F,
9am-5pm
US
PT)
AUSTRALIA
1800
788
210
NEW ZEALAND Toll Free
0800 479 266
UK
0808
168
9031

Swann®
Security Made Smarter
Back to top
M1580-4550-4750-5000-030616E | © Swann 2016
- Professional HD Security System
- Important Information
- FCC Verification
- FCC Regulation (for USA): Prohibition against eavesdropping
- Important Safety Instructions
- Password Information
- About this Manual
- Contents
- Contents (cont.)
- System Configuration 34
- System Status 43
- Live View
- Menu
- Menu Layout
- Camera Configuration
- Display: Camera
- Creating a Privacy Mask
- Recording: Encode (720p Models)
- Recording: Encode (1080p Models)
- Recording: Encode (3MP Models)
- Alarm: Motion
- Motion Detection
- Motion Detection Schedule
- Motion Detection Tips
- Placement of the cameras
- Avoiding false triggers
- Alarm: Video Loss
- Video Loss Schedule
- Device: PTZ
- Controlling a PTZ Camera
- Creating a Preset
- Creating a Patrol
- Recording Configuration
- Recording: Encode
- Recording: Option
- Recording: Schedule
- Playback & Backup
- Search: Playback
- The Playback Interface
- The Playback Interface (cont.)
- Search: Event
- Search: Backup
- System Configuration
- System: General
- System: User
- System: Maintenance
- Alarm: Exception
- Device: HDD
- Display: Output
- Network: General
- Network: Advanced
- System Status
- Search: Log Search
- Network: Status
- Device: S.M.A.R.T
- System: System Information
- Glossary
- Glossary (cont.)
- Warranty Information
- USA
- Australia
- United Kingdom
- Warranty Terms & Conditions
- Helpdesk & Technical Support
Brand : SWANN
Model : DVR8-4550
Category : Voice recorder