
VKJ318 - Water dispenser BREVILLE - Free user manual and instructions
Find the device manual for free VKJ318 BREVILLE in PDF.


| Type | Water dispenser (hot water only) |
| Brand | Breville |
| Model | VKJ318 |
| Water reservoir capacity | 2 liters |
| Dispensing volume control | Adjustable (small to large cup) |
| Heating method | Internal heating chamber |
| Power supply | 220-240V ~ 50-60Hz, 13A fuse (BS1363) |
| Power consumption | Not specified (estimated: 1500W) |
| Dimensions (approx.) | Not specified |
| Weight (approx.) | Not specified |
| Material | Plastic, stainless steel drip tray cover |
| Drip tray | Removable, holds over 1 cup |
| Illuminated water reservoir | Yes |
| Safety features | Stop button, boil-dry protection (auto reset), cool-touch exterior |
| Cleaning | Descaling with citric acid or vinegar recommended |
| Warranty | 1 year limited |
| Country of origin | PRC (China) |
Frequently Asked Questions - VKJ318 BREVILLE
User questions about VKJ318 BREVILLE
0 question about this device. Answer the ones you know or ask your own.
Ask a new question about this device
Download the instructions for your Water dispenser in PDF format for free! Find your manual VKJ318 - BREVILLE and take your electronic device back in hand. On this page are published all the documents necessary for the use of your device. VKJ318 by BREVILLE.
USER MANUAL VKJ318 BREVILLE
natural_image
Exterior view of a black and purple Dreville water tap with control panel (no text or symbols on main body)Actual product may differ from the one illustrated
Instructions for use
READ CAREFULLY AND KEEP FOR FUTURE REFERENCE
This product can be used by children aged 8 years and above, and persons who require supervision, provided:
• they are familiar with the hazards associated with the product, and,
• they receive instruction by a competent person on how to safely use the product.
Children must not play with the product. Cleaning and user maintenance must not be done by children unless they are aged 8 or older and are supervised.
Never use a power base other than the one supplied with the appliance.
Never fill the kettle above the MAX marking. If the kettle is overfilled, boiling water may be ejected.
If the supply cord is damaged, it must be replaced by the manufacturer, its service agent or similarly qualified persons in order to avoid a hazard.
Important Safety Instructions
This appliance generates heat during use. Adequate precaution must be taken to prevent the risk of burns, scalds, fires or other damage to persons or property caused by touching the exterior whilst in use or during cooling.
⚠️Never use this appliance for anything other than its intended use. This appliance is for household use only. Do not use this appliance outdoors.
⚠️Always ensure that hands are dry before handling the plug or switching on the appliance.
⚠️Always use the appliance on a stable, secure, dry and level surface.
⚠️ Never use a power base other than the one supplied with the appliance.
This appliance must not be placed on or near any potentially hot surfaces (such as a gas or electric hob).
⚠️Do not use the appliance if it has been dropped, if there are any visible signs of damage or if it is leaking.
⚠ Ensure the appliance is switched off and unplugged from the supply socket after use and before cleaning.
⚠️Always allow the appliance to cool before cleaning or storing.
⚠️ Never immerse any part of the appliance or power cord and plug in water or any other liquid.
⚠️ Never let the power cord hang over the edge of a work top, touch hot surfaces or become knotted, trapped or pinched.
⚠️Never leave the appliance unattended when in use.
⚠ Beware of steam coming from the spout or lid especially during refilling. Never open the lid during the boiling cycle.
⚠️Never fill the appliance when it is positioned on the power base.
⚠️ Never use the appliance without sufficient water in it for it to operate correctly.
⚠️Never allow the appliance to boil dry.
⚠️Always operate the appliance with a cup or suitable container placed below the dispensing nozzle.
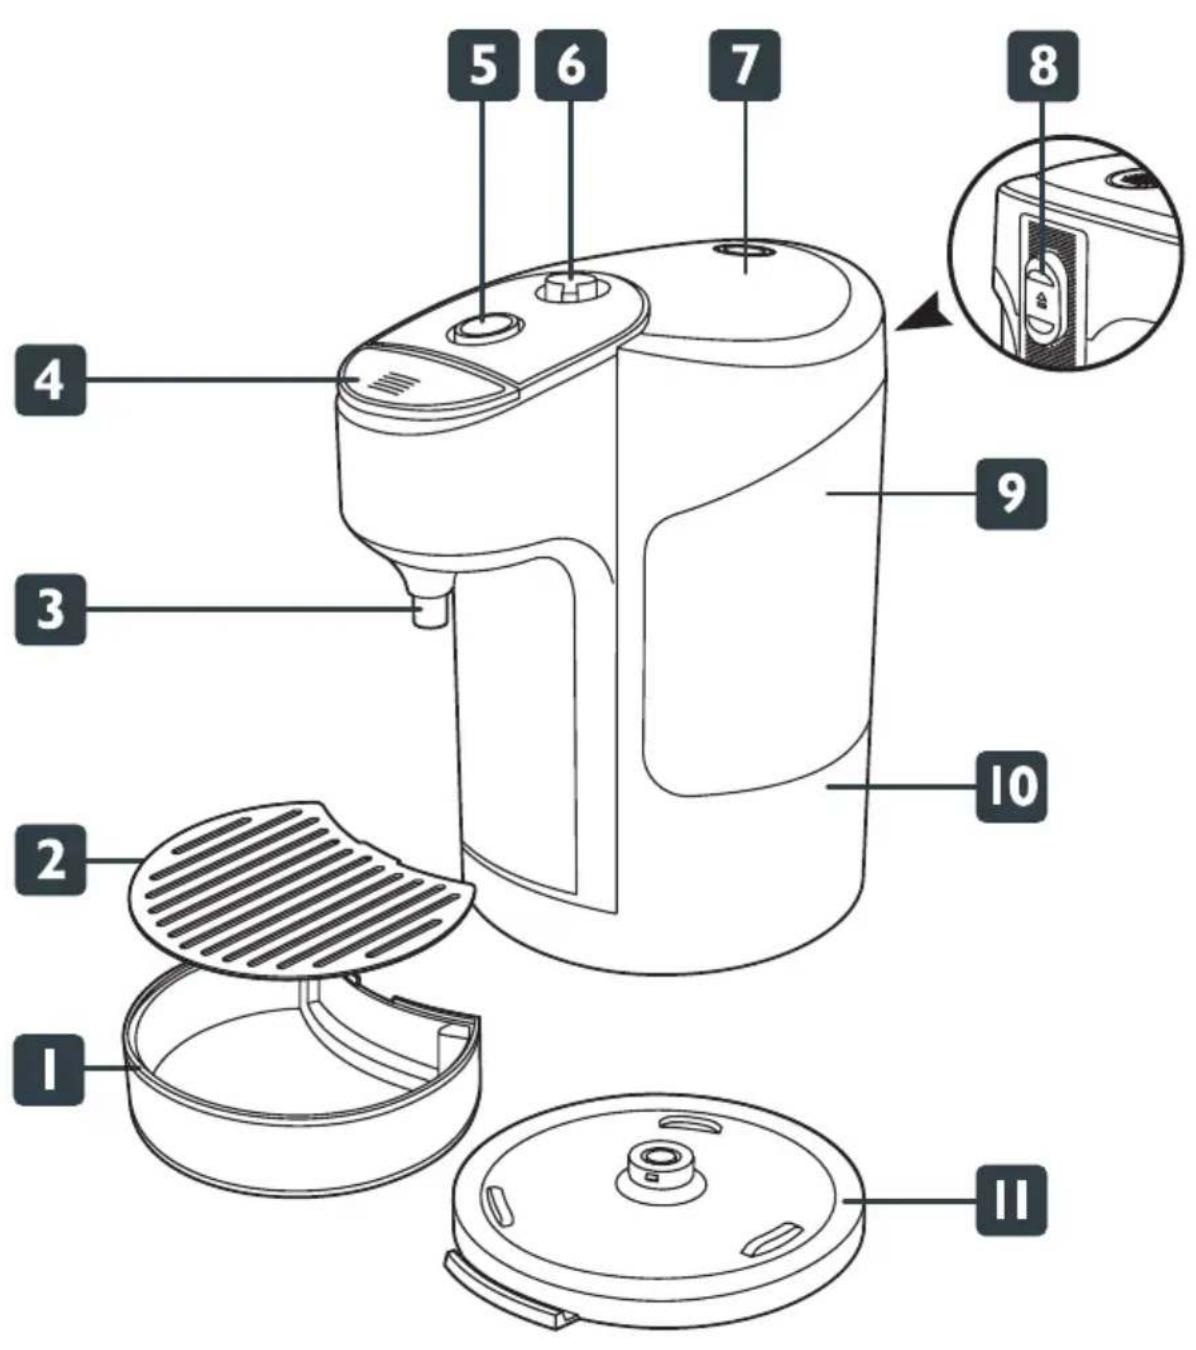
Identifying the Parts
I. Removeable drip tray
No mess, just lift it off the power base and rinse under the tap. Holds over 1 cup of water before it needs emptying.
2. Removable stainless steel drip tray cover
3. Dispensing nozzle
4. Stop button
Press to immediately stop the boil sequence or to stop water that is being dispensed.
5. Start button
Press to start the boil sequence.
6. Dispensing control
This control allows you to select the amount of water dispensed by your Hot Cup. Move it towards for less water or for more water.
7. Lid
8. Lid release button
Press to open the lid and fill the water tank.
9. Illuminated water reservoir
Easy fill water reservoir holds up to 2 litres.
10. Heating chamber
II. Power base
Before using your Hot Cup for the first time
- Remove your Hot Cup carefully from the box. Remove any packaging and promotional material and position your Hot Cup on a dry, level, secure work surface away from the edge.
- Follow the instructions below on using your Hot Cup and discard the first five measures of boiling water (i.e. the first full tank of water). This will remove any residues that may remain from the manufacturing process.
Using your Hot Cup
Always position your Hot Cup in such a way that the start button cannot be accidentally operated, especially by children. As you use your Hot Cup, a certain portion of the water boiled will be transferred back to the water reservoir. This will mean the water reservoir may become hot. Always use care when handling your Hot Cup.
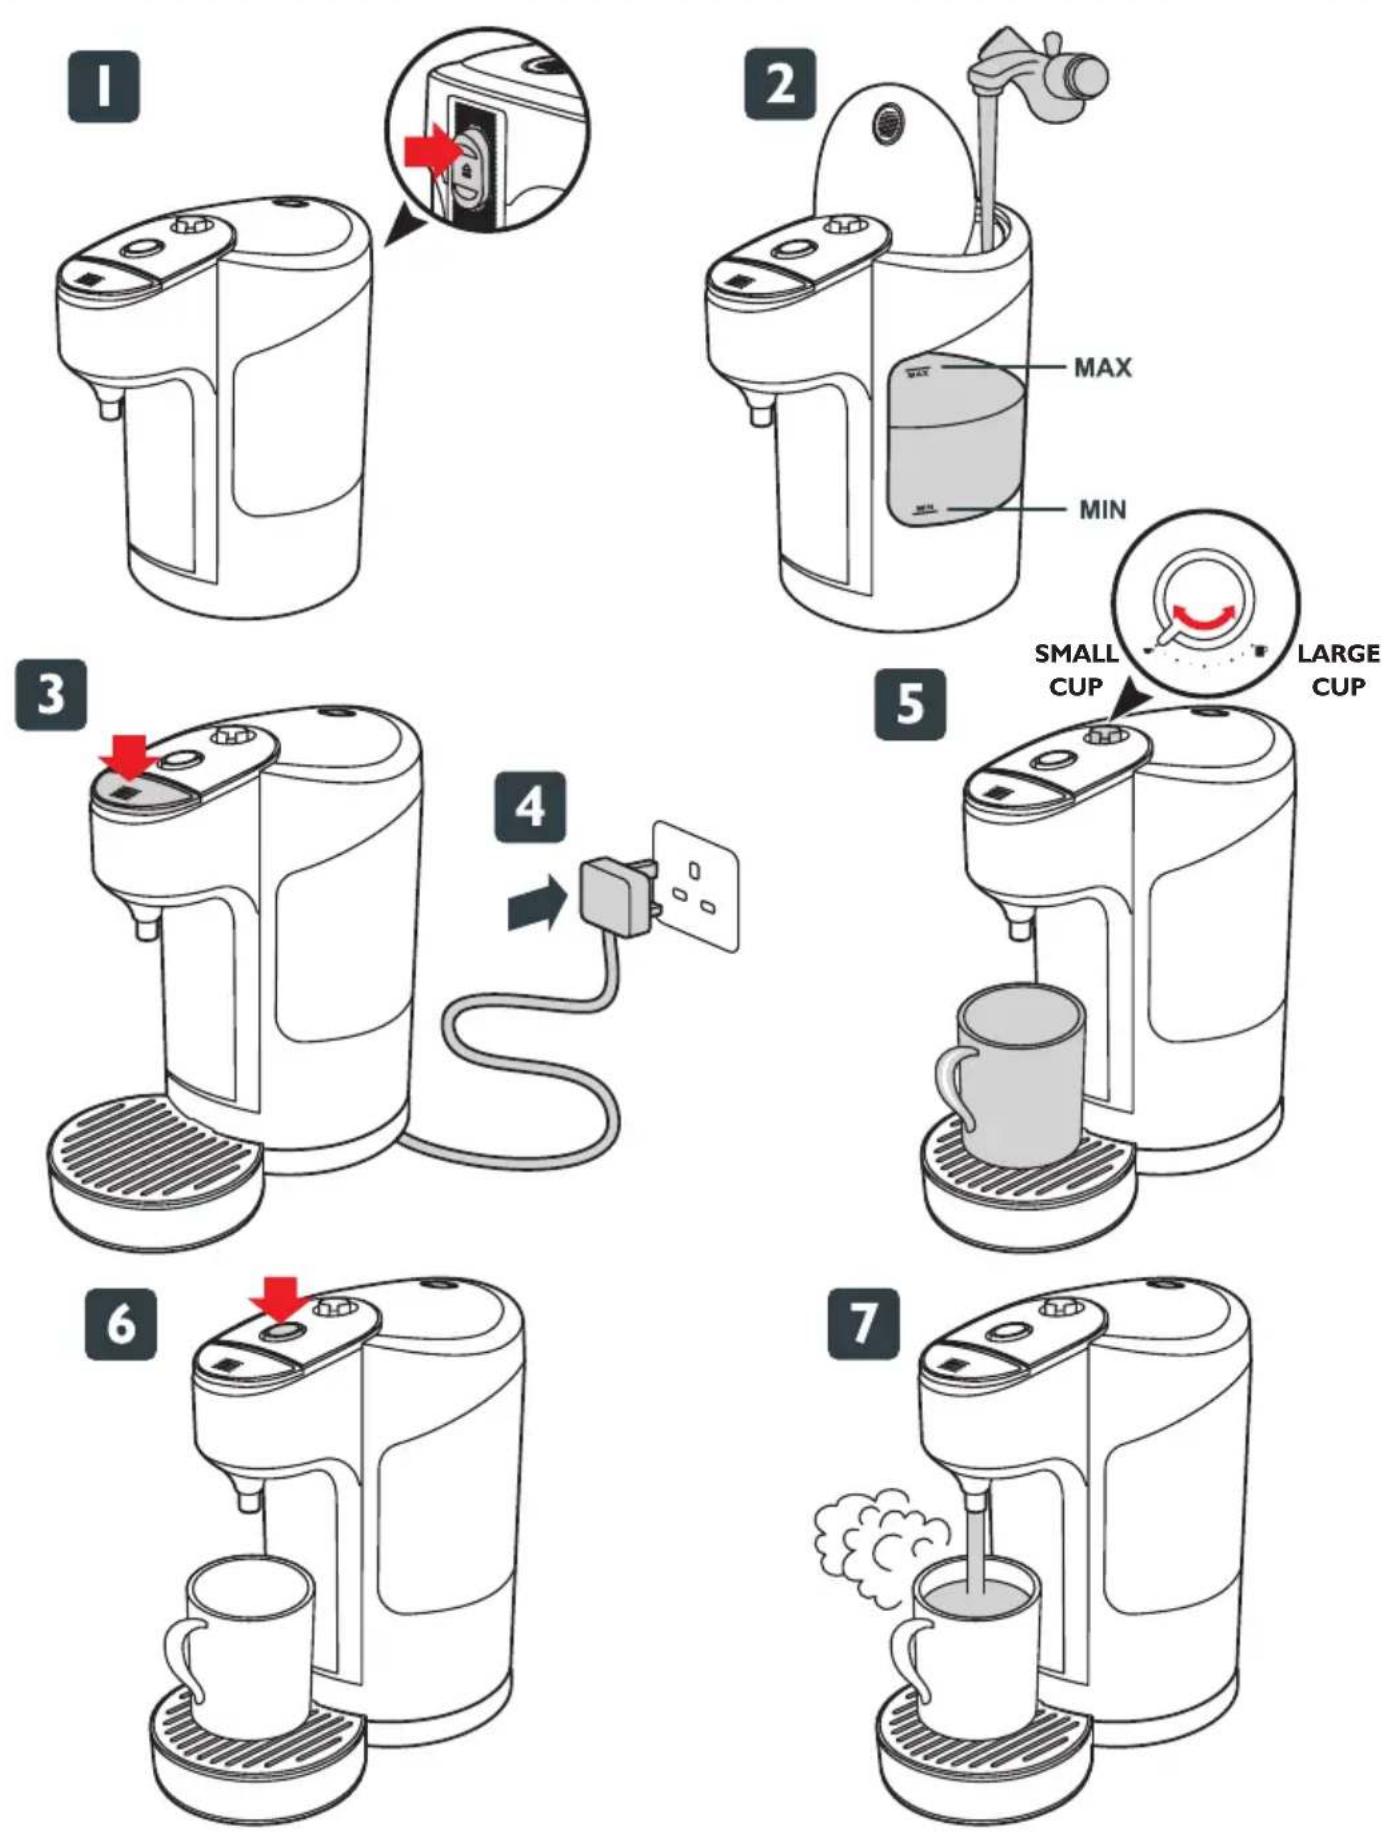
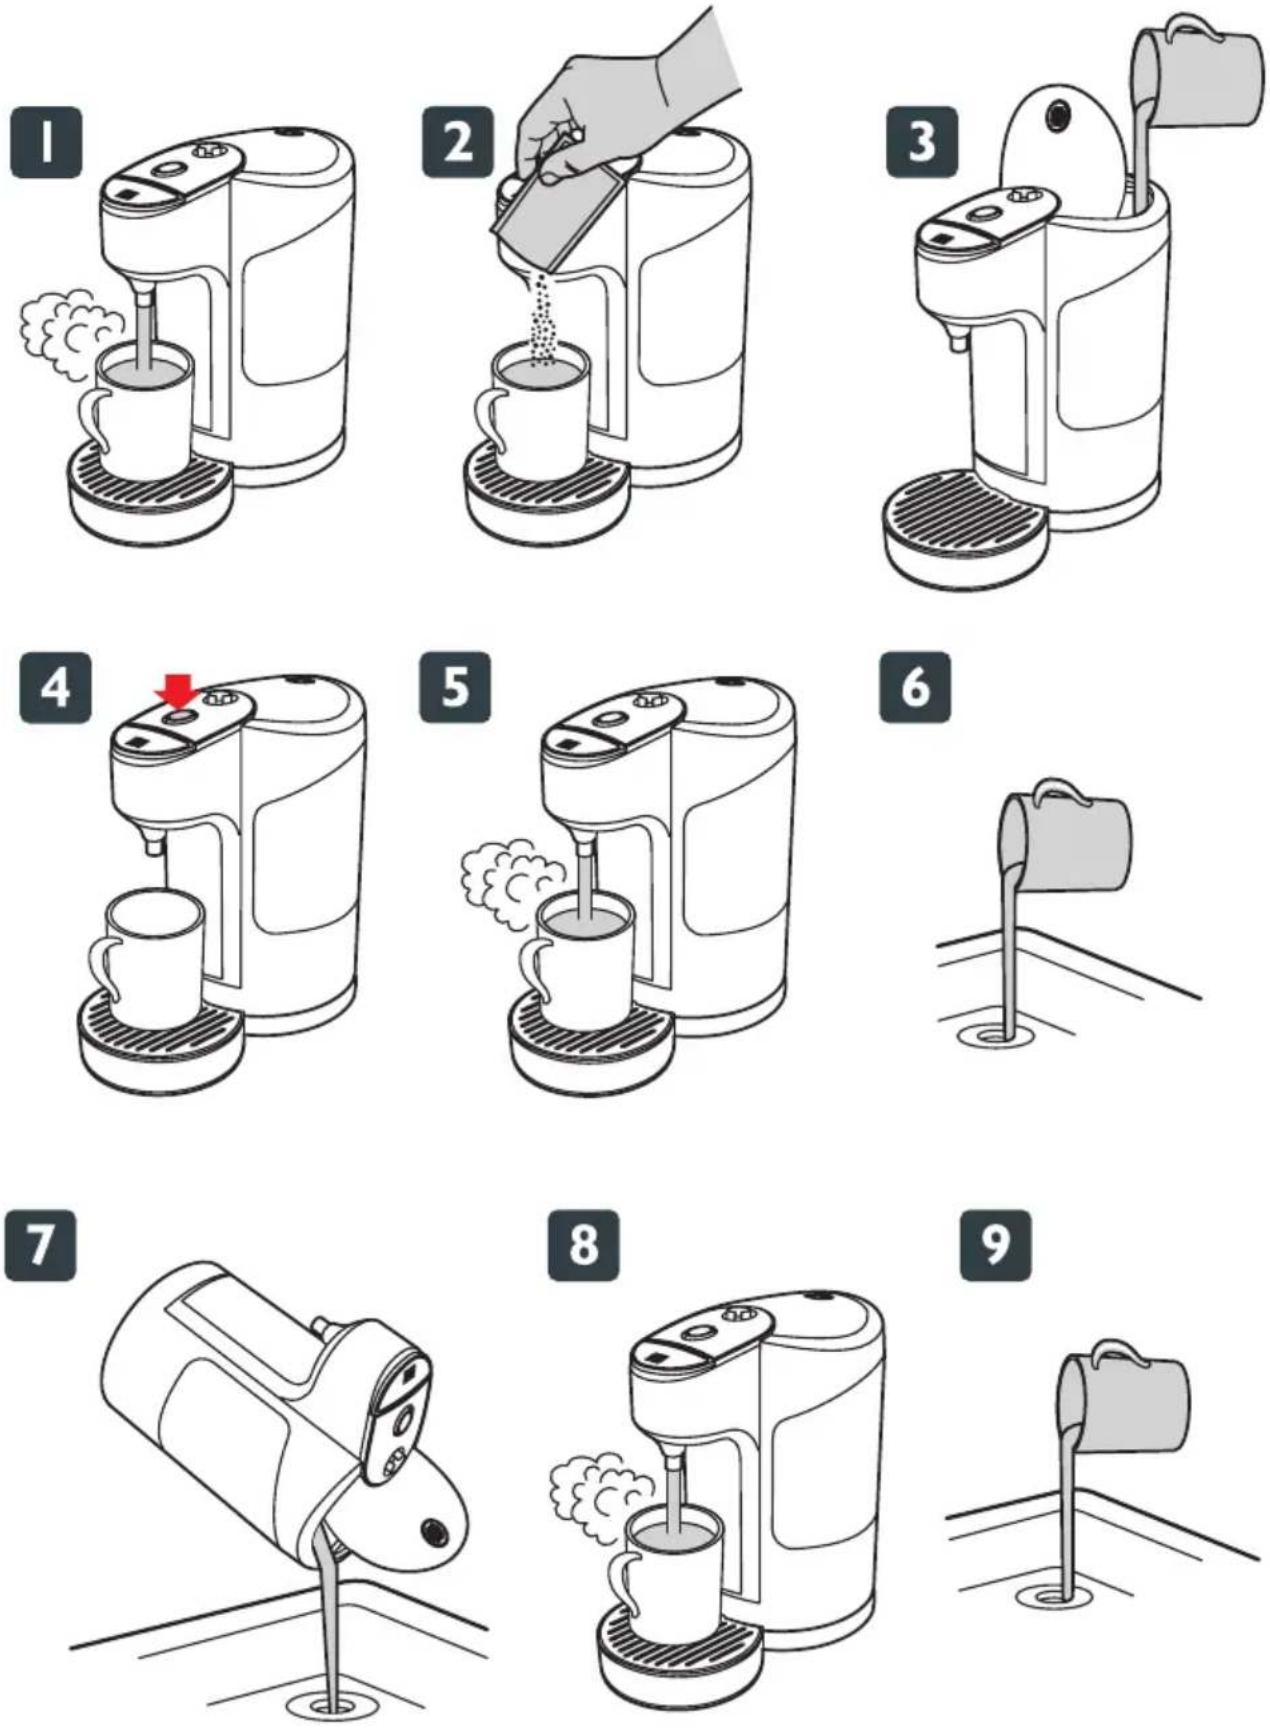
I. Press the lid release button.
2. Fill the water reservoir from your cold tap. The water level should be between the MIN and MAX markings.
3. Close the lid and press the stop button. This will make sure that your hot cup will not immediately start a boil cycle when you place it onto the power base.
4. Connect your Hot Cup to a mains supply socket.
5. Place a suitable cup or container with a tea bag, coffee, sugar, etc. below the dispensing nozzle. Never operate your Hot Cup without a cup or suitable container placed below the dispensing nozzle. Adjust the dispensing control to the required setting. The control adjusts the quantity of boiling water dispensed by your Hot Cup. For smaller cups like teacups, set the control towards the setting; for larger cups like coffee mugs, set the control towards the setting. If you are not sure which setting to use, it's best to use a lower setting until you gain experience using your Hot Cup.
6. Press the start button. The water tank will light up and your Hot Cup will start to boil.
7. The selected quantity of boiling water will be dispensed into the cup. Your Hot Cup is now ready to use again. If, after just having boiled, the start button doesn't stay in the down position, simply wait a few seconds before trying it again.
Stopping your Hot Cup
If you have started the boil procedure and then decide you want to stop your Hot Cup for any reason, simply press the stop button. You can also stop water that is being dispensed by pressing the stop button. The boiled water will be safely transferred back into the water reservoir.
Cleaning
Always switch off and unplug your Hot Cup and allow it to completely cool before cleaning. Never immerse the base unit, power cord or plug in water or any other liquid. Do not use harsh abrasives, chemicals or oven cleaners.
Emptying your Hot Cup
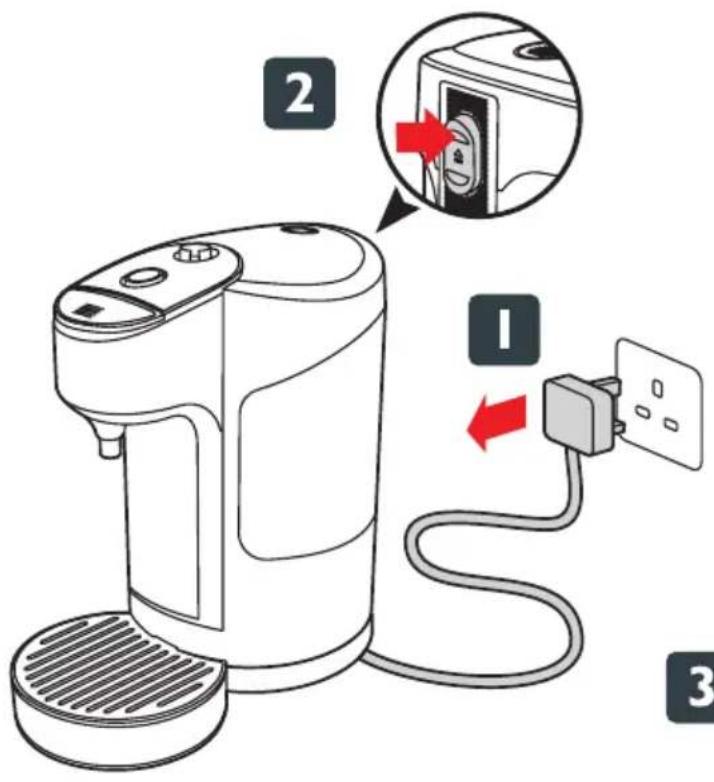
I. After your Hot Cup has completely cooled down, unplug it from the mains supply socket.
2. Press the lid release button.
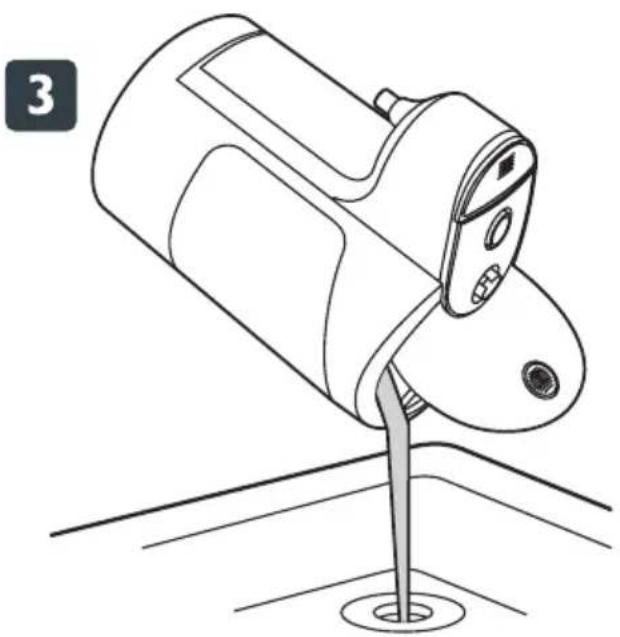
3. Hold your Hot Cup over a sink and pour the water out.
4. Still holding your Hot Cup over the sink, turn it the right way up and allow any water to drain out of the dispensing nozzle. If no water drains out of the nozzle, it may be because the stop button has been accidentally or intentionally pressed. Press the start button to allow water to drain from the nozzle.
- Repeat steps 3 and 4 until all the water has been emptied from your Hot Cup. If your Hot Cup will not be used for an extended period (e.g. if you are on holiday), we recommend that you first empty it. Before using your Hot Cup again, carry out several boil cycles discarding the water each time.
Cleaning
Clean the exterior surface of your Hot Cup with a damp cloth and then polish it with a soft, dry cloth. Do not use steel wool pads or harsh/abrasive cleaners.
natural_image
Line drawing of a mechanical device with a base and mounting base (no text or symbols)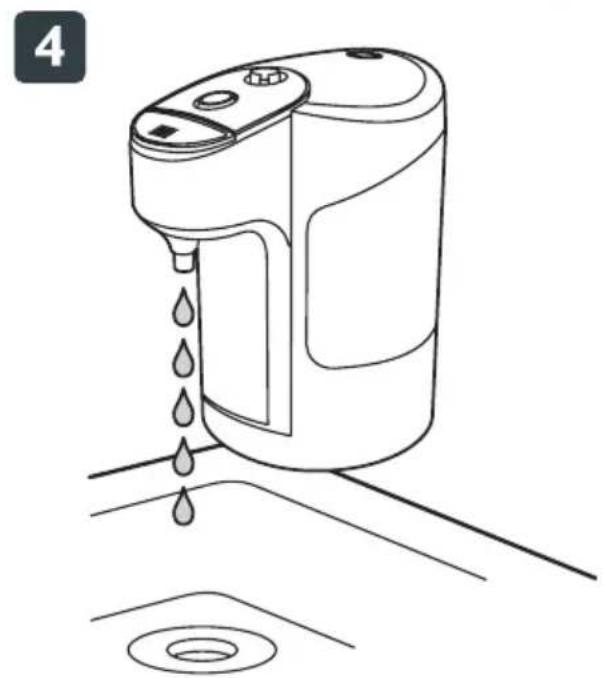
natural_image
Line drawing of a water dispenser with liquid drop and drain, no text or symbols presentTo ensure the safe and efficient operation of your Hot Cup it is important to descale it regularly. The harder your water the more regularly it will need doing. Your water company should be able to tell you how hard the water is in your area. Untreated scale deposits prevent the element conducting heat efficiently therefore wasting electricity. Scale can also cause your Hot Cup to malfunction or even cause premature failure.
Descaling using a proprietary descaling product
I. Fill your Hot Cup to the MAX fill level and place an empty cup on the drip tray. Press the start button and wait for the water to be dispensed into the cup.
2. Add a citric acid-based proprietary descaling product to the hot water in the cup and stir.
3. Tip the contents of the cup into your Hot Cup and close the lid.
4. Place the empty cup on the drip tray and press the start button.
5. Wait for the water to be dispensed into the cup.
6. Discard the water from the cup.
7. Repeat steps 4, 5 and 6 until the water level is at the MIN mark. Open the lid and empty any remaining water into the sink. Rinse your Hot Cup by filling it with clean water and emptying it into the sink (see Emptying your Hot Cup on page 8).
Fill your Hot Cup with fresh water to the MAX fill level and place an empty cup on the drip tray.
8. Pres the start button and wait for the water to be dispensed into the cup.
9. Discard the water in the cup. Repeat steps 8 and 9 until the water level is at the MIN mark. Open the lid and empty any remaining water into the sink.
Descaling using vinegar or citric acid
I. You can use ordinary vinegar (white or malt) or citric acid to descale your Hot Cup. Inexpensive, ordinary vinegar can be purchased in large bottles from any supermarket. Citric acid can be bought from pharmacies, home brewing/ winemaking suppliers or on-line retailers.
2. If you are using vinegar, make up a solution of 1 cup of vinegar to 1 cup of water. If you are using citric acid, mix 30g of the citric acid with 500ml of water.
3. Pour the solution into your Hot Cup, close the lid and allow it to stand for 1 hour.
4. Cycle your Hot Cup (as described in steps 4-6 above) until the level is at the MIN mark. Open the lid and empty any remaining solution into the sink. Rinse your Hot Cup several times by filling it with clean water and emptying it into the sink.
5. Fill your Hot Cup with fresh water to the MAX fill level and place an empty cup on the drip tray.
6. Press the start button and wait for the water to be dispensed into the cup.
7. Discard the water in the cup. Repeat steps 6 and 7 until the water level is at the MIN mark. Open the lid and empty any remaining water into the sink.
8. Finally, rinse your Hot Cup several times with clean water.
| Problem Possible Cause Solution | ||
| The start switch will not stay in the on position. | Your Hot Cup has not reset itself after the boiling cycle. | Your Hot Cup is still too hot after the last boil cycle. Wait a few seconds for it to cool slightly before trying again. |
| The water tank does not illuminate and your Hot Cup does not dispense boiling water. | ·Your Hot Cup is not plugged in.·Your Hot Cup is not positioned correctly on its power base.·The fuse has blown.·Your Hot Cup has boiled dry. | ·Check your Hot Cup is plugged in and switched on at the supply socket.·Check that the dispensing nozzle is positioned centrally over the drip tray.·Check the fuse in the plug.·Allow your Hot Cup to cool down completely then refill it with water. |
| Your Hot Cup does not dispense a full cup of water | ·Your Hot Cup has excessive scale.·The dispensing control may be set too low. | ·Descale your Hot Cup·Adjust the dispensing control |
| Your Hot Cup produces excess steam but does not dispense boiling water. | ·The water level has dropped below the MIN level.·Your Hot Cup has excessive scale. | ·Fill with water between the MIN and MAX markings then restart the boil cycle.·Descale your Hot Cup. |
| Your Hot Cup makes a noise and there is a ‘clunk’ sound after water has been dispensed. | This is the sound of the internal valve operating after the boil cycle finishes. | This is normal operation. |
| Water drips from the dispensing nozzle after the boil cycle has finished. | There is a residual amount of water left inside your Hot Cup after the boil cycle. | This is normal operation |
| Steam comes out from behind the start button and behind the dispensing nozzle | Steam is being vented in a controlled manner through designed vents | This is normal operation |
| The water reservoir is getting hot. | Hot water is being returned to the water reservoir | This is normal operation. |
| Your Hot Cup immediately turns iteslf on when it is placed on the power base. | Your Hot Cup is already switched on. | Press the stop button. |
This appliance is fitted with either a moulded or rewirable BS1363, 13 amp plug. The fuse should be rated at 13 amps and be ASTA approved to BS1362.
If the fuse in a moulded plug needs to be changed, the fuse cover must be refitted. The appliance must not be used without the fuse cover fitted.
If the plug is unsuitable, it should be dismantled and removed from the supply cord and an appropriate plug fitted as detailed below. If you remove the plug it must not be connected to a 13 amp socket and the plug must be disposed of immediately.
The wires of the mains lead are coloured in accordance with the following code:
$$ \text { GREEN / YELLOW } = \text { EARTH } $$
$$ \text { BLUE } = \text { NEUTRAL } $$
$$ B R O W N = L I V E $$
The wire which is coloured GREEN/YELLOW must be connected to the terminal in your plug which is marked with an E or by the earth symbol ( 12 ) or coloured GREEN or GREEN/YELLOW.
The wire which is coloured BLUE must be connected to the terminal in your plug which is marked with the letter N or coloured BLACK.
The wire which is coloured BROWN must be connected to the terminal in your plug which is marked with the letter L or coloured RED.
If any other plug is used, a 13 amp fuse must be fitted either in the plug or adaptor or at the distributor board.
Plug should be BS1363 approved
Fit a 13 Amp Fuse
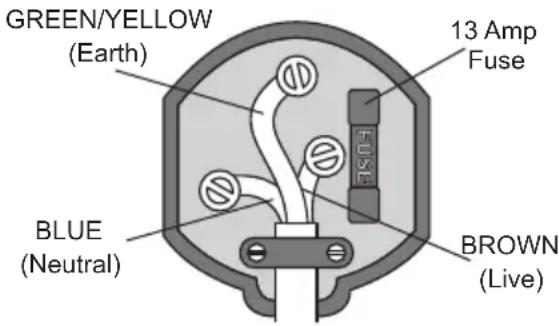
Ensure that the outer sheath of the cable is firmly held by the clamp
These appliances are built to the very highest of standards. There are no user serviceable parts. Follow these steps if the unit fails to operate:
Check the instructions have been followed correctly.
Check that the fuse has not blown.
Check that the mains supply is functional.
If the appliance will still not operate, return the appliance to the place it was purchased for a replacement. To return the appliance to the Customer Service Department, follow the steps below:
Pack it carefully (preferably in the original carton). Ensure the unit is clean.
Enclose your name and address and quote the model number on all correspondence.
Give the reason why you are returning it.
If within the guarantee period, state when and where it was purchased and include proof of purchase (e.g. till receipt).
Send it to our Customer Service Department at the address below:
Customer Service Department
Jarden Consumer Solutions (Europe) Limited
Middleton Road
Royton
Oldham
OL2 5LN, UK.
Telephone: 0161 621 6900 Fax: 0161 626 0391
e-mail: info@pulse-uk.co.uk
Please keep your receipt as this will be required for any claims under this guarantee.
This appliance is guaranteed for 1 year after your purchase as described in this document.
During this guaranteed period, if in the unlikely event the appliance no longer functions due to a design or manufacturing fault, please take it back to the place of purchase, with your till receipt and a copy of this guarantee.
The rights and benefits under this guarantee are additional to your statutory rights, which are not affected by this guarantee. Only Jarden Consumer Solutions (Europe) Limited (“JCS (Europe)”) has the right to change these terms.
JCS (Europe) undertakes within the guarantee period to repair or replace the appliance, or any part of appliance found to be not working properly free of charge provided that:
- you promptly notify the place of purchase or JCS (Europe) of the problem; and
- the appliance has not been altered in any way or subjected to damage, misuse, abuse, repair or alteration by a person other than a person authorised by JCS (Europe).
Faults that occur through, improper use, damage, abuse, use with incorrect voltage, acts of nature, events beyond the control of JCS (Europe), repair or alteration by a person other than a person authorised by JCS (Europe) or failure to follow instructions for use are not covered by this guarantee. Additionally, normal wear and tear, including, but not limited to, minor discoloration and scratches are not covered by this guarantee.
The rights under this guarantee shall only apply to the original purchaser and shall not extend to commercial or communal use.
If your appliance includes a country-specific guarantee or warranty insert please refer to the terms and conditions of such guarantee or warranty in place of this guarantee or contact your local authorized dealer for more information.
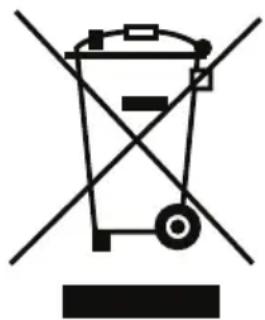
Waste electrical products should not be disposed of with household waste. Please recycle where facilities exist. E-mail us at info@pulse-uk.co.uk for further recycling and WEEE information.
Jarden Consumer Solutions (Europe) Limited
Middleton Road
Royton
Oldham
OL2 5LN
UK
natural_image
Symbol of a trash bin crossed with diagonal lines, no text or labels presentBreville

© 2013 Jarden Consumer Solutions (Europe) Limited
All rights reserved. Imported and distributed by Jarden Consumer Solutions (Europe) Limited,
Royton, Oldham OL2 5LN, United Kingdom.
The product you buy may differ slightly from the one shown on this carton due to continuing product development.
One (1) Year Limited Warranty—see inside for details.
Jarden Consumer Solutions (Europe) Limited is a subsidiary of Jarden Corporation (NYSE: JAH).
Made in PRC
www.breville.co.uk
- READ CAREFULLY AND KEEP FOR FUTURE REFERENCE
- Important Safety Instructions
- Identifying the Parts
- Removeable drip tray
- Removable stainless steel drip tray cover
- Dispensing nozzle
- Stop button
- Start button
- Dispensing control
- Lid
- Lid release button
- Illuminated water reservoir
- Heating chamber
- Power base
- Before using your Hot Cup for the first time
- Using your Hot Cup
- Stopping your Hot Cup
- Cleaning
- Emptying your Hot Cup
- Descaling using a proprietary descaling product
- Descaling using vinegar or citric acid
- Breville
Brand : BREVILLE
Model : VKJ318
Category : Water dispenser