
VTP169 - Pan BREVILLE - Free user manual and instructions
Find the device manual for free VTP169 BREVILLE in PDF.


| Product Type | Slow Cooker |
| Brand | Breville |
| Model | VTP169 |
| Capacity | 1.5 litres |
| Color | Black (with black lid) |
| Material | Removable ceramic cooking pot, glass lid |
| Temperature Control | 3 settings: LOW, HIGH, AUTO |
| Power Indicator | Yes |
| Handles | Cool-touch handles |
| Dishwasher Safe | Ceramic pot and glass lid are dishwasher safe |
| Cord Length | Approximately 1.0 m |
| Voltage | 220-240 V (UK plug) |
| Power Consumption | Approx. 150 W (estimated) |
| Dimensions (approx.) | 25 x 25 x 20 cm |
| Weight (approx.) | 2.5 kg |
| Accessories Included | Instruction booklet, selection of recipes |
| Spare Parts Available | Glass lid (part 9137191372), ceramic cooking pot |
| Warranty | 1 year limited warranty |
| Safety Features | Auto shut-off not specified, but cool-touch handles, heat-resistant base |
| Cleaning Instructions | Wipe cooker body with damp cloth; ceramic pot and lid dishwasher safe or hand wash |
| Usage | Household use only; not for outdoor or commercial use |
| Power Cord | Not replaceable by user; if damaged, return to service agent |
Frequently Asked Questions - VTP169 BREVILLE
User questions about VTP169 BREVILLE
0 question about this device. Answer the ones you know or ask your own.
Ask a new question about this device
Download the instructions for your Pan in PDF format for free! Find your manual VTP169 - BREVILLE and take your electronic device back in hand. On this page are published all the documents necessary for the use of your device. VTP169 by BREVILLE.
USER MANUAL VTP169 BREVILLE
natural_image
Breville-style cooking pot with black lid and control knob (no visible text or symbols)1.5 litre capacity slow cooker
instruction booklet
selection of recipes included
This product can be used by children aged 8 years and above, and persons who require supervision, provided:
• they are familiar with the hazards associated with the product, and,
• they receive instruction by a competent person on how to safely use the product.
Children must not play with the product. Cleaning and user maintenance must not be done by children unless they are aged 8 or older and are supervised.
If the supply cord is damaged, it must be replaced by the manufacturer, its service agent or similarly qualified persons in order to avoid a hazard.
Please read these instructions before operating the appliance and retain them for future use.
⚠ Allow adequate space above and on all sides for air circulation. Do not allow the appliance to touch any flammable material during use (such as curtains or wall coverings). Do not use under a wall cupboard.
⚠ Ensure the appliance is switched off and unplugged from the supply socket after use and before cleaning.
△Always allow the appliance to cool before cleaning or storing.
⚠ Use extreme caution when moving the appliance when it contains hot food or hot liquids.
⚠ The power cord is not replaceable by the user. Always return the appliance if the power cord is damaged to avoid any hazard.
⚠ Do not use the appliance if it has been dropped or if there are any visible signs of damage.
⚠️ Never use this appliance for anything other than its intended use. This appliance is for household use only. Do not use this appliance outdoors
⚠️ Never immerse any part of the appliance or power cord and plug in water or any other liquid.
⚠️ Never let the power cord hang over the edge of a work top, touch hot surfaces or become knotted, trapped or pinched.
This appliance must not be placed on or near any potentially hot surfaces (such as a gas or electric hob).
⚠ Do not touch the external surfaces of the appliance during use as they may become very hot. Use oven gloves or a cloth when removing the lid. Beware of escaping steam when removing the lid.
⚠️ Never operate the appliance if it is empty or without the lid fitted or if the lid is cracked or damaged.
⚠️ Don’t place the stoneware cooking pot on any surface affected by heat. Always place the pot onto a trivet or insulated mat. Be careful when placing the cooking pot directly onto delicate or polished surfaces because the base of the pot is unglazed and can cause scratches or other marks. We recommend placing protective padding under the pot to protect these types of surface.
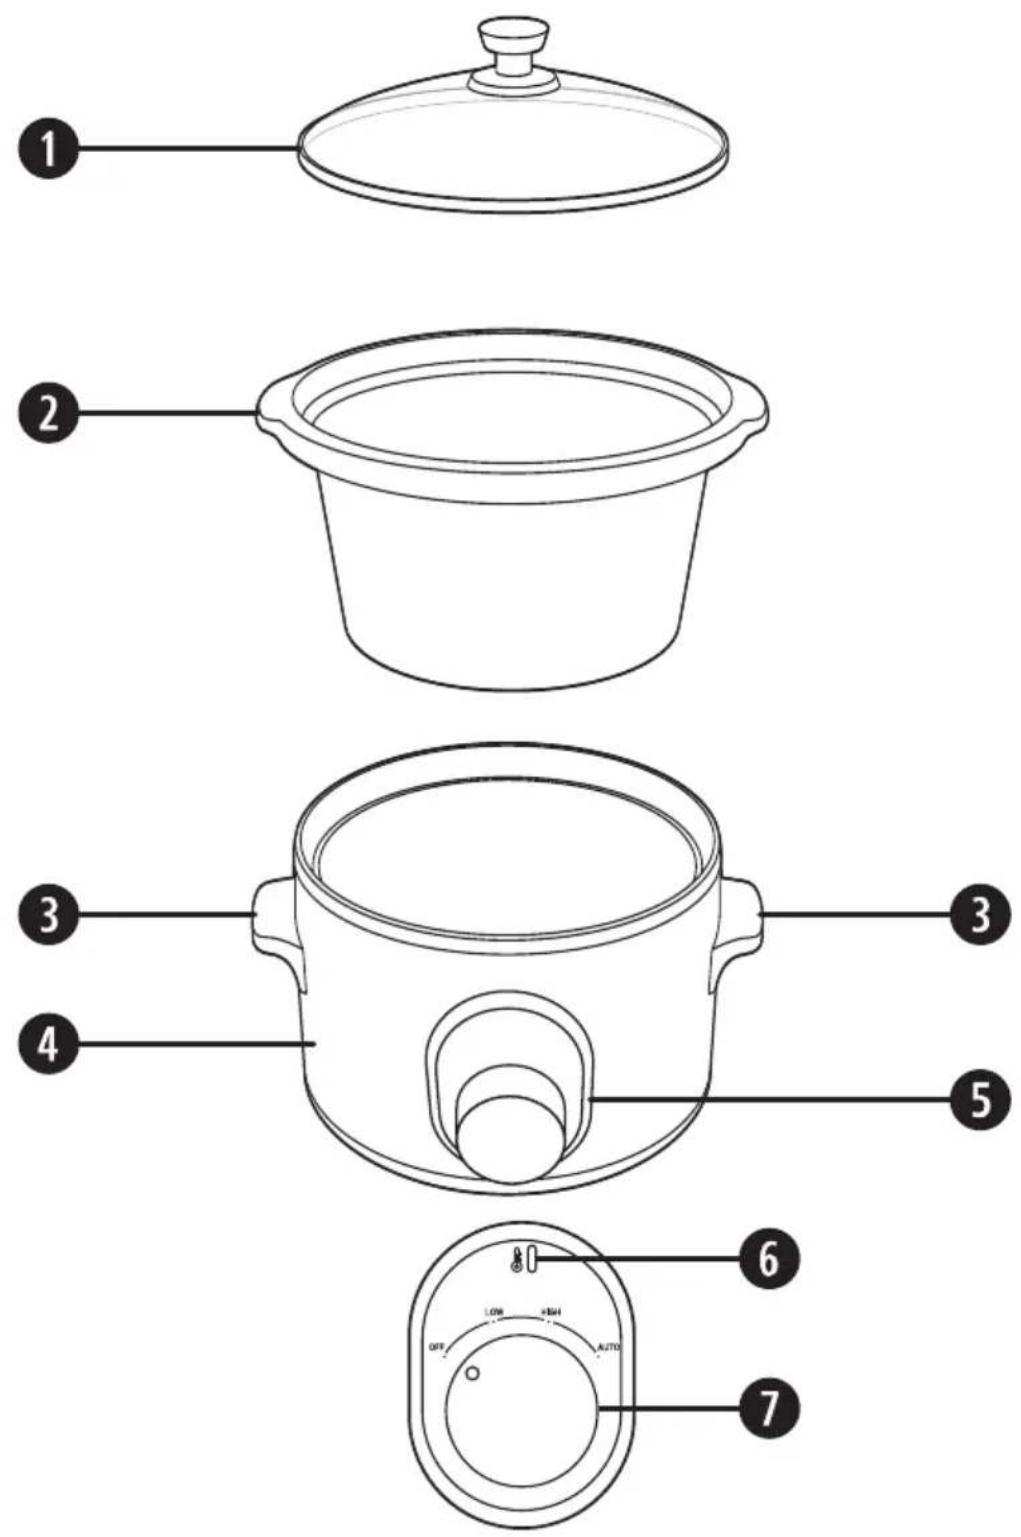
1 Glass lid
The glass lid allows you to check cooking progress without having to remove it. Dishwasher safe.
2 Removable ceramic cooking pot
Removable ceramic cooking pot distributes heat efficiently and evenly. Dishwasher safe.
3 Handles
4 Cooker body
5 Control panel
6 Power indicator
7 Temperature control
The temperature control allows you to select the required cooking power. There are three settings:
LOW: The low setting gently simmers the food for an extended period of time. It can also be used as a keep warm function which is useful whilst waiting to serve the meal. This setting is recommended for cheaper cuts of red meat.
HIGH: The high setting is used when cooking dried beans or pulses and will cook food in half the time required for the low setting. Use this setting for paler meat such as chicken.
AUTO: The auto setting will first cook on a high temperature and then reduce automatically to a lower heat setting. This setting is ideal for slow cooking meals overnight or when you are away for most of the day.
Before first use
⚠ Make sure your slow cooker is switched off and unplugged from the mains supply socket before cleaning. Never immerse the base of the cooker body, cord or plug in water or any other liquid.
Before using your slow cooker for the first time, wash the ceramic cooking bowl and glass lid in warm, soapy water. Rinse and dry thoroughly. Do not use harsh abrasives, chemicals or oven cleaners. Using a damp cloth or sponge, wipe the exterior and interior of the cooker body. Use a mild detergent solution.
Using your slow cooker
During use, the glass lid and ceramic cooking pot will get very hot. Always handle with care and use oven gloves.
Always check that the food is thoroughly cooked before serving.
Position your slow cooker on a dry, flat, stable surface away from any potential heat source (hob, oven, etc.). Make sure that the mains lead does not hang over the work surface edge.
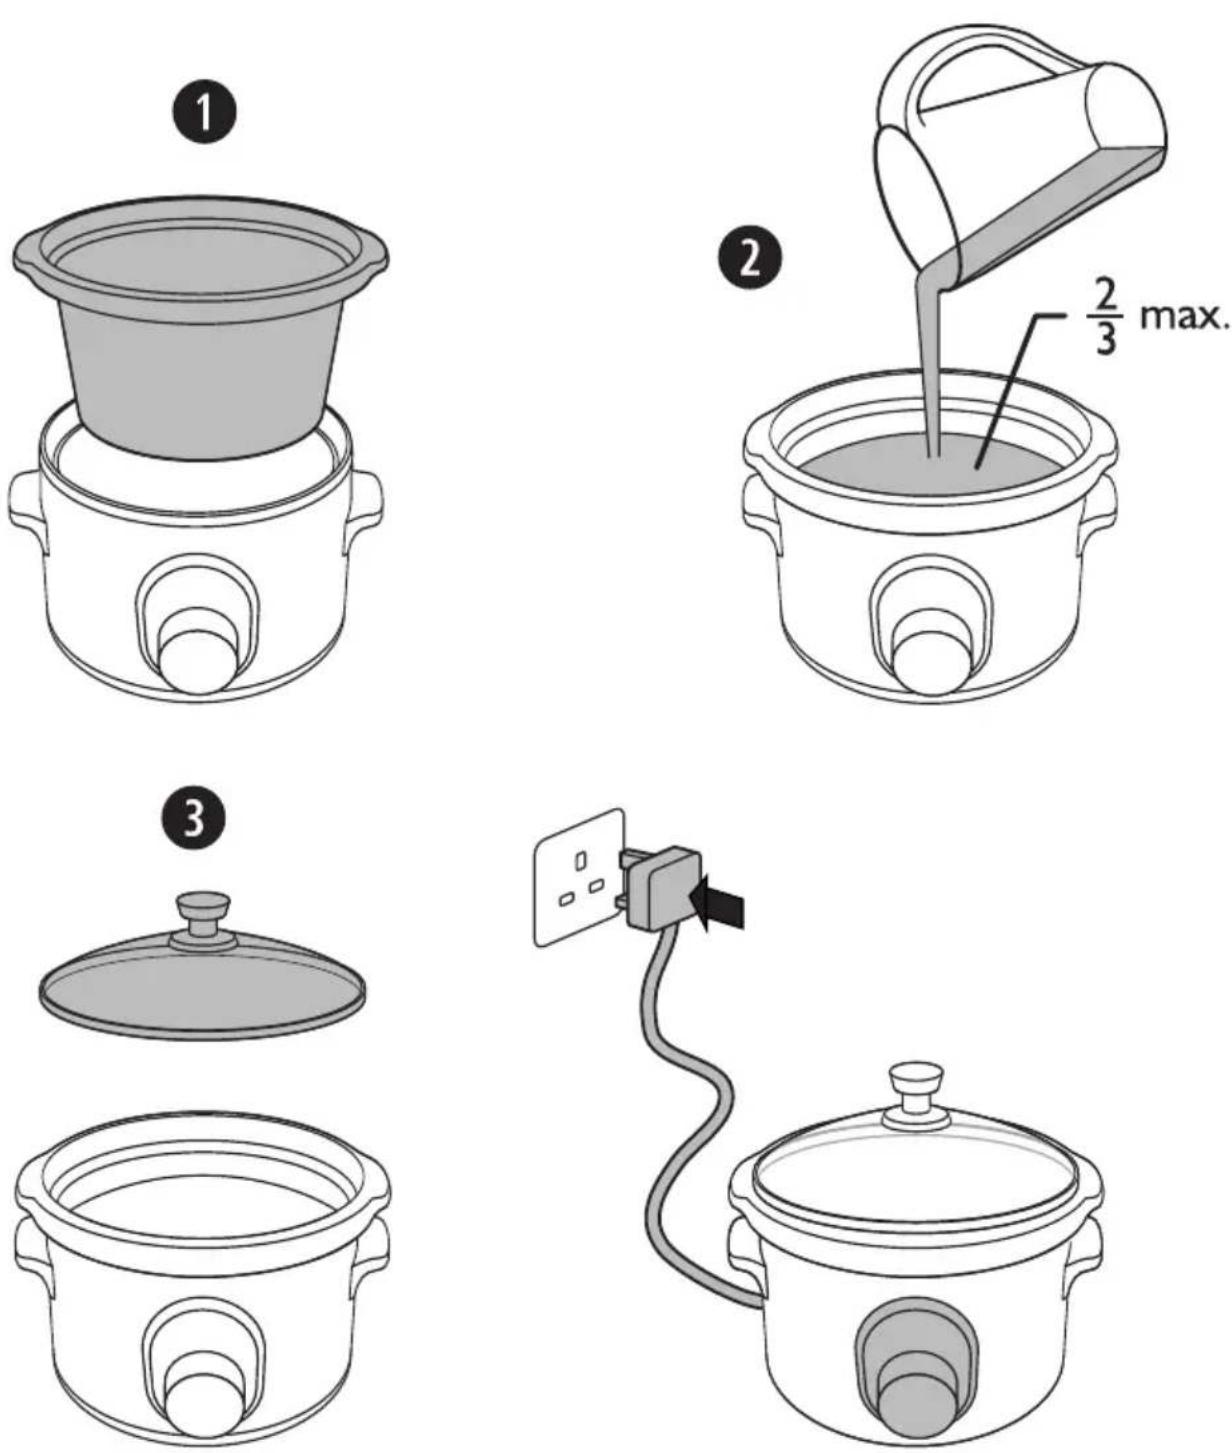
- Place the ceramic cooking pot inside your slow cooker's base. Ensure the ceramic cooking pot is positioned correctly before continuing.
- Add the prepared ingredients into the ceramic cooking pot. Never put food or liquid into the body of your slow cooker, always use the ceramic cooking pot. Don't overfill the pot. We recommend not to fill it more than two thirds full.
- Place the glass lid onto the ceramic cooking pot.
- Plug your slow cooker into a suitable mains supply. Set the temperature control to the desired setting.
LOW: The low setting gently simmers the food for an extended period of time. It can also be used as a keep warm function which is useful whilst waiting to serve the meal. This setting is perfect for cheaper cuts of red meat.
HIGH: The high setting is used when cooking dried beans or pulses and will cook food in half the time required for the low setting. The food will boil on the high setting and it may be necessary to add extra liquid depending on the recipe and the amount of time in which it is cooked. Food should be occasionally monitored when using the high setting. Cooking time is 3-6 hours. Use this setting for paler meats such as chicken.
AUTO: The auto setting will first cook on a high temperature and then reduce automatically to a lower heat setting. This setting is ideal for slow cooking meals overnight or when you are away for most of the day.
Once you have set the temperature control dial the power indicator will illuminate and the cooker will start cooking.
Your slow cooker works by building up heat and maintaining an even temperature. For the best results do not remove the glass lid before half the cooking time has elapsed. The glass lid allows you to monitor cooking progress without interrupting the cooking time.
If you aren't going to serve your meal straight away, you can set the temperature control of your slow cooker to LOW. This will keep your meal warm until you serve the food.
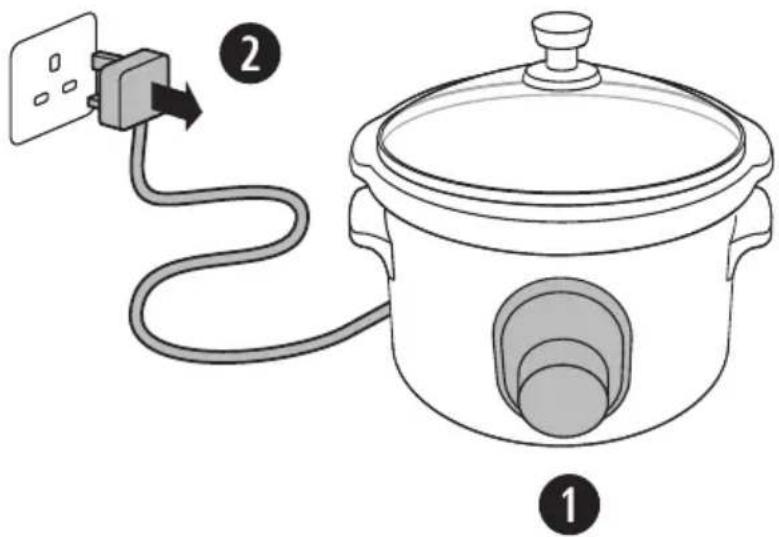
- When cooking is finished, set the temperature control to the OFF position.
- Unplug your slow cooker from the mains supply socket.
- Using oven gloves, remove the glass lid. Angle the glass lid away from you as you remove it. This will allow any build up of steam to escape safely away from your hands, arms and face.
- Carefully lift the ceramic cooking pot out of the cooker body. Place the ceramic cooking pot on a heat resistant surface. Don't place the ceramic cooking pot on any surface affected by heat. A trivet or an insulated pad is recommended. Be careful when placing the cooking pot directly onto delicate or polished surfaces because the base of the pot is unglazed and can cause scratches or other marks. We recommend placing protective padding under the pot to protect these types of surface.

natural_image
Illustration of a hand placing a lid onto a cooking pot with smoke and warning symbols (no text or labels)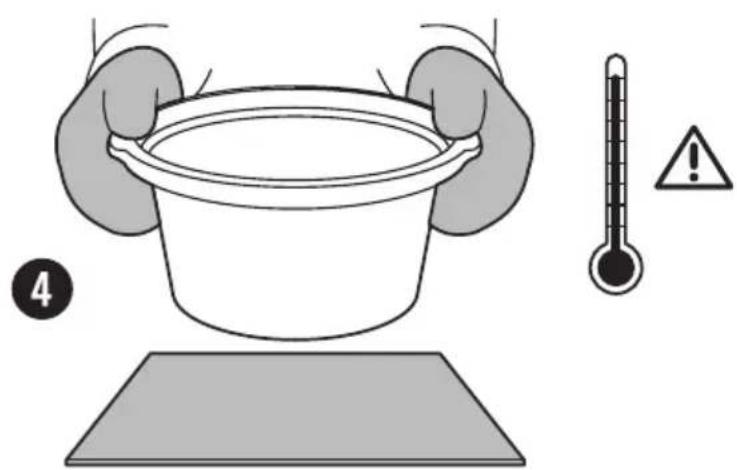
Adapting recipes for your slow cooker
This section is designed to help you adapt your favourite recipes so they can be cooked in your slow cooker. Many recipes can be converted to cooking in your slow cooker. Soups and stews, of course, are natural favourites. Casseroles and most meats benefit from the low temperatures and even cooking.
- Allow sufficient time for cooking.
- Do not add as much liquid as your recipe indicates. Generally, only half of the amount of liquid specified in the recipe needs to be added. This is because liquids do not boil away as in conventional cooking. Should you have too much liquid at the end of cooking, remove the lid and cook on the HIGH setting until the excess liquid has evaporated away.
- Many of the steps in conventional recipes may be ignored. Because vegetables don't overcook, everything can go into your slow cooker at the same time. However, milk, cream or sour cream should be added during the last hour of cooking.
Cooking time guide
Use the following table for suggested cooking times and settings when adjusting your favourite recipes. Always check that the food is thoroughly cooked before serving.
| Recipe time AUTO setting HIGH setting | ||
| 15 to 30 mins 2 to 3 hours 1.5 to 2 hours | ||
| 35 to 45 mins 3 to 5 hours 2 to 3 hours | ||
| 50 mins to 3 hours 5 to 10 hours 3 to 6 hours |
These times are approximate and can vary depending on the ingredients and quantities.
Preparing meat and poultry
When selecting meat, look for the leanest cuts. Trim any visible fat from the meat because the slow cooking process will result in too much liquid in the form of fat. If possible, use chicken without skin. For casserole style recipes, cut the meat into cubes, approximately 2.5cm (1").
Less tender cuts of meat are ideal to use in your slow cooker because the prolonged cooking periods make them tender and tasty. The table below shows cuts suitable for use.
| Meat Cut | |
| Beef Brisket, | shin, silverside, topside, stewing steak, braising steak |
| Lamb Neck, | forequarter, neck chops, shanks, shoulder chops |
| Pork Leg steaks, butterfly steaks, loin chops, fillet | |
Browning before cooking
Pre-browning meat and poultry prior to cooking seals in the moisture, intensifies the flavour and provides more tender results.
It also provides much richer flavours in other foods such as onions, peppers and leeks.
Pre-browning may take a little extra time, and whilst not strictly necessary, the rewards are evident in the end result. To brown, use a non-stick pan on the stove. Use a minimal amount of oil. Without browning, some meat and poultry may appear bland when cooked in your slow cooker.
Roasting
Roasting in your slow cooker results in delicious, tender meat which is easy to slice. The long, slow covered cooking process breaks down and softens the connective tissues within the meat, therefore the cheaper cuts of meat provide perfect results cooked by this method.
The addition of liquids is not necessary for roasting. A minimal amount is required for pot-roasting. Raise the meat to be roasted on an inverted heat proof plate or saucer so the meat is kept free of any fat released throughout the cooking process. Suitable cuts for roasting include:
| Meat Cut | |
| Beef Blade, fillet, rump, sirloin, silverside, topside | |
| Lamb Leg, mid loin, rack, shank, shoulders, mini roast | |
| Pork Loin, neck, leg, racks | |
Suitable cuts for pot roasting include:
| Meat Cut | |
| Beef Blade, chuck, round, silverside, skirt, topside | |
| Lamb Forequarter, shank, shoulder, leg | |
| Pork Loin, neck | |
Preparing vegetables
A characteristic of slow cooking is that vegetables generally cook much slower than most meat. Most vegetables should be cut into small bite sized pieces and placed near to the sides and as close to the bottom of the ceramic pot as possible. Meat should then be placed on top of the vegetables. Carrots should be peeled and placed where they will be completely covered by liquid. Frozen vegetables should be thawed before adding to other foods in your slow cooker.
Pasta and rice
If a recipe requires noodles, macaroni etc. to be added, cook on a conventional stove until slightly tender and add to your slow cooker during the last 30 minutes of cooking. To use rice, stir in with the other ingredients and add 14 cup extra of liquid for every 14 cup of rice. Long grain rice gives better results.
Herbs and spices
Leaf or whole herbs and spices are preferred. As the flavour of these is stronger, it is recommended to use half the suggested amount. If using ground or dried herbs and spices, add during the last hour of cooking. Always taste and season before serving.
Milk and cream
Milk, cream and sour cream tend to break down during extended cooking. When possible, add during the last hour of cooking.
Always unplug your slow cooker before cleaning it. Never immerse the cooker body, mains lead or plug in water or any other liquid. Never use harsh abrasive cleaners or cleaning materials.
Before cleaning
- Ensure the temperature control dial is set to the 'OFF' position.
- Ensure the slow cooker is switched off and unplugged at the mains supply.
- Allow all parts of the cooker to cool completely. To prevent damage to the glass lid and ceramic cooking pot, avoid severe temperatures changes, direct heat or sudden cooling.
Cleaning the ceramic cooking pot and glass lid
- Remove the ceramic cooking pot and glass lid. Wash the ceramic cooking pot and glass lid in warm, soapy water. Rinse and dry thoroughly.
- The glass lid and ceramic cooking pot can be washed in a dishwasher.
• To remove stubborn stains and foodstuff from the ceramic cooking pot, fill it 2/3 full with warm soapy water and leave it to soak. Rinse and dry thoroughly.
Cleaning the cooker body
The interior and exterior of the cooker body can be wiped with a soft, damp cloth.
Italian Style Vegetable Soup
Cooking time:
LOW: 7 – 9 hours
HIGH: 4 – 5 hours
AUTO: 6 – 7 hours
Ingredients
- 1 tin of rinsed and drained cannellini or mixed beans of your choice.
- 12 red onion, peeled and chopped
• 1 clove garlic, peeled and chopped - 1 leek, sliced
- 75g green beans, cut into quarters
• 2 small sticks celery, sliced - 2 small carrots, peeled and diced into 1-2cm cubes
- 50g broccoli florets
• 200g can chopped tomatoes
• 300ml hot vegetable stock - Salt and freshly ground black pepper
-
20ml red pesto
-
Put all the vegetables into the cooking pot.
- Pour over the hot stock then replace the lid.
- Select LOW, HIGH or AUTO and cook for the time indicated above.
- Serve with thickly cut granary bread for a delicious healthy meal.
Tip: Why not try adding 50g of uncooked pasta halfway through the cooking process. This will give a more substantial soup.
Coq au Vin
Cooking time:
LOW: 6 – 7 hours
HIGH: 3 – 5 hours
AUTO: 5 – 6 hours
Ingredients
• 100g bacon, chopped
• 150g shallots, peeled
• 2 cloves garlic, peeled and chopped
• 250g button mushrooms, sliced
• 2 chicken breasts, skinless and boneless
- 200ml red wine
• 200ml hot chicken stock
- Bay leaf
- Bouquet garni
• 1 tsp dried mixed herbs
- Salt and freshly ground black pepper
• 1 tbsp cornflour, to thicken
- Put all the ingredients into the cooking pot and replace the lid
- Select LOW, HIGH or AUTO and cook for the time indicated above.
- Mix the cornflour with a small amount of water. Gradually add the mixture to the pot, combining it with the sauce. Cook for a further 5-10 minutes.
- Garnish with some freshly chopped herbs and serve with creamy mashed potatoes and whole beans.
Lamb Hot Pot
Cooking time:
LOW: 8 – 10 hours
HIGH: 4 – 5 hours
AUTO: 6 – 7 hours
Ingredients
• 350g boned shoulder of lamb, cut into cubes
• 2 medium potatoes, cut into diced
• 1 medium onion, diced
• 1 large carrot, sliced
• 1 tsp freshly chopped rosemary
• 300ml of hot stock, lamb or chicken
- Salt and pepper
- Put all the ingredients into the cooking pot and replace the lid.
- Select LOW, HIGH or AUTO and cook for the time indicated above.
Delicious served with pickled red cabbage
Sausage and Bean Casserole
Cooking time:
LOW: 6 – 8 hours
HIGH: 4 – 5 hours
AUTO: 6 – 7 hours
Ingredients
• 1 tsp vegetable oil
- 4 thick sausages
• 1 medium onion, diced
• 1 clove of garlic, chopped
- 12 red pepper, sliced
- 1 x 400g tin of chopped tomatoes
- 1 x 200g baked beans
• 4 mushrooms, sliced
• 1 tsp Dijon mustard
• Dash of Worcestershire sauce
- 200ml of beef stock
- Heat the oil in a frying pan and brown the sausages quickly on all sides.
- Put the sausages into the cooking pot along with the rest of the ingredients.
- Gently stir to combine the ingredients and replace the lid.
- Select LOW, HIGH or AUTO and cook for the time indicated above.
Traditional Beef Pot Roast
Cooking time:
LOW: 8 – 10 hours
HIGH: 5 – 6 hours
AUTO: 6 – 7 hours
Ingredients
• 1kg piece of rolled brisket
• 1 medium onion, diced
• 2 carrots, peeled and sliced
• 1 tbsp Dijon mustard
- 1 tbsp plain flour
• 100ml beer or beef stock
- Salt and pepper
- Put the onions and carrots into the cooking pot.
- Place the beef on top of the carrots and onions.
- Mix the mustard and flour together to form a smooth paste then spread it over the beef.
- Season with salt and pepper and pour over the beer or stock. Replace the lid.
- Select LOW, HIGH or AUTO and cook for the time indicated above.
- Once cooked, strain the juice from the beef and serve with creamy mashed potatoes and steamed vegetables.
Ratatouille
Cooking time:
LOW: 6 – 8 hours
HIGH: 3 – 4 hours
AUTO: 5 – 6 hours
Ingredients
• 1 onion, peeled and sliced
• 2 cloves garlic, peeled and chopped
• 1 green pepper, de-seeded and chopped
• 1 red pepper, de-seeded and chopped
• 1 small aubergine, diced
• 1 medium courgette, sliced
• 225g tomatoes, skinned and chopped
• 400g can of chopped tomatoes
• 1 tbsp tomato purée
• 300ml hot vegetable stock
- Salt and freshly ground black pepper
• 1 tsp dried mixed herbs.
- Put all the vegetables into the cooking pot.
- Add the tomato puree to the hot vegetable stock and whisk to combine.
- Add the tinned tomatoes, stock and herbs, season and cover with the lid.
- Select LOW, HIGH or AUTO and cook for the time indicated above.
connection to the mains supply
This appliance must be earthed.
This appliance is fitted with either a moulded or rewirable BS1363, 13 amp plug. The fuse should be rated at 3 amps and be ASTA approved to BS1362.
If the fuse in a moulded plug needs to be changed, the fuse cover must be refitted. The appliance must not be used without the fuse cover fitted.
If the plug is unsuitable, it should be dismantled and removed from the supply cord and an appropriate plug fitted as detailed below. If you remove the plug it must not be connected to a 13 amp socket and the plug must be disposed of immediately.
The wires of the mains lead are coloured in accordance with the following code:
$$ \text { GREEN / YELLOW } = \text { EARTH } $$
$$ \text { BLUE } = \text { NEUTRAL } $$
$$ B R O W N = L I V E $$
The wire which is coloured GREEN/YELLOW must be connected to the terminal in your plug which is marked with an E or by the earth symbol ( ) or coloured GREEN or GREEN/YELLOW.
The wire which is coloured BLUE must be connected to the terminal in your plug which is marked with the letter N or coloured BLACK.
The wire which is coloured BROWN must be connected to the terminal in your plug which is marked with the letter L or coloured RED.
If any other plug is used, a 3 amp fuse must be fitted either in the plug or adaptor or at the distributor board.
Plug should be BS1363 approved Fit a 3 Amp Fuse
| GREEN/YELLOW(Earth) | 3 AmpFuse |
| BLUE(Neutral) | BROW(Live) |
Ensure that the outer sheath of the cable is firmly held by the clamp
Please keep your receipt as this will be required for any claims under this guarantee.
This appliance is guaranteed for 1 year after your purchase as described in this document.
During this guaranteed period, if in the unlikely event the appliance no longer functions due to a design or manufacturing fault, please take it back to the place of purchase, with your till receipt and a copy of this guarantee.
The rights and benefits under this guarantee are additional to your statutory rights, which are not affected by this guarantee. Only Jarden Consumer Solutions (Europe) Limited. ("JCS (Europe)") has the right to change these terms.
JCS (Europe) undertakes within the guarantee period to repair or replace the appliance, or any part of appliance found to be not working properly free of charge provided that:
- you promptly notify the place of purchase or JCS (Europe) of the problem; and
- the appliance has not been altered in any way or subjected to damage, misuse, abuse, repair or alteration by a person other than a person authorised by JCS (Europe).
Faults that occur through, improper use, damage, abuse, use with incorrect voltage, acts of nature, events beyond the control of JCS (Europe), repair or alteration by a person other than a person authorised by JCS (Europe) or failure to follow instructions for use are not covered by this guarantee. Additionally, normal wear and tear, including, but not limited to, minor discoloration and scratches are not covered by this guarantee.
The rights under this guarantee shall only apply to the original purchaser and shall not extend to commercial or communal use.
If your appliance includes a country-specific guarantee or warranty insert please refer to the terms and conditions of such guarantee or warranty in place of this guarantee or contact your local authorized dealer for more information.
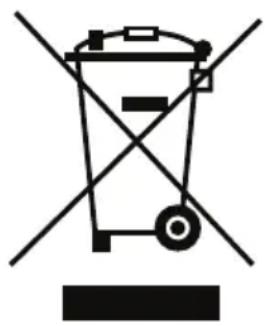
Waste electrical products should not be disposed of with Household waste. Please recycle where facilities exist. E-mail us at enquiries info@pulse-uk.co.uk for further recycling and WEEE information.
Jarden Consumer Solutions (Europe) Limited
Middleton Road
Royton
Oldham
OL2 5LN
UK
natural_image
Symbol of a trash bin crossed with diagonal lines, no text or labels presentThese appliances are built to the very highest of standards. There are no user serviceable parts. Follow these steps if the unit fails to operate:
- Check the instructions have been followed correctly.
- Check that the fuse has not blown.
- Check that the mains supply is functional.
If the appliance will still not operate, return the appliance to the place it was purchased for a replacement. To return the appliance to the Customer Service Department, follow the steps below:
- Pack it carefully (preferably in the original carton). Ensure the unit is clean.
- Enclose your name and address and quote the model number on all correspondence.
- Give the reason why you are returning it.
- If within the guarantee period, state when and where it was purchased and include proof of purchase (e.g. till receipt).
- Send it to our Customer Service Department at the address below:
Customer Service Department
Jarden Consumer Solutions (Europe) Limited
Middleton Road
Royton
Oldham
OL2 5LN, UK.
Telephone: 0161 621 6900 Fax: 0161 626 0391
e-mail: info@pulse-uk.co.uk
For replacement parts, phone our Customer Service Department on 0161 621 6900. They will give you up to date prices, inclusive of VAT and postage and packaging.
You may then send a cheque or postal order for the correct amount made payable to Jarden Consumer Solutions (Europe) Limited, with the order form printed below (or a photocopy of it) to our Customer Service Department.
| Name | |||
| Address | |||
| Postcode | |||
| Product Part number Description Quantity | |||
| VTP169 | 9137191372 | Glass LidCeramic Cooking Pot | |
| I enclose a cheque for £ ____ in full payment | |||
Breville

©2013 Jarden Consumer Solutions (Europe) Limited
All rights reserved. Imported and distributed by Jarden Consumer Solutions (Europe) Limited, Royton, Oldham OL2 SLN, United Kingdom.
The product you buy may differ from the one shown due to continuing product development. One (1) Year Limited Warranty—see inside for details. Jarden Consumer Solutions (Europe) Limited is a subsidiary of Jarden Corporation (NYSE:JAH). Made in PRC
www.breville.co.uk
- litre capacity slow cooker
- Please read these instructions before operating the appliance and retain them for future use.
- Glass lid
- Removable ceramic cooking pot
- Handles
- Cooker body
- Control panel
- Power indicator
- Temperature control
- Before first use
- Using your slow cooker
- Adapting recipes for your slow cooker
- Cooking time guide
- Preparing meat and poultry
- Browning before cooking
- Roasting
- Preparing vegetables
- Pasta and rice
- Herbs and spices
- Milk and cream
- Before cleaning
- Cleaning the ceramic cooking pot and glass lid
- Cleaning the cooker body
- Italian Style Vegetable Soup
- Cooking time:
- Ingredients
- Coq au Vin
- Lamb Hot Pot
- Sausage and Bean Casserole
- Traditional Beef Pot Roast
- Ratatouille
- connection to the mains supply
- This appliance must be earthed.
- Customer Service Department
- Jarden Consumer Solutions (Europe) Limited
- Middleton Road
- Breville
Brand : BREVILLE
Model : VTP169
Category : Pan