
HB-205CJ - Bread maker LG - Free user manual and instructions
Find the device manual for free HB-205CJ LG in PDF.


| Product Type | Bread Maker |
| Brand | LG |
| Model | HB-205CJ |
| Dimensions (approx.) | 30 x 25 x 35 cm (11.8 x 9.8 x 13.8 in) |
| Weight | 5.2 kg (11.5 lbs) |
| Power Consumption | 600 W |
| Capacity | Up to 2.0 lb (900 g) loaf |
| Programs | 12 automatic programs including Basic, Whole Wheat, French, Sweet, Gluten-Free, Dough, Jam, Bake, and more |
| Crust Control | 3 settings: Light, Medium, Dark |
| Timer | Up to 13 hours delay start |
| Keep Warm Function | Automatic keep warm for 1 hour after baking |
| Display | LCD display with program and time indication |
| Baking Pan | Non-stick coated, removable |
| Kneading Blade | Dual kneading blades for even mixing |
| Viewing Window | Large window in lid to monitor baking process |
| Safety Features | Auto shut-off; cool-touch exterior; lid lock |
| Cleaning and Maintenance | Wipe exterior with damp cloth; wash pan and blades in warm soapy water; dry thoroughly |
| Spare Parts Availability | Replacement pans, blades, and accessories available via LG authorized service centers |
Frequently Asked Questions - HB-205CJ LG
User questions about HB-205CJ LG
0 question about this device. Answer the ones you know or ask your own.
Ask a new question about this device
Download the instructions for your Bread maker in PDF format for free! Find your manual HB-205CJ - LG and take your electronic device back in hand. On this page are published all the documents necessary for the use of your device. HB-205CJ by LG.
USER MANUAL HB-205CJ LG
SAFETY PRECAUTIONS IN THIS MANUAL.
MODEL: HB-155CJ / 205CJ

PREFACE
- SAFETY PRECAUTIONS......4
- SERVICING PRECAUTIONS ....4
- INSTALLATION INSTRUCTIONS ....4
- SPECIFICATIONS....5
OPERATION INSTRUCTIONS
- FEATURES AND CONTROL PANEL
A. FEATURES....6 B. CONTROL PANEL....7 2. OPERATION CHECK 8 3. BREADMAKING PROGRAM....10
DISASSEMBLY INSTRUCTIONS....12
TROUBLESHOOTING GUIDE
A. CHECKING POINTS BEFORE SERVICE....15 B. TROUBLESHOOTING GUIDE EXCEPT CIRCUIT BOARD 16~24 C. FAILURE DIAGNOSIS OF THE CIRCUIT BOARD 25~26
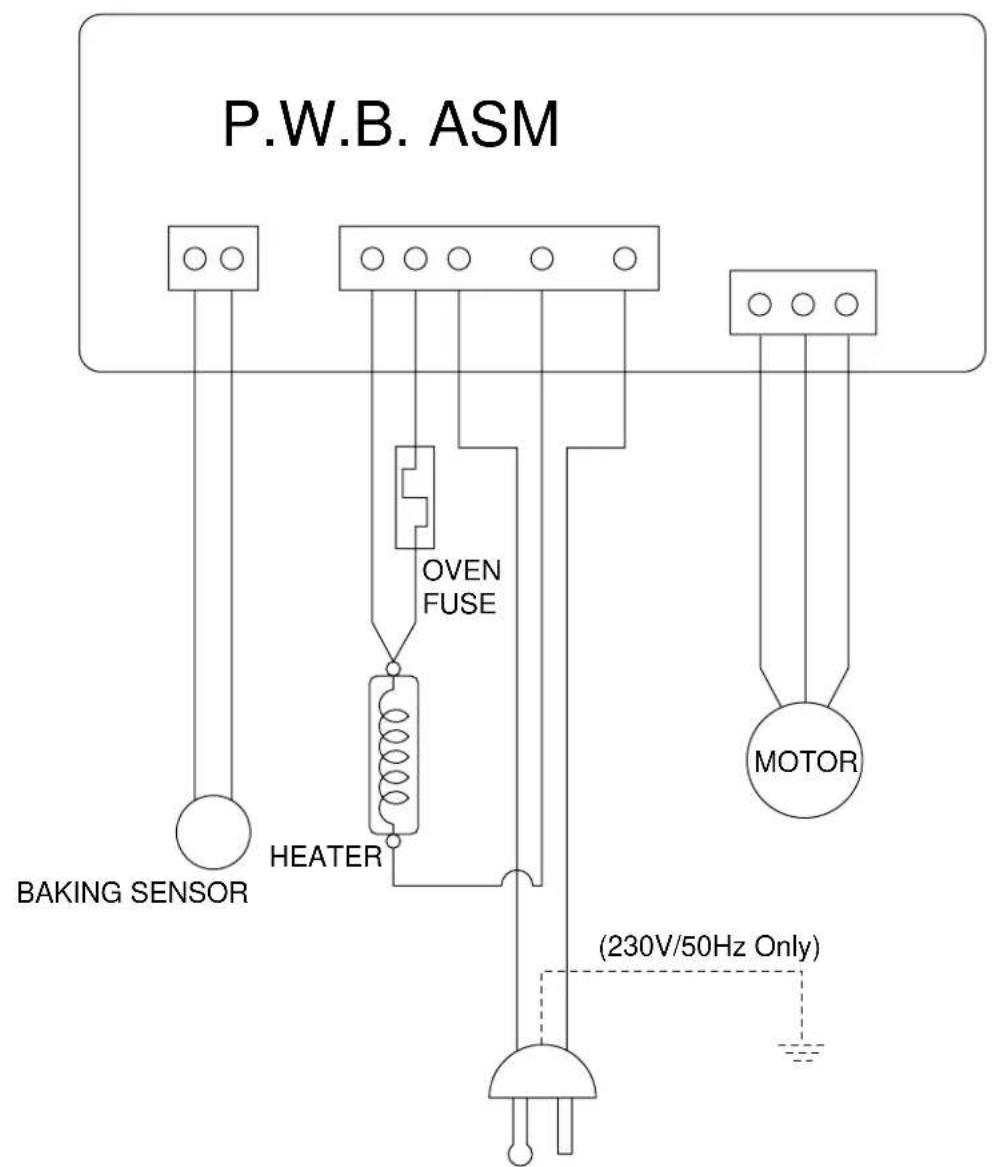
BLOCK DIAGRAM....27
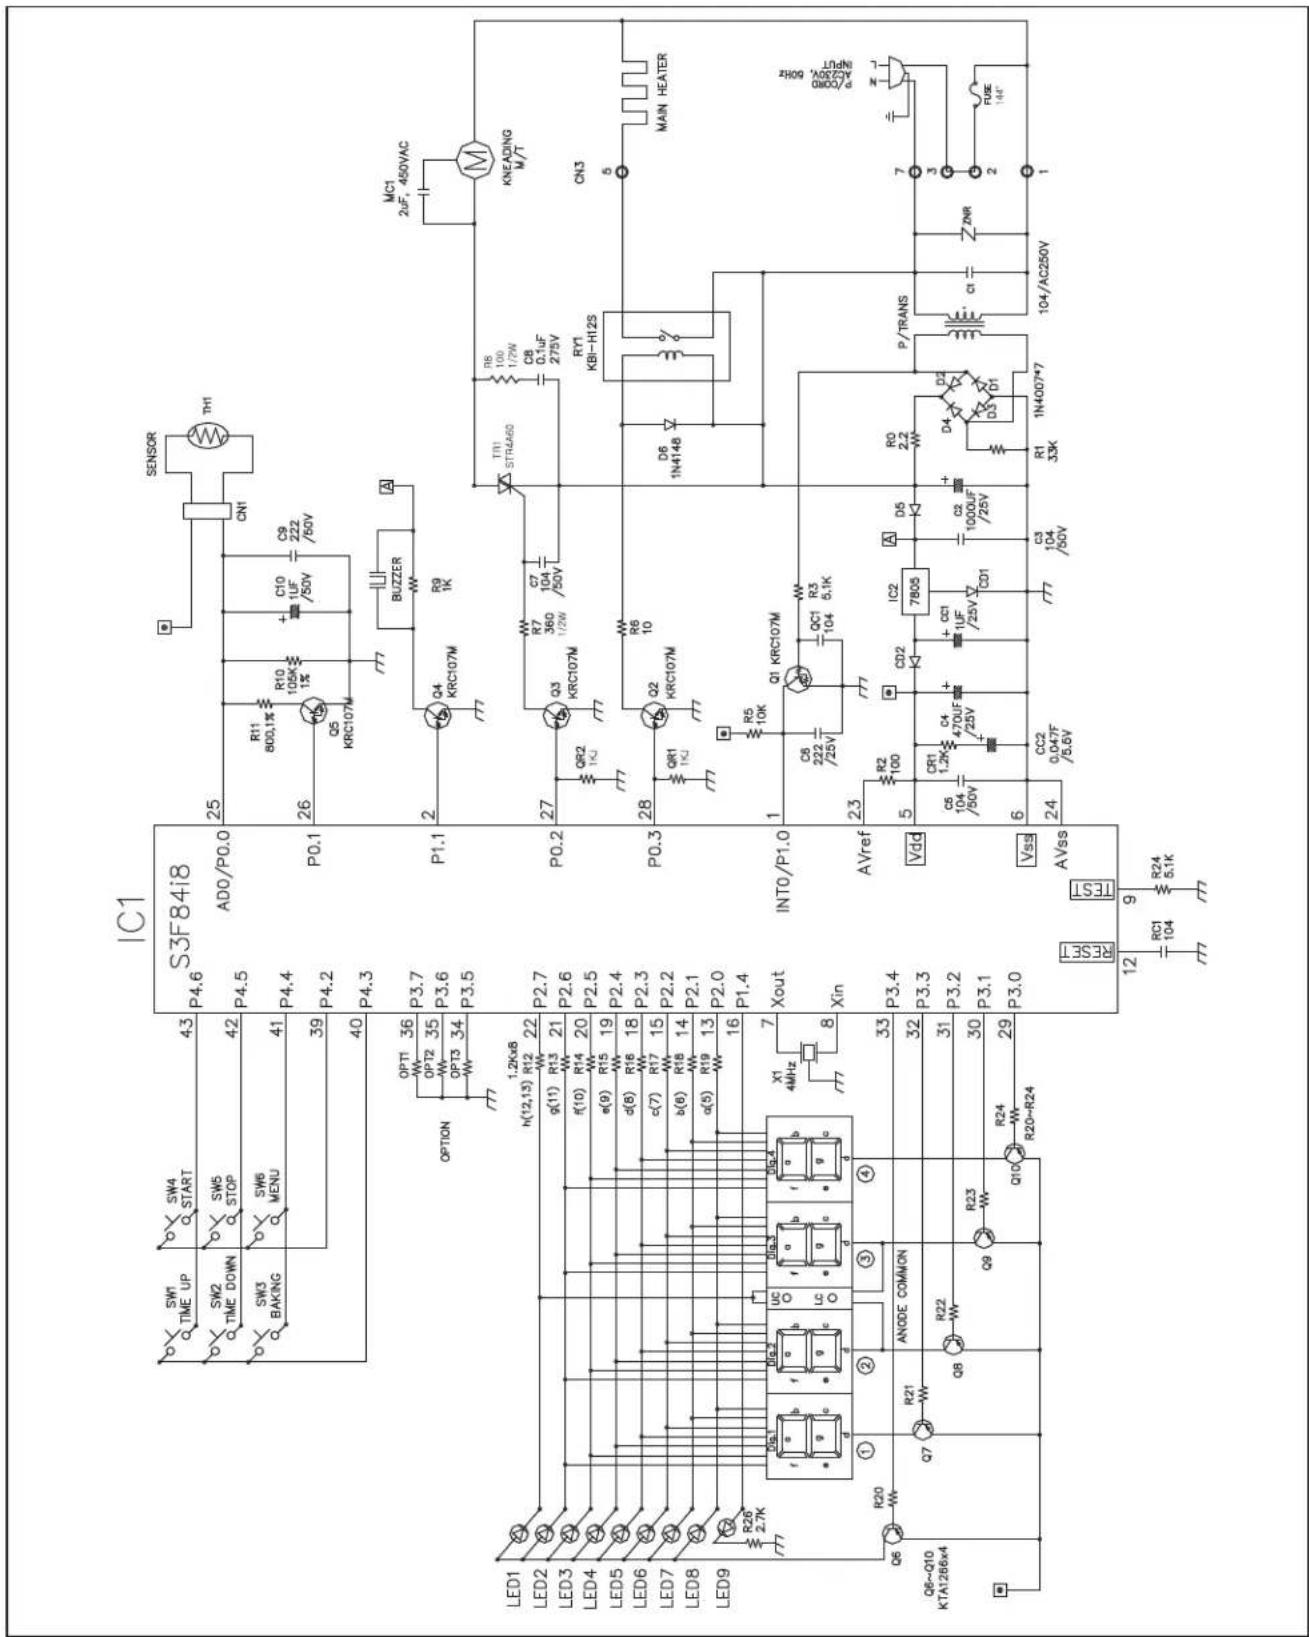
SCHEMATIC DIAGRAM....28
CONTROLLER PARTS LIST....29
EXPLODED VIEW & PARTS LIST
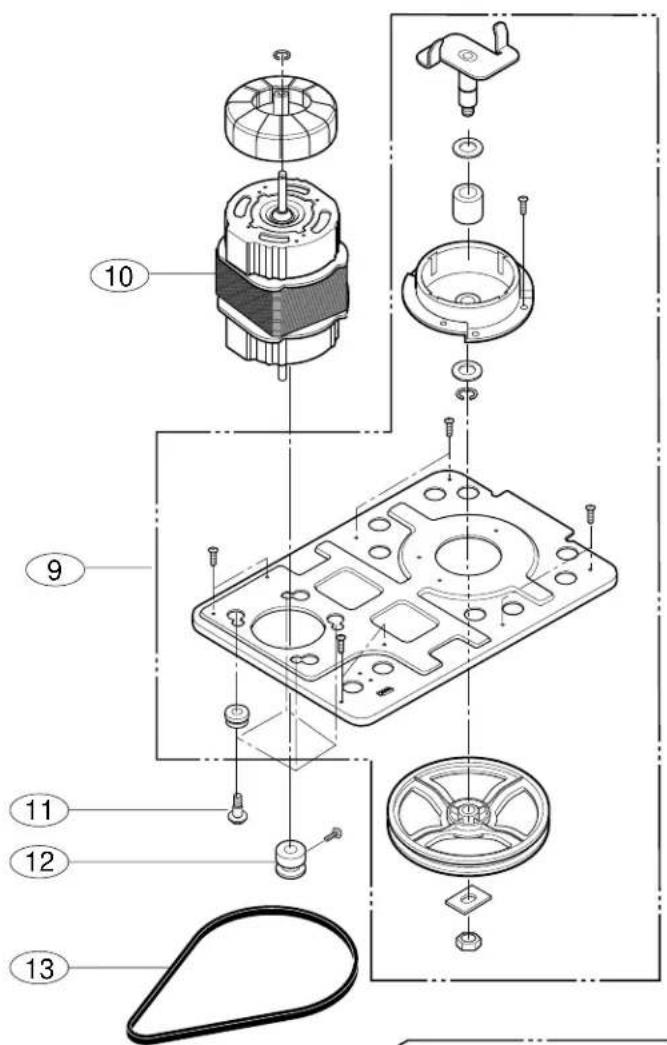
A. EXPLODED VIEW ....30~31 B. PARTS LIST ....32
1. SAFETY PRECAUTIONS
Follow basic safety precautions before using electrical appliances.
- READ ALL INSTRUCTIONS.
- To protect against electrical shock, do not immerse cord, plug, or appliance in water or other liquid.
- Do not touch hot surfaces. Always use oven mitts when handling the hot bread pan of bread.
- Close supervision is necessary when the appliance is used by or near children.
- Unplug the unit from the outlet when not in use and before cleaning. Allow the breadmaker to cool before attaching or removing parts.
- Do not touch moving parts.
- Do not operate the appliance with a damaged cord or plug or after the appliance malfunctions, or it has been dropped or damaged in any manner. Return the appliance to the nearest authorized service facility for examination, repair, or mechanical adjustment.
- Attachments that are not recommended or sold by the appliance manufacturer should not be used.
- Do not use outdoors.
- Do not let the cord hang over the edge of the table or counter or touch hot surfaces.
- Do not place on or near a gas or electric burner, or in a heated oven.
- To disconnect, grip the plug and pull it out from the wall outlet. Never pull the cord.
- Do not use the appliance for other than the intended use.
- This product is intended for household use only.
2. SERVICING PRECAUTIONS
The following cautions should be observed when troubleshooting.
a) As the appliance is made to be serviced only by properly qualified service personnel, it cannot be repaired by the user. b) Before servicing, you should keep your hands dry. The power cord must be unplugged to protect electrical hazards. c) Wear gloves when assembling or disassembling the appliance to avoid being injured by a sharp edge.
3. INSTALLATION INSTRUCTIONS
a) Place the breadmaker allowing at least 4-inch air space around sides and top of the breadmaker. b) Always place the breadmaker on a heat-proof counter top or table during operation. c) This breadmaker must be placed on a firm, flat, and solid surface. d) 120/60Hz rated bread Machine has a polarized plug; one blade is wider than the other. 230V/50Hz rated bread Machine has to be earthed. e) Extension cords are available and may be used if care is exercised in their use.
EXTENSION CORD IS USED
- The marked electrical rating of the extension cord should be at least as great as the appliance.
- The longer cord should be arranged so it will not drape over the counter top or tabletop where it can be pulled by children or tripped over.
- SPECIFICATIONS
| DESCRIPTION | AUTOMATIC | |
| MODEL REFER TO THE COVER PAGE | ||
| POWER SUPPLY INDICATED ON THE RATING LABEL | ||
| POWER CONSUMPTION | MAIN HEATER 550W | |
| KNEADING MOTOR 100W | ||
| DIMENSIONS (W × D × H) | APPROX. 3/4'' × 9'' × 133/4'' (23.2 × 3932 × 33cm) | |
| WEIGHT | APPROX. | |
| TIMER 4:10 TO 13:00 HOURS DIGITAL TIMER | ||
| CORD LENGTH APPROX. 3 FEET, 3.4 INCHES(1.0m) | ||
| THERMAL FUSE | MAIN HEATER PROTECTOR 291°F/144°C | |
| KNEADING MOTOR PROTECTOR 275°F/135°C | ||
| ACCESSORIES MEASURING CUP, MEASURING SPOON(OPTION) | ||
| SERIAL NO. INDICATED ON THE RATING LABEL WITH PERMANENT INK | ||
BR
1. FEATURES AND CONTROL PANEL
A. FEATURES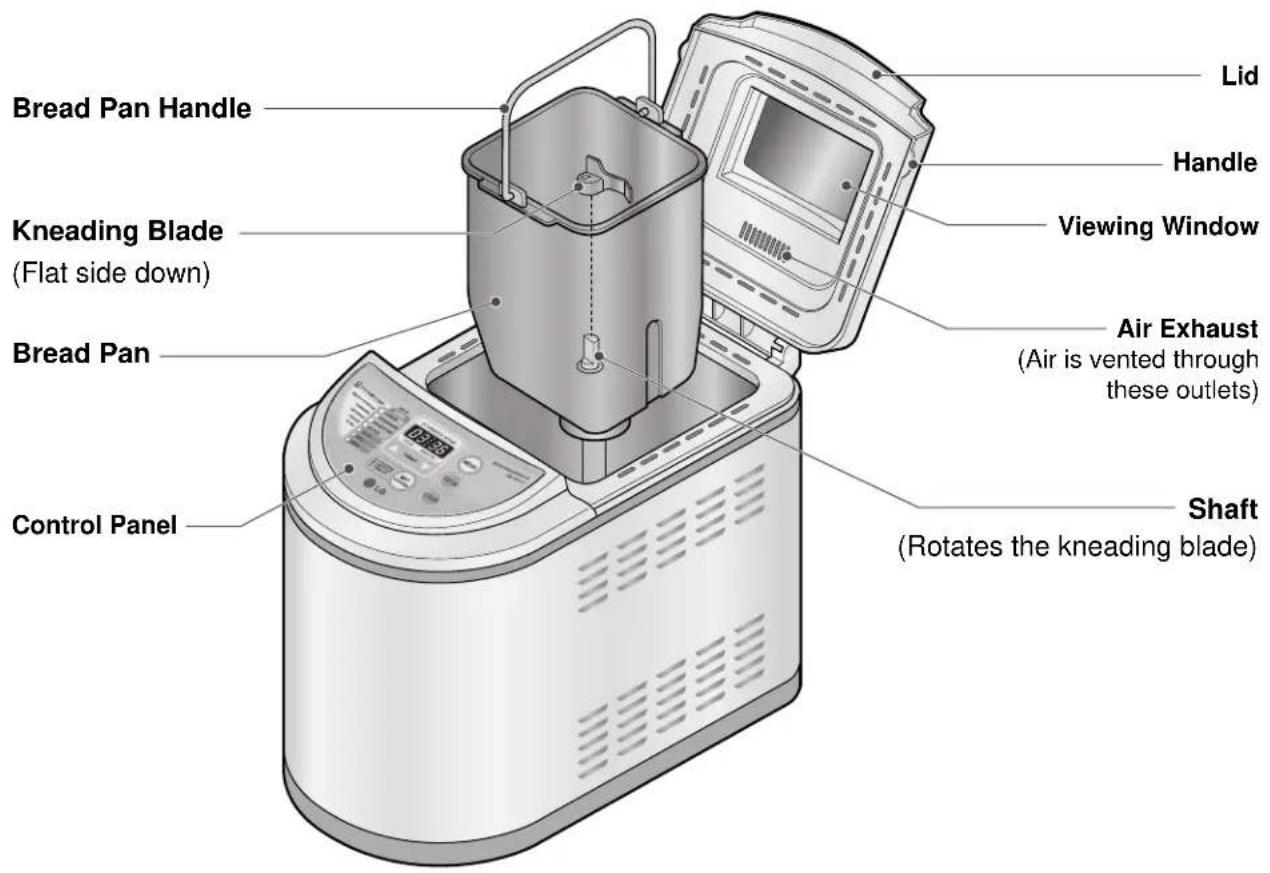
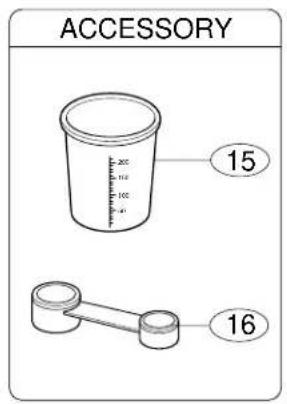
ACCESSORIES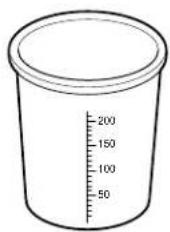
Measuring Cup Measuring Spoon (OPTION)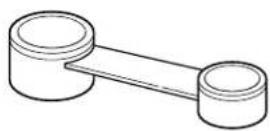
B. CONTROL PANEL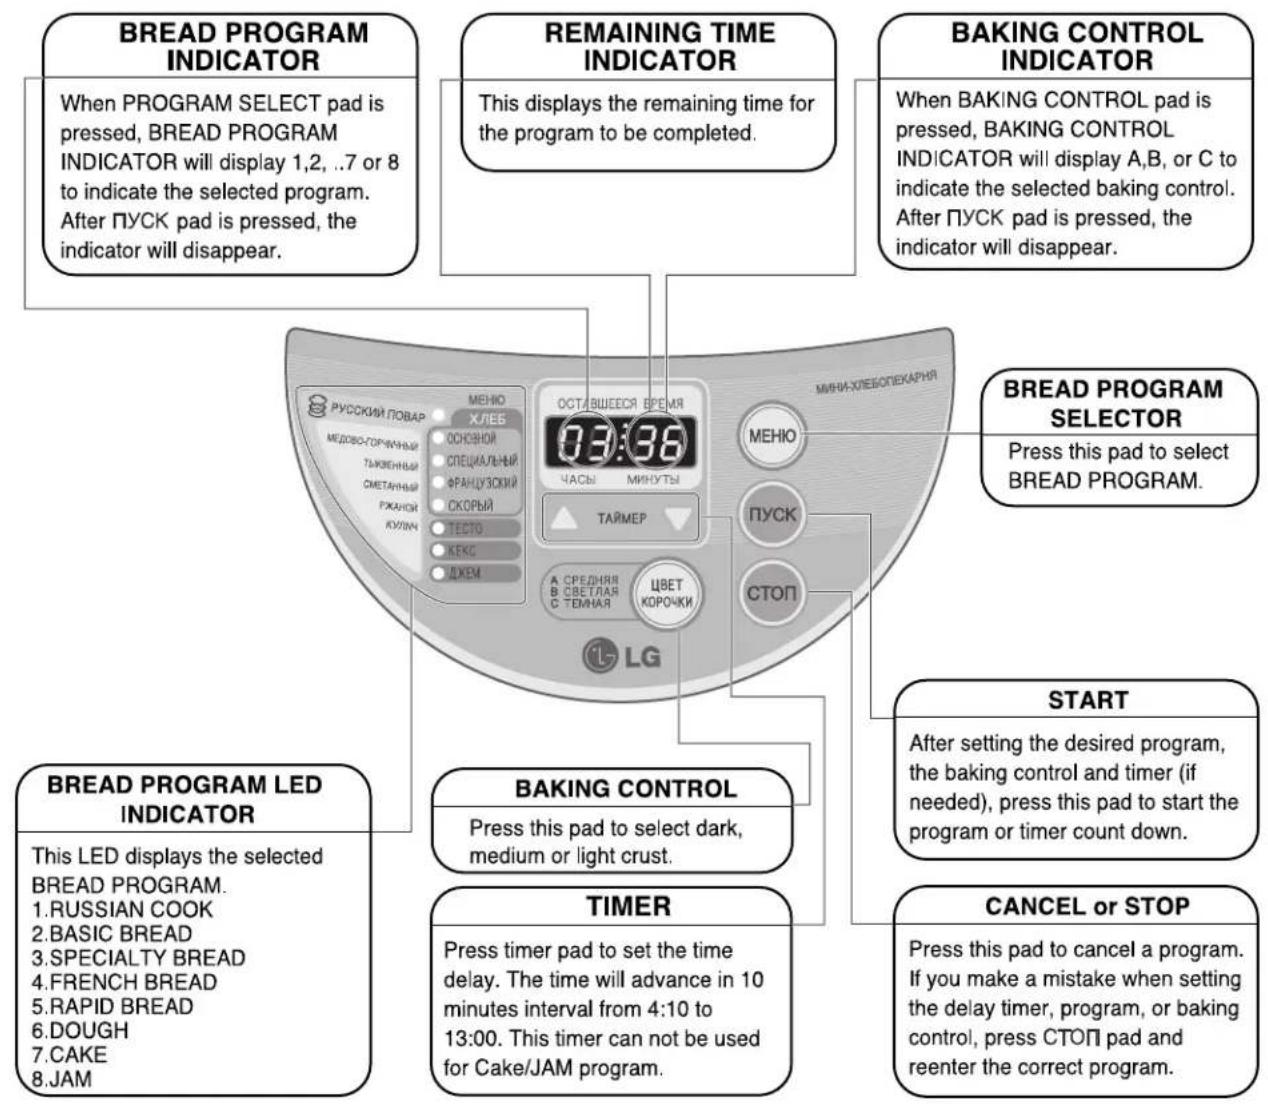
NOTE
If you want to cancel the selected program, press the CANCEL pad for more than 1 second at any time during the cycle.
2. OPERATION CHECK
After installation or repair, the following sequence and results should be checked.
1. GENERAL OPERATION CHECK
(a) Plug the power cord into a prolonged electrical outlet. (b) The REMAINING TIME display and Russian cook is set already.
(c) Check the PROGRAM SELECT.
Press the MENU pad, then REMAINING TIME will advance as follows:
![graph TD A["HB-155CJ 205CJ"] --> B["JAM"] B --> C["RUSSIAN COOK"] C --> D["BASIC BREAD"] D --> E["SPECIALTY BREAD"] E --> F["FRENCH BREAD"] B --> G["CAKE DOUGH RAPID BREAD"] G --> H["6 -"] H --> I["5 R"] I --> F B --> J["1 R"] J --> C C --> K["2 R"] K --> D D --> L["3 R"] L --> E E --> M["4 R"]](/content/2026/05/921069/images/1e89f9a5b634f809cddf3c7e0fb14a25ad6a35ba0f5eb38e8a6de97687ded50e.jpg)
(d) Check the BAKING CONTROL (except for CAKE or JAM and DOUGH program).
Press the BAKING CONTROL pad, then the REMAINING TIME will advance as follows:
![graph LR A["1"] --> B["MEDIUM LIGHT"] B --> C["1"] C --> D["B"] D --> E["1"] E --> F["DARK"] F --> A](/content/2026/05/921069/images/213294b99b5100272bf0af24e9c872ccbb26d3af9174b2839c97b16d46059849.jpg)
(e) Check the TIMER
Set the timer for how long you want to wait before the bread is done (from 4:10 to 13:00 in 10-minute intervals).
1) Press TIMER UP PAD (▲) once, the REMAINING TIME DISPLAY shows 4:10. 2) When constant pressure is applied to the pad, the time will advance quickly from 4:10 to 13:00. 3) After 13:00 is set, press once more, then the REMAINING TIME displays 4:10. 4) If you pass the time that you wanted, press TIMER DOWN PAD (▼) to go back.
(f) After selecting PROGRAM SELECT and BAKING CONTROL, press the START pad. Then the colon on the REMAINING TIME blinks to indicate that the breadmaker starts to operate. (g) Press the CANCEL(STOP) pad to cancel all baking processes. If the START pad is already pressed, just press the CANCEL(STOP) pad and hold for MORE THAN 1 SECOND.
CAUTION
- The TIMER cannot be used in CAKE AND JAM.
- After setting the time, press the START pad to operate the breadmaker. Check to see if the colon blinks.
1. TEST KEY PROGRAM CHECK
You can check the operation of each load by using the self-diagnosis program.
(a) OPERATION CHECK
1) When power is supplied while pressing the TIMER UP PAD (▲) and TIMER DOWN PAD (▼) at the same time, the self-diagnosis program will start. 2) After checking 1), press the START pad, then the process will advance as follows.
| REMAINING TIME display | 18:00 | P:1 | P:2 | 18:00 → P:1 → |
| OPERATION | LED CHECK | Kneading motor | Heater | ...... |
3) After 60 seconds from the starting points of processing, or if the CANCEL(STOP) pad is pressed, the self-diagnosis program will be canceled.
(b) BAKING PROCESS CHECK (for the only Russian Cook)
1) When power is supplied while pressing the START pad and CANCEL(STOP) pad at the same time, the self-diagnosis program will start. 2) After checking the REMAINING TIME (IR displayed with beeps), press the START pad. 3) The breadmaker starts to operate and the baking process will advance as follows.
| Baking Process | Time set | Mix | 1st Knead | Rest | 2nd Knead | 1st Rise | Gas Squeeze | 2nd Rise | Gas Squeeze | 3rd Rise | Bake Cool | Warm End | ||
| REMAINING Time | 11:AA 3: | 40 3:38 3: | 33 3:28 3: | 16 2:37 2: | 36 2:11 2: | 10 1:10 0: | 20 [:H] END | |||||||
| Baking Process indicator (OPTION) | KNEADKNEAD RISE | BAKE COOL -- | ||||||||||||
4) During checking 3), if the START pad was not pressed, the process will advance to the next process as time passes. 5) After checking 4), press the CANCEL(STOP) pad to cancel the self-diagnosis program.
3. BREADMAKING PROGRAM
3-1) EXPLANATION OF BASIC PROGRAM (Russian Cook)
| Process | Time Delay | 1st Knead | Rest | 2nd Knead | 1st Rise | Gas Squeeze | 2nd Rise | Gas Squeeze | 3nd Rise | Bake | Cool | Warm | End | |
| Time | Max 8:50 | 2min. | 5min. | 5min. | 12min. | 40min. | 4sec. | 26min. | 4sec. | 60min. | Approx. 50min. | Approx. 20min. | 3hours | - |
| Remaining Time | Max 13:00 | 3:40 | 3:38 | 3:33 | 3:28 | 3:16 | 2:37 | 2:36 | 2:11 | 2:10 | 1:10 | 0:20 | [:H] | End |
| Process Indicator (OPTION) | Time Set | Knead | Rise | Bake | Cool | - | - | |||||||
| Heater | On/Off | Off | On/Off | - | ||||||||||
| Kneading Motor | Off | On/Off | On | Off | On | Off | On | Off | On | Off | - | |||
| Temperature of oven case | 25°C/77°F | 30°C/86°F | 36°C/97°F | Temperature of bread | 50°C/122°F | |||||||||
| Micro-Computer Contorl | Time Delay | Knead | Rise | Bake | Cool | Warm | End | |||||||
| The temperature is controlled at 25°C (77°F). | Breadmaker starts to operate intermittently to proof flour splashed for 2 minutes. After mixing flour with water, kneading blade rotates with 250rpm for 5 minutes. After resting for 23 minutes, rotation again for 12 minutes. During knead and rest courses, the temperature is maintained at 30°C (86°F) by using the sensor and heater. | Accurate temperature control is essential during rising, (Dough temperature: Approx. 36°C (97°F). Microcomputer controls the power supply accurately to keep suitable dough temperature. | Bread is baked with high power. Bread is baked with a crisp golden crust and a fluffy inside. | Immediately after baking, bread can not be eaten because it's too hot. | Breadmaker maintains the bread at a suitable temperature (60°C/140°F) for 3 hours. | - | ||||||||
3-2) PROGRAM SPECIFICATIONS
(1) Russian Cook (3:40) ▼ Beep sounds 9 minutes before the end of 2nd kneading
(3) Specialty Bread (3:40) ▼ Beep sounds 9 minutes before the end of 2nd kneading
(4) French Bread (4:00) ▼ Beep sounds 9 minutes before the end of 2nd kneading
(5) Rapid Bread (1:59) ▼ Beep sounds 5 minutes before the end of 2nd kneading
| Remark | Timer | Knead | Rise | Bake | Cool | Warm | |||||||
| Mix | 1' Knead | Rest | 2' Knead | 1' Rise | G/Squeeze | 2' Rise | G/Squeeze | 3' Rise | |||||
| Time | 13hr | 2min. | 5min. | 5min. | 7min. | 13min. | 4sec. | 52min. | 35min. | 3hr | |||
(6) Dough (1:03)
| Remark | Remaining | Knead | Rise | ||||
| Mix | 1' Knead | Rest | 2' Knead | 1' Rise | G/Squeeze | ||
| Time | 13hr | 2min. | 4min. | 5min. | 12min. | 40min. | 4sec. |
(7) Cake (1:10)
| Remark | Timer | Bake | Cool | Warm |
| Time | 60min. | 3hr 10min |
(8) Jam (1:20)
| Remark | Timer | Pre Bake | Bake | Cool |
| Time | 10min. | 60min. | 10min. |
NOTE
- The Russian Cook, Specialty Bread, and French Bread Programs contain an audible signal (8 beeps) which sounds 9 minutes before the end of the 2nd knead (5 minutes before the end of the 2nd knead for Rapid program). For specialty bread, add additional ingredients at this time (i.e. raisins, nuts, vegetables, etc.).
- The Russian Cook Basic Bread, Specialty Bread, and French Bread Programs contain an audible signal (4 beeps) at the end of the baking cycle (20 minutes of cooling time remain).
- The beeper beeps 8 times at the end of each program to indicate the program is finished.
DISASSEMBLY INSTRUCTION
• PAY ATTENTION TO THE FOLLOWING IN SERVICE AND INSPECTION.
(a) Protect against electric shock: Pull out the plug for service and inspection. Don't touch live components when service and inspection are made. (b) Restore the original conditions of components and wire layout; Safety provisions are made by using tube and the other insulation material and by preventing wire from contact with heat generating or movable components by means of layout and binding. They should be restored to the original conditions. (c) Safety inspection after service is required as follows: confirm that screws, nuts, components, and wires removed for service are restored. Check the deterioration around service components, and check for insulation.
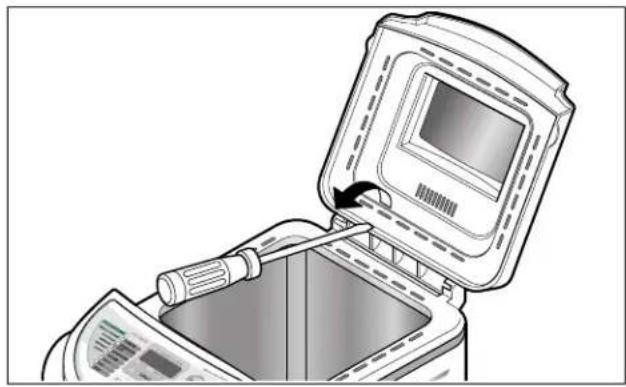
- Turn the Top Cover assembly upside down and pull out the inner cover and the viewing window.
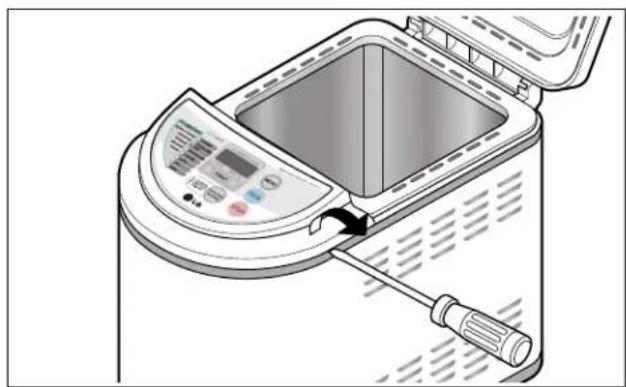
- Pull out the control panel.
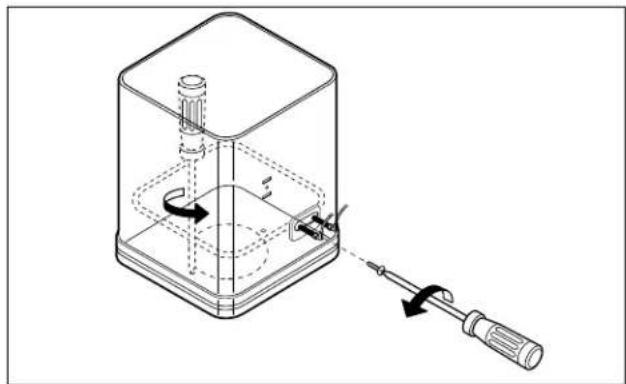
- After disconnecting leads, remove the oven case main assembly from the chassis by unscrewing two machine screws fixing oven case main assembly.
- Remove the leadwire assembly and sheath heater assembly from the oven case main assembly.
- Turn the breadmaker upside down. Remove four legs and base cover by unscrewing. Pull out the power cord assembly on the bottom of the unit. Remove the chassis assembly from the out case.
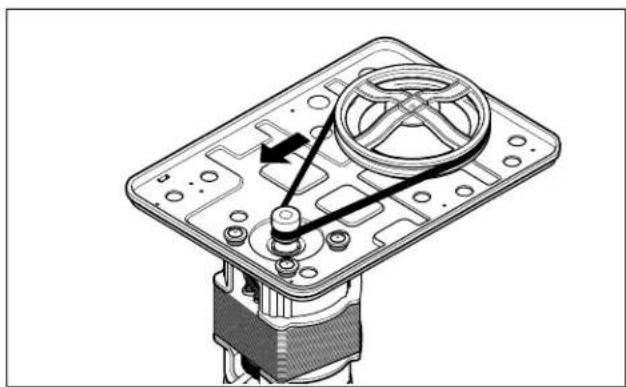
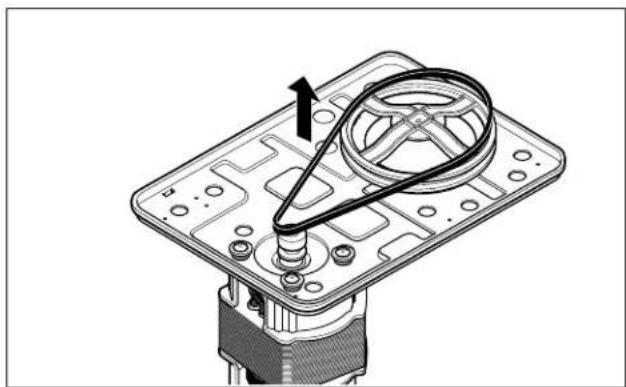
- Remove the poly V-belt. Remove nut and pulley washer, then kneading pulley can be disconnected. Remove the E-ring, washer, and pulley shaft assembly.
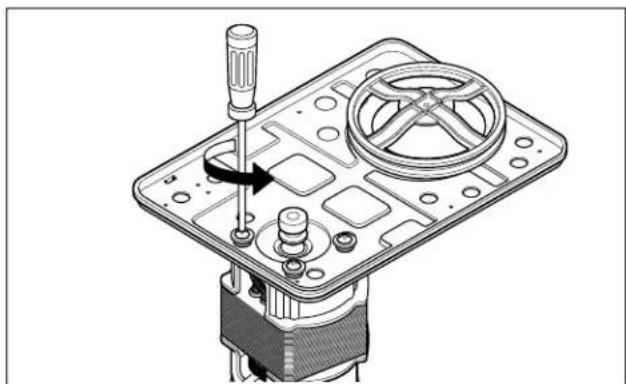
- Remove the motor pulley from the motor shaft by removing one machine screw. Remove three fixing screws, then the kneading motor and motor cushion can be disassembled.
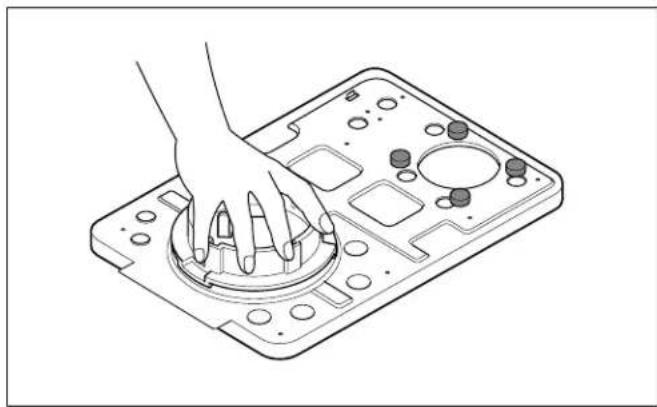
- Turn the chassis upside down and remove the oven base and the capacitor.
CAUTION
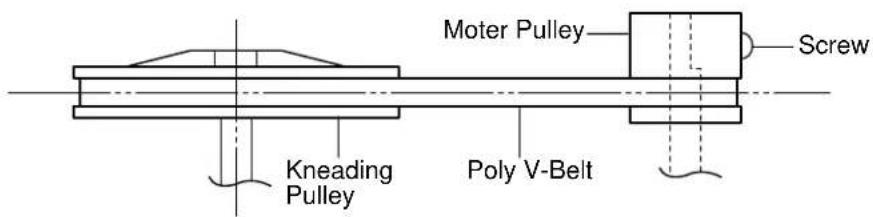
When you reassemble the kneading pulley, poly V-belt, and motor pulley after service or repair, adjust the center of the kneading pulley, poly V-belt, and motor pulley as follows.
When you get a complaint from your customer, evaluate the complaint carefully before going to the customer's home. If there are the following symptoms, please instruct the customer for the proper use of the breadmaker. This can save an unnecessary service call.
A. CHECKING POINTS BEFORE SERVICE![graph TD A["Breadmaker does not work."] --> B["Electric power is interrupted."] B --> C["Wait."] B --> D["Remaining time display shows [HI"] and does not work. (Inside of breadmaker is too hot.)] D --> E["Wait until cool."] B --> F["Breadmaker plug is not inserted tightly."] F --> G["Insert breadmak…](/content/2026/05/921069/images/2d4d952ff3eedf0c1c62130cbca67b9bd4066141146999009dbb387319737388.jpg)
B. TROUBLESHOOTING GUIDE EXCEPT CIRCUIT BOARD
(TROUBLE 1) Breadmaker does not operate.![graph TD A["CONDITION"] --> B["Does not operate."] B --> C["Power failure"] C --> D["Press start pad."] D --> E["Operates."] D --> F["Does not operate."] F --> G["Confirm connection of cord, inside lead wire, heater, motor etc."] G --> H["Abnormal"] G --> I["Normal"] H --> J["Repair."] I --> K["Conf…](/content/2026/05/921069/images/18c5795d50dab724edc5f181faaf20dcc30d7294f891c8e7f14e8d7eaadd3a20.jpg)
![graph TD A["CONDITION"] --> B["Kneading blade does not turn."] B --> C["WAIT about 20 minutes."] C --> D["Operates."] C --> E["Does not operate."] D --> F["Check if lead wires of kneading motor are properly connected."] E --> F F --> G["Abnormal"] F --> H["Normal"] G --> I["Repair."] H --> J["Confir…](/content/2026/05/921069/images/e565d472089046dd05f8e196af56d1a348f88a413acd55f846cf42ec40d16901.jpg)
![graph TD A["CONDITION"] --> B["HEater does not generate heat."] C["CHECK"] --> D["Check if lead wires of heater are properly connected."] E["RESULT"] --> F["Abnormal"] E --> G["Normal"] F --> H["Repair."] G --> I["Confirm conductivity between two taps of heater."] I --> J["Abnormal"] I --> K["Normal…](/content/2026/05/921069/images/ebfd6972bf190fb879ebceba92fa6a256a488d74d5792e914f97f2c849fd29a9.jpg)
(TROUBLE 2) Poor bread is made.![graph TD A["CONDITION"] --> B["Floured top."] B --> C["Incorrect use"] C --> D["Not enough water is added."] D --> E["Explain correct usage."] F["CAUSE"] --> G["Floured top sticky and raw bottom."] G --> H["Remaining time display window shows /R."] H --> I["There has been interruption in power (powe…](/content/2026/05/921069/images/d31953d5c17bb3ed51989449e1c499c29f76a732a05b1832710bc862507e72a3.jpg)
![graph TD A["CONDITION"] --> B["Dough doesn't rise even though it is knead."] B --> C["Remaining time display window shows IR."] C --> D["There has been interruption in power (power failure) after start."] D --> E["Recommend removing the dough and start again using all new ingredients."] C --> F["Can…](/content/2026/05/921069/images/9d47724e8542a40514e34bba997008f2775c71c1111afe8d1b73c820fbce78a2.jpg)
![graph TD A["CONDITION"] --> B["Not baked even though it is risen."] A --> C["CAUSE"] C --> D["Remaining time display window shows iR."] D --> E["There has been interruption in power (power failure) after start."] E --> F["Recommend removing the dough and start again using all new ingredients."] D --…](/content/2026/05/921069/images/b72c24be4487cfcadc6a56a0e520557188fff38250f3b361900e73f5deec8f63.jpg)
![graph TD A["Bread loaf is too short."] --> B["Incorrect use"] B --> C["Not enough flour."] B --> D["Old flour was used."] B --> E["Wrong type of flour was used."] B --> F["Not enough yeast."] B --> G["Old yeast was used."] B --> H["Wrong type of yeast which needs preliminary fermentation is used."]](/content/2026/05/921069/images/be52c293a6eb27ca66d89c93ea281630f183882e08c5e3d8e4cb8af5c8cbb4c4.jpg)
![graph TD A["CONDITION"] --> B["CAUSE"] B --> C["Not enough flour."] B --> D["Not enough water."] B --> E["The temperature of water was incorrect."] B --> F["Kneading blade was not installed."] B --> G["Not enough skim milk used."] B --> H["Other ingredients which should not be used were added."] I["…](/content/2026/05/921069/images/05192e013ede9c81c216ab3f5f88705021154d5fdbaade642fbeb2c2d035a298.jpg)
![graph TD A["CONDITION"] --> B["CAUSE"] B --> C["COARSE bread."] B --> D["INCORRECT use"] D --> E["Water is added too much."] E --> F["Explain correct usage."] G["WRONG-SHAPED BREAD."] --> H["INCORRECT USE"] H --> I["NOT ENOUGH FLUUR."] I --> F J["PRODUCT FAILURE."] --> K["Confirm the resistance valu…](/content/2026/05/921069/images/4f6a1dba7e92ed3c6600568fb92a168c6d96ed1318bfc34190fc6023bb155811.jpg)
(TROUBLE 3) Other problems.![graph LR A["CONDITION"] --> B["CAUSE"] B --> C["REMEDY"] A --> D["Water leaks from the bread pan."] D --> E["Product failure"] E --> F["Water seal is badly worn."] F --> G["Replace."] H["Heater is heated or thermal fuse is blown after making bread."] --> I["Circuit board failure."] I --> J["Refer to…](/content/2026/05/921069/images/8e277b13490c0a1fdf6215bda417d086c12eb79d1cc41b2cb90ee6c0af3b85a2.jpg)
![graph TD A["CONDITION"] --> B["CAUSE"] B --> C["REMEDY"] D["Electric shock."] --> E["Confirm visually damaged insulation cover of cord and lead wire in contact with metallic part of the unit."] E --> F["Too much water."] E --> G["Not enough flour added."] F --> H["Explain correct usage."] G --> I["V…](/content/2026/05/921069/images/e77acde496d5da48c4596b634952ea25c81c86532aae3cae3f522d882cc84667.jpg)
(TROUBLE 4) Some letter is displayed on remaining time display
| Letter | Cause | Remedy |
| H1 | The temperature of oven area is too hot.(higher than 40°C/104°F) | Press CANCEL pad for cooling and start again. |
| Er-3 | Baking sensor is defective (Resistance value is not 100KΩ ±5% at 25°C (77°F): and 1.305KΩ±0.15% at 160°C (320°F): | Repair or replace. |
C. FAILURE DIAGNOSIS OF THE CIRCUIT BOARD![graph TD A["CONDITION"] --> B["CAUSE"] B --> C["1. Kneading motor does not turn."] C --> D["See page 9 (OPERATION CHECK)"] D --> E{Is the signal generated at pin No. 15 of IC1 as follows?} E -->|Yes| F["Confirm the connection of Q501 R601 and repair or replace the POWER SOURCE BOARD assembly."] E --…](/content/2026/05/921069/images/1001d526ab997f0203e43ec94279addcf5a4ea371ec8e70510fb96f5dbeff37e.jpg)
![graph TD A["CONDITION"] --> B["CAUSE"] B -->|No| C["REMEDY"] B -->|Yes| D["4. LED does not light correctly."] D --> E["5. Er: 3 display appears."] E --> F["Baking temperature sensor is defective."] F --> G["When pressing the cancel pad, does the display disappear?"] G --> H["Does not disappear."] H…](/content/2026/05/921069/images/65b7f3d0aed82d264b625d786028d09ca695ab457112179a0fd13a27f06558d6.jpg)
REMARKS
- :HOUSING
- TERMINAL BLOCK
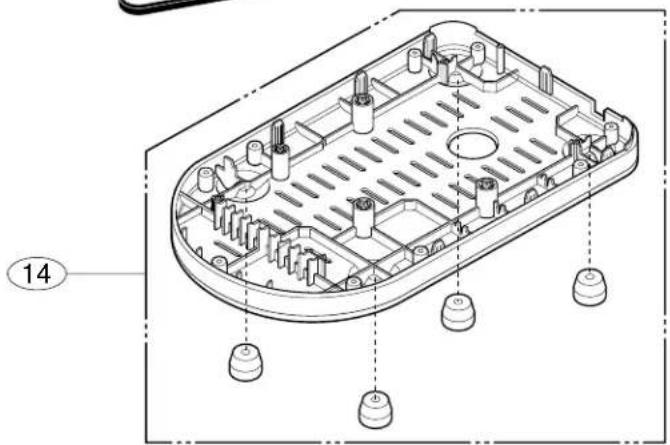
B. PARTS LIST
| LOCA NO. HB-155CJ HB-205CJ QTY | DESCRIPTION HB-205CJ QTY | PART NO. | REMARKS | ||
| 1 TOP COVER ASS'Y 3551FB2236A | 3551FB2236A 1 | ||||
| 2 CONTROLLER ASS'Y 4781FB2237 | 4781FB2237A 4781FB2237B 1 BWT | ||||
| H 4781FB2237J RUA | |||||
| 4781FB2237S 4781FB2237T SA | |||||
| 2-1 CONTROL PANL ASS'Y | 3572FB9112A 3572FB9113A 1 BWT | ||||
| 3572FB9112B 3572FB9113B RUA | |||||
| 3572FB9112C | 3572FB9113C | SA | |||
| 2-2 P.W.B ASM | 6871FB2247A 6871FB2247A 1 230V/50Hz | ||||
| 3 KNEADING BLADE | 5832FB3300B 5832FB3300B 1 PLASTIC | ||||
| 4 OVEN, ASS'Y | 5306FB2074A | - | 1 | AL DIC'G 1.5lb OPTIONAL | |
| - | 5306FB2074B 1 | AL DIC'G 2.0lb OPTIONAL | |||
| 5 HEATER ASS'Y, SHEATH | 5301FB2059F 5301FB2059F | 1 230V/550W | |||
| 6 OVEN CASE ASSY | 3111FB2057B | 311FB2057B | 1 1.5lb OPTIONAL | ||
| - | - | 1 2.0lb OPTIONAL | |||
| 7 OUT CASE | 3112FB1038A 3112FB1038A 1 WHITE OPTIONAL | ||||
| - | - | 1 SILVER OPTIONAL | |||
| 8 LEAD WIRE ASS'Y | 6877FB3166A 6877FB3166A 1 230V/50Hz | ||||
| 6877FB3166D | 6877FB3166D 1 230V/50Hz | ||||
| 9 CHASSIS ASS'Y | 3141FB2058D | 3141FB2058D 1 | |||
| 10 MOTOR ASM | 4681FB3177D | 4681FB3177D 1 | |||
| 11 SCREW | 4000FB4022B 4000FB4022B 4 | ||||
| 12 MOTOR PULEY | 4080018B | 4080018B | 1 | AL 8 PI | |
| 13 V-BELT | EBZ60921204 EBZ60921204 | 1 | LG | ||
| 4400FB3200A 4400FB3200A O/S | |||||
| 14 BASE ASS'Y | 3040FB3172A 3040FB3172A 1 | ||||
| 15 MEASURE CUP | EBZ60822111 EBZ60822111 | 1 | LG | ||
| 4030031A | 4030031A | O/S | |||
| 16 MEASURE SPOON | EBZ60822112 EBZ60822112 | 1 | LG | ||
| 4080080A | 4080080A | O/S | |||

LG Electronics Inc.
P/NO.: 3828FB5051D
JUL. 2003
Printed in Korea


- PREFACE
- OPERATION INSTRUCTIONS
- TROUBLESHOOTING GUIDE
- EXPLODED VIEW & PARTS LIST
- SAFETY PRECAUTIONS
- SERVICING PRECAUTIONS
- INSTALLATION INSTRUCTIONS
- EXTENSION CORD IS USED
- FEATURES AND CONTROL PANEL
- NOTE
- OPERATION CHECK
- GENERAL OPERATION CHECK
- CAUTION
- TEST KEY PROGRAM CHECK
- BREADMAKING PROGRAM
- ) EXPLANATION OF BASIC PROGRAM (RUSSIAN COOK)
- ) PROGRAM SPECIFICATIONS
- DISASSEMBLY INSTRUCTION
- PAY ATTENTION TO THE FOLLOWING IN SERVICE AND INSPECTION
- TROUBLESHOOTING GUIDE EXCEPT CIRCUIT BOARD
- REMARKS
- LG ELECTRONICS INC
Brand : LG
Model : HB-205CJ
Category : Bread maker