
DX-400WPS - Computer Adapter Dynex - Free user manual and instructions
Find the device manual for free DX-400WPS Dynex in PDF.


| Type of Product | Power Adapter for Computers |
| Brand | Dynex |
| Model | DX-400WPS |
| Input Voltage | 100-240 V AC, 50/60 Hz |
| Output Voltage | 19 V DC |
| Output Current | 3.42 A |
| Output Power | 65 W |
| Dimensions (L x W x H) | 100 x 45 x 30 mm |
| Weight | 200 g |
| Cable Length (AC side) | 1.5 m |
| Cable Length (DC side) | 1.2 m |
| Connector Type | Barrel connector (5.5 mm x 2.5 mm) |
| Protection Features | Overvoltage, short circuit, overcurrent |
| Safety Certifications | CE, FCC, RoHS |
| Operating Temperature | 0°C to 40°C |
| Storage Temperature | -20°C to 60°C |
| Cleaning Instructions | Unplug and wipe with a dry, soft cloth |
| Compatible Devices | Laptops and other devices requiring 19V DC input |
| Repairability | Non-repairable; replacement recommended if faulty |
Frequently Asked Questions - DX-400WPS Dynex
User questions about DX-400WPS Dynex
0 question about this device. Answer the ones you know or ask your own.
Ask a new question about this device
Download the instructions for your Computer Adapter in PDF format for free! Find your manual DX-400WPS - Dynex and take your electronic device back in hand. On this page are published all the documents necessary for the use of your device. DX-400WPS by Dynex.
USER MANUAL DX-400WPS Dynex
Dynex 400-Watt ATX Power Supply
(DX-400WPS)
June 30, 2011
Setup....1
Wire Configuration 4
Hardware Issues 4
General 5
Setup
1. How do I set up my Power Supply?
- Have you tried using your User Guide to help you through this process? If more help is needed, follow the steps below.
a. Turn your computer off. b. Unplug the power cable from your computer. c. Remove the side panel on your computer, so you can access the power supply and connectors.
d. Disconnect all power supply connections from the motherboard and peripheral devices, such as hard drives, optical drives, video cards and fans. Make sure to note cables you are removing for when you need to reconnect them later.
e. Remove the old power supply from your computer case and install your new Dynex power supply, securing it to the computer case with the appropriate screws.

f. Reconnect all power supply cables. Make sure that each connection is secure. Reference your notes from when you removed the old power supply to make sure you are making all connections which were previously in place.
a. Connect the 20+4-pin main power connector to your motherboard.

b. Connect the 8-pin (4+4) or 4-pin +12 V power connectors to your motherboard.

c. Connect all of the following that apply to your computer: i. The 4-pin peripheral device power connector to any peripheral device with a 4-pin connector.

ii. The floppy drive power connector to the floppy drive.

iii. The Serial ATA connector to any devices that have a Serial ATA interface.
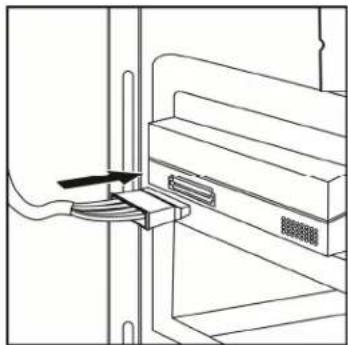
iv. The 6-pin +12V power connector(s) to the PCI-E graphic card(s).

g. Connect your case fans to the regular 4-pin peripheral connectors if you are using these fans.
h. Replace the side panel closing the computer case.
i. Connect the AC power cord to the power supply.
j. Switch the Power on.
Wire Configuration
2. What should the connectors look like?
| 20+4 PIN Main Power connector(1) | EPS12V 4-PIN CPU connector(1) | 4-PIN peripheral connector(3) | Serial ATA connector(4) | 3.25" Floppy drive connector(1) | 6-Pin PCI-E connector(1) |
 |  |  |  | 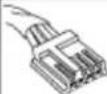 | 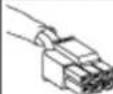 |
| Connect to the motherboard. | Connect to the motherboard for the processor. | Connect to the internal IDE drives. | Connect to the internal SATA drives. | Connect to the 3.25" floppy drive. | Connect to a PCI express card (such as a graphic card) that requires power. |
Hardware Issues
3. Nothing happens when I try to start up my computer.
- Make sure the computer power cable is firmly plugged into the power cord connector on your power supply. This power cable will extend out the back of your computer.
- If you are using a surge protector, make sure that it is plugged in and turned on.
- Make sure all cables are firmly connected. Make sure that all power supply cables to peripheral devices, such as hard drives, optical drives, and fans, are securely connected. Any loose power cable connections may cause the power supply to operate incorrectly.
- Make sure the wall outlet is supplying power. For example, plug a lamp into the outlet and turn it on.
- Make sure the power switch (I/O) on the back of the power supply is set to ON (I).
- Make sure the voltage switch (located on the back of the power supply) is set to the correct voltage setting. The setting for the United States is 115 V. The setting for Europe and other countries is 230 V.
- Make sure that the system board power supply cable is securely connected to the motherboard (24 pin or 20 pin).
- The power supply may be overloaded. Unplug any unnecessary components, such as extra drives, then try again.
- If the power supply is very hot, check the case fans and the power supply fan. Replace any faulty case fans, then try again.
General
4. Where can I get more information about my power supply?
• Refer to your User Guide or the Dynex Website:
http://www.dynexproducts.com/products/computers/DX-400WPS.html
5. Is someone available to install the power supply for me?
- Visit your local Best Buy Geek Squad for assistance or call Geek Squad at 1-800-GEEKSQUAD (1-800-433-5778).
| Date Reason | for Update |
| 6/30/11 | • Initial FAQ |
- DYNEX 400-WATT ATX POWER SUPPLY
- (DX-400WPS)
- SETUP
- HOW DO I SET UP MY POWER SUPPLY
- WIRE CONFIGURATION
- WHAT SHOULD THE CONNECTORS LOOK LIKE
- HARDWARE ISSUES
- NOTHING HAPPENS WHEN I TRY TO START UP MY COMPUTER
- GENERAL
- WHERE CAN I GET MORE INFORMATION ABOUT MY POWER SUPPLY
- IS SOMEONE AVAILABLE TO INSTALL THE POWER SUPPLY FOR ME
Brand : Dynex
Model : DX-400WPS
Category : Computer Adapter