
Pro SaladShooter - Vegetable Cutter Presto - Free user manual and instructions
Find the device manual for free Pro SaladShooter Presto in PDF.


| Brand | Presto |
| Model | Pro SaladShooter |
| Product Type | Electric Slicer-Shredder |
| Power Supply | 120V AC, 60 Hz |
| Polarized Plug | Yes |
| Interchangeable Cones | 4 cones: Thin Slice (grey), Thick Slice, Ripple Cut, Medium Shred |
| Funnel Guide | Included, snap-on |
| Food Guide | Adjustable two-piece food guide |
| Safety Interlock | Prevents operation if food chamber not properly attached |
| Auto Shut-Off | Motor stops if assembly slips off base |
| Material | Plastic housing, stainless steel cutting cones |
| Cleaning | Dishwasher safe (top rack) for all parts except motorized base |
| Storage | Compact, fits in a drawer |
| Warranty | 2-year limited warranty |
| Customer Service | 1-800-877-0441 / contact@GoPresto.com |
| Intended Use | Household only |
Frequently Asked Questions - Pro SaladShooter Presto
User questions about Pro SaladShooter Presto
0 question about this device. Answer the ones you know or ask your own.
Ask a new question about this device
Download the instructions for your Vegetable Cutter in PDF format for free! Find your manual Pro SaladShooter - Presto and take your electronic device back in hand. On this page are published all the documents necessary for the use of your device. Pro SaladShooter by Presto.
USER MANUAL Pro SaladShooter Presto
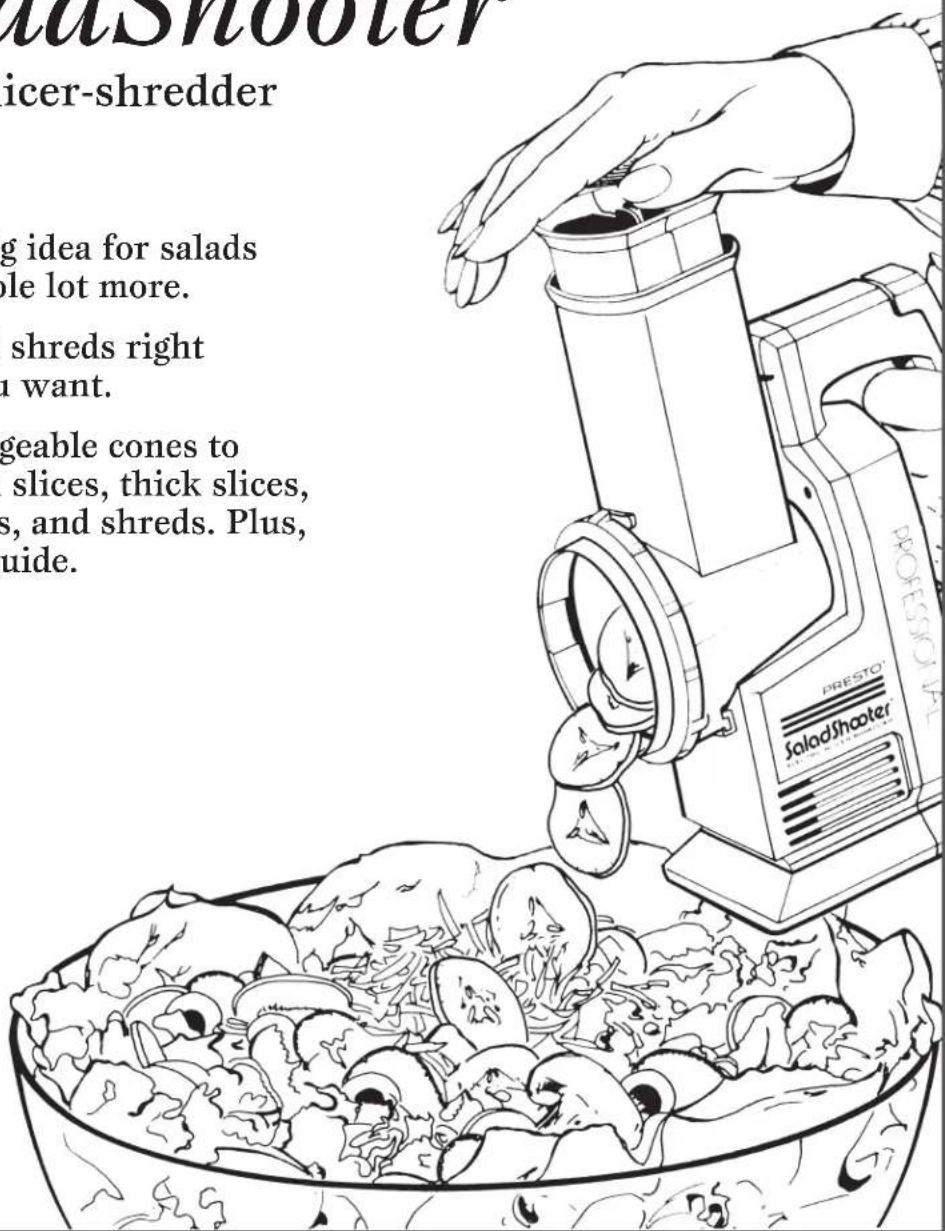
electric slicer-shredder
- A great big idea for salads and a whole lot more.
- Slices and shreds right where you want.
- Interchangeable cones to make thin slices, thick slices, ripple cuts, and shreds. Plus, a funnel guide.

INSTRUCTIONS
Visit us on the web at www.GoPresto.com
This is a listed appliance. The following important safeguards are recommended by most portable appliance manufacturers.
IMPORTANT SAFEGUARDS
To reduce the risk of personal injury or property damage when using electrical appliances, basic safety precautions should always be followed, including the following:
- Read all instructions before using the slicer-shredder.
- To protect against the risk of electrical shock, never put the motorized base, cord or plug in water or other liquids.
- Close supervision is necessary when any appliance is used by or near children.
- Unplug from outlet when not in use, before putting on or taking off parts, and before cleaning.
- Do not operate any appliance with a damaged cord or plug, or in the event the appliance malfunctions, or is dropped or damaged in any manner. Return the appliance to the Presto Factory Service Department (see page 8) or to the nearest Presto Authorized Service Facility for examination, repair, or electrical or mechanical adjustment.
- The use of attachments not recommended or sold by the appliance manufacturer may cause fire, electric shock, or injury.
- Do not use outdoors.
- Do not let cord hang over edge of table or counter or touch hot surfaces.
- Avoid contact with moving parts.
- Never feed the food through the food chamber with your hands, always use the food guide.
- Keep fingers out of the slicing-shredding chute.
- The metal portions of the slicing and shredding cones are sharp. Handle with care.
- Do not use the slicer-shredder for other than intended use.
SAVE THESE INSTRUCTIONS
THIS PRODUCT IS FOR HOUSEHOLD USE ONLY.
IMPORTANT SAFETY INFORMATION
Connect the power supply cord to a polarized outlet only. As a safety feature, this appliance has a polarized plug (one blade is wider than the other). This plug will only fit in a polarized outlet one way. If the plug does not fit fully in the outlet, reverse the plug. If it still does not fit, contact a qualified electrician. Do not attempt to defeat this safety feature.
Getting Acquainted
Before using your Presto ^® Professional SaladShooter ^® electric slicer-shredder, study the diagram below to become familiar with the various parts of the unit and read the instructions carefully.
Before initial use, and after each subsequent use, wash all parts except the motorized base in warm, sudsy water. Wipe the motorized base with a damp cloth to clean. Never immerse the motorized base in water or any other liquid.
Note: For your convenience, the thin slice cone is grey to differentiate it from the thick slice cone.

How To Use
-
Select one of the cones and insert it narrow end first, into the slicing-shredding chute (Fig. A). Then attach the twist-lock ring by turning clockwise until it locks into place (Fig. B). The metal portions of the slicing and shredding cones are sharp. Handle with care.
-
Attach the food chamber assembly to the motorized base by inserting the portion containing the driving end of the slicing or shredding cone into the socket of the motorized base (Fig. C). Then rotate the food chamber assembly clockwise until it is upright and it is centered with the handle. To be sure the food chamber assembly is attached properly, check to see that the interlock bracket is positioned in the bracket slot (Fig. D).


Proper assembly is important. The unit is designed with safety in mind. Thus, the food chamber assembly cannot be removed from the motorized base unless the switch is in the OFF position. Likewise, the motor will not turn on unless the food chamber assembly is attached to the unit, and the motor automatically stops if an incorrectly attached assembly slips off the motorized base during operation. Should the motor stop in the middle of operation, turn the switch to the OFF position. Reassemble, making sure the interlock bracket on the bottom of the slicing-shredding chute is positioned in the bracket slot on the motorized base before using the unit again.
- The adjustable food guide adapts to small or large loads. For small loads, you will need to separate the two-piece food guide. With the food guide placed in the food chamber, pull the lock tab on the food guide away from the handle and slide the portion of the food guide closest to the handle (this is the portion without the lock tab) up and out of the food chamber (Fig. E). Now place the food you would like processed in the portion of the food chamber closest to the handle (Fig. F). The food should not extend above the top of the food chamber. Use the part of the food guide that you removed earlier to push the food through the unit during processing (Fig. G). Make sure the portion of the food guide with the lock tab remains in the food chamber when processing small loads.
For large loads, fill the entire food chamber and use both pieces of the adjustable food guide to slowly push the food through the unit during processing.
-
For best slicing and shredding results, it is important that the food be prepared properly and placed in the food chamber as follows:
-
Cut food so that it will fit easily and loosely into the food chamber. For small loads, use the adjustable food guide as instructed in step 3. Food that does not fit loosely in the food chamber may become wedged in the food chamber and therefore will not discharge properly. If it is too large to fit loosely in the food chamber, cut it into smaller pieces.
■ Stack food into the food chamber upright for short slices or horizontally for longer slices (Fig. H).
■ Push food through the food chamber using an even pressure on the food guide. -
If you are going to slice or shred into a small bowl or onto a small area, you may want to use the funnel guide attachment. It directs foods right where you want them. The attachment simply snaps onto the twist-lock ring (Fig. I). When using the slicer-shredder with the funnel guide attached, hold the unit so that the open end of the funnel is over the spot you wish to shoot the ingredients.
If moist ingredients, such as lettuce and carrots, do not readily come out of the funnel during processing, shake the unit slightly.
When using the funnel guide with the slicing cones, be sure the diameter of the sliced food is less than the diameter of the small end of the funnel.
- Plug cord into a polarized outlet, and begin slicing or shredding. Use the fingertip power switch to turn the unit on and off.
Caution: To avoid personal injury, never use your hands to push food through the food chamber. Always use the food guide and always keep your hands away from the slicing-shredding chute when the slicer-shredder is running.


natural_image
Diagram of a mechanical component with internal cavities and a labeled section 'Fig. F' (no text or symbols on the diagram itself)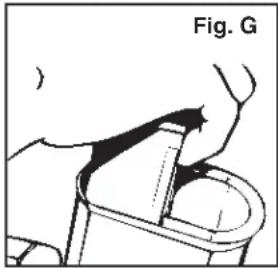
natural_image
Diagram of a hand operating a mechanical device with a curved handle (no text or symbols)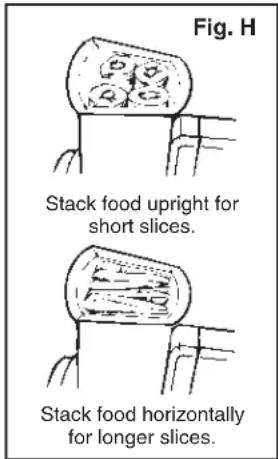

Use Guide for the Slicing and Shredding Cones:
Insert the slicing or shredding cone in the food chamber as instructed in the “How To Use” section on page 3. The metal portions of the cutting cones are sharp; handle with care. Note: The funnel guide attachment may be used for the functions below for directing foods right where you want them. Follow the instructions on page 4, step 5.
| Suggested Foods: | Color | Medium Shred Cone(White) | Thick Slice Cone(White) | Thin Slice Cone(Grey) | Ripple Cut Cone(White) |
| Fruits | |||||
| Apples | √ | √ | √ | √ | |
| Bananas | √ | √ | |||
| Coconut | √ | ||||
| Kiwi | √ | √ | |||
| Maraschino Cherries | √ | ||||
| Nectarines | √ | √ | √ | √ | |
| Peaches | √ | √ | √ | ||
| Pears | √ | √ | √ | ||
| Strawberries | √ | √ | |||
| Vegetables | |||||
| Cabbage | √ | √ | √ | √ | |
| Carrots | √ | √ | √ | √ | |
| Celery | √ | √ | √ | ||
| Chili Peppers | √ | √ | √ | √ | |
| Cucumbers | √ | √ | √ | √ | |
| Green Peppers | √ | √ | √ | ||
| Lettuce | √ | √ | |||
| Mushrooms | √ | √ | √ | ||
| Onions | √ | √ | √ | ||
| Potatoes | √ | √ | √ | √ | |
| Radishes | √ | √ | √ | √ | |
| Sweet Potatoes | √ | √ | √ | √ | |
| Turnips | √ | √ | √ | √ | |
| Zucchini | √ | √ | √ | √ | |
| Other Foods | |||||
| Bread | √ | ||||
| Cheese | √ | ||||
| Chocolate | √ | ||||
| Cookies | √ | ||||
| Crackers | √ | ||||
| Hard-Cooked Eggs | √ | ||||
| Nuts | √ | √ | √ | √ | |
| Olives | √ | √ | √ | √ | |
| Pickles | √ | √ | √ | √ | |
Suggested Uses
Make delicious, healthful salads using your own fresh, hand-selected vegetables for guaranteed goodness.
- Create beautiful fruit salads with thick and ripple slices of bananas, apples, peaches, nectarines and more.
✿ Turn an ordinary frozen pizza into a gourmet delight by adding your own fresh cheese, peppers, mushrooms, olives, onions, etc.
- Create spectacular vegetable trays with ripple sliced carrots, kohlrabi, radishes, and zucchini.
Make luscious pies and tortes with thick and ripple slices of apples, peaches, strawberries, and kiwi.
For perfect stir fry, use thin slices of carrots, mushrooms, and zucchini.
Chop nuts for baking or garnishing a dessert. Crumb crackers for pie crusts or make bread crumbs for casserole toppings. Use the funnel guide to direct them right where you want them.
For terrific tacos, taco salads, and pita sandwiches, use the thick slice cone to shred fresh lettuce.
Use the funnel guide to decorate a cream topped pie, a fluffy icing cake, or even a cupcake with shredded baking chocolate.
Make delicious, creamy coleslaw by shredding fresh cabbage and carrots. The cabbage can be shredded using the thick slice cone or the medium shred cone depending on the texture you prefer.
Shred potatoes for nutritious hash browns or potato pancakes. Use the ripple cut cone for delicious American fries or use the thin slice cone and make homemade potato chips.
Make deviled eggs, sandwich spreads, and salad toppings by shredding hard cooked eggs.
Make sensational sweet potato chips with thin slices of sweet potatoes and deep fry or microwave.
◆ Dry slices of fruits or vegetables in a home food dehydrator.
Helpful Hints
All food slices and shreds better when it is fresh and firm.
✿ Semi-soft cheeses should be refrigerated overnight or placed in the freezer for approximately 30 minutes before shredding. Hard cheeses should be at room temperature. All unprocessed cheeses can be shredded successfully with this unit. It is not recommended that you use soft or processed cheese as it may clog the unit.
Use light pressure on the food guide for thinner slices and shreds, and firm pressure for thicker slices and shreds.
Certain soft fruits such as strawberries and kiwi should be firm, not over ripe to slice. These types of fruits can also be placed in a freezer for a few minutes before slicing. Certain fruits with tough skins such as apples should be peeled before slicing or shredding.
Some foods can be double processed, for instance you can shred carrots and run them through again for grated carrots. Cheese can be shredded twice for grated cheese.
Place the food upright in the food chamber until it is full and apply pressure evenly with the food guide. Failure to properly load the food chamber or to apply even pressure, may result in the food falling over in the food chamber which will result in uneven slices and shreds.
Do not be concerned if bits of food remain on top of the slicing-shredding cone after you have completed slicing or shredding. This is normal.
The unit is not designed to shred onions, slice cheese or chocolate, or process meats and tomatoes.
To avoid personal injury or damage to the unit, do not attempt to slice foods that are too hard to be cut with an ordinary knife. This slicer-shredder was not designed to chop ice or grind coffee beans. You may damage the unit.
Questions & Answers
Occasionally my slicer-shredder will not turn on, or the ON-OFF switch works intermittently. Why is this?
Most likely the food chamber assembly is not attached properly to the motorized base. The ON-OFF switch is designed to work only when the food chamber is centered with the handle on the motorized base. Either the ON-OFF latch on the motorized base is not positioned directly between the two tabs on the food chamber, Fig. J, or the interlock bracket on the bottom of the slicing chute is not positioned in the bracket slot on the motorized base, (Fig K). Should the ON-OFF switch operate intermittently, check the position of the food chamber. Realign it so it is centered properly.


Sometimes I have trouble disengaging the food chamber assembly from the motorized base? What am I doing wrong?
You probably forgot to turn the unit off. The unit is designed with a safety switch feature which prevents the food chamber from being removed when the switch is in the ON position.
How come I sometimes have to use a lot of pressure to get food out of the slicing-shredding chute or no food comes out at all?
Any of the following may be occurring:
- You have packed the food chamber too tightly. Foods should fit loosely in the food chamber. Leafy vegetables, such as cabbage and lettuce should be cut into chunks the size of the food chamber.
- The food is not fresh and firm. All food slices and shreds better when it is fresh and firm.
- Pieces of the fruit or vegetable may have wrapped around the cutting cone during processing or may have become wedged in the cutting cones preventing food from coming out. If this occurs, simply disconnect the unit from the outlet, remove the cutting cone, and clean out the buildup of food.
- You may be slicing or shredding a hard vegetable, such as a sweet potato or shredding cheese. Cheese and hard vegetables may require more pressure on the food guide. Sometimes when slicing or shredding hard vegetables or when shredding cheese, the motor may sound as if it is laboring. This is normal.
Care and Cleaning
Before using for the first time and after each use, your slicer-shredder should be cleaned thoroughly. All parts, except the motorized base, are completely immersible and dishwasher safe. Wash these parts in warm, sudsy water, rinse and dry. If washing in the dishwasher, use the top rack or the rack farthest away from the heating element. Be sure the parts are positioned so they will not fall through the rack. The motorized base may be cleaned with a damp cloth. When removing the food chamber from the motorized base, be sure the power switch is off and the unit is unplugged (the food chamber cannot be removed with the switch in the ON position).
Never immerse the motorized base in water or any other liquid.
Note: Plastic parts may become stained after processing certain foods such as carrots. Should the unit become stained, clean with a mild abrasive cleaner.
The unit can be easily stored in a small space such as a drawer.
Consumer Service Information
If you have any questions regarding the operation of your Presto ^® appliance or need parts for your appliance, call our Consumer Service Department weekdays 8:00 AM to 4:30 PM (Central Time) at 1-800-877-0441 or write:
NATIONAL PRESTO INDUSTRIES, INC.
Consumer Service Department
3925 North Hastings Way
Eau Claire, Wl 54703-3703
You may also email your inquiries to contact@GoPresto.com. Inquiries will be answered promptly by telephone, letter, or email. When writing, please include a phone number and a time when you can be reached during weekdays if possible.
Any maintenance required for this product, other than normal household care and cleaning should be performed by our Factory Service Department or any Presto Authorized Service Station. Be sure to indicate date of purchase and a description of defect when sending an appliance for repair. Send appliances for repair to:
CANTON SALES AND STORAGE COMPANY
Presto Factory Service Department
555 Matthews Drive
Canton, MS 39046-0529
Appliances may also be repaired at any Presto Authorized Service Station. Check your yellow pages for Service Stations near you.
The Presto Factory Service Department and Presto Authorized Service Stations are equipped to service all PRESTO ^® appliances and supply genuine PRESTO ^® parts. Genuine PRESTO ^® replacement parts are manufactured to the same exacting quality standards as PRESTO ^® appliances and are engineered specifically to function properly with its appliances. Presto can only guarantee the quality and performance of genuine PRESTO ^® parts. “Look-alikes” might not be of the same quality or function in the same manner. To ensure that you are buying genuine PRESTO ^® replacement parts, look for the PRESTO ^® trademark.
PRESTO® Limited Warranty
This quality PRESTO ^® appliance is designed and built to provide many years of satisfactory performance under normal household use. Presto pledges to the original owner that should there be any defects in material or workmanship during the first two years after purchase, we will repair or replace it at our option. Our pledge does not apply to damage caused by shipping. To obtain service under the warranty, return this PRESTO ^® appliance, shipping prepaid, to the Presto Factory Service Department or to the nearest Presto Authorized Service Station. When returning a product, please include a description of the defect and indicate the date the appliance was purchased.
We want you to obtain maximum enjoyment from using this PRESTO® appliance and ask that you read and follow the instructions enclosed. Failure to follow instructions, damage caused by improper replacement parts, abuse or misuse will void this pledge. This warranty gives you specific legal rights, and you may also have other rights which vary from state to state. This is Presto's personal pledge to you and is being made in place of all other express warranties.
NATIONAL PRESTO INDUSTRIES, INC.
Eau Claire, WI 54703-3703
- INSTRUCTIONS
- IMPORTANT SAFEGUARDS
- SAVE THESE INSTRUCTIONS
- IMPORTANT SAFETY INFORMATION
- Getting Acquainted
- How To Use
- Use Guide for the Slicing and Shredding Cones:
- Suggested Uses
- Helpful Hints
- Questions & Answers
- Care and Cleaning
- Consumer Service Information
- NATIONAL PRESTO INDUSTRIES, INC.
- CANTON SALES AND STORAGE COMPANY
- PRESTO® Limited Warranty
Brand : Presto
Model : Pro SaladShooter
Category : Vegetable Cutter