12201570 - Barbecue Char-Broil - Free user manual and instructions
Find the device manual for free 12201570 Char-Broil in PDF.


| Product Type | Gas Barbecue Grill |
| Brand | Char-Broil |
| Model | 12201570 |
| Overall Dimensions (L x W x H) | 48 x 24 x 45 inches (approx.) |
| Cooking Surface Area | 450 sq. in. (approx.) |
| Primary Burner Output | 30,000 BTU (approx.) |
| Number of Burners | 3 (approx.) |
| Fuel Type | Liquid Propane (LP) |
| Ignition Type | Electronic Push-Button Ignition |
| Material | Steel body with porcelain-coated lid |
| Weight | 75 lbs (approx.) |
| Assembly Required | Yes |
| Warming Rack | Yes |
| Side Shelf | Yes, folding side shelf |
| Storage Cabinet | Yes, enclosed cabinet with doors |
| Wheel Size | 6-inch wheels (approx.) |
| Cleaning | Brush grates after each use; empty grease tray regularly |
| Safety Features | Gas shut-off valve, stable base, Lid stays open |
| Replacement Parts Available | Yes, via Char-Broil customer service |
| Warranty | Limited lifetime warranty on lid, 5 years on firebox, 2 years on other parts |
Frequently Asked Questions - 12201570 Char-Broil
User questions about 12201570 Char-Broil
0 question about this device. Answer the ones you know or ask your own.
Ask a new question about this device
Download the instructions for your Barbecue in PDF format for free! Find your manual 12201570 - Char-Broil and take your electronic device back in hand. On this page are published all the documents necessary for the use of your device. 12201570 by Char-Broil.
USER MANUAL 12201570 Char-Broil
Smoker, BBQ and Grill
Product Guide
Model 12201570
Tools needed for assembly:
Phillips Screwdriver
Flat Head Screwdriver
Two adjustable wrenches
Hammer
IMPORTANT: Fill out the product record information below.
Date Purchased
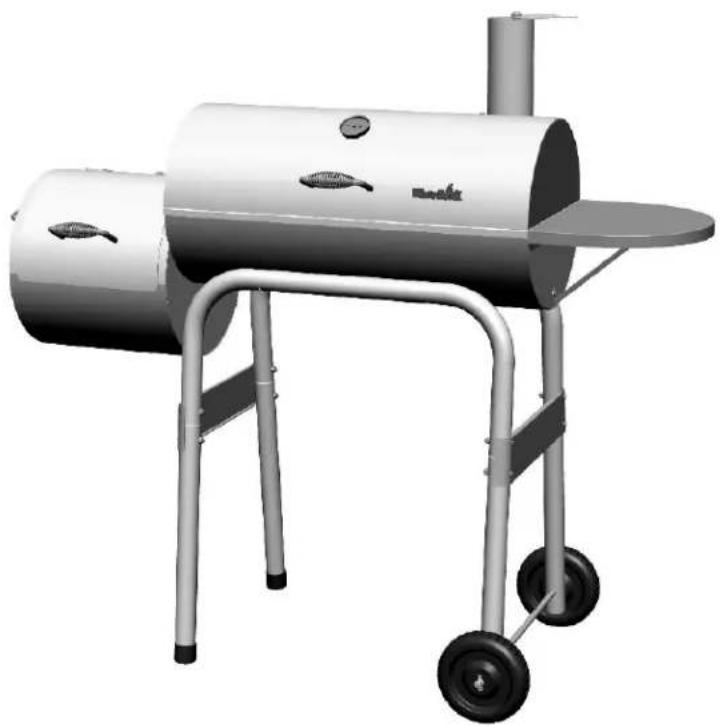
natural_image
3D rendering of a portable grill with fish-shaped cutout and wheels (no text or symbols visible)FOR OUTDOOR USE ONLY

CAUTION:
Read and follow all safety statements, assembly instructions, and use and care directions before attempting to assemble and cook.
INSTALLER/ASSEMBLER:
Leave this manual with consumer.
CONSUMER:
Keep this manual for future reference.

WARNING:
CARBON MONOXIDE HAZARD
Burning charcoal inside can kill you. It gives off carbon monoxide, which has no odor. NEVER burn charcoal inside homes, vehicles, or tents.

WARNING:
Failure to follow all manufacturer's instructions could result in serious personal injury and/or property damage.

CAUTION:
Some parts may contain sharp edges – especially as noted in the manual! Wear protective gloves if necessary.

CAUTION:
THIS UNIT IS HEAVY! DO NOT attempt to assemble without a helper.
TABLE OF CONTENTS
Product Record Information .... 1
Safety Symbols....2
Preparing to use your Grill 3
Smoker Maintenance 3
Cooking Tips 4-5
Limited Warranty....6
Parts List/ Parts Diagram 7
Assembly 8-13
Hardware List 14
Registration Card 16
This instruction manual contains important information necessary for the proper assembly and safe use of the appliance.
Follow all warnings and instructions when using the appliance.
Safety Symbols
The symbols and boxes shown below explain what each heading means. Read and follow all of the messages found throughout the manual.

DANGER

DANGER: Indicates an imminently hazardous situation which, if not avoided, will result in death or serious injury.

WARNING

WARNING: Indicates a potentially hazardous situation which, if not avoided, could result in death or serious injury.

CAUTION

CAUTION: Indicates a potentially hazardous situation or unsafe practice which, if not avoided, may result in minor or moderate injury.

WARNING

FAILURE TO READ AND FOLLOW INSTRUCTIONS FOR LIGHTING CHARCOAL MAY RESULT IN SERIOUS PERSONAL INJURY AND OR PROPERTY DAMAGE.

WARNING

Most surfaces on this unit are hot when in use. Use extreme caution. Keep others away from unit. Always wear protective clothing to prevent injury.
Keep children and pets away.
Do not move this unit during operation.
Never substitute gasoline, kerosene or alcohol for charcoal starter. In some states, the use of charcoal starter is prohibited by law. In this case, paraffin-based starter cubes can be substituted for charcoal starter. Never use charcoal starter fluid with an electric starter.

WARNING

CALIFORNIA PROPOSITION 65
- Combustible by-products produced when using this product contains chemicals known to the State of California to cause cancer, birth defects, or other reproductive harm.
- This product contains chemicals, including lead and lead compounds, known to the State of California to cause cancer, birth defects or other reproductive harm.
Wash your hands after handling this product.

WARNING

All surfaces can be hot during use. Use protection as required to prevent burning.
Do not use this unit on or near combustible surfaces or structures such as wood decks, dry leaves or grass, vinyl or wood siding, etc.
SEE OWNERS MANUAL FOR IMPORTANT SAFETY INFORMATION.

CAUTION

For residential use only. Do not use for commercial cooking.
Preparing and Using Your American Gourmet Smoker
Before cooking with your American Gourmet Smoker, the following steps should be closely followed to both cure the finish and season the interior steel. Failure to properly follow these steps may damage the finish and/or impart metallic flavors to your first foods.
- Brush all interior surfaces including grills and grates with vegetable cooking oil.
- Build a small fire on the fire grate, being sure not to lay coals against the walls.
- Close door. (Position butterfly damper and smokestack damper approximately at one quarter open.) This burn should be sustained for at least two hours, the longer the better. Then, begin increasing temperature by opening the butterfly damper and smokestack damper half-way and adding more charcoal. Your American Gourmet Smoker is now ready for use.
Rust can appear on the inside of your smoker. Maintaining a light coat of vegetable oil on interior surfaces will aid in the protection of your unit. Exterior surfaces of smoker may need occasional touch up. We recommend the use of a commercially available black high temperature spray paint. NEVER PAINT THE INTERIOR OF THE UNIT!
GRILLING
Wood is recommended, however charcoal or a combination of both may be used as the fuel source for grilling, with the fuel source placed and ignited on the fire grate. Do not build too large of a fire. We recommend starting a fire with no more than 2 pounds of charcoal (approximately 20 briquettes). After allowing the fire to burn down, place the cooking grates in the smoker. Failure to read and follow instructions for lighting charcoal may result in serious personal injury and/or property damage.
SMOKING AND SLOW COOKING
If using the American Gourmet Smoker as a smoker or slow cooker, remove the cooking grill from the firebox and build your fire on top of the fire grate in the firebox. Either charcoal or wood may be used, but wood is the recommended fuel for it's rate of burn and the flavor it imparts to the food being cooked. Most seasoned hardwoods are good for smoking such as hickory, mesquite, pecan, oak, and many other fruit woods. The firebox will accommodate most split fireplace size logs (16"). Bark should be avoided or burned off first as it contains a high acid content and imparts an acrid flavor.
After allowing the fire to burn down, close the doors and control the temperature and smoke with the dampers located on the firebox and atop the smokestack. Smoke is contained within the chambers, which will reduce burn while imparting more smoke flavor. Do not operate the Smoker with temperatures exceeding 450 degrees in the smoker chamber. Place the food in the smoker chamber and monitor the temperature. Cooking and smoking are taking place using indirect heat. There is no need to worry about a grease fire flare-up ruining the food. Do not place food within 6" of the opening from the firebox into the smoker chamber. A general rule of thumb for cooking is about 1 hour per pound for smoking large cuts of meat. Refer to a cook book for specific cuts of meats. Limit the number of times you open the smoker chamber door as this will allow heat to escape and extend the cooking time.
Grilling with Wood Chips/Wood Chunks
For a more robust smoke flavor while using charcoal briquettes or lump charcoal, try adding wood chips or several wood chunks to the fire. Wood chunks are available in a variety of natural flavors, and can be used alone or in addition to charcoal. As a general rule, any hardwood that bears a fruit or nut is suitable for cooking. However, different woods have very different tastes. Experiment with different woods to determine your personal favorite, and always use well-seasoned wood. Green or fresh-cut wood can turn food black, and tastes bitter.
Our Recommendations:
Chicken - Alder, Apple, Hickory, Mesquite, Sassafras
Beef - Hickory, Mesquite, Oak, Grapevines
Pork - Fruitwoods, Hickory, Oak, Sassafras
Lamb - Fruitwoods, Mesquite
Veal - Fruitwoods, Grapevines
Seafood - Alder, Mesquite, Sassafras, Grapevines
Vegetables – Mesquite
| USDA RecommendedInternal Cooking Temperatures | |
| Ground Meat | |
| Beef, Pork, Veal, Lamb....160°F | |
| Turkey, Chicken....165°F | |
| Fresh Beef, Veal, Lamb | |
| Medium Rare....145°F(let stand 3 minutes before cutting) | |
| Medium....160°F | |
| Well Done....170°F | |
| Poultry | |
| Chicken & Turkey, whole....165°F | |
| Poultry Parts....165°F | |
| Duck & Goose....165°F | |
| Fresh Pork | |
| Medium Rare....145°F(let stand 3 minutes before cutting) | |
| Medium....160°F | |
| Well Done....170°F |
COOKING TIPS
Building Your Fire
1.) Stack charcoal briquettes or wood into a pyramid-shaped pile on top of the charcoal grate or ash pan. We recommend using 2 pounds (approximately 20 briquettes) to start your fire.
2.) If using lighter fluid, saturate the charcoal briquettes with lighter fluid and let it soak in for approximately 5 minutes. If using a chimney starter, electric starter, or other type of fire starter, light your fire according to the manufacturer's instructions.
3.) After allowing the lighter fluid to properly soak in, light the pile of briquettes in several locations to ensure an even burn. Always light the fire with the grill lid open.
Leave lid open until briquettes are fully lit. Failure to do this could trap fumes from charcoal lighter fluid in grill and may result in a flash fire when lid is opened.
4.) Never add charcoal lighter fluid to hot or warm coals as flashbacks may occur causing injury.
5.) You are ready to begin cooking when the pile of briquettes ashes over and produces a red glow (approximately 12 - 15 minutes).
6.) Depending on your cooking method, either leave the briquettes in a pile or spread evenly across the charcoal grate using a long-handled poker.
*Always use caution when handling hot coals to prevent injury.
Know When Your Fire is Ready
Successful charcoal grilling depends on a good fire. The general rule for knowing when your coals are ready for grilling is to make sure that 80 percent or more of the coals are ashy gray. If you have less than that, the coals are not ready, and if all of them are glowing red hot, the fire is probably too hot. Here are a few steps you can take to adjust the temperature of your fire:
- If it is too hot, spread the coals out a bit more, which makes the fire less intense.
- Raise or lower the adjustable charcoal grate.
- Partially close the vents in the grill, which reduces the amount of oxygen that feeds the fire.
- Use the indirect grilling method, with coals to either side of a drip pan and the food over the pan rather than directly over the coals.
- In the event of a severe flare-up, spray the flames with water from a squirt bottle. Be careful, spraying with water tends to blow ashes around and make a mess.
- Add briquettes 2 or 3 at a time to increase the burn time. Allow 10 minutes for coals to ash over before adding more.
| THE HEAT OF THE COALS | |
| seconds you canhold the palm ofyour hand 4 inchesabove the coals temperature range ( F^p ) visual cues | |
| HOT COALS 2 400 to 450 barely covered withMODERATELY HOT TO HOT COALS3375 to 450 thin coating of grayMODERATELY HOT COALS 4 325 to 375 significant coating ofMODERATELY COOL COALS 5 300 to 325 thick coating of gray | gray ash; deep red glowash; deep red glowgray ash; red glowash; dull red glow |
GRILL MAINTENANCE
Frequency of cleanup is determined by how much your smoker is used. Make sure coals are completely extinguished before cleaning inside of smoker. Inside surfaces may be cleaned with a strong solution of detergent and water applied with a scrub brush. Thoroughly rinse with water and allow to air dry before using again.
If a bristle brush is used to clean any of the grill cooking surfaces, ensure no loose bristles remain on cooking surfaces prior to grilling. It is not recommended to clean cooking surfaces while grill is hot.
HELPFUL HINTS
- If food seems to be getting too smoky or brown before the cooking time is finished, cover it loosely with heavy duty aluminum foil.
- Remove the ash after each use.
• Covered side dishes can be warmed in smoker chamber.
•To prevent flare-ups, brush meat lightly with oil before grilling. - Keep a small squirt bottle of water handy for grilling flare-ups.
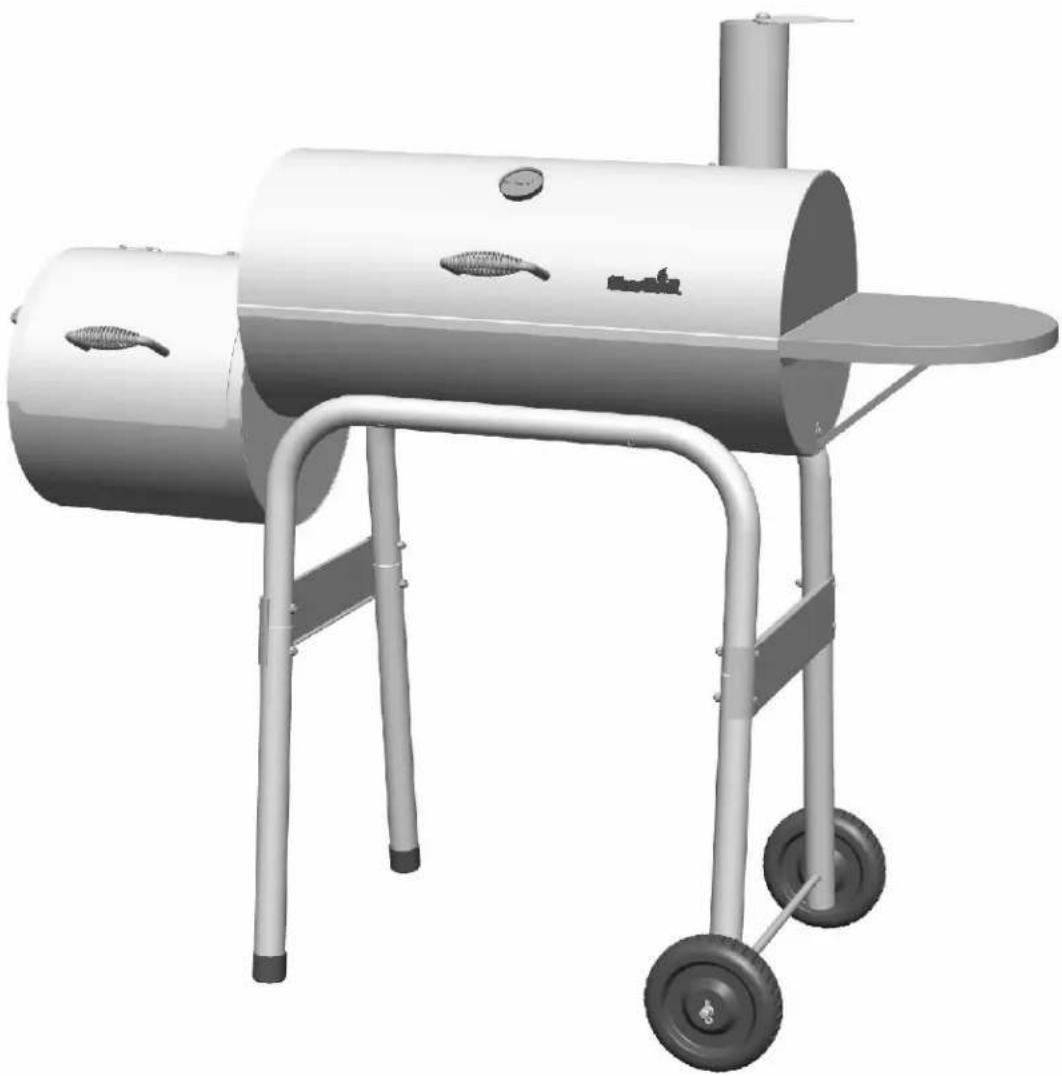
natural_image
3D rendering of a simple outdoor grill with fish and a small boat on top (no text or symbols visible)LIMITED WARRANTY
This warranty only applies to units purchased from an authorized retailer. Manufacturer warrants to the original consumer-purchaser only that this product shall be free from defects in workmanship and materials after correct assembly and under normal and reasonable home use for the periods indicated below beginning on the date of purchase*. The manufacturer reserves the right to require that defective parts be returned, postage and or freight pre-paid by the consumer for review and examination.
SCOPE OF COVERAGE PERIOD OF COVERAGE TYPE OF FAILURE COVERAGE
| All Parts | 90 days from date of purchase* | PERFORATION, MANUFACTURING, AND MATERIAL DEFECTS ONLY |
*Note: A dated sales receipt WILL be required for warranty service.
The original consumer-purchaser will be responsible for all shipping charges for parts replaced under the terms of this limited warranty.
This limited warranty is applicable in the United States and Canada only, is only available to the original owner of the product and is not transferable. Manufacturer requires proof of your date of purchase. Therefore, you should retain your sales slip or invoice. Registering your product is not a substitute for proof of purchase and the manufacturer is not responsible for or required to retain proof of purchase records.
This limited warranty applies to the functionality of the product ONLY and does not cover cosmetic issues such as scratches, dents, corrosions or discoloring by heat, abrasive and chemical cleaners or any tools used in the assembly or installation of the appliance, surface rust, or the discoloration of stainless steel surfaces. RUST is not considered a manufacturing or materials defect.
This limited warranty will not reimburse you for the cost of any inconvenience, food, personal injury or property damage.
ITEMS MANUFACTURER WILL NOT PAY FOR:
- Shipping cost, standard or expedited, for warranty and replacement parts
- Service calls to your home.
- Repairs when your product is used for other than normal, single-family household or residential use.
- Damage, failures, or operating difficulties resulting from accident, alteration, careless handling, misuse, abuse, fire, flood, acts of God, improper installation or maintenance, installation not in accordance with electrical or plumbing codes, or use of products not approved by the manufacturer.
- Any food loss due to product failures or operating difficulties.
- Replacement parts or repair labor costs for units operated outside the United States or Canada.
- Pickup and delivery of your product.
- Repairs to parts or systems resulting from unauthorized modifications made to the product.
- The removal and/or reinstallation of your product.
DISCLAIMER OF IMPLIED WARRANTIES and LIMITATION OF REMEDIES
Repair or replacement of defective parts is your exclusive remedy under the terms of this limited warranty. In the event of parts availability issues, the manufacturer reserves the right to substitute like or similar parts that are equally functional.
Manufacturer will not be responsible for any consequential or incidental damages arising from the breach of either this limited warranty or any applicable implied warranty, or for failure or damage resulting from acts of God, improper care and maintenance, grease fire, accident, alteration, replacement of parts by anyone other than Manufacturer, misuse, transportation, commercial use, abuse, hostile environments (inclement weather, acts of nature, animal tampering), improper installation or installation not in accordance with local codes or printed manufacturer instructions.
THIS LIMITED WARRANTY IS THE SOLE EXPRESS WARRANTY GIVEN BY THE MANUFACTURER. NO PRODUCT PERFORMANCE SPECIFICATION OR DESCRIPTION WHEREVER APPEARING IS WARRANTED BY MANUFACTURER EXCEPT TO THE EXTENT SET FORTH IN THIS LIMITED WARRANTY. ANY IMPLIED WARRANTY PROTECTION ARISING UNDER THE LAWS OF ANY STATE, INCLUDING IMPLIED WARRANTY OF MERCHANTABILITY OR FITNESS FOR A PARTICULAR PURPOSE OR USE, IS HEREBY LIMITED IN DURATION TO THE DURATION OF THIS LIMITED WARRANTY.
Neither dealers nor the retail establishment selling this product has any authority to make any additional warranties or to promise remedies in addition to or inconsistent with those stated above. Manufacturer's maximum liability, in any event, shall not exceed the purchase price of the product paid by the original consumer.
NOTE: Some states do not allow an exclusion or limitation of incidental or consequential damages, so some of the above limitations or exclusions may not apply to you. This limited warranty gives you specific legal rights as set forth herein. You may also have other rights which vary from state to state. In the state of California only, if refinishing or replacement of the product is not commercially practicable, the retailer selling this product or the Manufacturer will refund the purchase price paid for the product, less the amount directly attributable to use by the original consumer-purchaser prior to discovery of the nonconformity. In addition, in the state of California only, you may take the product to the retail establishment selling this product in order to obtain performance under this limited warranty.
If you wish to obtain performance of any obligation under this limited warranty, you should
write to:
Consumer Relations
P.O.Box 1240
Columbus, GA 31902-1240
Consumer returns will not be accepted unless a valid Return Authorization is first acquired. Authorized returns are clearly marked on the outside of the package with an RA number and the package is shipped freight/postage pre-paid. Consumer returns that do not meet these standards will be refused.
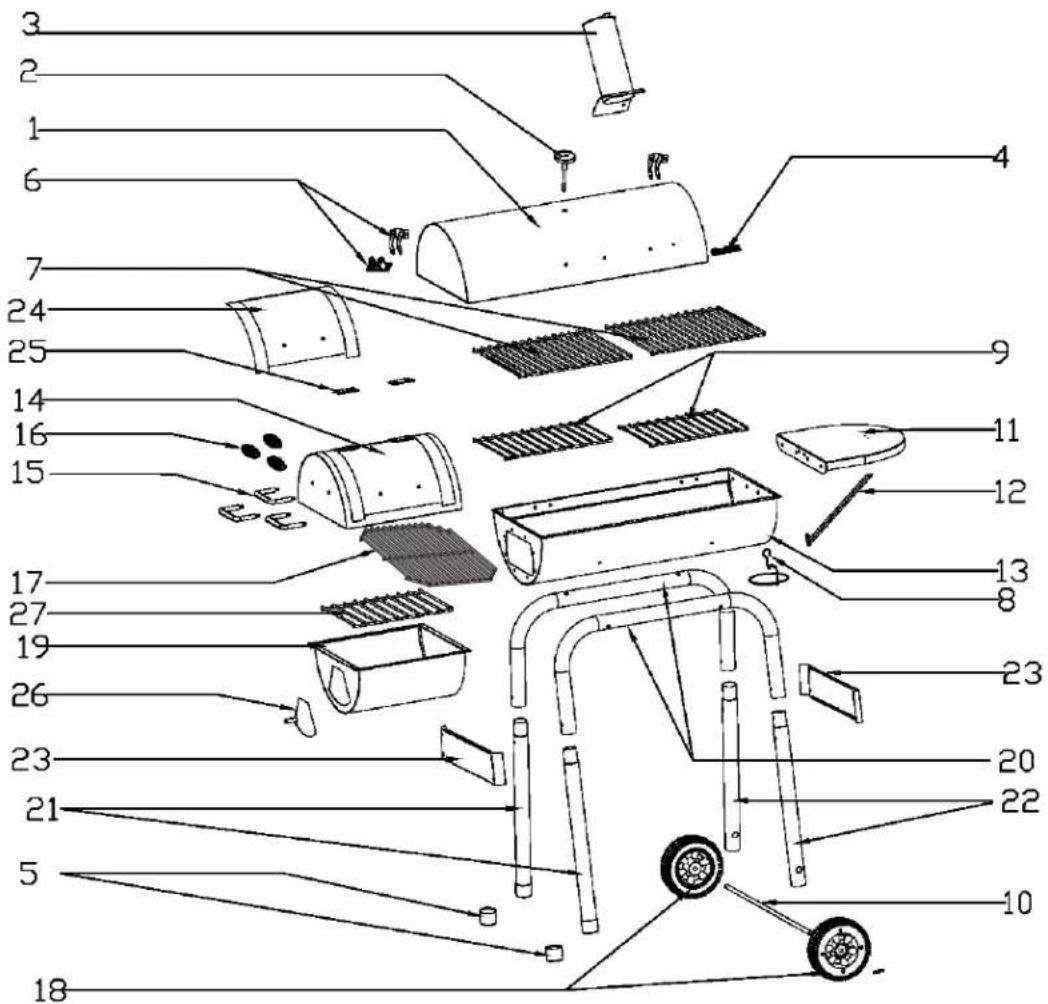
PARTS LIST
| Key | Qty | Description Key Qty Description |
| 1 1 | SMOKER CHAMBER LID ASSEMBLY 14 1 FIREBOX | LID |
| 2 1 | TEMPERATURE GAUGE WITH WINGNUT 15 3 | HANDLE ROD |
| 3 1 | SMOKE STACK ASSEMBLY 16 3 HANDLE BARREL | SPRING |
| 4 1 | LOGO PLATE KIT 17 1 FIREBOX COOK GRATE | |
| 5 2 | END CAP F/ LEGS | 18 2 WHEEL |
| 6 2 | HINGE KIT | 19 1 FIREBOX BOTTOM |
| 7 2 | SMOKER CHAMBER COOK GRATE | 20 2 LEG SUPPORT TUBE |
| 8 1 | GREASE CUP CLIP | 21 2 LEG, LONG |
| 9 2 | FIRE GRATE, LARGE | 22 2 LEG, SHORT |
| 10 | AXLE | 23 2 LEG BRACE |
| 11 | SIDE SHELF ASSEMBLY | 24 1 FIREBOX DOOR |
| 12 | SHELF SUPPORT | 25 2 HINGE F/ FIREBOX DOOR |
| 13 | SMOKER CHAMBER BOTTOM | 26 1 DAMPER DOOR |
| 27 1 FIRE BOX GRATE, SMALL | ||
NOT Pictured
| ... | 1 HARDWARE PACK |
| ... | 1 ASSEMBLY MANUAL, ENGLISH |
| ... | 1 ASSEMBLY MANUAL, FRENCH |
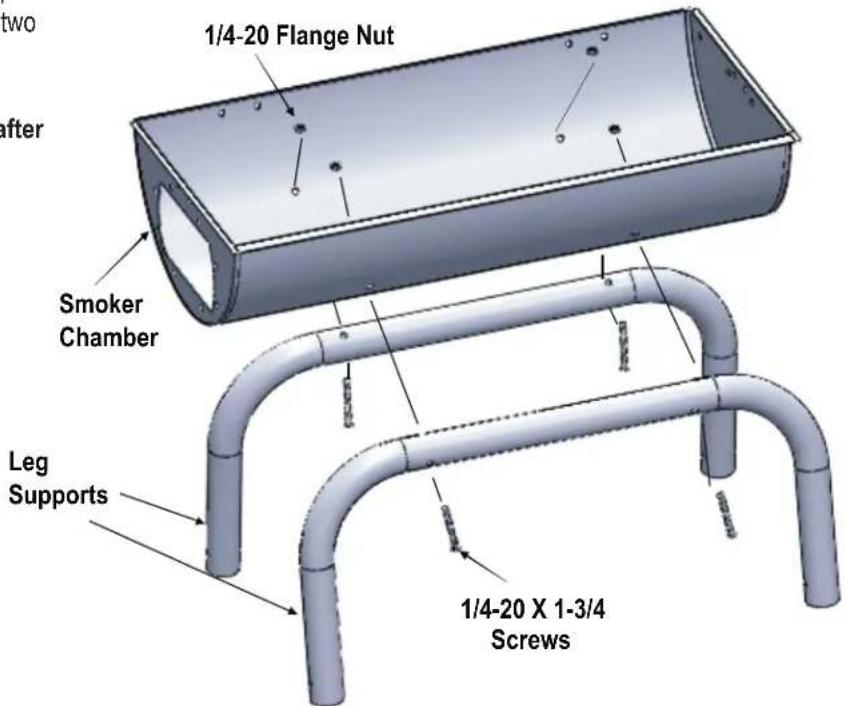
ASSEMBLY
FIRST, GET A HELPER! This unit is heavy and requires a second person for lifting and moving. NEXT, pick a suitable location to work. Open the carton and slit the corners so that the carton lays flat. This will give you a protective surface during assembly.
- Attach leg supports to smoker chamber using two 1/4-20 X 1-3/4" screws and two 1/4-20 flange nuts on each side.
Finger tighten screws and nuts until after next step.
2
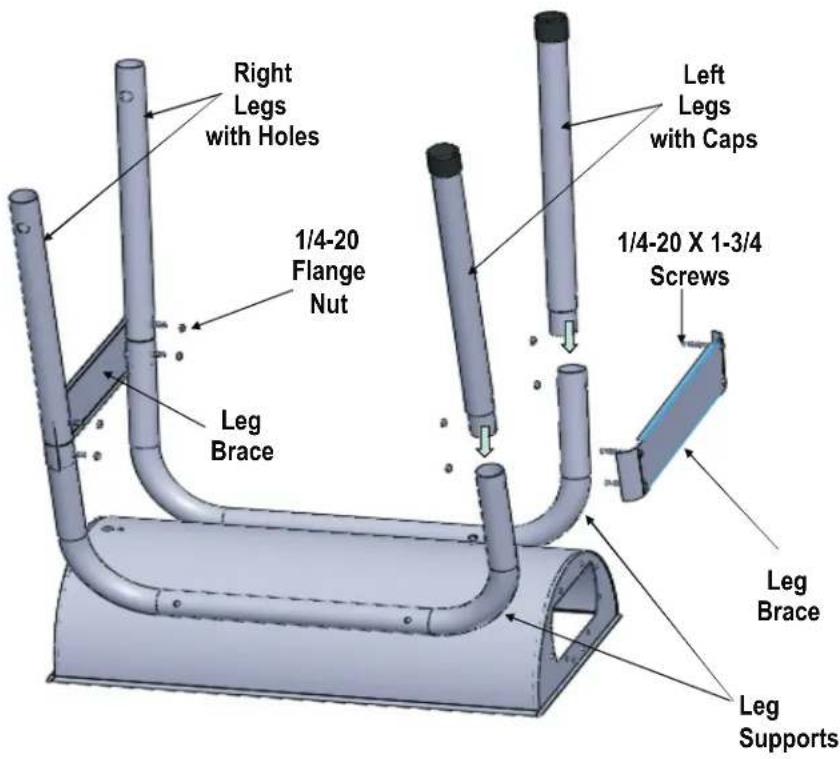
- Lay unit on smoker chamber.
- Insert legs into leg supports making sure holes align and the legs with caps are at the chamber side opening.
- Attach leg brace on each side using four 1/4-20 X 1-3/4" screws and four 1/4-20 flange nuts per brace.
Finger tighten all screws and nuts in this step until all are in place. Once all in place, then fully tighten all screws and nuts. Go back and fully tighten screws and nuts in step 1.
3
- Slide axle into holes at ends of legs (legs without end caps).
- Attach wheels onto axle rod using hitch pins. Hitch pins insert through hole in axle as shown in box A.
Check to be sure that all screws and nuts used so far are fully tightened.
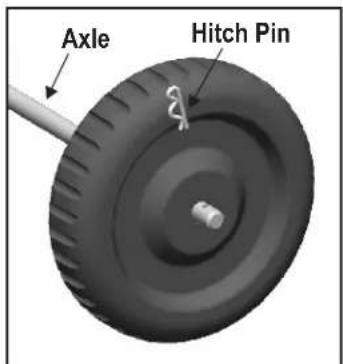
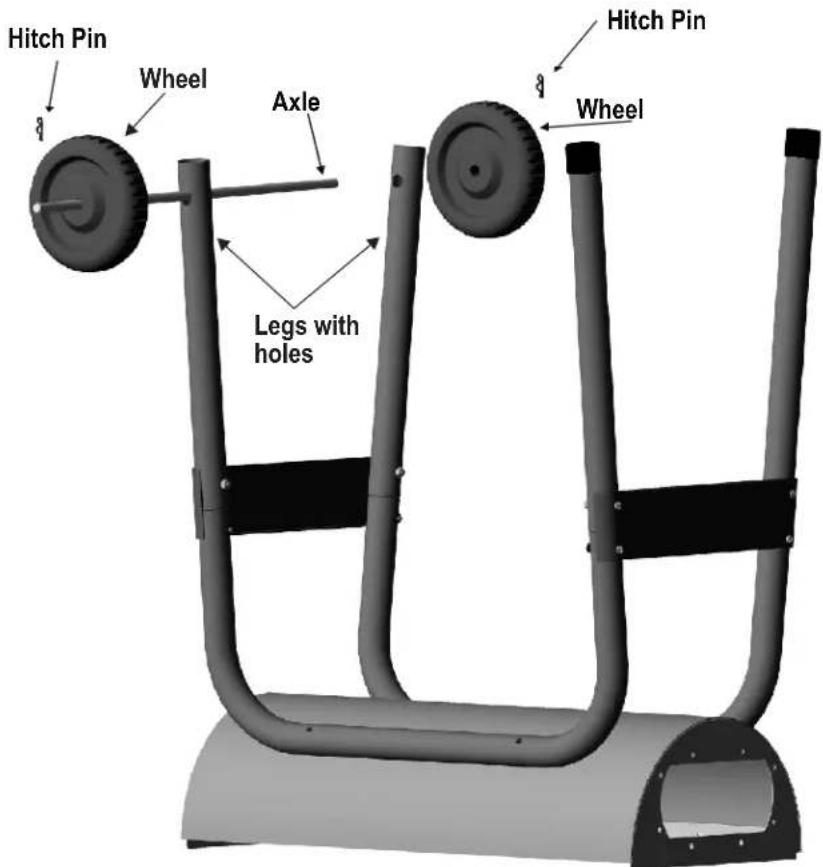
Figure B
4
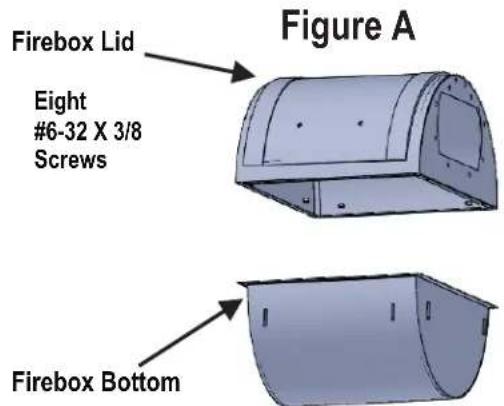
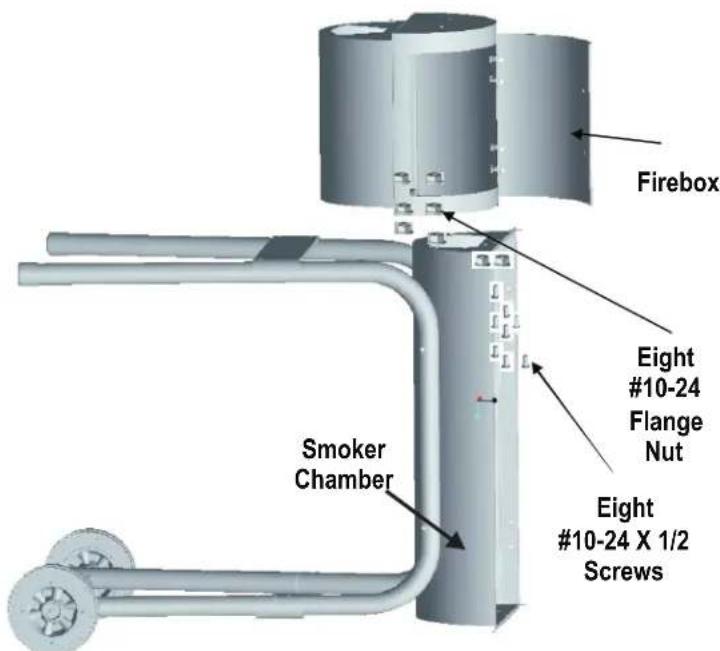
- Pre-assemble the Firebox Lid and the Firebox Bottom using eight #6-32 X 3/8 Screws as shown in figure A.
- Place the firebox onto the smoker chamber and align the large openings.
- Insert eight #10-24 X 1/2" screws through the smoker chamber, into the firebox. Secure with eight #10-24 flange nuts as shown in figure B.
Fully tighten all screws and nuts.
5
- Place unit in upright position.
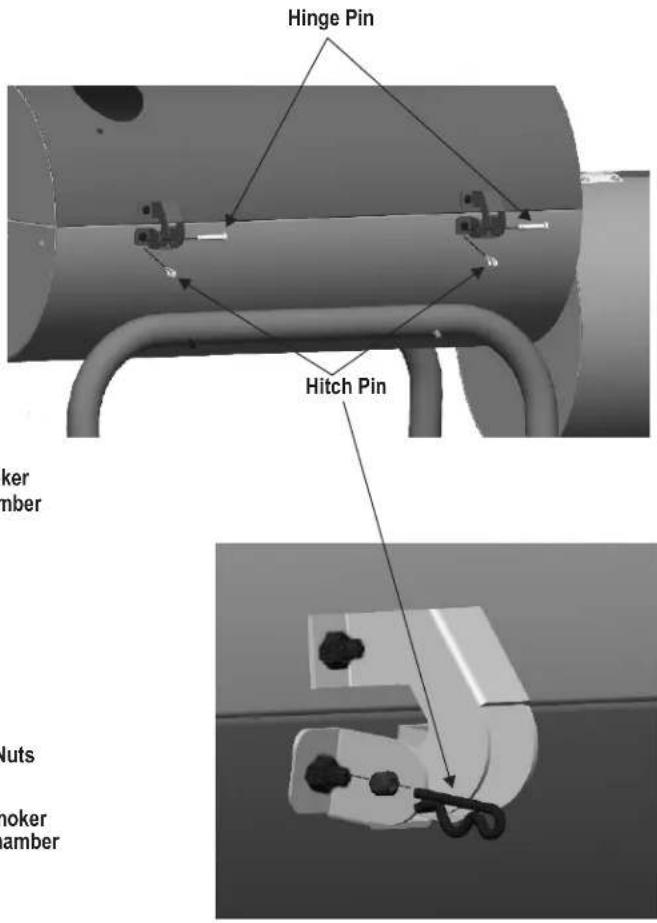
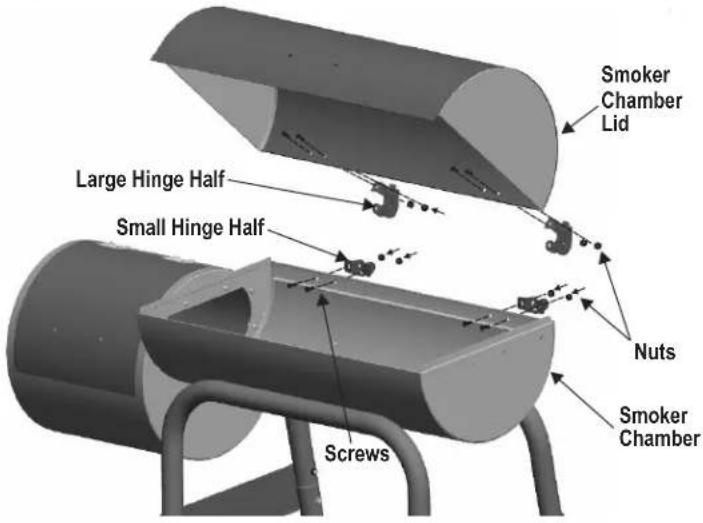
- Attach small hinge half to smoker chamber using two #10-24 X 1/2" screws and two #10-24 flange nuts for each hinge half. Install screws from inside the smoker chamber.
- Attach large hinge half to smoker chamber lid using two #10-24 X 1/2" screws and two #10-24 flange nuts for each hinge half. Install screws from inside the smoker chamber lid.
- Insert top hinge in between bottom hinge and secure using one hinge pin and one hitch pin for each hinge set.
Finger tighten all screws and nuts in this step until all are in place. Once all are in place, close the lid and fully tighten all screws and nuts.
NOTE: The temperature gauge may be packed inside of the smokestack to prevent damage during shipping. If so, remove gauge before assembling smokestack to chamber
6
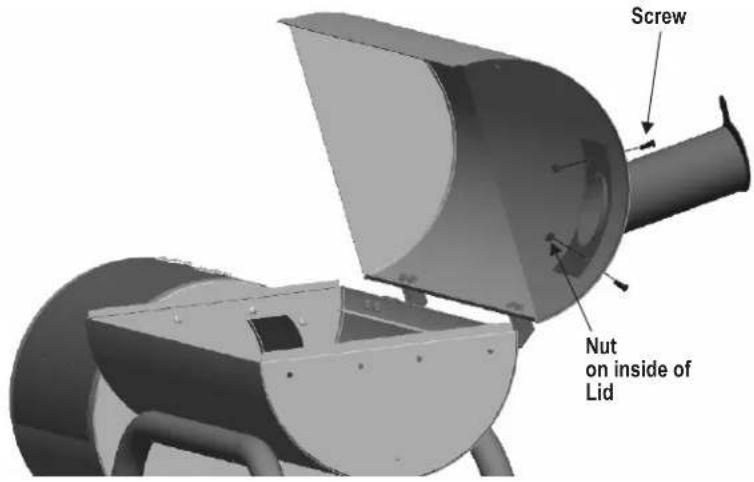
- Insert smoke stack through smoker chamber lid, aligning holes.
- Attach using two #10-24 X 1/2" screws and two #10-24 flange nuts.
Fully tighten all screws and nuts.
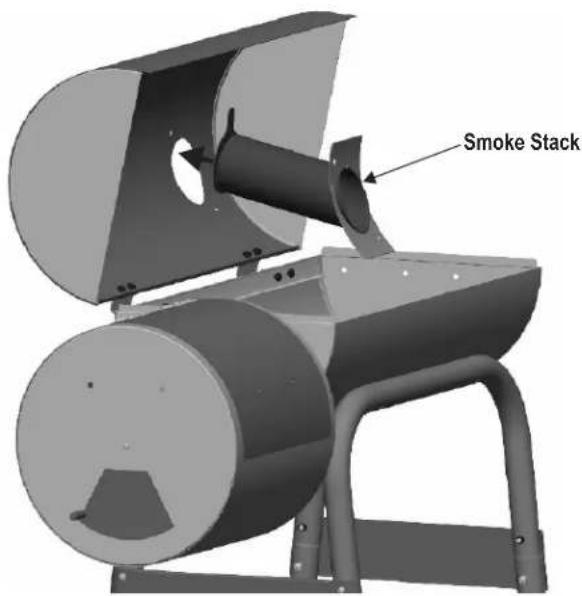
NOTE: Lid side wall shown transparent for clarity
7
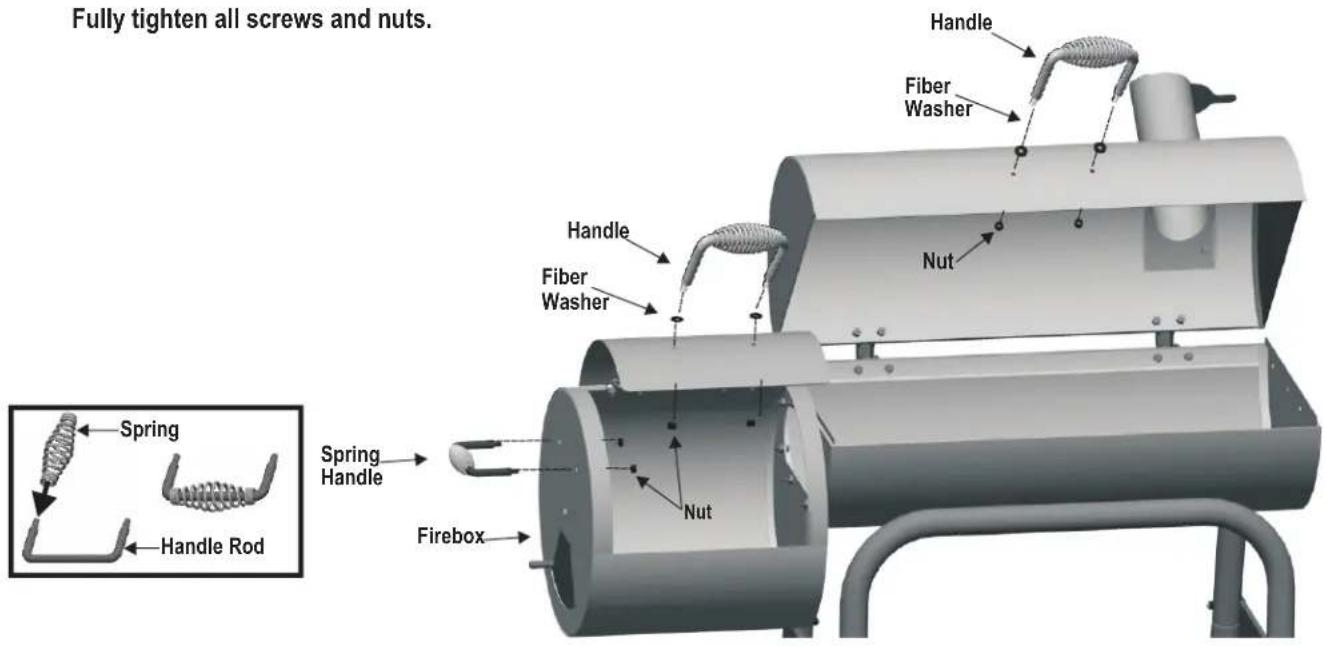
- Place fiber washers on handle rods.
- Place the handle assembly into the holes on the front of the smoker chamber door and secure with two 1/4-20 flange nuts.
- Repeat on firebox door.
- Insert spring handle through holes on the side of firebox and secure with two 1/4-20 flange nuts.
Fully tighten all screws and nuts.
8
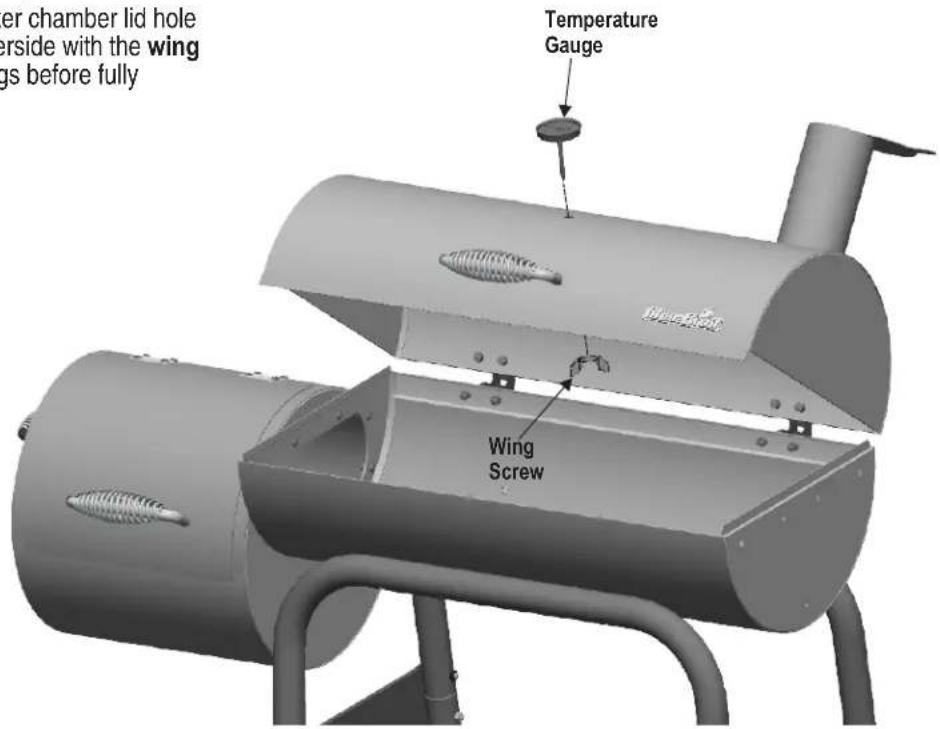
- Remove wing nut from temperature gauge.
- Insert temperature gauge though smoker chamber lid hole above handle securing it from the underside with the wing nut removed aligning the gauge settings before fully
9
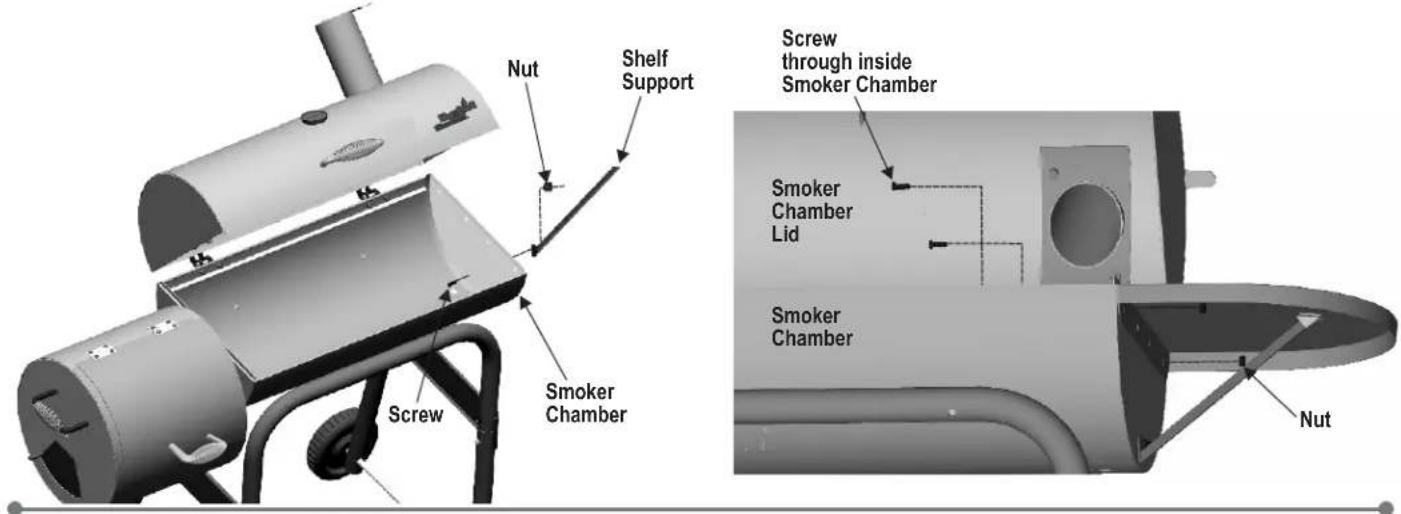
- Attach shelf support to side of smoker chamber with one #10-24 X 1/2" machine screw where screw is going through inside of chamber through hole of support and secured with one #10-24 flange nut.
- Lay side shelf on top of other end of shelf support so that it fits inside holding bracket.
- Secure side shelf to smoker chamber using two #10-24 X 1/2" screws and two #10-24 flanged nuts.
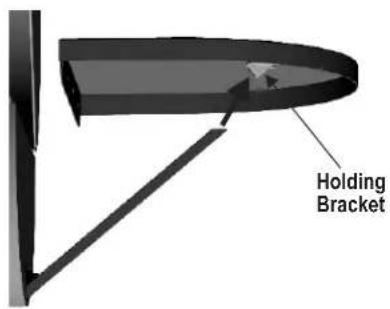
Fully tighten all screws and nuts.
10
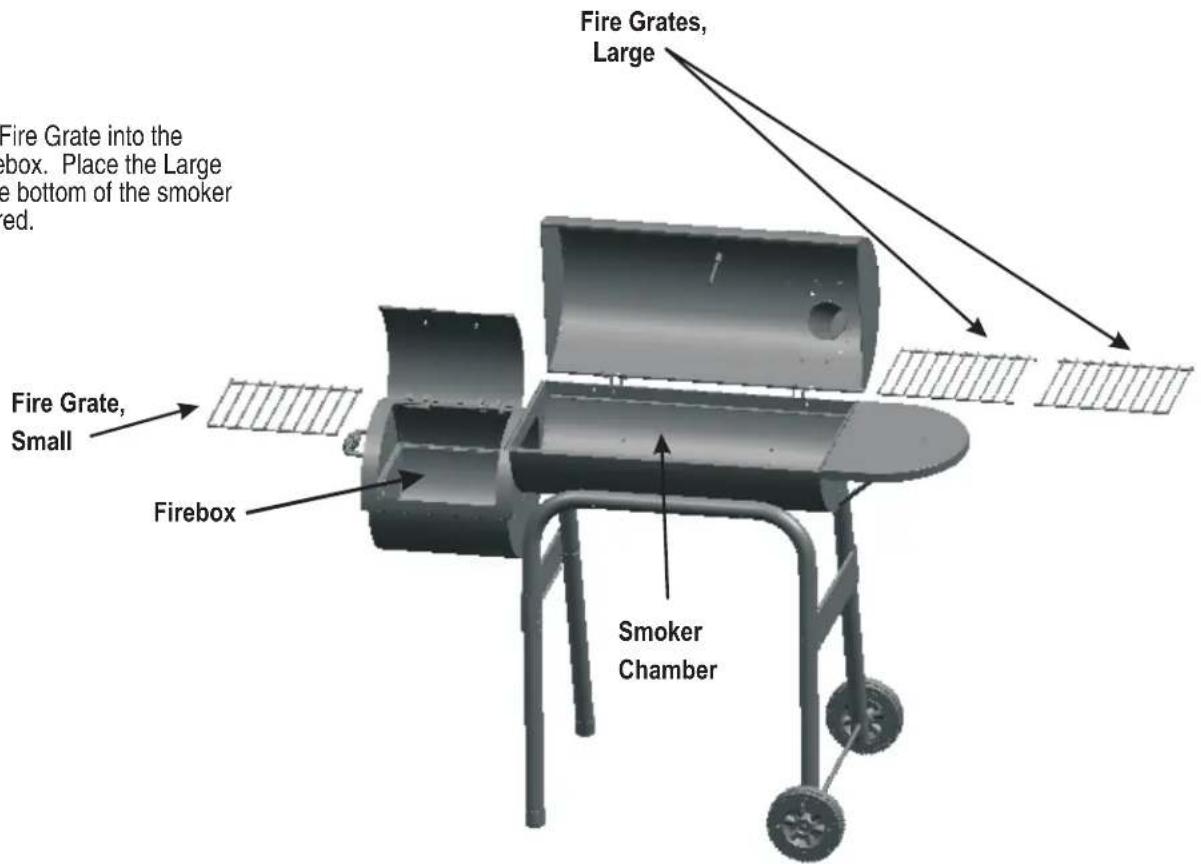
- Place the Small Fire Grate into the bottom of the firebox. Place the Large Fire Grates in the bottom of the smoker chamber, if desired.
11
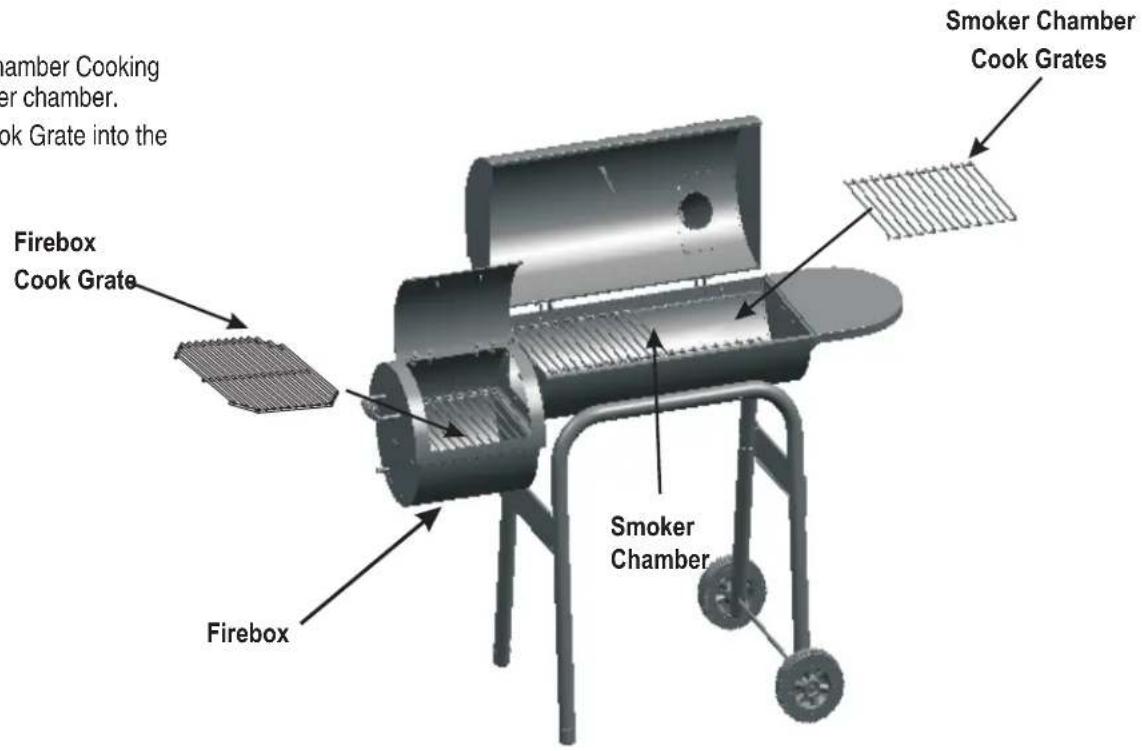
- Place two Smoker Chamber Cooking Grates into the smoker chamber.
- Place the Firebox Cook Grate into the Firebox.
12
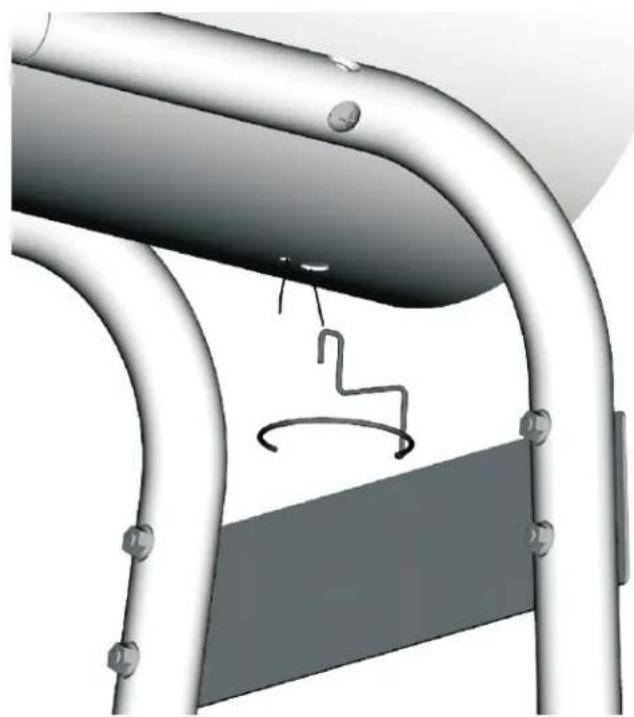
- Hang the grease clip under the smoker chamber on right side.
- An empty soup can is recommended to hang from grease clip.
natural_image
3D rendering of a curved metal structure with a circular component embedded, no visible text or symbolsThe assembly is completed.
HARDWARE LIST
You may have spare hardware after assembly is complete.

Hair Pin Clip
Qty. 4
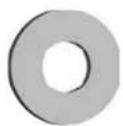
Fiber Washer
Qty. 4
natural_image
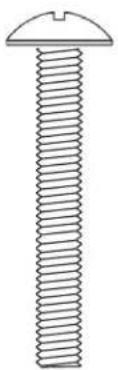
Line drawing of a screw with a triangular head and threaded base (no text or symbols)1/4-20 X 1-3/4"
Machine
Screw
Qty. 12
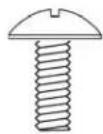
10-24 x 1/2"
Machine
Screw
Qty. 21
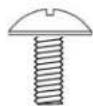
6-32 X 3/8"
Machine Screw
Qty. 8
Thank you for recent purchase from Char-Broil!
Register your product to receive a special offer www.charbroil.com/register
Check out these great features on our website!
• Product information
- Grilling accessories
- Replacement parts
• Reliable customer support
- Delicious recipes
• Grilling tips from expert chefs
• Exciting events and promotions
• Share your grilling secrets
- Browse the on-line store
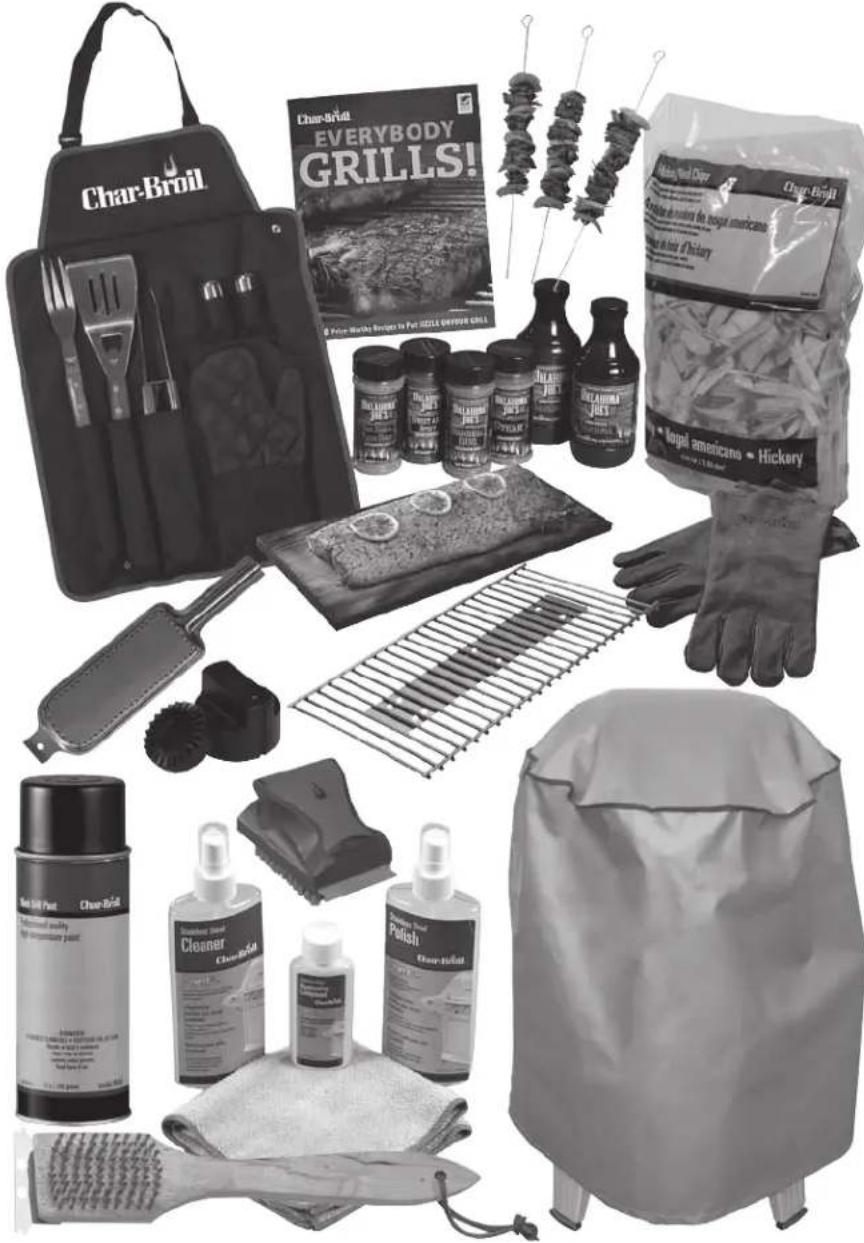
• And much more!
Char-Broil®
www.charbroil.com
For all your grilling needs!
www.charbroil.com/register
(If you register online, you do not need to send in this registration card.)
State | Estado | Province
Zip Code | Código Zip | Code Postal
*?
Char-Broil Warranty Registration
P.O. Box 1240
Columbus, GA 31902-1240

5 Attach copy of your sales receipt here.
- Smoker, BBQ and Grill
- FOR OUTDOOR USE ONLY
- CAUTION:
- INSTALLER/ASSEMBLER:
- CONSUMER:
- WARNING:
- CARBON MONOXIDE HAZARD
- TABLE OF CONTENTS
- This instruction manual contains important information necessary for the proper assembly and safe use of the appliance.
- Safety Symbols
- DANGER
- WARNING
- CAUTION
- CALIFORNIA PROPOSITION 65
- Preparing and Using Your American Gourmet Smoker
- GRILLING
- SMOKING AND SLOW COOKING
- Grilling with Wood Chips/Wood Chunks
- Our Recommendations:
- COOKING TIPS
- Building Your Fire
- Know When Your Fire is Ready
- GRILL MAINTENANCE
- HELPFUL HINTS
- LIMITED WARRANTY
- ITEMS MANUFACTURER WILL NOT PAY FOR:
- DISCLAIMER OF IMPLIED WARRANTIES and LIMITATION OF REMEDIES
- ASSEMBLY
- 2
- 3
- 4
- 5
- 6
- 7
- 8
- 9
- 10
- 11
- 12
- HARDWARE LIST
- 10-24 x 1/2"
- 6-32 X 3/8"
- Thank you for recent purchase from Char-Broil!
- Register your product to receive a special offer www.charbroil.com/register
- Check out these great features on our website!
- Char-Broil®
- www.charbroil.com/register
Brand : Char-Broil
Model : 12201570
Category : Barbecue