EXT-HD-PVR - Voice recorder Gefen - Free user manual and instructions
Find the device manual for free EXT-HD-PVR Gefen in PDF.


| Product Type | Digital Voice Recorder with HD PVR capability |
| Brand | Gefen |
| Model | EXT-HD-PVR |
| Dimensions (approx) | 120 x 70 x 20 mm |
| Weight (approx) | 150 g |
| Power Supply | USB 5V or rechargeable lithium-ion battery (3.7V, 1000 mAh) |
| Recording Media | Internal flash memory (8 GB) or microSD card up to 32 GB |
| Recording Format | MP3, WAV (PCM), or AAC for audio; MP4 for video |
| Audio Recording Modes | High quality (192 kbps), standard (128 kbps), and long play (64 kbps) |
| Video Recording Resolution | 720p HD (1280 x 720) at 30 fps |
| Microphone | Built-in stereo condenser microphone with noise reduction |
| Speaker | Built-in 8 Ohm speaker |
| Connectivity | USB 2.0 for data transfer and charging; 3.5 mm headphone jack |
| Controls | One-touch recording, play/pause, volume, and menu navigation buttons |
| Display | 2-inch TFT LCD screen for file browsing and status |
| Battery Life | Up to 20 hours of audio recording or 5 hours of video recording |
| File Management | Folder organization, file delete, and protect functions |
| Maintenance | Clean with a soft dry cloth; avoid liquids; update firmware via official website |
| Safety | Do not expose to extreme temperatures; use only supplied charger; keep away from children |
| Reparability / Spare Parts | Replacement battery and microSD card readily available; service by authorized technician |
| Operating Temperature | 0°C to 40°C (32°F to 104°F) |
Frequently Asked Questions - EXT-HD-PVR Gefen
User questions about EXT-HD-PVR Gefen
0 question about this device. Answer the ones you know or ask your own.
Ask a new question about this device
Download the instructions for your Voice recorder in PDF format for free! Find your manual EXT-HD-PVR - Gefen and take your electronic device back in hand. On this page are published all the documents necessary for the use of your device. EXT-HD-PVR by Gefen.
USER MANUAL EXT-HD-PVR Gefen
natural_image
Modern living room interior with large windows overlooking mountains, a flat-screen TV, and a sofa (no visible text or symbols)Gefen tv
High-Def Personal Video Recorder
GTV-HD-PVR
User Manual
www.gefentv.com
Technical Support:
| Telephone | (818) | 772-9100 |
| (800) | 545-6900 |
| Fax | (818) | 772-9120 |
Technical Support Hours:
8:00 AM to 5:00 PM Monday thru Friday PST (Pacific Standard Time)
Write To:
Gefen Inc.
c/o Customer Service
20600 Nordhoff St
Chatsworth, CA 91311
www.gefentv.com
support@gefen.com
Notice
Gefen Inc. reserves the right to make changes in the hard ware, packaging and any accompanying doc u men ta tion without prior written notice.
Gefen TV High-Def Personal Video Recorder is a trademark of Gefen Inc.
HDMI™ is a trademark of HDMI.org
1 Introduction / Operation Notes
2 Features / Package Includes
3 Panel Layout
4 IR Remote Layout
5 Quick Start Guide
6 Home Menu And Navigation
8 Setting Up The HD-PVR
14 One-Touch Recording
18 Playing A Movie
22 Scheduling A Recording
27 Viewing Photos
30 Copying/Deleting Movies And Photos
31 Viewing Photos On The SD-Card
35 Learning and Resetting The Remote
36 Installing The Decoder Software
41 Updating The HD-PVR Firmware
42 RS-232 Serial Communication
46 Specifications
47 Terminology
48 Warranty
Congratulations on your purchase of the Gefen TV High-Definition Personal Video Recorder (HD-PVR). Your complete satisfaction is very important to us.
Gefen TV
Gefen TV is a unique product line catering to the growing needs for innovative home theater solutions. We specialize in total integration for your home theater, while also focusing on going above and beyond customer expectations to ensure you get the most from your hardware. We invite you to explore our distinct product line and hope you find your solutions.. Don't see what you are looking for here? Please call us so we can better assist you with your particular needs.
The Gefen TV High-Definition Personal Video Recorder
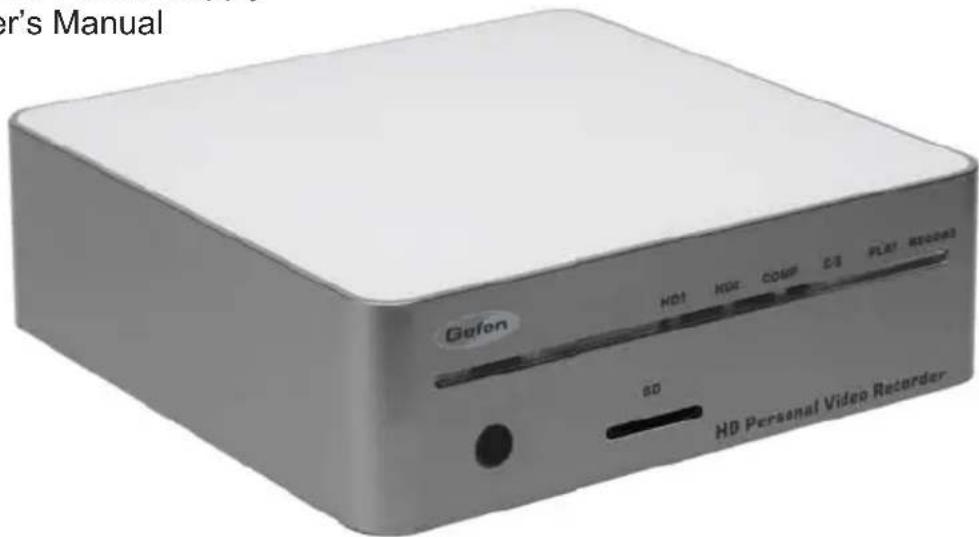
The Gefen TV High-Definition Personal Video Recorder (HD-PVR) allows consumers to implement the functions of a traditional video tape recorder or DVD recorder using standard MPEG-4 compression and H.264 encoding technology to store videos on removable SD flash cards or the built-in 80GB hard disk drive. With the Gefen TV HD-PVR, consumers can enjoy instant recording and versatile portability of digital video and music, as well as playback of music and digital pictures, all within one compact tabletop unit.
How It Works
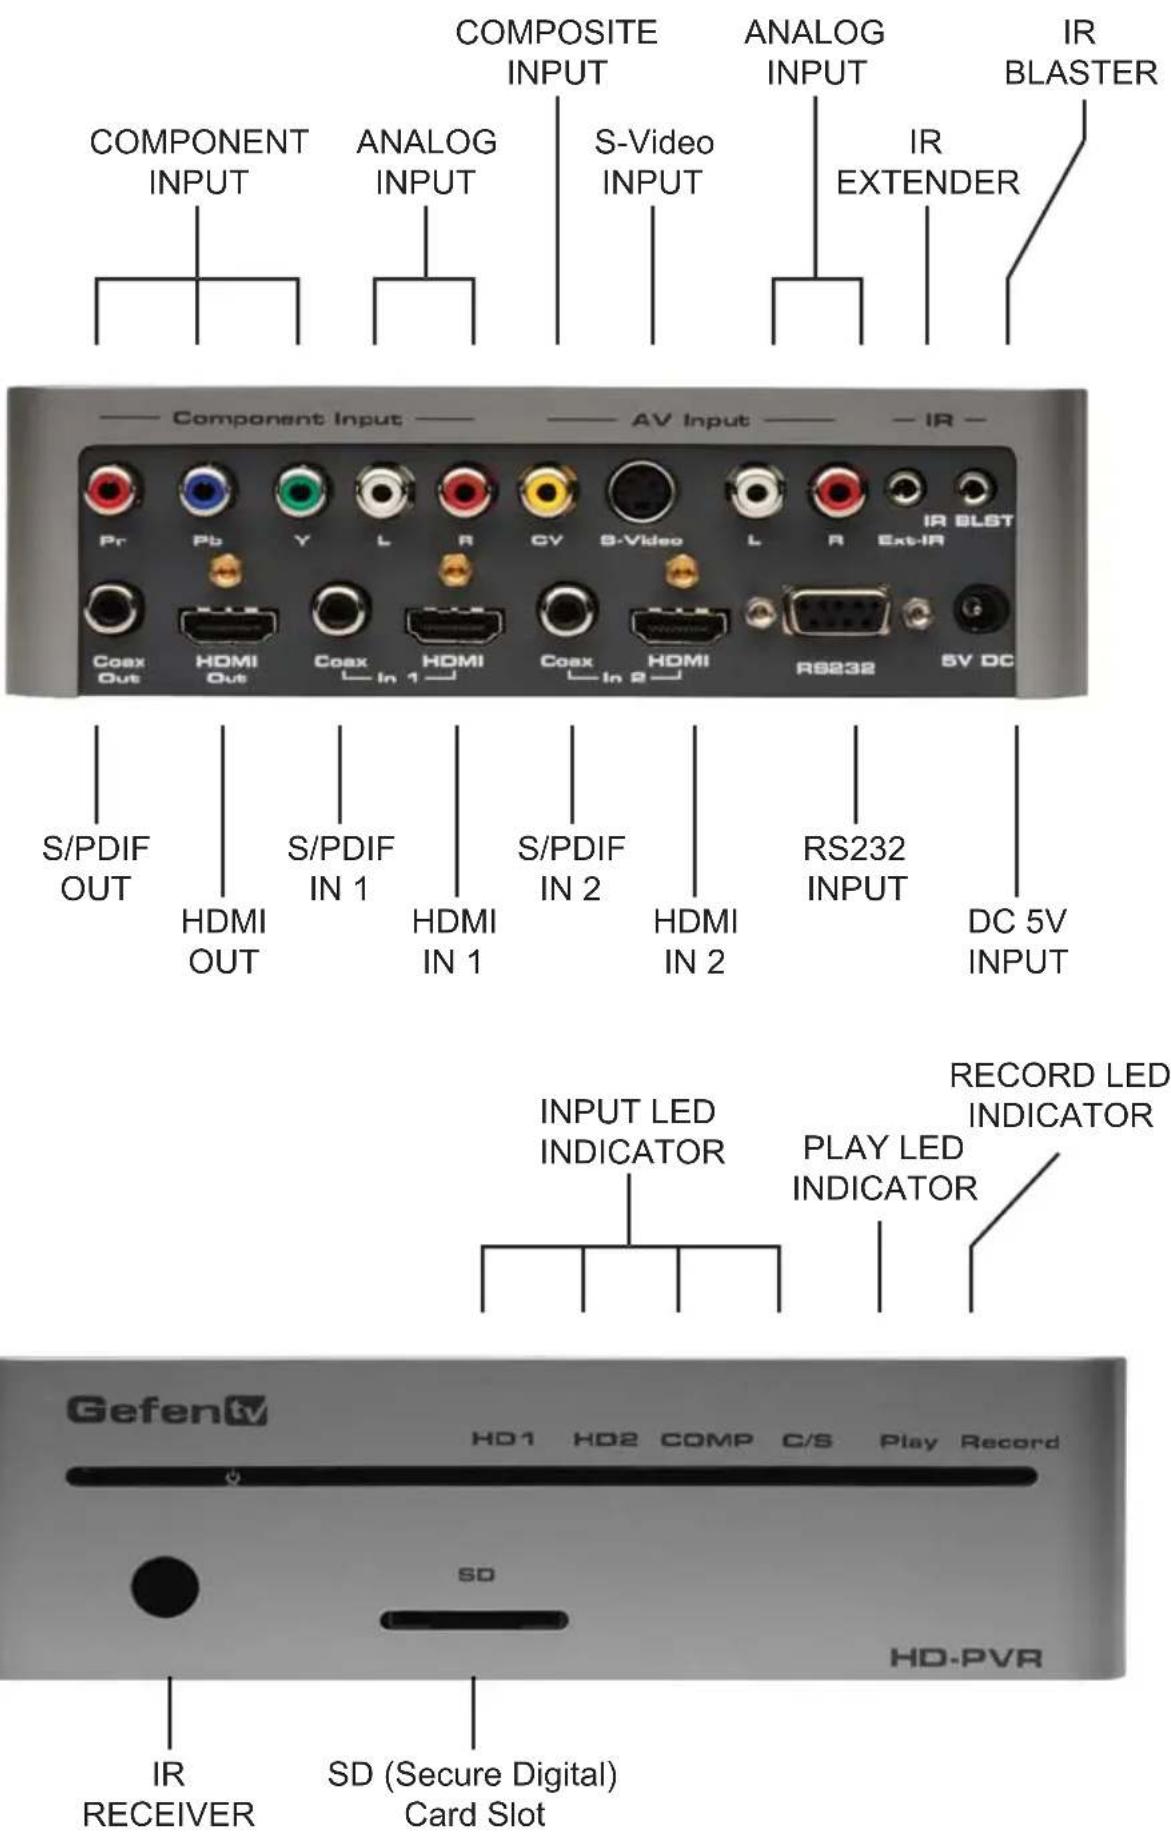
The HD-PVR is easy to use. You simply connect your video source(s) to one or all of the HD-PVR's 4 inputs, then connect your HDMI display on the HDMI output. Once the source(s), the HD-PVR and the display are powered and connected, you select the video source and feature that you want using the Infrared (IR) remote. If you want to modify settings for instant recording and other features, you can go into the friendly On-Screen Display and adjust the settings.
OPERATION NOTES
- Compatible with both HDMI and DVI* displays.
- Copy protected content cannot be recorded or copied in high-definition to the HD-PVR or to SD flash media.
IMPORTANT NOTICE:
Do not remove the casing from the HD-PVR. Doing so will void the warranty.
*When used with a DVI to HDMI Adapter
FEATURES
• Video recording and playback at resolutions of 480i to 1080i
- Instant Recording to SD Flash Media or Internal Hard Disk Drive
- Uses widely supported MPEG4 compression and H.264 encoding technology, supported on most computers with an add-on driver.
- Pause, Mute, Fast Forward & Fast Backwards playback controls
• Media Scanning Function to Locate Videos, Audio Files, Pictures
- Playback of externally imported videos, music, pictures
- Four quality settings are user-selectable ranging from data recording rates of 3.5Mbps to 10Mbps for Hi-Def content and from 1.5Mbps to 4Mbps for Standard Definition formats. Recording time can be increased with lower data recording rates.
- Friendly On-Screen Display (OSD) for controlling settings
• 2x-10x Picture Zoom for viewing Photos
• International language support within the OSD
INCLUDES:
(1) Gefen HD Personal Video Recorder
(1) 6FT HDMI cable (M-M)
(1) IR Extender
(1) IR Blaster
(1) IR Remote
(1) 5V DC Power Supply
(1) User's Manual
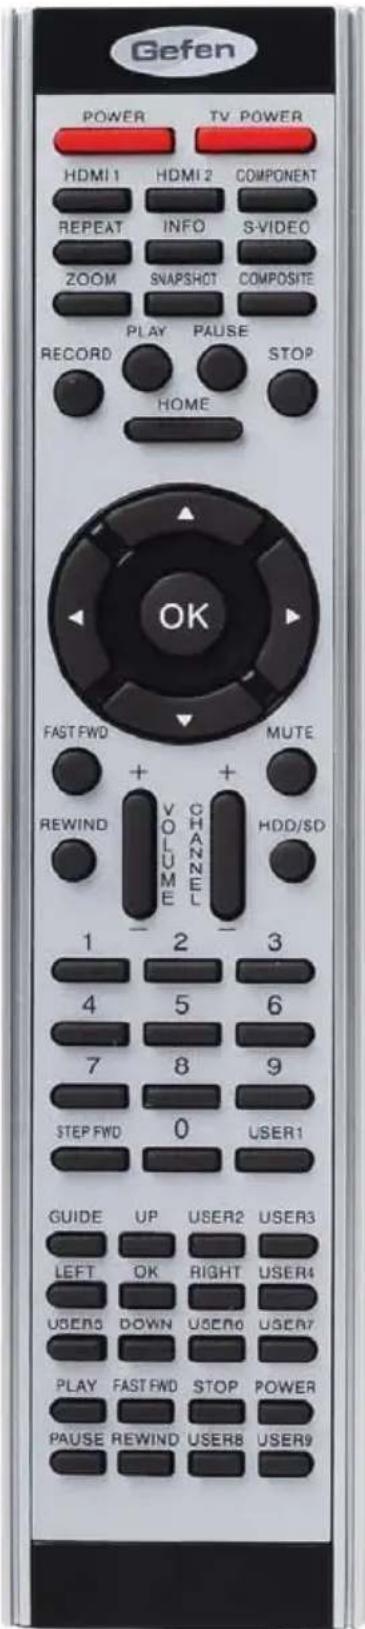
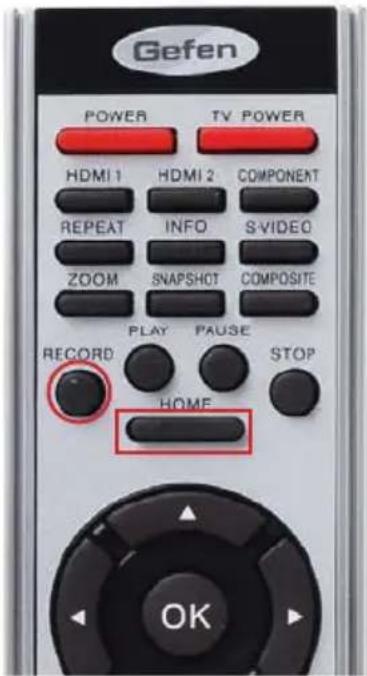
TV Power User programmable key
HDMI 1 Selects HDMI input 1
HDMI 2 Selects HDMI input 2
Component Selects the Component input
Repeat Cycles the repeat function
Info Displays info on selected movie
or photo
S-Video Selects the S-Video input
Zoom Cycles the zoom function
Snapshot Takes a snapshot of a movie
during playback
Composite Selects the composite input
Record Begins recording the selected source
Play Begins playback of recorded movie or begins slide show when in View Photo.
Pause Pauses movie during playback
Stop Stops movie during playback or returns to Photo Menu when viewing slide shows or photos.
Home Takes you to the Home menu.
◀▶ ▲▼ Directional keys for navigation
OK Press to accept the highlighted selection
Fast FWD During playback of movie, advances movie
forward
Rewind During playback of movie advances movie in reverse
Mute Mute sound
HDD/SD Switches between the internal hard drive and the Secure
Digital flash card
Volume +/- Increase or decrease the volume
Channel +/- User programmable key
0-9 User programmable keys
Step FWD While movie playback is paused this will advance movie one frame at a time
All remaining keys and all keys labeled above as user programmable are for use with the IR blaster. Please refer to the Learn Remote section for more details
How to connect the HD-PVR:
- Connect the HDMI OUT of the HD-PVR to the HDMI IN of your HDMI display.
- Connect the HDMI, Component, Composite or S-Video input, on the Gefen HD-PVR to the output of the source device you wish to record from.
- Plug the 5V power supply into the HD-PVR.
- Turn on the display (TV).
- Turn on the HD-PVR by pressing the POWER button on the supplied remote control.
The first time you turn on the power, you will be asked to set the Date and Time on the unit (see page 9 for instructions on how to do this). Once the Date and Time have been set, the HOME menu should be displayed.
If you are not receiving a picture on your display:
- Check that the power supply is plugged in and connected to the Gefen HD-PVR.
- Check that the unit is turned on. If there are lights on the front panel, then the HD-PVR is receiving power.
- If your display has more than one HDMI IN, make sure that your display is set up to receive signals from that input.
When the HOME menu is displayed, you can press the HOME button on the remote control, again, to view the input source.
If the HD-PVR is unable to find a source signal, you will receive the message: "No Signal". If this is the case, check the following:
- Make sure that you select the correct input source on the remote control.
- Verify the connection from the input source to the HD-PVR is correct.
- Verify that your display can handle the input resolution. For example, some displays do not support 480i. Try varying the resolution on the input source.
- The HD-PVR will not accept 1080p signals. The highest resolution supported by the HD-PVR is 1080i.
HOME MENU
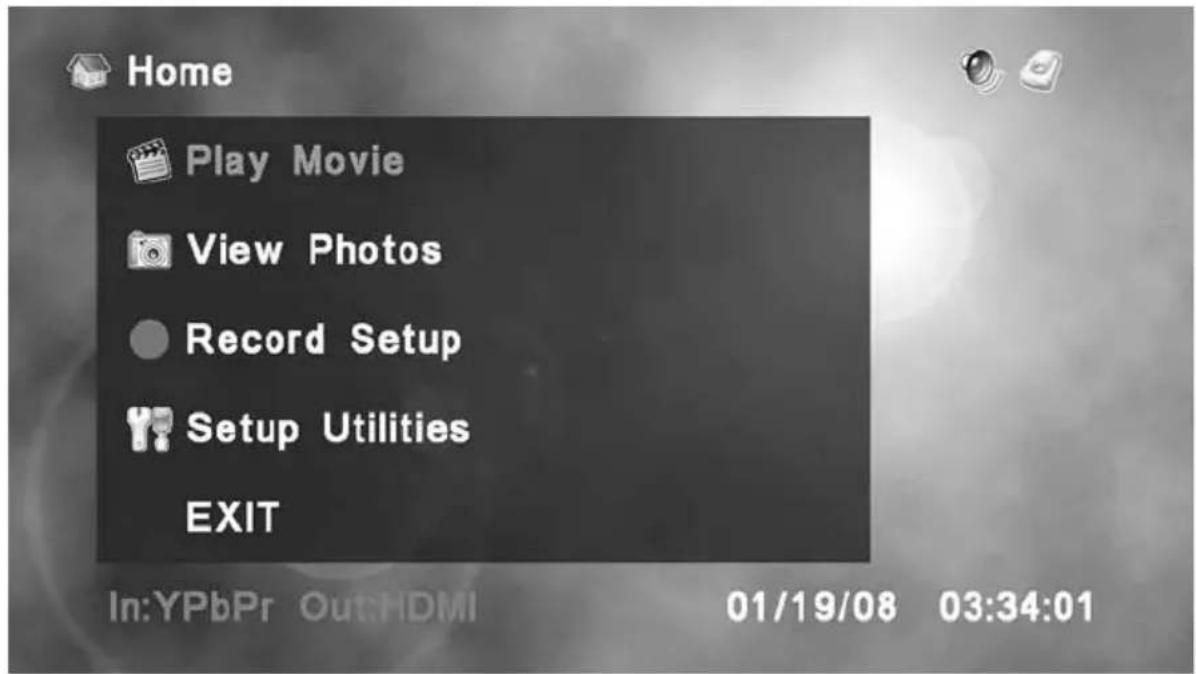
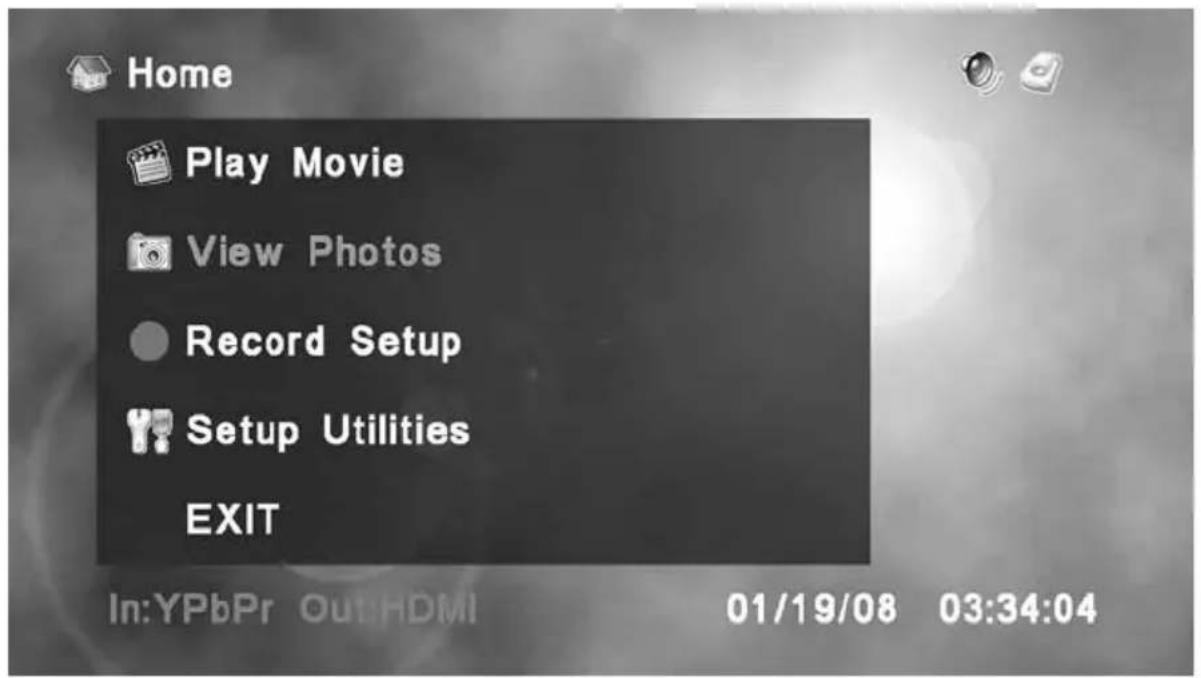
This is the HOME menu. From here, you can view recorded content, view photos, set up preferences or view the input source by selecting EXIT or pressing HOME on the remote control.
Navigation
To navigate through the menu system, use the ◆ and ◀ directional keys on the remote. The ⏻ key accepts the current selection.
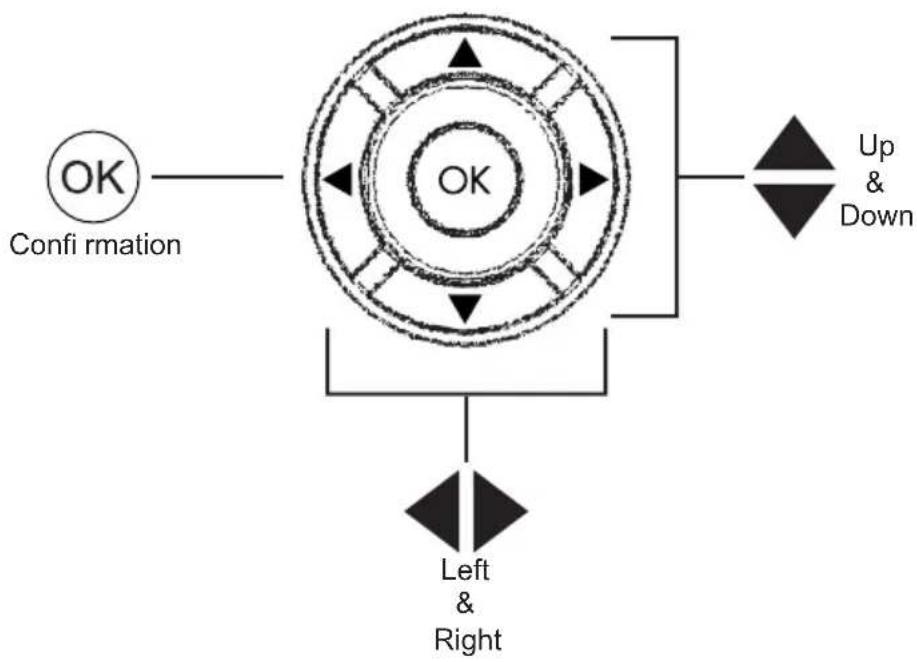
flowchart
graph TD
    A["OK"] --> B((OK))
    B --> C["Left & Right"]
    C --> D["Up & Down"]
HOME MENU - Panel Description
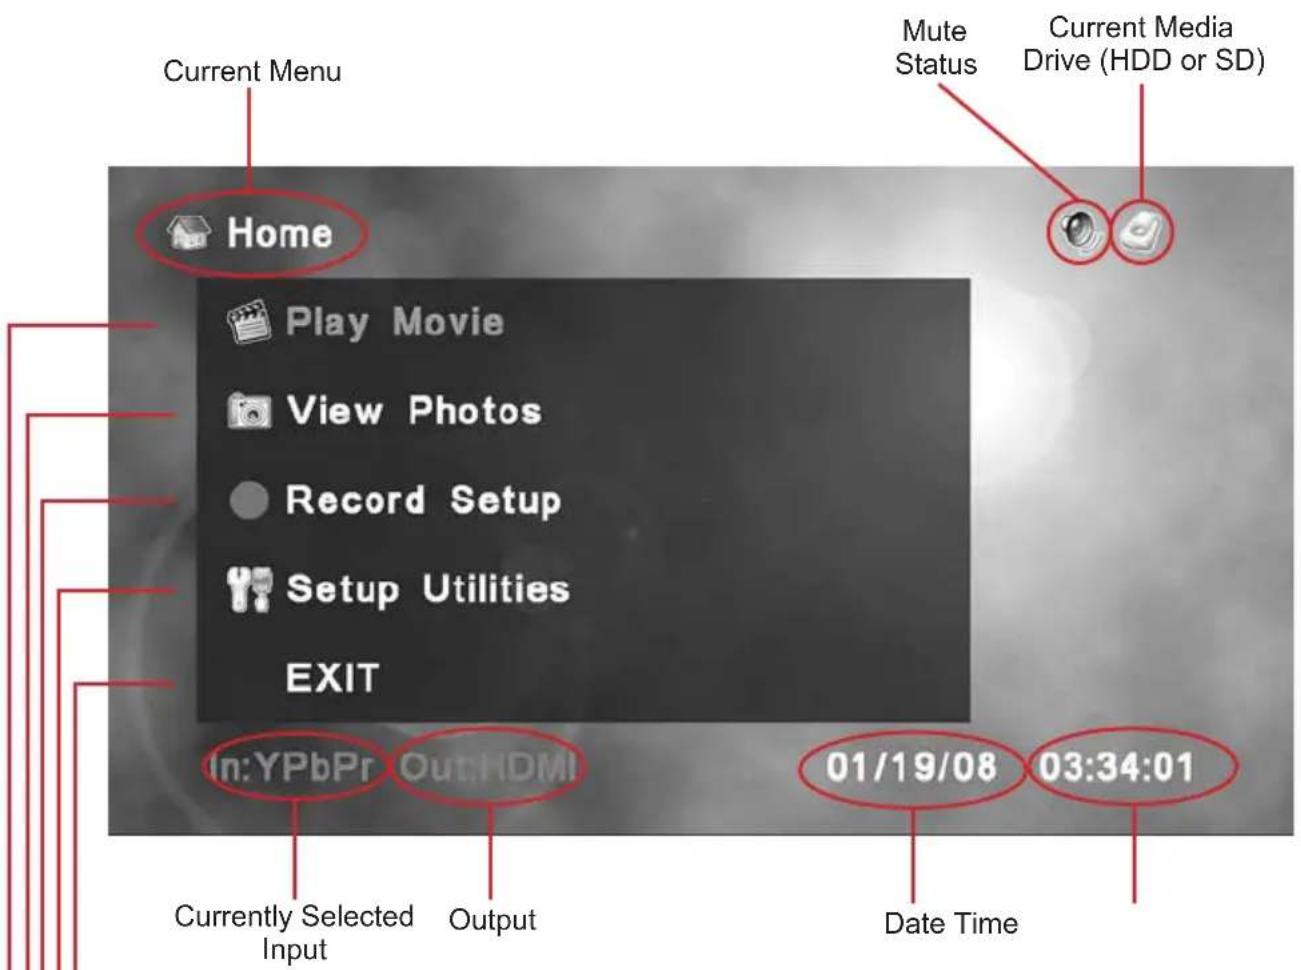
Exit
Exits the HOME menu, allowing you to view the input source.
Setup Utilities
All configurable options are located in this menu. Please see the next section for individual descriptions and setup of each option.
Record Setup
All scheduled recordings can be set, edited or viewed from this menu
View Photo
Slide shows, snapshots, viewing, copying and deleting of photos are done from this menu.
Play Movie
All recorded movies are accessible in this menu. Playback, copying and deletion of movie content are also done from this menu.
SETUP UTILITIES
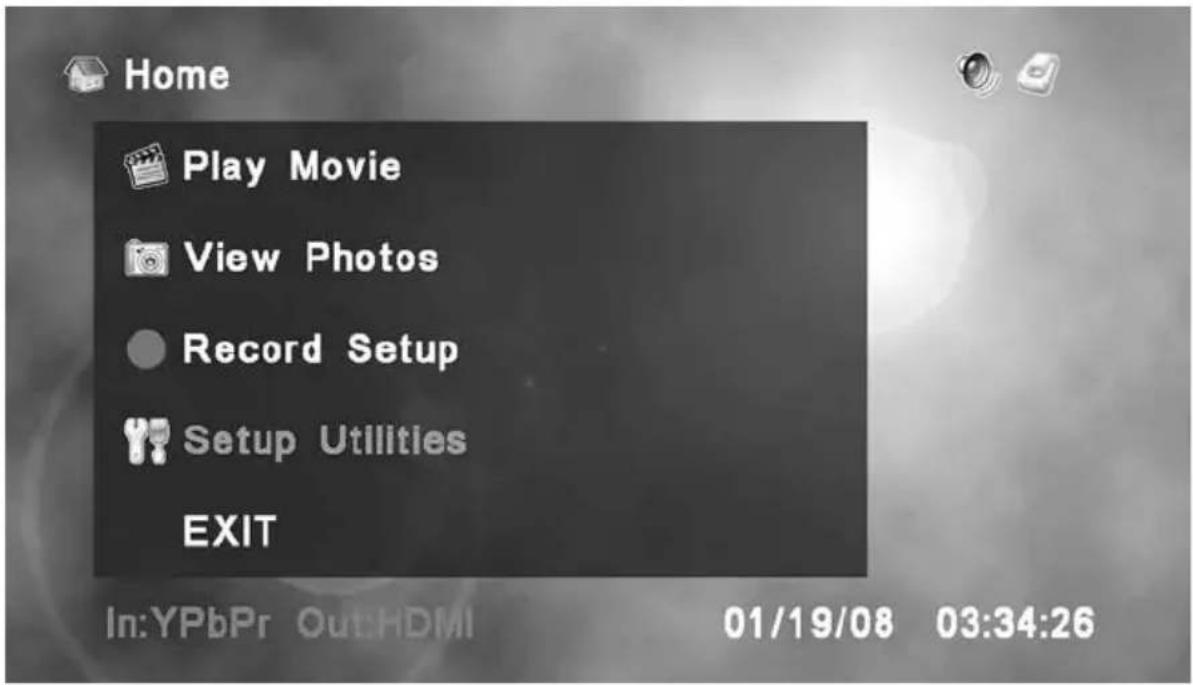
The SETUP UTILITIES menu allows you to configure the HD-PVR for use. There are three pages of settings. Use to ◆ highlight the selection and press OK to accept the current selection.
Set Date & Time
Set the current date and time.
Set Language
Choose the language option that will be used for all menus. At this time, the available languages are English or Chinese.
Format
Provides you the option of formatting the internal hard disk drive (HDD) or SD Card.
OSD Time-out
Controls the time that the information overlay is displayed when viewing movies or photos.
Default Record Quality
Sets the default quality that all recording will use. Please see the specific settings and bit rates that are described in the following section.
Background
This sets the background design that will be used for all menus. At this time, there are two background styles to choose from.
Information
This menu displays the used and remaining storage space for both the internal hard disk drive and the SD flash card, if inserted. It will also display the current firmware and our technical support e-mail address.
Learn Remote
This option allows the HD-PVR remote to learn keys from another remote. Use the supplied IR Blaster to send the commands to the device. See the Learn Remote section on page 32 for more details
Reset Remote
Clears (resets) all user-definable keys on the HD-PVR remote, restoring it to factory settings.
SETUP UTILITIES - Set Date
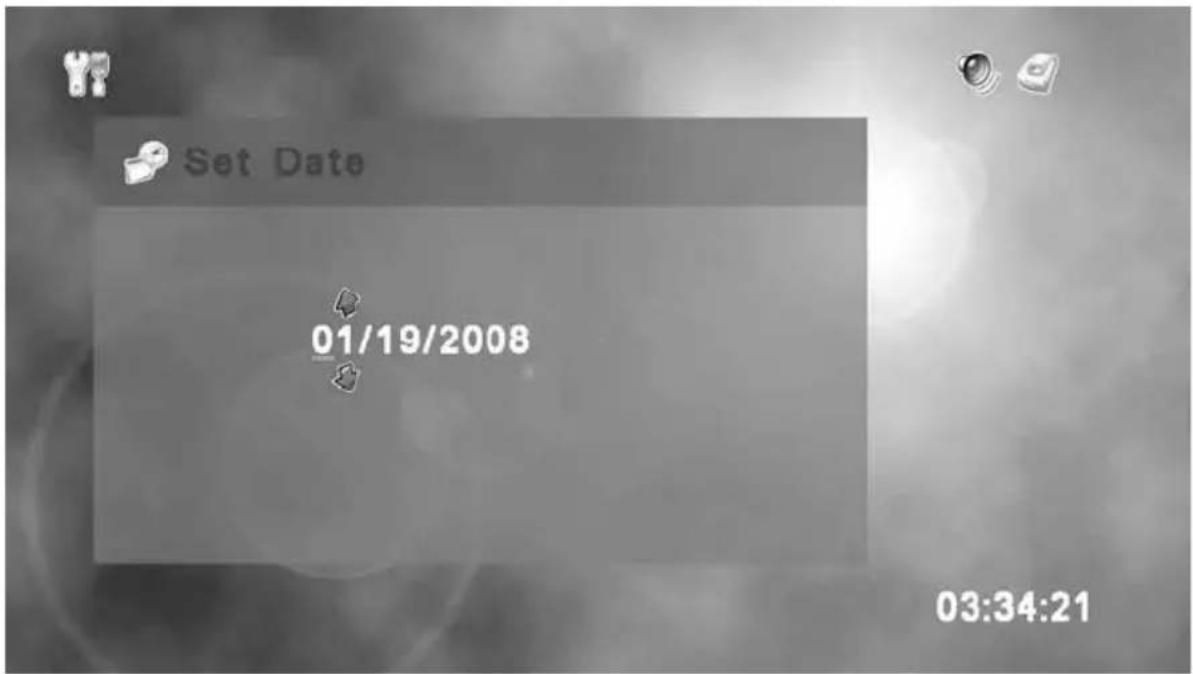
Use ◀ to move between each digit in the date and ◆ to change the numbers. Pressing Ⓞ will set the date and proceed to the SET TIME screen
SETUP UTILITIES - Set Time
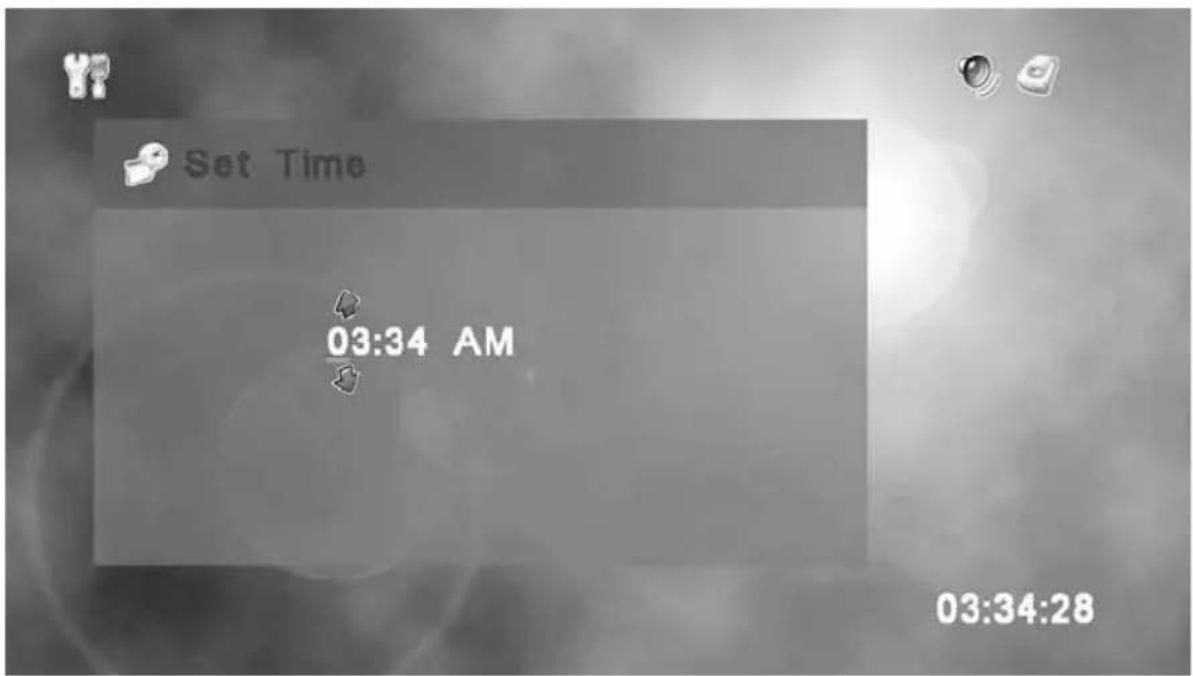
Use ◀ to move between each digit in the time and ◆ to change the numbers. Pressing Ⓤ will set the time.
SETUP UTILITIES - Set Language
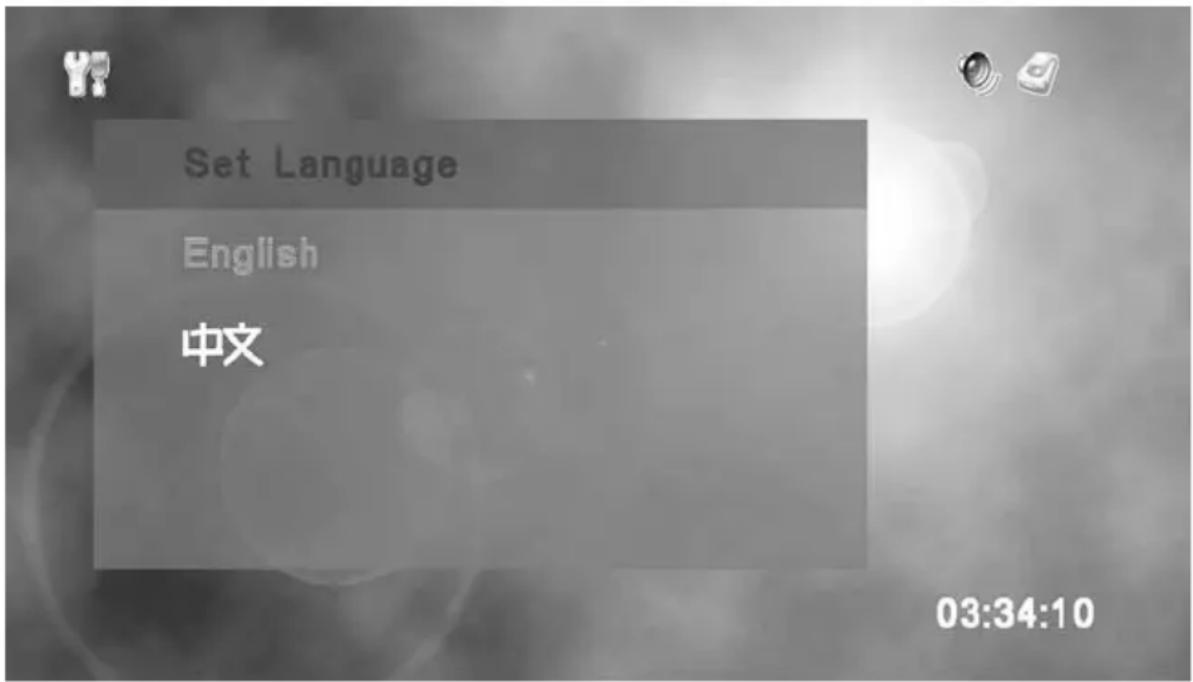
To set the language, use ◆ to select the language and press Ⓞ to accept the selection. You will be asked if you are sure you want to change the language. Press Yes to accept or press No to keep the current language setting. You can choose between English or Chinese. The default language is English.
SETUP UTILITIES - Format
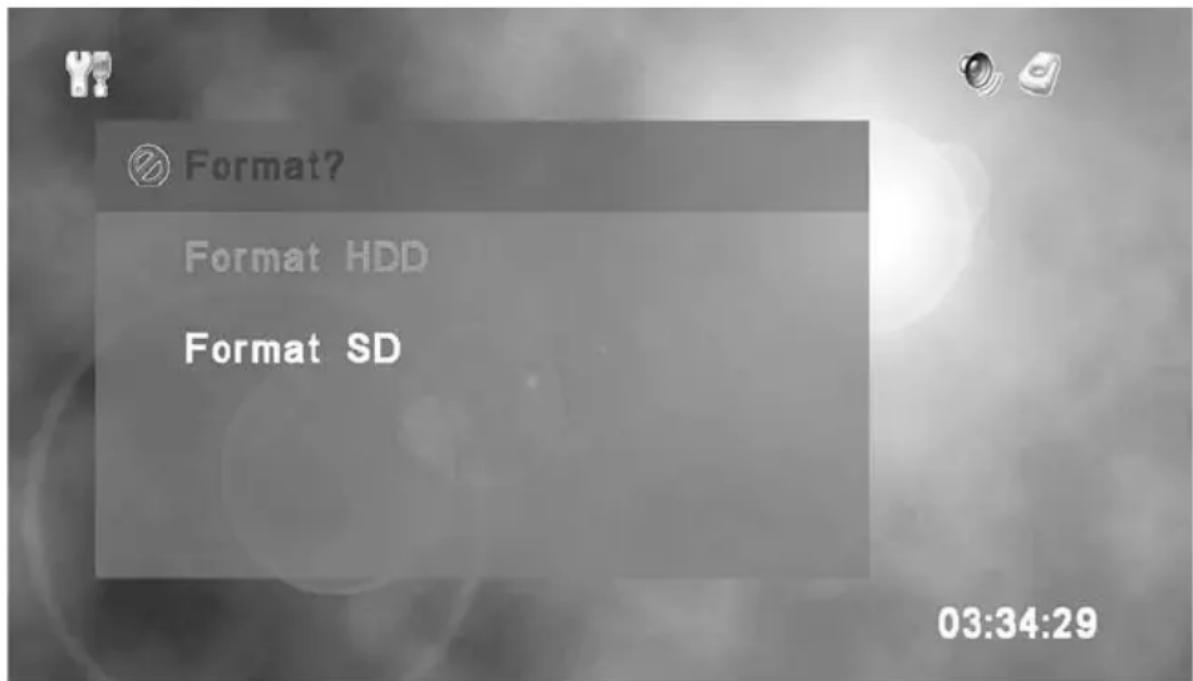
This provides you the option of formatting the internal hard disk drive (HDD) or SD Card.
Warning: Formatting the internal HDD or SD Card will erase ALL data on the media!
SETUP UTILITIES - OSD Time-out
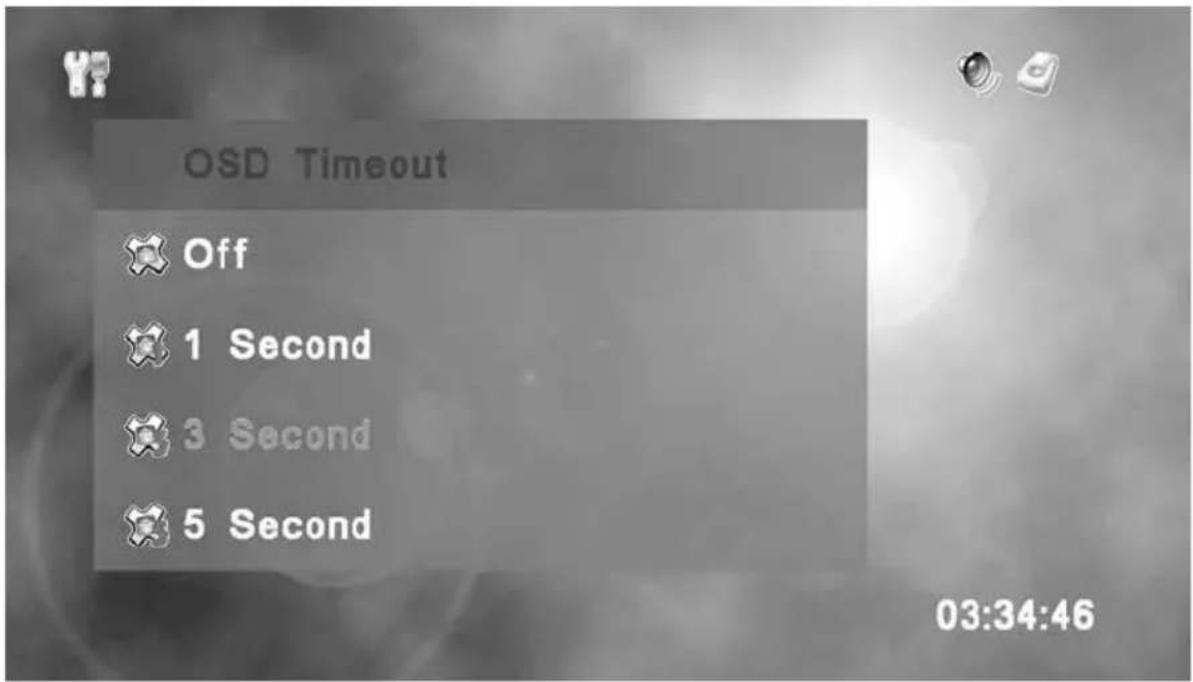
This controls the time that the information panel is displayed when viewing movies or photos. You can choose between 1, 3 or 5 seconds. Use OK to choose your desired setting and press ♦ to accept it. The default setting is 3 seconds.
SETUP UTILITIES - Default Record Quality
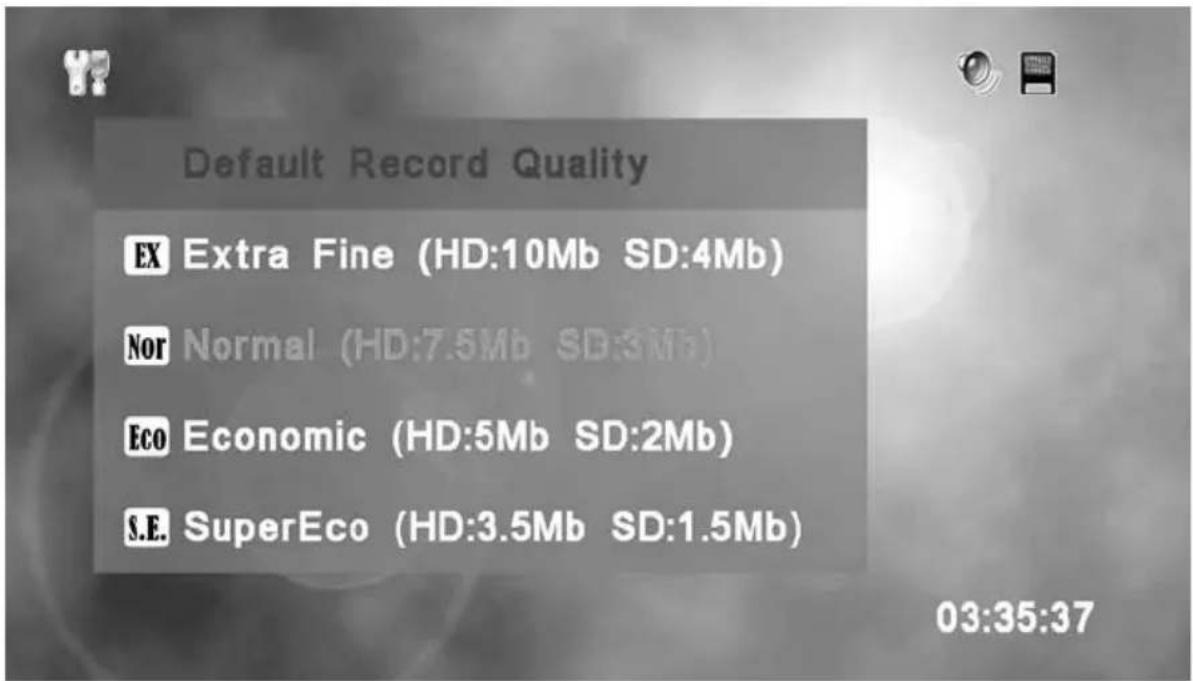
The default recording quality is set here. The table on the next page shows each recording option and its corresponding bit rate.
SETUP UTILITIES - Default Record Quality
| Quality HD Bit Rate HD Record Time | SD Bit Rate | SD Record Time | ||
| Extra Fine (EX) 10Mb 17 Hours 4Mb 44 Hours | ||||
| Normal (NOR) 7.5Mb 23 Hours 3Mb 59 Hours | ||||
| Economic (ECO) 5Mb 35 Hours 2Mb 88 Hours | ||||
| SuperEco (S.E.) 3.5Mb 50 Hours 1.5Mb 118 Hours | ||||
Select your desired recording rate with ◆ and press Ⓞ to accept your selection.
SETUP UTILITIES - Background
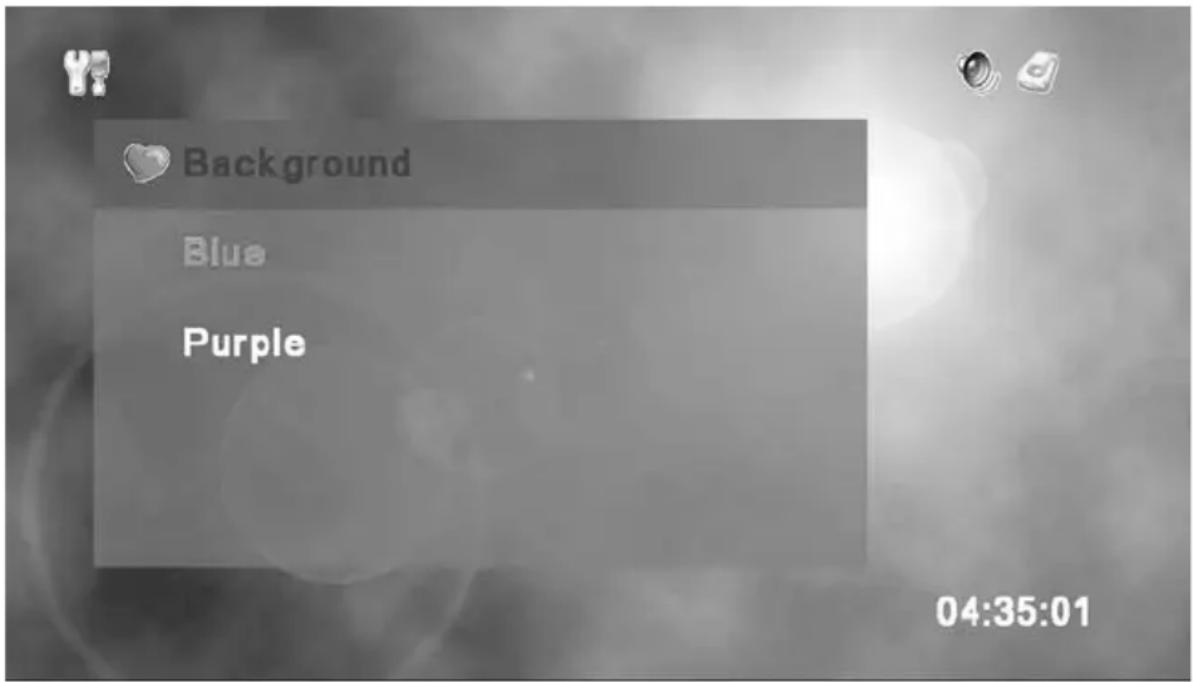
The background menu lets you choose between two images that will serve as the backdrop for all menu screens. Use to choose either background and press OK select it.
SETTING UP THE HD-PVR
SETUP UTILITIES - Free Space / Total Space
The information menu will give you statistics on the remaining and total space available on both the internal hard disk drive (HDD) and SD card.
The current fi rmware is also displayed
The HD-PVR allows you to instantly record programs while your watching them, using the one-touch record feature. To use the one-touch record feature, using the RECORD button, do the following:
- From the HOME menu, press the HOME button on the remote to view the currently selected source.
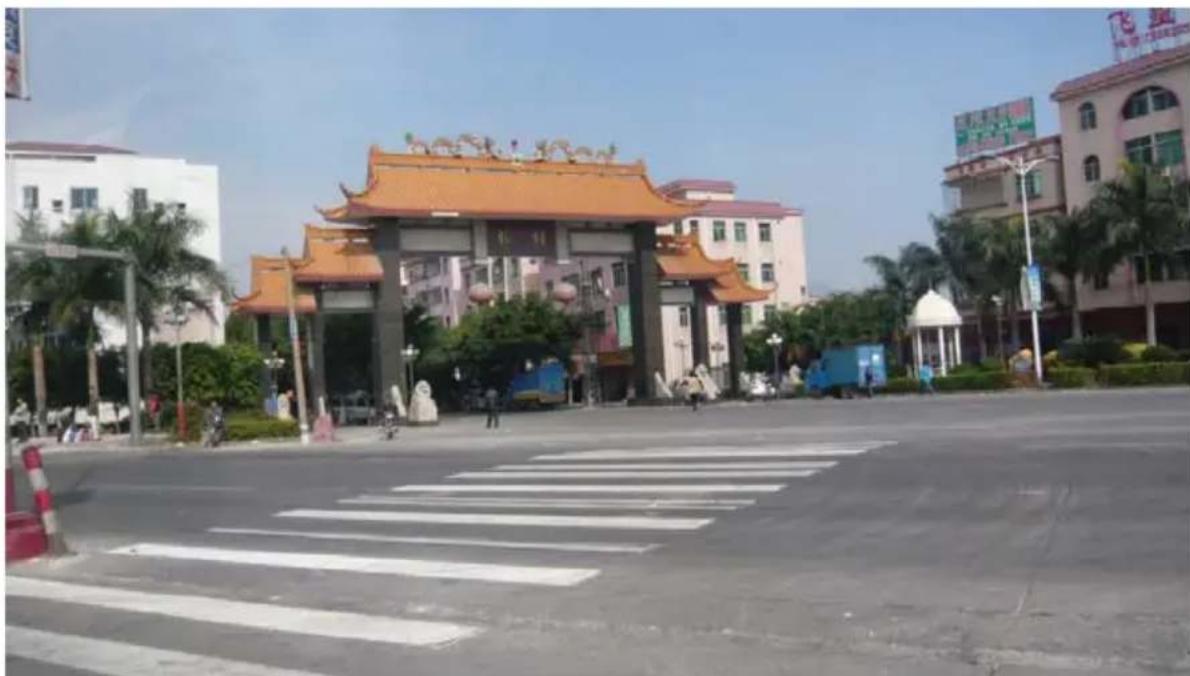
The current source will now be displayed on the screen:
natural_image
Exterior view of a traditional Chinese-style gate with orange roof and pedestrian crossingwalk (no signage)- Press the RECORD button on the remote control. Once the RECORD button is pressed you should see a flashing red light on the front panel of the HD-PVR. This indicates that the HD-PVR is now recording.
During the recording process, you can get information about the current recording by pressing the INFO button while you are recording.
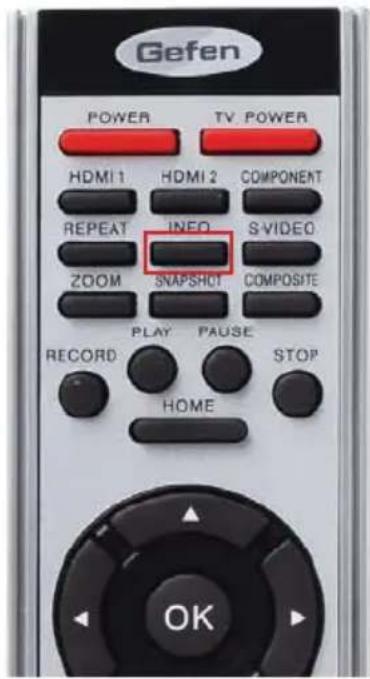
After pressing the INFO button you should see the following information:
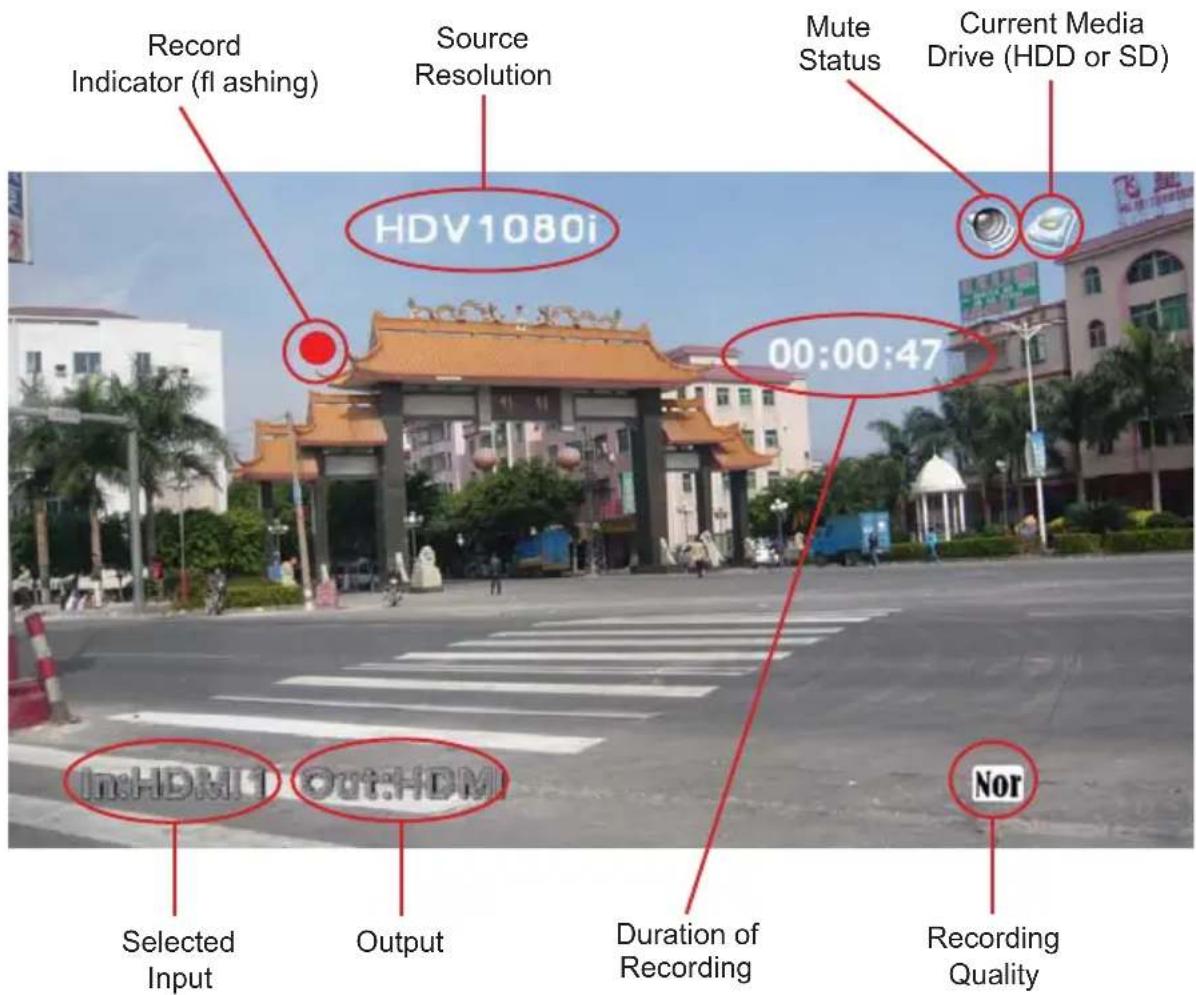
You can press the INFO button again to hide the recording information. NOTE: The recording information screen will not show up when you playback your recorded movies.
To stop the recording process, press the STOP button on the remote control.
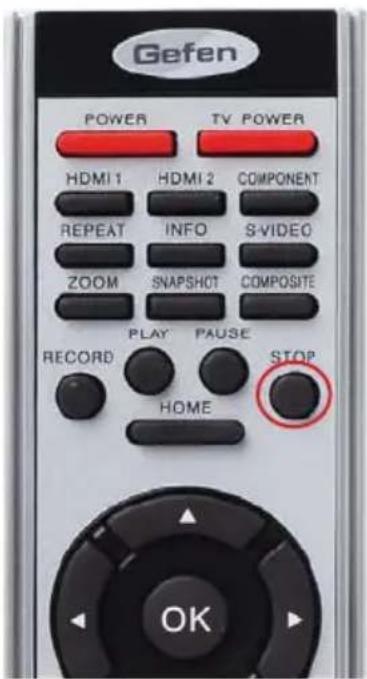
The HD-PVR will ask you if you are sure you want to stop recording:
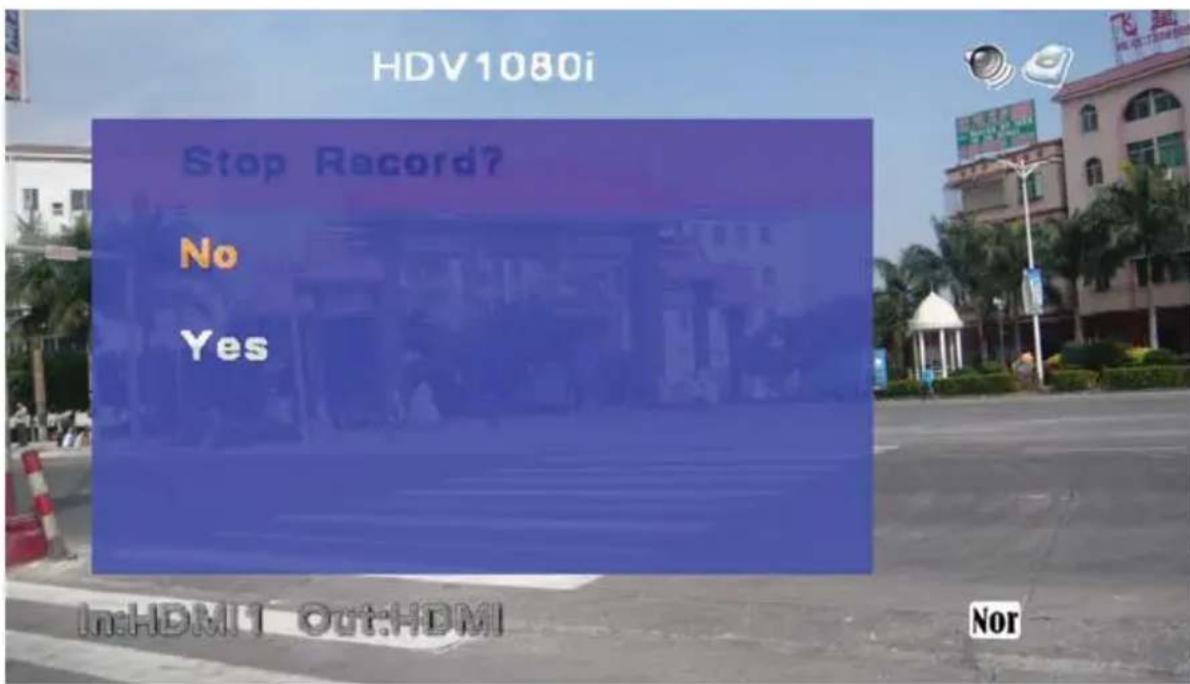
Use ◆ on the remote to select either Yes or No and press OK. Selecting No will continue the recording process. Selecting Yes will stop the recording process and save the movie to the currently selected media. Note that even though this dialog is displayed, the recording process is still taking place. The recording will not stop until you select Yes. NOTE: You cannot pause a recording by pressing the PAUSE button. You can only STOP a recording.
Most of the time you will want to view the source before recording it. However, it is possible to begin a one-touch recording directly from the HOME menu:
- From the HOME menu, press the RECORD button on the remote.
- The HD-PVR will switch from the HOME menu to the source. However, you will be asked "Record, Are you sure?". This prevents an accidental recording directly from the HOME menu, since the source is not currently being viewed. You will need to select Yes or No from the dialog. Selecting Yes will begin the recording process. Selecting No will allow you to view the source.
To stop the recording process, press the STOP button on the remote control. The HD-PVR will ask you if you are sure you want to stop recording.
- Press the HOME button on the remote to return to the HOME menu.
NOTE: If you're displays jumps slightly when starting a recording, it will not be seen in the movie during playback. This is simply due to a synchronization process between your display and the HD-PVR. This behavior is completely harmless.
PLAYING A MOVIE - Playback Controls
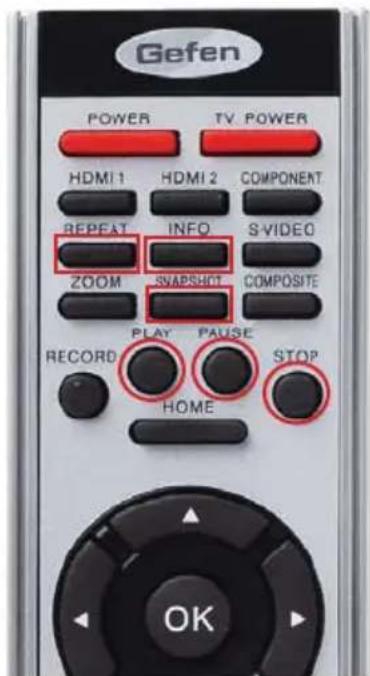
The HD-PVR remote has several buttons which allow you to control the playback of your recorded movies.
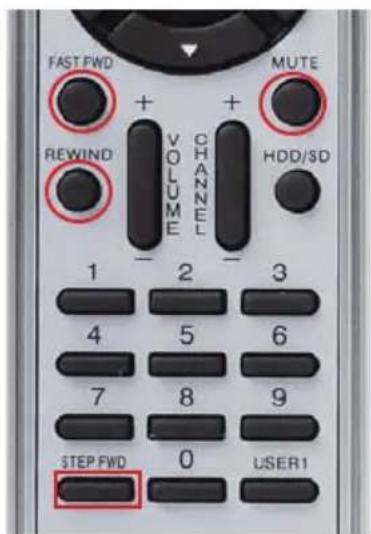
INFO
During a movie you can press the INFO button to get information on the current Movie. The information is displayed for the amount of time as set in the OSD menu in the setup utilities. Pressing the INFO button once more will bring up additional file details. Press the INFO button again to view the movie, normally.
REPEAT
The repeat function can be changed either in the menu or during a playback. There are three repeat modes.
Play Once The currently selected movie is played one time
Single Repeat The currently selected movie is continuously repeated
All Repeat All movies on the currently selected storage media are
played in succession and continuously repeated

flowchart
graph LR
    A["Play Once Single Repeat Repeat All"] --> B["Repeat All"]
Pressing the REPEAT button will cycle through these options as shown above.
STEP FWD (Step Forward)
A movie can be advanced frame-by-frame using the step forward function. To view a movie frame-by-frame, press PAUSE, then press the STEP FWD button on the remote to advance one frame at a time.
FAST FWD (Fast Forward)
Pressing the FAST FWD button during playback will advance the movie forward. Pressing the button each time will provide you with a different speed:

flowchart
graph LR
    A["Start"] --> B["2x 4x 8x 16x½"]
    B --> C["1/4"]
To resume normal playback speed at any time, press PLAY or OK. Press STOP to stop the movie and return to the thumbnail view.
REWIND
Pressing the REWIND button during playback will reverse the movie backward. Each press will increase the reverse speed by the following multiples:

flowchart
graph LR
    A["½"] --> B["¼"]
    B --> C["2x 4x 8x 16x"]
    C --> D[" "]
Pressing STOP will halt movie playback. Press PLAY to resume normal (forward) playback. Press STOP to return to the thumbnail view.
PAUSE
The PAUSE function is used to pause a movie during playback. You can then use the Step FWD function, mentioned earlier, to progress through the movie frame-by-frame.
SNAPSHOT
You can take snapshots of individual frames of a movie with the SNAPSHOT button. To take a snapshot, do the following:
- When you see a portion of a movie you would like to capture as a photo, press the PAUSE button. TIP: You can also use the PAUSE button and then use the Step FWD button to progress frame-by-frame until you see the frame you want to capture.
- Press the SNAPSHOT button on the remote to capture the current frame as a photo.
After the snapshot is taken, you can press the HOME button to stop the movie and return to the HOME menu. Once you are at the HOME menu, select View Photos and press OK
The most recent snapshot will be listed first in the thumbnail view, under View Photos.
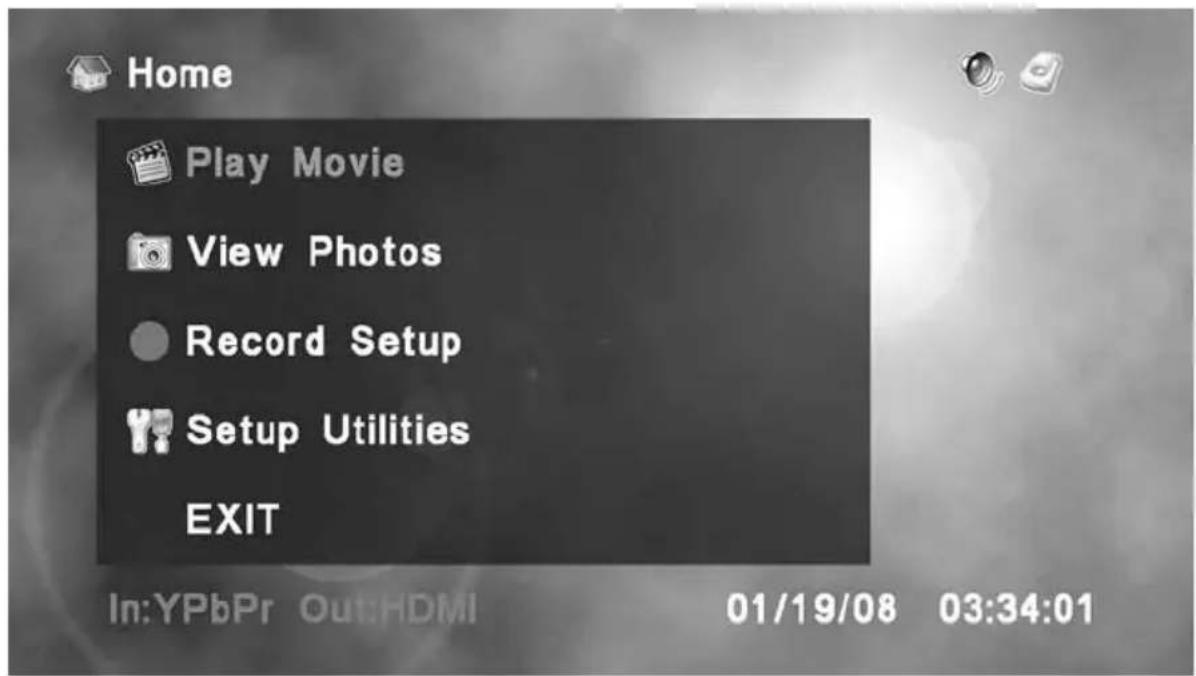
From the Home Menu, choose Play Movie with ◆ and press OK.
PLAY MOVIE - Thumbnail View
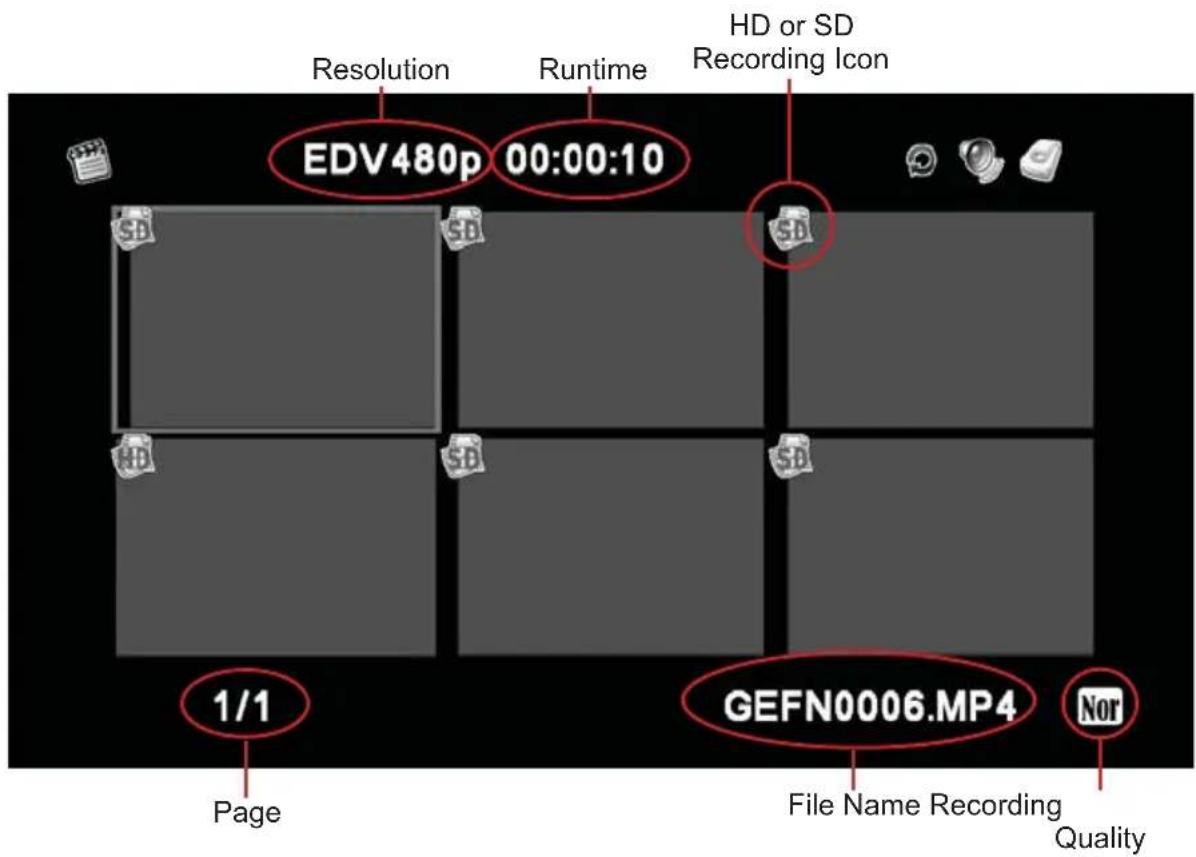
To navigate the PLAY MOVIE menu, use ◆ and ◄ to make your choice and press the PLAY button to start playback. You can also press OK to bring up the Movie Menu.
MOVIE MENU
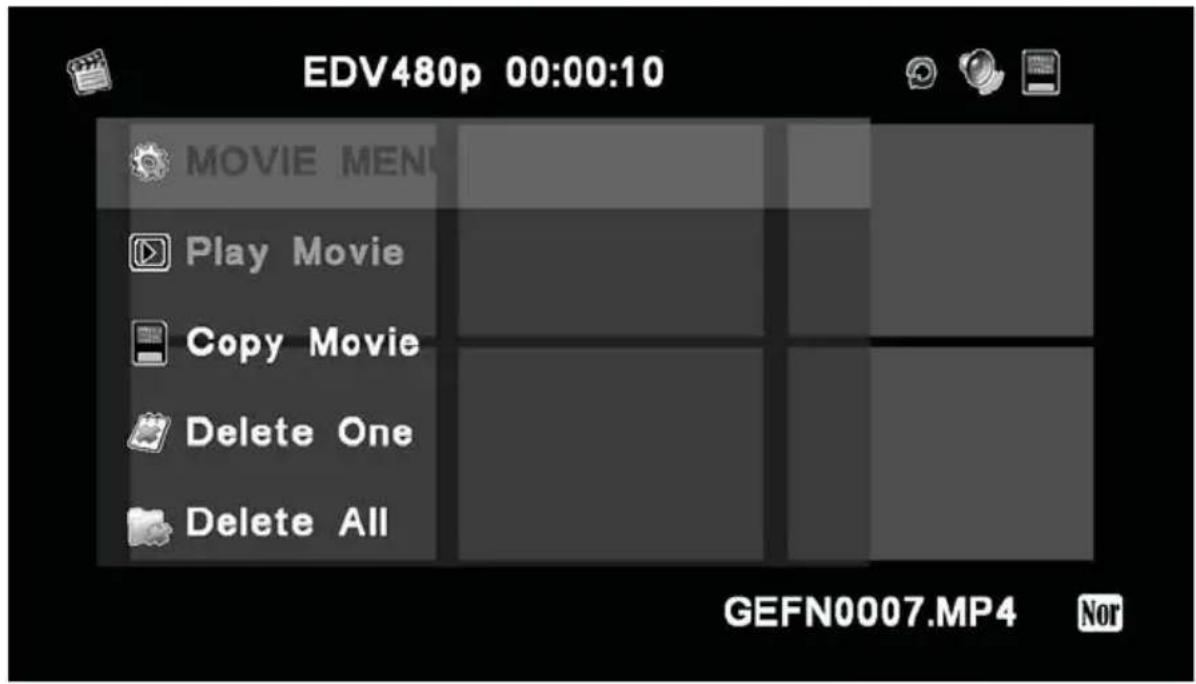
The Movie Menu allows you to begin playback, copy, or delete the selected movie. Use ◆ to select your choice and press OK to select it.
MOVIE INFORMATION - Panel Description
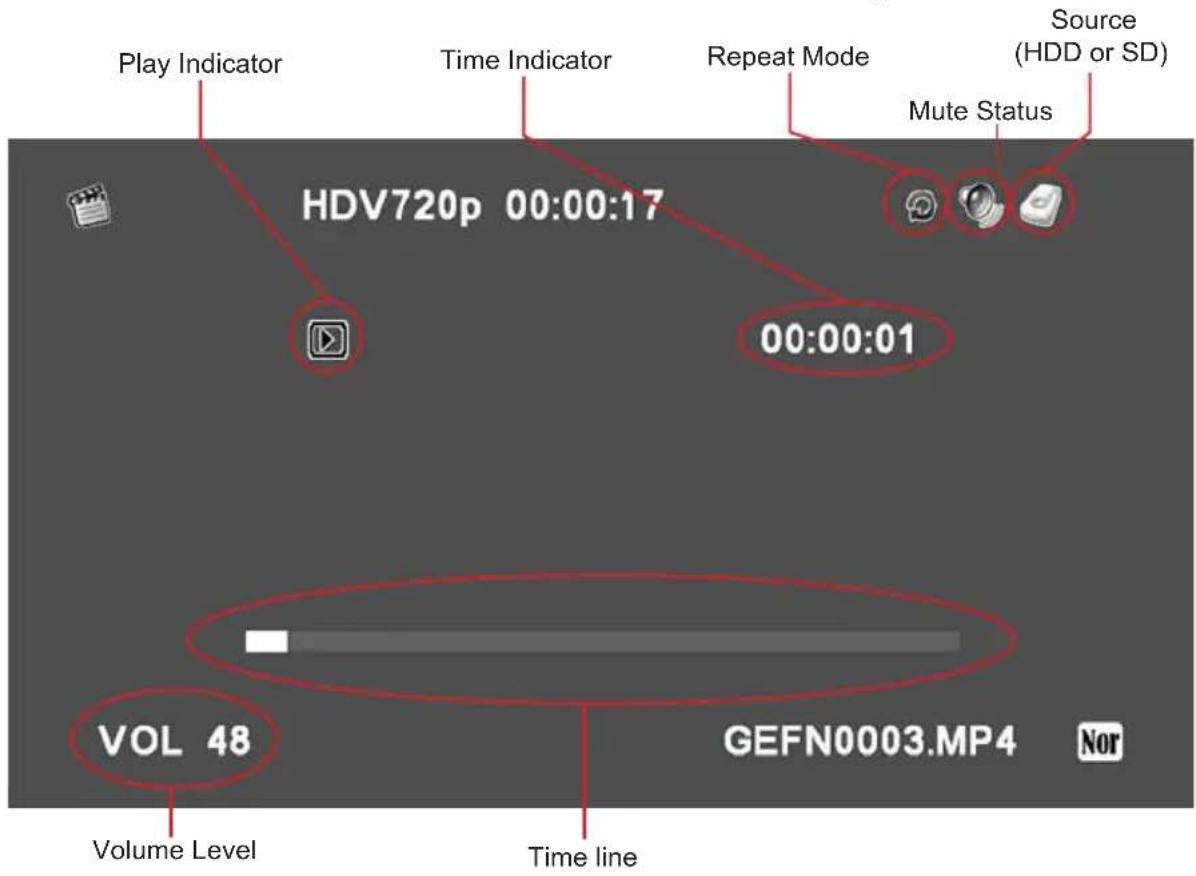
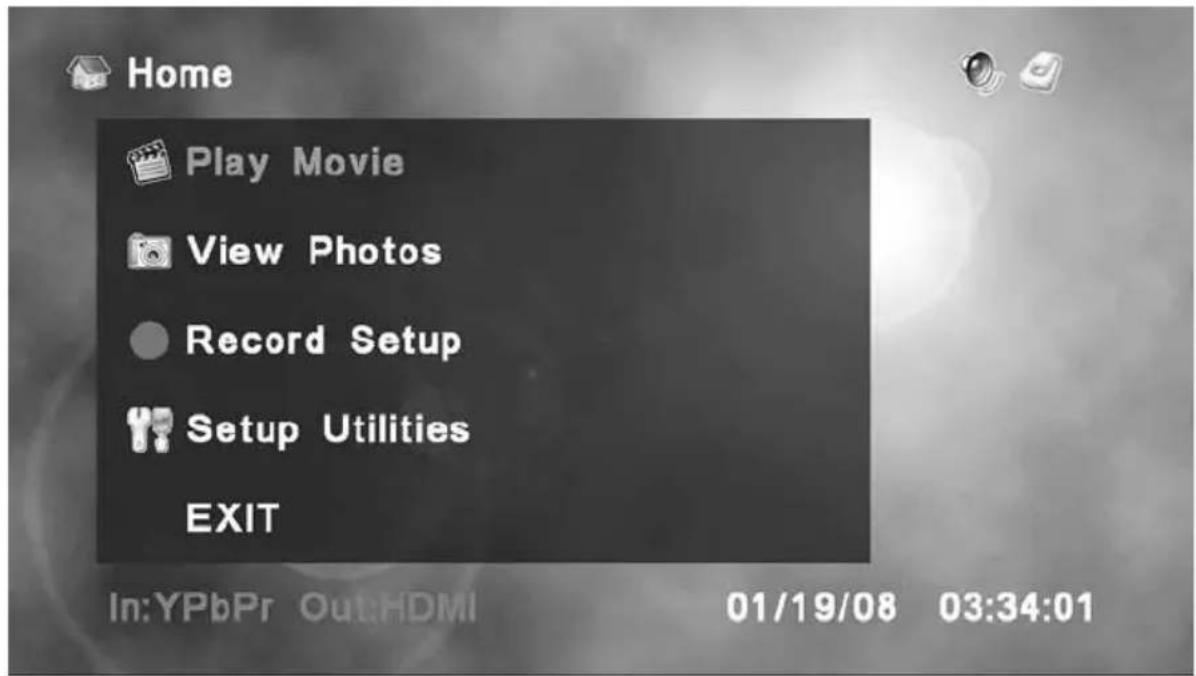
From the home menu use ◆ to select Record Setup and press OK.
RECORD SETUP - Schedule List
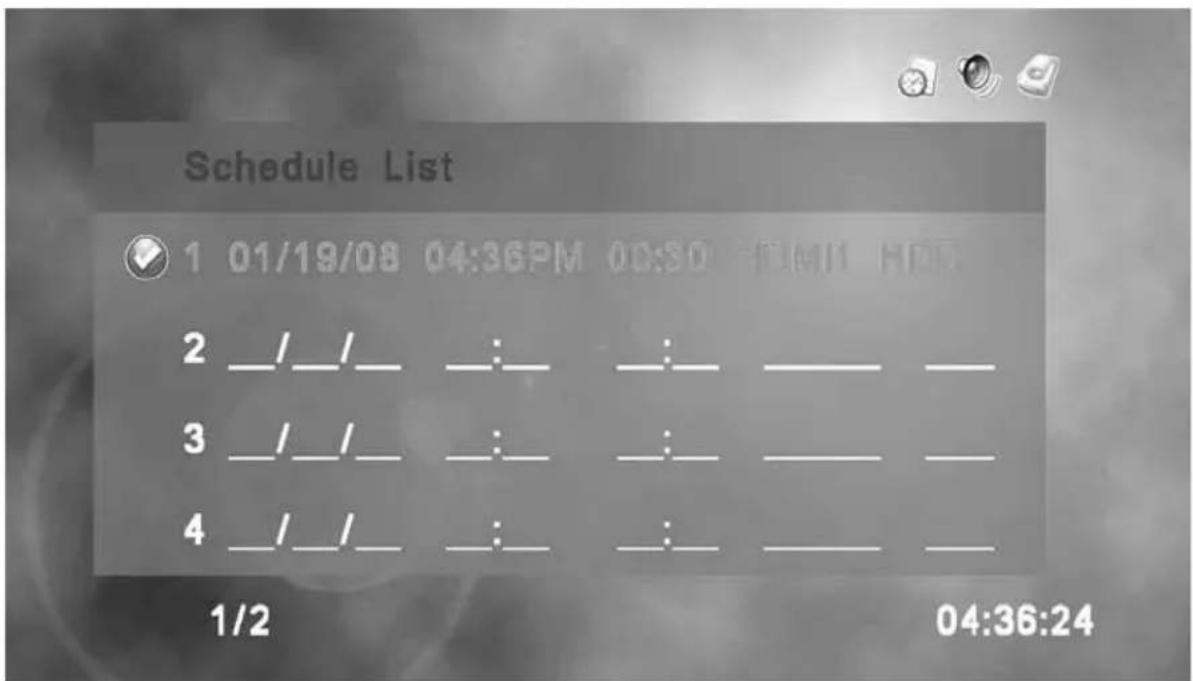
The Schedule List menu displays all scheduled recordings. Once a recording is complete, the entry is removed from the list. Scheduled recordings labeled with a 📋 are active recordings.
RECORD SETUP - Panel Description
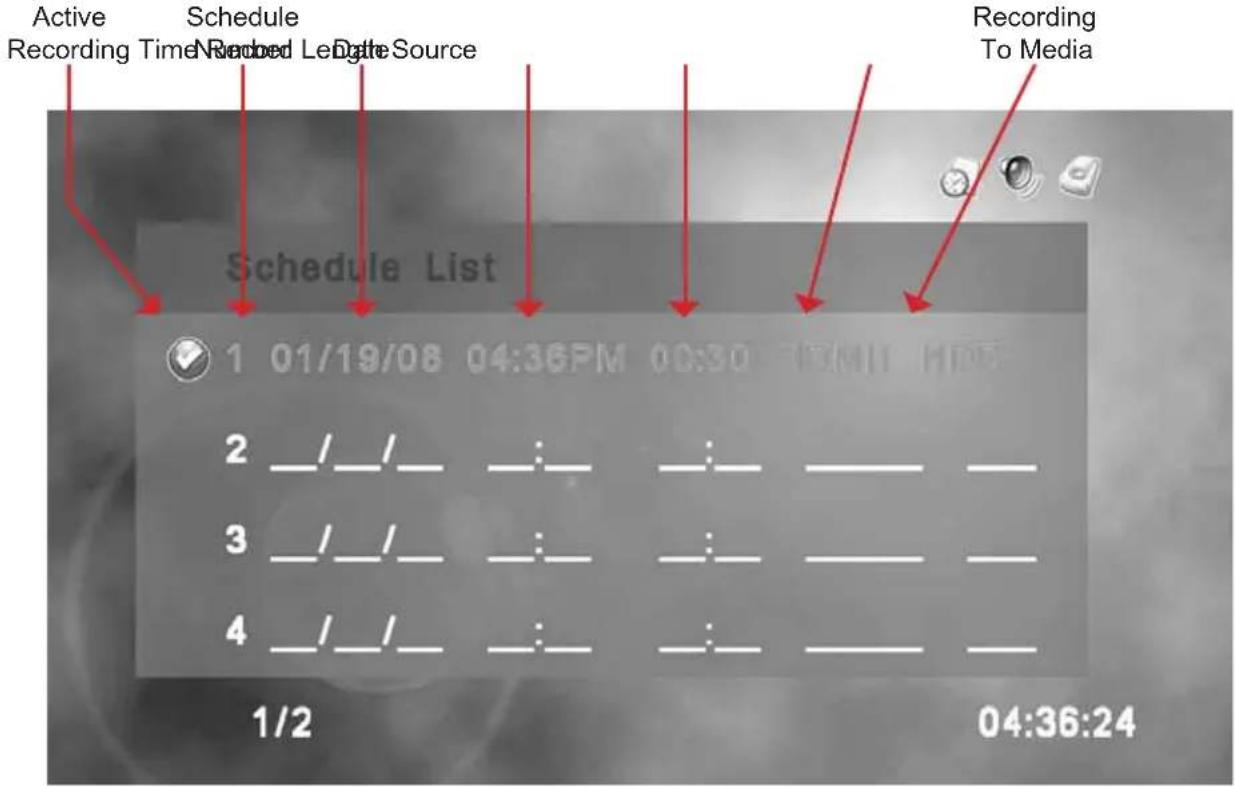
RECORD SETUP - Set Date
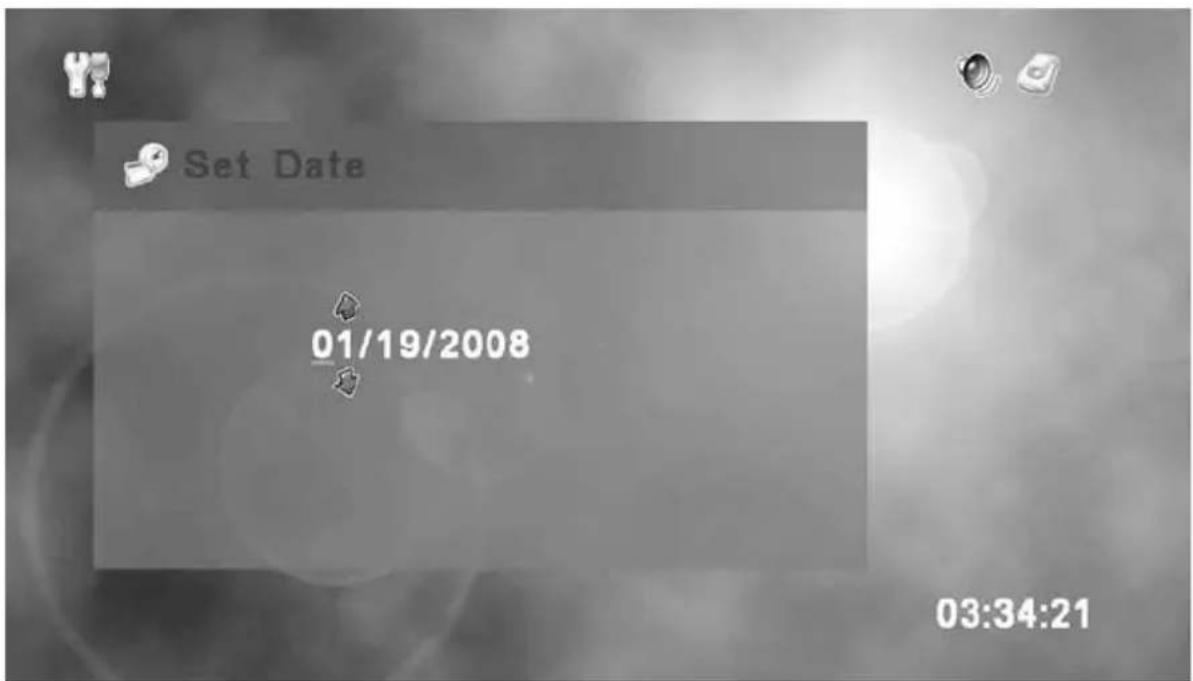
Set the date for the recording using ◆ to change each digit. Use ◆ to move to another digit. Press OK when you are done.
RECORD SETUP - Set Start Time
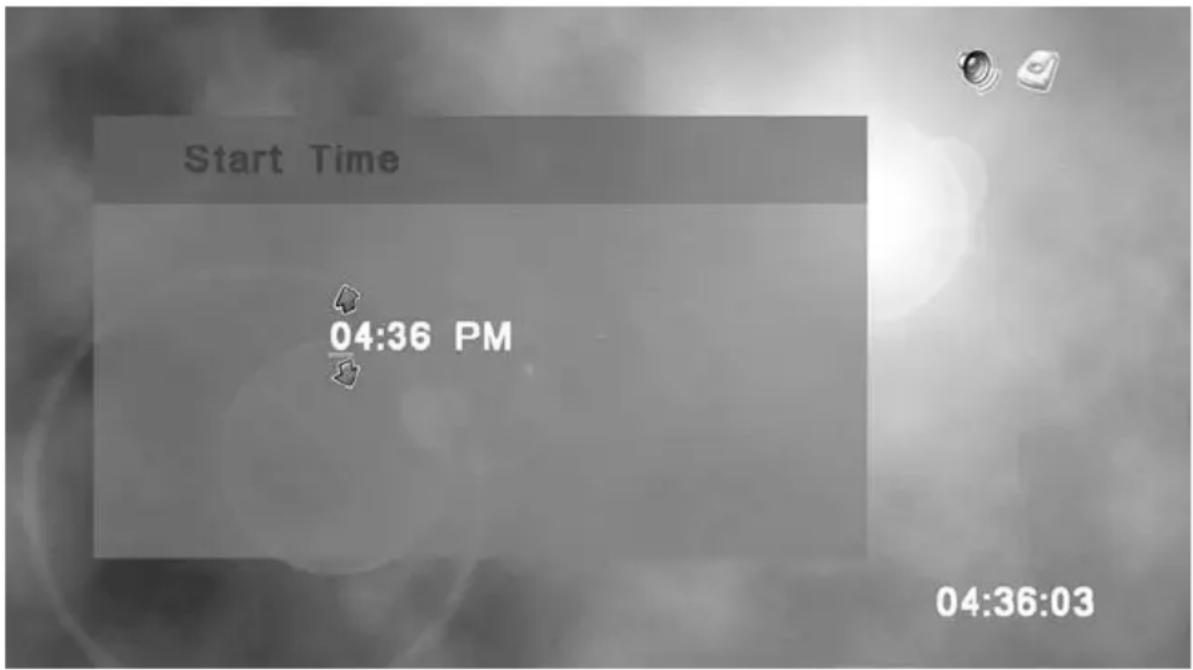
Set the time for when you want the recording to begin. Use ◆ to change the numbers and use ◄ to move between the digits. Press OK when you are done.
RECORD SETUP - Set Length
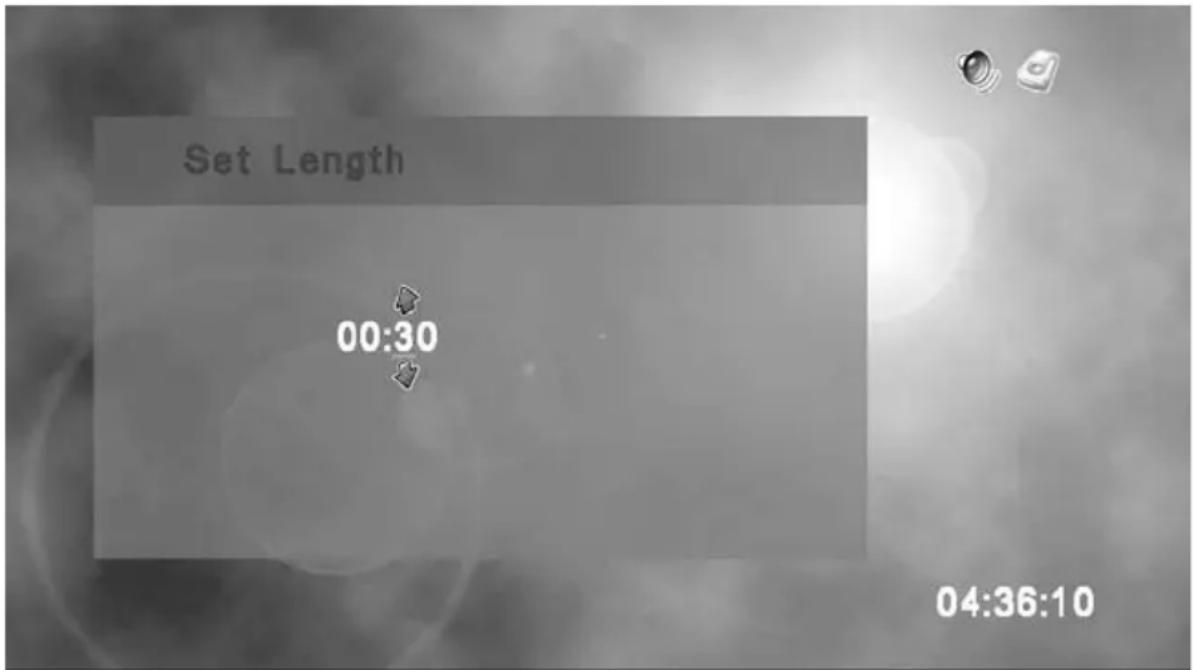
Set the time for when you want the recording to begin. Use ◆ to change the numbers and use ◄ to move between the digits. Press OK when you are done.
NOTE: Time cannot be set to 00:00. Minimum recording time is 1 minute (00:01)
RECORD SETUP - Set Source
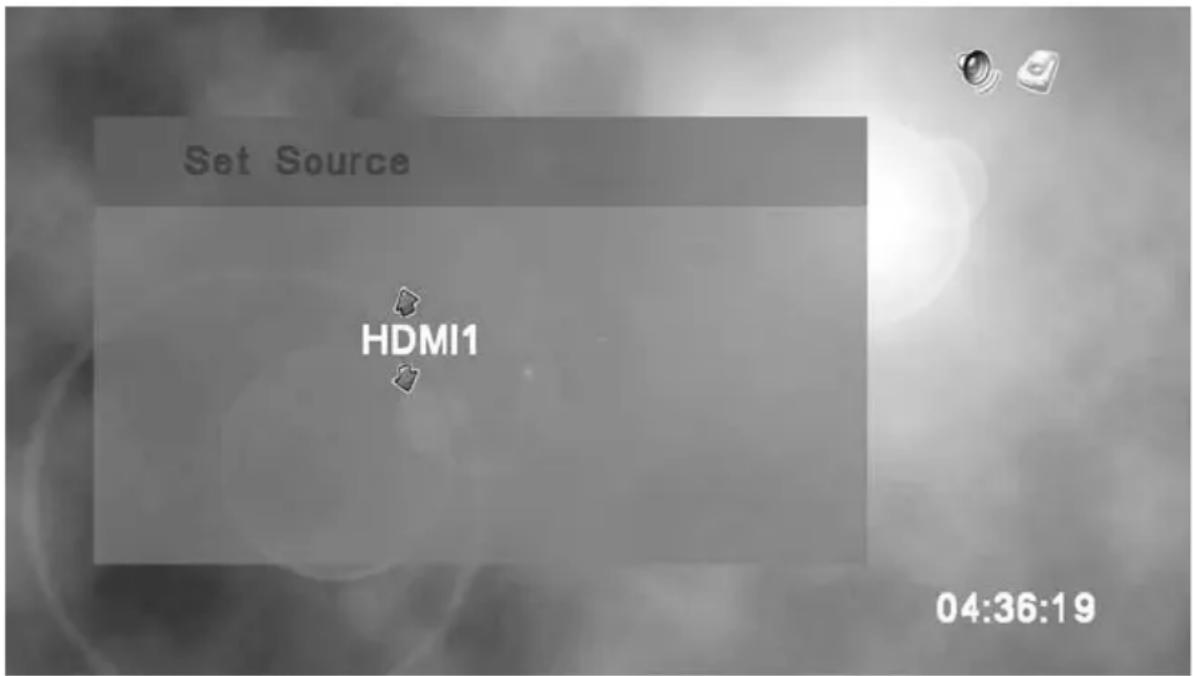
Set the input source for the recording using ◆ to select between HDMI1, HDMI2, COMPONENT or VIDEO. Press OK when you are done.
RECORD SETUP - Set Media
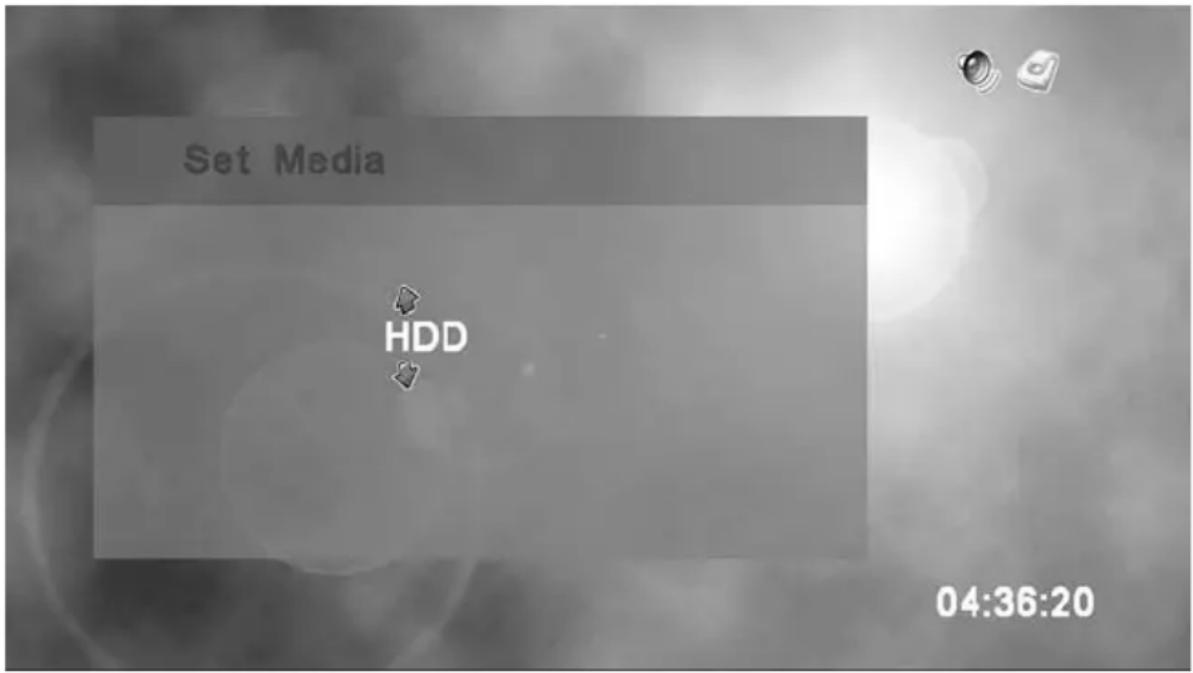
Set the media for the recording using ◆ and press Ⓞ when you are done. You can select between the internal hard drive (HDD) or the SD card.
RECORD SETUP - Set Channel
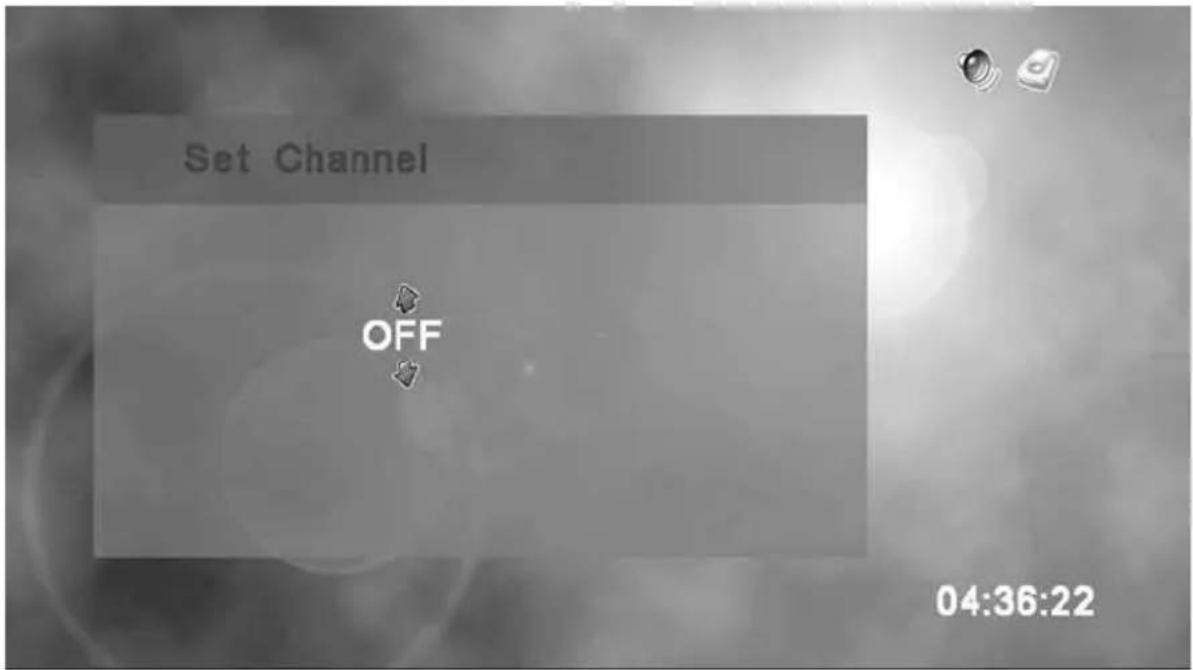
If the IR blaster is connected and set up, you can select a specific channel (up to 4 digits). Otherwise, you should set to OFF mode when not using an IR blaster. Use ◆ to change each digit and ◀ to move between them. Once you have set the channel, press OK to complete the Recording Setup.
RECORD SETUP
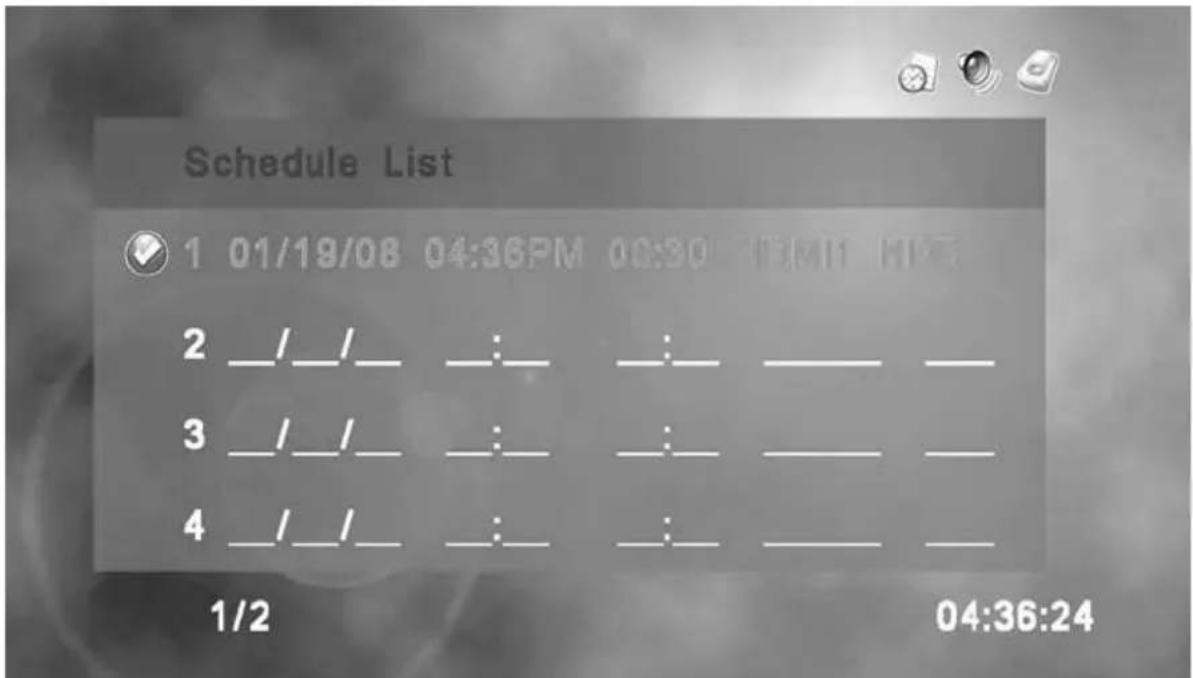
Once you have input all of the information for the recording it should already be set as active. To de-activate the recording for any reason, navigate to it using
and simply press the ▶ key on the remote. To re-activate it press ▶ again.
From the home menu use ◆ to select View Photo and press OK.
Folder Menu - Description
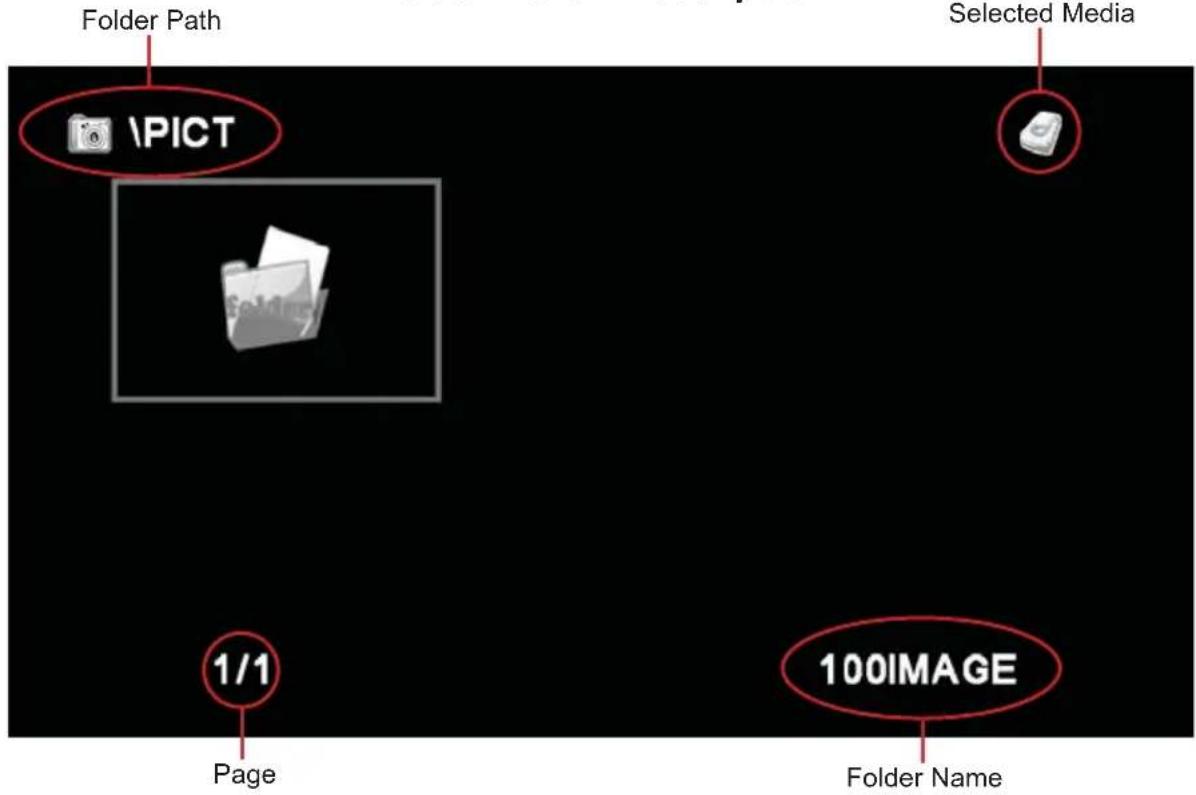
Folder Menu - Main
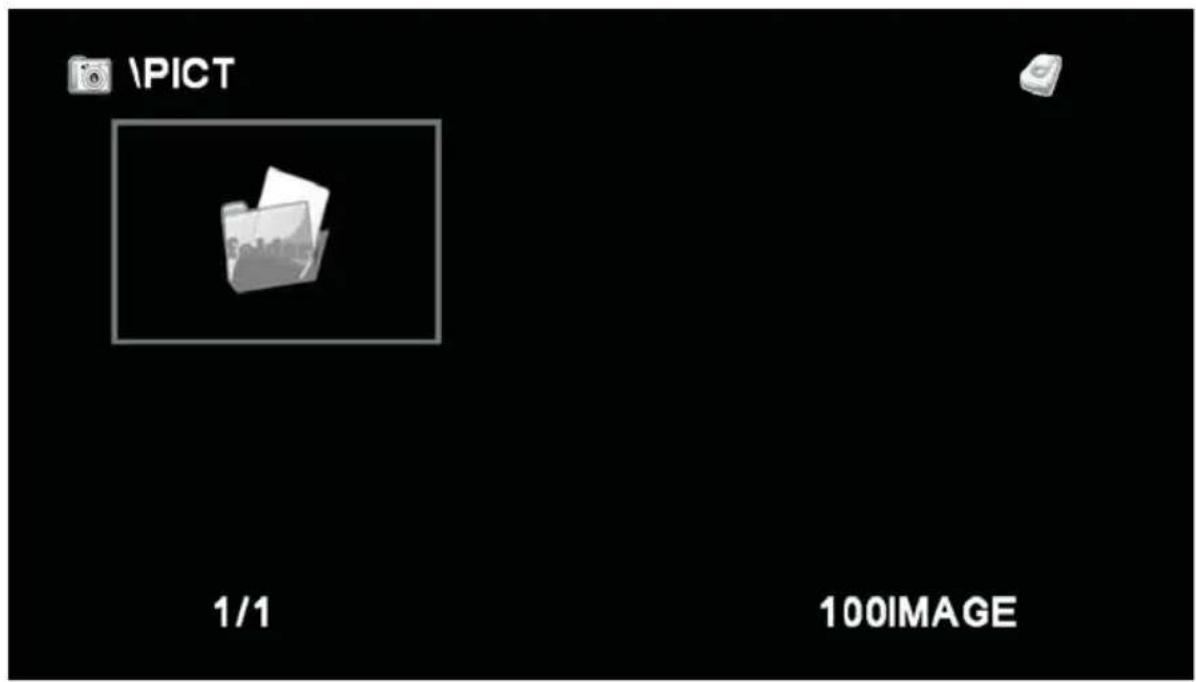
The Folder Menu displays the current folders located on the selected media. To change media type, press the HDD/SD button on the remote at any time. Use and to navigate the menu and press to open the selected folder.
Photo Selection Menu
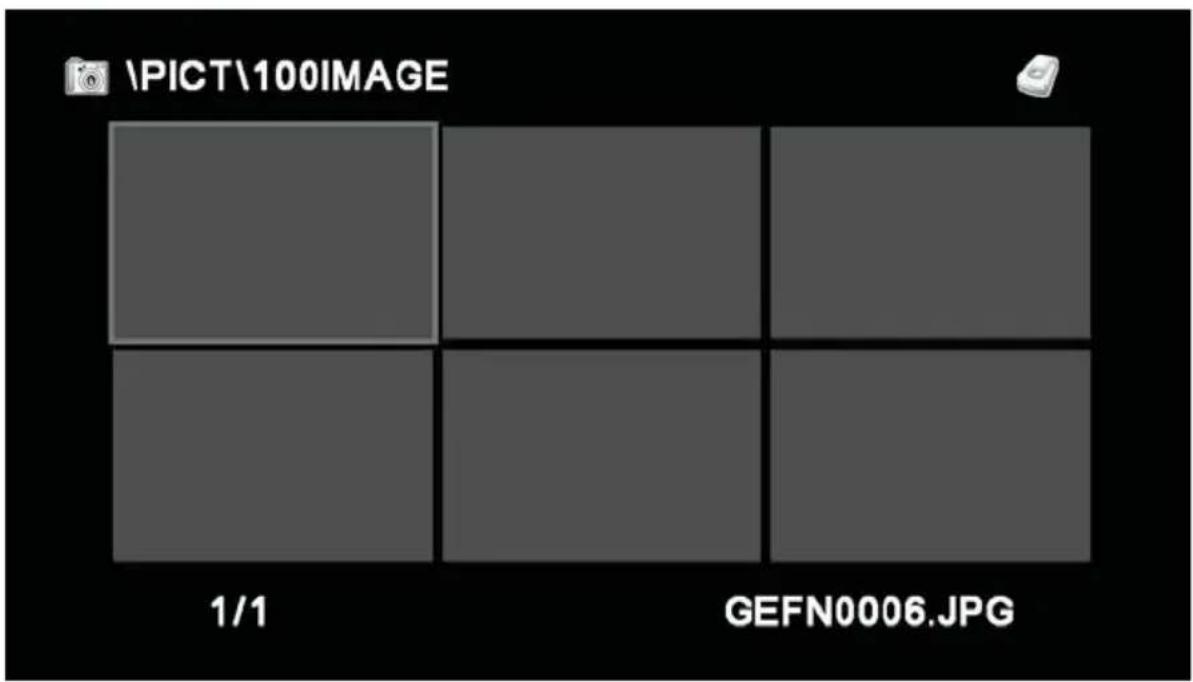
Navigate the photos with ◆ and ◀. You can start a slide show at any time by pressing the PLAY button on the remote. To view a single photo, press OK to bring up the Photo Menu, select View Photo with ◆ and press OK.
Photo Selection Menu - Photo Menu
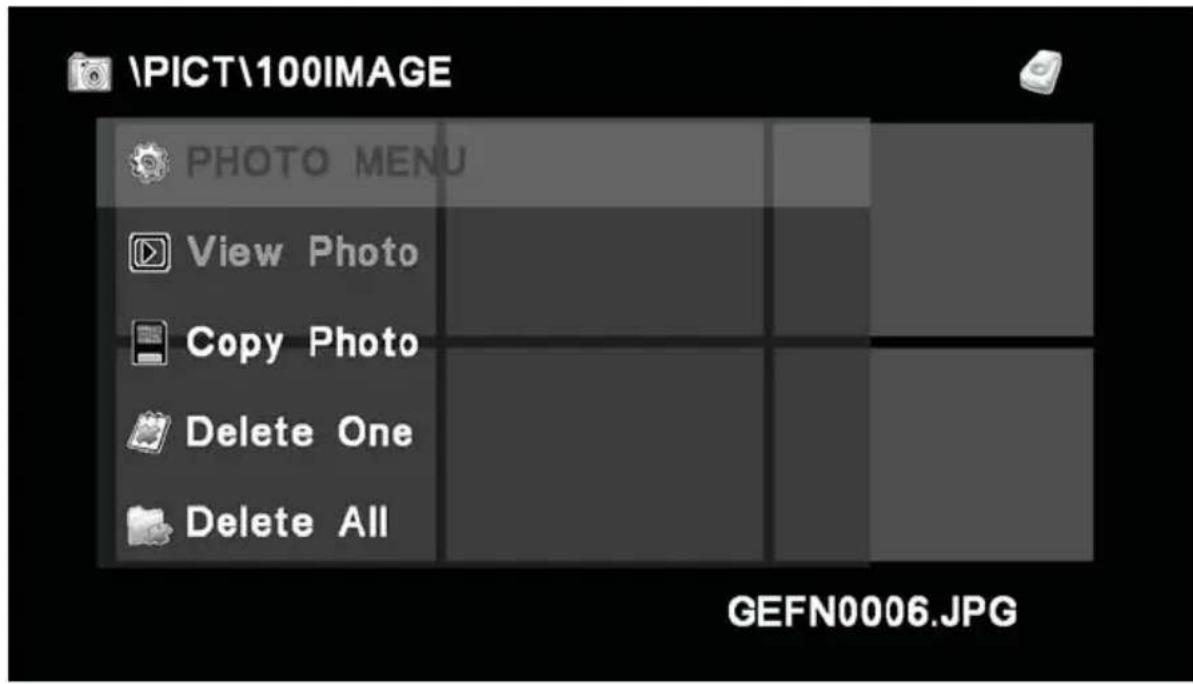
The Photo Menu will allow you to view a single photo, delete the selected photo, or delete all the photos on the selected media. Use ◆ to choose your option and press OK to select it.
While viewing a single photo, you may move to the next photo in the folder by pressing ▶ on the remote. You can also view the previous photo by pressing ◀ on the remote.
To exit either the slideshow or single photo view, simply press the STOP button on the remote. This will return you to the Photo Selection Menu.
TIP: You can quickly return to the main folder view by cycling the storage media. To do this just press the HDD/SD button on the remote twice.
Copying
Navigate to the desired movie or photo using the instructions in the Play Movie or View Photo section. Pressing OK will bring up the additional menu where the COPY command is located. Choose COPY and press OK. Choose your desired location, either HDD for the internal hard drive or SD for the SD flash card using OK and finally press.
Deleting
Navigate to the desired movie or photo using the instructions in the Play Movie or View Photo section. Pressing will bring up the additional menu where the DELETE command is located. Choose DELETE and press . There will be a confirmation window that asks if you want to proceed with the delete operation. Choose YES or NO using and finally press . Additionally, you can delete all the content on a particular storage media by selecting the DELETE ALL command from the same menu. WARNING: This will delete all content on the selected media and is not reversible. OK
OK
TIP: You can quickly change between storage media by pressing the HDD/SD key on the remote at any time.
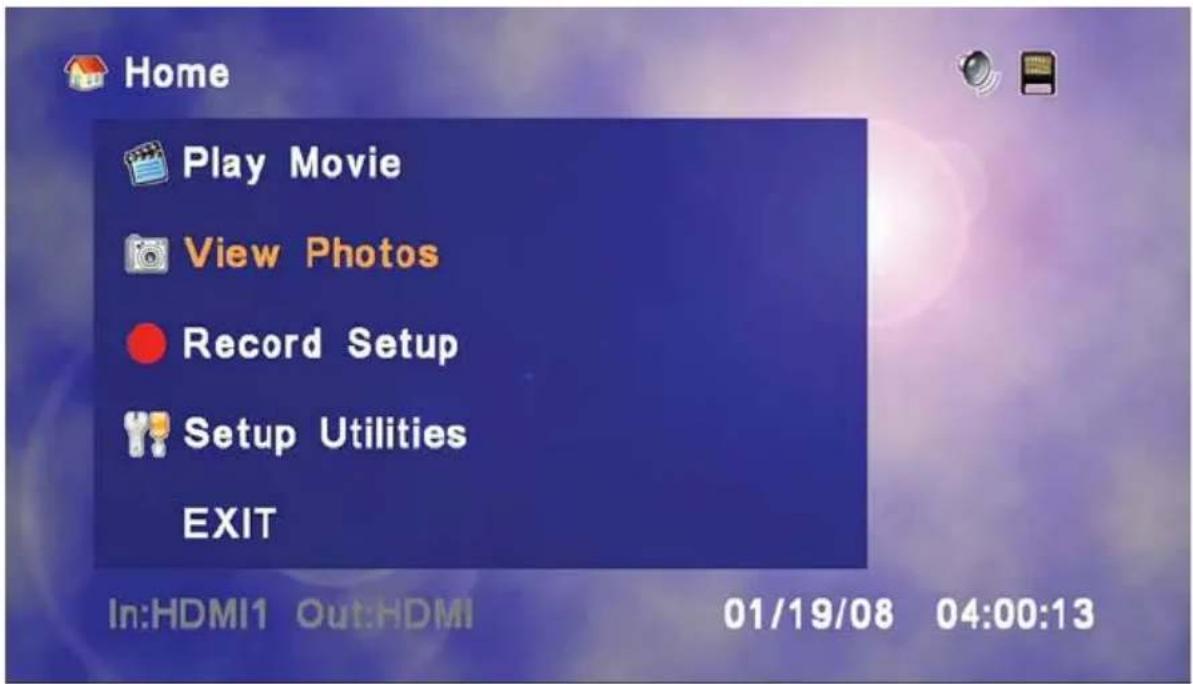
- Remove the SD-Card from your digital camera and insert it in the HD-PVR SD-Card slot.
- Press the HDD/SD button on the remote to make the SD-Card the active storage media. The icon in the upper right-hand corner of the screen should change to a black square disk icon (this let's you know you are working with the SD-Card and not the hard drive).
- Use ◆ to choose View Photos and press OK to select it.
Depending upon where photos are stored on your recording device, you may see the following screen.
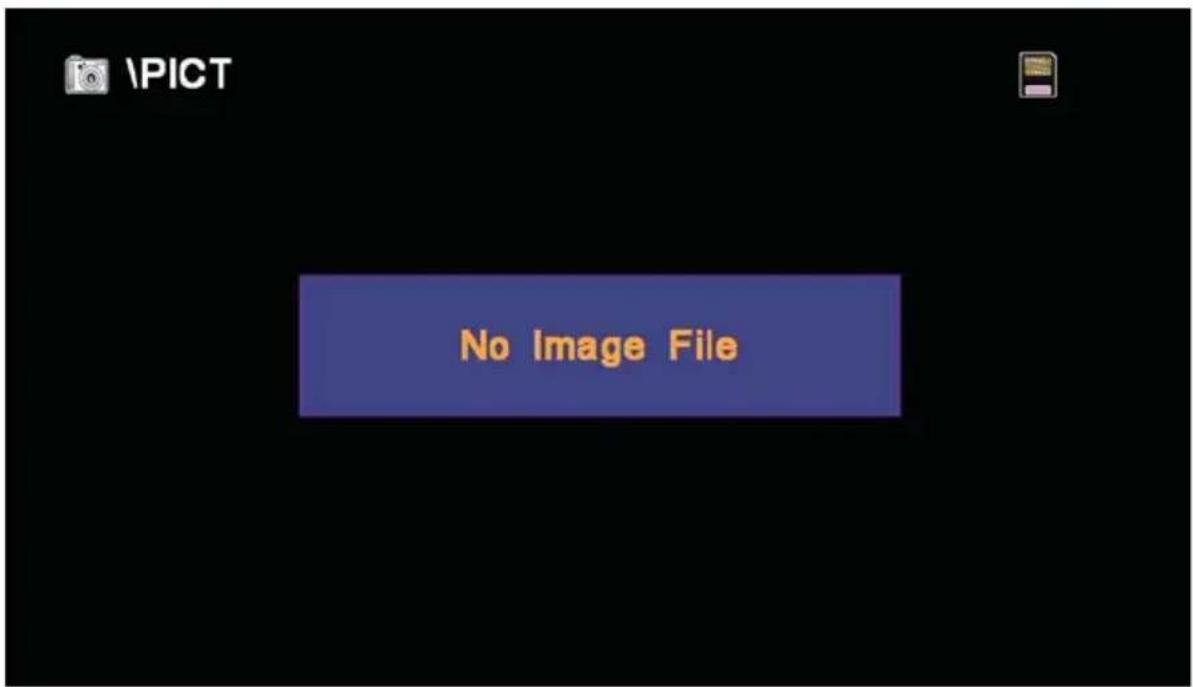
If this happens, you will need to tell the HD-PVR where the photos are stored. Most digital cameras use the \DCIM folder for storing digital photos. By default, the HD-PVR will always look in the \PICT folder for images.
To tell the HD-PVR to view another folder, do the following:
- Press the STOP button on the remote. Pressing STOP will tell the HD-PVR that you want to move up in the folder heirarchy. Note that the current folder is displayed in the upper-left corner of the screen. The “\” symbol tells us that we are at the “root” folder, which is as far up as we can go.
- You will see a screen that looks something like this. Using ◀ on the remote, highlight the \DCIM folder. The currently highlighted folder name is displayed in the lower-right corner. Here, we have highlighted the DCIM folder.
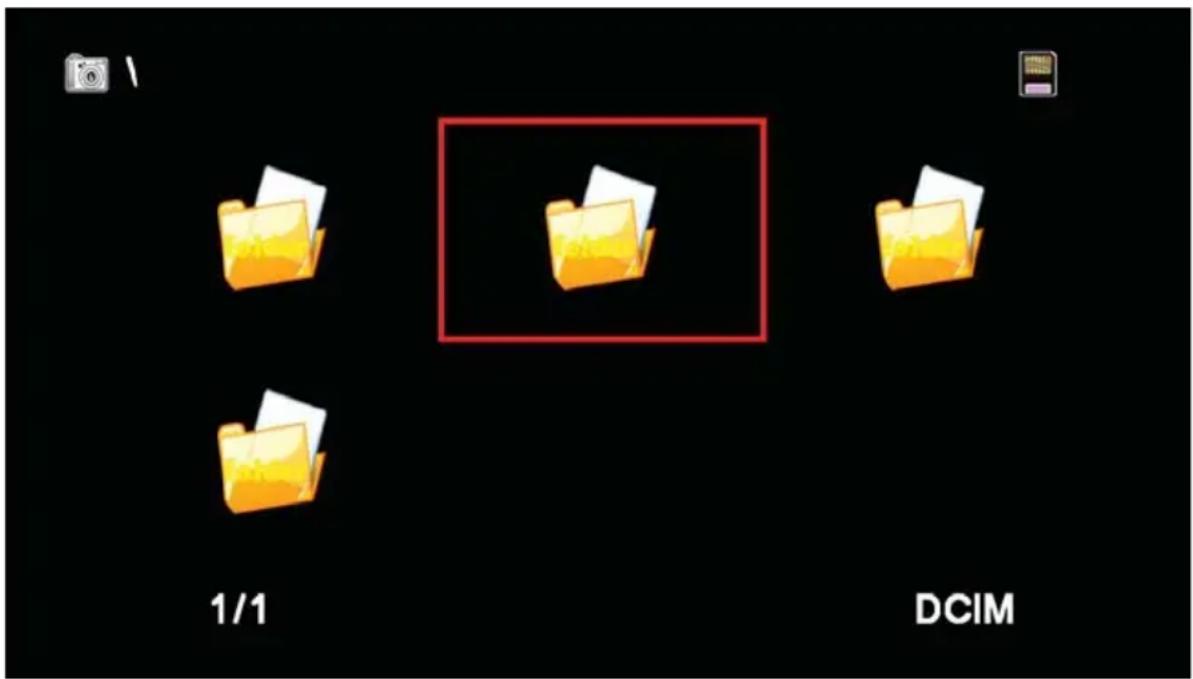
- Press OK on the remote to view the contents of the DCIM folder.
Once you are in the DCIM folder, you should see thumbnails of all your digital photos. However, it is also possible you may see other folders. If this is the case, you will need to highlight the folder containing your photos, by using ◀ and pressing Ⓔ to view the contents of the folder.
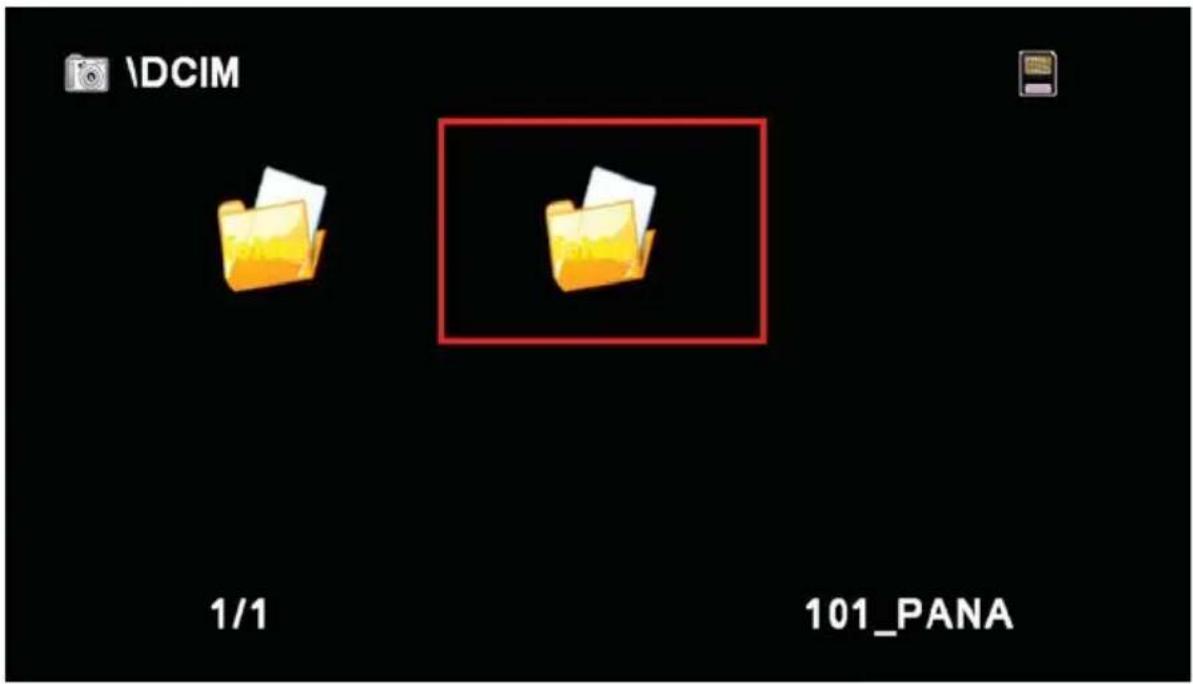
In our example, our photos are stored in a folder called "101_PANA". As you can see, the HD-PVR always tells us where we are: The text in the upper-left corner tells us what folder we are viewing (in this case, the \DCIM folder) and the text in the lower-right corner tells us what folder we have highlighted.
Once you are viewing a folder which contains photos, the HD-PVR will display a series of thumbnails, representing each photo.
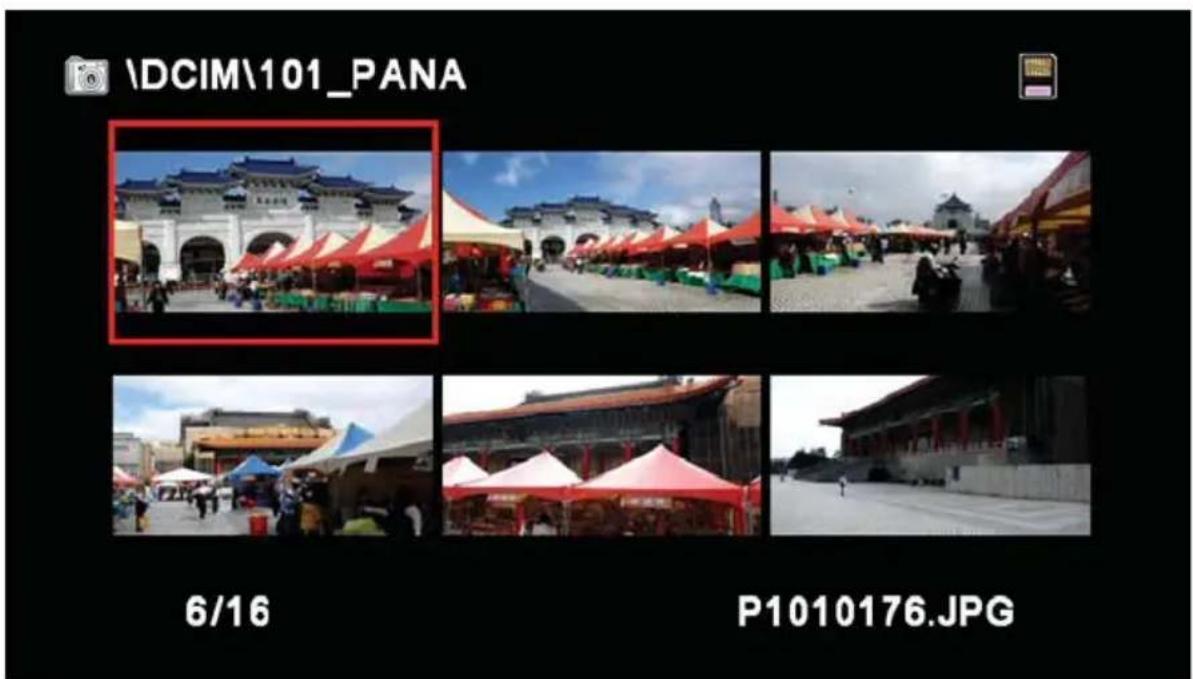
Navigate the photos with ◆ and ◀. You can start a slide show at any time by pressing the PLAY button on the remote. To view a single photo, press OK to bring up the Photo Menu, select View Photo with ◆ and press OK.
Once you are in thumbnail view, you can press the HOME button on the remote control to return to the HOME menu. You can also press the STOP button to move up one level in the folder hierarchy. In our example, pressing STOP will return you to the \DCIM folder.
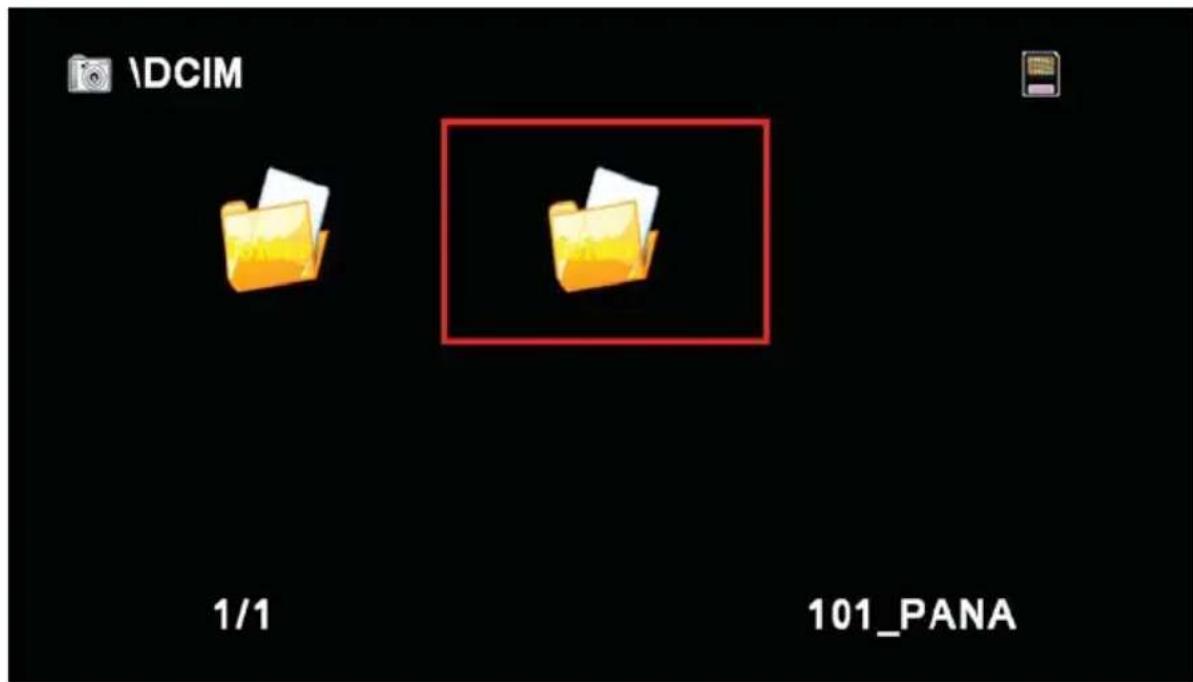
Pressing the STOP button again would return you to the "root" folder, indicated by a "\".
The same operations for STOP, OK, and HOME apply to viewing photos on the hard disk drive (HDD).
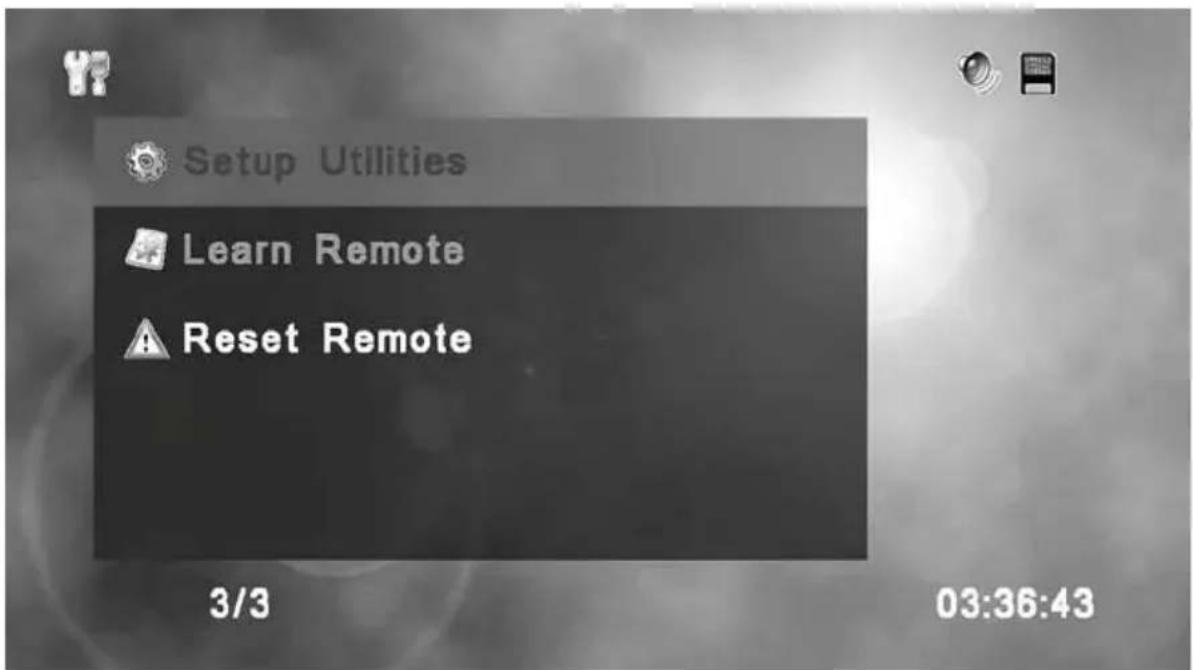
The Gefen HD-PVR remote has a number of user configurable keys that can be programmed with IR codes from other devices. The IR codes are transmitted through the IR blaster on the back of the unit. This feature allows you to control your other devices using the HD-PVR remote. There are a number of user-defined keys on the HD-PVR remote that can be programmed to control power, volume, channel, etc. Please see the IR Remote Layout at the beginning of this manual for a listing of the keys that are programmable.
Learn Remote
From the Setup Utilities menu, choose Learn Remote with ◆ and press Ⓞ.
-
Press the key on the HD-PVR remote which you would like to learn.
-
Now, press the key on the device's remote that you wish to assign.
For example, if you want to assign POWER ON/OFF for your DVD player, you could press USER2, on the PVR remote, in Step 1. Then press the power button on the DVD player for Step 2. You would then need to connect the IR blaster to the DVD plauer so it would be able to accept the commands.
Reset Remote
Resetting the remote will erase all user-defined functions, restoring the remote to factory settings. You will be asked to confirm this action if you select it. Use this only IF you wish to re-learn the remote keys. NOTE: Once a key has been learned, it cannot be re-learned until you perform a Reset.
The Gefen HD-PVR includes decoder software which allows you to play your recorded movies on your computer.
NOTE: The installer only installs decoder software. You will still need a program such as Windows® Media Player to play video files from the HD-PVR.
To install the software, please follow these steps:
Start your computer and insert the included CD in your CD or DVD drive.
Click Start, click Run, then type the following command and click OK:
After a few moments, you should see the following screen:
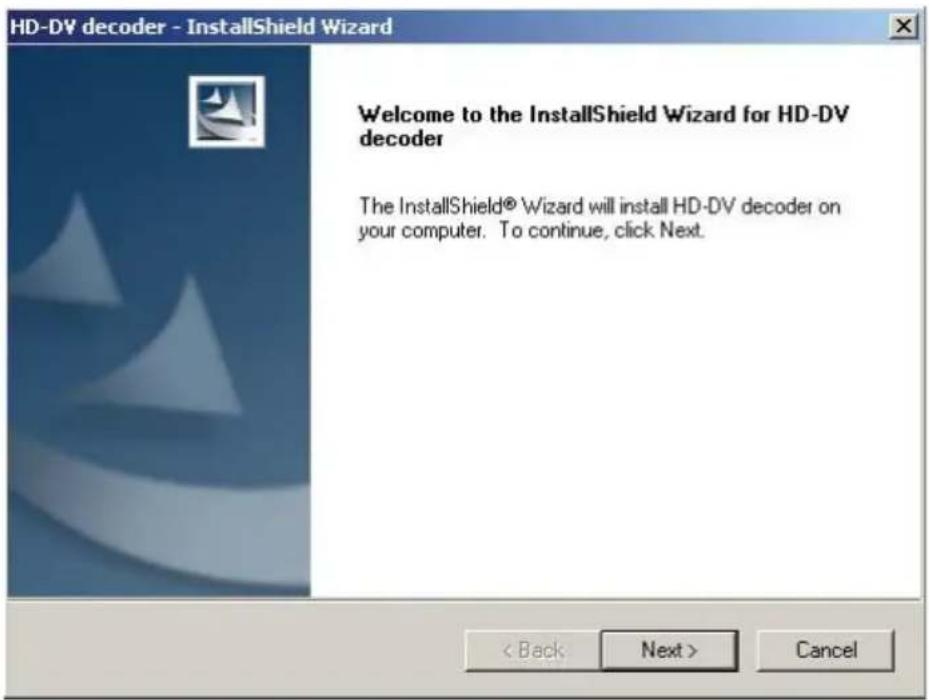
Click Next to continue with the installation. You may press Cancel at any time to abort the installation process.
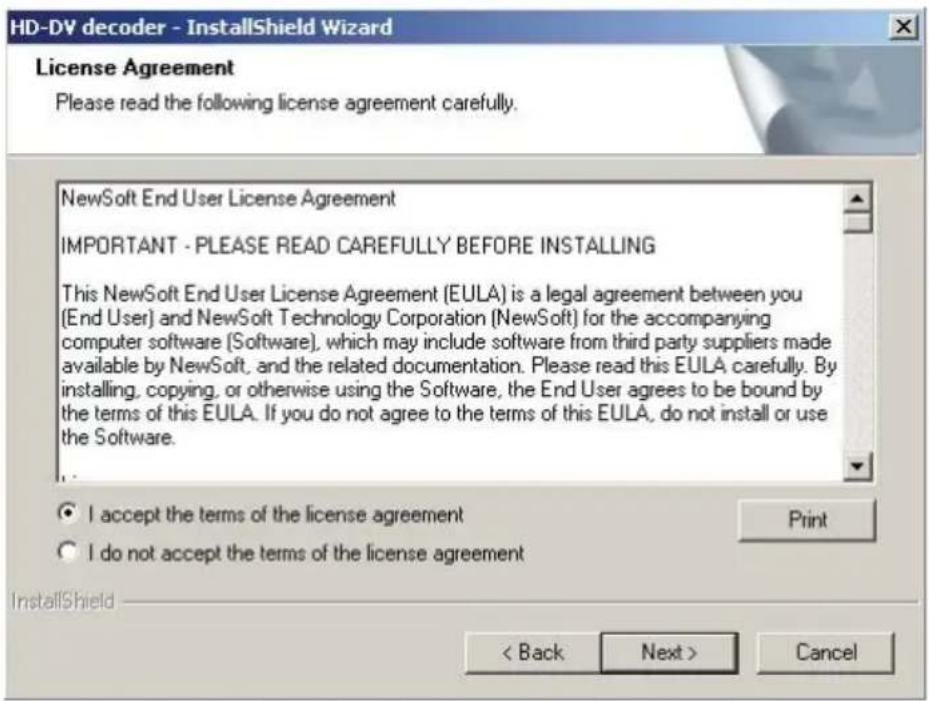
You must agree to the terms of the software license agreement before installation can continue. If you do, click "I accept the terms of the license agreement" and click Next.
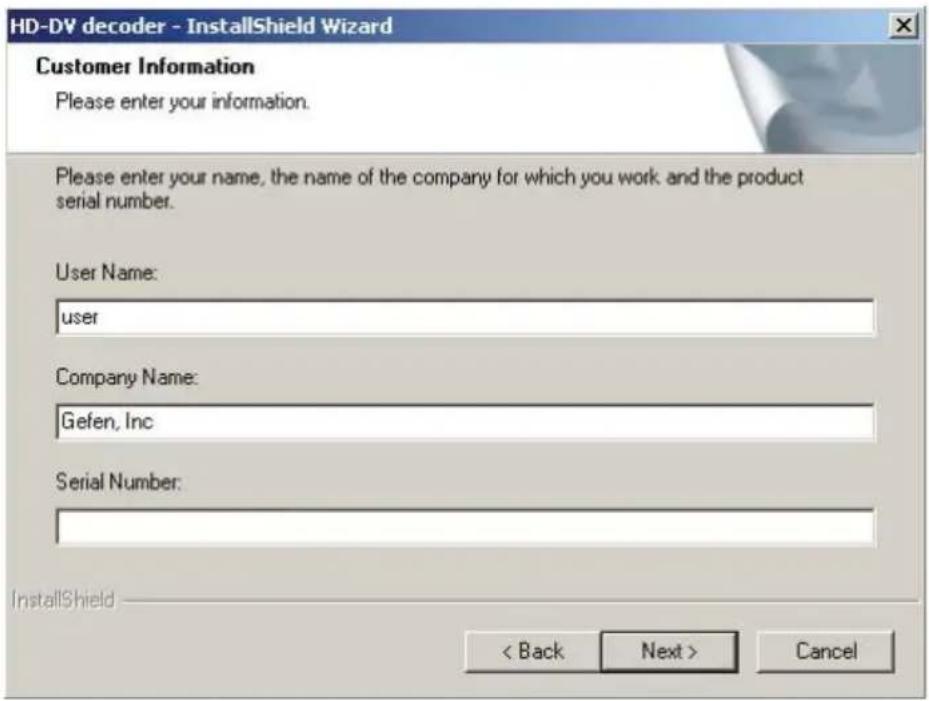
On the Customer Information screen, enter your name, company name and serial number. Each of these fields must be filled in order to continue with the installation. The serial number can be found on the front of the plastic casing in which the CD was shipped. If you make a mistake entering the serial number, the installation program will notify you.
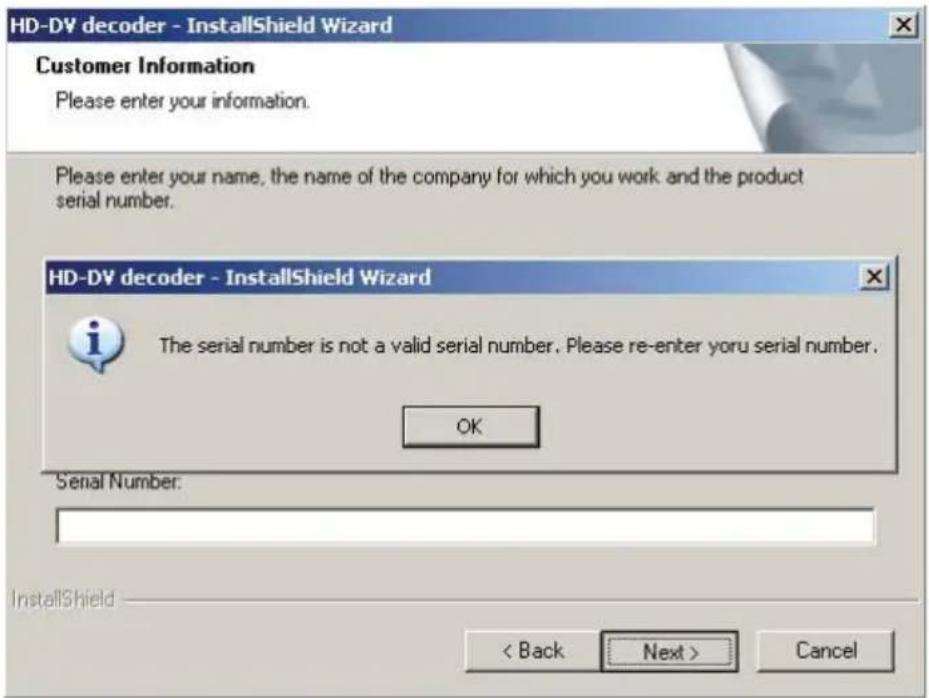
If you make a mistake entering the serial number, the installation program will notify you. If this happens, click OK and you will be returned to the Customer Information screen. Make sure there are no spaces in the serial number and that you type the serial number exactly as it appears on the CD jacket. Click Next to continue.
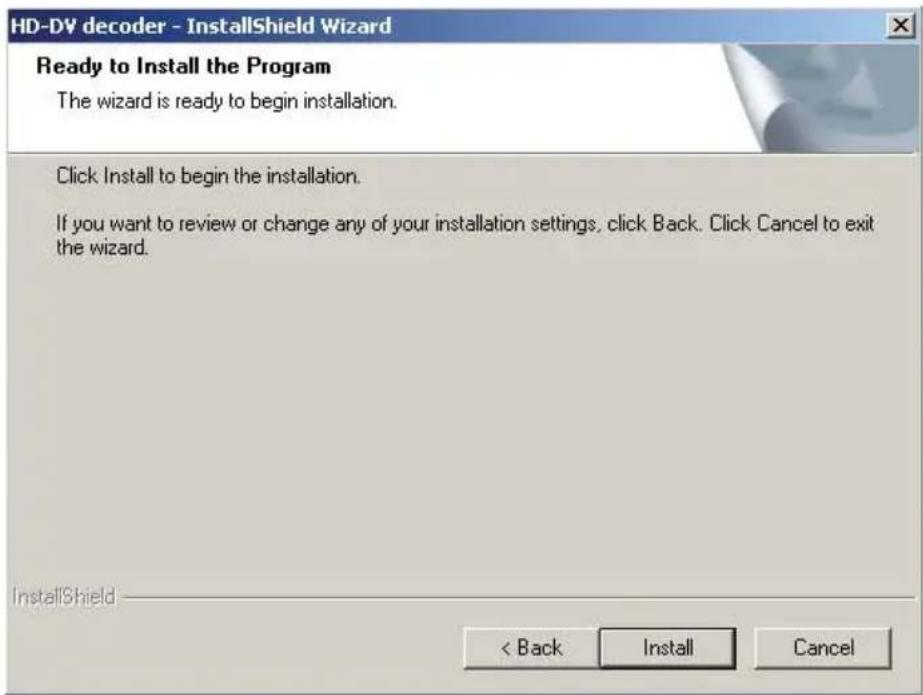
After you have entered your information and serial number, the installer will be ready to install the necessary files. You can click Back to review or change any information or Cancel to exit the installation. Click Install to begin the installation process.
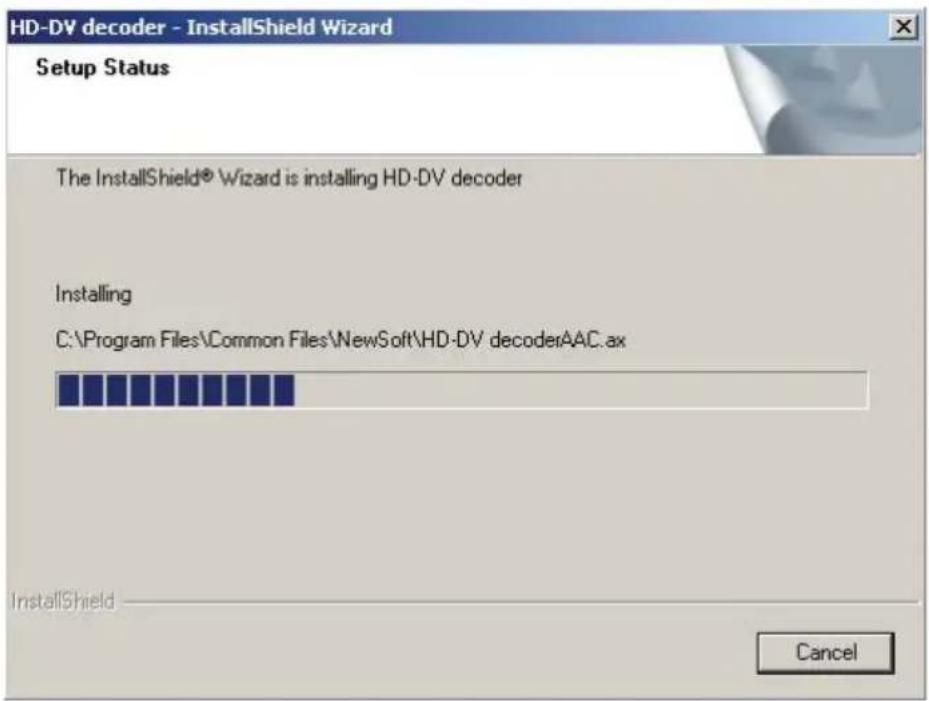
This screen will show you the progress of the installer as it installs the necessary files.
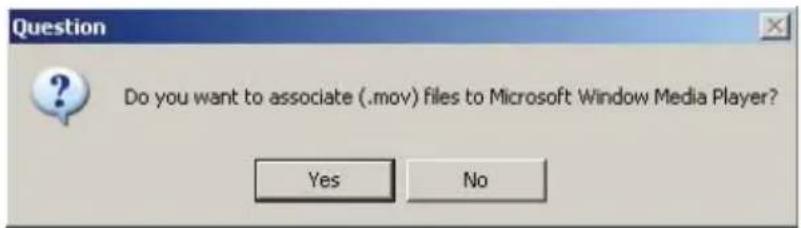
After all files have been installed, you have the option of using Microsoft® Windows Media Player to view all .mov files. If you want to do this, click the Yes button. Otherwise, click No to play .mov files with your default .mov file player.
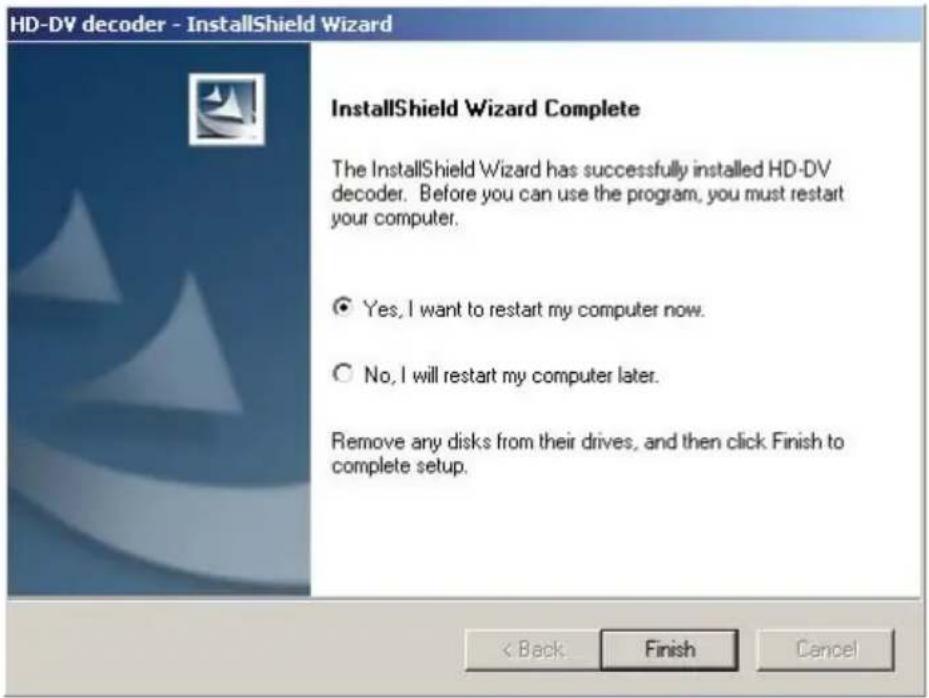
After the installation completes, you will need to restart your computer before you can playback any movies that were recorded with your HD-PVR. Click Yes then click Finish to restart your computer now. Click No then click Finish to restart your computer at a later time.
It is highly recommended that you restart your computer before viewing movie files, from the HD-PVR, on your computer.
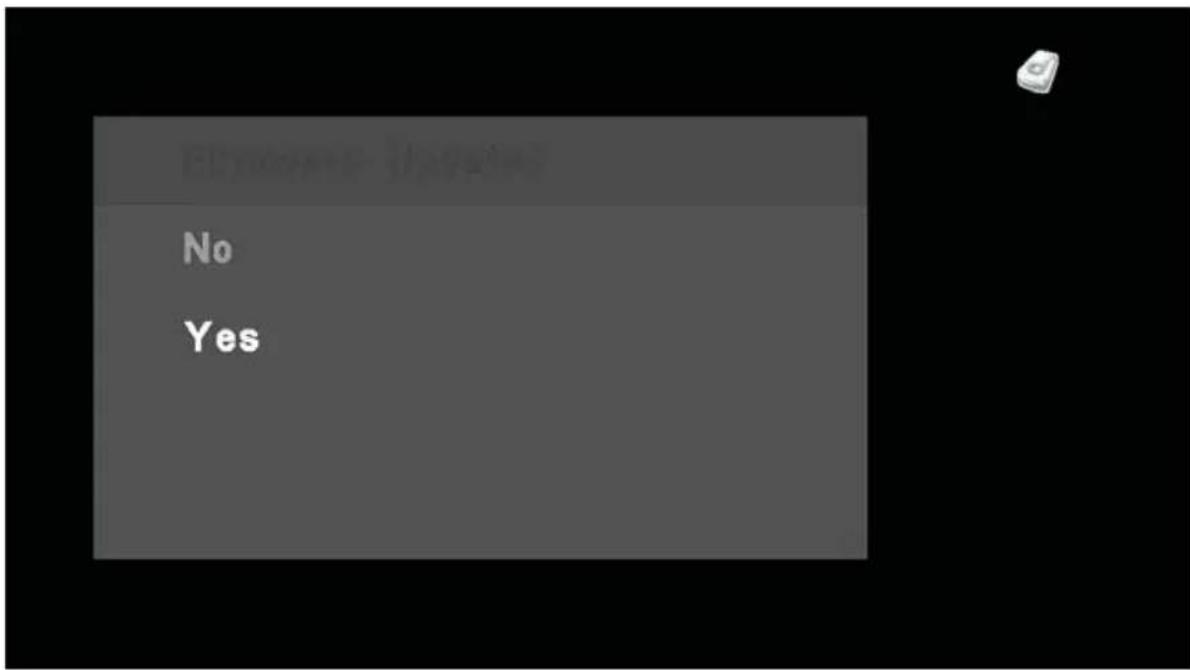
Updating the firmware on your Gefen HD-PVR is a simple process. If a new version of firmware is released, simply download the file and follow the procedure outlined below. You will need an SD-Card to update your HD-PVR.
- Go to the Gefen web site and download the updated firmware. Firmware updates can be found at: http://www.gefen.com/kvm/support/download.jsp
- Extract gefen_hdpvr.bin from the .zip file and copy the .bin file to the root directory of the SD-Card.
- Turn on the HD-PVR and insert the SD-Card containing the updated firmware.
- You should now see a screen (pictured above) asking you if you wish to perform a fi rmware update. Select Yes with ◆ and press OK.
- The next screen will display the message "Updating Firmware". Do not interrupt or turn off the power during the update process.
- After the update process is complete, you should see the message "Update OK!" At this point, you can remove the SD-Card from the HD-PVR. After a few seconds, the HD-PVR will restart automatically. If you don't remove the SD-Card after the HD-PVR restarts, you will see the "Firmware Update?" screen again. If you do, simply select No using ◆ and press OK
NOTE: The HD-PVR will always check for a firmware update on the SD-Card. You should erase the firmware file from the SD-Card once you have updated the unit.
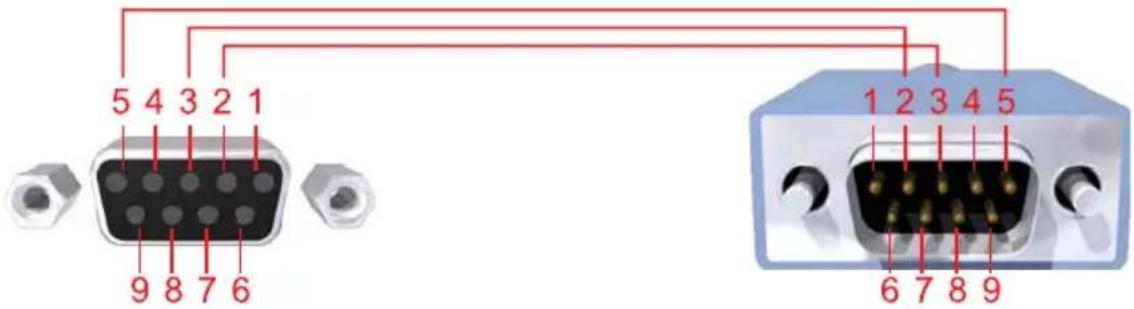
Only Pins 2 (RX), 3 (TX), and 5 (Ground) are used on the RS-232 serial interface
NOTE: A null modem cable is needed for proper operation of the RS-232 serial control. A null modem cable will internally cross the Tx and Rx lines. Please see the above diagram for a typical null model pinout.
RS232 Settings
Bits per second 115200
Data bits 8
Parity None
Stop bits ....1
Flow Control .... None
Verifying RS-232 Functionality
- Connect the PC to HD-PVR using a Null Modem DB9 cable
- Plug in the power supply of HD-PVR but do not really power on the unit
- Launch HyperTerminal, with the given port settings
- HyperTerminal will initialize the connection with HD-PVR automatically, if not, click the "Call" icon to connect manually
- Power on the unit using the "POWER" button on the remote unit
- The message on the next page will show on the HyperTerminal:
![Ambarella System Software Running on PrKERNELv4 Ambarella(R) Copyright (C) 2004-2006 core freq: 216000000 Memory Usage: fios/dma: 0xc0000000 - 0xc007ffff [0x00080000] dsp mem log: 0xc0080000 - 0xc009ffff [0x00020000] core mem log: 0xc00a0000 - 0xc00bffff [0x00020000] rtos + app: 0xc0100000 - 0xc07d5e67 [0x006d5e68] cached heap: 0xc07e0000 - 0xc2c7ffff [0x024a0000] non-cached heap: 0xc2c80000 - 0xc50ffff [0x02480000] dsp: 0xc5100000 - 0xc7ffffff [0x02f00000] cache id trademark: 0x41 cache id architecture: 0x6 Architecture (ARMv5TEJ) cache id part number: 0x926 cache id revision: 0x4 cache type: write back separate i-cache and d-cache cache type d-cache size: 16 KB cache type d-cache associativities: 0x4 cache type d-cache multiplier: 0x0 cache type d-cache line size: 32 byte cache type i-cache size: 16 KB cache type i-cache associativities: 0x4 cache type i-cache multiplier: 0x0 Connected 0x-13 Auto detect 11520 B-N-1 SCROLL CAP NUM Capture Break](/content/2026/05/920248/images/8979b18cca04d7c1308e33737700ac6591084c0536e00c3aa7774b2828a8654d.jpg)
Starting RS-232 Operation
- If there is no valid source connected to HD-PVR, the unit will keep searching for signal and make the HyperTerminal screen scrolling continuously (sending the messages.) To start the RS-232 control, use the "HOME" button on the remote unit to make it stop sending message.
- Press the "Enter" button on the keyboard of the PC to enter the system command mode, you will get the DOS-like screen as below (the "a: > "needs to show up):
application receives hms0_m01F_1R_NONE
--- Save User Preference : success ===
----- application receives HMSG_NEW_MW_STATE_PLAY ===----
ad8190_source_select(SOURCE_B)
Display Mode: 720P
--- Show background JPEG ===-
bits buffer addr = 0xC24D1BC0
desc buffer addr = 0xC50FD7A0
a:\>
- Type in any UART command and press the "Enter" button on the keyboard of the PC, after the "a:>" prompt to execute it.
- For example, type in "t app 0x61773002" and press "Enter" to change the input selection to HDMI 2, as shown below. (Note that there is one space between t and a, and one space between p and 0.
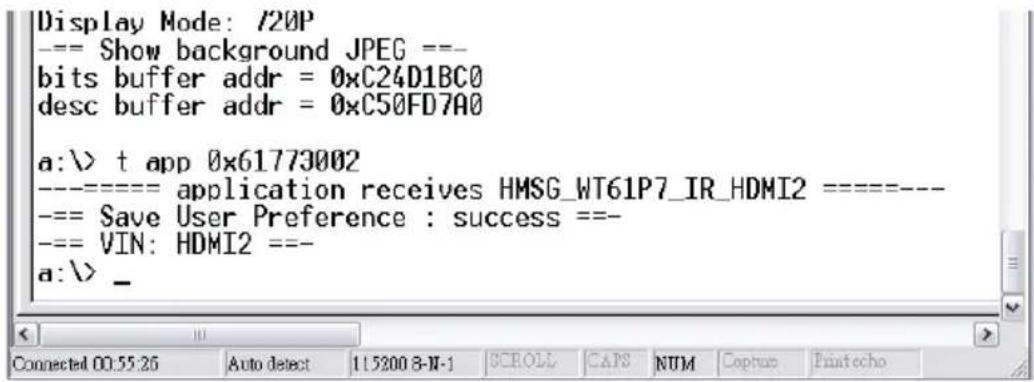
- After the command has been executed, HD-PVR will return the status and give "a:>" prompt again, to accept next command.
RS-232 UART Commands
Function UART command
POWER t app 0x61771000
MUTE t app 0x61771002
UP t app 0xfffe0000
DOWN t app 0xfffe0001
LEFT t app 0xfffe0002
RIGHT t app 0xfffe0003
ENTER t app 0xfffe0011
REV t app 0x6177100a
FWD t app 0x6177100b
STOP t app 0x61771010
PLAY/PAUSE t app 0x61771011
ZOOM t app 0x61771014
TO_CARD t app 0x61771015
REPEAT t app 0x61771016
TO_HDD t app 0x61771018
RECORD t app 0xfffe000e
INFO t app 0x6177101b
HOME t app 0x61773000
HDMI1 t app 0x61773001
HDMI2 t app 0x61773002
COMPONENT t app 0x61773003
SVIDEO t app 0x61773004
COMPOSITE t app 0x61773005
SNAPSHOT t app 0x61773006
STEP t app 0x61773007
1 t app 0x61772000
2 t app 0x61772001
3 t app 0x61772002
4 t app 0x61772003
5 t app 0x61772004
6 t app 0x61772005
7 t app 0x61772006
8 t app 0x61772007
9 t app 0x61772008
0 t app 0x61772009
CH_UP t app 0x6177200a
CH_DOWN t app 0x6177200b
VOL_UP_t app 0x6177200c
VOL_DOWN_ t app 0x6177200d
TV_POWER t app 0x61772010
*POWER ON *Send file
Powering On
Note: POWER ON function / command is only available on GTV-HD-PVR of 2009 version hardware. To execute the command, using the "Transfer" > "Send File" feature of HyperTerminal and browse to the *UART_wakeup.txt stored in the hard drive, then press the "Send" button on the dialog to send over this file to HD-PVR to bring it up from the standby mode.
*Note: This file can be downloaded from this location:
http://www.gefen.com/kvm/support/download/GTV-HD-PVR_RS-232.zip
Digital Video Amplifier Bandwidth 165 MHz
Component Video Bandwidth ....350 Mhz
Input DDC Signal ....5 Volts p-p (TTL)
Input Video Signal ....1.2 Volts p-p
Single Link Range 1080i /1920x1200
Input/Output HDMI Connector ....Type A 19 pin female
Analog Video Connector 1....(1) Component
Analog Video Connector 1....(1) RCA Composite or (1) S-Video
Digital Audio Connectors ....(3) SPDIF
Analog Audio Connector ....(1) RCA
Power Supply ....5V DC
Power Consumption ....20 watts (max)
Dimensions 6.875"W x 2.125"H x 6.875"D
Shipping Weight 6 lbs
DDC
Short form for Display Data Channel. It is a VESA standard for communication between a monitor and a video adapter. Using DDC, a monitor can inform the video card about its properties, such as maximum resolution and color depth. The video card can then use this information to ensure that the user is presented with valid options for confi guring the display.
DDWG
Digital Display Working Group DDWG are the creators of the DVI specification.
DVI
Digital Visual Interface. Connection standard developed by Intel for connecting computers to digital monitors such as flat panels and DLP projectors. A consumer electronics version, not necessarily compatible with the PC version, is used as a connection standard for HDTV tuners and displays. Transmits an uncompressed digital signal to the display. The latter version uses HDCP copy protection to prevent unauthorized copying.
HDCP
High-Bandwidth Digital Content Protection. Created by Intel, HDCP is used with HDTV signals over DVI and HDMI connections and on D-Theater D-VHS recordings to prevent unauthorized duplication of copy written material.
HDMI
The High-Definition Multi-media Interface (HDMI) is an industry-supported, uncompressed, all-digital audio/video interface. HDMI provides an interface between any compatible digital audio/video source, such as a set-top box, DVD player, and A/V receiver and a compatible digital audio and/or video monitor, such as a digital television (DTV).
HDTV
High-Definition Television. The high-resolution subset of our DTV system. The ATSC defines HDTV as a 16:9 image with twice the horizontal and vertical resolution of our existing system, accompanied by 5.1 channels of Dolby Digital audio. The CEA defines HDTV as an image with 720 progressive or 1080 interlaced active (top to bottom) scan lines. 1280:720p and 1920:1080i are typically accepted as high-definition scan rates.
RS-232
Recommended Standard 232. This is the de facto standard for communication through PC serial ports. It can refer to cables and ports that support the RS232 standard.
VESA
Video Electronic Standards Association, a consortium of manufacturers formed to establish and maintain industry wide standards for video cards and monitors. VESA was instrumental in the introduction of the Super VGA and Extended VGA video graphics standards with a refresh rate of 70 Hz, minimizing flicker and helping to reduce user eyestrain and fatigue.
Gefen warrants the equipment it manufactures to be free from defects in material and workmanship.
If equipment fails because of such defects and Gefen is notified within two (2) years from the date of shipment, Gefen will, at its option, repair or replace the equipment, provided that the equipment has not been subjected to mechanical, electrical, or other abuse or modifications. Equipment that fails under conditions other than those covered will be repaired at the current price of parts and labor in effect at the time of repair. Such repairs are warranted for ninety (90) days from the day of reshipment to the Buyer.
This warranty is in lieu of all other warranties expressed or implied, including without limitation, any implied warranty or merchantability or fitness for any particular purpose, all of which are expressly disclaimed.
- Proof of sale may be required in order to claim warranty.
- Customers outside the US are responsible for shipping charges to and from Gefen.
- Copper cables are limited to a 30 day warranty and cables must be in their original condition.
The information in this manual has been carefully checked and is believed to be accurate. However, Gefen assumes no responsibility for any inaccuracies that may be contained in this manual. In no event will Gefen be liable for direct, indirect, special, incidental, or consequential damages resulting from any defect or omission in this manual, even if advised of the possibility of such damages. The technical information contained herein regarding the features and specifications is subject to change without notice.
For the latest warranty coverage information, please visit Gefen's Warranty web page at http://www.gefen.com/kvm/aboutus/warranty.jsp
PRODUCT REGISTRATION
Please register your product online by visiting Gefen's web site at http://www.gefen.com/kvm/Registry/Registration.jsp
20600 Nordhoff St., Chatsworth CA 91311 1-800-545-6900 818-772-9100 fax: 818-772-9120
www.gefentv.com support@gefen.com
- Gefen tv
- Technical Support Hours:
- Write To:
- Notice
- The Gefen TV High-Definition Personal Video Recorder
- How It Works
- OPERATION NOTES
- IMPORTANT NOTICE:
- FEATURES
- INCLUDES:
- Navigation
- Exit
- Setup Utilities
- Record Setup
- View Photo
- Play Movie
- Set Date & Time
- Set Language
- Format
- OSD Time-out
- Default Record Quality
- Background
- Information
- Learn Remote
- Reset Remote
- SETUP UTILITIES - OSD Time-out
- SETUP UTILITIES - Default Record Quality
- SETTING UP THE HD-PVR
- PLAYING A MOVIE - Playback Controls
- INFO
- REPEAT
- STEP FWD (Step Forward)
- FAST FWD (Fast Forward)
- REWIND
- PAUSE
- SNAPSHOT
- RECORD SETUP - Set Channel
- Photo Selection Menu - Photo Menu
- Copying
- Deleting
- RS232 Settings
- Verifying RS-232 Functionality
- Starting RS-232 Operation
- RS-232 UART Commands
- Powering On
- DDC
- DDWG
- DVI
- HDCP
- HDMI
- HDTV
- RS-232
- VESA
- PRODUCT REGISTRATION
Brand : Gefen
Model : EXT-HD-PVR
Category : Voice recorder