
Roam for Business - Software HP - Free user manual and instructions
Find the device manual for free Roam for Business HP in PDF.


| Product Type | Cloud-based secure print management solution |
| Compatible Printers | Select HP LaserJet Pro, LaserJet Enterprise, LaserJet Managed, PageWide Enterprise, PageWide Managed (see compatibility matrix) |
| Supported Platforms | Android (6.0+), iOS (11+), Windows (7/10 with .NET 4.6.1), Web Portal |
| Mobile App Requirements | Bluetooth Low Energy (BLE), Location services enabled, notifications allowed |
| Connectivity | Internet access, ports 631 (IPP/IPPS) and 443 (HTTPS) open through firewall |
| Printer Firmware Requirement | HP FutureSmart 4.9 or newer (Enterprise printers) |
| Printer Discovery | BLE (embedded or accessory), LAN discovery via HP Roam Connect Installer Tool |
| Badge Reader Support | HP Universal USB Proximity Card Reader X3D03A |
| Print Job Management | Release from printer control panel via HP Roam Embedded Printer App |
| User Management | Add users individually or via CSV, assign groups, promote to admin |
| Guest Access | Enabled by default, can be disabled per printer |
| Printing Policies | Restrict color, simplex/duplex, guest access per group |
| Languages Supported | English, French, Italian, German, Spanish, Simplified Chinese, Traditional Chinese, Dutch, Portuguese |
| License Activation | Via email delivery confirmation, license key on certificate |
| Security | HTTPS, SSL, proxy server support, admin passwords, EWS password required |
| Maintenance | Firmware updates, check HP Web Services status, re-enable BLE after reset |
| Dimensions | N/A (software/service) |
| Weight | N/A (software/service) |
Frequently Asked Questions - Roam for Business HP
User questions about Roam for Business HP
0 question about this device. Answer the ones you know or ask your own.
Ask a new question about this device
Download the instructions for your Software in PDF format for free! Find your manual Roam for Business - HP and take your electronic device back in hand. On this page are published all the documents necessary for the use of your device. Roam for Business by HP.
USER MANUAL Roam for Business HP
HP Roam for Business - Deployment Guide
© Copyright 2019 HP Development Company, L.P.
October 2019
The information contained herein is subject to change without notice. The only warranties for HP products and services are set forth in the express warranty statements accompanying such products and services. Nothing herein should be construed as constituting an additional warranty. HP shall not be liable for technical or editorial errors or omissions contained herein.
Table of contents
1 Introduction .... 1
2 HP Roam Requirements .... 3
3 Setup an HP Roam account .... 5
Activate the HP Roam license and administrator account 5
4 Setup the HP printer 9
Make sure the printer is compatible 9
Check the firmware version 9
Set the Embedded Web Server (EWS) password 9
Set the proxy settings 10
Enable HP Web Services in the EWS 10
Enable Bluetooth Low Energy (BLE) to discover and print to HP Roam-enabled printers 12
Install the HP Roam Embedded Printer App 18
Enable HP Roam to work with a badge reader 20
5 Add printers and users 21
Add printers to HP Roam 21
Add users to HP Roam 29
6 Manage printers and users 33
Create a group of HP Roam users 33
Assign permissions to a group 34
Add a user to a group 36
Promote a user to Admin 37
Delete a user from HP Roam 39
Enable Guest access to an HP Roam printer 40
Remove a printer from HP Roam 41
7 Troubleshooting FAQs 43
What languages are supported by HP Roam? 43
Where do I find the license key? 43
How can I add or remove printers? 43
How can I add or remove users? 43
Why can't I get HP Roam to work with a printer? 43
A guest user is unable to print to the HP Roam printer 43
Only the Jobs tab is available after I log into the HP Roam Web Portal 44
Unable to import printers or users using a .csv file 44
Unable to discover printers with the HP Roam Printer Discovery Setup utility 44
Users cannot discover a printer from the HP Roam mobile app after selecting 'Find Printer' 44
'45.00.05 Error' or 'The given proxy host could not be resolved' 45
'45.00.1C Error' or 'Operation timeout' 45
'45.00.23 Error' or 'SSL (secure sockets layer) connect error' 45
'45.00.33 Error' or 'SSL certificate or SSH md5 fingerprint not OK' 45
49.wx.yz or 81.wx.yz errors after printing with HP Roam 45
'OXPd Application Error' 46
'Error while adding the printer' message when adding a printer using the HP Roam web portal 46
'Invalid or duplicate email address' message when inviting users using the HP Roam web portal 46
'Unable to contact HP Connected. HP Connected service may be affected. ...' message 46
'USB Error' message displays on the printer control panel 46
1 Introduction
HP Roam for Business (HP Roam) is a secure print solution that allows users to discover and print to HP Roam-enabled printers from virtually anywhere using the cloud.
For information about privacy, security, and data protection, go to http://www.hp.com/privacy.
This document provides instructions for HP Roam administrators on how to successfully enable and deploy the HP Roam solution in a business environment.
2 HP Roam Requirements
Use the following list to ensure that the HP Roam app, portal, and printer requirements are met before deploying the HP Roam solution in a business environment.
Printer requirements
HP Roam is compatible with select HP LaserJet Pro, HP LaserJet Enterprise, HP LaserJet Managed, HP PageWide Enterprise, and HP PageWide Managed printers.
To view the list, go to the HP Roam for Business Compatibility matrix.
HP Enterprise printers must be running HP FutureSmart firmware version 4.9 and newer.
For more information, go to the Latest Firmware Versions.
- Printers must have Bluetooth Low Energy (BLE) capability to print using the HP Roam app for Android and iOS. Go to the HP Roam for Business compatibility matrix for a list of printers supported by HP Roam and whether each has embedded BLE capability or requires a Bluetooth accessory to discover printers.
- Printers must have internet access with the following ports accessible through the firewall, if applicable:
-Port 631 IPP/IPPS
-Port 443 HTTP
HP Roam App for Android or iOS requirements
- Android 6.0 or newer
- iOS 11 or newer
- Bluetooth capability and Location services must be enabled on mobile devices.
- Android and iOS devices must allow notifications in order to receive HP Roam discovery prompts when nearby printers are detected.
HP Roam App for Windows requirements
- Windows 7 or Windows 10
- Windows platforms require .Net 4.6.1 installed on the client workstation
HP Roam Web Portal requirements
- Must have internet access to https://www.roamprint.com.
3 Setup an HP Roam account
To setup HP Roam, follow these steps.
Activate the HP Roam license and administrator account
To activate the HP Roam license, follow these steps:
- Open the HP Roam for Business delivery confirmation email from HPInc_software@hp.com.
NOTE: This email is sent to you after purchase with the subject line Your HP e-software Delivery Confirmation. If you can't find this email, ask your HP reseller to forward it to you.
-
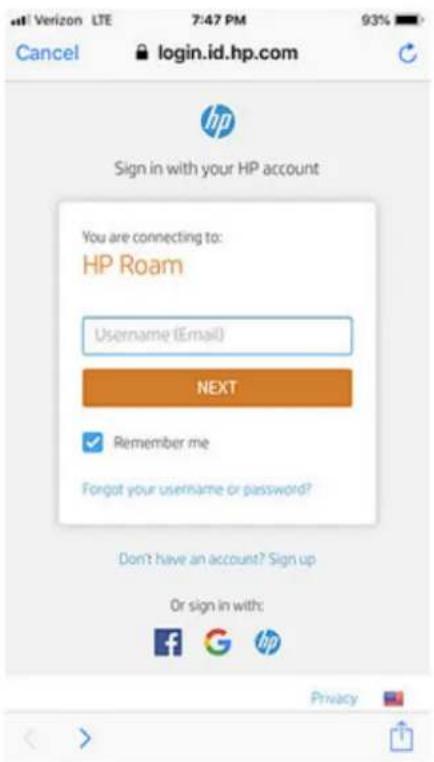
Click the Activate Your Product button at the bottom of the email or go to https://roamlicensing.smartcloudprint.com.
-
Click Don't have an account? Sign up to create an account, or click a logo to sign in with a Facebook, Google, or an HP Employee account.

NOTE: The login credentials used the first time you log in will determine how you will need to sign in to your HP Roam for Business account in the future.
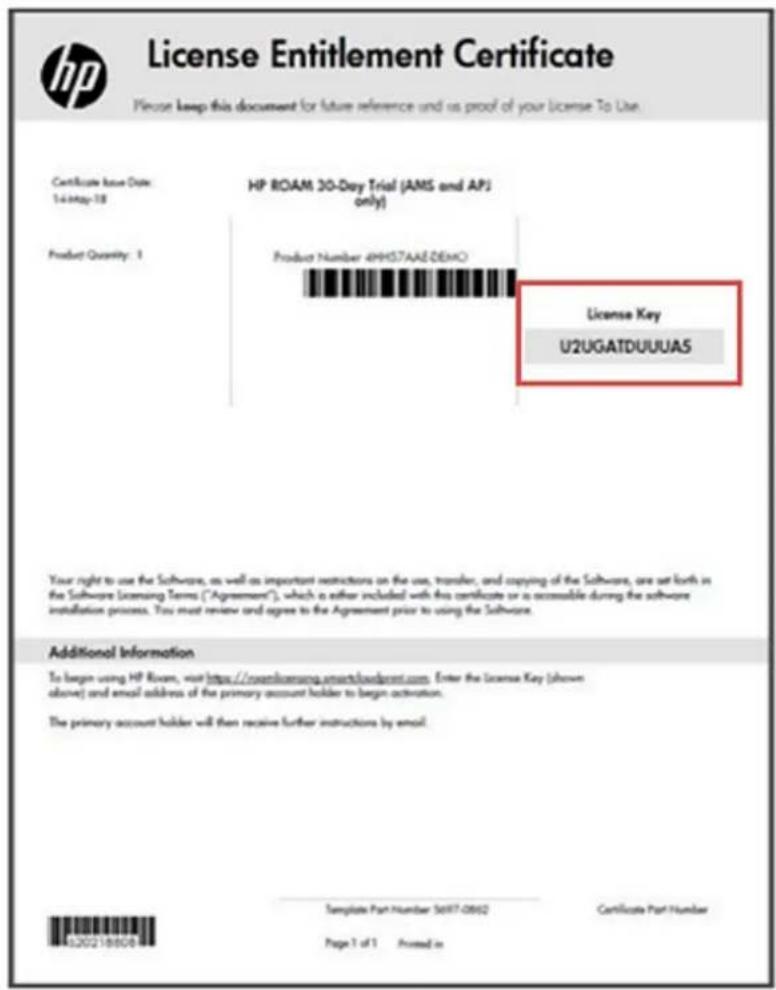
- Locate the license key on the License Entitlement Certificate and make sure it matches the one received in your delivery confirmation email.
- Click Activate.

NOTE: This will permanently associate the license with this HP Roam for Business account. If you already have an HP Roam for Business account linked to this User ID, this license will be added to that account.
- When the activation success prompt displays, click OK and check your email.

NOTE: The HP Roam email might take several minutes to arrive in the inbox. Make sure it has not been routed to junk or spam folders.

- Open the Activate your HP Roam Account email and click Activate again. A browser window opens.

NOTE: The license term and expiration date is set based on the activation date and the duration of the purchased license.
-
On the HP Roam for Business SaaS Agreement prompt, click the link. The HP Roam SaaS Agreement opens in a new window.
-
Read the agreement and click Accept. The window closes.
-
Create a password, click Submit, and close the browser.

NOTE: Password must adhere to the following standards:
- User name must not be present in password.
- Password must not have 4 or more consecutive letters or digits.
- If password has 8–9 characters, it needs at least 1 letter, 1 number, and 1 special character.
- If password has 10+ characters, two characters are needed from two of these three categories: Letters, Numbers, Special Characters
After the password has been set, you can log into the HP Roam Web Portal and start preparing the printer(s) for HP Roam. The Setup the HP printer section will walk you through the setup process.
To sign in to HP Roam in the future, return to https://www.roamprint.com and use the same HP, Facebook, or Google account credentials used earlier in this step.
4 Setup the HP printer
To setup the HP printer to work with HP Roam, follow these steps.
Make sure the printer is compatible
HP Roam is compatible with select HP LaserJet Pro, HP LaserJet Enterprise, HP LaserJet Managed, HP PageWide Enterprise, and HP PageWide Managed printers.
To make sure the printer is compatible, go to the HP Roam for Business compatibility matrix.
If the printer is not listed, it cannot use HP Roam.
Check the firmware version
For HP Roam functionality, HP Enterprise printers must be running HP FutureSmart firmware version 4.9 or newer. HP LaserJet Pro printers can skip this step.
To check the latest version of firmware available for the printer, go to Latest firmware versions
Set the Embedded Web Server (EWS) password
To set the EWS password, follow these steps:

NOTE: If you are prompted to log in with administrator credentials after opening the EWS for the first time, do not perform this step. An EWS password has already been set. Contact the system administrator.
- Open the EWS.
a. Open a web browser.
b. Type the printer's IP address in the URL field and press Enter.
- Set the EWS password.
- For Enterprise printers, select the Security tab, and under the Set the Local Administrator Password section, type and confirm the new password.
- For Pro printers, select the Settings tab, select Security from the left pane, select Password Settings, and then type and confirm the new password.
- Click Apply.
Set the proxy settings
If the company uses a proxy server, the proxy server information must be entered in the printer's Embedded Web Server (EWS) to allow the printer to communicate with the internet.
To set the proxy settings in the printer's EWS, follow these steps:
- Open the EWS.
a. Open a web browser.
b. Type the printer's IP address in the url field and press Enter.
-
Log in with administrator credentials.
-
Set the proxy settings.
-
For Enterprise printers, select the HP Web Services tab, select Web Proxy from the left pane, and then complete the provided fields.
-
For Pro printers, select the Web Services tab, select Proxy Settings from the left pane, select the Manual option, and then complete the provided fields.
-
Click Apply.
Enable HP Web Services in the EWS
HP Web Services must be enabled to associate the printer with HP Roam and to allow the printer to receive print jobs from HP Roam.
To enable HP Web Services, follow these steps:
- Open the EWS.
a. Open a web browser.
b. Type the printer's IP address in the url field and press Enter.
-
Log in with administrator credentials.
-
Enable HP Web Services.
-
For Enterprise printers, select the HP Web Services tab, select Web Services Setup from the left pane, and then click the Enable HP Web Services button.
-
For Pro printers, select the Web Services tab and select Setup from the left pane.
-
Wait for the process to complete. It might take several minutes.

NOTE: If Web Services fails to enable due to a communication problem with Web Services servers, click Enable Web Services to try again. If HP Connect fails to connect, click Refresh to reconnect. If another error is received, check the Web Proxy configuration. If the Web services connection continues to fail, there might be an internal firewall preventing the connection. Contact the system administrator.
- After Web Services is enabled, a printer email address is automatically generated.

NOTE: Save the printer email address for a later step. You will need this information to add printers to HP Roam.
Figure 4-1 HP Web Services enabled and printer email generated for an HP Enterprise printer
Web Services Setup

Success: HP Web Services successfully enabled
HP Web Services and HPconnected.com
Web Services Status
Printer connected to HP Connected
Enabled
Connected
HP ePrint
ON
Turn OFF
More information.

HP ePrintCenter
Product E-mail Address
@hpeprint.com
Printer Code
JW93DRMX3CH8R0DC
Enable Bluetooth Low Energy (BLE) to discover and print to HP Roam-enabled printers
Bluetooth Low Energy (BLE) is used by the HP Roam Mobile App to discover nearby HP Roam-enabled printers. For HP printer models that do not have embedded Bluetooth capability, install an optional accessory such as the HP Jetdirect 3100w (3JN69A) or a Radius Networks RadBeacon (RADUSB).

NOTE: Bluetooth must be enabled on the mobile device and on the printer.
To enable the Bluetooth Low Energy (BLE) on HP printers with embedded BLE capability or by installing an accessory, follow these steps.
Step one: Enable the Bluetooth Low Energy (BLE) feature in the EWS
To enable the Bluetooth Low Energy (BLE) on HP printers with embedded BLE capability or by installing an accessory, follow these steps.

NOTE: This setting should remain enabled after a standard firmware update. If a partial clean or format disk is performed on the printer, BLE support will need to be enabled again.
- Open the EWS.
a. Open a web browser.
b. Type the printer's IP address in the URL field and press Enter.
- Log in with administrator credentials.
-
Enable the Bluetooth Low Energy (BLE) feature.
-
For Enterprise printers, select the Security tab, scroll down to the Bluetooth Low Energy (BLE) section, and select Enabled from the list.
-
For Pro printers, select the Network tab, select the Bluetooth Low Energy option from the left pane, select Status, and then select Enable.
-
Click Apply.
Step two: Install a Bluetooth accessory on the printer
Printers that do not have embedded Bluetooth capability must install a BLE accessory. To check whether or not the printer needs this accessory, go to the HP Roam for Business compatibility matrix.
Method one: Install an HP Jetdirect 3100w BLE/NFC/Wireless accessory
Made for HP Enterprise printers, the HP Jetdirect 3100w BLE/NFC/Wireless accessory can be installed as an external USB accessory, or inserted into the printer's Hardware Integration Pocket (HIP2) on an HP Enterprise printer. For instructions, watch this video. HP LaserJet Pro printers can skip this step.

NOTE: You might want to install the HP Jetdirect 3100w as an external accessory if the printer will also be using an HP Proximity Badge reader which should be installed into the HIP2 pocket. Additional setup, configuration, and troubleshooting information can be found at www.hp.com/support/jd3100w.
Option one: Install in the HIP2 pocket
- Power off the printer.
- Locate and open the HIP2 pocket on the printer. The HIP2 location may vary by printer. Refer to the printer user guide, if needed.
NOTE: The HIP2 is covered by a rectangular cover that is retained by clips along its short edges. Using a thin, flat-blade screwdriver, gently pry the cover off. - Using the short USB cable from the accessory box, connect the white connector to the 3100w.
- Connect the other end of the USB cable to the socket in the printer's HIP2.
- Insert the hook-shaped clips of the 3100w into the HIP2 recess, and then gently press the 3100w onto the rounded clips until it is held securely in place.
- Power on the printer.

Option two: Install as an external accessory
- Using the long USB cable from the accessory box, connect the white connector to the Jetdirect 3100w.
- Push the long USB cable into the slot on the accessory cover, insert the Jetdirect 3100w into the accessory cover, and gently press it until it snaps into place.
- Use the fastener strips (included) to secure the accessory to the printer.
- Connect the USB cable to one of the USB accessory ports on the printer. The accessory ports are usually located at the back of the printer.
- When prompted, reboot the printer.
The Jetdirect 3100w will automatically configure itself for HP Roam. No additional configuration is needed.
Method two: Use a RadBeacon USB accessory with an HP printer
The RadBeacon USB accessory can be used along side an HP LaserJet Pro or HP LaserJet Enterprise printer as an external USB accessory to help users auto-detect HP Roam-enabled printers. A direct connection to HP printers is not supported.
Because the RadBeacon is not directly connected to the printer, it must be connected to an external power source or power adapter, and then it must be paired to the HP Roam account before it can be used to print. To set up the RadBeacon USB with the HP printer, follow these steps:

NOTE: The pairing process is performed from the HP Roam mobile app and you must be logged in with HP Roam administrator credentials.
- Connect the RadBeacon accessory to an external power source or power adapter.
- Open the HP Roam mobile app.
- Log in using HP Roam administrator credentials.
- Connect the RadBeacon USB to an external power source or charger.
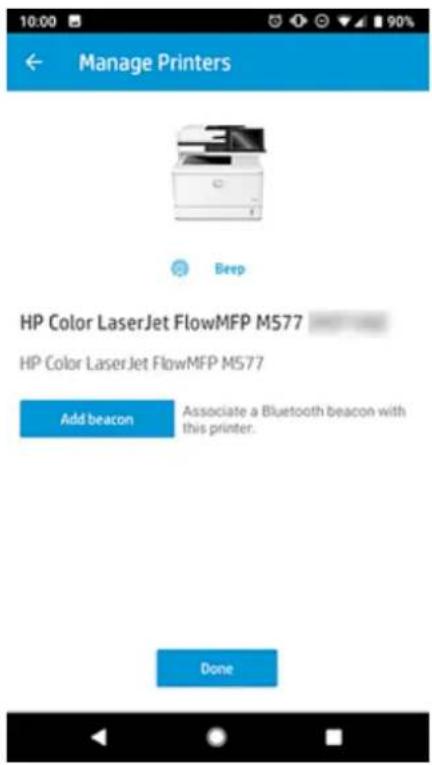
- Click the menu icon --- in the upper right corner of the HP Roam app, and select Manage Printers. A list of printers available in the HP Roam Web Portal is generated.
- Select the printer name you want to pair with the RadBeacon accessory.


7. Select Add beacon.
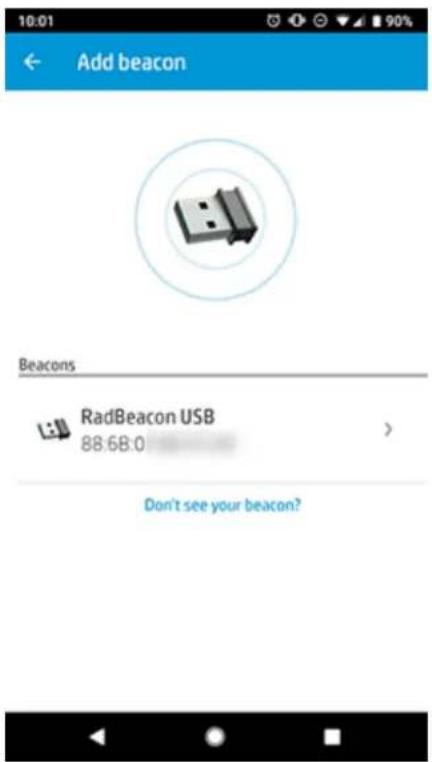
- Select the discovered RadBeacon USB to begin the pairing process.

NOTE: The RadBeacon USB is only available for pairing for the first 30 minutes after being powered on. If the RadBeacon USB is not visible, try unplugging it and then plugging it in again.
- To change the PIN from the default value, select the Update PIN check box and type an 8-digit PIN number.

NOTE: For improved security, HP recommends that you set a PIN on the RadBeacon USB during pairing. The updated PIN will be required for any future pairing activities. Be advised that there is no recovery process if you forget the PIN.
- Select Update. When complete, a confirmation message displays. Click OK.

Install the HP Roam Embedded Printer App
The HP Roam Embedded Printer App enables you to view, modify, and release HP Roam print jobs from the printer control panel.
- Sign in to the HP Roam Admin Console at https://www.roamprint.com using administrator credentials.
- Click the Settings tab.
- Click Download next to OXPd Installer in the Badge login setup section of the page.
Figure 4-2 Download the Roam Embedded Printer App
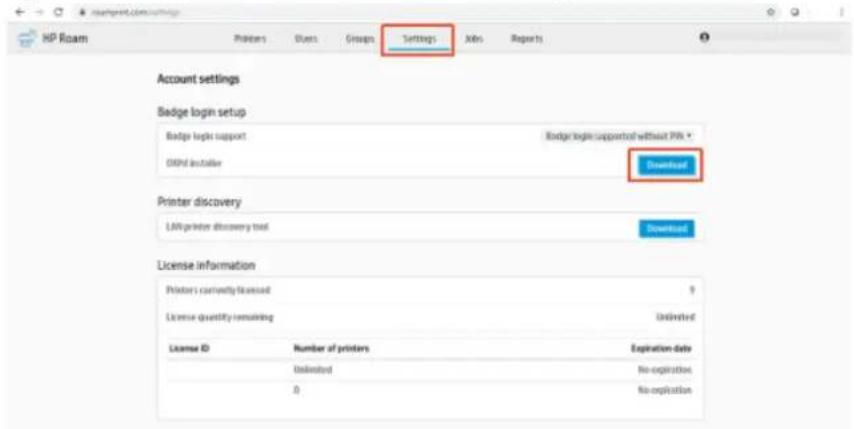
- Save the RoamEmbedded Installer.exe file to a local folder.
- Double-click RoamEmbeddedInstaller.exe to launch the HP Roam Embedded Installer.
Figure 4-3 HP Roam Embedded Installer
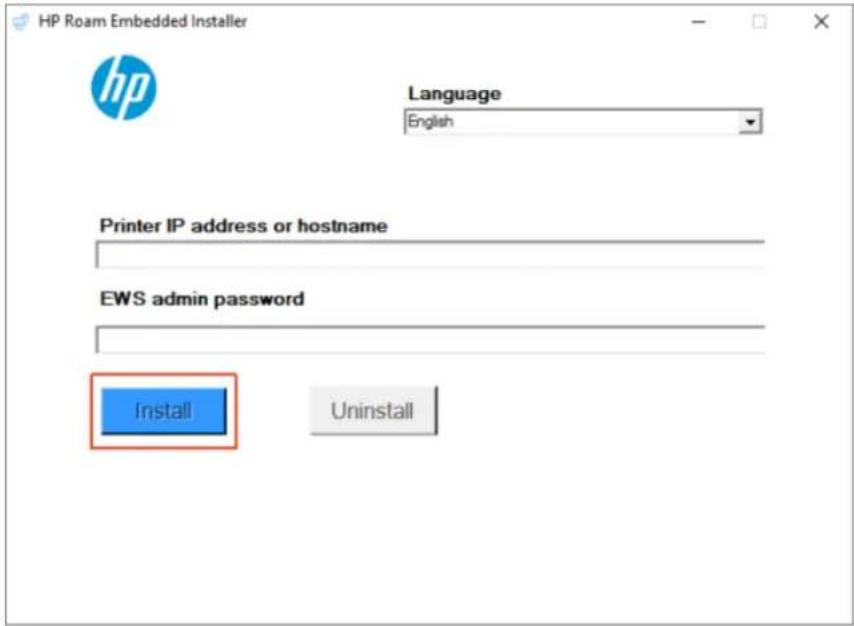
- Type the IP address and EWS admin password of the printer, and then click Install to install the HP Roam Embedded Printer App.
The HP Roam button now appears on the printer control panel.
Figure 4-4 HP Roam button on the printer control panel

For more information, go to the HP Roam support home page.
Enable HP Roam to work with a badge reader
Use the following procedure to enable HP Roam to work with a badge reader. This procedure is a one-time step performed by a printer administrator.
HP Roam supports the HP Universal USB Proximity Card Reader X3D03A.
- On the printer control panel, select the HP Roam button to open the HP Roam Embedded Printer App.
Figure 4-5 HP Roam button on the printer control panel

- Select Install badge reader to install the HP Roam Embedded Printer App driver for the HP Universal USB Proximity Card Reader X3D0A.
- Type the EWS admin password for the printer.
After providing the EWS admin password for the printer, the badge reader is registered and the message Badge reader is ready appears in the lower left corner of the app in place of the Install badge reader button.
HP Roam deployment for this printer is complete. You can use the HP Roam Embedded Printer App to display and release available Roam print jobs.
For more information about the HP Universal USB Proximity Card Reader X3D03A, go to:
HP LaserJet Enterprise, HP OfficeJet Enterprise, HP PageWide Enterprise - Install the HP Proximity card reader. X3D03A
5 Add printers and users
To add printers and users to HP Roam, follow these steps.
Add printers to HP Roam
Printers can be added to the list in one of three ways:
• Manually using the +Add Printer button
- Manually using a .csv file format (for multiple printers)
●Automatically using the HP Roam Connect Installer Tool
Method one: Manually add printers using the +Add Printer button
To add a printer(s) manually, use the +Add Printer button.
-
Open the HP Roam Web Portal. To do this, type or copy/paste the following URL into a web browser: https://www.roamprint.com
-
Click Log in with HP ID and log in using administrator credentials.

Roam
Log in with HP ID
- Select the Printers tab.
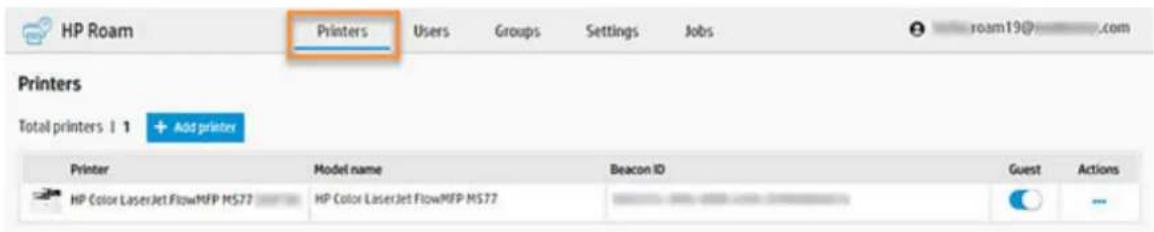
- Click the +Add printer button and type the Printer email address (required).

NOTE: The printer email address is located on the Web Services tab in the EWS.

- Select Save.
Method two: Import printers using a .csv file format
To import multiple printers at one time, follow these steps.

NOTE: The .csv format required to successfully import the printers is: EmailAddress, printerNickname, guest, adminUsername, adminPassword.
- Open the HP Roam Web Portal. To do this, type or copy/paste the following URL into a web browser: https://www.roamprint.com
- Click Log in with HP ID and log in using administrator credentials.

-
Select the Printers tab.
-
Select the + Add multiple printers button.
- Drag and drop the .csv or .xls file into the Add multiple printers dialog.

NOTE: Printer information in the .csv file or Excel file must be formatted in the following .csv structure: emailAddress, printerNickname, guest, adminUsername, adminPassword
- emailAddress is the printer email address found on the Web Services tab in the EWS.
- printerNickname is the name that will be used to identify the printer using Bluetooth (BLE).
- guest indicates whether guest access should be enabled (accepted values are TRUE and FALSE).
- adminUsername and adminPassword are the admin user and password credentials for the EWS account.
Add multiple printers

Upload a CSV file
Drop or click to add your file

Example CSV file format (.csv): emailAddress, printerNickname, guest, adminUsername, adminPassword

6. Select Import.
Method three: Install the HP Roam Connect Installer Tool
To discover and register printers automatically with the HP Roam cloud, download and install the HP Roam Connect Installer Tool.
- Open the HP Roam Web Portal. To do this, type or copy/paste the following URL into a web browser:
https://www.roamprint.com
- Click Log in with HP ID and log in using administrator credentials.

Log in with HP ID
-
Select the Settings tab.
-
Download and install the LAN printer discovery tool.
a. Under the Printer discovery section, click Download.

b. Click Run and wait for the file to download.
c. Read and accept the End-User License Agreement and click Install.

d. Wait for the installation to finish and when complete click Close.
- Discover nearby HP Roam-capable printers.
a. Double-click the HP Roam Printer Discovery Setup shortcut on the desktop.

b. Log in using administrator credentials.
c. Click Discover HP Roam capable printers.
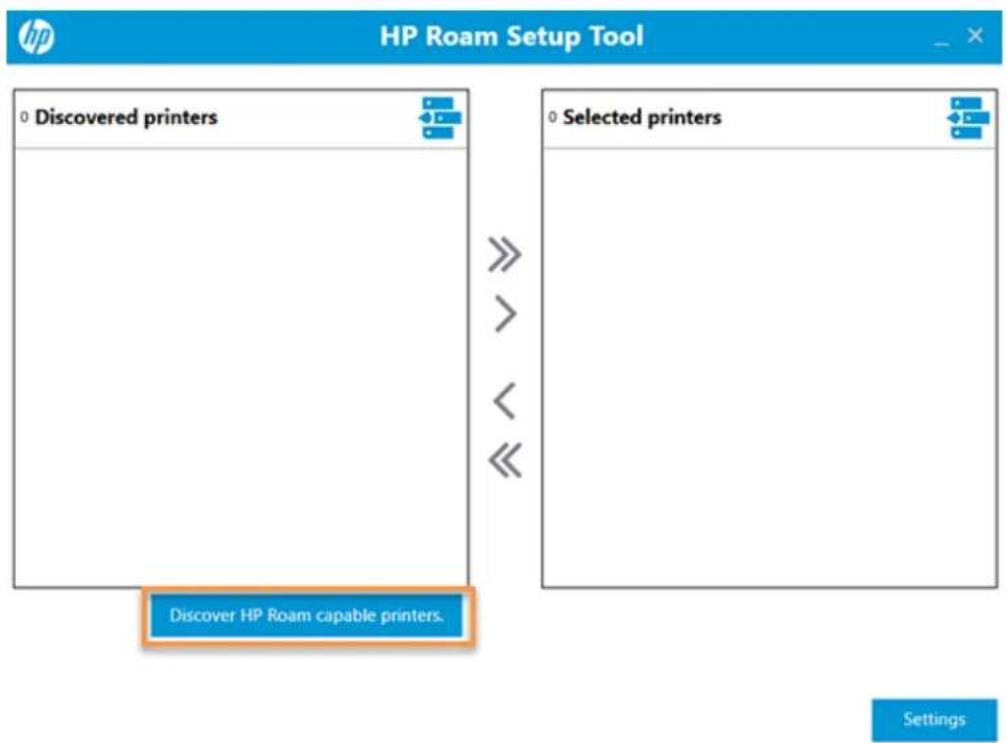
d. If a Windows Defender Firewall message displays requesting permission for HP Roam Connected to access the network, select Allow Access.
e. Wait for the printers to be detected.

NOTE: HP Roam Connect uses local subnet discovery by default. For other discovery options, click Settings.
- Select the printers to be added to the HP Roam Web Portal.
a. To also display HP Roam-enabled printers already added to your admin account, select the Show printers already added to a Roam account check box. To narrow the list to only printers not yet added to HP Roam, clear the check box.
![HP Roam Setup Tool 15 Discovered printers HP LaserJet Flow MFP E82560 [25312D] 15.25.250.162 HP LaserJet Flow MFP E82560 [2AD3C5] 15.25.250.237 HP LaserJet Flow MFP M632 [329CA6] 15.25.250.249 HP PageWide Color Flow E77660 [C88413] 15.25.251.21 HP PageWide Color Flow MFP 785 [DD5165] 15.25.249.96 HP PageWide Color MFP P77940 [A9076A] 15.25.251.238 HP Color LaserJet FlowMFP M577 [4CF106] 15.25.251.57 Discover HP Roam capable printers. 0 Selected printers ✓ Show printers already added to a Roam account. Settings](/content/2026/05/915652/images/52499904eff4586085c2bf4bae49891ccb4b2861f03460b6d5902d3850130f41.jpg)
b. Select the printers you want to add and click the arrow to add them to the right pane.

NOTE: To select multiple devices to add at one time, press and hold Ctrl, and click each printer you want to add.

c. When all printers have been added to the right pane, click Sync to HP Roam.

NOTE: If you receive a message Some printers failed to sync to HP Roam, it might be because HP Web Services has not been enabled for those printers. See the section Enable HP Web Services in the EWS.
The printers are added to the HP Roam Web Portal.
Add users to HP Roam
Users must have an HP Roam account before they can print to and retrieve jobs from HP Roam printers. Users can be added to the list in two ways:
- Add users manually using the +Invite user button
- Import users using a .csv file

NOTE: Adding a user to the list will generate an email invitation to HP Roam containing a link prompting the user to activate their account. For instructions, see the section Activate the HP Roam license and administrator account. This email will also provide the links to the HP Roam apps.
Method one: Add a user manually using the + Invite user button

NOTE: If you encounter an error message when adding a user, the most likely cause is that this user is already a member of another HP Roam site account, or has created their own account with that email address when using the HP Roam driver or mobile app. The user will need to delete any other HP Roam accounts associated with that email address before you can add them to the HP Roam site account.
To add HP Roam users manually, follow these steps:
- Open the HP Roam Web Portal. To do this, type or copy/paste the following URL into a web browser:
https://www.roamprint.com
- Click Log in with HP ID and log in using administrator credentials.

- Select the Users tab.

-
Select the +Invite User button.
-
Type the email address of the person you want to add as a user.

- Select Invite user.
Method two: Import multiple users using a .csv file format
To import multiple users at one time, follow these steps.

NOTE: The csv format required to successfully import the printers is: EmailAddress, firstName, lastName, locale.
- Open the HP Roam Web Portal. To do this, type or copy/paste the following URL into a web browser:
https://www.roamprint.com
- Click Log in with HP ID and log in using administrator credentials.

-
Select the Users tab.
-
Click the + Invite multiple users button.
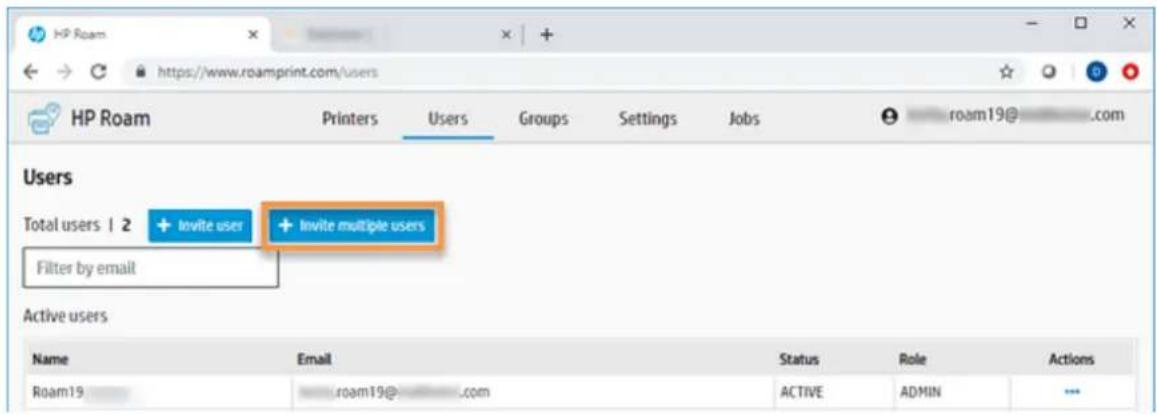
- Drag and drop the .csv or .xls file into the Invite multiple users dialog.

NOTE: User information in the .csv file or Excel file must be formatted in the following .csv structure:
emailAddress, firstName, lastName, locale
- emailAddress is the user's email address used to access HP Roam
- firstName is the user's first name
- lastName is the user's surname
- locale is the user's language code. For example, United States users would use en-US.

6. Select Submit.
The HP printer is now ready to print with HP Roam and will prompt users when HP Roam enabled printers are nearby and/or a when print job is in the queue.
For information on how to install the HP Roam App, send print jobs to the HP Roam cloud, and print files from the HP Roam cloud, refer to the HP Roam for Business - Set up and Use Guide.
To create groups, assign permissions, or manage printers and users, continue to Manage printers and users.
6 Manage printers and users
The HP Roam Web Portal is a portal can be used by administrators to manage HP Roam printers and users including the following options:
• Create a group of HP Roam users
- Assign permissions to a group
- Add a user to a group
- Promote a user to Admin
- Delete a user from HP Roam
- Enable Guest access to an HP Roam printer
- Remove a printer from HP Roam
To manage HP Roam-enabled printers and users using the HP Roam Web Portal, follow these steps.
Create a group of HP Roam users
Groups can be created within the HP Roam web portal to enable policy enforcement and set permissions for guest access, and simplex/duplex or color usage permissions.
-
Open the HP Roam Web Portal. To do this, type or copy/paste the following URL into a web browser:
https://www.roamprint.com -
Click Log in with HP ID and log in using administrator credentials.

- Select the Groups tab.

- Click + Add group and type a group name.
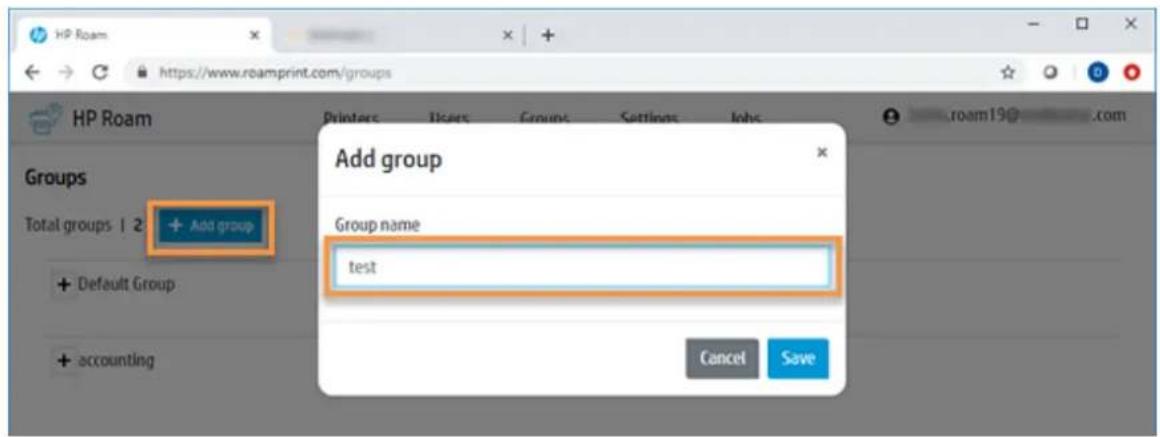
- Select Save.
The group is created. To add users to the group, see the section Add a User to a Group.
Assign permissions to a group
Groups can be created within the HP Roam web portal to enable policy enforcement and set permissions for guest access, and simplex/duplex or color usage.
- Open the HP Roam Web Portal. To do this, type or copy/paste the following URL into a web browser:
https://www.roamprint.com
- Click Log in with HP ID and log in using administrator credentials.

Log in with HP ID
- Select the Groups tab.
- Locate the group and click Edit policy.

-
Edit the policy options.
-
Guest access - Click the slider bar to restrict or allow group members to print as a guest user at a different site.
- Plex options - Select or clear the Simplex and Duplex check boxes to allow or restrict printing to 1-sided or 2-sided.
• Color options - Select or clear the Allow color check box to allow or restrict color printing.

- Select Save.
The policy is saved. To add users to the group, see the section Add a User to a Group.
Add a user to a group
Users can be added to a group by moving them from the default group into an assigned group.
- Open the HP Roam Web Portal. To do this, type or copy/paste the following URL into a web browser: https://www.roamprint.com
- Click Log in with HP ID and log in using administrator credentials.

- Select the Groups tab.
- Expand the Default Group. The active users that have not yet been assigned to a group are listed.
- Select the Users tab.
- Locate the user and under the Actions column, click the menu icon .
7. Select Move to Group.

8. In the Move user to group dialog, select from the drop-down list the group to which you want to assign the user.
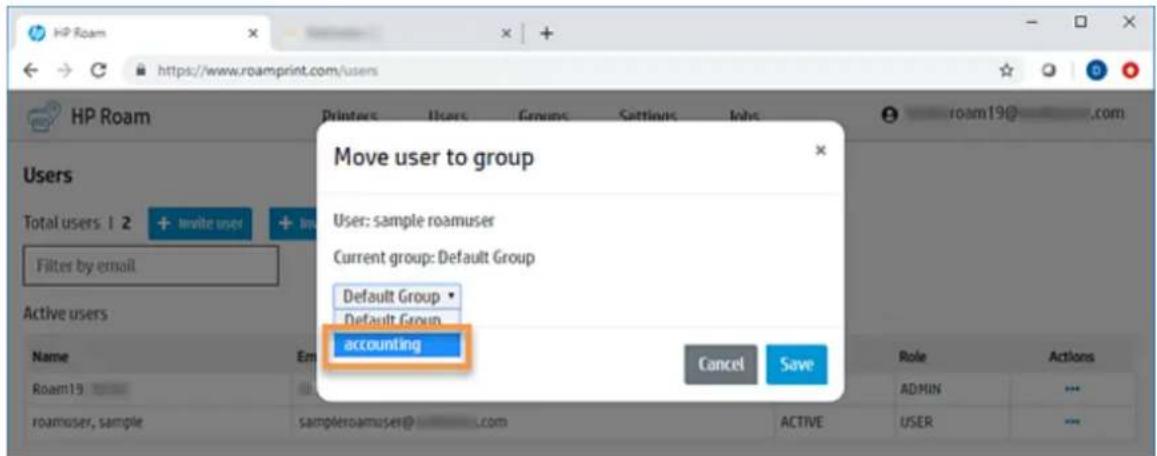
9. Select Save.
The user is now listed under the selected group.
Promote a user to Admin
Users can be promoted to Admins to allow them access to other tabs in the HP Roam Web Portal. Admin users have access to additional tabs while Users only have visibility of the Jobs tab.
1. Open the HP Roam Web Portal. To do this, type or copy/paste the following URL into a web browser:
https://www.roamprint.com
- Click Log in with HP ID and log in using administrator credentials.

Log in with HP ID
- Select the Users tab.

-
Locate the user and under the Actions column, click the menu icon .
-
Select Promote to Admin.

- In the Promote to admin dialog, select Promote to admin to confirm.

Under the Role column, the User is now listed with an ADMIN status.
Delete a user from HP Roam
To delete users from the HP Roam Web Portal, follow these steps.
- Open the HP Roam Web Portal. To do this, type or copy/paste the following URL into a web browser: https://www.roamprint.com
- Click Log in with HP ID and log in using administrator credentials.

- Select the Users tab.

- Find the user you want to remove, and under the Actions column, click the menu icon ....
- Select Delete User.

Enable Guest access to an HP Roam printer
Guest printing enables individuals with HP Roam user accounts that are not a member of your organization to print stored jobs to your HP Roam-enabled printer. Guest printing is enabled by default for printers that have been added, but can easily be disabled or re-enabled from the HP Roam Web Portal.
- Open the HP Roam Web Portal. To do this, type or copy/paste the following URL into a web browser:
https://www.roamprint.com
- Click Log in with HP ID and log in using administrator credentials.

- Select the Printers tab.

- Under the Guest column, click the slider bar to allow Guests to also use the printer.

Remove a printer from HP Roam
To remove printers from the HP Roam Web Portal, follow these steps:
- Open the HP Roam Web Portal. To do this, type or copy/paste the following URL into a web browser: https://www.roamprint.com
- Click Log in with HP ID and log in using administrator credentials.

- Select the Printers tab.

- For the printer you want to remove, click the menu icon ... from the Actions column.
5. Select Delete Printer.

7 Troubleshooting FAQs
Use the following FAQs as a guide to help troubleshoot any issues encountered when deploying HP Roam for Business.
What languages are supported by HP Roam?
HP Roam supports English, French, Italian, German, Spanish, Simplified Chinese, Traditional Chinese, Dutch, and Portuguese.
Where do I find the license key?
The HP Roam license key is located on the License Entitlement Certificate received via email.
How can I add or remove printers?
See the sections Add printers to HP Roam or Remove printers from HP Roam.
How can I add or remove users?
See the sections Add users to HP Roam or Delete users from HP Roam.
Why can't I get HP Roam to work with a printer?
Check the HP Roam for Business compatibility matrix to confirm the printer is supported with HP Roam.
A guest user is unable to print to the HP Roam printer
Guest printing enables individuals with HP Roam user accounts that are not a member of your HP Roam site to print stored jobs to your HP Roam-enabled printer. Guest printing is enabled by default but can easily be disabled or re-enabled from the HP Roam Web Portal.
If local users can print, but guest users cannot, check if Guest access is enabled for that printer in the HP Roam Web Portal. See the section Enable Guest access to an HP Roam printer.
Only the Jobs tab is available after I log into the HP Roam Web Portal
If you can't see the Printers, Users, Groups, Settings, or other tabs, make sure you are logged into the HP Roam Web Portal using administrator credentials. Admin users have access to additional tabs while Users only have visibility of the Jobs tab.
Unable to import printers or users using a .csv file
Information in an .csv or .xls file must be formatted using the correct file format. The following .csv file formats are accepted:
- Users: emailAddress, firstName, lastName, locale
- Printers: emailAddress, printerNickname, guest, adminUsername, adminPassword
Unable to discover printers with the HP Roam Printer Discovery Setup utility
- Confirm "HP JetAdvantage Connect Discovery Setup" is listed under the Windows Defender Firewall > Allowed apps list.
- Confirm the printer and PC running the HP Roam Printer Discovery Setup utility are on the same TCP/IP subnet. The default discovery method only discovers devices on the local subnet.
- Try using one of the extended discovery methods by selecting the Settings button in the HP Roam Printer Discovery Setup utility.
For more information, see the section Add printers to HP Roam, Method three: Use the HP Roam Printer Discovery Setup Utility.
Users cannot discover a printer from the HP Roam mobile app after selecting ‘Find Printer’
If only some users are unable to discover the printer, follow these steps:
- Make sure Bluetooth is enabled on the user's mobile device.
- Make sure the users have been added to the HP Roam Web Portal for the site to which the printer belongs.
- If the user is a guest, confirm Guest printing is enabled for the printer in the HP Roam Web Portal. See the section Enable Guest access to an HP Roam printer.
- If the user is a guest and Guest printing is enabled on the printer, the user might not have access permissions.
If all users are unable to discover the printer, Bluetooth or Web Services might not be enabled on the printer, or there might be an issue with proxy server settings. Follow these steps:
- Confirm you can connect to the printer's IP address using a web browser (confirms the device is powered on and accessible via the network).
-
Confirm the printer has a Bluetooth Low Energy (BLE) beacon installed. Some HP printers ship from the factory with BLE onboard. Go to the HP Roam for Business Compatibility Matrix for the list of supported models and what type of BLE beacon each requires.
-
Make sure the Bluetooth Low Energy (BLE) setting is enabled on the General Security tab in the EWS.
- Make sure Web Services is enabled on the HP Web Services tab in the EWS and that the printer has an ePrint email address assigned.
- Make sure the proxy is enabled and the setting is configured correctly on the HP Web Services tab in the EWS.
- If the device has recently been reset due to tech support troubleshooting or hardware maintenance, the HP ePrint email address might have changed. If this is suspected, re-add the device using the HP Roam Web Portal.
- Make sure the printer can print using the ePrint email address. To test printing from the WPP Cloud, email a document such as PDF to the printer's ePrint email address.
'45.00.05 Error' or 'The given proxy host could not be resolved'
If you receive a 45.00.23 error or a 'The given proxy host could not be resolved' message, the printer might be configured to use a corporate web proxy that is not available. Configure the printer to use your corporate web proxy using the printer's embedded web server.
'45.00.1C Error' or 'Operation timeout'
If you receive a 45.00.1C error or an 'Operation timeout' message, the printer might be configured to use a web proxy but a setting such as the proxy port is incorrect. Make sure the printer proxy settings are correct in the printer's embedded web server.
'45.00.23 Error' or 'SSL (secure sockets layer) connect error'
If you receive an 45.00.23 error or SSL (secure sockets layer) connect error, the corporate network might require a web proxy to access the Internet, but the printer is not currently configured to use it. Configure the printer to use your corporate web proxy using the printer's embedded web server.
'45.00.33 Error' or 'SSL certificate or SSH md5 fingerprint not OK'
If you receive a 45.00.33 error or an 'SSL certificate or SSH md5 fingerprint not OK' message, the printer might be configured to use a web proxy, but a security setting is not configured to trust the site. Enable HP Web Services on the HP Web Services tab in the EWS.
49.wx.yz or 81.wx.yz errors after printing with HP Roam
HP recommends that HP Enterprise-class printers should have a minimum firmware version of FutureSmart 4.9. Print a configuration page to determine the firmware version installed on the printer.
To check the latest firmware version available for the printer, go to the Latest Firmware Versions.
'OXPd Application Error'
If you receive an OXPd error, one of the following reasons might be the cause:
- The corporate network might require a web proxy to access the Internet but the printer is not currently configured to use it. Configure the printer to use your corporate web proxy using the printer's embedded web server.
- The printer might be configured to use the web proxy but a setting such as the proxy port is incorrect. Make sure the printer proxy settings are correct using the printer's embedded web server.
- The printer might be configured to use a web proxy that is not available. Configure the printer to use your corporate web proxy using the printer's embedded web server.
- The printer might be configured to use the web proxy, but a security setting is not configured to trust the site. Enable HP Web Services on the HP Web Services tab in the EWS.
'Error while adding the printer' message when adding a printer using the HP Roam web portal
Confirm the correct printer email address is being entered. The email address should end in @hpeprint.com. The printer's HP ePrint email address can be found on the printer's Configuration Page or on Web Services tab in the EWS.
'Invalid or duplicate email address' message when inviting users using the HP Roam web portal
The user already exists. The user might have enrolled their email address via the HP Roam App or Windows driver. Instruct the user to delete his or her account so they can be invited to create a new account associated with the site.
- Within the HP Roam driver, select Delete account from Account settings.
- Within the HP Roam for Android app, select the menu icon in the upper left corner of the app.
- Select the account email address.
- Select Delete Account.
'Unable to contact HP Connected. HP Connected service may be affected. ...' message
If you see this message when enabling HP Web Services in the EWS, try selecting Refresh. If the issue persists, confirm the Web Proxy settings are correct. If the issue still persists, try selecting Remove to disable HP Web Services. After it is successfully removed, re-enable HP Web Services. A new printer email address will be generated.
'USB Error' message displays on the printer control panel
A USB device has been connected to the printer for which there is no driver installed. HP Roam customers might commonly see this when a RadBeacon has been connected directly to the USB port on the printer.
HP recommends installing the RadBeacon using an external USB power supply to prevent the "USB Error" message from displaying.


- Table of contents
- Troubleshooting FAQs 43
- Introduction
- HP Roam Requirements
- Printer requirements
- HP Roam App for Android or iOS requirements
- HP Roam App for Windows requirements
- HP Roam Web Portal requirements
- Setup an HP Roam account
- Activate the HP Roam license and administrator account
- Setup the HP printer
- Make sure the printer is compatible
- Check the firmware version
- Set the Embedded Web Server (EWS) password
- Set the proxy settings
- Enable HP Web Services in the EWS
- Web Services Setup
- Enable Bluetooth Low Energy (BLE) to discover and print to HP Roam-enabled printers
- Step one: Enable the Bluetooth Low Energy (BLE) feature in the EWS
- Step two: Install a Bluetooth accessory on the printer
- Method one: Install an HP Jetdirect 3100w BLE/NFC/Wireless accessory
- Option one: Install in the HIP2 pocket
- Option two: Install as an external accessory
- Method two: Use a RadBeacon USB accessory with an HP printer
- Select Add beacon.
- Install the HP Roam Embedded Printer App
- Enable HP Roam to work with a badge reader
- Add printers and users
- Add printers to HP Roam
- Method one: Manually add printers using the +Add Printer button
- Method two: Import printers using a .csv file format
- Add multiple printers
- Upload a CSV file
- Select Import.
- Method three: Install the HP Roam Connect Installer Tool
- Add users to HP Roam
- Method one: Add a user manually using the + Invite user button
- Method two: Import multiple users using a .csv file format
- Select Submit.
- Manage printers and users
- Create a group of HP Roam users
- Assign permissions to a group
- Add a user to a group
- Select Move to Group.
- In the Move user to group dialog, select from the drop-down list the group to which you want to assign the user.
- Select Save.
- Promote a user to Admin
- Open the HP Roam Web Portal. To do this, type or copy/paste the following URL into a web browser:
- Delete a user from HP Roam
- Enable Guest access to an HP Roam printer
- Remove a printer from HP Roam
- Select Delete Printer.
- Troubleshooting FAQs
- What languages are supported by HP Roam?
- Where do I find the license key?
- How can I add or remove printers?
- How can I add or remove users?
- Why can't I get HP Roam to work with a printer?
- A guest user is unable to print to the HP Roam printer
- Only the Jobs tab is available after I log into the HP Roam Web Portal
- Unable to import printers or users using a .csv file
- Unable to discover printers with the HP Roam Printer Discovery Setup utility
- Users cannot discover a printer from the HP Roam mobile app after selecting ‘Find Printer’
- '45.00.05 Error' or 'The given proxy host could not be resolved'
- '45.00.1C Error' or 'Operation timeout'
- '45.00.23 Error' or 'SSL (secure sockets layer) connect error'
- '45.00.33 Error' or 'SSL certificate or SSH md5 fingerprint not OK'
- 49.wx.yz or 81.wx.yz errors after printing with HP Roam
- 'OXPd Application Error'
- 'Error while adding the printer' message when adding a printer using the HP Roam web portal
- 'Invalid or duplicate email address' message when inviting users using the HP Roam web portal
- 'Unable to contact HP Connected. HP Connected service may be affected. ...' message
- 'USB Error' message displays on the printer control panel
Brand : HP
Model : Roam for Business
Category : Software