
Experience Plus AC - Treadmills Toorx - Free user manual and instructions
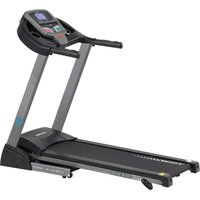
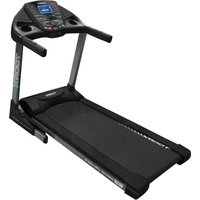
Find the device manual for free Experience Plus AC Toorx in PDF.


| Product Type | Treadmill |
| Brand | Toorx |
| Model | Experience Plus AC |
| Motor | DC motor, 2.5 HP |
| Speed Range | 1.0 - 15.0 km/h |
| Incline Range | 0 - 15% |
| Programs | Manual, Target, 24 Fixed Programs, 4 User Programs, HRC, Body Fat |
| Display | LED dot matrix display |
| Heart Rate Monitoring | Hand pulse sensors and chest strap compatible |
| Bluetooth | Yes, for music |
| Folding | Yes, with hydraulic damper |
| Running Surface (approx.) | 130 x 45 cm |
| Maximum User Weight (approx.) | 120 kg |
| Dimensions (L x W x H) (approx.) | 180 x 80 x 135 cm |
| Net Weight (approx.) | 70 kg |
| Power Requirements | 220-240V, 50/60 Hz |
| Safety Features | Safety key, automatic stop |
| Maintenance | Belt adjustment, lubrication every 3 months |
| Assembly Required | Yes, with included tools |
| Spare Parts Availability | Full parts list provided |
Frequently Asked Questions - Experience Plus AC Toorx
User questions about Experience Plus AC Toorx
0 question about this device. Answer the ones you know or ask your own.
Ask a new question about this device
Download the instructions for your Treadmills in PDF format for free! Find your manual Experience Plus AC - Toorx and take your electronic device back in hand. On this page are published all the documents necessary for the use of your device. Experience Plus AC by Toorx.
USER MANUAL Experience Plus AC Toorx
natural_image
Exterior view of a black TGMME LEAF treadmill with visible branding and control panel (no text-heavy elements)
READY 3.0
EXPLODED DRAWING

PARTS LIST
| PART NO | PART NAME | Q'TY |
| 1 | Handle frame 1 | |
| 2 Console | support frame 1 | |
| 3 Left heart rate tube | 1 | |
| 4 Right heart rate tube | 1 | |
| 5 Left upright | 1 | |
| 6 Right upright | 1 | |
| 7 Base frame | 1 | |
| 8 Incline frame | 1 | |
| 9 Deck frame | 1 | |
| 10 Heart rate tube foam | 2 | |
| 11 Heart rate sensor | 2 | |
| 12 Safety key | 2 | |
| 13 Start/stop press board | 1 | |
| 14 Main press board | 1 | |
| 15 Display board | 1 | |
| 16 Plastic panel | 1 | |
| 17 Newspaper frame | 1 | |
| 18 Cockpit transparency cover | 1 | |
| 19 START/STOP outside plastic frame | 1 | |
| 20 START gel key | 1 | |
| 21 STOP gel key | 1 | |
| 22 Handlebar quick button | 2 | |
| 23 Handle foam | 2 | |
| 24 Handle cap | 2 | |
| 25 Up cover for Console display | 1 | |
| 26 Down cover for Console top | 1 | |
| 27 Speaker | 2 | |
| 28 Left cup | 1 | |
| 29 Right cup | 1 | |
| 30 Up cover for console main body | 1 | |
| 31 down cover console main body | 1 | |
| 32 Protect cover of left upright | 1 | |
| 33 Protect cover of right upright | 2 | |
| 34 Level frame of base frame | 1 | |
| 35 Damper | 2 | |
| 36 Move wheel frame | 2 | |
| 37 Move wheel of base frame | 2 | |
| 38 Rubber cushion of base frame | 1 | |
| 39 | Motor belly pan 2 | |
| 40 | Move wheel of incline frame 2 | |
| 41 | Left end cap 1 | |
| 42 | The cover for support wheel (Left) 1 | |
| 43 | Right end cap 1 | |
| 44 | The cover for support wheel (Right) | 2 |
| 45 | Support wheel of deck frame 2 | |
| 46 | Fix cushion of running deck 2 | |
| 47 | Gel cushion 4 | |
| 48 | Side rail 1 | |
| 49 | Running deck 1 | |
| 50 | Running belt 1 | |
| 51 | Rear roller 1 | |
| 52 | Front roller 1 | |
| 53 | Motor belt 1 | |
| 54 | Motor | 1 |
| 55 | Motor frame | 1 |
| 56 | Motor cover 1 | |
| 57 | Magnet ring 1 | |
| 58 | Incline motor | 1 |
| 59 | Front cap of deck frame | 2 |
| 60 | The cap for motor adjust | 1 |
| 61 | Power wire cushion | 1 |
| 62 | Fuse | 1 |
| 63 | Power switch | 1 |
| 64 | Power wire | 1 |
| 65 | Inverter | 1 |
| 67 | Connect wire of console top | 1 |
| 68 | Connect wire of console frame | 1 |
| 69 | Connect wire of upright | 1 |
| 70 | Connect wire of running platform | 1 |
| 71 | ST4.2*15 screw | 30 |
| 72 | M8*15 Allen head bolt | 4 |
| 73 | ST4.2*15 screw | 12 |
| 74 | M8*25 Allen head bolt | 2 |
| 75 | M8*20 Allen head bolt | 4 |
| 76 | M8*20 Allen head bolt | 6 |
| 77 | Φ8 Arc Washer | 2 |
| 78 | Φ8 Washer | 15 |
| 79 | M8*35 Allen head bolt | 1 |
| 80 | M8 Lock Nut | 9 |
| 81 | M8*45 Allen head bolt | 1 |
| 82 | M8*50 Allen head bolt | 2 |
| 83 | ST4.2*20 screw | 2 |
| 84 | ST4.8*16 screw | 14 |
| 85 | M8*40 Allen head bolt | 4 |
| 86 | M10*80 Allen head bolt | 2 |
| 87 | M8*30 Allen head bolt | 2 |
| 88 | Connect shaft sleeve of incline frame | 2 |
| 89 | Plastic washer | 2 |
| 90 | ST4.2*15 screw | 6 |
| 91 | M8*65 Allen head bolt | 2 |
| 92 | Side rail cushion | 8 |
| 93 | M8*25 Allen head bolt | 2 |
| 94 | M8*80 Allen head bolt | 2 |
| 95 | M8*55 Allen head bolt | 4 |
| 96 | M8*20 Allen head bolt | 4 |
| 97 | Φ8 spring Washer | 6 |
| 98 | M8*12 Allen head bolt | 2 |
| 99 | M8*70 Allen head bolt | 1 |
| 100 | M10*50 Allen head bolt | 1 |
| 101 | Φ13 plastic Washer | 2 |
| 102 | M10 Lock Nut | 2 |
| 103 | M10*60 Allen head bolt | 1 |
| 104 | ST4.2*12 screw | 8 |
HARDWARE COMPARISON CHART
For your convenience, we have identified the hardware used in the assembly of this product. The chart below is provided to help you to identify items that may be unfamiliar to you.
| NO. | DESCRIPTION | Q'TY |
| 71 | ST4.2*15 screw | 8 |
| 72 | M8*15 Allen head bolt | 4 |
| 74 | M8*25 Allen head bolt | 2 |
| 75 | M8*20 Allen head bolt | 4 |
| 76 | M8*20 Allen head bolt | 6 |
| 77 | Φ8 Arc Washer | 2 |
| 78 | Φ8 Washer | 4 |
| A | SCREWDRIVER | 1 |
| B | 5mm SOCKET HEAD WRENCH | 1 |
| C | 6mm SOCKET HEAD WRENCH | 1 |
| D | LUBRICANT | 1 |

natural_image
Technical line drawing of a screwdriver with labeled end (A), no text or symbols present
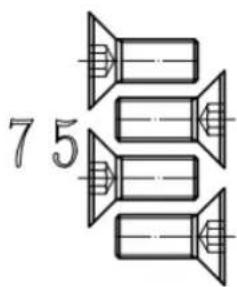


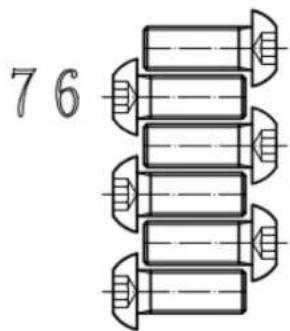
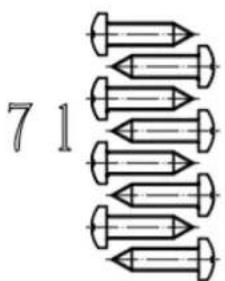

ASSEMBLY INSTRUCTIONS:
WARNING: Please put on all the screws, washers and bolts then tighten them.
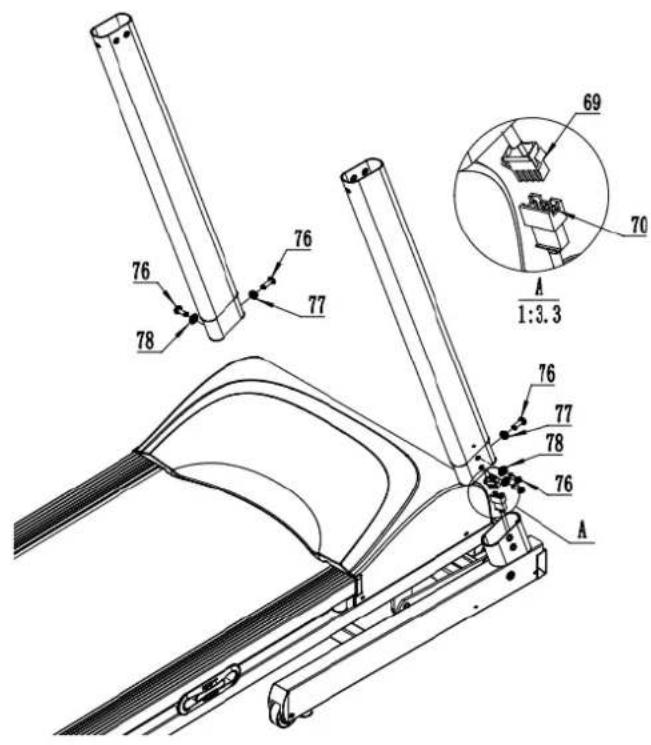
STEP1:
First connect Connect wire of base frame and Connect wire of upright.
Fix upright onto the base frame with M8*20 Allen head bolt76、Φ8 Arc Washer77 and Φ8 Washer78。

STEP2:
First connect Connect wire of console frame and Connect wire of upright.
Fix the console onto the upright with M8*25 Allen head bolt74 and M8*20 Allen head bolt75.
natural_image
Technical line drawings of a treadmill with internal components and a 72-degree angle annotation (no text or symbols present)STEP3 A:
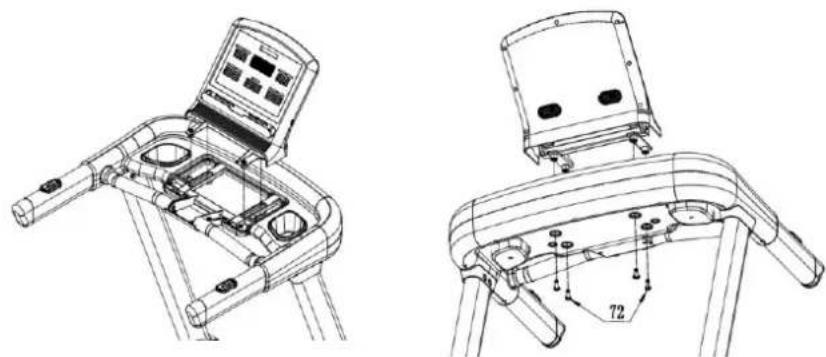
Fix console display with console frame with 72 M8*15 Allen head bolt.

STEP3 B:
Connect all cable.
A. Main connection cable
B. Incline handlebar button cable
C. Speed handlebar button cable
D. Pulse cable
E. Pulse cable
F. Safety key cable
G. Cockpit cable

natural_image
Line drawing of a treadmill with control panel and labeled parts (no text or symbols beyond basic diagram)STEP3 C:
Fastening 71 ST4.2*15 screw

STEP4:
Fix the protect cover of upright base frame with ST4.2 * 15 Screw 71.
natural_image
Line drawing of a stationary exercise machine with rotating legs and control panel (no text or symbols)Folding illustration:
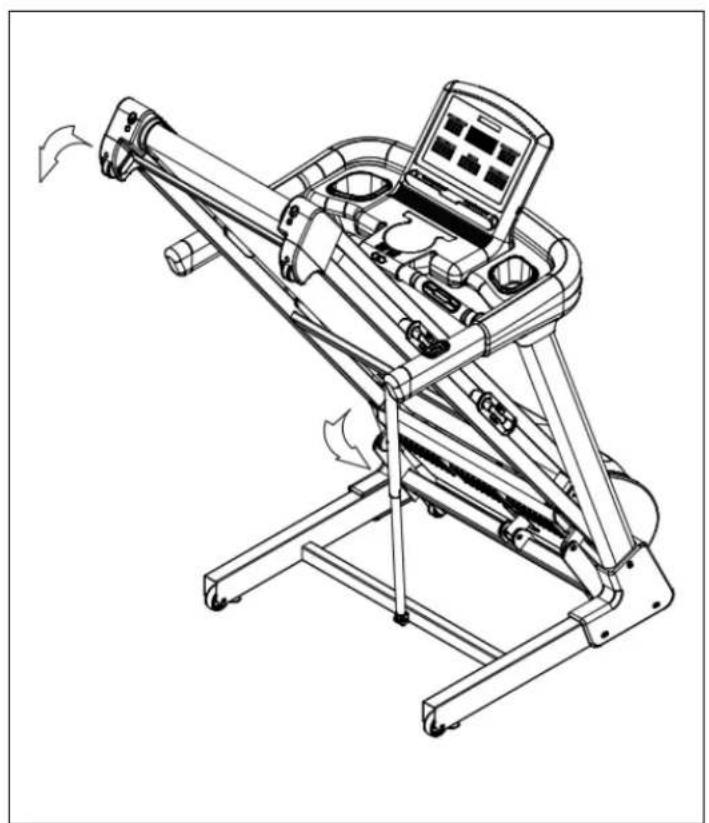
To unfold the treadmill:
Folding illustration:
To drop down treadmill:
- Strike the damper.
- Hold on to the top end covers and pull down the treadmill slowly on the ground.
natural_image
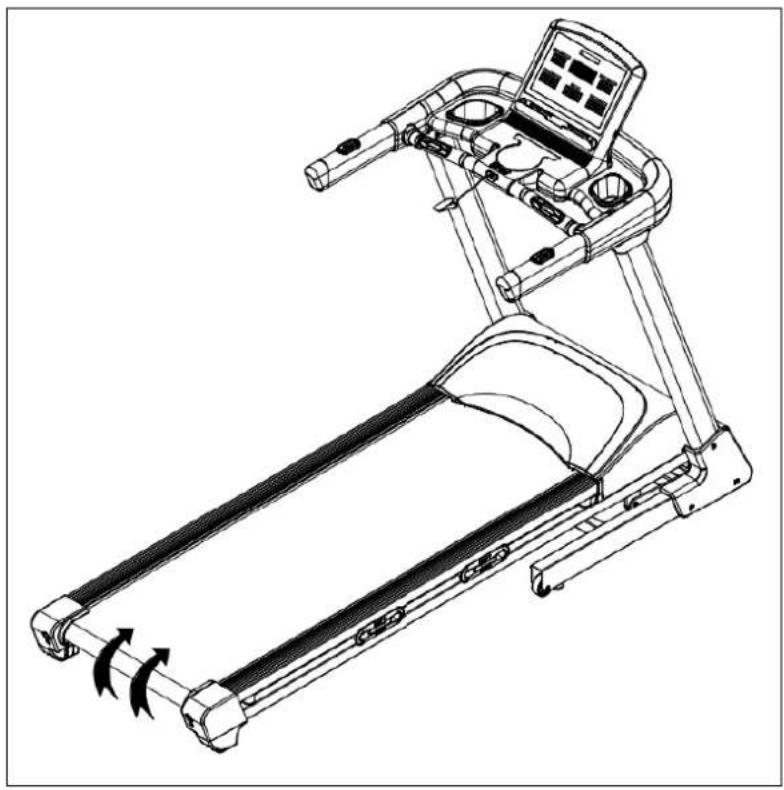
Line drawing of a treadmill with motion arrows indicating rotation (no text or symbols)To fold up the treadmill: Both hands hold on the bottom end covers and lift up the treadmill.
COMPUTER OPERATION
The Operation
1 function
a) Manual program
Run directly after pressing start
b) Target program
Press the target button to set the countdown to set the target time, distance, calories, and number of steps.
c) Fixed program (P01\~P24)
Press PROGRAM to select the program, use the up/down arrows to scroll through the list 24 programs can be used to select and set the running time (default 99 minutes), from 5 minutes to 99 minutes.
The 24 procedures are as follows:
□ 6 only change speed
□ 12 speeds and lifts all change
□ 6 only up and down changes
d) User mode
User mode U1\~U4, manual input time, speed and lift
e)HRC
There are 4 programs (HRC1, HRC2, HRC3, HRC4) HRC, you can set the time, age, weight, and display the maximum heart rate of the current program
The maximum heart rate is calculated as 220-age, and the user can adjust it with the up and down arrows
HRC1: 60% max
HRC2: 70% max
HRC3: 80% max
HRC4: 90% max
In HRC mode, the treadmill will only detect the heart rate through the chest strap.
f) Body Fat
Measure fat percentage
2 operation
Make sure the security key is inserted well, otherwise, the console will display "--"
a) After inserting the security key, turn on the power, the console displays the version number and TOTAL value. Then standby, default program: manual mode
Start 1.0km/h-0.0 lift, the user can freely change the speed/lift, the default maximum time is 99 minutes
b) start running
After standby or program setting, press <;Start>; count down with 3-2-1 (3s), and then start running.
c) Stop running
During operation, press
The first time the user presses stop the treadmill, we pause and hold it for 2 minutes, then it will automatically stop and reset to 0.0
If you press stop twice, the treadmill will stop, lift 0.0 and reset the data
When the safety switch is unplugged, the speed returns to zero. The slope is maintained.
When the safety switch is put on again, the slope returns to zero.
d) Speed setting
When running, press speed +/- to increase/decrease speed by 0.1, speed adjustment
range 1-maximum speed, speed shortcut keys <3>, <6>, <9>, <12>, <15> directly set the speed
e) Lift setting
When running, press the lift +/- to increase/decrease lift 1, the lift adjustment range is 0-15, the lift shortcut keys <3>, <6>, <9>, <12>, <15> directly set the lift
f) Set the target program
In standby mode, after pressing TARGET, the dot matrix window will display TIME by default. Press the MODE button to cycle through the time, distance, calories and steps and flash the current window; use the speed +- button to adjust the flashing window parameters, and press ENTER to confirm after the parameter adjustment is completed After saving the settings, START and then run the current value confirmed by ENTER.
Target time: default value 30:00; range 5:00-99:00; 1st gear = 1 minute
Target calories: default value 50; range 10-990; level 1=10 calories
Target step: default 4000; range 1000-9900; 1st gear=100 steps
During the setting process, press
g) Set up a fixed program
In the standby mode, press
h) HRC setting
Press HRC in standby
If you want to select programs H1-H4, press the Ascend Plus or Subtract to turn pages H1-H4 (you can also press the HRC button to turn pages), and press the ENTER button to enter the setting interface.
• To adjust the value, press ENTER
1) Set the time, the default value is 30 minutes, the range is 5\~99 minutes-then press Enter
2) Press ENTER to set the age, the default value is 40, the range is 16-65-and then press Enter
3) Press ENTER>; set the weight, the default value is 68 kg, the range is 40-130 kg-then press Enter
4) The recommended target will be displayed in the heart rate window, and the user
5) can use the speed plus and minus buttons to change the value-then press Enter Press
window displays the default value 30 or the set time.
When the time countdown reaches zero, the treadmill stops
The HRC program is only applicable to the chest strap, and the speed and lift will be adjusted according to the current heart rate compared to the target heart rate
• Speed change relationship
A: Change frequency, HRC detects heart rate every 30 seconds (heart rate is always displayed).
B: If the user's heart rate is lower than the target heart rate by 30 beats/min, the speed will increase by 2.0 km/h.
C: If the user's heart rate is 6-29 beats/min below the target heart rate, the speed will increase by 1.0 km/h.
D: If the user's heart rate is higher than the target heart rate by 30 beats/min, the speed will decrease by 2.0 km/h.
E: If the user's heart rate is 6-29 beats/min higher than the target heart rate, the speed will decrease by 1.0 km/h.
G: The user's heart rate is higher or lower than the target heart rate 0-5 beats per minute, and the speed remains the same.
-
In the following situations, decelerate to the minimum, run at the lowest speed for
-
15 seconds and then stop, and beep once every second.
A: The heart rate is detected every 30 seconds, if the heart rate is not detected twice in a row.
B: At a speed of 1 km/h, the exercise heart rate is greater than the target heart rate, resulting in deceleration.
C: When the heart rate exceeds (220-years old).
-
At speeds above 1 km/h, the deceleration cannot be lower than 1 km/h. For example,
-
the minimum speed of the treadmill is 1 km/h, and when running at 1.6 km/h,
-
the heart rate will decelerate by 1.0 (2.0) km/h., Then decelerate to 1 km/h.
The slope is not controlled by the heart rate and can be adjusted manually.
The starting speed is 1 km/h, and the heart rate is not used for 1 minute before running.
Manual adjustment of speed and tilt is also available. The adjustment will be for the current 30 segments. When passed to the next step, the speed/tilt value will follow the HRC rules. Press the mode and the user can stop the HRC and run in the manual program
i) 【USER setting
In the standby state, press the USER button to select U1—U4, and press ENTER to set the time. The following is the setting method of 30-segment data of USER program
1) Press ENTER to enter the time window (the window should flash), adjust the time with
2) speed +-, press the ENTER button to enter the dot matrix window 30-segment
3) programming (speed default 1.0, slope default 0), adjust the speed value with
4) speed plus and minus ; Use slope +- to adjust the slope value, after each section
5) of the dot matrix window is set, press ENTER to enter the next section of setting,
2) The second step will flash-repeat all 30 steps
3) After setting all the 30-segment programs, press ENTER to return to the flashing state of the USER name, indicating that all the data has been recorded. At this time, you can press ENTER to set the running time. You can also directly press START to directly start running. Countdown at 0:00, the treadmill stops
j)【Body Fat】Test mode
Press BODY FAT in standby mode to enter the fat measurement mode
Time window display: gender, default value: S-1, setting range: 1-2 1 = male 2 = female
Energy window display: age, default value: 25 years old, setting range: 10-99 years old
Slope window display: height, default value: 170cm, setting range 100-220cm
Step number window display: weight, default value: 70kg, setting range 20-150kg
1) Press ENTER to enter the setting, use the speed +- button to adjust gender, age,
2) height and weight
2) After setting the parameters, press ENTER and the matrix window displays 0.0
3) At this time, put your hands on the heart rate grip, the matrix window will display the measured body fat value after 8 seconds..
k) fixed program diagrams,
| TIME MODE | 1 2 | 3 4 | 5 6 7 | 8 9 | 10 11 | 12 13 | 14 | 15 16 | 17 18 | 19 | 20 21 | 22 23 | 24 | 25 26 | 27 28 | 29 30 | |||||||||||||||
| P-01 | SPD 13 | 8455 | 4433 | 2333 | 4554 | 4333 | 345 | 5443 | 31 | ||||||||||||||||||||||
| P-02 | SPD 24 | 6665 | 4443 | 346 | 6654 | 4434 | 666 | 5444 | 32 | ||||||||||||||||||||||
| P-03 | SPD 24 | 6776 | 6553 | 467 | 7665 | 5346 | 776 | 6554 | 32 | ||||||||||||||||||||||
| P-04 | SPD 24 | 6866 | 5544 | 346 | 8665 | 5443 | 468 | 6655 | 32 | ||||||||||||||||||||||
| P-05 | SPD | 3 | 4 | 6 | 8 | 10 | 8 | 6 | 6 | 5 | 5 | 4 | 4 | 6 | 8 | 10 | 8 | 6 | 6 | 5 | 5 | 4 | 4 | 6 | 8 | 10 | 8 | 6 | 5 | 3 | 2 |
| P-06 | SPD | 3 | 4 | 6 | 8 | 10 | 12 | 10 | 8 | 6 | 5 | 4 | 6 | 8 | 10 | 12 | 10 | 8 | 6 | 5 | 4 | 6 | 8 | 10 | 12 | 10 | 8 | 6 | 5 | 3 | 2 |
| P-07 | spd 13 | 455 | 4433 | 2334 | 554 | 4333 | 345 | 443 | 31 | ||||||||||||||||||||||
| inc 0 | 3344 | 664 | 4303 | 3446 | 6440 | 334 | 4664 | 430 | |||||||||||||||||||||||
| P-08 | spd 24 | 6665 | 4443 | 346 | 6654 | 4434 | 6665 | 444 | 32 | ||||||||||||||||||||||
| inc 0 | 3355 | 665 | 5313 | 3446 | 6440 | 334 | 4664 | 430 | |||||||||||||||||||||||
| P-09 | spd 24 | 6665 | 4443 | 346 | 6654 | 4434 | 6665 | 444 | 32 | ||||||||||||||||||||||
| inc 3 | 5359 | 424 | 6810 | 1055 | 5446 | 787 | 4445 | 77640 | |||||||||||||||||||||||
| P-10 | spd 24 | 6776 | 6553 | 467 | 7665 | 5346 | 7766 | 6554 | 32 | ||||||||||||||||||||||
| inc | 5 | 4 | 4 | 3 | 3 | 4 | 4 | 3 | 3 | 10 | 8 | 6 | 6 | 4 | 3 | 4 | 5 | 6 | 10 | 8 | 6 | 3 | 3 | 5 | 5 | 3 | 3 | 5 | 4 | 0 | |
| P-11 | spd 24 | 6776 | 6553 | 467 | 7665 | 5346 | 7766 | 6554 | 32 | ||||||||||||||||||||||
| inc 7 | 5434 | 554 | 4879 | 9554 | 668 | 7663 | 3466 | 440 | |||||||||||||||||||||||
| P-12 | spd 24 | 6866 | 554 | 346 | 8665 | 5443 | 4686 | 655 | 32 | ||||||||||||||||||||||
| inc | 6 | 4 | 4 | 3 | 4 | 4 | 5 | 6 | 7 | 7 | 10 | 8 | 6 | 5 | 6 | 7 | 9 | 7 | 8 | 10 | 10 | 8 | 6 | 5 | 7 | 7 | 10 | 8 | 5 | 0 | |
| P-13 | spd 24 | 6866 | 554 | 346 | 8665 | 5443 | 4686 | 655 | 32 | ||||||||||||||||||||||
| inc | 5 | 7 | 7 | 5 | 7 | 4 | 6 | 6 | 7 | 8 | 10 | 10 | 3 | 3 | 5 | 5 | 7 | 7 | 8 | 8 | 10 | 8 | 6 | 4 | 6 | 6 | 8 | 8 | 10 | 0 | |
| P-14 | spd | 3 | 4 | 6 | 8 | 10 | 8 | 6 | 6 | 5 | 5 | 4 | 4 | 6 | 8 | 10 | 8 | 6 | 6 | 5 | 5 | 4 | 4 | 6 | 8 | 10 | 8 | 6 | 5 | 3 | 2 |
| inc | 5 | 4 | 4 | 3 | 3 | 4 | 5 | 5 | 8 | 10 | 8 | 8 | 6 | 4 | 3 | 4 | 6 | 6 | 8 | 8 | 10 | 10 | 8 | 4 | 3 | 4 | 8 | 8 | 10 | 0 | |
| P-15 | spd | 3 | 4 | 6 | 8 | 10 | 8 | 6 | 6 | 5 | 5 | 4 | 4 | 6 | 8 | 10 | 8 | 6 | 6 | 5 | 5 | 4 | 4 | 6 | 8 | 10 | 8 | 6 | 5 | 3 | 2 |
| inc | 6 | 5 | 6 | 5 | 4 | 6 | 8 | 8 | 9 | 9 | 10 | 10 | 6 | 5 | 4 | 5 | 6 | 6 | 8 | 8 | 10 | 10 | 6 | 5 | 4 | 6 | 8 | 8 | 10 | 0 | |
| P-16 | spd 34 | 6781 | 865 | 3467 | 7665 | 5346 | 7766 | 6554 | 32 | ||||||||||||||||||||||
| inc | 8 | 8 | 6 | 5 | 6 | 5 | 6 | 8 | 8 | 10 | 10 | 8 | 6 | 4 | 6 | 6 | 8 | 8 | 10 | 8 | 6 | 5 | 5 | 8 | 6 | 8 | 10 | 10 | 12 | 0 | |
| P-17 | spd | 3 | 4 | 6 | 8 | 10 | 12 | 10 | 8 | 6 | 5 | 4 | 6 | 8 | 10 | 12 | 10 | 8 | 6 | 5 | 4 | 6 | 8 | 10 | 12 | 10 | 8 | 6 | 5 | 3 | 2 |
| inc | 8 | 8 | 6 | 5 | 4 | 3 | 4 | 5 | 6 | 6 | 10 | 6 | 6 | 4 | 3 | 4 | 6 | 8 | 10 | 12 | 10 | 8 | 4 | 3 | 4 | 6 | 8 | 10 | 12 | 0 | |
| P-18 | spd | 3 | 4 | 6 | 8 | 10 | 12 | 10 | 8 | 6 | 5 | 4 | 6 | 8 | 10 | 12 | 10 | 8 | 6 | 5 | 4 | 6 | 8 | 10 | 12 | 10 | 8 | 6 | 5 | 3 | 2 |
| inc | 10 | 9 | 8 | 7 | 6 | 5 | 6 | 7 | 8 | 10 | 12 | 8 | 7 | 6 | 5 | 6 | 7 | 8 | 10 | 12 | 10 | 8 | 6 | 5 | 6 | 7 | 8 | 10 | 12 | 0 | |
| P-19 | INC 033 | 446 | 5443 | 0334 | 466 | 4403 | 3446 | 644 | 30 | ||||||||||||||||||||||
| P-20 | INC 353 | 594 | 2468 | 1010 | 5554 | 4678 | 7444 | 4577 | 640 | ||||||||||||||||||||||
| P-21 | INC | 5 | 4 | 4 | 3 | 3 | 4 | 4 | 3 | 3 | 10 | 8 | 6 | 6 | 4 | 3 | 4 | 5 | 6 | 10 | 8 | 6 | 3 | 3 | 5 | 5 | 3 | 3 | 5 | 4 | 0 |
| P-22 | INC | 6 | 5 | 6 | 5 | 4 | 6 | 8 | 8 | 9 | 9 | 10 | 10 | 6 | 5 | 4 | 5 | 6 | 6 | 8 | 8 | 10 | 10 | 6 | 5 | 4 | 6 | 8 | 8 | 10 | 0 |
| P-23 | INC | 8 | 8 | 6 | 5 | 4 | 6 | 6 | 8 | 6 | 10 | 10 | 8 | 6 | 4 | 6 | 6 | 8 | 8 | 10 | 8 | 6 | 5 | 5 | 8 | 6 | 8 | 10 | 10 | 12 | 0 |
| P-24 | INC | 10 | 9 | 8 | 7 | 6 | 5 | 6 | 7 | 8 | 10 | 12 | 8 | 7 | 6 | 5 | 6 | 7 | 8 | 10 | 12 | 10 | 8 | 6 | 5 | 6 | 7 | 8 | 10 | 12 | 0 |
m) Bluetooth music
Turn on the phone's Bluetooth to pair with the searched Bluetooth device of the machine. After the connect successful, use the phone to play music.
MAINTENANCE
Proper maintenance is very important to ensure your treadmill is always in top working condition. Improper maintenance could cause damage or shorten the life of your treadmill and exceed the LIMITED WARRANTY coverage.
- Important: Never use abrasives or solvents to clean the treadmill. To prevent damage to the computer, keep liquids away and keep it out of direct sunlight.
- Inspect and tighten all parts of the treadmill regularly. Replace any worn parts immediately
CLEANING:
Routine cleaning of your treadmill will extend the product's life.
- Warning: To prevent electrical shock, be sure the power to the treadmill is OFF and the power cord is unplugged from the wall electrical outlet before attempting any cleaning or
maintenance.
- Important: Never use abrasives or solvents to clean the treadmill. To prevent damage to the computer, keep liquids away and keep it out of direct sunlight.
- After each workout: Wipe off the console and other treadmill surfaces with a clean, water dampened soft cloth to remove excess perspiration
- Weekly: Use of a treadmill mat is recommended for ease of cleaning. Dirt from your shoes contacts the belt and eventually makes it to underneath the treadmill. Vacuum the underneath treadmill once a week.
BELT ADJUSTMENT:
Belt adjustment and tension performs two functions: adjustment for tension and centering. The running belt has been adjusted properly at the factory. However transportation, uneven flooring or other unpredicted reasons could cause the belt to shift off center resulting in the belt rubbing with the plastic side rail or end caps and possibly causing damage. To adjust the belt back to it proper position please follows the directions below:
1. Walking belt has shifted to the left:
First unplug the power cord from the surge protector. Using the hex key provided, turn the left rear roller adjustment bolt 1/4 turn in the clockwise direction. Plug the power cord back into the surge protector and run the treadmill at 2.5 mph. You should see the belt start to correct itself, moving back towards the center. Repeat the above procedure until the walking belt is centered. It may be necessary to set walking belt tension once you have completed this procedure if the belt feels like it is slipping while walking. Refer below to the “Walking belt slipping” instructions.
2. Walking belt has shifted to the right:
First unplug the power cord from the surge protector. Using the hex key provided, turn the right rear roller adjustment bolt 1/4 turn in the clockwise direction. Plug the power cord back into the surge protector and run the treadmill at 2.5 mph. You should see the belt start to correct itself, moving back towards the center. Repeat the above procedure until the walking belt is centered. It may be necessary to set walking belt tension once you have completed this procedure if the belt feels like it is slipping while walking. Refer below to the “Walking belt slipping” instructions.
3. Walking belt is slipping:
First unplug the power cord from the surge protector. Using the hex key provided, turn both the left and right rear roller adjustment bolts the same distance, usually a 1/4 turn in the clockwise direction. Plug the power cord back into the surge protector and run the treadmill at 2.5 mph. You should now walk on the belt to determine if the belt is still slipping. Repeat the above procedure until the walking belt is not slipping. The tension should be just tight enough not to slip.
WARNING! Do not over tighten rollers! This will cause premature roller bearing failure!

natural_image
Line drawing of a treadmill with curved blades and wheels (no text or symbols)Right and left Allen bolts are located at the rear of the treadmill.
DECK LUBRICATION:
The walking belt has been pre-lubricated at the factory. However, it is recommended that the walking board be checked periodically for lubrication to ensure optimal treadmill performance.
Every 3 months of operation lift the sides of the walking belt and feel the top surface of the walking board as far as you can reach. If you feel signs of silicone, no further lubrication is required. If it feels dry to the touch, follow the instructions below.
Please use Lube 'N Walk, or a non petroleum based silicone such as "Napa 8300" (available at most stores).
TO APPLY LUBRICANT TO THE WALKING BELT
1 Position the walking belt so that the seam is located on top and in center of the walking board.
2 Insert the spray nozzle into the spray head of the lubricant can.
3 While lifting the side of the walking belt, position the spray nozzle between the walking belt and the board approxinateUY6" from the front of the treadmill. Apply the silicone spray to the walking board, moving from the front of the treadmill to the rear. Repeat this on the other side of the belt. Spray approximately 4 seconds on each side.
4 Allow the silicone to "set" for 1 minute before using the treadmill.

natural_image
Line drawing of a treadmill with curved blades and wheels (no text or symbols)
Garlando
GARLANDO SPA
Via Regione Piemonte, 32 - Zona Industriale D1
15068 - Pozzolo Formigaro (AL) - Italy
www.toorx.it - info@toorx.it

- EXPLODED DRAWING
- HARDWARE COMPARISON CHART
- ASSEMBLY INSTRUCTIONS:
- STEP1:
- STEP2:
- STEP3 A:
- STEP3 B:
- STEP3 C:
- STEP4:
- Folding illustration:
- COMPUTER OPERATION
- The Operation
- e) Lift setting
- f) Set the target program
- g) Set up a fixed program
- h) HRC setting
- • To adjust the value, press ENTER
- j)【Body Fat】Test mode
- m) Bluetooth music
- MAINTENANCE
- CLEANING:
- BELT ADJUSTMENT:
- Walking belt has shifted to the left:
- Walking belt has shifted to the right:
- Walking belt is slipping:
- DECK LUBRICATION:
- TO APPLY LUBRICANT TO THE WALKING BELT
- Garlando
Brand : Toorx
Model : Experience Plus AC
Category : Treadmills