PR850 - Radio N'oveen - Free user manual and instructions
Find the device manual for free PR850 N'oveen in PDF.


| Product Type | Portable Radio |
| Brand | N'oveen |
| Model | PR850 |
| Dimensions (W x D x H) | Approx. 200 x 120 x 60 mm |
| Weight | Approx. 500 g |
| Power Source | AC 230V 50Hz or 3x AA batteries (not included) |
| Battery Life | Up to 20 hours with alkaline batteries |
| Radio Bands | FM 87.5-108 MHz, AM 530-1600 kHz |
| Tuning | Analog dial with fine tuning control |
| Speaker | Built-in 3-inch dynamic speaker |
| Headphone Jack | 3.5mm stereo output |
| Aux Input | 3.5mm stereo input for external devices |
| Antenna | Built-in ferrite for AM, telescopic rod for FM |
| Controls | Volume, tuning, band selector, power switch |
| Display | None |
| Care & Cleaning | Wipe with a soft, dry cloth. Do not use liquid cleaners. |
| Safety Warnings | Keep away from water and heat sources. Use only specified power supply. |
| Spare Parts Availability | Battery cover and antenna available separately |
| Repair Information | Contact N'oveen support for authorized service centers. |
| Warranty | 1 year limited warranty |
Frequently Asked Questions - PR850 N'oveen
User questions about PR850 N'oveen
0 question about this device. Answer the ones you know or ask your own.
Ask a new question about this device
Download the instructions for your Radio in PDF format for free! Find your manual PR850 - N'oveen and take your electronic device back in hand. On this page are published all the documents necessary for the use of your device. PR850 by N'oveen.
USER MANUAL PR850 N'oveen
When using electrical devices you should always follow safety rules:
READ ALL INSTRUCTIONS BEFORE USING THE APPLIANCE.
KEEP THE APPLIANCE AWAY FROM WATER.
NOTE: for most electrical appliances, all electric parts are able to energize even when the device is turned off.
BE CAREFUL !!!
To reduce the risk of health damage and even death by electric shock:
- Always turn off the appliance from the socket when it is not in use.
- Do not use the device while bathing. Store the device in such place so that his fall into the bathtub or sink is not possible.
- Do not place the device in water or other liquids.
- If the device falls into water, unplug it immediately. DO NOT REACH FOR IT TO THE WATER!
NOTE: To reduce the risk of burns, electric shock, fire or other trauma:
- Do not leave the device unattended during operation or it is plugged into the outlet.
- Supervision is necessary when the device is used by children or disabled persons.
- Use the device only for the purposes for which it is intended. the use of additives not recommended by the manufacturer can be dangerous.
- Never use the device if its cord or plug are damaged.
Also when it is not working properly, it has been dropped or otherwise Broken. Even more so when it fell into the water. Take the device to the nearest service for review or repair.
-
Keep the power cord away from hot surfaces or other heat sources.
-
Never throw or put any objects into the device. It may be dangerous.
-
The elements may heat up during use. Let them cool down after finished work, before you put the device away.
PREFACE
We invite you to use our products! Thank you for your trust! To fully understand the functions and capabilities of the device, please read the instructions carefully before first use. Keep the manual together with the warranty card.
ATTENTION
a. Do not use an external power source with a voltage other than indicated to avoid damage to the device.
b. Do not listen to the radio at high volume for a long time to avoid hearing damaging.
c. Avoid magnetic sources to prevent interference.
TECHNICAL DATA
| Model | PR150 | PR450 | PR650/651 | PR750 | PR850 | PR950/951 |
| Power supply | DC 3V(2 x 1.5V AAA) | AC 230V 50HzlubDC 2 x R20 | AC 230V 50HzlubDC 2 x R20 | AC 230V 50HzlubDC 4 x R20 | AC 110V 60 Hzlub220V 50 HzlubDC 2 x R20 | DC 5V |
| Dimensions | 58 x 104 x 27mm | 20 x 12,6 x 6,8cm | 21 x 12,5 x 6cm | 27,3 x 14,4 x11,8 cm | 24 x 13 x 6,6 cm | 156 x 99 x 105mm |
| Weight | 0,3 kg | 0,574 kg | 0,67 kg | 1,26 kg | 0,75 kg | 0,5 kg |
PR150 DESCRIPTION
- Telescopic antenna
- Headphone jack
- Radio band switch
- Tuning knob
- Volume knob
POWER
- Open the battery compartment.
- Insert two 1.5V "AAA" batteries according to the shown polarity.
RADIO OPERATION
- Turn the volume control towards the large speaker to turn on the radio and increase the volume. Turning towards the small speaker decreases the volume until the radio turns off.
- Select desired radio band using the switch.
- Set the desired station by turning the tuning knob.
NOTE
- Avoid dropping the device.
- Avoid exposure to extreme temperatures, direct sunlight and moisture.
- For celaning use a soft cloth moistened with a mild detergent.
- The batteries must be replaced in case of fluctuations or sound distortion.
- When the device is not going to be used for a long time, remove the batteries in order to
avoid damage caused by leakage and corrosion.
TELESCOPIC ANTENNA:
- Pull out the telescopic antenna for optimal FM radio reception.
- The device is equipped with a built-in AM ferrite antenna.
Note: The built-in antenna is directional, so reception of the AM band can be improved by turning the radio.
WARNING:
To prevent the risk of fire or electric shock, do not expose to rain or moisture. Do not remove the cover of the radio, the parts inside the device cannot be operated by user.
The servicing must be carried out by an authorised service centre.
PR450 DESCRIPTION
- TELESCOPIC ANTENNA
- TUNING KNOB
- FUNCTION SWITCH
- VOLUME CONTROL / ON / OFF
- RADIO SCALE
6. SPEAKER
OPERATION
To turn on the radio, turn the volume knob to the right. To turn off the radio turn the volume knob to the extreme left.
Set the function switch to FM / MW / SW1 / SW2 to listen to the radio:
- Set the switch to FM and then use the tuning knob to set the desired station in the 88-108 MHz range.
- Set the switch to SW1, SW2 and then use the tuning knob to set the desired station in the 3-23 MHz range.
When receiving FM, SW, extend the telescopic FM antenna to get the best reception.
- Set the switch to MW and then use the tuning knob to set desired station in the 530-1600 KHz range.
When receiving a MW signal, adjust the position of the radio to get the best reception.
PR650/651 DESCRIPTION
- BAND SWITCH
- TUNING
- TREBLE / BASS
- VOLUME KNOB
- DC POWER CONNECTOR
OPERATION
- Use the slider (1) to select the FM / SW radio band:
a. Set the volume knob to the middle position, then use the tuning knob, to search for FM stations 88-108 MHz.
b. Use the tuning knob to search for the 5.55-16 MHz SW stations.
c. If you are receiving FM, SW, you should extend the telescopic antenna, to get the best possible reception.
MW radio:
a. Use the slider (1) to select the MW radio band. Use the tuning knob to search for MW 530-1600KHz stations.
b. When receiving a MW station, adjust the position of the radio to get the best possible reception.
PR750 DESCRIPTION
- TELESCOPIC ANTENNA
- VOLUME CONTROL KNOB
- BASS CONTROL KNOB
- FREQUENCY TUNING KNOB
- ON / OFF SWITCH
- FUNCTION SWITCH
- PREV BUTTON
- PLAY / PAUSE BUTTON
- NEXT BUTTON
- REPEAT BUTTON
- SD CARD READER
- USB INPUT
- AUX IN INPUT
PR750 OPERATION
a. MP3 playback (applies to PR750)
Set the function switch to MP3 to play USB / SD / MP3:
1). Insert the USB (with MP3 files) or SD card into the USB input or SD card reader to play songs. During playback, press the Play / Pause button to pause playback, then press again to resume playback.
2). During playback, press PREV to skip to the previous song; press NEXT to skip to the next song. Long press these two buttons to fast forward and rewind.
3). When the USB memory and SD card are connected to the device at the same time, press PLAY / PAUSE button for about 1 second to switch between the USB input or SD.
4). Bass adjustment: when you listen to music, you can adjust the level of low tones using this regulator.
5). Repeat tracks: press and hold the REPEAT button to start repeating the whole folder / repeating one song / canceling the repetition.
6). To stop the playback, set the switch to OFF, disconnect USB or SD card.
Note: Please do not pull out USB or SD memory during playback, it may cause damage to the memory storage (applies to PR750).
b. RADIO (applies to PR750)
Set the function switch to FM / MW / SW to listen to the radio:
- Set the switch to FM and then use the tuning knob to set the desired station in the 88-108 MHz range.
- Set the switch to SW, then use the tuning knob to set the desired station in the 8-16 MHz range (on the 18 MHz scale).
When receiving FM, SW, extend the telescopic FM antenna to get the best reception.
- Set the switch to MW and then use the tuning knob to set the desired station in the range 530-1600 Khz.
When receiving a MW signal, adjust the position of the radio to get the best reception.
AUX INPUT (applies to PR750)
- Turn on the device.
- Connect the audio cable (not included) to the AUX IN input. Audio signal from any external device will be played through the radio speaker.
PR850 DESCRIPTION
- INDICATOR
- DISPLAY
- TIME/M+ BUTTON
- POWER BUTTON
- TUNING+ / TUNING - BUTTON
- LIGHT BUTTON
- WAKE/BAND BUTTON
- METER BUTTON
- SLEEP / SNOOZE BUTTON
- VOLUME + / - BUTTON
-
BATTERY DOOR (BACK SIDE)
-
SPEAKER
- AC IN SOCKET
- HANDLE
- FM ANTENNA
- POWER ON/OFF
POWER SOURCE
Battery operation
1.) Open the battery door
2.) Insert 2 "D" size (UM-1, LR20 or equivalent) batteries into the battery
compartment,
making sure that the batteries are installed with the proper polarities (+ and -).
AC Supply
1) Before use, check the rated voltage of your local voltage. And then slide the voltage
switch to match your local voltage.
Note: The voltage switch is on the bottom of the unit.
1) Make sure the Voltage Selector is set to the correct position. Connect the AC cord to the AC IN socket and the wall socket. Unit is ready to use.
2) To turn the unit off completely, pull the AC cord from the wall socket and disconnect from the AC IN socket.
To prevent possible damage:
- Load new batteries with their polarities (+ / -) aligned correctly.
- Do not apply heat to batteries, or internal short - circuit may occur.
- If the unit is not to be used for a long period of time, remove all batteries and store them
in a cool and dry place.
- Remove dead batteries immediately and dispose of them.
- Do not use old and new batteries together. Also never use an alkaline battery with a
manganese battery.
- If the sound becomes low or distorted, replace batteries with new ones.
BASIC OPERATION
1) Press POWER button to turn the unit ON and OFF.
2) Press VOLUME + or - button to adjust to your desired volume level.
1) Press POWER button to turn on the unit.
2) Press BAND button to select FM / AM / SW1/SW2.
3) Press VOLUME + or - button to adjust to your desired volume level.
4) Tune in to your desired station.
- Press TUNING + or - button to search manually.
- Press and hold TUNING + or - button to search automatically.
- Press BAND button to adjust to SW1 or SW2, and then you can press METER button to select wave frequency.
- Press M button to select your preset station. See “PRESET TUNING” for more details.
5) Adjust the antenna to receive well signal.
6) To turn off the unit press the power button.
PRESET TUNING
You can store memory stations for each of the FM, AM, SW-1/SW-2 waveband range by following these steps:
1) First tune in to your desired station.
2) Press and hold M button and the MEMO will flash on the display.
3) Press M button or TUNING + or TUNING - button to select the preset station number.
4) Press and hold M button to confirm and the MEMO will stop flashing.
Note: It will quit the station storage mode in about 7 seconds. Once the MEMO disappears from the display, you have to repeat steps 1 to 3 to store more preset stations.
SETTING THE CLOCK
Press WAKE button to select OFF
1) Press TIME button, the time will start flashing on the display.
2) Press TUNING + button to select hour.
3) Press TUNING - button to select minutes.
4) Press the TIME button again to confirm the time and the time will stop flashing
Note: - It will auto confirm in about 7 seconds. Repeat steps 1 to 3 to set the clock. - The unit must be off in order to set the clock and the display the time.
SETTING THE ALARM CLOCK
1) Press WAKE button to select OFF, wake to buzzer or wake to radio
will appear.
2) Press and hold WAKE button, the time will start flashing.
3) Press TUNING + button to select hour.
4) Press TUNING - button to select minutes.
5) Just press WAKE button again to confirm, the alarm time will stop flashing and
the time will appear.
6.) The alarm ( buzzer or radio ) will go off for 2 hours if you do not shut off the
alarm. To cancel the alarm clock function, press the WAKE button to turn the alarm off and the will disappear.
Note: - It will auto confirm in about 7 seconds. Repeat steps 1 to 4 to set alarm clock. -The unit must be off in order to set the alarm.

USING THE SNOOZE ALARM
1) When the alarm (buzzer or radio) goes off, press the SNOOZE button and the
indicator will begin flashing. The alarm will snooze for about 9 minutes.
2) To cancel the snooze feature, press the WAKE button and the will
disappear.
SETTING THE SLEEP TIMER
1) Press the SLEEP button, the display will show 90, 80, 70, 60, 50, 40, 30,
20, 10 minutes, your clock radio will turn off in the minutes you set. And the will appear on the display.
2) If you want to change the number of minutes, press the SLEEP button until the number of minutes you want appears.
3) To turn off the sleep timer before the time you set occurs, just press the
SLEEP button until the disappears.
Note: - It will auto confirm in about 5 seconds - The unit must be off when you set the timer.
LIGHT FUNCTION
Press the LIGHT button, the display backlight light will light up 3 seconds.
FM

AM
SW1-2
ANTENNAS
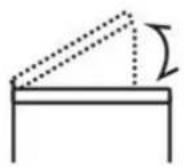
FM
Pull out the telescopic antenna and adjust its length and angle for optimum reception.
AM
The sensitive ferrite core antenna inside the set will provide excellent AM reception in most areas.
Turn the set in the direction which gives the best results because the ferrite core antenna is directional.
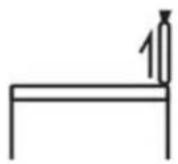
SW1-2
Fully and vertically extend the telescopic antenna.
Battery change
When the sound being played is weakening or distorted replace the batteries.
Do not expose the device to:
a. Rapid temperature changes, do not use the device until it returns to room temperature.
b. Direct sunlight.
c. Moisture, water dripping, oil, chemical solvents, pesticides.
d. Do not place objects with liquids, such as vases on the device.
TROUBLESHOOTING
- If you are not using the radio, remove the plug from the socket.
- The radio is hissing or stops working, possible causes:
1) The voltage is too low, please replace the batteries.
2) External factors interfere with the reception.
- No sound, possible causes:
1) No power supply.
2) Speaker damaged, contact service. - If you are not using the radio for a long time, remove the batteries to prevent leakage, which can damage the device
PR950/951 DESCRIPTION
1 Previous track / rewind
2. Playback / pause
3. Next track / fast forward
4. Mode button
5. Fisplay
6. Radio scale
7. Function switch
8. Power switch / volume knob
9. Tuning knob
10. Headphone jack
11. AUX-IN socket
12. MicroSD card slot
13. USB socket
14. Charging socket
15. FM antenna
OPERATION
After turning on the power, the following operations can be performed: a. Set the function switch to BT/AUX for USB/MicroSD playback:
1). Insert the USB/MicroSD to play the songs directly. During playback press the play/pause button
once to pause playback, press the button again to resume.
2) During playback, press the "previous track" button to go to the previous song; press the "next song" button to go to the next song. Long press of these two buttons allows for fast forward and rewind.
3). When there is a USB and MicroSD card in the device at the same time, press the MODE button to switch between USB/MicroSD/BT.
4). Turn off the power before disconnecting the USB memory or MicroSD card.
Note: Disconnecting the USB memory or MicroSD card during playback can cause damage to the media.
b. Bluetooth operation
1). Press the MODE button to switch to Bluetooth function and enter the search mode. When the search is completed, the device will emit a signal sound.
2). In Bluetooth mode, you can play music when connected to your phone. Press the
▶ II button to play/pause playback, press ▶ button to move to the next track, press ◀ to move to previous track.
3). Long press the PLAY button to disconnect the current connection.
c. Set the function switch to FM position to listen to the FM band:
1). Set the volume to a moderate position and use the tuning knob to find a radio station. You can listen to any radio programme within the 88-108 MHZ range.
2). When receiving FM programmes, stretch the telescopic antenna to get a better reception.
d. Set the function switch to AM position to listen to the AM band:
1). Set the volume to a moderate position, and use the tuning knob to find a radio station. You can listen to any radio programme in the 530-1600 kHz range.
2). If the received radio signal is not good, change the direction of the device to get a better reception.
EXTERNAL AUDIO INPUT (AUX-IN)
- Set the function switch to BT/AUX.
- Connect the external audio cable to the AUX-IN connector.
- When a USB memory stick or MicroSD card is inserted, the AUX input will be played first when the cable is connected to the AUX-IN socket.
CHARGING
Insert the 5V DC charging cable plug (supplied) into the charging socket, the red indicator will light up. When the battery is fully charged, green indicator will light up.
DEUTSCH DE
EXTERNE AUDIO IN (AUX-IN)
INTRARE AUDIO EXTERNĂ (AUX-IN)
- PREFACE
- ATTENTION
- PR150 DESCRIPTION
- POWER
- RADIO OPERATION
- NOTE
- TELESCOPIC ANTENNA:
- WARNING:
- PR450 DESCRIPTION
- SPEAKER
- OPERATION
- PR650/651 DESCRIPTION
- MW radio:
- PR750 DESCRIPTION
- PR750 OPERATION
- a. MP3 playback (applies to PR750)
- b. RADIO (applies to PR750)
- AUX INPUT (applies to PR750)
- PR850 DESCRIPTION
- POWER SOURCE
- Battery operation
- AC Supply
- Note: The voltage switch is on the bottom of the unit.
- BASIC OPERATION
- PRESET TUNING
- SETTING THE CLOCK
- SETTING THE ALARM CLOCK
- USING THE SNOOZE ALARM
- SETTING THE SLEEP TIMER
- LIGHT FUNCTION
- ANTENNAS
- FM
- AM
- SW1-2
- Battery change
- Do not expose the device to:
- TROUBLESHOOTING
- PR950/951 DESCRIPTION
- After turning on the power, the following operations can be performed: a. Set the function switch to BT/AUX for USB/MicroSD playback:
- b. Bluetooth operation
- c. Set the function switch to FM position to listen to the FM band:
- d. Set the function switch to AM position to listen to the AM band:
- EXTERNAL AUDIO INPUT (AUX-IN)
- CHARGING
- DEUTSCH DE
- EXTERNE AUDIO IN (AUX-IN)
- INTRARE AUDIO EXTERNĂ (AUX-IN)
Brand : N'oveen
Model : PR850
Category : Radio