
Assume - Coffee machine QUICKMILL - Free user manual and instructions
Find the device manual for free Assume QUICKMILL in PDF.


| Product Type | Semi-automatic espresso machine |
| Dimensions (W x D x H) | 30 cm x 40 cm x 40 cm |
| Weight | 15 kg |
| Power Consumption | 1300 W |
| Water Tank Capacity | 2.5 L |
| Boiler Type | Stainless steel, 0.3 L |
| Pump Pressure | 15 bar |
| Functions | Espresso, steam, hot water |
| Portafilter Size | 58 mm |
| Water Supply | Removable water tank |
| Maintenance | Descaling every 2-3 months, clean brew group |
| Cleaning | Backflush with cleaning powder weekly |
| Safety Features | Auto shut-off, safety valve, overheat protection |
| Spare Parts Available | Portafilter, baskets, gaskets, shower screen |
| Repairability | Modular design, user-replaceable parts |
| Warranty | 2 years |
Frequently Asked Questions - Assume QUICKMILL
User questions about Assume QUICKMILL
0 question about this device. Answer the ones you know or ask your own.
Ask a new question about this device
Download the instructions for your Coffee machine in PDF format for free! Find your manual Assume - QUICKMILL and take your electronic device back in hand. On this page are published all the documents necessary for the use of your device. Assume by QUICKMILL.
USER MANUAL Assume QUICKMILL
since 1945
E61
GROUP
OPERATING INSTRUCTIONS
PROFESSIONAL HOME COFFEE MACHINES
QUICK MILL S.R.L. thank you for having purchased one of our products. Before using the machine, we suggest you carefully read this manual to obtain the necessary information for correctly using and servicing the product. If you have any questions please contact your retailer or our offices.
This instructions manual refers to the following machine models
• 0960 – CAROLA - CAROLA PID
• 0980 - MILANO
• 0980 – ANDREJA - ANDREJA PID
• 0980 - ANDREJA DOSATA
• 0981 - RUBINO
• 0985 - AQUILA
• 0985 - AQUILA PID
• 0992 - QM 67-2 BOILER PID
• 0995 - VETRANO
• 0995 - VETRANO - 2 BOILER PID
• 0995 - VETRANO DOSATA - 2 BOILER PID
TABLE OF CONTENTS
TABLE OF CONTENTS .... 3
INTRODUCTION ....5
Symbols 5
Warnings....6
1. GENERAL INFORMATION ....7
Destination for use....7
Improper use....7
Safety instructions....8
General information .... 10
Safety....10
Vibrations....10
Noise....10
2. MACHINE COMPONENTS AND FUNCTIONING ....11
0960 - CAROLA - CAROLA PID 11
0980 - MILANO 13
0980 - ANDREJA - ANDREJA PID 18
0980 - ANDREJA DOSATA 23
0981 – RUBINO 31
0985 – AQUILA E AQUILA PID 35
0985 – AQUILA....37
0985 -AQUILA PID 42
0992 – QM67 - 2 BOILER PID....47
0995 – VETRANO....53
0995 – VETRANO - 2 BOILER PID .... 57
0995 - VETRANO DOSATA - 2 BOILER PID ...... 64
3. TERMOPID FUNCTIONING AND PROGRAMMING....72
Alarms....73
Alarms....75
Termopid Setting and Functioning model CAROLA....75
Pid Parameters Graph (model 0960 CAROLA)....76
-
ACCESSORIES 79
-
TRANSPORT 80
Packaging....80
Removal of packaging 80
-
INSTALLATION....81
-
MACHINE CLEANING....82
Cleaning the coffee brew group....82
- MAINTENANCE....83
Daily....83
Periodically after machine heavy duty....83
As well as the daily routine operations, proceed as follows: 83
Extraordinary maintenance 84
Decalcification....84
-
POSSIBLE PROBLEMS....85
-
DECOMMISSIONING 87
Temporary 87
Definitive 87
Grinding Capacity and Settings....88
Good Rules to Obtain an Excellent Expresso 89
How to Heat and Dose the Milk....91
How to Pour the Milk Cream 92
Menú....93
INTRODUCTION
Keep this instruction manual in a safe place. For any information or difficulties not fully explained, please contact the service personnel.
Symbols

The warning triangle identifies all the explanations of an important nature for the safety of persons.
Follow these instructions to avoid accidents!
Indicates a warning or note of key functions or useful information.
a
The numerical symbol, numbers or letters refer to illustrations and parts of the machine such as buttons, lights, etc.
The manufacturer assumes no responsibility for any damages in the event of:
- Uses not in accordance with the intended purposes;
- Alterations made to the power cable;
- Alterations made to any component part of the machine;
- Use of non-original components or accessories;
- Repairs not carried out by an authorised service centre;

This product meets the labelling requirements set out in RAEE Directive (2012/19/UE). The symbol indicates that this electrical or electronic product must not be discarded with normal household waste. PRODUCT CATEGORY with references to the type of equipment listed in Annex 1 of the RAEE Directive. This product falls within category 2 “Small household appliances”.
DO NOT DISPOSE WITH DOMESTIC HOUSEHOLD WASTE
The failure to observe the above-mentioned points voids the guarantee.
Warnings
- The packaging material (plastic bags, polystyrene, nails, cardboard, etc.) must not be left within the reach of children as they are a potential source of danger.
- Before connecting the machine to power supply, make certain that the rating plate corresponds to the requirements of the electrical grid.
- The power cable must lie flat (avoid curling or overlapping) in a position which is not exposed to any impacts or handling by minors. It must not be placed near liquids, water or heat sources, and must not be damaged (if necessary have qualified personnel replace it).
- The use of adapters, multiple sockets and/or extensions is not advised. Whenever their use is absolutely necessary, only use products with quality certification markings (IMQ, VDE, +S, etc.), and ensure that the power rating stamp is higher than the absorption (A = amps) of the equipment to be attached.
-
In the event of doubt or uncertainty, have qualified personnel check the electrical power supply which must correspond to the provisions required by the current safety regulations, including:
-
Proper heating;
- Conductor section is suitable for the absorption capacity;
-
Efficient circuit breaker device.
-
Position the machine on a hydro-repellent surface (laminated, stainless steel, ceramic, etc.) away from heat sources (ovens, stove tops, fireplaces, etc.) and in an environment where temperature does not drop below 5 °C.
- Do not expose the machine to the elements, or install it in an environment with high humidity, such as a bathroom area.
- If the need for a replacement part arises, contact a distributor or Authorised Retailer and only used original spare parts.
- The machine in its packaging is to be stored in a dry location, free from humidity and protected from the elements. The temperature must not be lower than +5 °C.
- A maximum of four packages containing pieces of the same type may be stacked, one on top of the other. Do not stack heavy packages on boxes of a different type.
- In the event of damage to objects or persons caused by the improper installation or use, the manufacturer can not be considered responsible.
1. GENERAL INFORMATION
This instruction manual is an essential part of operating your coffee machine safely, so it is important to read carefully all the warnings and precautions to be taken as described below.
Destination for use
The machine has been designed and constructed to distribute coffee brews and to prepare other hot drinks (tea, cappuccino, etc....)
This machine is intended to be used in household and similar applications such as:
- Shops, offices and other working environments.
- Farm houses.
- By customers in hotels, motels and other residential type environments.
- Bed & Breakfast type environments.
Any other use is to be considered improper and therefore hazardous.
The operator is to always follow the indications for use and maintenance contained in this handbook.
If in doubt, or if faults occur in functioning, stop the machine, do not attempt any repairs or direct actions, but contact the authorised after-sales service.
Improper use
The machine is only to be used for the operations indicated and not for other purposes, for example, to grind and distribute products other than coffee or that are not drinkable.
Safety instructions
- Check the data on the rating plate: they have to correspond to that of the main electrical supply to which the machine will be attached.
- Ensure that the capacity and power rating is suitable for the maximum power consumption indicated on the machine, before connecting the machine to electric supply.
- We do not recommend the use of accessory attachments such as adaptors, multiboards or extension cords that are not recommended by the appliance manufacturer as they may cause injury.
- Do not use this machine if there is damage to its cord, plug or any other part or if the machine does not work properly. Return the machine to the Manufacturer Quick Mill.
- This machine has been designed for the sole purpose of producing coffee, hot water and steam for hot beverages. All other uses are inappropriate and dangerous. The manufacturer shall not be held responsible for any damage caused by inappropriate use.
-
Follow the precautions below to protect the machine from electrical issues:
-
Do not immerse the machine itself, cord and plugs in water or other liquid; do not let the machine internal parts get in contact with liquid.
- Prevent the power cable from being stretched or pulled tight.
- Do not use the machine with wet hands.
- Do not allow children to use the machine or play with it..
- Do not use the machine with bare feet.
- Do not spill any liquid over the machine.
- Do not expose the machine to the sunlight, rain, snow, extreme temperature etc.
• Always use spare parts and accessories Quick Mill certified.
- Before performing any cleaning turn the machine "off" and disconnect it from the electrical supply.
- The machine can be used by children aged 8 years and over and by people with reduced physical, sensory or mental abilities, or lack of experience and knowledge if they are supervised or instructed, understanding the risks involved in using the machine.
- Cleaning and maintenance of the machine can only be carried out by children under supervision.
- The machine may only be used by personnel who have acquired knowledge and experience in its use, particularly with regard to safety and hygiene.
- The machine is not suitable for installation in an area where water jets can be used.
- The machine must be positioned on a horizontal plane at a suitable height so that the upper part of the machine exceeds 1.2 m.
- If the machine operates in a faulty manner, is compromised in its performance or stops working, turn the machine into the “off” position at the machine power switch and disconnect it from the electrical supply: do not try to repair it. Any repair must be performed by the Quick Mill operator. Please contact Quick Mill.
General information
The machine must be operated with soft, clean drinking water. If the local water supply has a high mineral content use a water softener. A build-up of mineral deposit may restrict the flow of water within the hydraulic systems causing damage to the machine and risking personal injury. Otherwise, very “pure/sweet” water may interfere with the electronic signals read by the machine for both boiler level and water reservoir level indications: use a filtered water.
Instructions for connection to the water supply:
- The maximum inlet pressure is 0,8 MPa (8 bar).
If the supply pressure is higher, use a pressure reducer.
-
The minimum inlet pressure is 0,4 MPa (4 bar).
-
Always use the tubes supplied with the machine.
The machine is not to be used by persons with physical or mental disabilities or without experience, unless they have been properly instructed beforehand.
Safety
The coffee boiler is fitted with a mechanical spring valve against over-pressure, set at 10 bar and has a thermal switch that stops the heating in the event of failure.
The steam boiler has a safety valve set at 2,3 Bar and a thermal switch that stops the heating in the event of failure.
The pump is fitted with a thermal switch that resets automatically for protection against overheating.
All the heating elements and those electrically powered are located inside the machine panelling.
Vibrations
The machine is supplied with rubber vibration damping feet. In normal working conditions the machine does not generate vibrations which could damage objects or cause injury to persons.
Noise
The operating characteristics of the machine are such that the weighted sound pressure level is less than 70 dB (A).
2. MACHINE COMPONENTS AND FUNCTIONING
A description follows of the parts that compose the machine and how they function.
0960 - CAROLA - CAROLA PID

Legend:
a. Coffee brew group
b. Coffee brew lever
c. Filterholder
d. Boiler gauge
e. Drip tray
f. Cup warmer
g. Water tank
h. General switch
i. Machine light ON
j. Heating light
k. Termopid
$$ \text { SIZE l x h x p } $$
$$ 2 0 0 \times 3 3 0 \times 3 8 5 \mathrm{mm} $$
WEIGHT:
15 Kg
VOLTAGE:
$$ 2 3 0 \mathrm{v} - 5 0 \mathrm{Hz} / 1 1 0 \mathrm{v} - 6 0 \mathrm{Hz} $$
POWER:
850W
BOILER CAPACITY
0,75 L
TANK CAPACITY:
1,8 L
WORKING TEMPERATURE:
$$ + 5 ^ {\circ} \mathrm{C} \div + 3 5 ^ {\circ} \mathrm{C} $$
Commissioning
- Remove the cup warmer lid (f). Take out the delivery and discharge pipes and withdraw the water tank.
- Fill the water tank (g), with drinking water, softened if possible.
- Return the water tank to its original position.
- Switch on the machine bringing the switch (h) to position 1; the light (i) switches on.
- Raise the group lever (b) to delivery position, wait until approx. 12 litre of water pours out from the group (boiler full) then lower the lever.
- Set the switch (h) in position 2 to start the boiler heating; light (j) on.
- When the heater light (j) switches off, the machine is ready to deliver the coffee.
Important: Make sure that the silicon tubes are completely immersed in the water, and are not bent.
Coffee brew
- Remove the filter (c) holder from its seat, turning it clockwise.
- Fill the filter with one or two doses of coffee (according to the filter inserted);
- Press the coffee with the presser.
- Place the filter holder to its seat, turning it anti-clockwise.
- Place the cups under the corresponding outlets under the filter holder.
- Lift the coffee delivery lever (b) after a few seconds the coffee starts to brew. When the desired amount of coffee has been delivered, lower the group lever.
Boiler temperature adjustment
The boiler temperature management is carried out by means of a dedicated PID; for the settings please refer to "SETTING AND THERMOPID OPERATION" model CAROLA. For the CAROLA PID model refer to the chapter "THERMOPID OPERATION AND PROGRAMMING" in the "SINGLE TEMPERATURE TERMOPID" section.
0980 - MILANO

Legend:
a. Brew group
b. Coffee delivery lever
c. Filter holder
d. Steam valve
e. Steam wand
f. Hot water valve
g. Hot water wand
h. Boiler gauge
i. Pump gauge
j. Drip tray
k. Cup warmer
I. Pressure adjustment valve
m. Water tank lid
n. Water tank
o. General switch + Machine light ON
p. Heating light -
q. Machine light ready (if present)
SIZE | x h x p 225x410x445 mm
WEIGHT 21 Kg
VOLTAGE: 220/230 v - 50/60 Hz
POWER: 1500W
TANK CAPACITY: 3L
BOILER CAPACITY 1,60 LT
WORKING TEMPERATURE: +5°C ÷ +35°C
Commissioning
- Remove the tank filler lid (m).
- Fill the tank (n), under the cup warmer, with drinking water, softened if possible.
- Connect the machine to an electric socket, switch on the machine with the general switch (o) on position 1, the green ON light switches on.
- The machine fills the boiler.
- Start the delivery of the coffee brew group through the lever (b), turn on the water from the group to make sure that the circuit has filled correctly.
- Wait for the machine to reach the working temperature, indicated by the orange light — that switches off (p) and the pointer of the boiler gauge (h) that is to indicate a value between 1 Bar and 1,5 Bar. When the machine has reached the working temperature also the green light (q) switches on, indicating that the machine is ready.
Coffee brew
- Remove the filter holder (c) from its seat, turning it clockwise.
- Fill the filter with one or two doses of coffee (according to the filter inserted).
- Press the coffee with the presser.
- Place the filter holder (c) to its seat, turning it anti-clockwise.
- Place the cups under the corresponding outlets under the filter holder.
- Lift the coffee delivery lever (b) to the horizontal position to start the coffee brew, and after a few seconds the coffee brew starts.
When the desired amount of coffee has been delivered, lower the group lever to the vertical position.
Steam delivery
- Wait until the heater light switches off (p) and make sure that the pressure indicated on the boiler gauge (h) is over 0,8 Bar.
- Open the Steam valve (d) for a few seconds and discharge a little steam into the drip tray (j), then immerse the steam wand (e) in the brew to be heated and turn on the tap, when the required temperature is reached, turn off the tap.

After heating the beverage, always discharge a little steam from the wand to clean the spray holes.
Hot water delivery
- Place the container to collect the water under the water wand (g).
- Turn on the water tap (f) to deliver the hot water.
- When the required water level is reached, turn off the water tap.
Coffee pressure adjustment valve
The machine is delivered with the coffee pressure valve (I) set at 10 Bar. The end user can adjust the valve to increase or decrease the pressure.
- Release the group filter holder.
- Remove the filter from the filter holder.
- Insert the blind filter in the filter holder.
- Secure the filter holder to the coffee brew group.
- Start the coffee brew group delivery to reach the maximum pressure in the circuit, shown on the gauge (i).
- Remove the cup warmer plate to have access to the adjustment screw (I).
- Act on the valve adjustment screw, turning it clockwise to increase and anticlockwise to decrease the pressure in the circuit.
- Stop the delivery.
- Start the group delivery and check the pressure adjustment shown on the gauge (i).
- Repeat the above operations until the required adjustment is obtained.
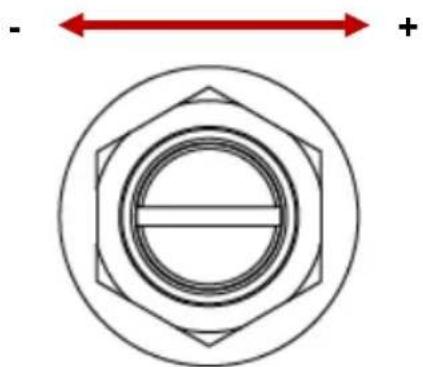
natural_image
Pure geometric diagram of concentric circles with arrows indicating direction (no text or symbols)Valve adjustment screw
It is advised to adjust the pressure between a maximum of 12 and a minimum of 9 Bar.
Specific functions of model 0980 Milano
Filling Timeout
If the boiler filling takes longer than 300 seconds, the machine generates an alarm with an intermittent acoustic warning and flashing the low water warning light (q - if present). In this alarm status the boiler heating does not start.
This condition may occur if the machine is switched on for the first time, with the boiler completely empty.
Switch the machine off, then on again to restart the filling.
If the problem persists, make sure there are no water leakages or clogging in the hydraulic circuit.
No water in the tank
If the water in the tank drops below minimum level, the machine generates an alarm with an intermittent acoustic warning flashing the low water warning light (q - if present).
To exit from alarm condition, it is sufficient to fill the tank.
When the machine is in alarm condition due to lack of water in the tank, the boiler continues to heat and the water level can be topped-up. This is also possible when the heating is interrupted due to lack of water in the boiler.
Dosing the coffee if there is no water in the tank
If during coffee delivery there is insufficient water in the tank, the machine only generates an alarm after the delivery terminates.
0980 - ANDREJA - ANDREJA PID

Legend:
a. Brew group
b. Coffee delivery lever
c. Filter holder
d. Steam valve
e. Steam wand
f. Steam wand
g. Hot water wand
h. Boiler gauge
i. Pump gauge
j. Drip tray
k. Cup warmer
I. Pressure adjustment valve
m. Water tank lid
n. Water tank
o. General switch
p. Machine light ON
q. Heating light
r. Boiler lifting indicator light (if present)
s. Termopid
| SIZE lxhxp: | 290×405×445 mm |
| WEIGHT: | 24 Kg |
| VOLTAGE: | 220/230V – 50/60Hz - 115V – 60Hz |
| POWER: | 1500W |
| TANK CAPACITY: | 3 L |
| BOILER CAPACITY: | 1,60 LITRES |
| WORKING TEMPERATURE: | +5°C ÷ 35°C |
Commissioning
- Open the tank filler lid.
- Fill the tank (n) with drinking water, softened if possible.
- Connect the machine to an electric socket. Switch on the machine through the general switch (o) in position 1, the green ON light (p) switches on.
- The machine fills the boiler, indicated by the red light (r) that switches on.
- Activate the coffee delivery group through the lever (b), deliver water from the group to make sure that the circuit is correctly filled.
- Wait for the machine to reach the operating temperature indicated by the red light (q) that switches off and by the pointer of the boiler gauge (h) that is to indicate a value between 1 Bar and 1.5 Bar.
Coffee brew
- Remove the filter holder (c) from its seat, turning it clockwise.
- Fill the filter with one or two doses of coffee (according to the filter inserted).
- Press the coffee with the presser.
- Place the filter holder (c) to its seat, turning it anti-clockwise.
-
Place the cups under the corresponding outlets under the filter holder.
-
Lift the coffee delivery lever (b) to the horizontal position to start the coffee brew, and after a few seconds starts the coffee brew. When the desired amount of coffee has been delivered, lower the group lever to the vertical position.
Steam delivery
- Wait until the heating light (q) switches off and make sure that the pressure indicated on the boiler gauge (h) is more than 0.8 Bar.
- Open the steam valve (d) for a few seconds and discharge a little steam into the drip tray (e) then immerse the steam wand in the liquid to be heated and open the tap, when the required temperature is reached, close the tap

After the brew has been heated, always discharge a little steam from the wand to clean the spray holes
Hot water delivery
- Place the container to collect the water under the hot water wand (g).
- Open the water tap (f) to deliver the hot water.
- When the required level is reached close the water tap.
Boiler temperature adjustment
For model 0980 - ANDREJA PID the boiler temperature management is done through the TERMOPID: refer to the chapter "TERMOPID OPERATION AND PROGRAMMING" under "SINGLE TEMPERATURE TERMOPID".
Coffee pressure adjustment valve
The machine is delivered with the coffee pressure adjustment valve (I) set at 10 Bar. The end user can adjust the valve (I) to increase or decrease the pressure
- Release the filter holder from the group.
- Remove the filter from the filter-holder.
- Insert the blind filter in the filter-holder.
- Attach the filter holder to the coffee brew group.
- Start the coffee brew group delivery to obtain the maximum pressure in the circuit, shown on the pump pressure gauge (i).
- Remove the cup warmer plate to have access to the adjustment screw (I).
-
Act on the valve adjustment screw, turning it clockwise to increase the pressure and anticlockwise to decrease the pressure in the circuit.
-
Stop the delivery.
- Start the delivery of the group and check the pressure adjustment shown on the gauge (i).
- Repeat the above operations until the required adjustment is achieved.

natural_image
Pure geometric diagram of concentric hexagons with a central horizontal bar, no text or symbols presentValve adjustment screw
It is advised to adjust the pressure within a maximum of 12 and a minimum of 9 Bar.
Specific functions of model 0980 Andreja
Filling Timeout
If the boiler filling takes longer than 300 seconds, the machine generates an alarm with an intermittent acoustic warning and flashing the low water warning light (r - if present). In this alarm status the boiler heating does not start.
This condition may occur if the machine is switched on for the first time, with the boiler completely empty.
Switch the machine off, then on again to restart the filling.
If the problem persists, make sure there are no water leakages or clogging in the hydraulic circuit.
No water in the tank
If the water in the tank drops below minimum level, the machine generates an alarm with an intermittent acoustic warning flashing the low water warning light (r - if present).
To exit from alarm condition, it is sufficient to fill the tank.
When the machine is in alarm condition due to lack of water in the tank, the boiler continues to heat and the water level can be topped-up. This is also possible when the heating is interrupted due to lack of water in the boiler.
Dosing the coffee if there is no water in the tank
If during coffee delivery there is insufficient water in the tank, the machine only generates an alarm after the delivery terminates.
0980 – ANDREJA DOSATA

Legend:
a. Brew group
b. Coffee delivery controls
c. Filter holder
d. Steam valve
e. Steam wand
f. Hot water valve
g. Hot water wand
h. Boiler gauge
i. Pump gauge
j. Drip tray
k. Cup warmer
I. Pressure adjustment valve
m. Water tank lid
n. Water tank
o. General switch
p. Machine light ON
q. Heating red light
SIZE Ixhxp: 290×405×445 mm
WEIGHT: 24 KG
VOLTAGE 220/230V - 50/60Hz - 115V - 60Hz
POWER: 1500W
CAPACITY TANK: 3L
BOILER TANK: 1,80 L
WORKING TEMPERATURE: +5°C ÷ 35°C
Commissioning
- Lift the tank lid (m) and fill the tank (n) with water, (drinking water, softened if possible).
- Connect the machine to an electric socket. Switch on the machine through the general switch (o) in position 1 and wait for the machine to fill the boiler and reach the functioning temperature: the red heating light (q) is to switch on, then off.
When used for the first time, with the machine warmed, allow an outflow of approx.0,5 litres of water to flush the coffee delivery group and hot water to flush the hydraulic circuit.
Coffee brew
- Remove the filter holder (c) from its seat, turning it clockwise.
- Fill the filter with one or two doses of coffee (according to the filter inserted).
- Press the coffee with the presser.
- Place the filter holder (c) to its seat, turning it anti-clockwise.
- Place the cups under the corresponding outlets under the filter holder.
- Press the key of the required dose (as described in the section "Functions and adjustments"). With the exception of the continuous dose, the delivery will stop automatically according to the programming set in the factory, or that of the customer.
It is recommended to be very careful of the machine hot parts, especially the delivery group and the steam pipe. Never place the hands under the steam pipe and/or the group when carrying out the relevant operations.
Steam delivery
- Activate the steam delivery for a few seconds with the knob (d) and discharge the condensation formed in the steam pipe into the drip tray (j) then close the steam delivery.
- Immerse the steam wand (e) roughly half-way in the liquid to be heated, reactivate the steam delivery with the knob. When the required temperature is reached, close the knob.

After heating the beverage, it is recommended to always discharge some steam from the wand to clean the spray holes.
Hot water delivery
- Place a container to collect the water under the hot water distributor, then turn on the tap (f) and turn ift off when the required water level is reached.
Functions and Adjustments

In this instructions handbook and for an easier description of the use, each key is numbered as follows:
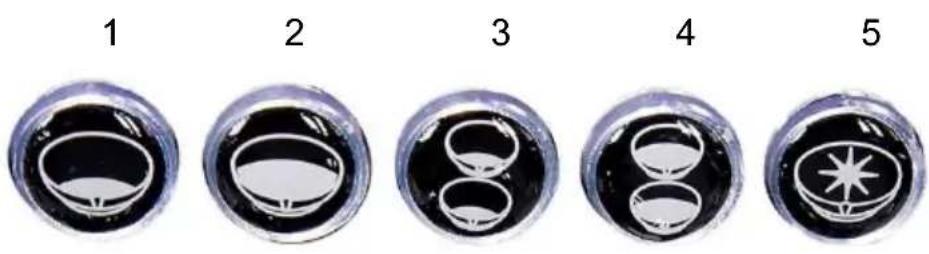
Key 1 = expresso
Key 2 = long coffee
Key 3 = double expresso
Key 4 = double long coffee
Key 5 = continuous dose
Coffee dosing controls
On the front of the machine there are the illuminated dosing keys.
1
2
3
4
5

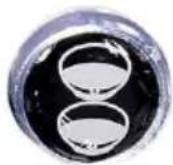

Key 1 = expresso
Key 2 = long coffee
Key 3 = double expresso
Key 4 = double long coffee
Key 5 = continuous does dose
Using one of the keys from 1 to 4, the machine starts delivery, stopping when the set dose is reached (see “Dose setting”). For key 5 “continuous dose”, delivery has to be stopped by pressing the same key again.
Dose setting
Coffee dosing takes place automatically through the specific keys which, in the factory have been assigned a default quantity.
If it is wished to change the quantity of the doses, proceed as follows:
-
Switch on the machine.
-
Press key 5 (continuous dose) so that it flashes.
-
Press one of the dosing keys from 1 to 4 to start the dosing.
-
Press the same key again to stop the dosing at the required quantity.
-
The machine has saved the dose.
-
Continue the programming with another key or exit from programming waiting 5 seconds or pressing key 5 again.
Display and Boiler temperature adjustment
Boiler temperature management is by means of an electronic board in the machine.
The temperature of the water contained in the boiler can be seen or modified through the 5 dosing keys.
To see the temperature set, switch on the machine keeping the keys 1+5 pressed.
Keys 1,2 and 3 will start to flash in the following mode (example):
- key 1 (hundreds) = n° 1 flash
- key 2 (tens) = n° 2 flashes
- key 3 (units) = n° 4 flashes
With these flashes, the temperature setpoint is 124 °C.
To modify the temperature setpoint, use keys 4 and 5 as follows:
- key 4 to decrease
- key 5 to increase
Switch the machine off, then on again, to save the new temperature setpoint value.
The settable temperature range is between 120^ C and 128^ C whereas the value set in the fqactory is 123^ C.
Standby/Economy function
With the Standby/Economy function the machine remains in low consumption condition by switching off the boiler heating resistors.
The machine can be set in this mode manually with the machine on, by pressing in sequence keys 5 and 3 or in automatic mode after 20 minutes that no coffee delivery is requested.
In both cases, when the machine is in Standby/Economy all the keys switch off, except key 1 that flashes every 2 seconds.
To exit from Standby/Economy, just press one of the 5 dosing keys.
To engage the automatic Standby/Economy function after 20 minutes with no coffee delivery, proceed as follows:
- Switch off the machine.
- Press keys 3+5 simultaneously.
- Switch on the machine.
- Key 1 flashes twice = Standby/Economy not engaged.
- Key 1 flashes 3 times = Standby/Economy engaged.
- Press key 4 to decrease the flashes (Standby/Economy disengagement).
- Press key 5 to increase the flashes (Standby/Economy engagement).
- Switch off the machine.
- Switch on the machine.
To check whether the automatic Standby/Economy function is engaged or not, just count how many times key 1 flashes each time the machine is switched on in this way:
- Switch on the machine.
- Wait until all the keys light up, then switch off.
- Count how many times key 1 flashes.
- Key 1 flashes twice = Standby/Economy not engaged.
- Key 1 flashes 3 times = Standby/Economy engaged.
Factory values reset
To reset the factory values of the machine, proceed as follows:
- Switch off the machine.
- Press keys 1+3+5 simultaneously.
- Switch on the machine.
- Release the keys when they start to flash.
Coffee pressure adjustment valve
The machine is delivered with the valve (I) set at 10 Bar. The end user can adjust the valve (I) to increase or decrease the pressure.
-
Release the filter holder from the group.
-
Remove the filter from the filter-holder.
-
Insert the blind filter in the filter-holder.
-
Attach the filter holder to the coffee brew group.
-
Start the coffee brew group delivery to obtain the maximum pressure in the circuit, shown on the the pump pressure gauge (i).
-
Remove the cup warmer plate to have access to the adjustment screw (I).
-
Act on the valve adjustment screw, turning it clockwise to increase the pressure and anticlockwise to decrease the pressure in the circuit.
-
Stop the delivery.
-
Start the delivery of the group and check the pressure adjustment shown on the gauge (i).
-
Repeat the above operations until the required adjustment is achieved.

natural_image
Pure geometric diagram with concentric circles and arrows, no text or symbols presentValve adjustment screw
It is advised to adjust the pressure within a maximum of 12 and a minimum of 9 Bar.
Specific functions of model 0980 Andreja Dosata
Filling Timeout
If the boiler filling takes longer than 120 seconds, the machine generates an alarm with an intermittent acoustic warning and flashing of the dosing keys. In this alarm status the boiler heating does not start.
This condition may occur if the machine is switched on for the first time, with the boiler completely empty.
Switch the machine off, then on again to restart the filling.
If the problem persists, make sure there are no water leakages or clogging in the hydraulic circuit.
No water in the tank
If the water in the tank drops below minimum level, the machine generates an alarm with an intermittent acoustic warning and flashing of the dosing keys.
To exit from alarm condition, it is sufficient to fill the tank.
When the machine is in alarm condition due to lack of water in the tank, the boiler continues to heat and the water level can be topped-up. This is also possible when the heating is interrupted due to lack of water in the boiler.
Dosing the coffee if there is no water in the tank
If during coffee delivery there is insufficient water in the tank, the machine only generates an alarm after the delivery terminates.
0981 – RUBINO

Legend:
a. Brew group
b. Coffee delivery lever
c. Filter holder
d. Steam valve
e. Stem wand
f. Hot water valve
g. Hot water wand
h. Boiler gauge
i. Drip tray
j. Cup warmer
k. General switch
I. Heating light
m. Empty water tank indicator light
n. Machine light ON
o. Water tank
SIZEl x h x p
WEIGHT:
VOLTAGE:
POWER:
BOILER CAPACITY
TANK CAPACITY:
WORKING TEMPERATURE:
265×345×452 mm
19,50 Kg
220/230 v - 50/60 Hz - 115 v - 60 Hz
1500 W
1,8 L
3L
+5^ ÷ +35^
Commissioning
- Remove the cup warmer (j).
- Fill the tank (n), under the cup warmer, with drinking water, softened if possible.
- Connect the machine to an electric socket, switch on the machine with the general switch (k) in position 1.
- The machine starts to fill the boiler.
- Activate the coffee brew group lifting the lever (b): deliver water from the group to ensure that the circuit has filled correctly.
- Wait until the machine reaches the working temperature indicated by the red light that switches off (l) and the boiler gauge pointer (h) that is to indicate a value between 1 Bar and 1,5 Bar.

When used for the first time, with the machine warmed, allow an outflow of approx.0,5 litres of water to flush the delivery group activating the coffee delivery.
Coffee brew
- Remove the filter holder (c) from its seat, turning it clockwise.
- Fill the filter with one or two doses of coffee (according to the filter inserted).
- Press the coffee with the presser.
- Place the filter holder (c) to its seat, turning it anti-clockwise.
- Place the cups under the corresponding outlets under the filter holder.
- Lift the coffee delivery lever (b) to the horizontal position to start the coffee brew, and after a few seconds the coffee brew starts. When the desired amount of coffee has been delivered, lower the group lever to the vertical position.
Steam delivery
- Wait until the heating light switches off (I) and make sure that the pressure indicated on the boiler gauge is over 0.8 Bar.
- Open the steam valve (d) for a few seconds and discharge a little steam into the drip tray (i) then immerse the steam wand (e) in the liquid to be heated and open the tap, when the required temperature is reached, close the tap.

After heating the beverage, always discharge a little steam from the wand to clean the spray holes.

For this model, without adjustment PID, the machine temperature management is by means of a specific pressure switch.
Hot water delivery
- Place the container to collect the water under the hot water wand (g).
- Open the water tap (f) to deliver the hot water.
- When the required level is reached close the water tap.
Specific functions of model 0981 Rubino
Filling Timeout
If the boiler filling takes longer than 300 seconds, the machine generates an alarm with an intermittent acoustic warning and flashing the low water warning light (m). In this alarm status the boiler heating does not start.
This condition may occur if the machine is switched on for the first time, with the boiler completely empty.
Switch the machine off, then on again to restart the filling.
If the problem persists, make sure there are no water leakages or clogging in the hydraulic circuit.
No water in the tank
If the water in the tank drops below minimum level, the machine generates an alarm with an intermittent acoustic warning flashing the low water warning light (m).
To exit from alarm condition, it is sufficient to fill the tank.
When the machine is in alarm condition due to lack of water in the tank, the boiler continues to heat and the water level can be topped-up. This is also possible when the heating is interrupted due to lack of water in the boiler.
Dosing the coffee if there is no water in the tank
If during coffee delivery there is insufficient water in the tank, the machine only generates an alarm after the delivery terminates.
0985 – AQUILA E AQUILA PID

Legend:
a. Coffee brew group
b. Coffee delivery level
c. Filter holder
d. Steam valve
e. Steam wand
f. Hot water valve
g. Hot water wand
h. Boiler gauge + Pump gauge
i. Drip tray
j. Cup warmer
k. Water tank lid
I. Water tank
m. General switch
n. Machine light ON
o. Heating light -W
p. Termopid (if present)
q. Tank/service valve
r. Tank/service switch (0=tank/1=se
s. Pump pressure adjustment
t. Standby/Economy light (if presen
SIZE | x h x p
WEIGHT:
VOLTAGE:
POWER:
BOILER CAPACITY:
TANK CAPACITY:
WORKING TEMPERATURE:
310×405×440 mm
28,5 Kg
220/230 v - 50/60 Hz - 115 v - 60 Hz
1550 W
1,8 L
3L
+5^ ÷ +35^
0985 - AQUILA
Commissioning
The 0985 Aquila model without TermoPID can be supplied either with water coming from the tank or from the water mains. According to the type of supply, proceed as follows.
Tank
- Position the tank/service tap (q), underneath the machine, on tank.
- Position the tank/service switch (r) on tank.
- Fill the water tank (use drinking water, softened if possible).
Water supply:
- Connect the mains water supply pipe to the fitting under the machine.
- Position the tank/service tap (q), underneath the machine, on service.
-
Position the tank/service switch (r) on service.
-
Open the water tank lid (k), take out the tank (l) and fill with drinking water, softened if possible (only for supply with tank).
- Connect the machine to an electric socket, switch on the machine with the general switch (m) in ON position, the green light (n) switches on.
- The machine fills the boiler.
- Activate the coffee brew group lifting the lever (b): deliver water from the group to ensure that the circuit has filled correctly.
- Wait until the machine reaches the working temperature indicated by the red heating light that switches on, then off (o) and the boiler gauge pointer (h) that is to indicate a value between 1 Bar and 1.5 Bar.

When used for the first time, with the machine warmed, allow an outflow of approx.0,5 litres of water to flush the delivery group activating the coffee delivery.
Coffee brew
- Remove the filter holder (c) from its seat, turning it clockwise.
- Fill the filter with one or two doses of coffee (according to the filter inserted).
- Press the coffee with the presser.
- Place the filter holder (c) to its seat, turning it anti-clockwise.
- Place the cups under the corresponding outlets under the filter holder.
- Lift the coffee delivery lever (b) to the horizontal position to start the coffee brew, and after a few seconds the coffee brew starts.
When the desired amount of coffee has been delivered, lower the group lever to the vertical position.
Steam delivery
- Wait for the heating light → to switch on, then switch off (o) and make sure that the pressure indicated on the boiler gauge (h) is more than 0.8 Bar.
- Open the steam valve (d) for a few seconds and discharge a little steam into the drip tray (i) then immerse the steam wand (e) in the liquid to be heated and open the tap, when the required temperature is reached, close the tap.
After heating the beverage, always discharge a little steam from the wand to clean the spray holes.
Hot water delivery
- Place the container to collect the water under the hot water wand (g).
- Open the water tap (f) to deliver the hot water.
- When the required level is reached close the water tap.
Standby/Economy function
The Standby/Economy is used to set the machine in a condition of low consumption by switching off the boiler heating resistor.
The machine automatically sets in Standby/Economy after 20 minutes if no coffee is delivered.
When the machine is in Standby/Economy, the relevant LED (t) flashes every 2 seconds.
To exit from Standby/Economy, just deliver a coffee with the lever.
To engage the Standby/Economy function so that the machine, after 20 minutes with no coffee delivery, will automatically set in Standby/Economy, proceed as follows:
- Switch off the machine.
- Keep the lever raised as for dosing a coffee.
- Switch on the machine.
- The LED flashes twice = Standby/Economy not engaged.
- The LED flashes 3 times = Standby/Economy engaged.
- Bring the lever down.
- Switch off the machine.
- Switch on the machine.
Repeating the operation changes from engaged to disengaged condition, and vice-versa.
To check whether the automatic Standby/Economy function is engaged or not, just count how many times the relevant LED flashes each time the machine is switched on in this way:
- switch on the machine
- count how many times the LED flashes
- the LED flashes twice = Standby/Economy not engaged
- the LED flashes 3 times = Standby/Economy engaged
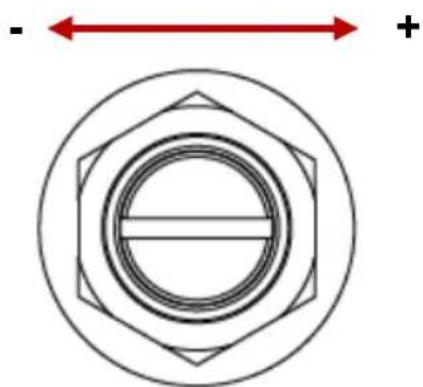
Pump pressure adjustment valve
The machine is delivered with the valve set at 10 Bar. The end user can adjust the valve (s) to increase or decrease the pressure.
- Release the filter holder from the group.
- Remove the filter from the filter-holder.
- Insert the blind filter in the filter-holder.
- Attach the filter holder to the coffee brew group.
- Start the coffee brew group delivery using the delivery lever to obtain the maximum pressure in the circuit, shown on the gauge.
- Remove the cap to have access to the adjustment screw (s).
- Act on the valve adjustment screw, turning it clockwise to increase the pressure and anticlockwise to decrease the pressure in the circuit.
- Stop the delivery.
- Start delivery of the group and check the pressure adjustment shown on the gauge.
- Repeat the above operations until the required adjustment is achieved.
natural_image
Pure geometric diagram of concentric circles with arrows and a plus sign, no text or symbols presentValve adjustment screw
It is advised to adjust the pressure within a maximum of 12 and a minimum of 9 Bar.
Specific functions of model 0985 Aquila
Filling Timeout
If the boiler filling takes longer than 120 seconds, the machine generates an alarm with an intermittent acoustic warning.
This condition may occur if the machine is switched on for the first time, with the tank completely empty.
Switch the machine off, then on again to restart the filling.
If the problem persists, make sure there are no water leakages or clogging in the hydraulic circuit.
No water in the tank
If the water in the tank drops below minimum level, the machine generates an alarm with an intermittent acoustic warning. To exit from alarm condition, it is sufficient to fill the tank.
When the machine is in alarm condition due to lack of water in the tank, the boiler continues to heat and the water level can be topped-up. This is also possible when the heating is interrupted due to lack of water in the boiler.
Dosing the coffee if there is no water in the tank
If during coffee delivery there is insufficient water in the tank, the machine only generates an alarm after the delivery terminates.
0985 -AQUILA PID
Commissioning
The 0985 Aquila PID model can be supplied either with water coming from the tank or from the water mains. According to the type of supply, proceed as follows.
Tank
- Position the tank/service tap (q), underneath the machine, on tank.
- Position the tank/service switch (r) on tank.
- Fill the water tank (use drinking water, softened if possible).
Mains water supply:
- Connect the mains water supply pipe to the fitting under the machine.
- Position the tank/service tap (q), under the machine, on service.
-
Position the tank/service switch (r) on service.
-
Open the water tank lid (k), take out the tank (l) and fill with drinking water, softened if possible (only for supply with tank).
- Connect the machine to an electric socket, switch on the machine with the general switch (m) in ON position, the green light (n) switches on.
- The machine starts to fill the boiler.
- Activate the coffee brew group lifting the lever (b): deliver water from the group to ensure that the circuit has filled correctly.
- Wait until the machine reaches the working temperature indicated by the red heating light that switches on, then off (o) and the boiler gauge pointer (h) that is to indicate a value between 1 Bar and 1,5 Bar.

When used for the first time, with the machine warmed, allow an outflow of approx.0,5 litres of water to flush the delivery group activating the coffee delivery.

For this model, the machine temperature management is by means of the TermoPID (p). For the management of the TermoPID see the section "TERMOPID SETTING AND FUNCTIONING".
Coffee brew
- Remove the filter holder (c) from its seat, turning it clockwise.
- Fill the filter with one or two doses of coffee (according to the filter inserted).
- Press the coffee with the presser.
- Place the filter holder (c) to its seat, turning it anti-clockwise.
-
Place the cups under the corresponding outlets under the filter holder.
-
Lift the coffee delivery lever (b) to the horizontal position to start the coffee brew, and after a few seconds the coffee brew starts. When the desired amount of coffee has been delivered, lower the group lever to the vertical position.
Steam delivery
- Wait for the heating light → to switch on, then switch off (o) and make sure that the pressure indicated on the boiler gauge (h) is more than 0.8 Bar.
- Open the steam valve (d) for a few seconds and discharge a little steam into the drip tray (i) then immerse the steam wand (e) in the liquid to be heated and open the tap, when the required temperature is reached, close the tap.

After heating the beverage, always discharge a little steam from the wand to clean the spray holes.
Hot water delivery
- Place the container to collect the water under the hot water wand (g).
- Open the water tap (f) to deliver the hot water.
- When the required level is reached close the water tap.
Standby/Economy function
The Standby/Economy is used to set the machine in a condition of low consumption by switching off the boiler heating resistor.
The machine automatically sets in Standby/Economy after 20 minutes if no coffee is delivered.
When the machine is in Standby/Economy, the relevant LED (t) flashes every 2 seconds.
To exit from Standby/Economy, just deliver a coffee with the lever.
To engage the Standby/Economy function so that the machine, after 20 minutes with no coffee delivery, will automatically set in Standby/Economy, proceed as follows:
- switch off the machine.
- keep the lever raised as for dosing a coffee.
- switch on the machine.
- the LED flashes twice = Standby/Economy not engaged.
- the LED flashes 3 times = Standby/Economy engaged.
- bring the lever down.
- switch off the machine.
- switch on the machine.
Repeating the operation changes from engaged to disengaged condition, and vice-versa.
To check whether the automatic Standby/Economy function is engaged or not, just count how many times the relevant LED flashes each time the machine is switched on in this way:
- switch on the machine.
- count how many times the LED flashes.
- the LED flashes twice = Standby/Economy not engaged.
- the LED flashes 3 times = Standby/Economy engaged.
Pump pressure adjustment valve
The machine is delivered with the valve set at 10 Bar. The end user can adjust the valve (s) to increase or decrease the pressure.
-
Release the filter holder from the group.
-
Remove the filter from the filter-holder.
-
Insert the blind filter in the filter-holder.
-
Attach the filter holder to the coffee brew group.
-
Start the coffee brew group delivery to obtain the maximum pressure in the circuit, shown on the the gauge.
-
Remove the cap to have access to the adjustment screw (s).
-
Act on the valve adjustment screw, turning it clockwise to increase the pressure and anticlockwise to decrease the pressure in the circuit.
-
Stop the delivery.
-
Start the delivery of the group and check the pressure adjustment shown on the gauge.
-
Repeat the above operations until the required adjustment is achieved.

natural_image
Pure mechanical diagram showing concentric hexagonal rings with a central horizontal bar, no text or symbols present.Valve adjustment screw
It is advised to adjust the pressure within a maximum of 12 and a minimum of 9 Bar.
Specific functions of model 0985 with AQUILA
Filling Timeout
If the boiler filling takes longer than 120 seconds, the machine generates an alarm with an intermittent acoustic warning.
This condition may occur if the machine is switched on for the first time, with the boiler completely empty.
Switch the machine off, then on again to restart the filling.
If the problem persists, make sure there are no water leakages or clogging in the hydraulic circuit.
No water in the tank
If the water in the tank drops below minimum level, the machine generates an alarm with an intermittent acoustic warning. To exit from alarm condition, it is sufficient to fill the tank.
When the machine is in alarm condition due to lack of water in the tank, the boiler continues to heat and the water level can be topped-up. This is also possible when the heating is interrupted due to lack of water in the boiler.
Dosing the coffee if there is no water in the tank
If during coffee delivery there is insufficient water in the tank, the machine only generates an alarm after the delivery terminates.
0992 – QM67 - 2 BOILER PID

Legend:
| a. Coffee brew group | k. Pressure adjustment valve |
| b. Coffee delivery lever | l. Drip tray |
| c. Filter holder | m. General switch ON/OFF |
| d. Steam valve | n. Machine green light ON |
| e. Steam wand | o. Coffee heating red light |
| f. Hot water valve | p. Steam switch |
| g. Hot water wand | q. Steam green light ON |
| h. Steam boiler pressure gauge+ | r. Steam heating red light |
| Pump pressure gauge | s. Termopid |
| i. Water tank lid | t. Water tank |
| j. Cup warmer | u. Standby/Economy light |
| SIZE l x h x p | 280x405x450 mm |
| WEIGHT: | 25 Kg |
| VOLTAGE: | 220/230 v – 50/60 Hz - 115 v - 60 Hz |
| POWER: | 2350 W |
| COFFEE RESISTOR: | 800W |
| STEAM RESISTOR: | 1400W |
| TANK CAPACITY: | 3 L |
| COFFEE BOILER: | 0,75L |
| STEAM BOILER: | 1,40L |
| WORKING TEMPERATURE: | +5°C ÷ +35°C |
- Open the water tank lid. Take out the tank and fill with drinking water, softened if possible.
- Connect the machine to an electric socket, switch on the machine with the general switch (m), and wait for the machine to fill the boiler and reach the working temperature.
- Activate the switch of the boiler steam (p) and wait until working pressure is reached (1,2 Bar).

When used for the first time, with the machine warmed, allow an outflow of approx.0,5 litres of water to flush the coffee delivery group and hot water to flush the exchanger circuit.

For this model, the machine temperature management is by means of the TermoPID (s). For the management of the TermoPID see the section “TERMOPID SETTING AND FUNCTIONING”.
Coffee brew
- Remove the filter (c) holder from its seat, turning it clockwise.
- Fill the filter with one or two doses of coffee (according to the filter inserted).
- Press the coffee with the presser.
- Place the filter holder to its seat, turning it anti-clockwise.
- Place the cups under the corresponding outlets under the filter holder.
- Lift the coffee delivery lever (b) after a few seconds the coffee brew starts. When the desired amount of coffee has been delivered, lower the group lever.
It is recommended to be very careful of the machine hot parts, especially the delivery group and the steam pipe. Never place the hands under the steam pipe and/or the group when carrying out the relevant operations.
Steam delivery

Open the tap (d) and discharge a little steam into the drip tray then immerse the steam wand in the liquid to be heated and open the tap (d), when the required temperature is reached, close the tap.
After heating the beverage, discharge a little steam from the pipe to clean the spray holes.
Hot water delivery

- Place a container to collect the water under the hot water distributor (g).
- Open the water tap (f) to deliver the hot water
- When the required level is reached close the water tap.
Standby/Economy function
The Standby/Economy is used to set the machine in a condition of low consumption by switching off the boiler heating resistor.
The machine automatically sets in Standby/Economy after 20 minutes if no coffee is delivered.
When the machine is in Standby/Economy, the relevant LED (u) flashes every 2 seconds
To exit from Standby/Economy, just deliver a coffee with the lever.
To engage the Standby/Economy function so that the machine, after 20 minutes with no coffee delivery, will automatically set in Standby/Economy, proceed as follows:
- Switch off the machine.
- Keep the lever raised as for dosing a coffee.
- Switch on the machine.
- The LED flashes twice = Standby/Economy not engaged.
- The LED flashes 3 times = Standby/Economy engaged.
- Bring the lever down.
- Switch off the machine.
- Switch on the machine.
Repeating the operation changes from engaged to disengaged condition, and vice-versa.
To check whether the automatic Standby/Economy function is engaged or not, just count how many times the relevant LED flashes each time the machine is switched on in this way:
- Switch on the machine.
- count how many times the LED flashes.
- the LED flashes twice = Standby/Economy not engaged.
- the LED flashes 3 times = Standby/Economy engaged.
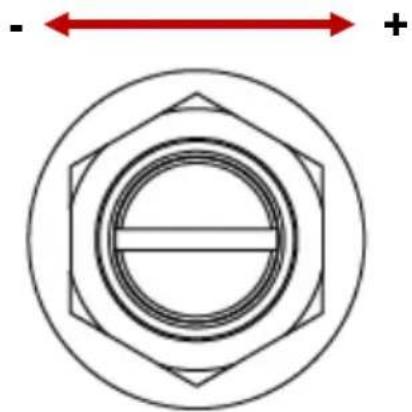
Coffee pressure adjustment valve
The machine is delivered with the valve set at 10 Bar. The end user can adjust the valve (k) to increase or decrease the pressure.
-
Release the filter holder from the group.
-
Remove the filter from the filter-holder.
-
Insert the blind filter in the filter-holder.
-
Attach the filter holder to the coffee brew group.
-
Start the coffee brew group delivery to obtain the maximum pressure in the circuit, shown on the the gauge.
-
Remove the cup warmer plate to have access to the adjustment screw.
-
Act on the valve adjustment screw, turning it clockwise to increase the pressure and anticlockwise to decrease the pressure in the circuit.
-
Stop the delivery.
-
Start the delivery of the group and check the pressure adjustment shown on the gauge.
-
Repeat the above operations until the required adjustment is achieved.
natural_image
Pure mechanical diagram showing concentric hexagonal rings with a central horizontal bar, no text or symbols present.Valve adjustment screw
It is advised to adjust the pressure within a maximum of 12 and a minimum of 9 Bar.
Specific functions of model 0992 QM67 - 2 Boiler PID
Filling Timeout
If the boiler filling takes longer than 120 seconds, the machine generates an alarm with an intermittent acoustic warning.
This condition may occur if the machine is switched on for the first time, with the boiler completely empty.
Switch the machine off, then on again to restart the filling.
If the problem persists, make sure there are no water leakages or clogging in the hydraulic circuit.
No water in the tank
If the water in the tank drops below minimum level, the machine generates an alarm with an intermittent acoustic warning. To exit from alarm condition, it is sufficient to fill the tank.
When the machine is in alarm condition due to lack of water in the tank, the boiler continues to heat and the water level can be topped-up. This is also possible when the heating is interrupted due to lack of water in the boiler.
Dosing the coffee if there is no water in the tank
If during coffee delivery there is insufficient water in the tank, the machine only generates an alarm after the delivery terminates.
0995 – VETRANO

Legend:
a. Coffee brew group
b. Coffee delivery lever
c. Filter holder
d. Steam valve
e. Steam wand
f. Hot water valve
g. Hot water wand
h. Steam boiler gauge+
Pump pressure gauge
i. Drip tray
j. Cup warmer
k. Water tank
I. General switch + Light ON
m. Heating light
n. Boiler filling light
o. Tank/service valve
p. Tank/service switch (0=tank/1=service)
q. Direct discharge tank
r. Water tank lid
s. Pump pressure adjustment valve
| SIZEI x h x p | 320x400x460 mm |
| WEIGHT: | 26 Kg |
| VOLTAGE: | 220/230 v – 50/60 Hz - 115 v – 60 Hz |
| POWER: | 1500 W |
| TANK CAPACITY: | 3LITRES |
| BOILER CAPACITY: | 1,80 LITRES |
| WORKING TEMPERATURE: | +5°C ÷ +35°C |
Commissioning
The 0995 Vetrano model can be supplied either with water coming from the tank or from the water mains. According to the type of supply, proceed as follows.
Tank
- Position the tank/service tap (o), underneath the machine, on tank.
- Position the tank/service switch (p) on tank.
- Fill the water tank (k) (use drinking water, softened if possible).
Mains water supply:
- Connect the mains water supply pipe to the fitting under the machine position the tank/manins tap (o), underneath the machine, on mains.
- Position the tank/service switch (p) on service.
Important: for this machine model it is necessary that the water collected in the drip tray is conveyed to the domestic drainage outlet. For this reason, it is necessary to connect the drip tray under the machine (q) directly to the drainage pipe supplied.
- Open the water tank lid (r), take out the tank (k) and fill with drinking water, softened if possible, (only for supply with tank).
- Connect the machine to an electric socket, switch on the machine with the general switch (I) in position 1, the green ON light switches on. The machine fills the boiler, indicated by the red light (n) that switches on.
-
Activate the coffee brew group lifting the lever (b): deliver water from the group to ensure that the circuit has filled correctly.
-
Wait until the machine reaches the working temperature indicated by the orange light — that switches off (m) and the boiler gauge pointer (h) that is to indicate a value between 1 Bar and 1,5 Bar.

When used for the first time, with the machine warmed, allow an outflow of approx.0,5 litres of water to flush the group activating the coffee delivery.
Coffee brew
- Remove the filter holder (c) from its seat, turning it clockwise.
- Fill the filter with one or two doses of coffee (according to the filter inserted).
- Press the coffee with the presser.
- Place the filter holder (c) to its seat, turning it anti-clockwise.
- Place the cups under the corresponding outlets under the filter holder.
- Lift the coffee delivery lever (b) to the horizontal position to start the coffee brew, and after a few seconds the coffee brew starts.
When the desired amount of coffee has been delivered, lower the group lever to the vertical position.
Steam delivery
- Wait until the heating light (m) switches off (l) and make sure that the pressure indicated on the boiler gauge is over 0.8 Bar.
- Open the steam valve (d) for a few seconds and discharge a little steam into the drip tray (i) then immerse the steam wand (e) in the liquid to be heated and open the tap, when the required temperature is reached, close the tap.

After heating the beverage, always discharge a little steam from the wand to clean the spray holes.
Hot water delivery
- Place the container to collect the water under the hot water wand (g).
- Open the water tap (f) to deliver the hot water.
- When the required level is reached close the water tap.
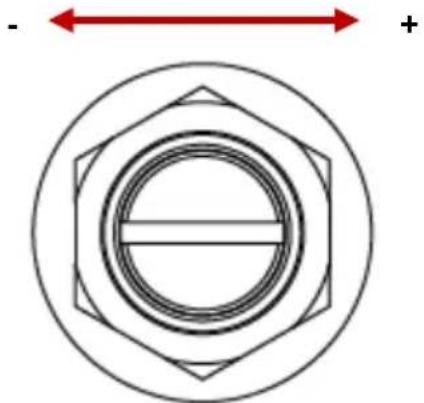
Pump pressure adjustment valve
The machine is delivered with the valve set at 10 Bar. The end user can adjust the valve (s) to increase or decrease the pressure.
- Release the filter holder from the group.
- Remove the filter from the filter-holder.
- Insert the blind filter in the filter-holder.
- Attach the filter holder to the coffee brew group.
- Start the coffee brew group delivery to obtain the maximum pressure in the circuit, shown on the the gauge (h).
- Remove the cap to have access to the adjustment screw (s).
- Act on the valve adjustment screw, turning it clockwise to increase the pressure and anticlockwise to decrease the pressure in the circuit.
- Stop the delivery.
- Start the delivery of the group and check the pressure adjustment shown on the gauge.
- Repeat the above operations until the required adjustment is achieved.
natural_image
Pure geometric diagram of concentric circles with a central horizontal bar, no text or symbols presentValve adjustment screw
It is advised to adjust the pressure within a maximum of 12 and a minimum of 9 Bar.
0995 - VETRANO - 2 BOILER PID

Legend:
a. Coffee brew group
b. Coffee delivery lever
c. Filter holder
d. Steam valve
e. Steam wand
f. Hot water valve
g. Hot water wand
h. Boiler pressure gauge+ Pump pressure gauge
i. Termopid
j. Cup warmer
k. Water tank
I. Drip tray
m. General switch ON/OFF
n. Machine ON green light
o. Coffee heating red light
p. Steam switch
q. Steam ON green light
r. Steam heating red light
s. Standby/Economy light
t. Tank/service valve
u. Tank/service switch (0=tank;1=service)
v. Direct discharge tank
w. Pump pressure adjustment
x. Water tank lid
y. Led switch (if present)
SIZE | x h x p
WEIGHT:
VOLTAGE:
POWER 220/230 v:
POWER 115 v:
TANK CAPACITY:
BOILER COFFEE CAPACITY:
STEAM BOILER CAPACITY:
WORKING TEMPERATURE:
330x405x465 mm
28 Kg
220/230 v - 50/60 Hz - 115 v - 60 Hz
2350 W
2050 W
3 L
0,75L
1,40 L
+5^ ÷ +35^
Commissioning
The 0995 Vetrano 2 Boiler Pid model can be supplied either with water coming from the tank or from the water mains, According to the type of supply, proceed as follows.
Tank
- Position the tank/service tap (t), underneath the machine, on tank.
- Position the tank/service switch (u) on tank.
- Fill the water tank (k) (use drinking water, softened if possible).
Mains water supply:
- Connect the mains water supply pipe to the fitting under the machine.
- Position the tank/service tap (t), underneath the machine, on service.
- Position the tank/service switch (u) on service.

For this machine it is necessary that the water collected in the drip tray is conveyed to the domestic drainage outlet. For this reason, it is necessary to connect the drip tray under the machine (v) directly to the drainage pipe supplied.
- Open the water tank lid (x), take out the tank and fill with drinking water, softened if possible (only for supply with tank).
- Connect the machine to an electric socket, switch on the machine with the general switch (m) and wait for the machine to fill the boiler and reach working temperature.
- Activate the switch of the steam boiler (p) and wait until the heating light (r) switches off and the working pressure is reached (1,2 Bar).
When used for the first time, with the machine warmed, allow an outlow of approx.0,5 litres of water to flush the coffee delivery group and hot water to flush the hydraulic circuit.

For this model, the machine temperature management is by means of the TermoPID (i). For the management of the TermoPID see the section “TERMOPID SETTING AND FUNCTIONING.
Coffee brew
- Remove the filter holder (c) from its seat, turning it clockwise.
- Fill the filter with one or two doses of coffee (according to the filter inserted).
- Press the coffee with the presser.
- Place the filter holder (c) to its seat, turning it anti-clockwise.
- Place the cups under the corresponding outlets under the filter holder.
- Raise the coffee delivery lever (b). after a few seconds, delivery starts. When the required dose is reached, lower the lever.

In machines with display, during delivery it is possible to see the seconds count to check the extraction time.
It is recommended to be very careful of the machine hot parts, especially the delivery group and the steam pipe. Never place the hands under the steam pipe and/or the group when carrying out the relevant operations.
Steam delivery
- Activate the steam delivery for a few seconds with the knob (d) and discharge the condensation formed in the steam pipe into the drip tray (l) then close the steam delivery.
- Immerse about half the steam wand (e) in the brew to be heated, start the steam delivery again with the knob. When the required temperature is reached, close the knob.

It is advised, after heating the beverage, to always discharge a little steam from the wand to clean the spray holes.
Hot water delivery
- Place a container to collect the water under the hot water distributor, then open the tap (f) and close it when the required water level is reached.
Standby/Economy function
The Standby/Economy is used to set the machine in a condition of low consumption by switching off the boiler heating resistor.
The machine automatically sets in Standby/Economy after 20 minutes if no coffee is delivered.
When the machine is in Standby/Economy, the relevant LED (s) flashes every 2 seconds.
To exit from Standby/Economy, just deliver a coffee with the lever.
To engage the Standby/Economy function so that the machine, after 20 minutes with no coffee delivery will automatically set in Standby/Economy, proceed as follows:
- Switch off the machine.
- Keep the lever raised as for dosing a coffee.
- switch on the machine.
- the LED flashes twice = Standby/Economy not engaged
- the LED flashes 3 times = Standby/Economy engaged
- bring the lever down
- switch off the machine
- switch on the machine
Repeating the operation changes from engaged to disengaged condition, and vice-versa.
To check whether the automatic Standby/Economy function is engaged or not, just count how many times the relevant LED flashes each time the machine is switched on in this way:
- switch on the machine
- count how many times the LED flashes
- the LED flashes twice = Standby/Economy not engaged
- the LED flashes 3 times = Standby/Economy engaged
Pump pressure adjustment
The machine is delivered with the valve set at 10 Bar. The end user can adjust the valve (w) to increase or decrease the pressure.
- Release the filter holder from the group.
- Remove the filter from the filter-holder.
- Insert the blind filter in the filter-holder
- Attach the filter holder to the coffee brew group.
- Start the coffee brew group delivery to obtain the maximum pressure in the circuit, shown on the gauge.
- Remove the cap to have access to the adjustment screw.
- Act on the valve adjustment screw, turning it clockwise to increase the pressure and anticlockwise to decrease the pressure in the circuit.
- Stop the delivery.
- Start the delivery of the group and check the pressure adjustment shown on the gauge.
- Repeat the above operations until the required adjustment is achieved.

natural_image
Pure mechanical diagram showing concentric hexagonal rings with a central horizontal bar, no text or symbols present.Valve adjustment screw
It is advised to adjust the pressure within a maximum of 12 and a minimum of 9 Bar.

The machine is delivered with the pump regulated at 9 Bar to function taking water from the tank. If connected to the mains water supply, the pump regulation will be higher and has to be set according to the pressure of the the water supply network.
Specific functions of model 0995 Vetrano 2 Boiler Pid
Filling Timeout
If the boiler filling takes longer than 120 seconds, the machine generates an alarm with an intermittent acoustic warning.
This condition may occur if the machine is switched on for the first time, with the boiler completely empty.
Switch the machine off, then on again to restart the filling.
If the problem persists, make sure there are no water leakages or clogging in the hydraulic circuit.
No water in the tank
If the water in the tank drops below minimum level, the machine generates an alarm with an intermittent acoustic warning. To exit from alarm condition, it is sufficient to fill the tank.
When the machine is in alarm condition due to lack of water in the tank, the boiler continues to heat and the water level can be topped-up. This is also possible when the heating is interrupted due to lack of water in the boiler.
Dosing the coffee if there is no water in the tank
If during coffee delivery there is insufficient water in the tank, the machine only generates an alarm after the delivery terminates.
LEDS on-off
On the models where these are fitted, the LEDs on the sides of the machine can be switched on or off through the switch underneath the machine on the right side.
0995 - VETRANO DOSATA - 2 BOILER PID

Legend:
a. Coffee brew group
b. Coffee delivery control
c. Filter holder
d. Steam valve
e. Steam wand
f. Hot water valve
g. Hot water wand
h. Boiler gauge + Pump gauge
i. Termopid
j. Cup warmer
k. Water tank
I. Drip tray
m. General switch ON/OFF
n. Machine ON green light
o. Coffee heating red light
p. Steam switch
q. Steam ON green light
r. Steam heating red light
s. Tank/service valve
t. Tank/service switch (0=tank;1=service)
u. Direct discharge tank
v. Pump pressure adjustment
w. Water tank lid
x. Led switch (if present)
SIZE l x h x p
WEIGHT:
VOLTAGE:
POWER 220V/230V:
POWER 115 V:
TANK CAPACITY
COFFEE TANK CAPACTY:
S TEAM TANK CAPACITY:
WORKING TEMPERATURE:
330x405x465 mm
28 Kg
220/230 v - 50/60 Hz - 115 v - 60 Hz
2350 W
2050 W
3LITRES
0,75 LITRES
1,40 LITRES
+5^ ÷ +35^
Commissioning
The 0995 Vetrano dosata 2 Boiler Pid, model can be supplied either with water coming from the tank or from the water mains. According to the type of supply, proceed as follows.
Tank
- Position the tank/service tap (s), underneath the machine, on tank.
- Position the tank/service switch (t) on tank.
- Fill the water tank (use drinking water, softened if possible).
Mains water supply:
- Connect the mains water supply pipe to the fitting under the machine.
- Position the tank/service tap (s), underneath the machine, on service.
- Position the tank switch (t) on service.

For this machine model it is necessary that the water collected in the drip tray is conveyed to the domestic drainage outlet. For this reason, it is necessary to connect the drip tray under the machine (u) directly to the drainage pipe supplied.
- Open the water tank lid (w), take out the tank (k) and fill with drinking water, softened if possible (only for supply with tank).
- Connect the machine to an electric socket, switch on the machine with the general switch (m) and wait for the machine to fill the boiler and reach working temperature.
- Activate the switch of the steam boiler (p) and wait to reach working pressure (1,2 Bar).
- When used for the first time, with the machine warmed, allow an outflow of approx.0,5 litres of water to flush the coffee delivery group and hot water to flush the hydraulic circuit.

For this model, the machine temperature management is by means of the TermoPID (i). For the management of the TermoPID see the section "TERMOPID SETTING AND FUNCTIONING.
Coffee brew
- Remove the filter holder (c) from its seat, turning it clockwise.
- Fill the filter with one or two doses of coffee (according to the filter inserted).
- Press the coffee with the presser.
- Place the filter holder (c) to its seat, turning it anti-clockwise.
- Place the cups under the corresponding outlets under the filter holder.
- Press the key of the required dose (as described in "Functions and Adjustments"). Except for the continuous dose, delivery stops automatically according to the factory programming or the programming of the customer.
It is recommended to be very careful of the machine hot parts, especially the delivery group and the steam pipe. Never place the hands under the steam pipe and/or the group when carrying out the relevant operations.
Steam delivery
-
Activate the steam delivery for a few seconds with the knob (d) and discharge the condensation formed in the steam pipe into the drip tray (l) then close the steam delivery.
-
Immerse about half the steam wand in the brew to be heated, start the steam delivery again with the knob. When the required temperature is reached, close the knob.

It is advised, after heating the beverage, to always discharge a little steam from the wand to clean the spray holes.
Hot water delivery
Place a container to collect the water under the hot water distributor, then open the tap (f) and close it when the required water level is reached.
Coffee dosing controls
On the front of the machine there are the illuminated dosing keys.
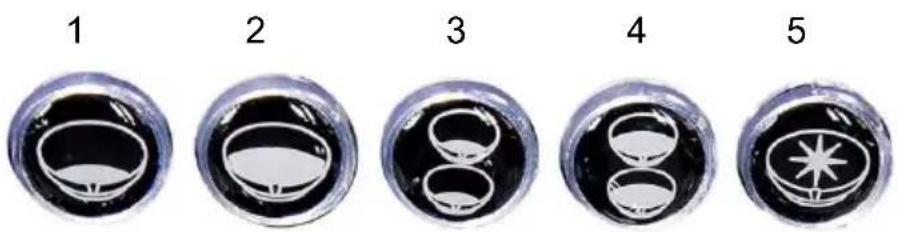
natural_image
Five circular diagrams showing progressive stages of a biological or chemical process, with no visible text or symbols.Key 1 = expresso
Key 4 = double long coffee
Key 2 = long coffee
Key 5 = continual dose
Key 3 = double expresso
Using one of the keys from 1 to 4, the machine starts delivery, stopping when the set dose is reached (see “Dose setting”). For key 5 “continuous dose”, delivery has to be stopped by pressing the same key.
Dose setting
Coffee dosing takes place automatically through the specific keys which, in the factory have been assigned a default quantity.
If it is wished to modify the quantity of the doses, proceed as follows:
- Switch on the machine.
- Press key 5 (continuous dose) until it starts to flash.
- Press one of the dosing keys from 1 to 4 to start the dosing.
- Press the same key again to stop the dosing at the required quantity.
- The machine has saved the dose.
- Continue the programming with another key or exit from programming waiting 5 seconds or pressing key 5 again.
Standby/Economy function
The Standby/Economy is used to set the machine in a condition of low consumption by switching off the boiler heating resistor.
The machine can be brought to this condition manually with the machine on, by pressing in sequence the keys 5 and 3, or in automatic mode after 20 minutes if no coffee is delivered.
In both cases, when the machine is in Standby/Economy, all the keys switch off, except key 1 that flashes every 2 seconds.
To exit from Standby/Economy, just press one of the 5 dosing keys.
To engage the Standby/Economy function so that the machine, after 20 minutes with no coffee delivery, will automatically set in Standby/Economy, proceed as follows:
- switch off the machine
- press keys 3+5 simultaneously
- switch on the machine
- key 1 flashes twice = Standby/Economy not engaged
- key 1 flashes 3 times = Standby/Economy engaged
- press key 4 to decrease the flashes (Standby/Economy disengagement)
- press key 5 to increase the flashes (Standby/Economy engagement)
- switch off the machine
- switch on the machine
To check whether the automatic Standby/Economy function is engaged or not, just count how many times key 1 flashes each time the machine is switched on in this way:
- switch on the machine
- wait until all the keys light up, then switch off
- count how many times key 1 flashes
- key 1 flashes twice = Standby/Economy not engaged
- key 1 flashes 3 times = Standby/Economy engaged
Pump pressure adjustment
The machine is delivered with the valve set at 10 Bar. The end user can adjust the valve (v) to increase or decrease the pressure.
- Release the filter holder from the group.
- Remove the filter from the filter-holder.
- Insert the blind filter in the filter-holder.
- Attach the filter holder to the coffee brew group.
- Start the coffee brew group delivery to obtain the maximum pressure in the circuit, shown on the gauge.
-
Remove the cap to have access to the adjustment screw.
-
Act on the valve adjustment screw, turning it clockwise to increase the pressure and anticlockwise to decrease the pressure in the circuit.
- Stop the delivery.
- Start the delivery of the group and check the pressure adjustment shown on the gauge.
- Repeat the above operations until the required adjustment is achieved

natural_image
Pure geometric diagram with concentric circles and arrows, no text or symbols presentValve adjustment screw
It is advised to adjust the pressure within a maximum of 12 and a minimum of 9 Bar.

The machine is delivered with the pump regulated at 9 Bar to function taking water from the tank. If connected to the mains water supply, the pump regulation will be higher and has to be set according to the pressure of the the water supply network.
Factory values reset
To reset the machine factory values, follow these steps:
- Switch off the machine.
- Press simultaneously keys 1+3+5.
- Switch on the machine.
- Release the keys when they start to flash.
Specific functions of model 0995 Vetrano Dosata 2 Boiler PID
Filling Timeout
If the boiler filling takes longer than 120 seconds, the machine generates an alarm with an intermittent acoustic warning and flashing of the dosing keys. In this alarm condition the boiler heating does not start.
This condition may occur if the machine is switched on for the first time, with the boiler completely empty.
Switch the machine off, then on again to restart the filling.
If the problem persists, make sure there are no water leakages or clogging in the hydraulic circuit.
No water in tank
If the water in the tank drops below minimum level, the machine generates an alarm with an intermittent acoustic warning and flashing of the dosing keys.
To exit from alarm condition, it is sufficient to fill the tank.
When the machine is in alarm condition due to lack of water in the tank, the boiler continues to heat and the water level can be topped-up. This is also possible when the heating is interrupted due to lack of water in the boiler.
Dosing the coffee if there is no water in the tank
If during coffee delivery there is insufficient water in the tank, the machine only generates an alarm after the delivery terminates.
LEDS on-off
On the models where these are fitted, the LEDs on the sides of the machine can be switched on or off through switch (x), underneath the machine on the right side.
3. TERMOPID FUNCTIONING AND PROGRAMMING
ThermoPID double temperature


Through one of the TermoPID models mounted, it is possible to adjust the temperature of the machine boilers.
To set the temperature, proceed as follows.
Set-point temperature programming
To access the set point temperature adjustment programming, proceed as follows:
- With the termopid enabled (on), press the ▼ and ▲ keys simultaneously.
- When the display shows "t1" press the ▼ key to scan the set points "t1 or t2".
- When the display shows the required set point "t1 or t2" press ▲.
- The display will show the set point temperature entered; it is then possible to modify the value of the temperature required with the ▼ and ▲ keys.
- 3 seconds after the pressing of the last key, the data is stored and the display will show the current temperature.
Factory parameters preset
With the PRESET operation, the TermoPID control unit can be reconfigured with the default parameters (factory data).
To perform the PRESET, proceed as follows:
- With the termopid disabled. press ▼.
- Power the board.
- When the display shows "prs" release the key.
- Cut-out the power to the board.
The factory data (default) is the following:
$$ \mathrm{F01-} ^ {\circ} \mathrm{C} \quad \mathrm{I2-0,0} $$
$$ \mathrm{F02-6} \quad \mathrm{D2-1,5} $$
$$ \mathrm{P1-1,5} \quad \mathrm{B2-6} $$
$$ \mathrm{I} 1 - 0, 0 \quad \mathrm{T} 1 - 9 5 $$
$$ \mathrm{D} 1 - 1, 5 \quad \mathrm{T} 2 - 1 2 4 $$
$$ \mathrm{B1-10} \quad \mathrm{E1-15} $$
$$ \mathrm{P2-1,5} \quad \mathrm{E2-0} $$
Alarms
In the case of a sensor failure, on the display the caption A1 (or A3 for the Vetrano model) is shown: the adjustment and programming outputs are disabled.
In the case of a sensor short circuit, on the display the caption A2 (or A4 for the Vetrano model) is shown: the adjustment and programming outputs are disabled.
ThermoPID single temperature

Through one of the TermoPID models mounted, it is possible to adjust the temperature of the machine boilers.
During normal operation, the display shows the current boiler temperature.
To set the temperature, proceed as follows.
Set-point temperature programming
To access the set point temperature adjustment programming, proceed as follows:
• With thermopid enabled (on), press the ▼ button.
- When the display shows "PrG" press the ▲ and ▼ key to change the desired boiler temperature set point.
- After 3 seconds after pressing the last key the data is stored and the display shows the current temperature.
ECONOMY function
The Economy function on the SINGLE TEMPERATURE TERMOPID allows you to turn off the boiler heating if no coffee is brewed after a programmable time of 10 to 240 minutes.
When the machine is in Economy mode, "ECO" appears on the thermoPID display. When a coffee is brewed or a key is pressed on the display, the machine exits Eco and starts heating again as if it were the first time it was switched on.
To enter and set the ECONOMY time, simply act as follows:
- With thermoPID enabled (on), press the ▼ key twice until the display shows "ECO";
- Press the ▲ and ▼key to enter OFF and disable the function or enter the minutes after which the ECONOMY function must be entered.
- Three seconds after pressing the last key the data is stored and the display shows the current temperature.
Factory parameters preset
With the PRESET operation, the TermoPID control unit can be reconfigured with the default parameters (factory data).
To perform the PRESET, proceed as follows:
- With the termopid disabled. press ▼.
- Power the board.
- When the display shows "prs" release the key.
- Cut-out the power to the board.
The factory data (default) is the following:
$$ \begin{array}{l} \mathrm{F03-} ^ {\circ} \mathrm{C} \quad \mathrm{F04-0} \ P - 1, 0 \ \mathsf {I} - 0, 0 1 \ D - 2, 0 \ \end{array} $$
Alarms
In the case of a sensor failure, on the display the caption A1 is shown: the adjustment and programming outputs are disabled.
Termopid Setting and Functioning model CAROLA
With this TERMOPID model, the set pont temperature adjustment is through the position of the micro switch as shown below.
Pid Parameters Graph (model 0960 CAROLA)

a. Two cups filter
b. One cup filter
c. Blind filter
d. One cup filter holder
e. Two cups filter holder
f. Brush
g. Mains input pipe
h. Wooden presser
i. Discharge pipe
5. TRANSPORT
Packaging
During transport, always keep the package in the correct position referring to the indications printed on the outside of the box.
Do not turn over or lay the machine and packaging on its side.
The packaging contains loose parts and accompanying documentation which is to be kept for further consultation.
- Open the upper part of the package, remove the accessories and then slip the machine from the wrapper.
- Check the integrity of the machine, the accessories, the power supply cable and plug, and in the event of damage contact the retailer immediately.
Removal of packaging
- Make sure there are no signs of damage to the machine, carefully checking the packaging.
- Check that the machine shows no signs of damage after carefully removing the packaging.
- Keep the machine packaging, should it be necessary to transport the machine in the future.
- Keep out of the reach of children.
- If there are evident signs of flaws or damage on the machine, please inform the authorised dealer of the manufacturer immediately, to be able to take the necessary actions.
The packaging materials (plastic bags, foam polystyrene, nails, cardboard, etc.) are not to be left within the reach of children since they are potential sources of danger. Do not disperse the packaging materials in the environment, but dispose of them through the authorised bodies.
6. INSTALLATION
The machine is shipped ready for installation in accordance with the data found rating plate.
Ensure that the machine specifications comply with those of the local electrical power supply.
The electrical system must be equipped with an efficient residual current device or an automatic circuit breaker with an efficient earthing system. In the event no electrical safety device is present, have a qualified technician install a two-pole rocker switch/thermal-magnetic circuit breaker as required by current safety regulations.
Proper earthing of the device is mandatory.
The manufacturer declines all responsibility in the event this health and safety regulation is not respected.
Be careful not to damage the power supply cable by bending, crushing or stresses.
Do not disconnect the machine power supply by pulling the cable, disconnect by gripping the plug.
It is recommended to avoid positioning the machine in tight spaces or avoid disruption to its operation, supply or maintenance.
- The surface where the machine is to be installed must be level, dry, durable and stable, and at a height of 80 cm from ground.
- Position the machine and connect the power supply cable to the electrical socket.
7. MACHINE CLEANING

To clean the machine do not use water jets or metal or abrasive tools such as straw, metal brushes, needles, etc., and detergents but use a damp cloth or sponge.
Careful and accurate cleaning of the machine is very important for the reliability, duration and safety of the equipment.
- Clean the filter, removing it from the filter holder and wash it in clean water. This operation is facilitated using a brush.
- At least once a week, even if the coffee pours out normally, it is necessary to clean the gasket of the group using the specific brush.
- Clean the water tank taking care to reposition the rubber tube with the filter so that it touches the bottom of the tank.
- A blind filter is supplied with the machine for the group cleaning. This operatin is to be carried out once a week so as to remove the coffee encrustations from the circuit.
Cleaning the coffee brew group
- Remove the filter from the group.
- Insert the blind filter in the filter holder.
- Attach the filter holder to the group.
- Start delivery from the coffee brew group for approximately 15 seconds, then stop delivery. Repeat this operation 10-15 times.
8. MAINTENANCE

Maintenance operations are to be carried out with the machine off and cold, and with the electric plug disconnected.

To clean the machine do not use water jets or metal or abrasive tools such as straw, metal brushes, needles, etc., and detergents but use a damp cloth or sponge.
Daily
- Clean the outer body panels, the water/steam spout, the spray unit and the sump gasket.
- Check and if necessary clean the drip tray.
- Clean the coffee filter with hot water and a sponge.
Periodically after machine heavy duty
As well as the daily routine operations, proceed as follows:
- Immerse the filters and filter holder in boiling water for a few minutes to dissolve the coffee grease, then remove it with a cloth or a sponge.
- Clean the water tank 18.
Extraordinary maintenance
A blind filter is supplied together with the machine, for the cleaning of the coffee brew group. This operation is to be carried out at least once a week, to remove the coffee encrustations from the circuit.
- Release the filter holder from the group.
- Remove the filter from the filter holder and insert the blind filter.
- Attach the filter holder to the group.
- Start coffee delivery for approx. 15 seconds, then stop delivery. Repeat this operation 10-15 times.
Decalcification
Insert the decalcification product in the water tank then start delivery from the coffee brew group and from the water tap. Leave the machine on for about an hour, for the decalcifying, then switch off the machine and pour clean water into the tank.
Activate delivery of the brewing group and the water tap, then switch off the machine and discharge the pressure from the two boilers.
When the machine has cooled down, open the taps and discharge the water from the two bolers.
Close the discharge taps and reset the machine in operation.
9. POSSIBLE PROBLEMS

If the power supply cable becomes damaged, contact an authorised after sales service, because a special tool is necessary.
Waste materials used for processing or maintenance, if they are not biodegradable or cause pollution, are to be placed in separate containers and handed over to the specific collection centres.
Checking operations that can be carried out by the user after disconnecting the electric power supply:
- The machine does not start:
- Ensure the plug is inserted correctly.
- Ensure there is mains power and the residual current device or circuit breaker is inserted.
- Check the condition of the plug and the power supply cable; if damaged have them replaced by qualified personnel.
- No coffee is delivered:
- No water in the reservoir, refill with water.
- The pump has overheated due to excessive use. Wait for the pump to cool down and the thermal protector to reset.
• Inconsistent coffee delivery:
- Clean the filter in the filter holder.
- The coffee grounds are too fine or too coarse.
• No hot water or steam delivery:
- No water in the reservoir; refill with water.
- Nozzles clogged; clean the nozzles of the steam spout with a pin.
For any other type of irregularity or problem which has not been specified, unplug the power supply cable, avoid performing any direct repairs or inspections and contact a qualified technical service centre.

natural_image
Close-up of a metallic mechanical switch handle with glossy finish and red indicator lights (no visible text or symbols)10. DECOMMISSIONING
Temporary
• Empty the water reservoir and the spill basin.
- Switch off the main switch and remove the power plug from the mains.
• Perform the maintenance operations.
- Store the machine in a dry environment, protected from the elements and with limited access (avoid leaving it in the reach of minors or unfit persons).
Definitive
Besides carrying out the operations necessary for a temporary stop, do the following:
- Cut the power cable.
- Pack the machine in cardboard or other packing material and send it to authorised personnel for its disposal or second-hand sale).

The disposable materials used for processing or maintenance, if non-biodegradable or are pollutants, should be placed in separate containers and sent to special waste disposal centres.
11. THE GOOD COFFEE
Grinding Capacity and Settings
The coffee grinding serves to increase the contact surface between the coffee and the water, enhancing the extraction of these substances by the water. To regulate a correct grinding for expresso coffee, it is necessary to find the right grinding point, the right granulometry.
If the grounds are too fine, the water would take too long to pass through. It would extract all the positive substances, but also some that are negative, and remaining too long in contact with the coffee, it would burn it. The result would be a coffe with a biiter and burnt taste, with a very thin, dark cream, perhaps with a white stain in the centre (sign of over-extraction).
If the grounds are too coarse, the water would pass through too quickly, not extracting the right quantity of substances from the coffee. The result would be a cup with a pale cream and a watery taste, with little body and aroma.
At this point, (if we have used a good mixture and proper tamping) we should have an expresso with a hazelnut cream with darker tones, full body and an intense aroma.
Good Rules to Obtain an Excellent Expresso
1. Purge (or flushing)
This is a fundamental operation to be carried out before every expresso, to ensure maximum hygiene and cleanliness of the beverage. Release the filter holder and deliver water to remove any coffee residue from previous coffees, and clean the machine spray. This is to be always carried out before every new expresso.
2. Filter holder cleaning
After releasing the filter holder, this is to be cleaned with specific brushes or cloths, to remove the coffee residue and all the grounds that have remained in the filter. This serves to eliminate unpleasant tastes of burning caused by the previously used coffee waste.
Accurately free the filter holder from any residue each time, by hand. The first and second steps can be reversed, it is important that both operations are carried out before the extraction.
3. Grinding
To obtain the best taste and freshness, the coffee is always to be ground at the moment of use: in fact, after only 15 minutes from the grinding, the product has already lost about 65% of its aroma. A product in beans is advised, located in the specific hoppers (known also as the bells); the walls are to be always transparent and perfectly clean. It is possible that the bells are found covered with a yellowish stain, this coating is due to the oil contained inside the coffee beans that, over time, oxidates upon contact with the air and causes rancidity.
4. Pressing
After grinding, the coffee has to be pressed with the aid of a manual presser, the only tool that guarantees absolute precision.
5. Filter holder cleaning – second part
Now clean the filter holder again, this time along the edges, to remove any grounds. Without this step, the coffee grounds on the sides of the filter holder will burn during the extraction process, giving an unpleasant taste to the brew. Furthermore, these excess grounds can also cause damage to the rubber gasket inside the machine.
6. Spounts cleaning
After cleaning the filter holder edges, it is necessary to clean the spouts – the two hollow ends from which the brew is poured. These are always to be cleaned before every new extraction, like all the other elements used during the process.
7. Extraction
Fit the filter holder; now the brew can be extracted in a time calculated between 20 and 30 seconds, according to the parameters set by Scae (Specialty Coffee Association of Europe).

natural_image
Close-up of dried coffee beans with visible grain and seeds (no text or symbols)How to Heat and Dose the Milk
- Pour the fresh, cold milk into the mik jug, filling it half-way.
- Use 250 ml to prepare the milk for one cup; use 500 ml to prepare the milk for two cups.
- Bleed off the steam from the empty wand for a few seconds.
- Place the jug so that the spout of the steam pipe is just underneath the milk surface. Turn the steam tap to maximum. As the milk heats and increases in volume, will form a sort of vortex and a sipping noise.
- Do not move the jug to avoid producing air bubbles.
- Always keep the steam spout under the milk surface.
- When the milk reaches approx. 65^ C and the jug becomes too hot for the hand, the foam is ready.
- Switch off the steam pressure and remove the milk jug.
- Clean the steam pipe with a damp cloth and bleed the spout with the vacuum steam.
- If there are bubbles on the surface, knock the jug with little jerks on the work surface.
- Gently rotate the milk jug to mix the milk better.
- Use the milk promptly to avoid it deflating.
How to Pour the Milk Cream
- Start to gently pour the milk as soon as it is mounted into the centre of the cup, making sure the cream remains compact.
- When the milk and the coffee are well mixed and the cup is half full, move your hand more quickly, bringing the beak of the jug to the cup and increasing the dosing angle.
- Bring the jug to the edge of the cup keeping it near the surface of the drink.
- To create a decorative effect, continue to pour the milk moving the beak toward the centre in little steps, then finish with a longer step.

natural_image
Close-up of hands pouring a white substance into a black cup with a visible floral pattern (no text or symbols)Menú
SHORT COFFEE FLAT WHITE

-
Cup of 90 ml
• 20 ml espresso -
Cup 150 ml
- 40 ml espresso
• 110 ml hot milk, little cream

ESPRESSO
- Cup of 90 ml
• 40 ml espresso
• Cup/Glass of 220 ml
- 40 ml espresso
• 180 ml hot milk, little cream

DARK LONG COFFEE PICCOLO LATTE
- Cup of 150 ml
- 80 ml hot water
• 40 ml espresso
• Glass of 100 ml
• 20 ml espresso
• 80 ml hot milk, little cream

natural_image
Close-up of a glass filled with amber-colored beverage (no visible text or symbols)
- Cup of 150 ml
-
80 ml hot water
• 40 ml espresso -
Cup of 150 ml
• 40 ml espresso
• 11 ml cream-whipped milk


MACCHIATO MOCACCINO
- Cup of 90 ml
-
40 ml espresso
• Little cream of milk -
Cup of 190 ml
- Chocolate or cocoa
- 40 ml espresso
• Little cream of milk


LONG MACCHIATO COFFEE WITH ICE CREAM
- Cup of 150 ml
- 80 ml hot water
-
40 ml espresso
• Little cream of milk -
Cup of 300 ml
- Vanilla ice cream
- 40 ml espresso
- Wafers

natural_image
Close-up of a glass of brown beverage with ice cream and chocolate toppings (no text or symbols visible)NOTE:


The taste of Perfection
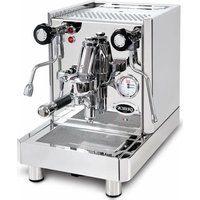

- E61
- GROUP
- TABLE OF CONTENTS
- TABLE OF CONTENTS .... 3
- INTRODUCTION ....5
- GENERAL INFORMATION ....7
- MACHINE COMPONENTS AND FUNCTIONING ....11
- TERMOPID FUNCTIONING AND PROGRAMMING....72
- INTRODUCTION
- Symbols
- a
- Warnings
- GENERAL INFORMATION
- Destination for use
- Improper use
- Safety instructions
- General information
- Safety
- Vibrations
- Noise
- MACHINE COMPONENTS AND FUNCTIONING
- Legend:
- Commissioning
- Coffee brew
- Boiler temperature adjustment
- - MILANO
- Steam delivery
- Hot water delivery
- Coffee pressure adjustment valve
- Specific functions of model 0980 Milano
- Filling Timeout
- No water in the tank
- Dosing the coffee if there is no water in the tank
- - ANDREJA - ANDREJA PID
- Specific functions of model 0980 Andreja
- – ANDREJA DOSATA
- Functions and Adjustments
- Coffee dosing controls
- Dose setting
- Display and Boiler temperature adjustment
- Standby/Economy function
- Factory values reset
- Specific functions of model 0980 Andreja Dosata
- – RUBINO
- Specific functions of model 0981 Rubino
- - AQUILA
- Tank
- Water supply:
- Pump pressure adjustment valve
- Specific functions of model 0985 Aquila
- -AQUILA PID
- Mains water supply:
- Specific functions of model 0985 with AQUILA
- Specific functions of model 0992 QM67 - 2 Boiler PID
- – VETRANO
- Pump pressure adjustment
- Specific functions of model 0995 Vetrano 2 Boiler Pid
- LEDS on-off
- - VETRANO DOSATA - 2 BOILER PID
- Specific functions of model 0995 Vetrano Dosata 2 Boiler PID
- No water in tank
- TERMOPID FUNCTIONING AND PROGRAMMING
- ThermoPID double temperature
- Set-point temperature programming
- Factory parameters preset
- Alarms
- ThermoPID single temperature
- ECONOMY function
- Termopid Setting and Functioning model CAROLA
- TRANSPORT
- Packaging
- Removal of packaging
- INSTALLATION
- Proper earthing of the device is mandatory.
- The manufacturer declines all responsibility in the event this health and safety regulation is not respected.
- MACHINE CLEANING
- Cleaning the coffee brew group
- MAINTENANCE
- Daily
- Periodically after machine heavy duty
- Extraordinary maintenance
- Decalcification
- POSSIBLE PROBLEMS
- DECOMMISSIONING
- Temporary
- Definitive
- THE GOOD COFFEE
- Grinding Capacity and Settings
- Good Rules to Obtain an Excellent Expresso
- Purge (or flushing)
- Filter holder cleaning
- Grinding
- Pressing
- Filter holder cleaning – second part
- Spounts cleaning
- Extraction
- How to Heat and Dose the Milk
- How to Pour the Milk Cream
- Menú
- SHORT COFFEE FLAT WHITE
- ESPRESSO
- DARK LONG COFFEE PICCOLO LATTE
- MACCHIATO MOCACCINO
- LONG MACCHIATO COFFEE WITH ICE CREAM
- NOTE:
Brand : QUICKMILL
Model : Assume
Category : Coffee machine