MGF30L - Microwave Stirling - Free user manual and instructions
Find the device manual for free MGF30L Stirling in PDF.


| Product Type | Microwave Oven |
| Brand | Stirling |
| Model | MGF30L |
| Capacity | 30 Liters |
| Power Output | 800 Watts |
| Power Supply | 230V / 50Hz |
| Dimensions (W x D x H) | Approx. 485 x 400 x 290 mm |
| Weight | Approx. 14 kg |
| Control Type | Electronic with Digital Display |
| Defrost Function | Yes, by weight or time |
| Timer | Up to 99 minutes 99 seconds |
| Interior Light | Yes |
| Turntable | Yes, diameter 315 mm |
| Child Lock | Yes |
| Mute Function | Yes |
| Cleaning | Wipe with damp cloth; do not use abrasive cleaners |
| Spare Parts Availability | Contact Stirling support or authorized dealers |
| Safety Certifications | CE, RoHS compliant |
| Warranty | 2 years (subject to terms) |
Frequently Asked Questions - MGF30L Stirling
User questions about MGF30L Stirling
0 question about this device. Answer the ones you know or ask your own.
Ask a new question about this device
Download the instructions for your Microwave in PDF format for free! Find your manual MGF30L - Stirling and take your electronic device back in hand. On this page are published all the documents necessary for the use of your device. MGF30L by Stirling.
USER MANUAL MGF30L Stirling
natural_image
Abstract black and white spiral pattern enclosed in a circle (no text or symbols)STIRLING®
natural_image
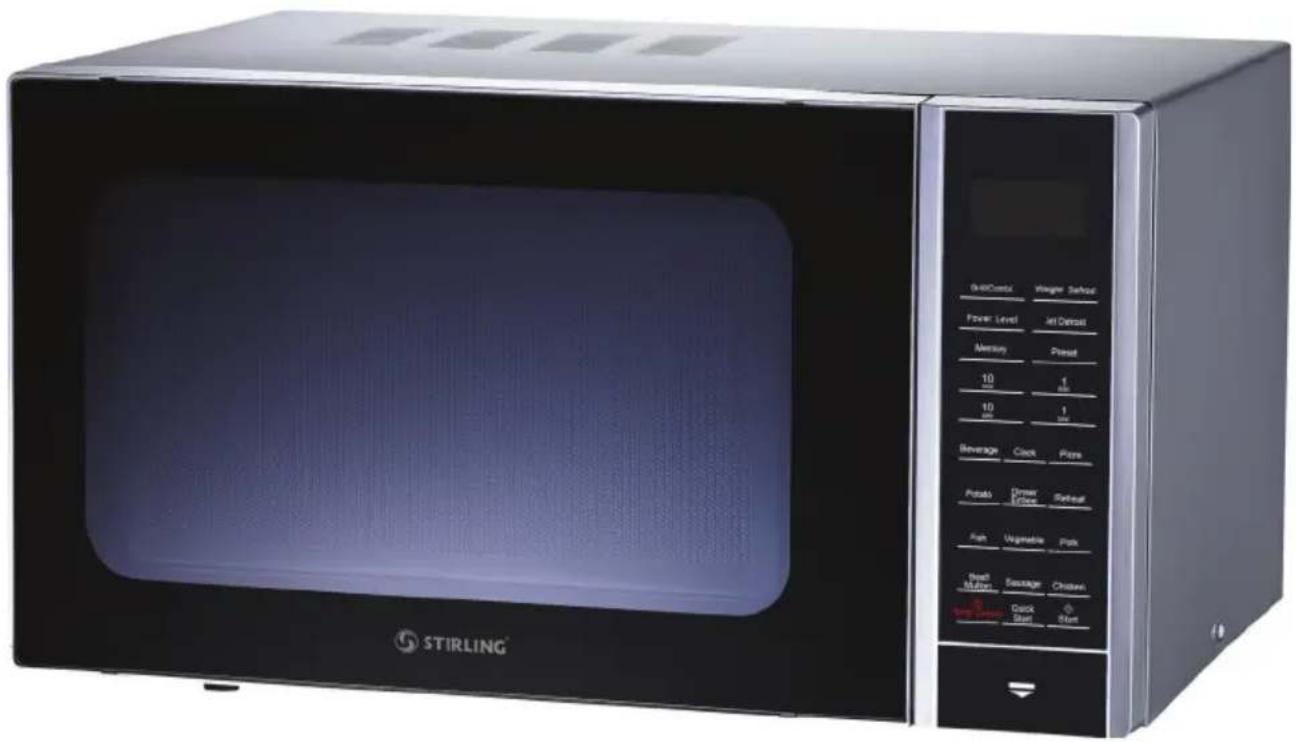
Stirling microwave oven with control panel and display screen (no visible text or symbols on main body)30 L MICROWAVE WITH GRILL FUNCTION
Model Number MGF30L
INSTRUCTION MANUAL
Welcome
Congratulations on choosing to buy a STIRLING® product.
All products brought to you by STIRLING ^® are manufactured to the highest standards of performance and safety and, as part of our philosophy of customer service and satisfaction, are backed by our comprehensive 3 Year Warranty.
We hope you will enjoy using your purchase for many years to come.
Contents
02 Welcome
04 Warranty Details
05 General Safety Instructions
10 Product Overview
11 Getting Started
14 Instructions
21 FAQs and Troubleshooting Guide
22 Other Useful Information
25 Repair and Refurbished Goods or Parts Notice


natural_image
Abstract black-and-white spiral pattern enclosed in a circle (no text or symbols)STIRLING®
30 L Microwave with Grill Function
Warranty Details
REGISTER YOUR PURCHASE AT www.aldi.com.au/en/about-aldi/product-registration/ TO KEEP UP-TO-DATE WITH IMPORTANT PRODUCT INFORMATION
The product is guaranteed to be free from defects in workmanship and parts for a period of 36 months from the date of purchase. Defects that occur within this warranty period, under normal use and care, will be repaired, replaced or refunded at our discretion. The benefits conferred by this warranty are in addition to all rights and remedies in respect of the product that the consumer has under the Competition and Consumer Act 2010 and similar state and territory laws.
Our goods come with guarantees that cannot be excluded under the Australian Consumer Law. You are entitled to a replacement or refund for a major failure and to compensation for any other reasonably foreseeable loss or damage. You are also entitled to have the goods repaired or replaced if the goods fail to be of acceptable quality and the failure does not amount to a major failure.

General Safety Instructions
IMPORTANT SAFETY INSTRUCTIONS
READ CAREFULLY AND KEEP FOR FUTURE REFERENCE
Read this manual thoroughly before first use, even if you are familiar with this type of product. The safety precautions enclosed herein reduce the risk of fire, electric shock and injury when correctly adhered to. Keep the manual in a safe place for future reference, along with the completed warranty card, purchase receipt and carton. If applicable, pass these instructions on to the next owner of the appliance.
Always follow basic safety precautions and accident prevention measures when using an electrical appliance, including the following:
Precautions to Avoid Possible Exposure to Excessive Microwave Energy
- Do not tamper with the safety locking mechanism, and do not attempt to use the microwave oven with the door open. The door needs to be tightly shut to prevent harmful exposure to microwave energy.
- Do not allow any object to prevent the door from closing. Also, do not allow cleaner residue to accumulate on sealing surfaces.
- Do not use the oven if it is damaged. It is particularly important that there is no damage to the oven door (bent, warped or otherwise damaged), hinges and latches (broken or loosened), door seals and sealing surfaces.
- Maintain the appliance in a clean condition to avoid surface deterioration, which could affect its working life and result in a hazard risk.
- WARNING: If the door or door seals are damaged, the oven must not be operated until it has been repaired by a competent person.
- WARNING: It is hazardous for anyone other than a competent person to carry out any service or repair operation that involves the removal of a cover which gives protection against exposure to microwave energy.
Precautions to Avoid the Risk of Fire in the Appliance Interior
- Do not use near flammable materials such as curtains, drapes, paper, wall coverings, tea towels or clothing.
- Do not cover the appliance, or store anything on top of it, to avoid overheating.
- Keep an eye on the appliance when using the microwave function for heating food in plastic or paper containers as these could ignite.
- If you detect smoke when using the microwave function, switch the appliance off immediately, unplug it and keep the door closed in order to stifle any flames.
- Remove wire twist ties from paper or plastic bags before placing them in the microwave oven.
- Do not place oversize foods, metal foil packages and utensils in the appliance as they may cause a risk of fire or electric shock.
- Do not leave paper products, cooking utensils, or food in the interior, and do not use the oven for storage purposes when it is not in use.
General Safety Instructions (Cont.)
- WARNING: Liquids and other foods must not be heated in sealed containers since they are liable to explode.
- Do not use the microwave function when the oven is empty.
- WARNING: Do not leave the appliance unattended when in use.
Electrical Safety and Cord Handling
- Voltage: Make sure that your outlet voltage and circuit frequency correspond to the voltage stated on the appliance rating plate. If it does not match, do not use the appliance and contact our after sales support centre.
- Power outlet: Connect the appliance to a properly earthed power outlet, which must be readily accessible so that you can easily unplug it if necessary. Operate the unit on a separate electrical circuit. If the circuit is overloaded with other appliances, this appliance may not work properly.
- Power cord: Do not kink or damage the power cord. Do not let it hang over the edge of a table or benchtop. Do not let it touch hot or sharp surfaces. Do not place anything on top of the cord. Do not run the cord under the appliance. Run the cord so that there will be no risk of anyone pulling it inadvertently or tripping over it. Never pull the cord to lift up, carry or unplug the appliance.
- No extension cord: A short power supply cord is provided to reduce the risks resulting from becoming entangled in or tripping over a longer cord. If use of an extension cord becomes unavoidable, ensure that its marked electrical rating is at least as great as that of the appliance. Exercise due care and arrange the longer cord safely.
- Winding the cord: If winding the power cord, avoid tight bends as this could damage the cord.
- No external timer: The appliance is not intended to be operated by means of an external timer or separate remote control system.
- WARNING: Protect from moisture: Do not expose the electrical connections to water. Do not use the appliance, or touch the plug, with wet or damp hands, on a damp floor, or when the appliance itself is wet. Do not use it near an open window as rain may cause electric shock.
- WARNING: Do not use when damaged! Do not pick up or operate an appliance with a damaged cord or plug, or after it malfunctions or has been dropped or damaged in any manner. A damaged cord must be replaced by the manufacturer, its authorised service centres or similarly qualified personnel in order to avoid any hazards. Contact our after sales support centre for advice.
- WARNING: Do not attempt to repair, disassemble or modify the appliance. There are no user-serviceable parts contained within.
- After use: Disconnect the power supply after use and before cleaning, servicing, maintenance or moving the appliance. Wait until the appliance has cooled completely before cleaning, maintenance or moving it.
General Safety Instructions (Cont.)
- Disconnection: Turn off all controls, then switch off the power at the outlet and remove the plug. Grip the plug when disconnecting, do not pull the cord.
- Safety switch: Unless your home is already fitted with a residual current device (safety switch), we recommend installing an RCD with a rated residual operating current not exceeding 30 mA to provide additional safety protection when using electrical appliances. See your electrician for professional advice.
- Electrical safety: Do not insert any objects into the appliance. Do not attempt to dislodge food when the appliance is plugged into an electrical outlet.
Usage Conditions and Restrictions
- Domestic use only: This appliance is intended for private domestic use only. It is not suitable for commercial, industrial, trade or laboratory use.
- Intended use: This appliance is specifically designed for heating or cooking food or beverages in a domestic environment. Do not use the appliance for anything other than its intended purpose and only use it as described in this manual. Using the appliance for things such as drying of food or clothing, heating of warming pads, slippers, sponges, damp cloths and similar items may be an injury or fire hazard.
- No outdoor use: Do not use the appliance outdoors or in areas of high humidity.
- Usage restrictions: This appliance is not intended for use by persons (including children) with reduced physical, sensory or mental capabilities, or lack of experience and knowledge, unless they have been given supervision or instruction concerning the use of the appliance by a person responsible for their safety.
- Children and pets: Supervise children to ensure they do not play with the appliance. Only allow children to use the appliance without supervision when adequate instructions have been given so that the child is able to use the appliance in a safe way and understands the hazards of improper use. Do not allow children to clean the appliance or perform user maintenance.
- Protect from heat: Do not place the appliance on or near a hot gas or electric stove/cooktop, oven or heater.
- Accessories: Only use the accessories supplied with this unit; do not use other accessories. Doing so may expose you to danger and void your warranty.
- Installation: Position the appliance on a level and stable, heat and flameproof work surface with the rear against a wall. Do not place it on an inclined or unstable surface. Ensure there is sufficient free space above and around all sides for air circulation. (Please refer to page 14 for comprehensive installation instructions.)
- Freestanding use: The appliance is designed for freestanding use: do not install it in a pantry, cabinet or below shelving. Do not install it behind a decorative door in order to avoid overheating.
• Storage: Do not store any materials other than the supplied ovenproof
General Safety Instructions (Cont.)
accessories in the appliance. Never store paper, cardboard, plastic or similar products in the appliance.
- DANGER: The appliance has no user-serviceable parts contained inside. Do not attempt to repair, disassemble or modify it. Touching some of the internal components can cause serious personal injury or death.
- Grounding: This appliance must be earthed (grounded). We accept no liability for damage to the oven or personal injury resulting from failure to observe any electrical connection procedures.
In the event of a malfunction or breakdown, earthing will reduce the risk of an electric shock by providing a path of least resistance for the electric current.
The plug must be connected to an appropriate outlet that is installed and earthed in accordance with all local standards and requirements. If unsure, consult an electrician or a service representative. Do not, under any circumstances, cut or remove the third (grounding) prong from the power plug.
- Cleaning: Clean the appliance regularly and remove food residues from door seals, cavities and adjacent parts. Do not place the appliance in water or other liquids. Do not use a steam cleaner. Clean the housing only with a sponge/ cloth moistened in warm, soapy water. Do not use a steel wool pad as pieces may break off and touch electrical parts, causing an electric shock hazard. Do not use corrosive chemicals. Do not use harsh abrasive cleaners or sharp metal scrapers to clean the oven door glass, since they can scratch the surface, which may result in shattering of the glass. See pages 22–23 for detailed cleaning instructions.
- Misuse: Improper use or installation may cause injury and/or damage. We accept no responsibility for any eventual damage or injury caused by misuse of the appliance or noncompliance with the instructions.
WARNING: HOT SURFACES! RISK OF BURNS!
The temperature of accessible surfaces may be very high when the device is operating. Take proper precautions to prevent the risk of burns or other injuries to persons and damage to property.
- Do not touch hot surfaces! Some parts of the appliance can retain heat for some time after turning off. Always use handles, knobs and oven mitts or pot holders when the appliance is operating. Allow metal parts to cool before cleaning.
- Do not touch hot food! Always use tongs and oven mitts or pot holders when removing food.
- Do not move the appliance during cooking! Exercise extreme caution when removing hot food, oil or other liquids from the appliance.
- Beware of hot steam! Hot steam may escape when you open the door of the appliance. Take proper precautions to protect yourself from burns.
General Safety Instructions (Cont.)
- Prevent damage! Keep the power supply cord away from hot appliance parts.
Safe Cooking
- Only use utensils that are suitable for use in a microwave oven. Do not use metallic containers for microwave cooking (refer to pages 12-13).
- WARNING: Never heat liquids and other foods in sealed containers as they are liable to explode.
- CAUTION: HOT! Use pot holders or oven mitts to handle cookware and utensils which have become hot following a cooking process.
• Take care when handling containers with hot drinks, as microwave heating of beverages can result in delayed eruptive boiling. - WARNING: To avoid burns, stir or shake the contents of feeding bottles and baby food jars and always check the temperature before serving.
- Do not heat eggs in their shell or whole hard-boiled eggs on the microwave setting, as they may explode, even after microwave heating has ended.
- Pierce foods with nonporous skins such as potatoes, whole squash, apples, chestnuts or sausages before cooking on the microwave setting.
- Watch the cooking time. Cook for the shortest amount of time indicated and add more time as needed. Severely overcooked food can smoke or ignite.
• Cover the food, but not tightly, to prevent spattering and help food cook evenly. - WARNING: Accessible parts may become hot during use. Young children should be kept away.
- Do not use harsh abrasive cleaners or sharp metal scrapers to clean the oven door glass/the glass of hinged lids of the hob (as appropriate), since they can scratch the surface, which may result in shattering of the glass.

WARNING: HOT SURFACES! RISK OF BURNS!
Take proper precautions to prevent the risk of burns, fires, or other injury to persons or damage to property.
Product Overview
Scope of delivery

Microwave with Grill Function
1 Door safety lock system
2 Oven window
3 Roller ring
4 Shaft
5 Glass turntable
6 Control panel
7 Door release button
8 Metal rack
Documentation (not shown)
Instruction Manual
Quick Start Guide
Warranty Certificate
NOTE: Due to continued product improvement, images and illustrations in this manual may vary slightly from the product purchased. All images in this manual are for reference purposes only. Parts are not necessarily pictured to scale.
Getting Started
Before first use
Unpacking
CAUTION: The appliance has sharp edges which can cause injury if handled inappropriately. Unpack and use the appliance with due care.
This product has been packaged to protect it against transportation damage. Unpack the appliance and keep the original packaging carton in a safe place. It will help prevent any damage if the product needs to be transported in the future, and you can use it to store the appliance when it is not in use. In the event that the packaging materials are to be disposed of, please recycle them where possible.
Make sure to remove any stickers from the surface of the oven and all documentation from inside the oven.
Safe packaging disposal
Plastic wrapping can be a suffocation hazard for babies and young children, so ensure all packaging materials are out of their reach and disposed of safely. Before you discard any packaging, ensure you have unpacked all the parts listed previously. Contact our after sales support centre if anything is missing.
Check the contents
Unwind the power cord to its full length and inspect all parts of the appliance for visual damage. Do not use it if anything appears to be damaged or not working properly. In case of damage, please contact our after sales support centre.
Documentation
Make sure you have read and understood all instructions and warnings in this manual. Refer to the Product Overview, page 9, to familiarise yourself with the product and identify all parts. Pay particular attention to the safety instructions.
Cleaning
Make sure the power cord is unplugged. Before first use, clean all parts of the appliance that come into contact with food, as described in the "Cleaning and care" section on pages 22–23. Dry thoroughly.
CAUTION: Do not immerse the microwave oven in water or other liquid.
Your microwave oven is now ready for connection to your power supply.
Getting Started (Cont.)
Installing the turntable
- Never place the glass turntable upside down. The glass turntable should never be restricted.
- Both glass turntable and turntable support must always be used during cooking.
- All food and containers of food must always place on the glass turntable for cooking.
- If glass turntable or turntable support crack or break, contact your nearest authorized service center.

Installation
- Make sure that all the packing materials are removed from the inside of the door.
- This microwave oven must be placed on a flat, stable surface to hold its weight and the heaviest food likely to be cooked in the oven.
- Do not place the oven where heat, moisture, or high humidity are generated, or near combustible materials.
- For correct operation, the oven must have sufficient airflow. Allow minimum 20cm of free space necessary above the top surface of the oven and 5cm at both sides. The microwave oven rear plate must not be placed too close to the wall. Do not cover or block any openings on the appliance. Do not remove feet.
- Do not operate the oven without glass turntable, roller support, and shaft in their proper positions.
- Make sure that the power supply cord is undamaged and does not run under the oven or over any hot or sharp surface.
- The socket must be readily accessible so that it can be easily unplugged in an emergency.
- Do not use the oven outdoors.
Getting Started (Cont.)
Radio interference
Operation of the microwave oven can cause interference to your radio, TV, or similar equipment. When there is interference, it may be reduced or eliminated by taking the following measures:
- Clean door and sealing surface of the oven.
- Reorient the receiving antenna of radio or television.
- Relocate the microwave oven with respect to the receiver.
-
Move the microwave oven away from the receiver.
-
Plug the microwave oven into a different outlet so that microwave oven and receiver are on different branch circuits.
Utensils guide
- Microwave cannot penetrate metal. Only use utensils that are suitable for use in microwave ovens. Metallic containers for food and beverages are not allowed during microwave cooking.
- Specific metal utensils may be used when using the grill function only, listed in the table below.
- Microwave cannot penetrate metal, so metal utensils or dishes with metallic trim should not be used.
- Do not use recycled paper products when microwave cooking, as they may contain small metal fragments which may cause sparks and/or fires.
- Round /oval dishes rather than square/oblong ones are recommend, as food in corners tends to overcook.
- Narrow strips of aluminum foil may be used to prevent overcooking of exposed areas. But be careful don't use too much and keep a distance of 1 inch (2.54cm) between foil and cavity.
| Cookware Microwave Grill Combination | |||
| Heat-Resistant glass Yes Yes Yes | |||
| Non-Heat-Resistant glass No No | No | ||
| Heat-Resistant Ceramics | Yes Yes Yes | ||
| Microwave-safe plastic dish | Yes No | No | |
| Kitchen Paper | Yes No | No | |
| Metal Tray | No Yes No | ||
| Metal Rack | No Yes No | ||
| Aluminum Foil & Foil Container | No Yes No | ||
Instructions
Control Panel

Display screen
Cooking time, power, indicators and present time are displayed.
Grill/Combi
Press to set grill and combination cooking program.
Weight defrost
Press to program defrost program based on weight.
Power level
Press to set microwave cooking power level.
Jet defrost
Press to program defrost program based on time.
Memory
Press to set multistage cooking program.
Preset
Preset function allows you to put food into the oven and program it to start cooking at a later time.
Number pads
Press to set clock, cooking time or enter food weight.
Auto cook menus
Instant settings to cook popular foods.
Clock
Press to set the oven clock of time.
Stop/Cancel
Press to clear entry before setting a cooking program.
Press once to temporarily stop cooking or twice to cancel cooking.
Quick Start
Press to start the oven quickly at full power.
Start
Press to start cooking program
Instructions (Cont.)
How to set the oven controls
- When the oven is first plugged in, a beep will sound and the display will show "1:01" and "💡".
- When setting up, if nothing is pressed for 30 secs, the microwave will enter standby mode.
- Press "Stop/Cancel" once to pause the program.
- Press "Start" to resume the program.
- Press "Stop/Cancel" twice to cancel the program.
- Once cooking is complete, the screen will display "End" and a beep will sound regularly until either the door is opened or the "Stop/Cancel" button is pressed.
Setting the clock
This is a 12 or 24 hour clock. You can choose to set the clock time in 12 or 24 hour cycle by pressing the “Clock” pad.
- In standby mode, press "Clock" pad once to choose 12 hour clock, or twice to choose 24 hour clock.
- Use the number pads to set the correct time.
- Press "Clock." pad to confirm.
Quick start
Use this feature to program the oven to start at 100% power.
Press Quick Start to start microwave cooking at full power for 30 seconds. Press again in quick succession to increase cooking time in 30 second increments up to 99 minutes and 59 seconds.
Microwave cooking
- In standby mode, press "Power Level" to set a power level between 100% and 0%.
- Use number pad to set cooking time up to 99 minutes and 99 seconds.
- Press "Start" to begin cooking.
Instructions (Cont.)
Press Power Level pad to set a cooking power level:
| Press Power Level Power Level | |
| Once 100% | |
| Twice 80% | |
| 3 Times 60% | |
| 4 Times 40% | |
| 5 Times 20% | |
| 6 Times Reset back to 0% | |
Grill
Grill cooking is particularly useful for pizza, potatoes, sausages, fish, pieces of chicken, and thin slices of pork or beef. It is also suitable for hot sandwiches and au gratin dishes. The provided metal grill rack which sits on the glass turntable is suitable for this cooking function.
- In standby mode, press "Grill/Combi" once.
- Use number pad to set cooking time. The longest time is 99 minutes and 99 seconds.
- Press "Start" to begin cooking.
Combination
IMPORTANT: Do not use the metal grill rack for this cooking function and only the glass turtable.
Combination 1: 30% of time for microwave cooking, 70% for grill cooking. It is recommended for fish, potatoes or au gratin.
Combination 2: 55% of time for microwave cooking, 45% for grill cooking. Use for puddings, omelets, baked potatoes and poultry.
- Press "Grill/Combi" twice for combination 1, or three times for combination 2.
- Use number pads to set cooking time. The longest time is 99 minutes and 99 seconds.
- Press "Start" to begin cooking.
Instructions (Cont.)
Jet defrost
Jet Defrost quickly and evenly thaws frozen food using optimized power and time settings. IMPORTANT: Do not use the metal grill rack for this cooking function and only the glass turtable.
- In standby mode, press "Jet Defrost" once.
- Use the number pads to enter defrosting time. The longest time is 99 minutes and 99 seconds.
- Press "Start" to begin defrosting.
- During defrost cooking, the system will pause and sound to remind you to turn over the food, Press "Start" to resume."
Weight defrost
The oven can defrost meat, poultry, and seafood.
The defrosting time and power level are automatically set once the food category and weight are programmed. IMPORTANT: Do not use the metal grill rack for this cooking function and only the glass turtable.
- In standby mode, press "Weight Defrost" repeatedly to select food code.
- Use the number pads to select food weight..
- Press "Start" to begin defrosting.
Weight defrost code description:
| Press Power Level Display Weight Range | |
| Once d1 100 g - 2300 g | |
| Twice d2 100 g - 2300 g | |
| Thrice d3 100 g - 900 g |
| 10 Minute=1 kg 1 Minute=100 g | |
| 10 Second=10 g 1 Second=1 g |
- During defrost cooking, the system will pause and sound to remind you to turn over the food. Press "Start" to resume."
Instructions (Cont.)
Preset
Preset function allows the microwave to start up in a later time. This function does not work with Auto cook. IMPORTANT: Please do not put foods/liquids that spoil (i.e. requiring refrigeration) in the oven cavity for present/delayed start.
- In standby mode, set a cooking program.
- Press "Preset" pad once.
- Use the number pads to enter desired time.
- Press "Start" to begin cooking.
- You can check the preset time during cooking by pressing “Preset” pad once. Time countdown can be seen in display for 5 seconds, press “Stop/Cancel” pad within 5 seconds to cancel the program
Multi-stage cooking
Microwave cooking can be programmed for two (or three including Jet Defrost) cooking sequences. For example, suppose you want to set the following cooking program. IMPORTANT: Do not use the metal grill rack for this cooking function and only the glass turtable.
Jet defrost

Microwave-cooking (2 min 100%)

Microwave-cooking (1 min 80%)
- Open the door and place the food into the oven, close it.
- Press "Jet Defrost" and input defrosting time.
- Press "Memory" pad once.
- Input power level and cooking time for the first stage of microwave cooking.
- Press "Memory" pad once.
- Input power level and cooking time for the second stage of microwave cooking.
- Press "Start".
- Quick start, preset function, weight defrost and auto cook menus cannot be in a multistage cooking program
Instructions (Cont.)
Auto cook
The Auto Cook Menu function uses preprogrammed power levels and cook times based on different weights or servings of the selected food/beverage.
IMPORTANT: Do not use the metal grill rack for this cooking function and only the glass turtable.
- Place the food or beverage in the oven and close the oven door.
- Press corresponding Auto Cook menu pad repeatedly to select food weight or servings.
- Press "Start" to begin cooking.
| Auto cook menus | |
| Food or Beverage Weight / Serving sizes | |
| Beverages 200 ml/cup, 1-3 cups | |
| Dinner Entree 250-500 g | |
| Reheating 200-800 g | |
| Potatoes 230±10 g/serving, 1-2 servings | |
| Vegetables 200-600 g | |
| Pizza 150-450 g | |
| Chicken 800-1400 g | |
| Fish 200-600 g | |
| Sausage | 100-500 g |
| Pork | 200-600 g |
| Beef/Mutton | 200-600 g |
- For Chicken, Sausage, Pork and Beef/Mutton, oven will stop during cooking to let you turn over food and then close the door, press the "Start" to resume cooking. Be careful to handle with the very hot food in the oven.
- For Beverage and Potato, parameters on screen are not weight but number of servings.
Instructions (Cont.)
- The result of auto cooking depends on factors such as fluctuation of voltage, the shape and size of food, your personal preference as to the doneness of certain foods and even how well you happen to place food in the oven. If you find the result at any rate not quite satisfactory, please adjust the cooking time a little bit accordingly using the regular mode as Auto cook cannot be adjusted.
Child lock
Use to prevent unsupervised operation of the oven by children.
To set the child lock: When the microwave has been inactive for one minute, Child Lock Mode will activate and the lock indicator light will illuminate. In the lock state, all pads are disabled.
To cancel the child lock: In child lock mode, open or close the oven door to cancel the program.
Cooking Techniques
- Arrange food carefully. Place thickest areas towards outside of dish.
- Watch cooking time. Cook for the shortest amount of time indicated and add more as needed. Food severely overcooked can smoke or ignite.
- Cover foods while cooking. Covers prevent spattering and help foods to cook evenly.
- For quicker and more even cooking, turns foods such as chicken or hamburger once. Large items like roasts must be turned over at least once.
- Rearrange foods such as meatballs halfway through cooking both from top to bottom and from the center of the dish to the outside.
FAQs and Troubleshooting Guide
If your microwave oven fails to operate, or you experience any other problems with the appliance, check in table below for solutions to common problems. If none of the solutions offered helps you solve the problem, please contact our after sales support centre for advice or to arrange a service.
| Problem Potential cause Solution | ||
| Oven cannot be started. | Power cable is not plugged in properly.Fuse is blown or circuit breaker is activatedTrouble with outlet. | Unplug. Then plug in again after 10 secondsReplace fuse or reset circuit breaker by a qualified technician.Test the outlet with other electrical appliances. |
| Oven does not heat. | Door is not closed properly. | Close the door properly. |
| Glass turntable makes noise when microwave oven operates | Turntable and bottom of the oven is dirty. | Refer to "Cleaning and Maintenance" section to clean dirty parts. |
Other Useful Information
Cleaning and care
WARNING!
- Before cleaning or storing the appliance, always unplug the oven from the electrical outlet and allow it to cool completely.
- Never immerse the appliance, cord or plug in water or any other liquid.
- Never use solvents, cleaning powders, wire brushes, steel wool pads or any other harsh abrasive cleaners, as such materials will damage the finish.
Exterior surfaces
Wipe the appliance housing clean with a damp cloth and a mild detergent. Apply the cleansing agent to the cloth, not directly onto the oven. Dry thoroughly.
Interior surfaces
To keep your microwave oven in good working order, make sure to remove all food residues and grease splatters from interior surfaces on a regular basis. Regular cleaning will also reduce the fire hazard risk.
- Unplug the microwave oven from the power supply. Allow the appliance to cool.
- Remove all accessories (Roller ring, Shaft, Glass Turntable, Metal Rack) from the oven cavity.
Interior walls and oven door
- Use a damp cloth and mild detergent solution on a sponge to clean the interior walls and door of the microwave oven. Repeat with a dry, clean cloth.
- Never use harsh abrasives or corrosive products as these could damage the oven surface. Never use steel wool pads or other abrasive cleaning products. Abrasive cleaners, scrubbing brushes and chemical cleaners will damage the coating on this unit. Pieces can break off the and touch electrical parts involving a risk of electrical shock.
- If scrubbing is necessary, use a nonabrasive nylon or polyester mesh pad.
Storage
- When the appliance is not in use, disconnect it from the power supply.
- Storing the appliance and accessories safely in the original packaging will protect it from dust.
- Store the appliance in a dry location, out of reach of children.
Other Useful Information (Cont.)
- Do not place any heavy items on top of appliance during storage as this may result in damage of appliance.
Service, repair and spare parts
- This appliance requires little maintenance. It contains no user serviceable parts. Servicing is necessary if the microwave oven has been damaged, or if it has been exposed to rain or moisture, or if it does not work correctly, or has been dropped. In such a case, please contact our after sales support centre to arrange for examination or repair of the product. Never attempt to open the housing or repair the appliance yourself.
- To purchase a part, please contact our after sales support centre on 1300 112 534 or via tempo.org/support. Our after sales support centre stocks the following spare parts for the appliance:
Other Useful Information (Cont.)
Technical Specifications
| Model MGF30L | |
| Rated Voltage 230-240 V~ | |
| Rated Frequency 50 Hz | |
| Rated Input (Microwave) 1400 W | |
| Rated Input (Grill) 1050 W | |
| Rated Output (Microwave) 900 W | |
| Capacity Microwave Frequency 2450 MHz | |
| Capacity | 30 L |
| Dimensions (approx.) (W) 539 x (D) 405 x (H) 300 mm | |
| Weight (approx.) 16.5 kg | |
Compliance
This appliance has been fully tested and meets all requirements as set out by standards AS/NZS 60335.1, AS/NZS 60335.2.25 and AS/NZS 60335.2.9 for electrical safety.

The RCM Mark (Regulatory Compliance Mark) indicates that the product complies with the relevant guidelines of the ACMA as well as corresponding government requirements for the safety of electrical devices.
Responsible disposal


Packaging materials are recyclable. Please dispose of them responsibly for recycling.
At the end of its working life, do not throw this appliance out with your household waste. Electrical and electronic products contain substances that can have a detrimental effect on the environment and human health if disposed of inappropriately. Observe any local regulations regarding the disposal of electrical consumer goods and dispose of it appropriately for recycling.
Contact your local authorities for advice on recycling facilities in your area. Or find recycling scheme services listed on Planet Ark's website at www.recyclingnearyou.com.au, or call Planet Ark on 1300 733 712.


natural_image
Abstract black-and-white spiral pattern enclosed in a circle (no text or symbols)STIRLING®
30 L Microwave with Grill Function
Repair and Refurbished Goods or Parts Notice
Unfortunately, from time to time, faulty products are manufactured which need to be returned to the supplier for repair.
Please be aware that if your product is capable of retaining user-generated data (such as files stored on a computer hard drive, telephone numbers stored on a mobile telephone, songs stored on a portable media player, games saved on a games console or files stored on a USB memory stick) during the process of repair, some or all of your stored data may be lost. We recommend you save this data elsewhere prior to sending the product for repair.
You should also be aware that rather than repairing goods, we may replace them with refurbished goods of the same type or use refurbished parts in the repair process.
Please be assured though, refurbished parts or replacements are only used where they meet ALDI's stringent quality specifications.
If at any time you feel your repair is being handled unsatisfactorily, you may escalate your complaint. Please telephone us on 1300 112 534 or write to us at:
Tempo (Aust) Pty Ltd (ABN 70 106 100 252) PO BOX 6097, North Sydney 2059, NSW Australia
Web Support: tempo.org/support
Tempo Help Desk: 1300 112 534 (Aust) (Operating Hours: Mon-Sat 09:00 am to 06:00 pm AEST)

This page has been left blank intentionally.
This page has been left blank intentionally.

natural_image
Icon showing a person reading a book with an exclamation mark symbol (no text or numbers present)Please read the manual
It will help you get the best out of your product.
Still have questions?
Call after sales support
1300 112 534
Or visit www.tempo.org
Warranty returns
Should you for any reason need to return this product for a warranty claim, make sure to include all accessories with the product.
Product does not work?
If you encounter problems with this product, or if it fails to perform to your expectations, make sure to contact our After Sales Support Centre on 1300 112 534 for advice.
Made in China
STIRLING® is a registered trademark of ALDI Stores.
ALDI guarantees that our exclusive brand products are developed to our stringent quality specifications. If you are not entirely satisfied with this product, please return it to your nearest ALDI store within 60 days from the date of purchase for a full refund or replacement, or take advantage of our after sales support by calling the supplier's Customer Service Hotline.
ALDI STORES, 1 SARGENTS ROAD, MINCHINBURY NSW 2770
www.aldi.com.au
For an electronic copy of this manual, please contact our after sales support centre.
Instruction Manual Revision Index
Version No Issue Date Description
V1.0 13 November 2024 Original (2025) release
V1.1 10 December 2024 Minor Changes, p. 15, 17, 24, Product image updated.
- STIRLING®
- L MICROWAVE WITH GRILL FUNCTION
- Welcome
- Contents
- Warranty Details
- General Safety Instructions
- IMPORTANT SAFETY INSTRUCTIONS
- READ CAREFULLY AND KEEP FOR FUTURE REFERENCE
- Precautions to Avoid Possible Exposure to Excessive Microwave Energy
- Precautions to Avoid the Risk of Fire in the Appliance Interior
- General Safety Instructions (Cont.)
- Electrical Safety and Cord Handling
- Usage Conditions and Restrictions
- WARNING: HOT SURFACES! RISK OF BURNS!
- Safe Cooking
- Product Overview
- Scope of delivery
- Microwave with Grill Function
- Documentation (not shown)
- Getting Started
- Before first use
- Unpacking
- Safe packaging disposal
- Check the contents
- Documentation
- Cleaning
- Getting Started (Cont.)
- Installing the turntable
- Installation
- Radio interference
- Utensils guide
- Instructions
- Display screen
- Grill/Combi
- Weight defrost
- Power level
- Jet defrost
- Memory
- Preset
- Number pads
- Auto cook menus
- Clock
- Stop/Cancel
- Quick Start
- Start
- Instructions (Cont.)
- How to set the oven controls
- Setting the clock
- Microwave cooking
- Grill
- Combination
- Multi-stage cooking
- Microwave-cooking (2 min 100%)
- Microwave-cooking (1 min 80%)
- Auto cook
- Child lock
- Cooking Techniques
- FAQs and Troubleshooting Guide
- Other Useful Information
- Cleaning and care
- WARNING!
- Exterior surfaces
- Interior surfaces
- Interior walls and oven door
- Storage
- Other Useful Information (Cont.)
- Service, repair and spare parts
- Compliance
- Responsible disposal
- Repair and Refurbished Goods or Parts Notice
- Warranty returns
- Product does not work?
Brand : Stirling
Model : MGF30L
Category : Microwave