Vision+ N3 NDI - Security Camera Telycam - Free user manual and instructions
Find the device manual for free Vision+ N3 NDI Telycam in PDF.


| Brand | Telycam |
| Model | Vision+ N3 NDI |
| Product Type | Security Camera (NDI PTZ) |
| Sensor | 1/2.8-inch CMOS |
| Resolution | 1920x1080 (Full HD) |
| Lens | Motorized zoom, 4.7-47mm (10x optical) |
| NDI Support | NDI|HX |
| Video Outputs | NDI, HDMI, 3G-SDI, CVBS |
| Audio | Line in/out, built-in microphone |
| Pan Range | ±170° |
| Tilt Range | ±90° |
| Preset Positions | 255 |
| Control Interface | RS-232, RS-422, IR remote |
| Power Supply | PoE+ (IEEE 802.3at) or DC 12V |
| Power Consumption | Max 12W |
| Dimensions (WxHxD) | 200 x 160 x 160 mm |
| Weight | 1.5 kg |
| Mounting | Wall/ceiling mount (included) |
| Protection Rating | IP20 (indoor use) |
| Storage | MicroSD card slot (up to 128GB) |
| Firmware Update | Via network |
| Certifications | CE, FCC |
| Maintenance | Clean lens with soft cloth; keep vents unobstructed |
| Safety | Use only certified power supply; avoid exposure to moisture |
| Spare Parts | Remote control, power adapter, mounting bracket |
| General Information | User manual available for download in PDF format |
Frequently Asked Questions - Vision+ N3 NDI Telycam
User questions about Vision+ N3 NDI Telycam
0 question about this device. Answer the ones you know or ask your own.
Ask a new question about this device
Download the instructions for your Security Camera in PDF format for free! Find your manual Vision+ N3 NDI - Telycam and take your electronic device back in hand. On this page are published all the documents necessary for the use of your device. Vision+ N3 NDI by Telycam.
USER MANUAL Vision+ N3 NDI Telycam
natural_image
Black Telcom video camera with lens and control buttons (no text or symbols on device body)V1.0
CONTENT....1
SAFETY GUIDES 2
USE CHECK 4
PRODUCT HIGHLIGHTS 6
CAMERA SPEC....7
INTERFACE DESCRIPTION ......9
CAMERA DIMENSION ....10
INSTALLATION.... 11
IR REMOTE CONTROLLER.... 13
VISCA IN(RS232 PORT)....15
VISCA PROTOCOL.... 17
PELCO-D PROTOCOL.... 30
PELCO-P PROTOCOL.... 31
OSD MENU 32
UVC CONTROL 36
WEB SETTING ....37
VIEW RTSP VIDEO VIA VLC 45
NDI TOOLS 46
VISCA OVER IP 48
● Before operation, please fully read and follow all instructions in the manual. For your safety, always keep this manual with the camera.
● The camera power voltage is 12V DC, rated currency is 2A. We suggest y use it with the original power supply adapter supplied by the factory.
- Please keep the power cable, video cable and control cable in a safe place. Protect all cables especially the connectors.
● Operational environment: 10^ C\~ 50^ C, humidity less than 80%.
● To avoid any danger, please keep the camera away from the corrosive liqui
● Avoid stress, vibration and damp during transportation, storage and installation.
- Do not remove the camera housing and cover. For any service, please contact authorized technicians.
- Video cable and control cable should be individually shielded, and cannot be substituted with other cables. Do not direct the camera lens towards strong light, such as the sun or the intensive light.
- Use a dry and soft cloth to clean the camera housing. Applied with neutral cleaning agent when there is need to clean. To avoid damage on the camera lens, never use strong or abrasive cleaning agents on the camera housing.
- Do not move the camera by holding the camera head. To avoid mechanical trouble, do not rotate the camera head by hand.
- Put the camera on fixed and smooth desk or platform, avoid leaned installation.
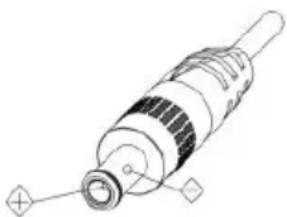
● Power Supply Polarit
natural_image
Technical line drawing of a mechanical component with no visible text or symbolsAttention!
▲ The video quality may be affected by the specific frequencies of electromagnetic field.
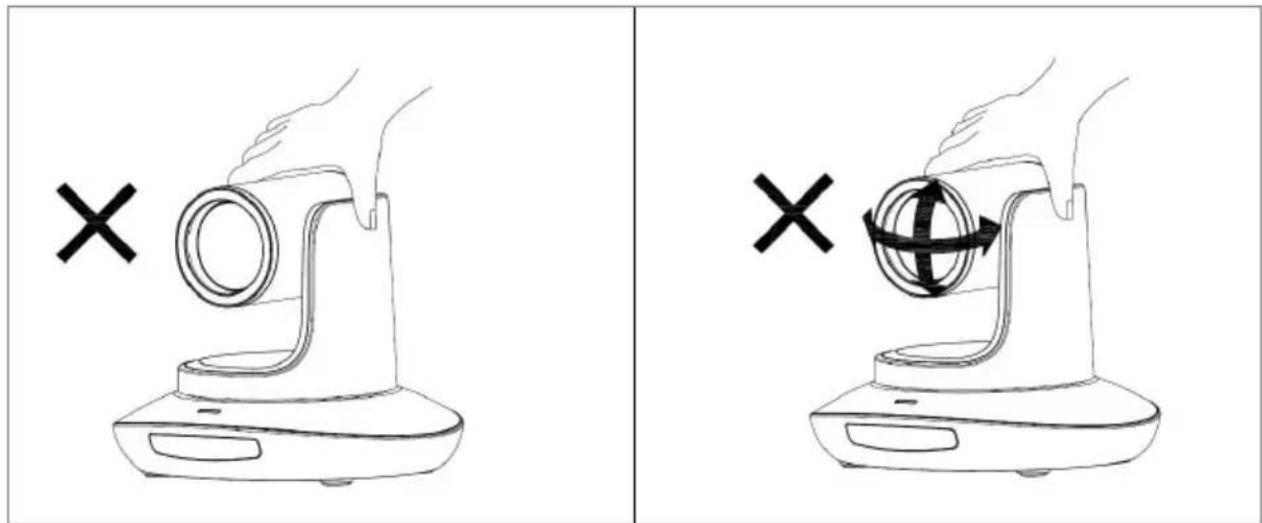
▲ Never grasp the head of the camera, and never move the camera by hand when it is working, otherwise, mechanism maybe destroyed.
Declaration:
■ Instructional Manual is for reference only. Please refer to the actual product.
■ Please contact Customer Service staff for the latest programs and supplementary documentations.
In case of any doubt or dispute in the instruction manual, the final interpretation of the company shall prevail.
USE CHECK
PACKING LIST
Check all below items when open the package
Camera 1PCS
Power Adapter 1PCS
Power Cable 1PCS
Remote Controller 1PCS
USB Type-C Cable 1PCS
RS232 Cable 1PCS
User Manual 1PCS
QC PASS 1PCS
Shock-absorbing Pad 1PCS
QUICK START
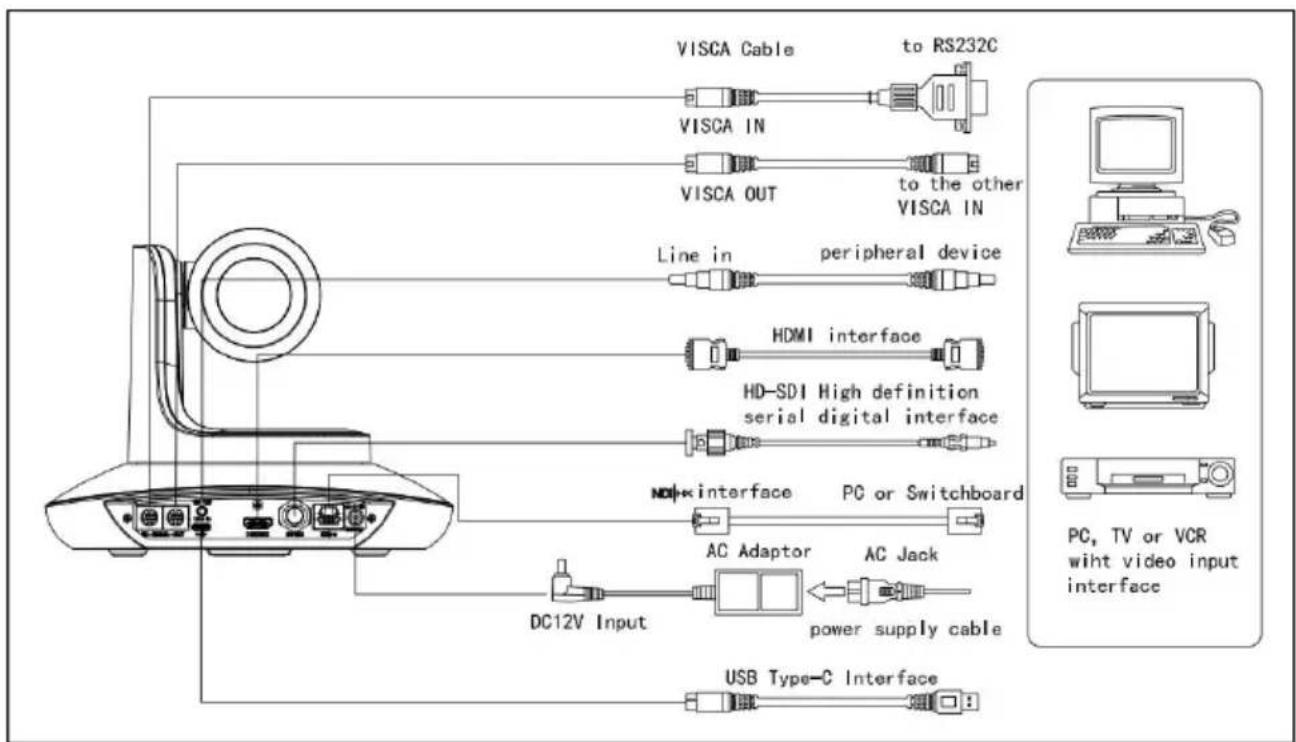
flowchart
graph TD
    A["Device"] --> B["VISCA Cable to RS232C"]
    A --> C["VISCA IN"]
    A --> D["VISCA OUT to the other VISCA IN"]
    A --> E["Line in peripheral device"]
    A --> F["HDMI interface"]
    A --> G["HD-SDI High definition serial digital interface"]
    A --> H["MDI interface PC or Switchboard"]
    A --> I["AC Adaptor AC Jack"]
    A --> J["DC12V Input power supply cable"]
    A --> K["USB Type-C Interface"]
    style A fill:#f9f,stroke:#333
    style B fill:#ccf,stroke:#333
    style C fill:#ccf,stroke:#333
    style D fill:#ccf,stroke:#333
    style E fill:#ccf,stroke:#333
    style F fill:#ccf,stroke:#333
    style G fill:#ccf,stroke:#333
    style H fill:#ccf,stroke:#333
    style I fill:#ccf,stroke:#333
    style J fill:#ccf,stroke:#333
    style K fill:#ccf,stroke:#333
USE CHECK
Dial Switch Setting (at the bottom of the camera)
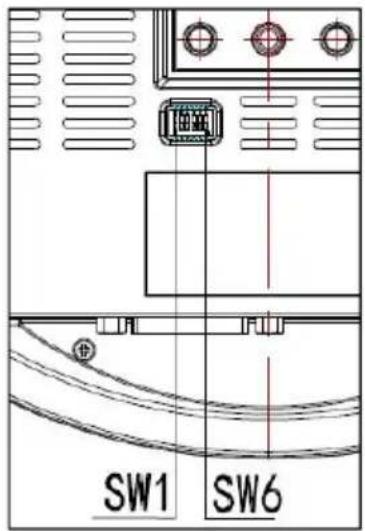
| Dial Switch(ARM) | |||
| SW-1 | SW-2 | Instruction | |
| 1 | OFF | OFF | Upgrading mode |
| 2 | ON | OFF | Debugging mode |
| 3 | OFF | ON | Undefined |
| 4 | ON | ON | Working mode |
| Dial Switch | |||
| SW-3 | SW-4 | Instruction | |
| 1 | OFF | OFF | Reserved |
| 2 | ON | OFF | Reserved |
| 3 | OFF | ON | Reserved |
| 4 | ON | ON | Reserved |
| Dial Switch | |||
| SW-5 | SW-6 | Instruction | |
| 1 | OFF | OFF | Undefined |
| 2 | ON | OFF | Working mode |
| 3 | OFF | ON | Undefined |
| 4 | ON | ON | Undefined |
PRODUCT HIGHLIGHTS
★ Adopting the most advanced image processing DSP, 1/2.8 inch 2.4MP sensor.
★ High-Definition Optical Lens: 20x optical zoom, with 60-degree field of view.
★ FHD 1080P60 video output from ^® HDI (or Ethernet), while supporting H.264, H.265 encoding.
★ Support POE+: one single ethernet cable to get video, control, and power supply
★ Fast video format switch.
★ Special Focusing Algorithm: fast and precise focusing performance when zooming or moving.
★ Unique camera design with patent.
★ Smooth PTZ mechanical design, accurate pan tilt motor control.
★ Support field upgrade, one-click software upgrade through WebUI.
★ Support Line in input.
★ Support NDHX, HDMI, SDI high-quality audio output.
★ NDHX, HDMI, SDI, USB Type-C outputs, fit for different scenarios.
★ Standard VISCA, PELCO-D, PELCO-D control protocol, quickly set up through OSD menu.
★ Support Auto-Tracking and lock the first person captured by the camera.
★ Supplied with multi-functional IR remote controller, can set IP address via OSD menu.
★ Standard Sony VISCA over IP protocol, support network video and control transmission simultaneously.
★ Support SRT protocol for secure transmission of high-quality, low-latency video over WANs.
★ Support for the latest 📄DHX3, easy plug and play for live streaming.
★ Support RTMP protocol directly streaming to Youtube Live, Facebook Live and other platform.
★ Support Auto tracking.
★ Multi language menu: support Chinese, English and Russian.
| Vision+ N3 20X | ||
| Sensor | 1/2.8inch high quality, 2.4 MP CMOS Sensor | |
| Video Format | HDMI | 1920*1080P60/59.94/50/30/29.97/25/24/23.981920*1080I60/59.94/501280*720P60/59.94/50/30/29.97/25 |
| SDI | 1920*1080P60/59.94/50/30/29.97/25/24/23.981920*1080I60/59.94/501280*720P60/59.94/50/30/29.97/25 | |
| USB | MJPEG, H.264, HEVC: 1920*1080P60;1280*720P60; 1024*576P60; 800*448P60NV12, YUY2: 1920*1080P5; 1280*720P15;1024*576P25; 800*448P30 | |
| IP(NDI®|HX) | 1920*1080P15~60; 1280*720P15~60;1024*576P15~60; 640*360P30 | |
| Video Interface | HDMI, SDI, RJ45(NDI®|HX), USB Type-C | |
| Audio Interface | 3.5mm Line in | |
| Focal Length | 4.9mm~98mm | |
| Lens magnifications | 20X optical zoom + 4X digital zoom | |
| Aperture | F1.5~3 | |
| View Angel | 60°(Wide)~3.2°(Tele) | |
| Rotation Angle | Pan: ±170°; Tilt: -30°~+90°; | |
| Rotation Speed | Pan: 0.1°~120°/s; Tilt: 0.1°~80°/s | |
| Preset | Remote controller: 10; RS232: 128; Accuracy: 0.1° | |
| Control Port | RS232 IN, RJ45(NDI®|HX) | |
| Network Speed | 1000M | |
| Video encode | H.264 / H.265 | |
| Bit Rate Contro | Variable Bit Rate, Constant Bit Rate | |
| Video Bit Rate | 1024~61440kbps | |
| Protocol | HTTP, RTSP, RTMP, ONVIF, Visca TCP, Visca UDP, Visca oNDI®|HX, Visca Serial, Pelco-P, Pelco-D | |
CAMERA SPEC
| POE+ | Supported |
| Daisy Chain | Support RS232 serial daisy chain |
| Minimum Lux | 0.7lux |
| White Balance | Auto / Manual / ATW / Push / Indoor / Outdoor / Color Tem |
| Exposure | Auto / Manual / Iris / Bright |
| Focus | Auto / Manual |
| Iris | Auto / Manual |
| Shutter | Auto / Manual |
| Auto Track | Supported |
| Gamma select | Supported |
| BLC | Supported |
| 2D Noise Reduction | Supported |
| 3D Noise Reduction | Supported |
| Anti-flicker | OFF, 50Hz, 60Hz |
| Pan Tilt Flip | Supported |
| Mirroring | Supported |
| Input Voltage | DC12V/POE+(IEEE802.3at) |
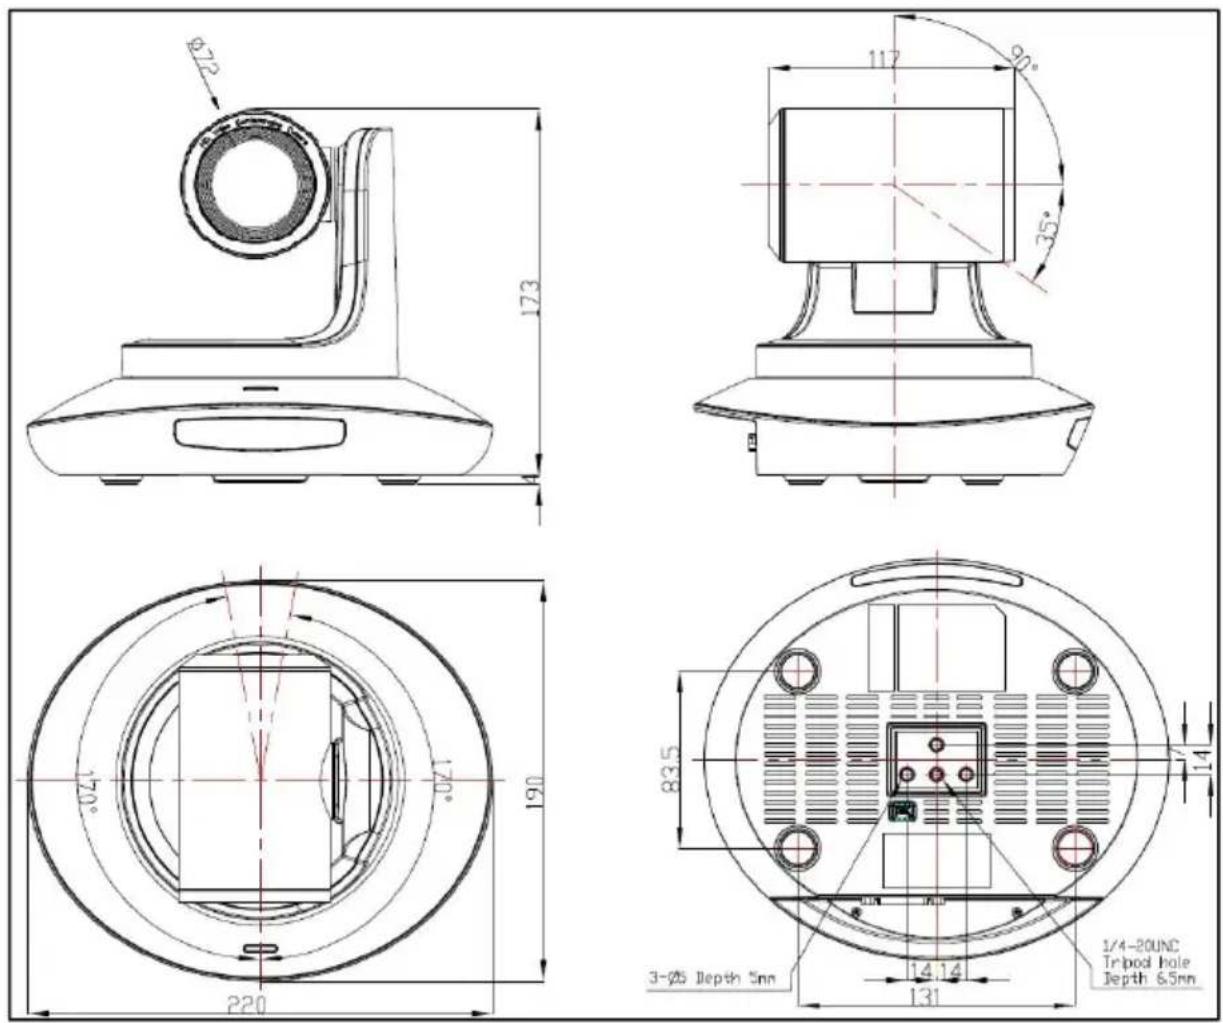
| Dimension | 220mm×190mm×173mm |
| Net Weight | 1.35kg |
| Working Temperature | -10°C~50°C |
| Working Humidity | ≤80% |
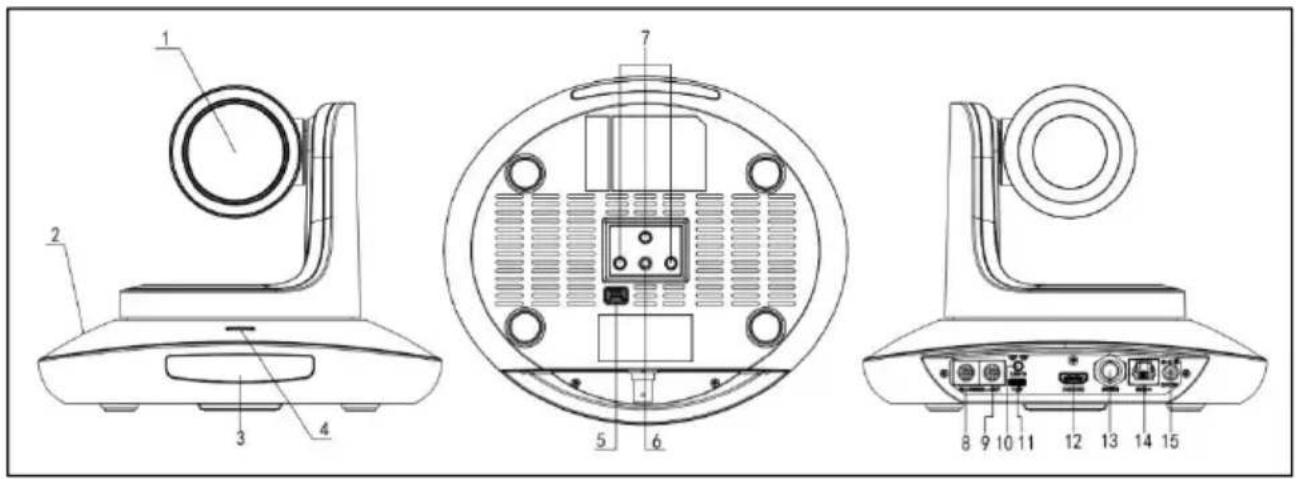
- Camera Lens
- Camera Base
3.IR Receiver Panel
4.Power Indicator Light - Dial Switch
6.Tripod Screw Hole
7. Installation Hole
8.RS232 ((IN) port
9.RS232 (OUT) port
10.Line in port
11.USB Type-C port
12.HDMI port
13.3G-SDI port
14.RJ45(NDI®|HX) port
15.DC 12V plug
Wall-Mount Installation:
![1.Drill the hole on the wall referring to the wall mounting bracket hole position, hole diameter of Φ6mm, position the four Φ6mm plastic expansion screws in the drilled hole. 2.Use four M4×30mm self-tapping screws to mount the wall-mount bracket on the wall. 3.Fix the lower cover of the bracket to the base of the camera with imperial screws (size 1/4-20UN[×3/8]). Note: A layer of the silicone shock-absorbing pad should be positioned between the camera base and the bracket.(It is included in the package.) 3. Use four M4×30mm self-tapping screws to mount the wall-mount bracket on the wall.](/content/2026/05/913525/images/75937edb55dc6676919e3752c36c0fa91b415f4cff1efd46c2432463e9cc812f.jpg)
- Drill the hole on the wall referring to the wall mounting bracket hole position hole diameter of 6mm , position the four 6mm plastic expansion screws in the drilled hole.
- Use four M4*30 self-tapping screws to mount the wall-mount bracket on the wall.
- Fix the lower cover of the bracket to the base of the camera with imperial screws (SIZE 1/4-20UNC*3/8)
Note: A layer of silicone shock-absorbing pad should be positioned between the camera base and the bracket. (It is included in the package)
Ceiling-Mount Installation :
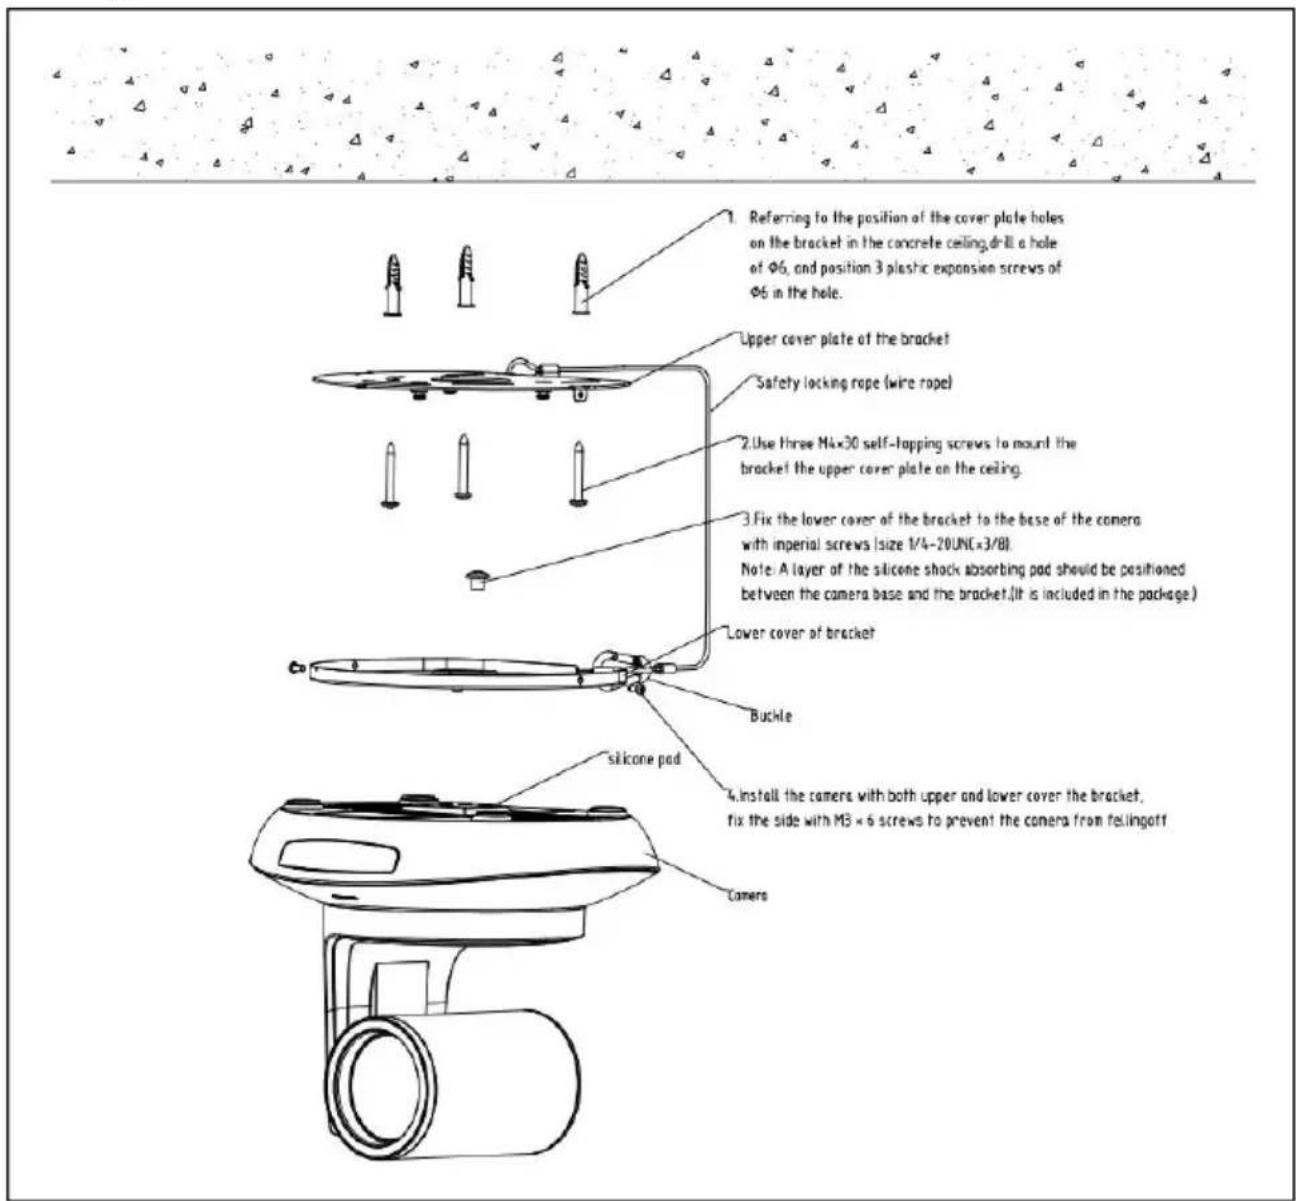
- Referring to the position of the cover plate holes on the bracket in the concrete ceiling, drill a hole of 6 , and position 3 plastic expansion screws of 6 in the hole.
- Use three M4*30 self-tapping screws to mount the bracket the upper cover plate on the ceiling.
- Fix the lower cover of bracket to the base of the camera with imperial screws (Size 1/4-20UNC*3/8)
Note: A layer of silicone shock-absorbing pad should be positioned between the camera base and the bracket. (It is included in the package).
- Install the camera with both upper and lower cover of the bracket, fix the side with M3*6 screws to prevent the camera from falling off.
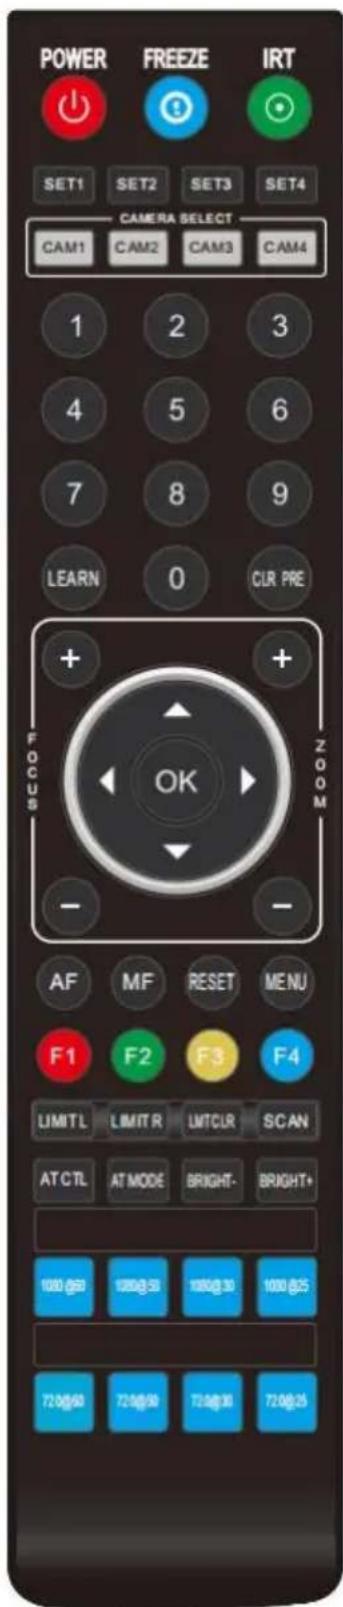
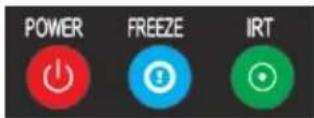
POWER
Short press POWER key to enter standby mode from normal working mode. Press it again, the camera will do self-checking, then go back to HOME position. It will go to preset position if power on mode has been set before.
FREEZE
Short press FREEZE key to freeze/unfreeze the image.
IRT (IR Transfer/IR Pass)
Open/Close the IR pass function. Once press the IRT key, the camera will receive and pass the IR remote control signal to the codec/terminal.(via VISCA IN port)
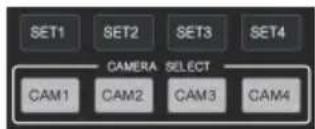
Set 1 \~ Set 4 ADDRESS SETTING
Long press for 3 seconds until the key light ON, to set camera address.
CAM1 \~ CAM4 (CAMERA SELETING)
Short press to select the relative camera.
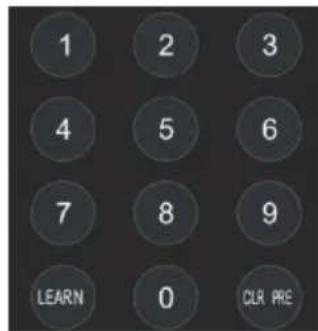
NUMBER KEY (1-9)
Set Preset: Long press the number key (3 seconds) to set preset.
Run Preset: Short press the number key to run preset.
CLR PRE (CLEAR PRESET)
CLR PRE+number key: to clear the relative preset.
Long press to clear all presets.
VISCA IN (RS232 PORT)
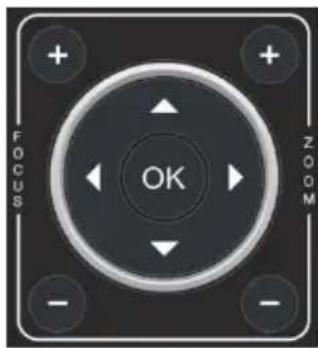
FOCUS KEY: +/-
Manual focus, only valid under manual focus mode.
ZOOM KEY: +/-
Set the Zoom rate.
Under working mode, use navigate key to set the pair and select menu when enter OSD.
OK/ HOME KEY: Under working mode, short pres OK to make the camera go back to HOME position; when enter OSD.
natural_image
Close-up of a black remote control knob with directional arrows and 'OK' text (no readable symbols or text beyond basic markings)and confirm the selection
AF/MF: AUTO FOCUS/ MANUAL FOCUS
RESET: Press 3 seconds to reset camera.
MENU: Enter OSD menu under working mode. Use as Go-Back function after entering the menu.
F1: F1+OK: Aging mode (Factory debug use only).
F2: LEARN+F2+1: Calibration mode (Factory debug use only).
F3: Short press: One-touch white balance. (You need to set the white balance mode in the menu to PUSH mode.)
F4: Reserved.
LIMIT L/ LIMIT R/ LIMIT CLR:
LEARN+LIMIT L: Set the pan tilt left limit position.
LEARN+LIMIT R: Set the pan tilt right limit position.
LEARN+LIMIT CLR: Clear the limit position.


AT CTL: To turn off/on the auto tracking.
AT MODE: Select auto tracking mode. (left/ middle/ right)
BRIGHT-/ BRIGHT+: Set image brightness, only valid under bright priority exposure mode.
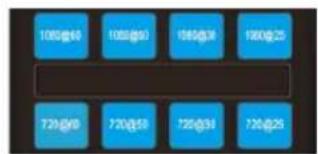
VIDEO FORMAT KEYS:
Long press 3 seconds to select different video format output.
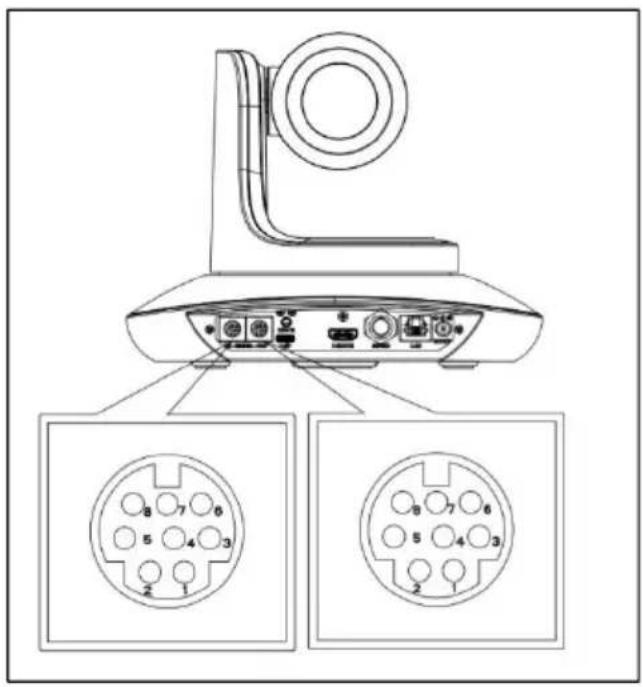
| NO. | V_IN | V_OUT |
| 1 | DTR | DTR |
| 2 | DSR | DSR |
| 3 | TXD | TXD |
| 4 | GND | GND |
| 5 | RXD | RXD |
| 6 | A | |
| 7 | IR | |
| 8 | B |
| V_IN | RS485 |
| 1 | |
| 2 | |
| 3 | |
| 4 | |
| 5 | |
| 6 | A(+) |
| 7 | IR |
| 8 | B(-) |
VISCA IN 与 Mini DIN
| Camera VISCA IN | Mini DIN | ||
| 1 | DTR | 1 | DSR |
| 2 | DSR | 2 | DTR |
| 3 | TXD | 5 | RXD |
| 4 | GND | 4 | GND |
| 5 | RXD | 3 | TXD |
| 6 | A(+) | 6 | NC |
| 7 | IR OUT | 7 | NC |
| 8 | B(-) | 8 | NC |
VISCA IN 与 DB9 Connection
| CameraVISCA IN | Windows DB-9 | ||
| 1 | DTR | 6 | DSR |
| 2 | DSR | 4 | DTR |
| 3 | TXD | 2 | RXD |
| 4 | GND | 5 | GND |
| 5 | RXD | 3 | TXD |
| 6 | A(+) | ||
| 7 | IR OUT | ||
| 8 | B(-) | ||
VISCA Network Construction:
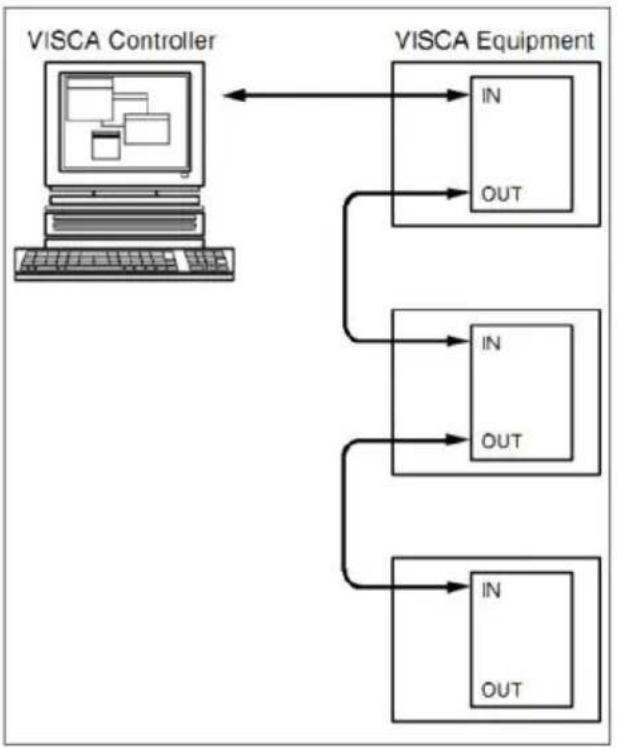
flowchart
graph TD
    A["VISCA Controller"] --> B["VISCA Equipment"]
    B --> C["IN"]
    B --> D["OUT"]
    C --> E["IN"]
    C --> F["OUT"]
    D --> G["IN"]
    D --> H["OUT"]
SERIAL PORT CONFIGURATION:
| Parameter | Value |
| Baud rate | 2400/4800/9600/115200 |
| Start bit | 1bit |
| Date bit | 8bits |
| Stop bit | 1bit |
| Check bit | None |
Part1 Camera Return Command
| Ack/Completion Message | ||
| command | Note | |
| ACK | z0 41 FF | Returned when the command is accepted. |
| Completion | z0 51 FF | Returned when the command has been executed. |
| Error Messages | ||
| command | Note | |
| Syntax Error | z0 60 02 FF | Returned when the command format is different or when a command with illegal command parameters is accepted. |
| Command Not Executable | z0 61 41 FF | Returned when a command cannot be executed due to current conditions. For example, when commands controlling the focus manually are received during auto focus. |
Part2 Camera Control Command
| Command type | function | command | |
| Address Set | Broadcast | 88 30 01 FF | Address setting |
| IF_Clear | Broadcast | 88 01 00 01 FF | I/F Clear |
| Command Cancel | 8x 21 FF | ||
| CAM_Power | On | 8x 01 04 00 02 FF | Power ON/OFF |
| Off | 8x 01 04 00 03 FF | Address setting | |
| CAM_Zoom | Stop | 8x 01 04 07 00 FF | |
| Tele(Standard) | 8x 01 04 07 02 FF | ||
| Wide(Standard) | 8x 01 04 07 03 FF | ||
| Tele(Variable) | 8x 01 04 07 2p FF | p = 0(low)~7(high) | |
| Wide(Variable) | 8x 01 04 07 3p FF | ||
| Direct | 8x 01 04 47 0p 0q 0r 0s FF | pqrs: Zoom Position (0(wide) ~0x4000(tele)) | |
| Direct with speed | 8x 0A 04 47 0t 0p 0q 0r 0s | t: spd 0~7pqrs: Zoom Position (0(wide) ~0x4000(tele)) | |
| CAM_DZoom | ON | 8x 01 04 06 02 FF | |
| OFF | 8x 01 04 06 03 FF | ||
| Combine Mode | 8x 01 04 36 00 FF | Combine with optical | |
| Separate Mode | 8x 01 04 36 01 FF | Separate with optical | |
| Stop | 8x 01 04 06 00 FF | Enable In separate mode | |
| Tele (Variable) | 8x 01 04 06 2p FF | Enable In separate mode | |
| Wide (Variable) | 8x 01 04 06 3p FF | Enable In separate mode | |
| Direct | 8x 01 04 46 0p 0q 0r 0s F | Enable In separate mode | |
| CAM_Focus | Stop | 8x 01 04 08 00 FF | |
| Far(Standard) | 8x 01 04 08 02 FF | ||
| Near(Standard) | 8x 01 04 08 03 FF | ||
| Far (Variable) | 8x 01 04 08 2p FF | p=0 (Low) to 7 (High) | |
| Near (Variable) | 8x 01 04 08 3p FF | p=0 (Low) to 7 (High) | |
| Direct | 8x 01 04 48 0p 0q 0r 0s F | pqrs: Focus Position | |
| Auto Focus | 8x 01 04 38 02 FF | ||
| Manual Focus | 8x 01 04 38 03 FF | ||
| One Push AF | 8x 01 04 18 01 FF | ||
| CAM_Zoom Focus | Direct | 8x 01 04 47 0p 0q 0r 0s 0v 0w FF | pqrs: Zoom Position(0(wide)~ 0x4000(tele))tuvw: Focus Position |
| CAM_WB | Auto | 8x 01 04 35 00 FF | |
| Indoor | 8x 01 04 35 01 FF | ||
| Outdoor | 8x 01 04 35 02 FF | ||
| One Push | 8x 01 04 35 03 FF | ||
| ATW | 8x 01 04 35 04 FF | ||
| Manual | 8x 01 04 35 05 FF | ||
| One Push Trigger | 8x 01 04 10 05 FF | ||
| CAM_R Gain | Reset | 8x 01 04 03 00 FF | Manual Control of R Gai |
| Up | 8x 01 04 03 02 FF | ||
| Down | 8x 01 04 03 03 FF | ||
| Direct | 8x 01 04 43 00 00 0p 0q F | pq: R Gain (0~0xFF) | |
| CAM_B Gain | Reset | 8x 01 04 04 00 FF | Manual Control of B Gai |
| Up | 8x 01 04 04 02 FF | ||
| Down | 8x 01 04 04 03 FF | ||
| Direct | 8x 01 04 44 00 00 0p 0q F | pq: B Gain (0~0xFF) | |
| CAM_AE | Full Auto | 8x01 04 39 00 FF | Automatic Exposure mode |
| Manual | 8x 01 04 39 03 FF | Manual Control mode | |
| Shutter Priority | 8x 01 04 39 0A FF | Shutter PriorityAutomatic Exposure mode | |
| Iris Priority | 8x 01 04 39 0B FF | Iris Priority AutomaticExposure mode | |
| Bright | 8x 01 04 39 0D FF | Bright Mode (Manualcontrol) | |
| CAM_Shutter | Reset | 8x 01 04 0A 00 FF | Shutter Setting |
| Up | 8x 01 04 0A 02 FF | ||
| Down | 8x 01 04 0A 03 FF | ||
| Direct | 8x 01 04 4A 00 00 0p 0q F | pq: Shutter Position (0~0x15) | |
| CAM_Iris | Reset | 8x 01 04 0B 00 FF | Iris Setting(0~0xD) |
| Up | 8x 01 04 0B 02 FF | ||
| Down | 8x 01 04 0B 03 FF | ||
| Direct | 8x 01 04 4B 00 00 0p 0q F | pq: Iris Position (0~0x11) | |
| CAM_Gain | Reset | 8x 01 04 0C 00 FF | Gain Setting (0~0x0F) |
| Up | 8x 01 04 0C 02 FF | ||
| Down | 8x 01 04 0C 03 FF | ||
| Direct | 8x 01 04 0C 00 00 0p 0q F | pq: Gain Positon (0~0x0E) | |
| GainLimit | 8x 01 04 2C 0p FF | p:GainLimit 0x04~0x0F | |
| CAM_AEBright | Reset | 8x 01 04 0D 00 FF | Bright Setting |
| Up | 8x 01 04 0D 02 FF | ||
| Down | 8x 01 04 0D 03 FF | ||
| Direct | 8x 01 04 4D 00 00 0p 0q F | pq: Bright 1 Positon (0~0x1B) | |
| CAM_ImageBright | Direct | 8x 01 04 A4 00 00 0p 0q F | pq: Image Bright Positon (0~0x0F)AE_AUTO/AE_SHUTTER/AE_IRIS |
| CAM_WDR | On | 8x 01 04 3D 02 FF | Exposure Compensation ON/OFF |
| Off | 8x 01 04 3D 03 FF | ||
| Direct | 8x 01 04 D3 pq FF | pq: ExpComp Position (0~0x6) | |
| CAM_Back Light(BLC) | On | 8x 01 04 33 02 FF | BackLight On |
| Off | 8x 01 04 33 03 FF | BackLight Off | |
| CAM_Shardness | Reset | 8x 01 04 02 00 FF | Aperture Control |
| Up | 8x 01 04 02 02 FF | ||
| Down | 8x 01 04 02 03 FF | ||
| Direct | 8x 01 04 42 00 00 0p 0q F | pq: Aperture Gain (0~0x0F) | |
| CAM_Memory(preset) | Reset | 8x 01 04 3F 00 pp FF | pp: Preset Number(=0 to 127) |
| Set | 8x 01 04 3F 01 pp FF | ||
| Recall | 8x 01 04 3F 02 pp FF | ||
| CAM_MemoryH (preset) | Reset | 8x 01 04 3F 00 0p 0p FF | pp: Preset Number(=0 to 255)Corresponds to 0 to 9 or the Remote Commander |
| Set | 8x 01 04 3F 01 0p 0p FF | ||
| Recall | 8x 01 04 3F 02 0p 0p FF | ||
| Freeze | Set | 8x 01 04 75 0p FF | p: Freeze switch 3=OFF 2=ON |
| Preset Freeze Set | Set | 8x 01 04 76 0p FF | p: Preset Freeze switch 3= OFF 2=ON |
| Preset Speed Set | Set | 8x 01 7E 01 0B 00 qq FF | qq:Preset speed 2~24 default:15 |
| Preset Speed Adj | adj | 8x 01 7E 01 1B 0p FF | p: direction adjustment 3= down 2=up |
| CAM_LR_Reverse | On | 8x 01 04 61 02 FF | Image Flip Horizontal ON/OFF |
| Off | 8x 01 04 61 03 FF | ||
| CAM_Picture Flip | On | 8x 01 04 66 02 FF | Image Flip Vertical ON/OFF |
| Off | 8x 01 04 66 03 FF | ||
| CAM_RS485Ctl | On | 8x 01 06 A5 02 FF | |
| Off | 8x 01 06 A5 03 FF | ||
| CAM_Saturation | Saturation | 8x 01 04 A1 00 00 0p 0q F | pq:saturation level 0x00~0x0f |
| CAM_Contrast | Contrast | 8x 01 04 A2 00 00 0p 0q F | pq:Contrast level 0x00~0x0f |
| CAM_Speed By Zoom | On | 8x 01 06 A0 02 FF | |
| Off | 8x 01 06 A0 03 FF | ||
| CAM_PT Speed | PT Speed | 8x 01 04 C1 00 00 0p 0q F | pq:PT speed 0x05~0x18 |
| CAM_Zoom Speed | Zoom Speed | 8x 01 04 D1 00 00 0p 0q F | pq:Zoom speed 0x01~0x07 |
| CAM_Zoom Display | On | 8x 01 06 C2 02 FF | |
| Off | 8x 01 06 C2 03 FF | ||
| CAM_Freeze | Freeze | 8x 01 04 75 0p FF | p: Freeze switch 3=OFF, 2=ON |
| CAM_Preset Freeze Set | Preset Freeze Set | 8x 01 04 76 0p FF | p: Preset Freeze switch 3=OFF, 2=ON |
| CAM_Preset PT Speed Set | Preset PT Speed Set | 8x 01 7E 01 0B 00 qq FF | qq:Preset PT Speed 02~24 default:15 |
| CAM_Preset Zoom Speed Set | Preset Zoom Speed Set | 81 01 7E 01 2B 00 qq FF | qq: Preset Zoom Speed 01~07 default:5 |
| CAM_Preset Speed Adj | Preset Speed Adj | 8x 01 7E 01 1B 0p FF | p: Adjustment of direction 3=down, 2=up |
| CAM_IR address | IR address | 8x 01 06 D8 0p FF | p: IR address 1~4 |
| CAM_Gamma | Gamma set | 8x 01 04 5B 0p FF | P: Gamma NO. (0~4) |
| CAM_2D Noise Reduction | Direct | 8x 01 04 A5 0p FF | (0~0x01) |
| CAM_3D Noise Reduction | Direct | 8x 01 04 53 0p FF | (0~0x05) |
| CAM_AT_OnOff | Direct | 8x 01 04 C8 0p FF | P: 0 = off1 = on |
| CAM_AT_TargetChange | Target change | 8x 01 04 CA 0p FF | P:0x02 right moveP:0x03 left move |
| CAM_TargetLocation | Target location | 8x 01 04 CB 0p FF | P: 0:mid 1:left2:right |
| CAM_TargetRatio | Target ratio | 8x 01 04 CC 0p 0q FF | Pq:(6~20)Human is 1/pq in the pic |
| CAM_AT_ChangeTime | Direct | 8x 01 04 CD 0p 0q FF | pq: t*10 |
| CAM_AT_BlackBoardMode | Direct | 8x 01 04 CE 0p FF | p: 1=Enable 0=Disable |
| CAM_AT_HilightTarget | Direct | 8x 01 04 CF 0p FF | p: 1=Enable 0=Disable |
| CAM_AT_LeftUp_Limit(preset#251) | Direct | 8x 01 04 3F 0p 0F 0B FF | p: 1=Set 2=Call 3=Clear |
| CAM_AT_RightDown_Limit(preset#253) | Direct | 8x 01 04 3F 0p 0F 0D FF | p: 1=Set 2=Call 3=Clear |
| CAM_AT_InitialPosition(preset#255) | Direct | 8x 01 04 3F 0p 0F 0F FF | p: 1=Set 2=Call 3=Clear |
| CAM_AT_BlackBoard Position(preset#252) | Direct | 8x 01 04 3F 0p 0F 0C FF | p: 1=Set 2=Call 3=Clear |
| CAM_AT_ZoomLock | Direct | 8x 01 04 D6 0p FF | p: 1=Enable 0=Disable |
| CAM_AT_LimitEnable | Direct | 8x 01 04 D7 0p FF | p: 1=Enable 0=Disable |
| CAM_AudioSet | Direct | 8x 01 04 D8 0p 0q 0r 0s 0m 0n 0h 0i 0j FF | 0p: 0x01-ON 0x00-OFF0q: 0x01-line inrstu: sampleratemn: volume 0~100h: encode mode4: LPCM 5: ACCij: bitrate*1000 |
| FLICK | 50HZ | 8x 01 04 23 01 FF | |
| 60HZ | 8x 01 04 23 02 FF | ||
| OFF | 8x 01 04 23 00 FF | ||
| Video System Set(Factory) | 8x 01 06 35 00 pp FF | pp: Video format1080P60 0x001080P50 0x011080I60 0x021080I50 0x031080P30 0x041080P25 0x05720P60 0x06720P50 0x07720P30 0x08720P25 0x091080P5994 0x0E1080I5994 0x0F1080P2997 0x10720P5994 0x13720P2997 0x141080P24 0x111080P2398 0x12 | |
| Video System Set(Sony) | 8x 01 04 24 72 0p 0q FF | pq: Video format1080P60 0x2e1080P50 0x2f1080I60 0x011080I50 0x041080P30 0x061080P25 0x08720P60 0x09720P50 0x0c720P30 0x0e720P25 0x111080P5994 0x131080I5994 0x021080P2997 0x07720P5994 0x0a720P2997 0x0f1080P24 0x2a1080P2398 0x2b | |
| CAM_ID Write | 8x 01 04 22 0p 0q 0r 0s FF | pqrs: Camera ID (=0000 to FFFF) | |
| DHCP control | DHCP off | 8x 01 04 AE 00 FF | DHCP off |
| DHCP on | 8x 01 04 AE 01 FF | DHCP on | |
| IP address control | IP set | 8x 01 04 AB 0p 0q 0r 0s 0n 0x 0y FF | Set ip to: pq.rs.mn.xy |
| Mask set | 8x 01 04 AC 0p 0q 0r 0s 0n 0x 0y FF | Set mask to: pq.rs.mn.xy | |
| Gateway set | 8x 01 04 AD 0p 0q 0r 0s 0n 0x 0y FF | Set gateway to :pq.rs.mn.xy | |
| Mainstream | resolution | 8x 01 04 C2 00 0p 0q 0r 0n 0x 0y FF | pqrs : Column(x size)mnxy: Line (y size)only support:1920*10801280*7201024*576 |
| rate | 8x 01 04 C2 01 0p 0q 0r 0n 0x 0y FF | pqrsmnxy: bitrate(1024~61440kbps) | |
| Encode Mode | 8x 01 04 C2 02 0p 0q FF | Mode sel: 0xpq0x00: h2640x01: h265 | |
| Frame Rate | 8x 01 04 C2 03 0p 0q FF | Frame rate: 0xpq(15~60) | |
| IDR | 8x 01 04 C2 04 0p 0q FF | IDR Setting: 0xpq(1~120) | |
| Stream Rate Mode | 8x 01 04 C2 05 0p 0q FF | Contor mode: 0xpq0x00: CBR0x01: VBR | |
| Sub stream | resolution | 8x 01 04 C3 00 0p 0q 0r 0n 0x 0y FF | pqrs : Column(x size)mnxy: Line (y size)only support:640*360 |
| rate | 8x 01 04 C3 01 0p 0q 0r 0n 0x 0y FF | pqrsmnxy: bitrate(1024~20480kbps) | |
| Encode Mode | 8x 01 04 C3 02 0p 0q FF | Mode sel: 0xpq0x00: h2640x01: h265 | |
| Frame Rate | 8x 01 04 C3 03 0p 0q FF | Frame rate: 0xpq(15~60) | |
| IDR | 8x 01 04 C3 04 0p 0q FF | IDR Setting: 0xpq(1~120) | |
| Stream Rate Mode | 8x 01 04 C3 05 0p 0q FF | Contor mode: 0xpq0x00: CBR0x01: VBR | |
| SYS_Menu | Menu On | 8x 01 06 06 02 FF | Turn on the menu |
| Menu Off | 8x 01 06 06 03 FF | Turn off the menu | |
| Menu Back | 8x 01 06 06 10 FF | Menu step back | |
| Menu OK | 8x 01 7E 01 02 00 01 FF | Menu ok | |
| IR_Receive | On | 8x 01 06 08 02 FF | IR(remote commander)receive ON/OFF |
| Off | 8x 01 06 08 03 FF | ||
| On/Off | 8x 01 06 08 10 FF | ||
| Tally control | Tally on/off | 8x 01 7E 01 0A 00 0p FF | p: 0: OFF(LED off)1: (LED green on)2: (LED red on)4: (LED blue on) |
| Pan_tilt Drive | Up | 8x 01 06 01 VV WW 03 0 | VV: Pan speed 0x01 (low speed) to 0x18 (high speed)WW: Tilt speed 0x01 (low speed) to 0x14 (high speed)YYYY: Pan Position(TBD)ZZZZ: Tilt Position(TBD) |
| Down | 8x 01 06 01 VV WW 03 0 | ||
| Left | 8x 01 06 01 VV WW 01 0 | ||
| Right | 8x 01 06 01 VV WW 02 0 | ||
| Up left | 8x 01 06 01 VV WW 01 0 | ||
| Up right | 8x 01 06 01 VV WW 02 0 | ||
| Down Left | 8x 01 06 01 VV WW 01 0 | ||
| Down Right | 8x 01 06 01 VV WW 02 0 | ||
| Stop | 8x 01 06 01 VV WW 03 0 | ||
| Absolute Position | 8x 01 06 02 VV WW 0Y 0Y 0Y 0Z 0Z 0Z 0Z FF | ||
| Relative Position | 8x 01 06 03 VV WW 0Y 0Y 0Y 0Z 0Z 0Z 0Z FF | ||
| Home | 8x 01 06 04 FF | ||
| Reset | 8x 01 06 05 FF | ||
| Pan-tilt Limit Set | Set | 8x 01 06 07 00 0W0Y 0Y 0Y 0Y 0Z 0Z 0Z 0Z | W: 1: Up Right0: Down LeftYYYY: Pan Limit Position(TBD)ZZZZ: Tilt Limit Position(TBD) |
| Clear | 8x 01 06 07 01 0W07 0F 0F 0F 07 0F 0F 0F |
Part3 Camera Inquiry Command
| Command type | command | return | note |
| CAM_Power Inq | 8x 09 04 00 FF | y0 50 02 FF | On |
| y0 50 03 FF | Off(Standby) | ||
| CAM_Zoom Pos Inq | 8x 09 04 47 FF | y0 50 0p 0q 0r 0s FF | pqrs: Zoom Position |
| CAM_DZoom On Off Inq | 8x 09 04 06 FF | y0 50 0p FF | p: 2: ON 3: OFF |
| CAM_PT Speed Inq(IR) | 8x 09 04 C1 FF | y0 50 pp FF | pp: 0x05~0x18 |
| CAM_Zoom Speed Inq(IR) | 8x 09 04 D1 FF | y0 50 0p FF | p:0x00~0x07 |
| CAM_Focus Mode Inq | 8x 09 04 38 FF | y0 50 02 FF | Auto Focus |
| y0 50 03 FF | Manual Focus | ||
| CAM_Focus Pos Inq | 8x 09 04 48 FF | y0 50 0p 0q 0r 0s FF | pqrs: Focus Position |
| CAM_2D_Inq | 8x 09 04 A5 FF | y0 50 03 FF | (0~0x01)p: 0: off 1: on |
| CAM_3D_Inq | 8x 09 04 53 FF | y0 50 03 FF | (0~0x05)p:0:off 1: auto2~5: noise level |
| CAM_WB Mode Inq | 8x 09 04 35 FF | y0 50 00 FF | Auto |
| y0 50 01 FF | Indoor mode | ||
| y0 50 02 FF | Outdoor mode | ||
| y0 50 03 FF | OnePush mode | ||
| y0 50 04 FF | ATW | ||
| y0 50 05 FF | Manual | ||
| CAM_RGain Inq | 8x 09 04 43 FF | y0 50 00 00 0p 0q FF | pq: R Gain |
| CAM_BGain Inq | 8x 09 04 44 FF | y0 50 00 00 0p 0q FF | pq: B Gain |
| CAM_Saturation Inq | 8x 09 04 A1 FF | y0 50 00 00 0p 0q FF | pq: saturation |
| CAM_Contrast Inq | 8x 09 04 A2 FF | y0 50 00 00 0p 0q FF | pq: contrast |
| CAM_AE Mode Inq | 8x 09 04 39 FF | y0 50 00 FF | Full Auto |
| y0 50 03 FF | Manual | ||
| y0 50 0A FF | Shutter priority | ||
| y0 50 0B FF | Iris priority | ||
| y0 50 0D FF | Bright | ||
| CAM_Flicker Mode Inq | 8x 09 04 AA FF | y0 50 0p FF | p: 0: OFF1: 50HZ2: 60HZ |
| CAM_Shutter Pos Inq | 8x 09 04 4A FF | y0 50 00 00 0p 0q FF | pq: Shutter Position |
| CAM_Iris Pos Inq | 8x 09 04 4B FF | y0 50 00 00 0p 0q FF | pq: Iris Position |
| CAM_Gain Posi Inq | 8x 09 04 4C FF | y0 50 00 00 0p 0q FF | pq: Gain Position |
| CAM_Bright Posi Inq | 8x 09 04 4D FF | y0 50 00 00 0p 0q FF | pq: Bright Position |
| CAM_WDR Mode Inq | 8x 09 04 3D FF | y0 50 02 FF | On |
| y0 50 03 FF | Off | ||
| CAM_Pre PT Speed Inq | 8x 09 7E 01 0B FF | y0 50 pp FF | pp: 0x05~0x18 |
| CAM_Pre Zoom Speed Inq | 8x 09 7E 01 2B FF | y0 50 pp FF | pp: 0x01~0x07 |
| SYS_Menu Mode Inq | 8x 09 06 06 FF | y0 50 02 FF | On |
| y0 50 03 FF | Off | ||
| CAM_LR_Reverse Inq | 8x 09 04 61 FF | y0 50 02 FF | On |
| y0 50 03 FF | Off | ||
| CAM_Picture Flip Inq | 8x 09 04 66 FF | y0 50 02 FF | On |
| y0 50 03 FF | Off | ||
| CAM_ID Inq | 8x 09 04 22 FF | y0 50 0p 0q 0r 0s FF | pqrs: Camera ID |
| CAM_DHCP Inq | 8x 09 04 AE FF | y0 50 pp FF | |
| CAM_IP Inq | 8x 09 04 AB FF | y0 50 0p 0p 0q 0q 0r 0r 0s FF | |
| CAM_MASK Inq | 8x 09 04 AC FF | y0 50 0p 0p 0q 0q 0r 0r 0s FF | |
| CAM_GATEWAY Inq | 8x 09 04 AD FF | y0 50 0p 0p 0q 0q 0r 0r 0s FF | |
| CAM_Version Inq | 8x 09 00 02 FF | y0 50 ab cd mn pq rs tu FF | |
| Tally Inq | 8x 09 7E 01 0A FF | y0 50 0p FF | p: tally state |
| Freeze Inq | 8x 09 04 75 FF | y0 50 0p FF | p: Freeze switch 3 = OF 2 = ON |
| Preset Freeze Inq | 8x 09 04 76 FF | y0 50 0p FF | p: Preset Freeze switch 3 = OFF 2 = ON |
| PresetExist Inq | 8x 09 04 3F 0p 0p FF | y0 50 0q FF | pp: preset NO. 0~255q: 0:not saved 1:saved |
| Preset Speed Set Inq | 8x 09 7E 01 0B FF | y0 50 pp FF | pp: Preset Speed 2~24 default:15 |
| CAM_Inq_AT_OnOff | 8x 09 04 C8 FF | y0 50 0p FF | P: 0 = off1 = on |
| CAM_Inq_AT_TargetChange | 8x 09 04 CA FF | y0 50 0p FF | P:0x02 right moveP:0x03 left move |
| CAM_Inq_TargetLocation | 8x 09 04 CB FF | y0 50 0p FF | P: 0:mid 1:left 2:right |
| CAM_Inq_TargetRatio | 8x 09 04 CC FF | y0 50 0p 0q FF | Pq:(6~20)Human is 1/pq in the pic |
| CAM_AT_ChangeTime_Inq | 8x 09 04 CD FF | y0 50 0p 0q FF | Pq: t*10 |
| CAM_AT_BlackBoardMode_Inq | 8x 09 04 CE FF | y0 50 0p FF | p: 1=Enable 0=Disable |
| CAM_AT_HilightTarget_Inq | 8x 09 04 CF FF | y0 50 0p FF | p: 1=Enable 0=Disable |
| CAM_AT_ZoomLock_Inq | 8x 09 04 D6 FF | y0 50 0p FF | p: 1=Enable 0=Disable |
| CAM_AT_LimitEnable_Inq | 8x 09 04 D7 FF | y0 50 0p FF | p: 1=Enable 0=Disable |
| CAM_AudioSet | 8x 09 04 D8 FF | 8x 01 04 D8 0p 0q 0r 0s 0u0m 0n 0h 0i 0j FF | 0p: 0x01-ON 0x00-OFF0q: 0x01-line inrstu: sampleratemn: volume 0~100h: encode mode4: LPCM 5: ACCij: bitrate*1000 |
| Video System Inq(Factory) | 8x 09 06 23 FF | y0 50 pp FF | pp: Video format |
| Video System Inq(Sony) | 8x 09 04 24 72 FF | y0 50 0p 0p FF | pp: Video format |
| IR_Transfer | 8x 09 06 1A FF | y0 50 02 FF | On |
| y0 50 03 FF | Off | ||
| IR_Receive | 8x 09 06 08 FF | y0 50 02 FF | On |
| y0 50 03 FF | Off | ||
| Pan-tilt Max Speed Inq | 8x 09 06 11 FF | y0 50 ww zz FF | ww: Pan Max Speed zz:Tilt Max Speed |
| Pan-tilt Pos Inq | 8x 09 06 12 FF | y0 50 0w 0w 0w 0w0z 0z 0z 0z FF | www: Pan Positionzzzz: Tilt Position |
| Mainstream ResolutionInq | 8x 09 04 C2 00FF | y0 50 0p 0q 0r 0s 0m 0n0y FF | pqrs : Column(x size)mnxy: Line (y size)only support:1920*10801280*7201024*576 |
| Main stream Rate Inq | 8x 09 04 C2 01FF | y0 50 0p 0q 0r 0s 0m 0n0y FF | pqrsmnxy: bitrate(1024~61440kbps) |
| Main Encode Mode Inq | 8x 09 04 C2 02FF | y0 50 pp FF | Mode sel:0xpp0x00: h2640x01: h265 |
| Main Frame Rate Inq | 8x 09 04 C2 03FF | y0 50 pp FF | Frame rate:0xpp(15~60) |
| Main IDR Inq | 8x 09 04 C2 04FF | y0 50 pp FF | IDR Setting:0xpp(1~120) |
| Main Stream Rate ModeInq | 8x 09 04 C2 05FF | y0 50 pp FF | Contor mode:0xpp0x00: CBR0x01: VBR |
| Sub stream ResolutionInq | 8x 09 04 C3 00FF | y0 50 0p 0q 0r 0s 0m 0n0y FF | pqrs : Column(x size)mnxy: Line (y size)only support:640*360 |
| Sub stream Rate Inq | 8x 09 04 C3 01FF | y0 50 0p 0q 0r 0s 0m 0n0y FF | pqrsmnxy: bitrate(1024~20480kbps) |
| Sub Encode Mode Inq | 8x 09 04 C3 02FF | y0 50 pp FF | Mode sel:0xpp0x00: h2640x01: h265 |
| Sub Frame Rate Inq | 8x 09 04 C3 03FF | y0 50 pp FF | Frame rate:0xpp(15~60) |
| Sub IDR Inq | 8x 09 04 C3 04FF | y0 50 pp FF | IDR Setting:0xpp(1~120) |
| Sub Stream Rate ModeInq | 8x 09 04 C3 05FF | y0 50 pp FF | Contor mode:0xpp0x00: CBR0x01: VBR |
VISCA PAN TILT ABSOLUTE POSITION VALUE
| PAN ANGLE | VISCA value | TILT ANGLE | VISCA value |
| -170 | 0xF670 | -30 | 0xFE50 |
| -135 | 0xF868 | 0 | 0x0000 |
| -90 | 0xFAF0 | 30 | 0x01B0 |
| -45 | 0xFD78 | 60 | 0x0360 |
| 0 | 0x0000 | 90 | 0x510 |
| 45 | 0x0288 | ||
| 90 | 0x0510 | ||
| 135 | 0x0798 | ||
| 170 | 0x0990 |
VISCA PAN TILT SPEED VALUE
| Pan(Degree/Second) | Tilt(Degree/Second) | ||
| 0 | 0.3 | 0 | 0.3 |
| 1 | 1 | 1 | 1 |
| 2 | 1.5 | 2 | 1.5 |
| 3 | 2.2 | 3 | 2.2 |
| 4 | 2.4 | 4 | 3.6 |
| 5 | 2.6 | 5 | 4.7 |
| 6 | 2.8 | 6 | 6 |
| 7 | 3.0 | 7 | 8 |
| 8 | 3.2 | 8 | 10 |
| 9 | 3.4 | 9 | 12 |
| 10 | 3.8 | 10 | 15 |
| 11 | 4.5 | 11 | 18 |
| 12 | 6 | 12 | 23 |
| 13 | 9 | 13 | 30 |
| 14 | 15 | 14 | 39 |
| 15 | 19 | 15 | 48 |
| 16 | 25 | 16 | 59 |
| 17 | 32 | 17 | 69 |
| 18 | 38 | 18 | 80 |
| 19 | 45 | ||
| 20 | 58 | ||
| 21 | 75 | ||
| 22 | 88 | ||
| 23 | 105 | ||
| 24 | 120 | ||
| Function | Byte1 | Byte2 | Byte3 | Byte4 | Byte5 | Byte6 | Byte7 |
| Up | 0xFF | Address | 0x00 | 0x08 | Pan Speed | Tilt Speed | SUM |
| Down | 0xFF | Address | 0x00 | 0x10 | Pan Speed | Tilt Speed | SUM |
| Left | 0xFF | Address | 0x00 | 0x04 | Pan Speed | Tilt Speed | SUM |
| Right | 0xFF | Address | 0x00 | 0x02 | Pan Speed | Tilt Speed | SUM |
| Up left | 0xFF | Address | 0x00 | 0x0C | Pan Speed | Tilt Speed | SUM |
| Up right | 0xFF | Address | 0x00 | 0x0A | Pan Speed | Tilt Speed | SUM |
| Down Left | 0xFF | Address | 0x00 | 0x14 | Pan Speed | Tilt Speed | SUM |
| Down Right | 0xFF | Address | 0x00 | 0x12 | Pan Speed | Tilt Speed | SUM |
| Zoom In | 0xFF | Address | 0x00 | 0x20 | 0x00 | 0x00 | SUM |
| Zoom Out | 0xFF | Address | 0x00 | 0x40 | 0x00 | 0x00 | SUM |
| Focus Far | 0xFF | Address | 0x00 | 0x80 | 0x00 | 0x00 | SUM |
| Focus Near | 0xFF | Address | 0x01 | 0x00 | 0x00 | 0x00 | SUM |
| Set Preset | 0xFF | Address | 0x00 | 0x03 | 0x00 | Preset ID | SUM |
| Stop | 0xFF | Address | 0x00 | 0x00 | Pan Speed | Tilt Speed | SUM |
| Clear Preset | 0Xff | Address | 0x00 | 0x05 | 0x00 | Preset ID | SUM |
| Call Preset | 0Xff | Address | 0x00 | 0x07 | 0x00 | Preset ID | SUM |
| Query Pan Position | 0Xff | Address | 0x00 | 0x51 | 0x00 | 0x00 | SUM |
| Query Pan Position Response | 0Xff | Address | 0x00 | 0x59 | Value High Byte | Value Low Byte | SUM |
| Query Tilt Position | 0Xff | Address | 0x00 | 0x53 | 0x00 | 0x00 | SUM |
| Query Tilt Position Response | 0Xff | Address | 0x00 | 0x5B | Value High Byte | Value Low Byte | SUM |
| Query Zoom Position | 0Xff | Address | 0x00 | 0x55 | 0x00 | 0x00 | SUM |
| Query Zoom Position Response | 0Xff | Address | 0x00 | 0x5D | Value High Byte | Value Low Byte | SUM |
PELCO-P PROTOCOL
| Function | Byte1 | Byte2 | Byte3 | Byte4 | Byte5 | Byte6 | Byte7 | Byte8 |
| Up | 0Xa0 | Address | 0x00 | 0x08 | Pan Speed | Tilt Speed | 0Xaf | XOR |
| Down | 0Xa0 | Address | 0x00 | 0x10 | Pan Speed | Tilt Speed | 0Xaf | XOR |
| Left | 0Xa0 | Address | 0x00 | 0x04 | Pan Speed | Tilt Speed | 0Xaf | XOR |
| Right | 0Xa0 | Address | 0x00 | 0x02 | Pan Speed | Tilt Speed | 0Xaf | XOR |
| Up left | 0Xa0 | Address | 0x00 | 0x0C | Pan Speed | Tilt Speed | 0Xaf | XOR |
| Up right | 0Xa0 | Address | 0x00 | 0x0A | Pan Speed | Tilt Speed | 0Xaf | XOR |
| Down Left | 0Xa0 | Address | 0x00 | 0x14 | Pan Speed | Tilt Speed | 0Xaf | XOR |
| Down Right | 0Xa0 | Address | 0x00 | 0x12 | Pan Speed | Tilt Speed | 0Xaf | XOR |
| Zoom In | 0Xa0 | Address | 0x00 | 0x20 | 0x00 | 0x00 | 0Xaf | XOR |
| Zoom Out | 0Xa0 | Address | 0x00 | 0x40 | 0x00 | 0x00 | 0Xaf | XOR |
| Focus Far | 0Xa0 | Address | 0x00 | 0x80 | 0x00 | 0x00 | 0Xaf | XOR |
| Focus Near | 0Xa0 | Address | 0x01 | 0x00 | 0x00 | 0x00 | 0Xaf | XOR |
| Stop | 0Xa0 | Address | 0x00 | 0x00 | Pan Speed | Tilt Speed | 0Xaf | XOR |
| Set Preset | 0xA0 | Address | 0x00 | 0x03 | 0x00 | Preset ID | 0xAF | XOR |
| Clear Preset | 0xA0 | Address | 0x00 | 0x05 | 0x00 | Preset ID | 0xAF | XOR |
| Call Preset | 0xA0 | Address | 0x00 | 0x07 | 0x00 | Preset ID | 0xAF | XOR |
| Query Pan Position | 0xA0 | Address | 0x00 | 0x51 | 0x00 | 0x00 | 0xAF | XOR |
| Query Pan Position Response | 0xA0 | Address | 0x00 | 0x59 | Value High Byte | Value Low Byte | 0xAF | XOR |
| Query Tilt Position | 0xA0 | Address | 0x00 | 0x53 | 0x00 | 0x00 | 0xAF | XOR |
| Query Tilt Position Response | 0xA0 | Address | 0x00 | 0x5B | Value High Byte | Value Low Byte | 0xAF | XOR |
| Query Zoom Position | 0xA0 | Address | 0x00 | 0x55 | 0x00 | 0x00 | 0xAF | XOR |
| Query Zoom Position Response | 0xA0 | Address | 0x00 | 0x5D | Value High Byte | Value Low Byte | 0xAF | XOR |
- Under working mode, press the MENU key on the IR remote controller, to enter the OSD menu as below:
| MENU | |||
| SYSTEM | PROTOCOL | < VISCA | > |
| EXPOSURE | ADDRESS | < 001 | > |
| IMAGE | BAUDRATE | < 9600 | > |
| QUALITY | PROTOCOL LOCK | < OFF | > |
| PTZ SETTINGS | RS485 | < ON | > |
| VIDEO FORMAT | LANGUAGE | < ENGLISH | > |
| IP SETTINGS | AUTO TRACKING | < OFF | > |
| RESET | AT LOCATION | < MIDDLE | > |
| INFORMATIONS | AT RATIO | < 1/16 | > |
-
After entering the main menu, use the navigate UP/DOWN key to select the main menu. Once selected, the main menu will change to the blue background, and the right side will show sub-menu options.
-
Press the navigate RIGHT key to enter the sub-menu; use the UP/DOWN key to select the sub-menu; use the LEFT/RIGHT key to select the parameter.
-
Press the MENU key again to return to the previous menu. Press the MENU key continuously to exit the OSD menu.
-
OSD Menu Setting List
| SYSTEM | PROTOCOL | Optional: VISCA, PLC.P, PLC.D | Default: VISCA |
| ADDRESS | VISCA:: 1~7 PLC-P/D: 0~255 | Default: 1 | |
| BAUDRATE | Optional: 2400, 4800, 9600, 115200 | Default: 9600 | |
| PROTOCOL LOCK | Optional: OFF, ON | Default: OFF | |
| RS485 | Optional: OFF, ON | Default: ON | |
| LANGUAGE | Optional: ZH-CH, ENGLISH, ZH-TW, RUSSIAN | Default: ENGLISH | |
| AT TRACKING | Optional: OFF, ON | Default: OFF | |
| AT LOCATION | Optional: MIDDLE、LEFT、RIGHT | Default: MIDDLE | |
| AT RATIO | Optional: 1/6~1/20 | Default: 1/16 | |
| EXPOSURE | EXPOSURE MODE | AUTO、MANUAL、SHUTTER、IRIS、BRIGHT | Default: AUTO |
| SHUTTER | Shutter speed: 1/30~1/10000, only valid under MANUAL and SHUTTER mode | Default: AUTO | |
| IRIS | Iris setting: CLOSE~F1.8, only valid under MANUAL and IRIS mode | Default: AUTO | |
| GAIN | Gain setting: 0dB~30dB, only valid undc MANUAL mode | Default: AUTO | |
| EXPOSURE BRIGHT | Bright setting: 0~27, only valid under BRIGHT priority mode. | Default: AUTO | |
| BRIGHT | 0~15 | Default: 8 | |
| WIDE DYNAMIC MODE | OFF/ON | Default: OFF | |
| WIDE DYNAMIC LEVEL | 1~6 | Default: 1 | |
| BLC | OFF/ON | Default: OFF |
| IMAGE | WHITE BALANCE MODE | Optional: ATW, MANUAL, AUTO, INDO OUTDOOR, PUSH, C.T. | Default: ATW |
| RED GAIN | Red gain level: 0~255, only valid under manual white balance mode | Default: AUTO | |
| BLUE GAIN | Blue gain level:0~255, only valid under manual white balance mode | Default: AUTO | |
| COLOR TEMPERATURE | Set the color temperature value: 2500~1000 only valid under C.T. mode | Default: AUTO | |
| FLICKER | Anti-Flicker setting:50/60HZ/OFF, to reduce the video flicker | Default: 50HZ | |
| DIGITAL ZOOM | OFF/ON | Default: OFF | |
| FOCUS MODE | AUTO, MANUAL | Default: AUTO | |
| 3G SDI | Optional: LEVELA, LEVELB | Default: LEVELA | |
| FOCUS NEAR LIMIT | Optional: 1.5M、2M、3M、6M、10M | Default: 1.5M |
| QUALITY | 2D NOISE REDUCTION | 2D noise reduction: the bigger value is, th less noise on image is, the lower resolution | Default: OFF |
| 3D NOISE REDUCTION | 3D noise reduction: OFF/AUTO/0~4, the bigger value is, the less motion noise on image is. High value will cause image sm | Default: AUTO | |
| SHARPNESS | Sharpness setting: 0~15, the higher value i edge of the image will be sharpened | Default: 6 | |
| CONTRAST | Set contrast level: 0~15 | Default: 8 | |
| SATURATION | Set saturation level: 0~15 | Default: 8 | |
| GAMMA | Select gamma level: 0~15 | Default: 8 | |
| IMAGE STYLE | USER, NORMAL, COLORFULL | Default: USER | |
| FOCUS SENSITIVITY | HIGH, NORMAL, LOW | Default: NORMAL |
| PTZ SETTINGS | SPEED BY ZOOM | Optional: OFF, ON | Default: ON |
| FLIP | Flip horizontal | Default: OFF | |
| MIRROR | Flip vertical | Default: OFF | |
| PT SPEED | Set Pan Tilt speed: 5~24 | Default: 18 | |
| ZOOM SPEED | Set Zoom speed: 1~7 | Default: 5 | |
| PRESET FREEZE | Optional: OFF, ON | Default: OFF | |
| PRESET PT SPEED | Preset head speed:2~24 | Default: 18 | |
| PRESET ZOOM SPEED | Preset zoom speed:1~7 | Default: 5 | |
| PRESET SAVE AE&AW | Optional: OFF, ON | Default: OFF |
| VIDEO FORMAT | SIZE | 1080P, 1080I, 720P |
| FRAME RARE | 60, 59.94, 50, 30, 29.97, 25, 24, 23.98 | |
| VI FRAME RARE | 60, 50, 30, 25 |
| IP SETTINGS | DHCP | OFF/ON |
| IP | 192.168.001.188 (Example) | |
| MASK | 255.255.255.000 (Example) | |
| GATEWAY | 192.168.001.001 (Example) | |
| MAIN SIZE | Current main stream resolution | |
| BITRATE | Current main stream bit rate | |
| SUB SIZE | Current sub stream resolution | |
| BITRATE | Current sub stream bit rate |
| RESET | SYSTEM RESET | Reset communication parameter to default |
| CAMERA RESET | Reset image parameter to default | |
| PAN TILI RESET | Reset pan/tilt parameter to default | |
| ALL RESET | Reset all parameter to default | |
| INFORMATIONS | IR ADDRESS | Camera IR control address |
| CLIENT | VISCA | |
| MODEL NO. | Model number | |
| ARM VERSION | ARM firmware version | |
| ISP VERSION | Camera ISP firmware version | |
| RELEASE DATE | Software release date |
Set IP Address in Menu
In order to help customers debug, the camera has the support menu to set the IP address. The specific methods are as follows.
- Press "MENU" to open the menu interface, and select "network parameters" in the menu to call up the IP setting interface.
| MENU | |||
| SYSTEM | DHCP : | < OFF > | |
| EXPOSURE | IP : | 192.168.001.188 | |
| IMAGE | MASK : | 255.255.255.000 | |
| QUALITY | GATEWAY : | 192.168.001.001 | |
| PTZ SETTINGS | |||
| VIDEO FORMAT | |||
| IP SETTINGS | |||
| RESET | |||
| INFORMATIONS | |||
- Press the right navigation button to enter the IP setting interface, and select the parameters needed by using the navigation up and down buttons, and then select the IP address, mask, gateway.
- Short-press the number button to set the corresponding parameters. After setting the parameter, press the "MENU" button again to complete the current parameter setting.
-
To exit the menu, just press the "MENU" button again.
-
Only run the client's software after the camera has completed self-configuration (the IR indicator in blue color and will not flash); otherwise may cause black screen issue.
-
Make sure the camera is recognized by the PC Device Manager.
- Make sure the interval of video format switching more than 1 seconds, otherwise black video maybe caused.
- Make sure the interval of control command sending from the server (via USB) to the camera no less than 250ms.
- Support standard UVC interface.
| UVC properties | VISCA |
| PU_BACKLIGHT_COMPENSATION_CONTROL | 8x 01 04 33 02 FF |
| CY_FX_UVC_PU_BRIGHTNESS_CONTROL | 8x 01 04 A4 00 00 0p 0q FF |
| CY_FX_UVC_PU_CONTRAST_CONTROL | 8x 01 04 A2 00 00 0p 0q FF |
| CY_FX_UVC_PU_SATURATION_CONTROL | 8x 01 04 A1 00 00 0p 0q FF |
| CY_FX_UVC_PU_SHARPNESS_CONTROL | 8x 01 04 42 00 00 0p 0q FF |
| CY_FX_UVC_PU_GAMMA_CONTROL | 8x 01 04 5B 0p FF |
| CY_FX_UVC_PU_WHITE_BALANCE_TEMPERATURE_CONTROL | 8x 01 04 35 0p FF |
| CY_FX_UVC_PU_BACKLIGHT_COMPENSATION_CONTROL | 8x 01 04 33 0p FF |
| CY_FX_UVC_PU_GAIN_CONTROL | 8x 01 04 49 00 00 0p 0q FF |
| CY_FX_UVC_PU_POWER_LINE_FREQUENCY_CONTROL | 8x 01 04 AA 0p FF |
| PU_GAIN_CONTROL | 8x 01 04 49 00 00 0p 0p FF |
| CT_ZOOM_ABSOLUTE_CONTROL | 8x 01 04 47 0p 0q 0r 0s FF |
| CT_PANTILT_ABSOLUTE_CONTROL | 8x 01 06 02 VV WW 0Y 0Y 0Y 0Z 0Z 0Z 0Z FF |
| CT_PANTILT_RELATIVE_CONTROL | 8x 01 06 01 pp qq rr ss FF |
| CT_ZOOM_RELATIVE_CONTROL | 8x 01 04 07 pp FF |
It is not necessary to install additional video player plug-in to preview the local screen on the web interface.
The web interface supports Google Chrome, Firefox, IE, Safari, Opera, 360, QQ and other browsers, adaptability is very good.
1. Login
Run browser, input IP address( defaulted IP address is 192.168.1.188), to enter login interface, can select Language (Chinese, English, Korean, Portuguese or Spanish), input admin and password to login as following: (Default Username: admin Default password: admin)

2. PTZ Control
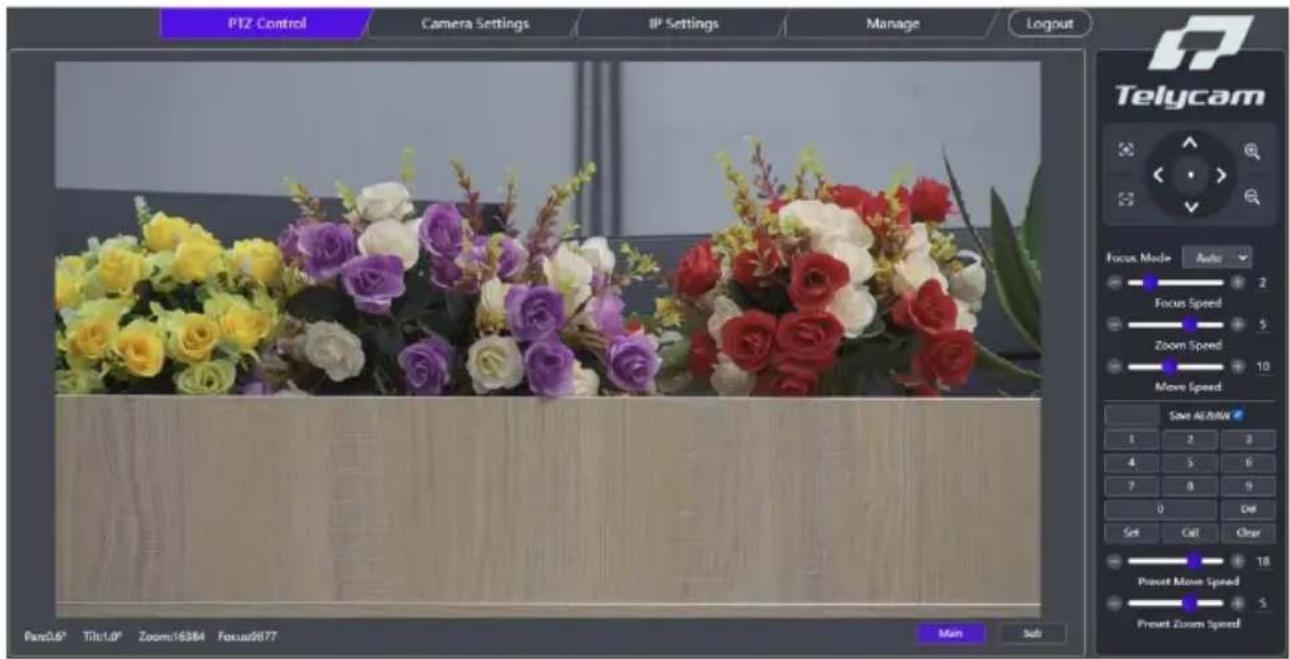
After successful login, the interface is shown in the above figure. The
preview interface is displayed on the left, and the functions of camera pan tilt rotation, zoom, focus, and preset position settings can be controlled on the right. Additionally, parameters such as pan tilt and zoom speed can be set through the scroll bar.
3. Camera Settings
Click on the "Camera Settings" option to enter the camera settings interface, as shown in the following figure:
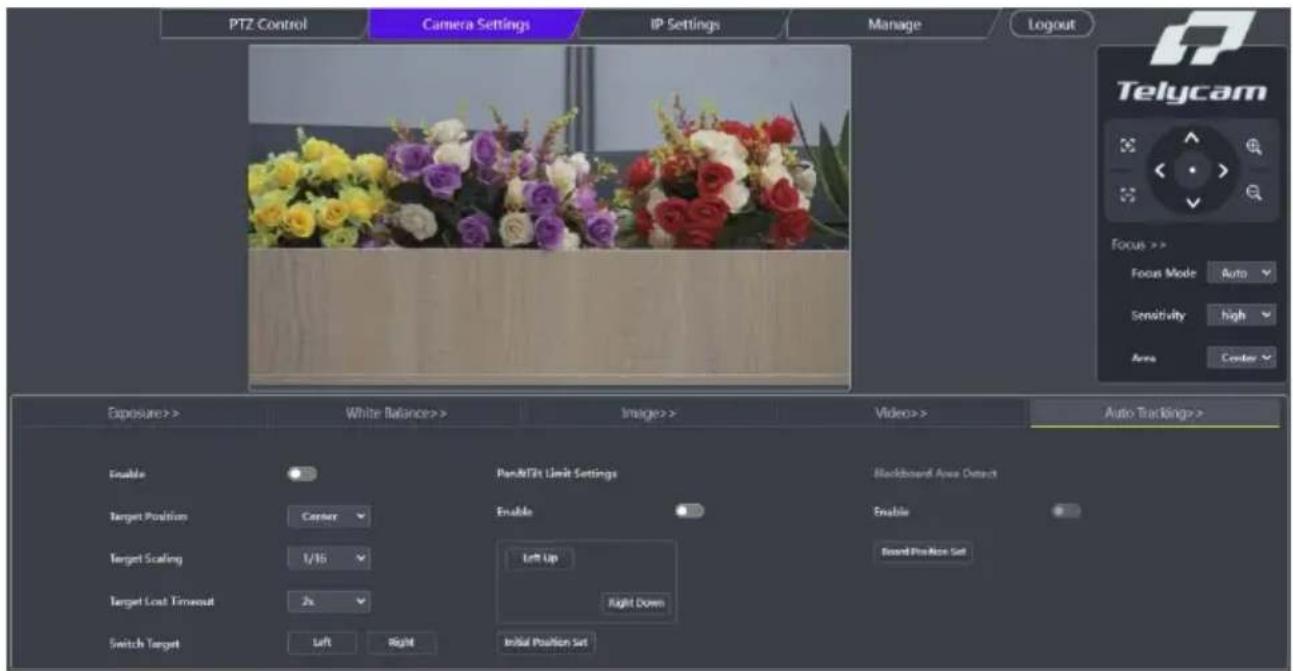
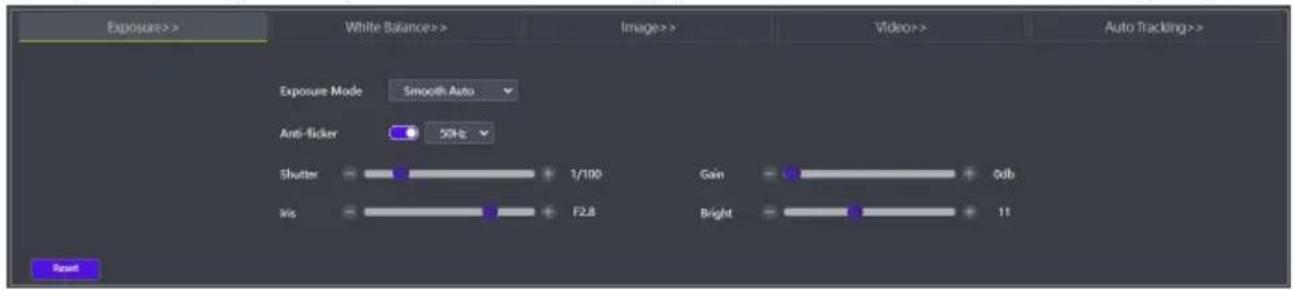
The "Exposure" option allows you to set exposure mode, anti-flicker, shutter, gain, iris, brightness, and other settings, as shown in the following figure:
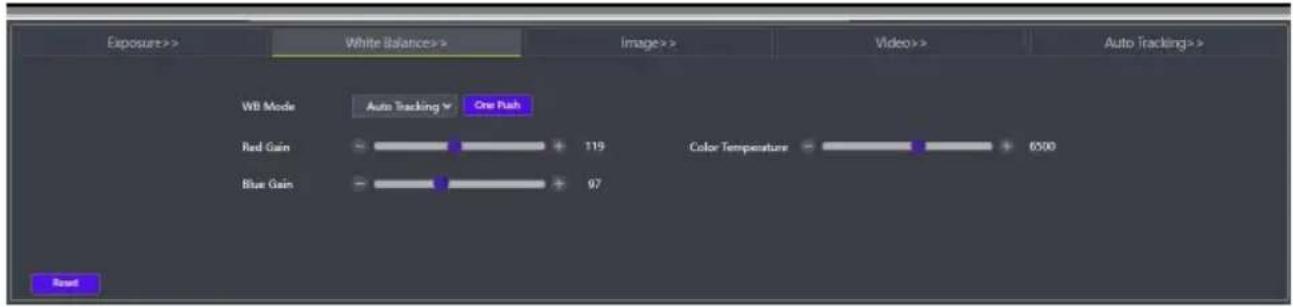
The "White Balance" option includes settings such as white balance mode, red gain, blue gain, and color temperature, as shown in the following figure:
WEB SETTING
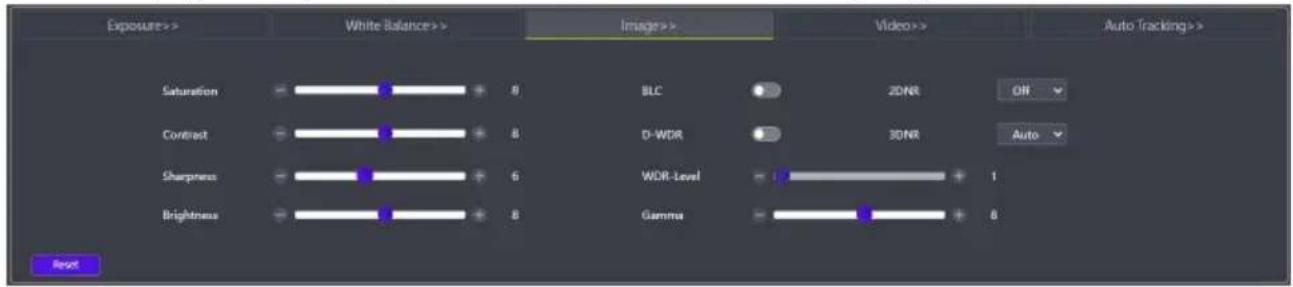
The "Image" option includes settings such as saturation, contrast, sharpness, brightness, backlight compensation, wide dynamic, 2D noise reduction, 3D noise reduction, gamma, etc., as shown in the following figure:
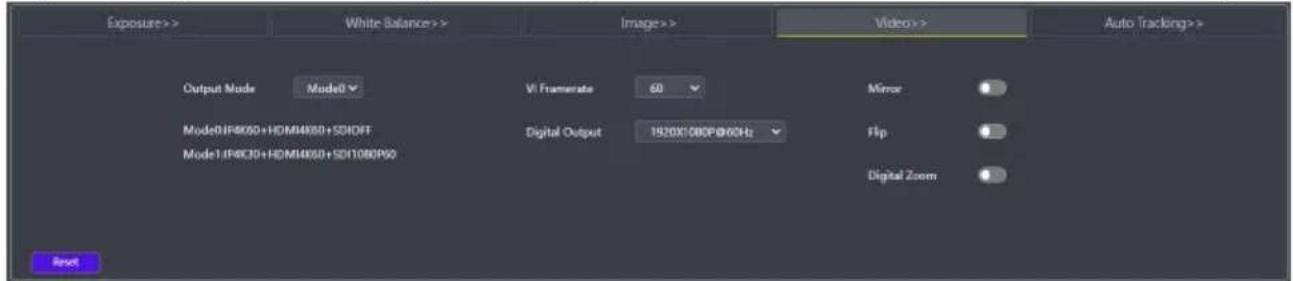
The "Video" option includes settings such as output mode, VI frame rate, digital output, mirror, flip, and digital zoom, as shown in the following figure:
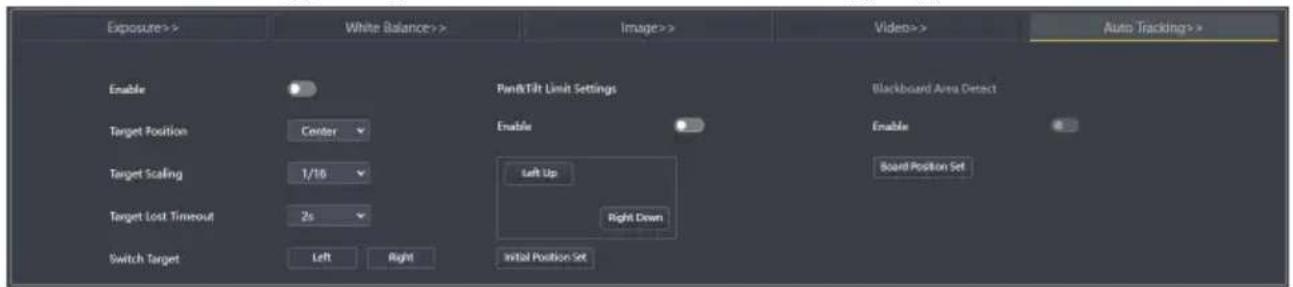
The "Auto Tracking" option includes settings such as tracking switch, target position, target scaling, target loss timeout, target switching, pan tilt limit setting, whiteboard setting, etc., as shown in the following figure:
4. IP Settings
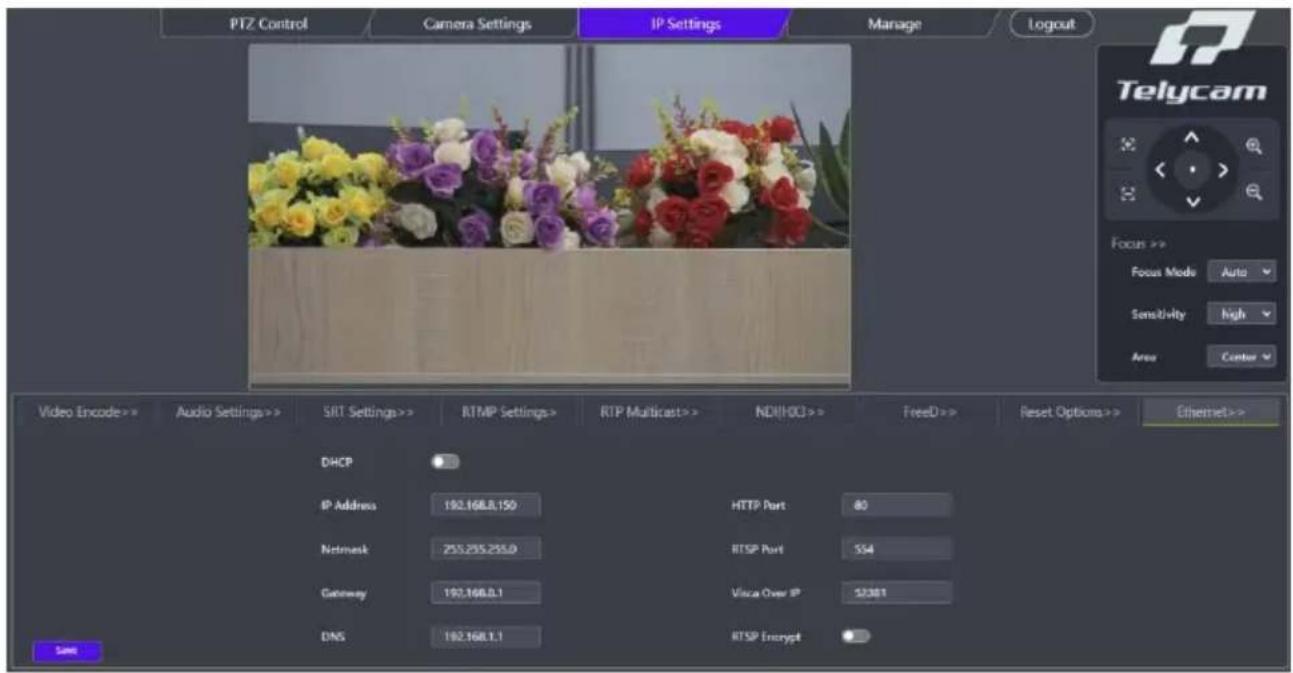
Click on the "IP Settings" option to enter the camera IP settings interface, as shown in the following figure:
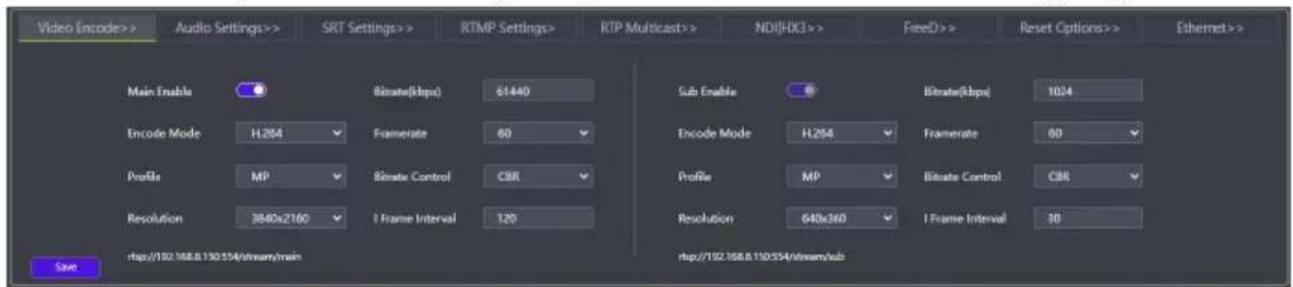
The "Video Encoding" option includes settings such as main and sub stream enable, encoding mode, profile, resolution, bit rate, frame rate, bit rate control, I frame interval, RTSP address, etc., as shown in the following figure:
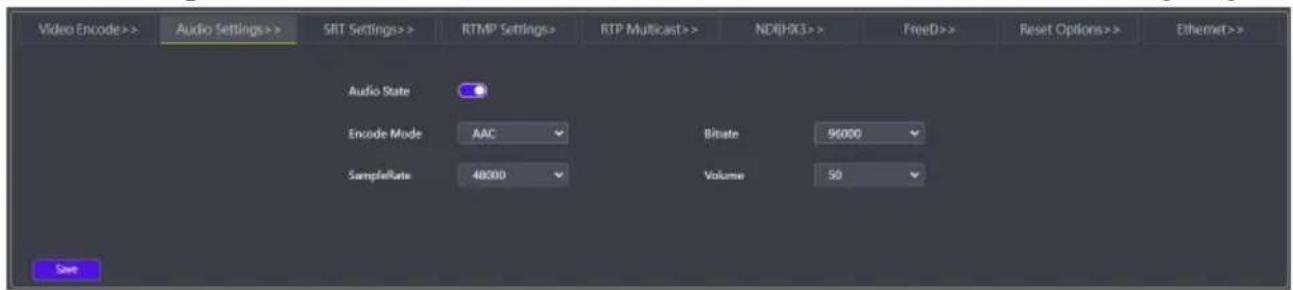
The "Audio Settings" option includes settings such as audio switch, encode mode, sample rate, bit rate, volume, etc., as shown in the following figure:
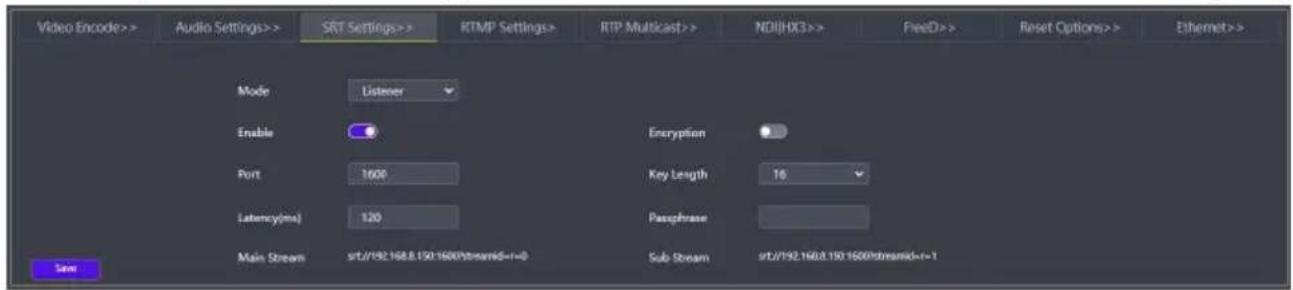
The "SRT Settings" option includes settings such as mode selection, enable
switch, port, latency, encryption switch, etc., as shown in the following figure:
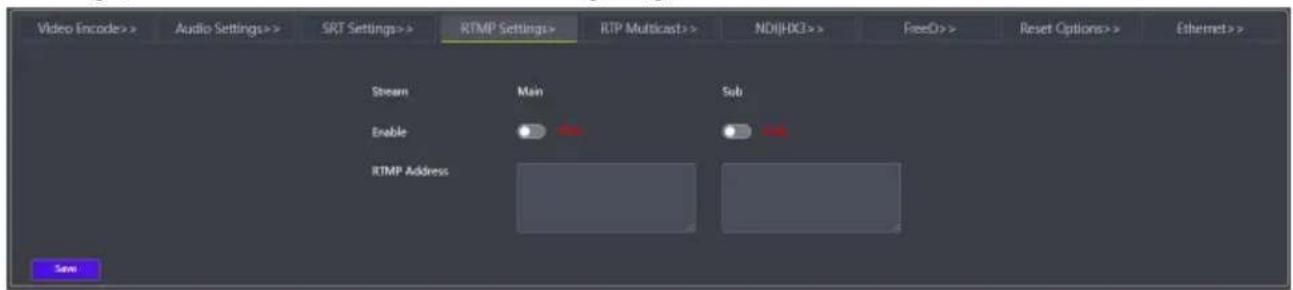
The "RTMP Settings" option includes enable switches and RTMP address settings, as shown in the following figure:
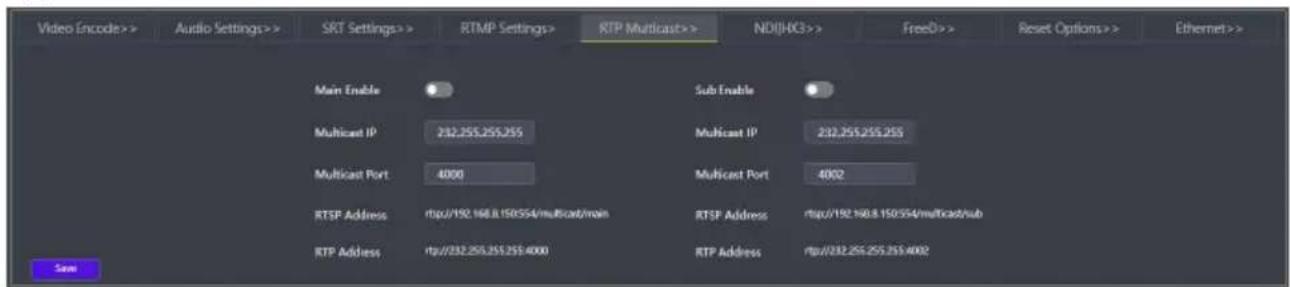
The "RTP multicast" option includes settings such as enable switch, multicast IP, multicast port, RTSP address, RTP address, etc., as shown in the following figure:
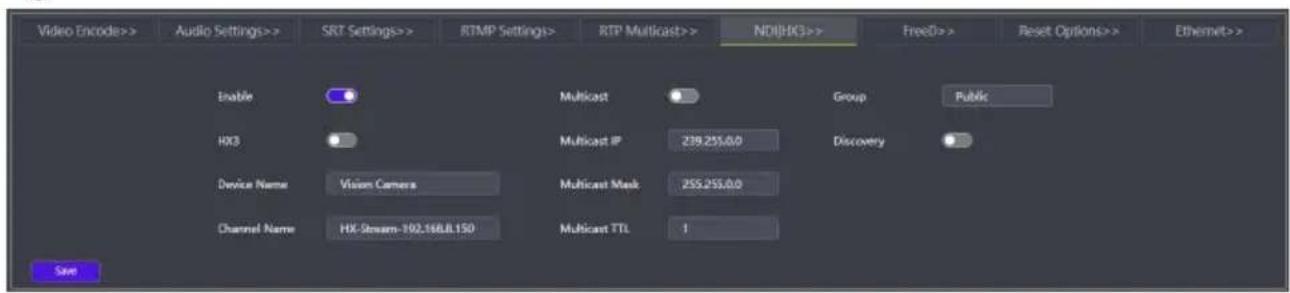
The "NDI | HX3" option includes settings such as NDI enable switch, HX3 switch, device name, channel name, multicast, etc., as shown in the following figure:
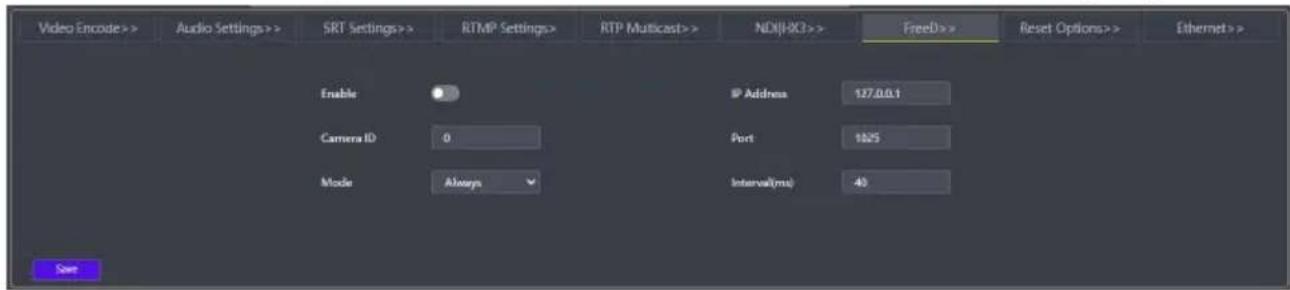
The "FreeD" option includes settings such as enable switch, camera ID,
mode, IP address, port, interval, etc., as shown in the following figure:
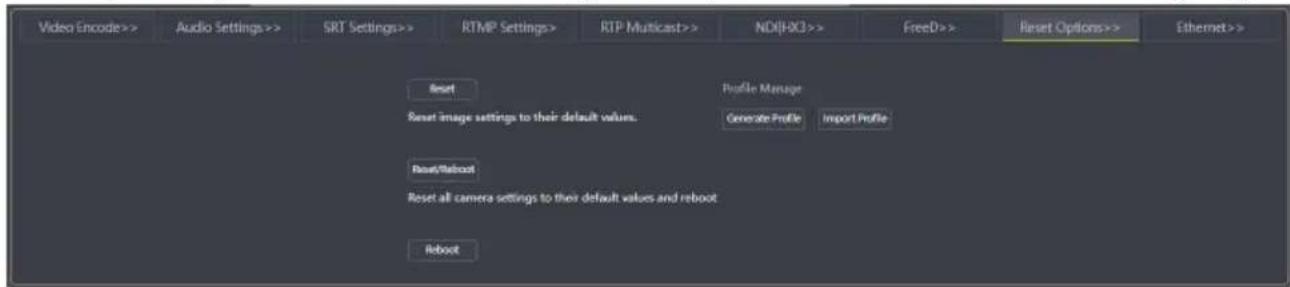
The "Reset Options" option includes settings such as reset, reset/reboot, reboot, and parameter batch configuration, as shown in the following figure:
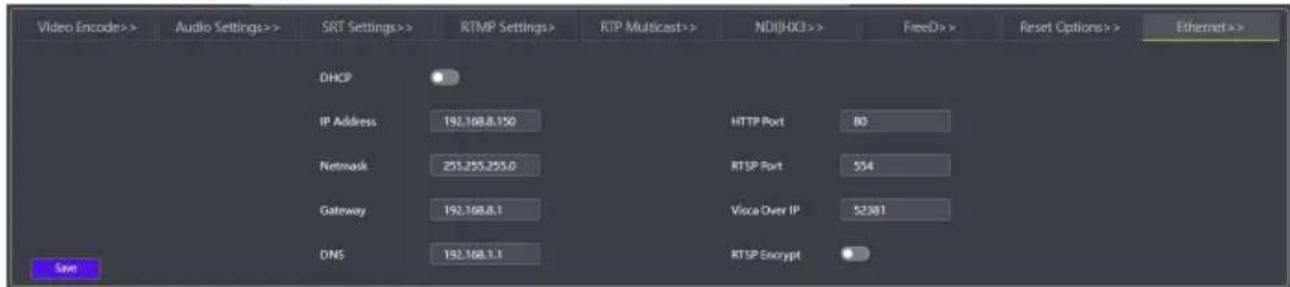
The "Ethernet" option includes parameters such as automatic allocation switch, IP address, net mask, gateway, HTTP port, RTSP port, Visca over IP port, RTSP encryption, etc., as shown in the following figure:
5. Manage
Click on the "Manage" option to enter the camera management interface, as shown in the following figure:
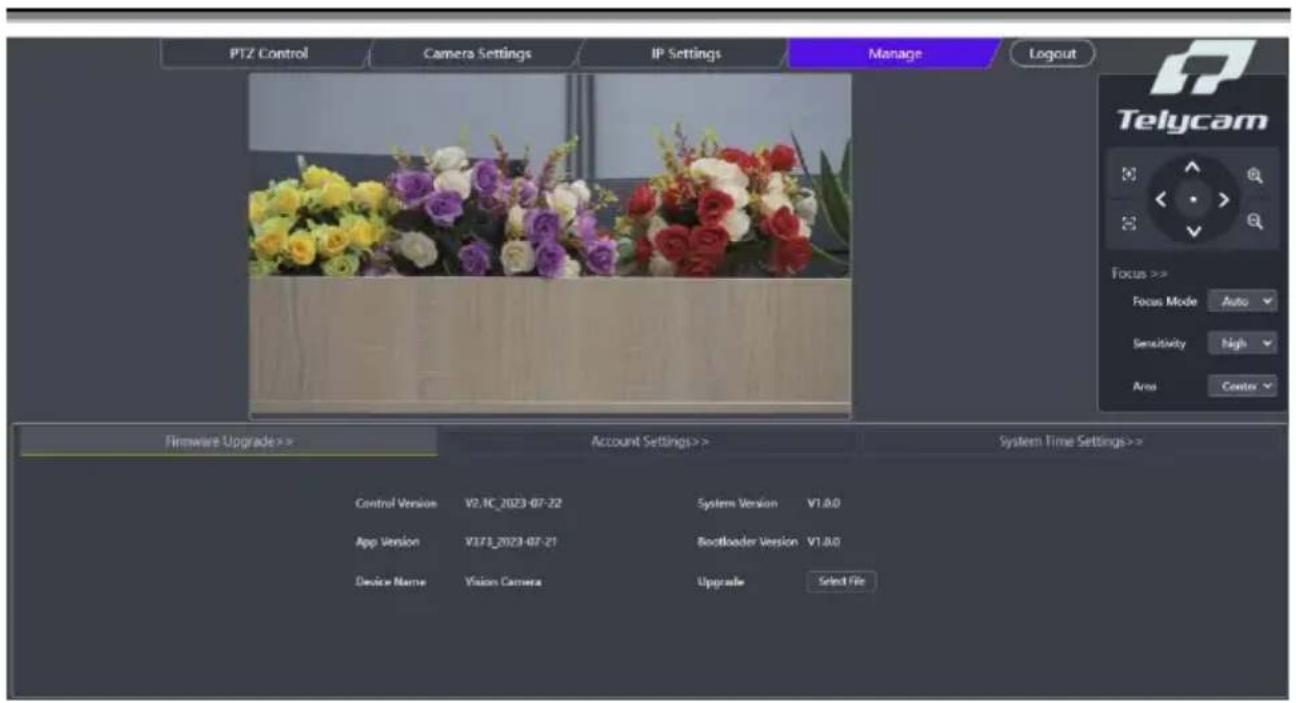
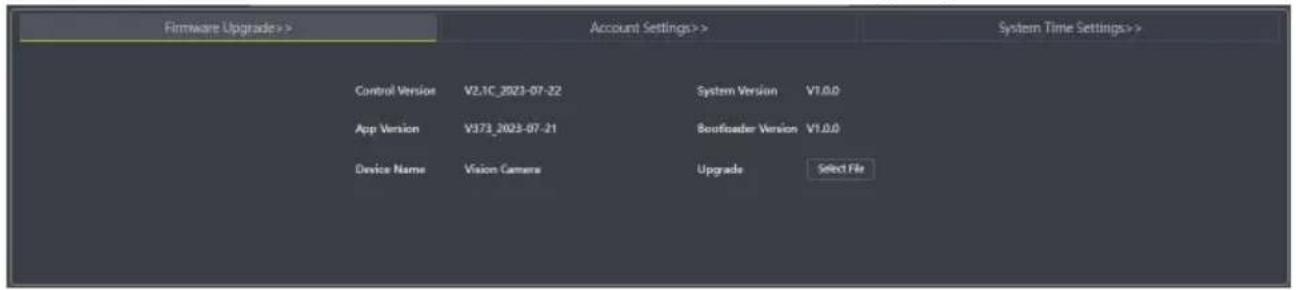
The "Firmware Upgrade" option allows you to view the device name, camera software and hardware version number, and upgrade the camera program through the "Select File" column, as shown in the following figure:
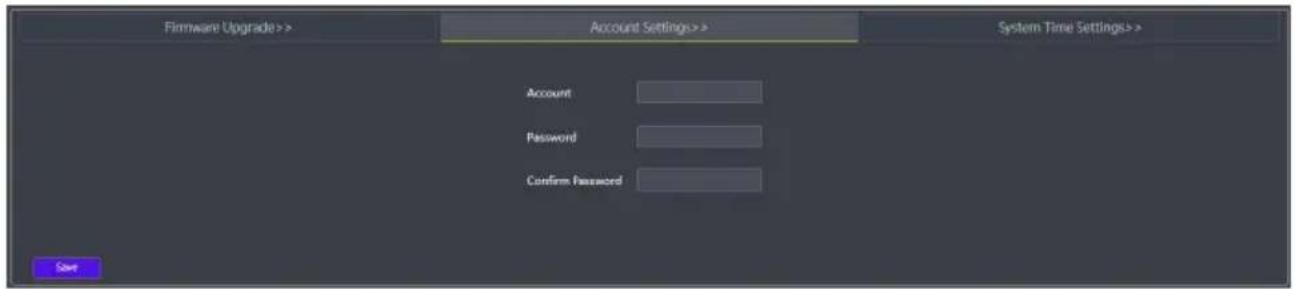
The "Account Settings" option allows you to set the login account and password for the camera:
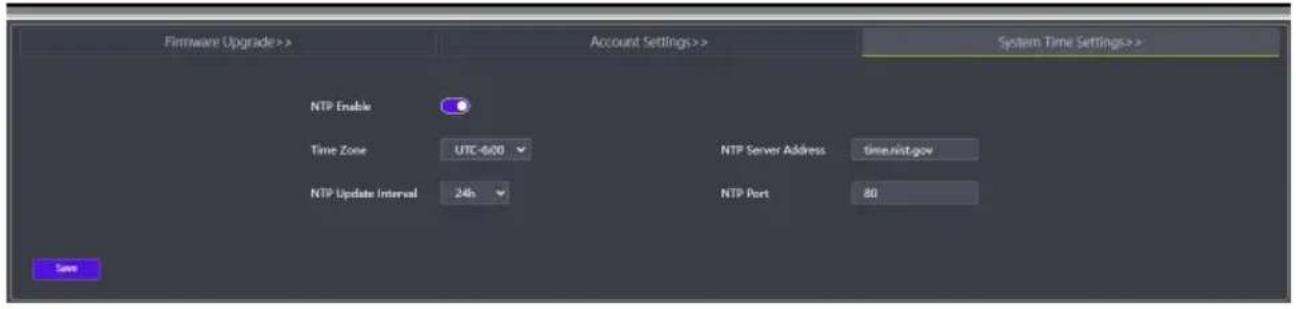
The "Time Settings" option includes settings for NTP activation, time zone, update interval, NTP server address, and port, as shown in the following figure:
6. Logout
Click "Logout" to return to the login interface.
Default RTSP main streaming address:
rtsp://192.168.1.188/stream/main
Default RTSP sub streaming address:
rtsp://192.168.1.188/stream/sub
Default RTMP main streaming address:
rtmp://192.168.1.188:1935/app/rtmpstream0
Default RTMP sub streaming address:
rtmp://192.168.1.188:1935/app/rtmpstream1
- Run VLC Media Player.
- Media->network stream, to enter into "open media" interface.
- Input RTSP address in URL as following:
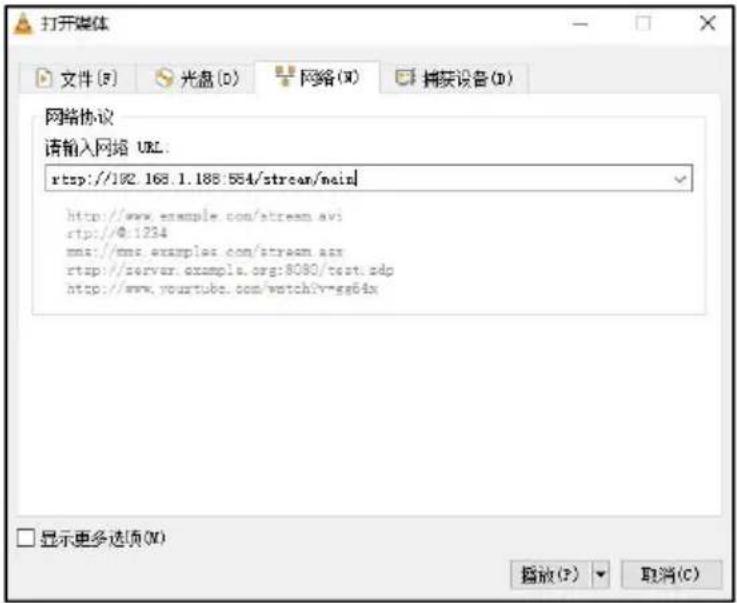
- Click play to view the real time image.
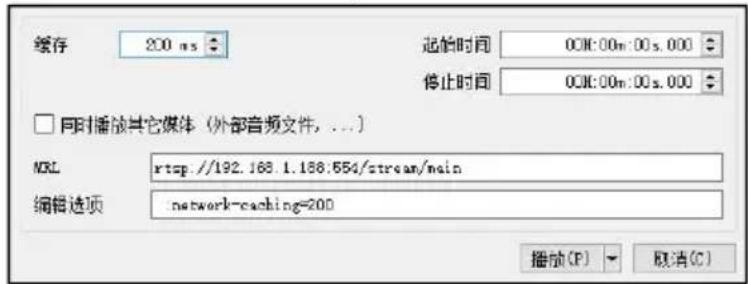
Note: If there is much image lag, select “more option” to enter into following setting, change buffer time smaller (VLC default buffer time is 1000ms).
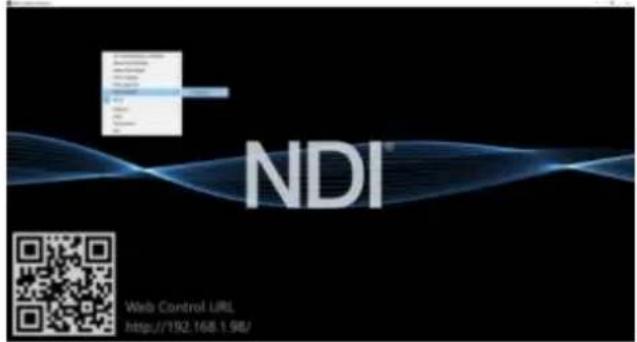
A. Download the NDI Tools via https://ndi.tv/tools/ and install it.
B. Find out the NDI 5 Tools/Studio Monitor via Windows toolbars, and then open it, as bellow:

C. Right click on the Studio Monitor screen, select the preview device:

natural_image
Floral arrangement featuring blue and yellow roses with green buds (no text or symbols)2. Pan Tilt Control
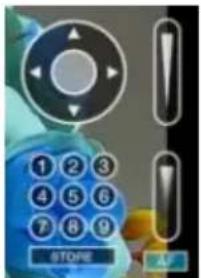
Refer to above picture, once open the video via Studio Monitor, it will show up the control panel on the right side, to control camera pan, tilt, zoom, focus, preset, focus.
3. Run WEB via Studio Monitor

Refer to above picture, once open the video via Studio Monitor, there will show up a setting icon at the lower right corner,
single click this iron to enter WEB UI.
4. How to use NDI tools to Virtual Input CAMERA
A. Find out the NDI Tools/Virtual Input via Windows toolbars, open it, then it will show up the NDI Virtual Input icon at the
Windows toolbars, as bellow picture shows:
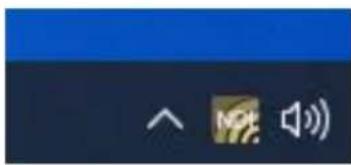
B.Right click on the NDI Virtual Input icon, to select the virtual device name
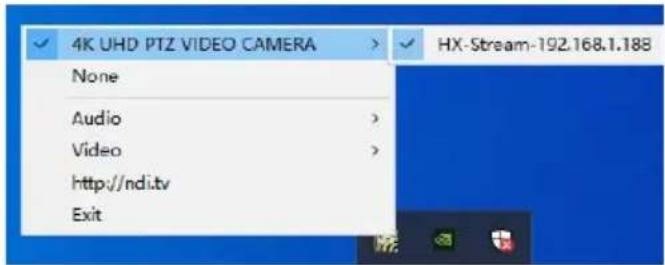
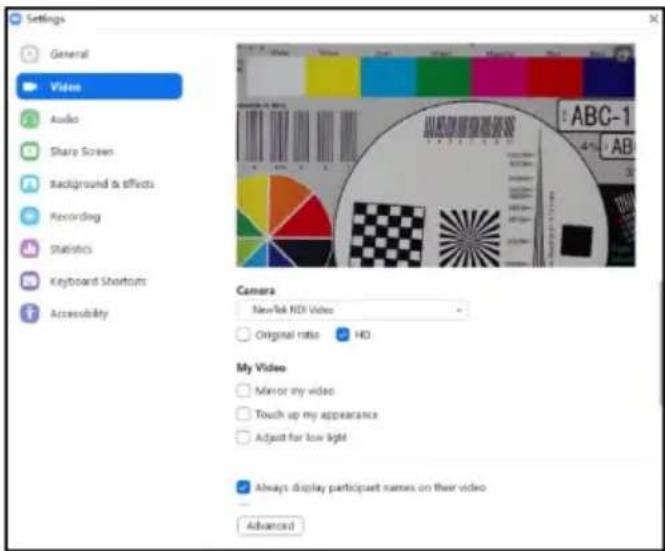
C. Take Zoom for example, select NDI Video as video camera, as bellow picture shows:
This also work for other applications, such as GotoMeeting, Skype for Business, Hangouts.
VISCA over IP
VISCA over IP:
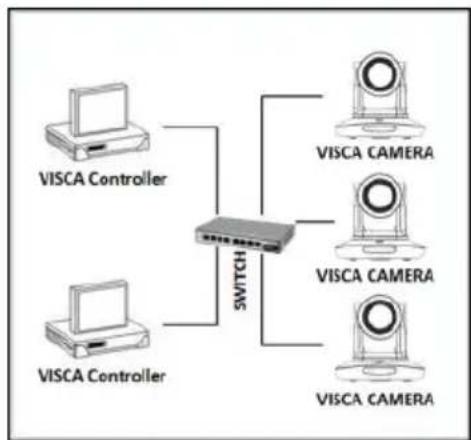
VISCA over IP means VISCA protocol transmit via IP, to reduce RS232/RS485 cable layout (the controller must support IP communication function)
Communication port spec:
● Control port: RJ45 Gigabit LAN
- IP protocol: IPv4
● Transmit protocol: UDP
- IP address: set via web end or OSD menu
● Port address: 52381
- Confirm send/transmission control: depend on applied program
● Applied range: in the same segment, not suitable for bridge network
- Turn on camera: In the menu, set VISCA option to OVER IP or OVER ALL
flowchart
graph TD
    A["VISCA Controller"] --> C["Switch"]
    B["VISCA Controller"] --> C["Switch"]
    D["VISCA CAMERA"] --> C["Switch"]
    E["VISCA CAMERA"] --> C["Switch"]
    F["VISCA CAMERA"] --> C["Switch"]
IP Networking method
How to use VISCA over IP
VISCA Command
It means commands from controller to peripheral equipment, when peripheral equipment receives commands, then return ACK. When commands executed, will return complete message.
For different commands, camera will return different message.
VISCA Inquiry
It means inquiry from controller to peripheral equipment when peripheral equipment receives this kind of commands, it will return required message.
VISCA Reply
It means ACK, complete message, reply or error reply, it is sent from peripheral equipment to controller.
Command format: the following is message head and valid message format.
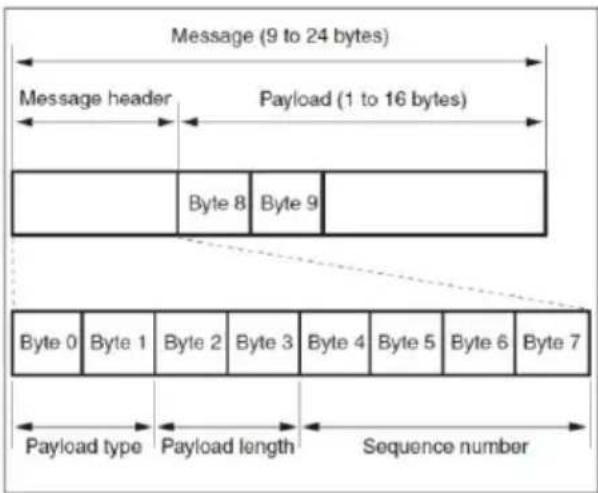
Note: LAN output way is big-endian, LSB is in the front.
Payload type:
Data definition as following:
| Name | Value (Byte 0) | Value (Byte1) | Value |
| VISCA command | 0x01 | 0x00 | Stores the VISCA command. |
| VISCA inquiry | 0x01 | 0x10 | Stores the VISCA inquiry. |
| VISCA reply | 0x01 | 0x11 | Stores the reply for the VISCA command and VISCA inquiry, or VISCA device setting command. |
| VISCA device setting command | 0x01 | 0x20 | Stores the VISCA device setting command. |
| Control command | 0x02 | 0x00 | Stores the control command. |
| Control reply | 0x02 | 0x01 | Stores the reply for the control command. |
Payload length
Valid data length in Payload (1\~16), is command length.
For example, when valid data length is 16 byte
Byte 2 : 0x00
Byte 3 : 0x10
Controller will save sequence number of each command, when one command sent, the sequence number of the command will add 1, when the sequence number becomes the max value, it will change to 0 for next time. The peripheral
equipment will save sequence number of each command, and return the sequence number to the controller.
Payload
According to Payload type, the following data will be saved.
- VISCA command
Save VISCA command packet
- VISCA inquiry
Save VISCA message packet
- VISCA reply
Save VISCA return packet
- VISCA device setting command
Save VISCA equipment setting command packet.
- Control command
The following data is saved in control command payload
| Name | Value | Description |
| RESET | 0x01 | Resets the sequence number to 0. The value t was set as the sequence number is ignored. |
| ERROR | 0x0Fyy | yy=01:Abnormality in the sequence number. |
| yy=02:Abnormality in the message(message type). |
- Controlled reply
The following data is saved in return command payload of control command.
| Message | Value | Description |
| ACK | 0x01 | Reply for RESET. |
Delivery confirmation
VISCA over IP uses UDP as transmission communication protocol, UDP communication message transmission is not stable, it is necessary to confirm delivery and resent in application.
Generally, when controller sends a command to peripheral equipment,
VISCA over IP
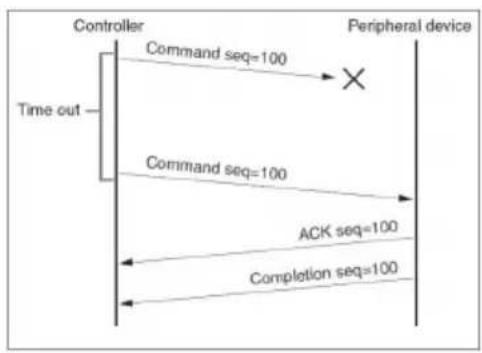
controller will wait for the return message then send the next command, we can detect and confirm if the peripheral equipment receive the commands from return message's lag time. If controller shows it is overtime, it is regarded as error transmission.
If controller shows it is overtime, resend the commands to check peripheral's status, resent command sequence number is same as last command, the following chart list the received message and status after resending the commands.
| Lost message | Received message for retransmission | Status after retransmission | Correspondence after retransmission |
| Command | ACK message | Command is performed by retransmission. | Continue processing. |
| Completion message For the command | ERROR(Abnormality in the sequence number.) | Command has been performed.If only the ACK message is lost, the completion message returns. | If the result by the completion message is needed, retransmit by updating the sequence number. |
| Completion message for the command | ERROR(Abnormality in the sequence number.) | Command has been performed. | If the result by the completion message is needed, retransmit by updating the sequence number. |
| Inquiry | Reply message | Inquiry is performed by retransmission. | Continue processing. |
| Reply message for the inquiry | ERROR(Abnormality in the sequence number.) | Inquiry has been performed. | If the result by the reply messa is needed, retransmit by updating the sequence number. |
| Error message | Error message | Command is not performed. If the error cause eliminates, normal reply is return(ACK, reply message) | Eliminate the error cause. If normal reply returns, continue processing. |
| Inquiry of the VISCA device setting command | Reply message of the VISCA device setting command | Inquiry has been performed by retransmission. | Continue processing. |
| Reply message of the VISCA device setting command | ERROR(Abnormality in the sequence number.) | Inquiry has been performed. | If the result by the reply messa is needed, retransmit by updating the sequence number. |
Sequence chart as following
flowchart
graph TD
    A["Time out"] --> B["Controller"]
    B --> C["Command seq=100"]
    C --> D["Peripheral device"]
    B --> E["Command seq=100"]
    E --> F["ACK seq=100"]
    F --> G["Completion seq=100"]
    G --> B
Sequence chart when command lost
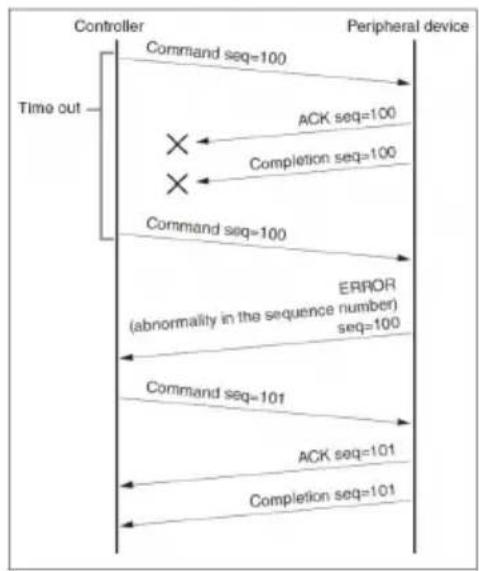
flowchart
graph TD
    A["Controller"] --> B["Command seq=100"]
    B --> C["Peripheral device"]
    D["Time out"] --> E["×"]
    E --> F["ACK seq=100"]
    F --> G["Completion seq=100"]
    G --> H["×"]
    H --> I["Command seq=100"]
    I --> J["ERROR (abnormality in the sequence number) seq=100"]
    J --> K["Command seq=101"]
    K --> L["ACK seq=101"]
    L --> M["Completion seq=101"]
Sequence chart when returned message lost
Note: Do not set IP address, sub net mask, gateway parameter in VISCA ove IP command, otherwise, it will cause network breaks off. Due to change these parameter, network will be in off status.

Telycam
Telecam Technology Co., Ltd
Add: 6F, Building A, Shuanghuan Information Technology Industrial Park, No.8, Baoqing Rd, Longgang District, Shenzhen, 518116, China
Tel: +86-755-33275155
Website: Https://www.telycam.com
E-mail: telycam@telycam.com
- Attention!
- Declaration:
- USE CHECK
- PACKING LIST
- PRODUCT HIGHLIGHTS
- CAMERA SPEC
- Wall-Mount Installation:
- Ceiling-Mount Installation :
- POWER
- FREEZE
- IRT (IR Transfer/IR Pass)
- Set 1 \~ Set 4 ADDRESS SETTING
- CAM1 \~ CAM4 (CAMERA SELETING)
- NUMBER KEY (1-9)
- CLR PRE (CLEAR PRESET)
- VISCA IN (RS232 PORT)
- LIMIT L/ LIMIT R/ LIMIT CLR:
- VIDEO FORMAT KEYS:
- PELCO-P PROTOCOL
- Set IP Address in Menu
- Login
- PTZ Control
- Camera Settings
- WEB SETTING
- IP Settings
- Manage
- Logout
- Pan Tilt Control
- Run WEB via Studio Monitor
- How to use NDI tools to Virtual Input CAMERA
- VISCA over IP
- VISCA over IP:
- How to use VISCA over IP
- Payload type:
- Payload length
- Payload
- Delivery confirmation
- Sequence chart as following
- Telecam Technology Co., Ltd
Brand : Telycam
Model : Vision+ N3 NDI
Category : Security Camera