ZvSync - Media player ZeeVee - Free user manual and instructions
Find the device manual for free ZvSync ZeeVee in PDF.


| Product Type | Media Player |
| Brand | ZeeVee |
| Model | ZvSync |
| Dimensions | 120 x 80 x 25 mm |
| Weight | Approx. 200 g |
| Power Supply | DC 5V 2A via USB |
| Video Output | HDMI 1.4 |
| Audio Output | HDMI, Optical, Analog |
| Supported Video Formats | MP4, AVI, MKV, MOV, WMV |
| Supported Audio Formats | MP3, WAV, FLAC, AAC |
| Supported Image Formats | JPEG, PNG, BMP, GIF |
| Maximum Video Resolution | 4K@30fps |
| Storage Media | USB, SD Card |
| Connectivity | Wi-Fi, Ethernet, Bluetooth |
| Remote Control | Included (IR) |
| Operating System | Linux-based |
| Power Consumption | < 5W |
| Cleaning Instructions | Wipe with a soft, dry cloth |
| Safety Precautions | Keep away from water and heat sources |
| Spare Parts Available | Remote control, power cable |
| Repairability | User-serviceable: no |
Frequently Asked Questions - ZvSync ZeeVee
User questions about ZvSync ZeeVee
0 question about this device. Answer the ones you know or ask your own.
Ask a new question about this device
Download the instructions for your Media player in PDF format for free! Find your manual ZvSync - ZeeVee and take your electronic device back in hand. On this page are published all the documents necessary for the use of your device. ZvSync by ZeeVee.
USER MANUAL ZvSync ZeeVee
Warnings Cautions and Notes
Throughout the entire user's manual, pay special attention to the following marks that indicate hazardous situations:
1. Warning
Indicates a hazardous situation which could result in serious injury
2. Caution
Indicates a situation which could damage the equipment or other apparatus.
3. Note
Indicates additional information to make the user aware of possible problems and information of any importance to help understand, use and maintain the installation.
Important Symbols
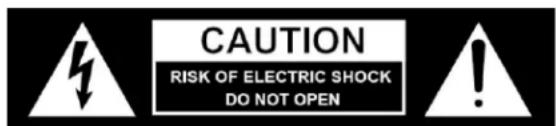
To reduce risk of electric shock, do not open unit or breach power supply enclosure. There are no user serviceable parts inside.
Contact ZeeVee support at +1.877.493.3833
natural_image
Black triangular warning symbol with a lightning bolt inside, indicating electrical hazard (no text)DANGEROUS VOLTAGE
This symbol indicates dangerous voltage inside the unit that presents a risk of electric shock or personal injury.

natural_image
Black triangular warning symbol with exclamation mark (no text or numbers)IMPORTANT INSTRUCTIONS
This symbol indicates important instructions accompanying the unit.
Safety Instructions and Precautions
This receiver has been manufactured to comply with international safety standards. Please read the following safety precautions carefully.
1. Main Supply (100-240V \~50-60Hz AC)
- Operate this product only from the type of power source indicated on the marking label. If you are not sure of the type of power supplied to the location where the receiver is to be used, consult your local power company. Disconnect the product from the main power source before you start any maintenance or installation procedures.
2. Connection to the Cable Feed or Aerial
- Disconnect the product from the AC mains before connecting or disconnecting the cable from the aerial jack.
3. Connection to the Television
- Disconnect the product from the AC mains before connecting or disconnecting a cable from the receiver to the attached television. Failure to do so can damage the television.
4. Overloading
- Do not overload a wall outlet, extension cord or adapter as this may result in electric fire or shock hazard.
5. Liquids
- This product should not be exposed to liquid of any kind. In addition, no objects filled with liquid should be placed on the apparatus.
6. Cleaning
- Disconnect the product from the wall outlet prior to cleaning.
- Use a light, damp cloth (no solvents) to dust or clean the product.
7. Ventilation
- The slots and openings on the case of the product must be left uncovered to allow for air to pass in and out of the for proper cooling.
- Do not operate the product on soft furnishings or carpet.
- Do not stack items on top of the product.
8. Attachments
- Do not use unsupported attachments as these may be hazardous or cause damage to the product.
9. Extraneous Objects
- Do not insert anything into the openings of the unit.
10. Location
- Place the product indoors and avoid exposing it to lightning, rain, or direct sunlight.
- Do not place the product near a radiator or heat register.
- Try to place the unit at least 2 inches (\~10 cm) from any appliance susceptible to electromagnetic influences, such as a television or radio.
- Insure the ventilation considerations are followed when the unit is in service.
- Do not place the product on an unstable cart, stand, tripod, or bracket where it can fall. A falling object can cause injury and may cause serious damage to the product.
11. Lightning, Storm, or Not in Service
- Unplug the product from the wall outlet and disconnect the aerial during a thunderstorm or when left unattended and unused for long periods of time. This will prevent damage due to lightning or power surges.
12. Replacement Parts
- Replacement parts should be purchased through an authorized ZeeVee distributor and approved by the manufacturer. Unauthorized parts may result in damage to the units and will void any warranty.
Contents
1 Before Using the Product....6
1.1 Front Panel 6
1.2 Rear Panel....7
1.3 Remote Control 8
1.3.1 Button Definitions....9
1.3.2 Programmable Buttons....10
2 Setup 12
2.1 Connecting to an Aerial....12
2.2 Connecting to a Cable Feed 12
2.3 Connecting to the Television....13
2.3.1 Using an HDMI Cable....13
2.3.2 Using RCA Cables....14
2.4 Infrared Remote Control Receiver 15
2.4.1 Connecting Infrared Receiver to ZySync 15
2.4.2 Infrared Receiver Usable Angles 16
2.5 Connecting to Power Supply....17
3 Installation Wizard....18
4 Basic Operation....21
4.1 Program Management....21
4.2 Picture Settings 23
4.3 Channel Search....24
4.4 Time Setting....25
4.5 World Option Settings 26
4.6 System Settings....27
4.7 USB & Multimedia 28
5 Troubleshooting....29
6 Technical Specifications 30
7 Declaration of Conformity ....31
1 Before Using the Product
This section provides detailed descriptions of the product and included accessories.
1.1 Front Panel
Front View
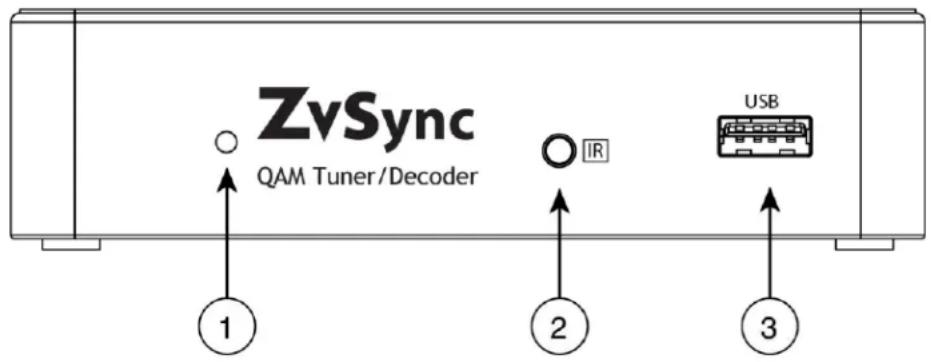
- LED Status Indicator – Indicates state of unit. RED – Unit is powered-up and ACTIVATED
- Infrared Jack – Jack for the installation of the remote Infrared Sensor. For more info, see page 15.
- USB – Jack for installation of USB storage device used for firmware upgrade or activation of the advanced media functions. Use is strictly optional.
1.2 Rear Panel
Rear View
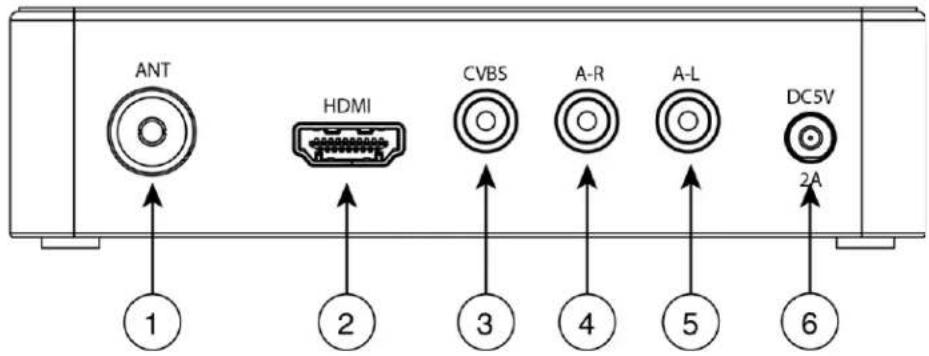
- Aerial/Cable/RF Input (F-type) – Connect to antenna for ATSC over-the-air reception or to a cable feed for Clear QAM reception
- HD Video Output – Most commonly used video output from the receiver unit. Connect to the HDMI digital input of the display device (typically a television). Both high definition video and digital audio are carried.
- CVBS Video Output – Should composite video output be desired, connect the CVBS Video output to the appropriate composite video input of the display device (typically a television or monitor).
- Right Audio Output – Should analog audio be desired, connect to the appropriate 'Right' analog audio input on the display device (typically a television or amplifier).
- Left Audio Output – Should analog audio be desired, connect to the appropriate 'Left' analog audio input on the display device (typically a television or amplifier).
- Power Connector – Connect to the plug on the supplied wall-mount power supply.
1.3 Remote Control
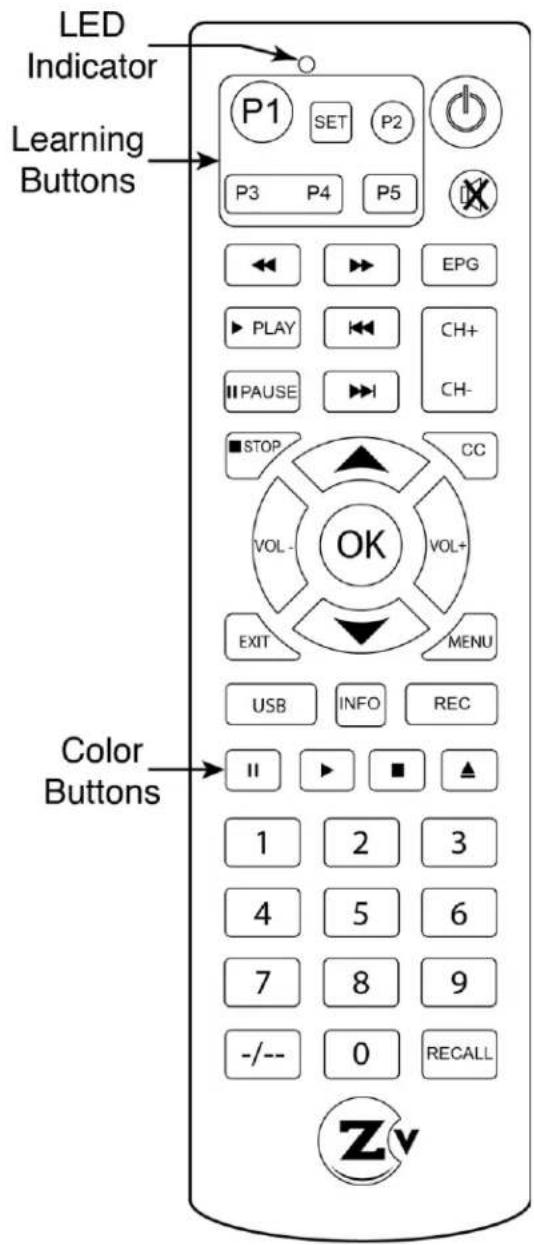
The ZvSync receiver/decoder is supplied with a partial learning remote control device. Buttons P1-P5 can be programmed to mimic the functions of a select set of buttons from another remote control unit.
The intention is that the TV viewing experience can be controlled from a single handset to include power and volume control of the television set and all other functions directed at controlling the ZvSync receiver/decoder.
1.3.1 Button Definitions
| Key | Definition |
 | Power. Pressing once turns on ZvSync. Again turns it off |
| [GWH] | Mute. Disables/Enables audio |
 | Reverses playback while in PVR mode |
 | Fast Forwards playback while in PVR mode |
 | Starts Playback when using PVR mode |
 | Back up to division in PVR mode. |
 | Pauses playback in PVR mode |
 | Advances to division when using PVR mode |
 | Displays Electronic Program Guide information |
 | Quick channel up and down buttons when watching television programs. |
 | |
 | Stops playback when using PVR mode. Causes PVR mode to be entered during normal playback. |
 | Enables/disables Closed Captioning |
 | Cancels/Exits menu levels when navigating interface. |
 | Calls up the menu of options for control of the ZvSync device. |
| [GBGK] | Activates PVR mode. Displays related options. |
| [BY2X] | Displays current playback information |
 | Presents Recording options when using the storage and PVR functions. |
 | Color buttons. Program specific meaning |
 | Dash button for entering digital channel numbers (ie: “23-1”) |
 | Recall last channel being played |
 | Numeric digits for entering channel numbers |
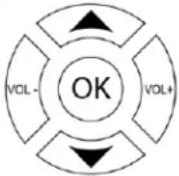 | Arrow Navigation Buttons when driving configuration interface.During normal playback Up/Down sets channels, Left/Right sets volume and OK displays channel list. |
1.3.2 Programmable Buttons
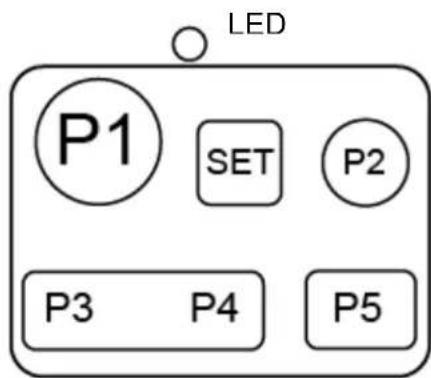
The upper-left portion of the remote houses a set of programmable keys. The intent is to allow for common television functions to be programmed so the user only needs to use a single remote control device to manage their television experience when using the ZvSync receiver/decoder.
Keys P1 though P5 can be set to any function the user desires. The labeling is present only to provide visual cues the user may use to help remember which key has been programmed to which function.
The "SET" key has a fixed function that is not programmable. It initiates the programming process for setting the P1-P5 key functions.
1.3.2.1 Programming P1 - P5 Buttons
The ZvSync remote has been tested to be compatible with a large number of remotes. However, some manufacturers use infrared codes that are obscure and cannot be “copied” into the programmable keys of the ZvSync remote.
ZvSync Remote
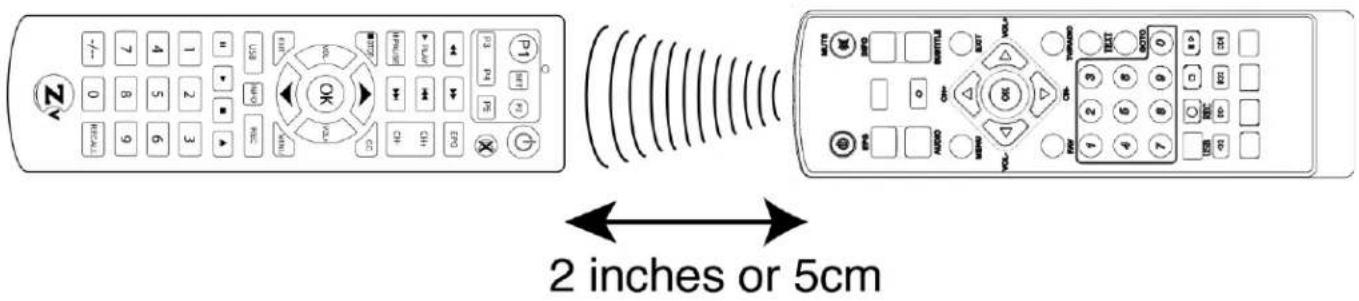
To program a key the following sequence shall be executed:
- Step1: Press and hold the "SET" button for three seconds
The RED LED lights immediately when the button is pressed
➢ After 3 seconds the LED changes to a very bright state
- Step 2: Press the key you wish to program (P1-P5)
The RED LED changes to a slow flash (1/second)
- Step 3: Press the key on the remote that you are copying
The RED LED performs three quick flashes to acknowledge
▶ RED LED turns on solid again.
➢ Repeat steps 2 and 3, or simply wait for light to extinguish
- Step 4: Test Programmed key on television or device to be controlled
○ If command is not executing properly, repeat steps 1-3
2 Setup
This chapter describes how to connect your ZvSync Receiver to the television and receiving apparatus appropriately. The receiver has various options and interfaces for connectivity. Select the method appropriate to your application.
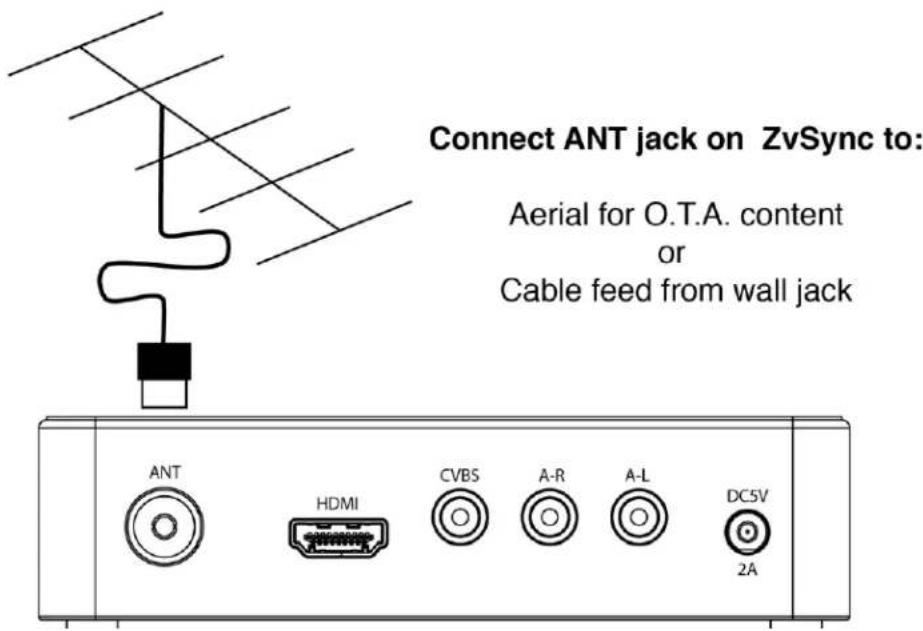
2.1 Connecting to an Aerial
Connect you antenna to the ZvSync receiver's 'ANT' jack for Over-the-Air reception as follows:
2.2 Connecting to a Cable Feed
To receive a cable television signal or a channel generated by ZeeVee's encoder/modulator products connect the cable feed to the 'ANT' jack on the rear face with a 75ohm F-Type cable.
2.3 Connecting to the Television
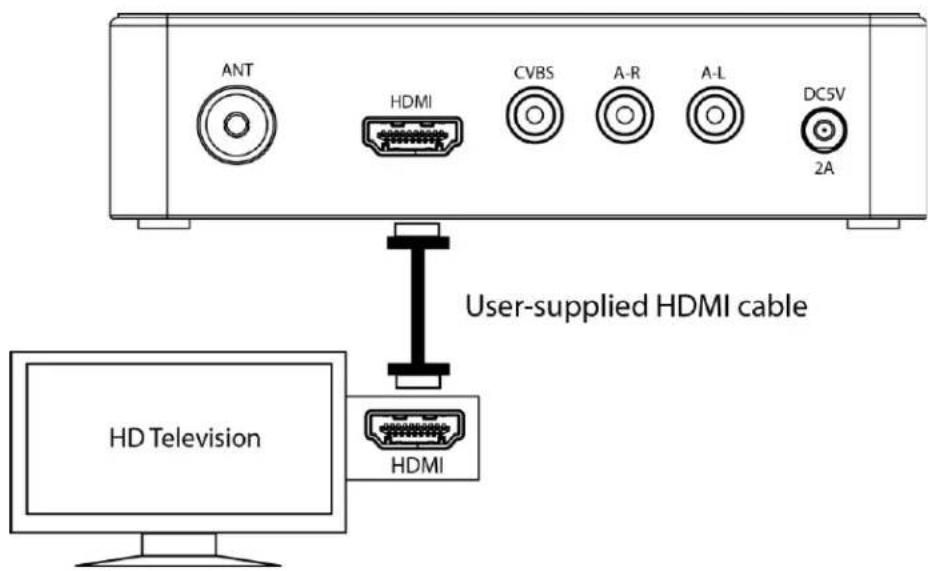
2.3.1 HDMI Cable
A connection to the HDMI input of a television, if so equipped, is the recommended method to get visual content on to the television display. Both visual content and audio content are carried over the single cable from the ZvSync to the television display.
The digital connection presents the highest resolution, sharpest picture possible from the ZvSync receiver.
2.3.2 RCA Cables
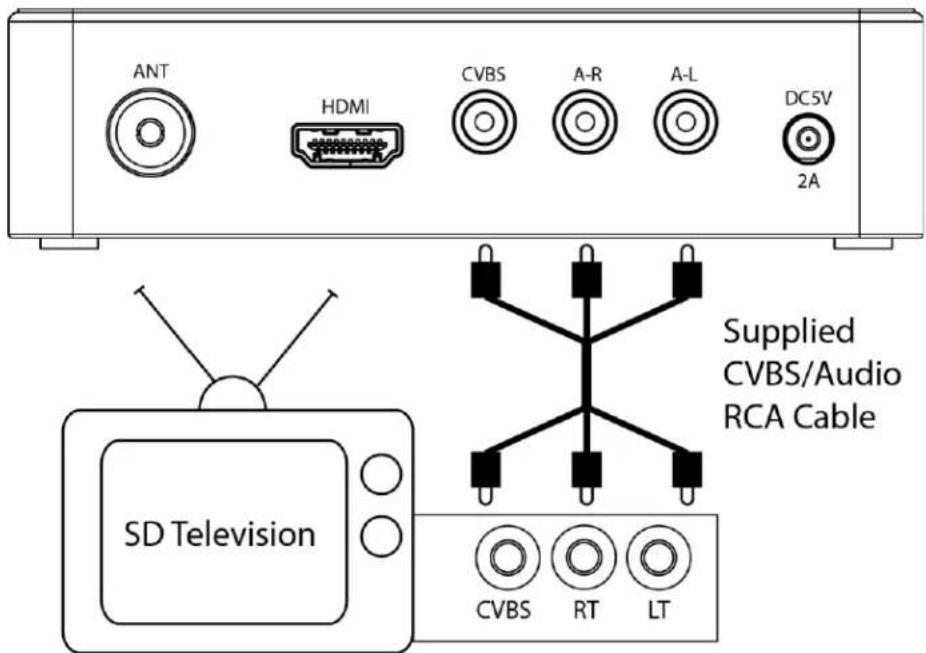
Certain televisions or applications do not have digital video inputs. The ZvSync will output standard definition representations of the programming over the CVBS port. Both the CVBS output and the HDTV digital output are active simultaneously.
All content will be scaled down to 480i resolution regardless of the incoming resolution prior to be sent out the CVBS port.
2.4 Infrared Remote Control Receiver
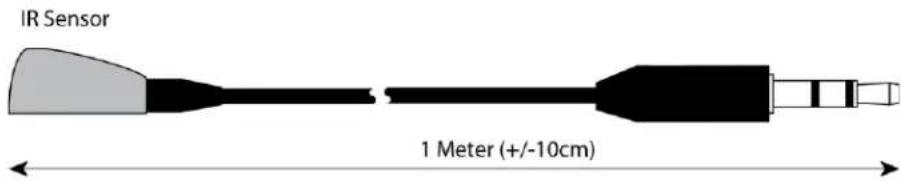
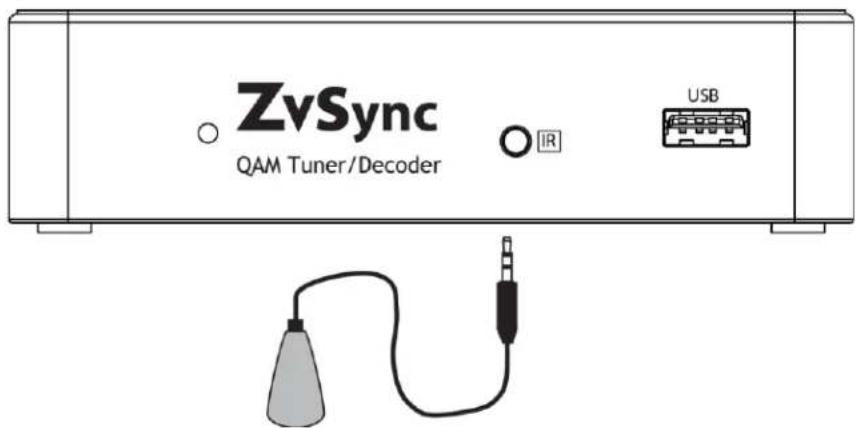
The ZvSync-NA receiver/decoder is supplied with an external IR receiver. This is in the form of a cable with an IR receiver at the end.
The pigtail MUST be installed for the ZvSync to receive commands from the remote control device and is required for proper operation.
By separating the Infrared receiver from the base unit, the main body of the ZvSync receiver/decoder can be installed in an unobtrusive location with only the IR sensor showing.
2.4.1 Connecting Infrared Receiver to ZySync
The 3.5mm plug on the Infrared pigtail must be plugged in to the front "IR" port on the ZvSync main unit for proper operation.
2.4.2 Infrared Receiver Usable Angles
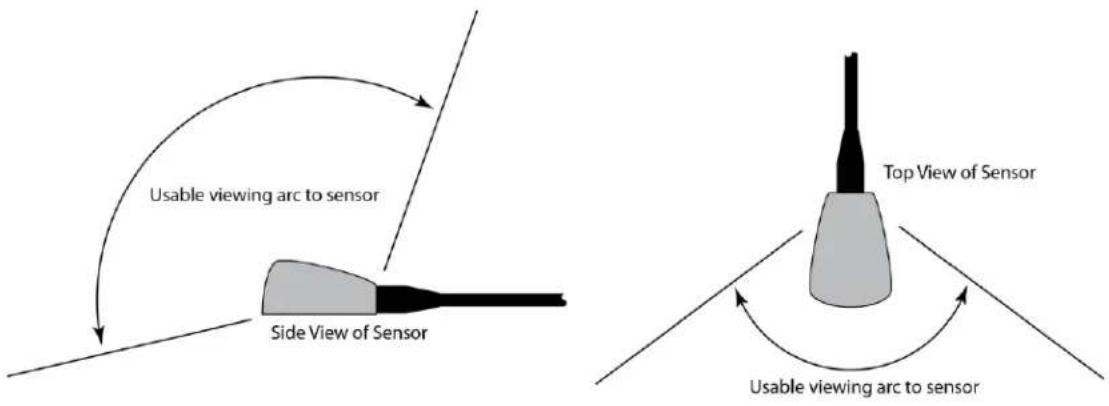
The remote control must have a relatively unobstructed "line-of-sight" to the infrared sensor. The usable angles are quite flexible, yielding many possible mounting options. The included double-sided tape is commonly used to mount the IR sensor to bottom or side bezel of the attached television.
At the user's discretion the main body of the ZvSync-NA receiver/decoder may be placed out of sight, providing the proper ventilation considerations are observed.
2.5 Connecting to Power Supply
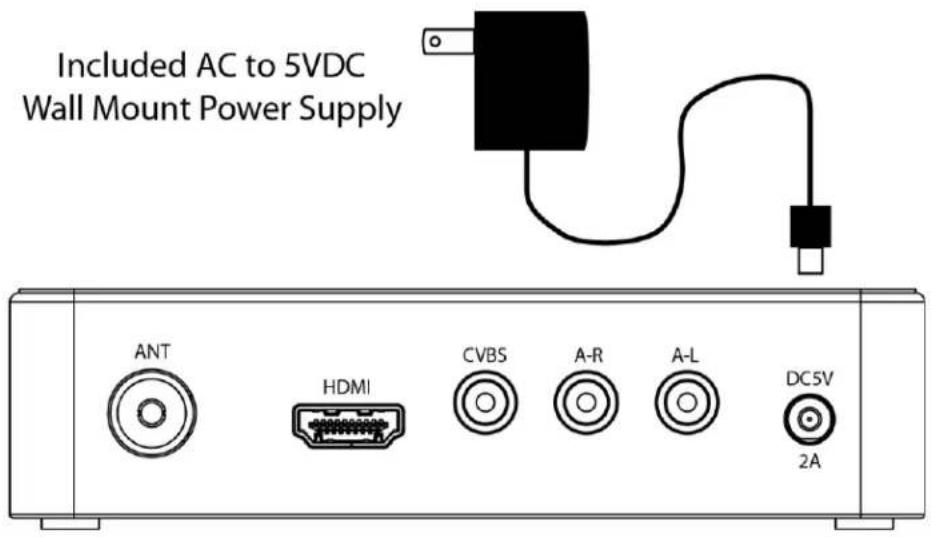
The wall-mount power supply (included) shall provide the power for the ZvSync receiver. Other methods of powering the ZvSync may void the warranty.
The DC input is rated at 5VDC at a maximum peak consumption of 10W, nominal consumption of 6W during operation, and a standby power draw of 0.8W.
3 Installation Wizard
If you are using the receiver for the first time, or have restored it to factory defaults, the Installation Guide Menu will appear on your screen.
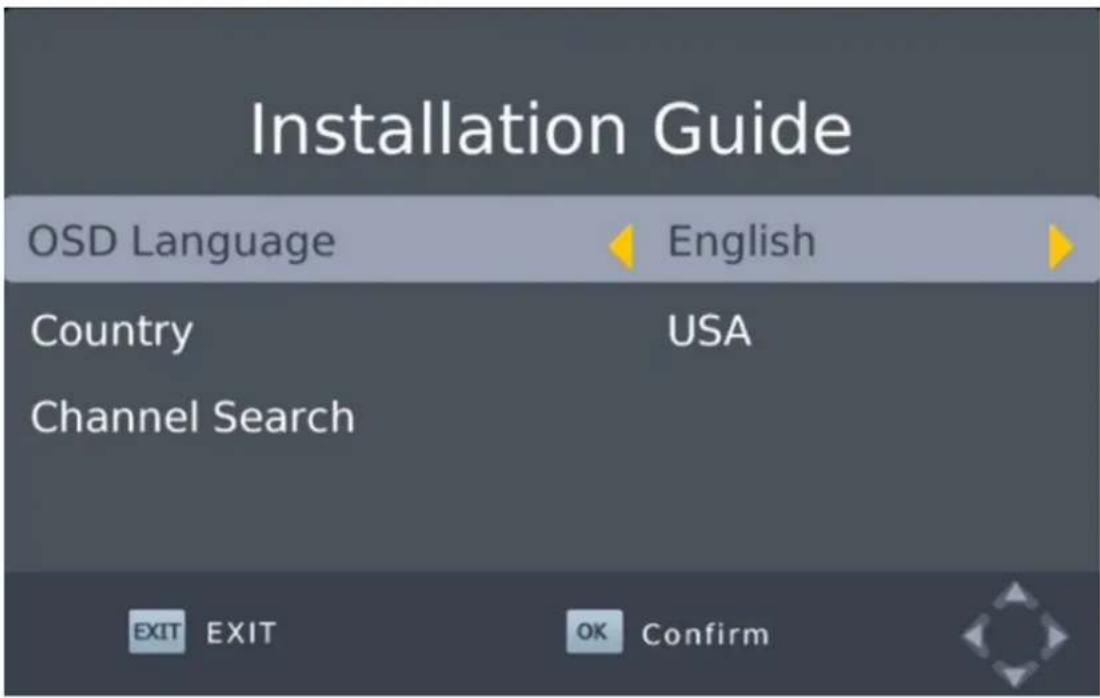
Select the desired language for the On Screen Display interface
If the ZvSync Receiver/Decoder is being used for CABLE reception (or channels being generated by ZeeVee encoder/modulator products), navigate to the "Channel Search" option and press "OK".
- The ZvSync unit will then begin searching for channels. Allow it to run to completion.
Once the scan is complete, the ZvSync is ready for normal operation.
If the ZvSync-NA Receiver/Decoder is being used for Over-theAir (antenna) reception, Press the "Exit" button on the remote control.
If Over-the-Air (antenna) reception is desired, and the previous "Installation Guide" page was exited, you will be presented with the following screen:
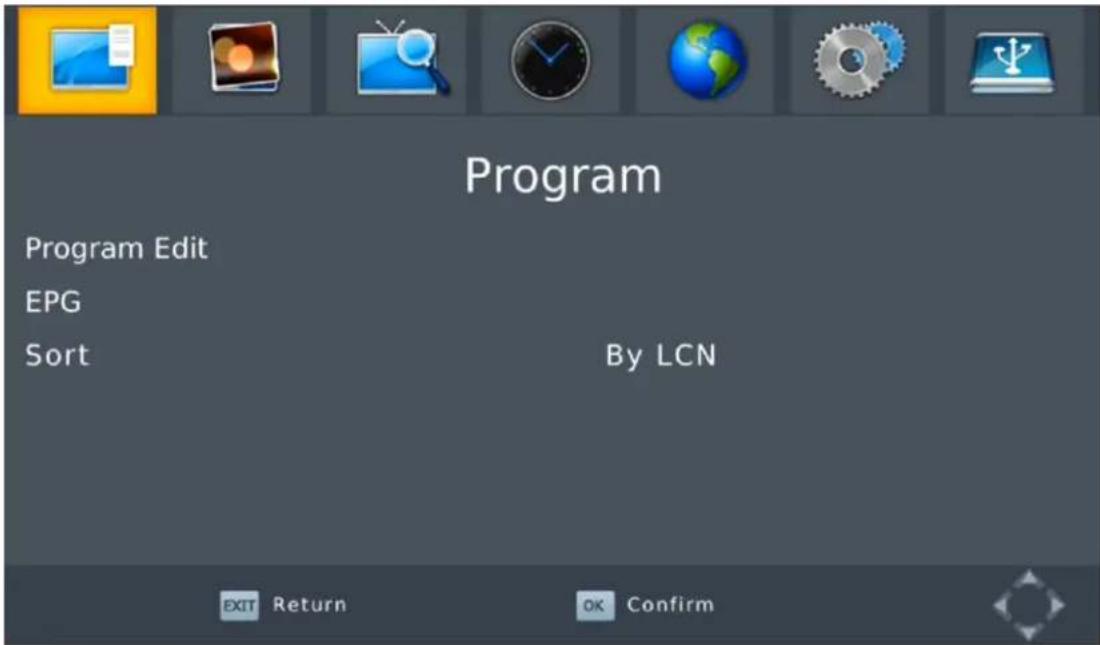
Use the RIGHT arrow key (VOL+) to navigate to the "Channel Search" page
Use the DOWN arrow key to navigate to the "Signal Type"
Use the RIGHT arrow key (VOL+) to bring up the "AIR" option
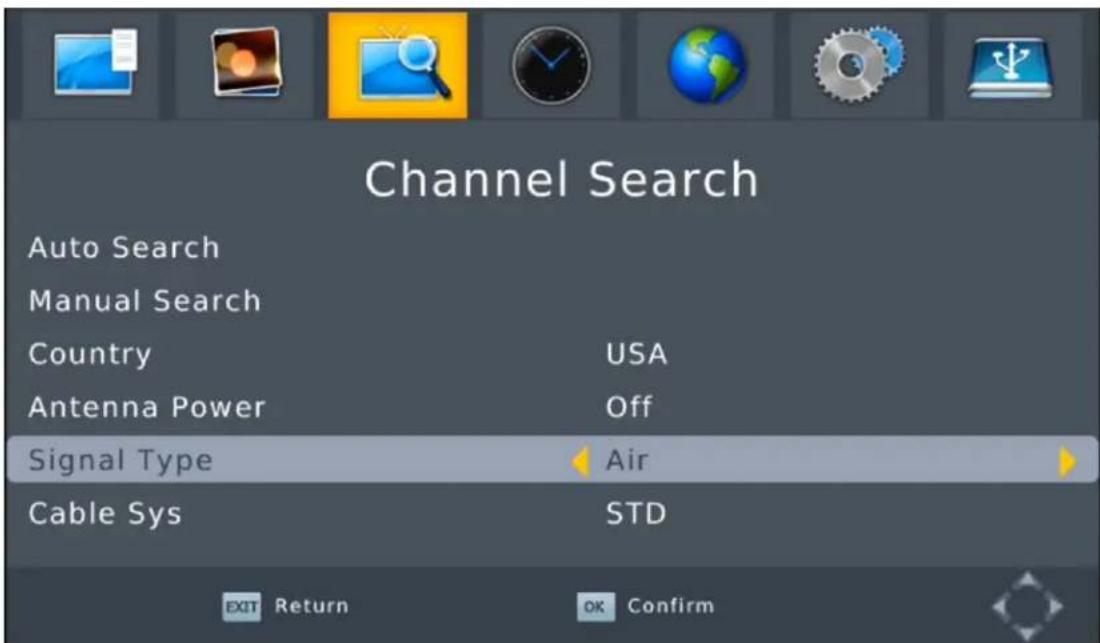
With the "AIR" option highlighted:
Use the UP arrow key to navigate to the "Auto Search" option
Use the RIGHT arrow key (VOL+) to activate a channel search
A scanning status screen showing the progress of the initial channel scan will appear.
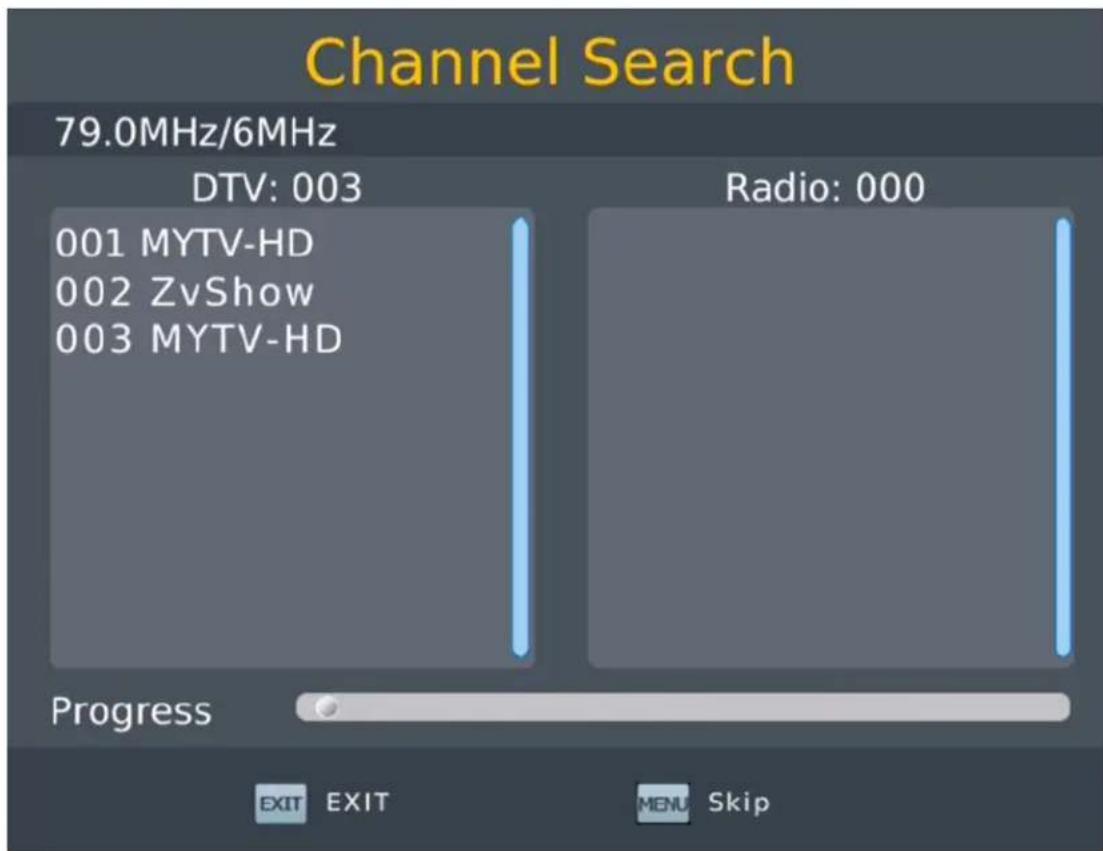
Allow the scanning process to run to completion (may take several minutes).
Once the initial scan is complete (OTA or Cable) the ZvSync may be used to start watching television programs.
4 Basic Operation
To access the general setup menu, press the "Menu" button. The user will be presented with this top-level navigation screen.
Major categories may be selected by navigating left and right using the arrow keys. Once a category is selected, the options may be explored by navigating down into the page and selecting the appropriate page item.
After selecting a page item for a certain category offunctions, navigate DOWN to a specific item and “step into” the item by navigating to the RIGHT (VOL +). The function will execute or a sub-menu will be presented with additional options.
4.1 Program Management
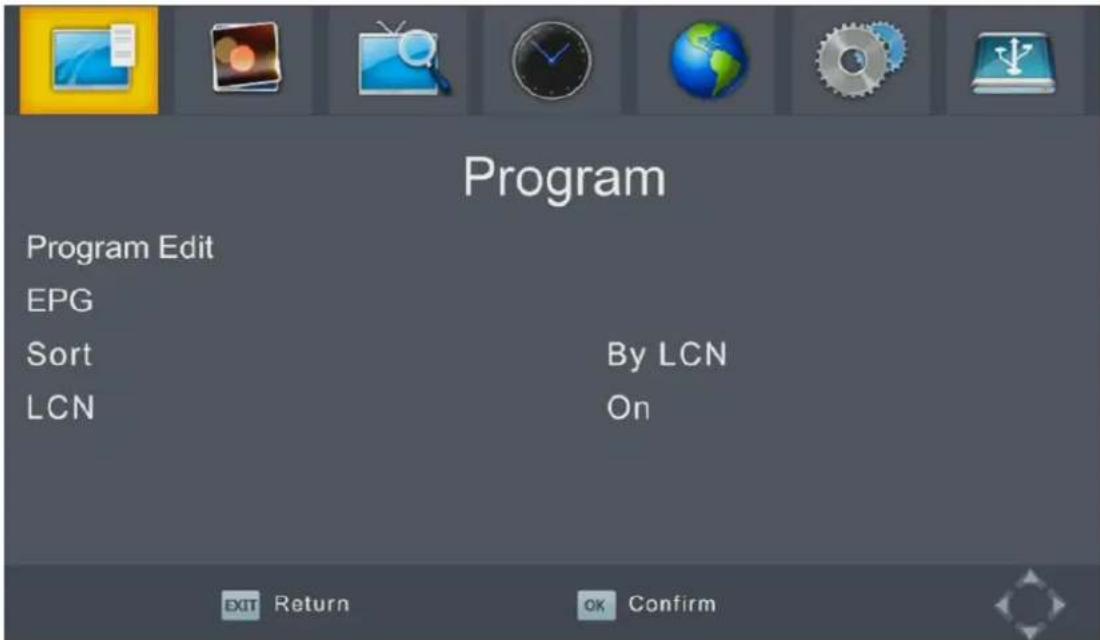
(a) Program Edit
To edit your program preferences (lock, skip, favorite, move, or delete), you will need to enter the Program Edit Menu item. This menu requires a password to access. The default password is '000000', while the master unlock password is '888888'.
Selecting Channels
At any point in time the "CH+" or "CH-" keys may be pressed to step up or down in the channel lineup.
The “OK” key may be pressed at any point in time while viewing a program to being up a complete list of the available programs that was determined during the last scan
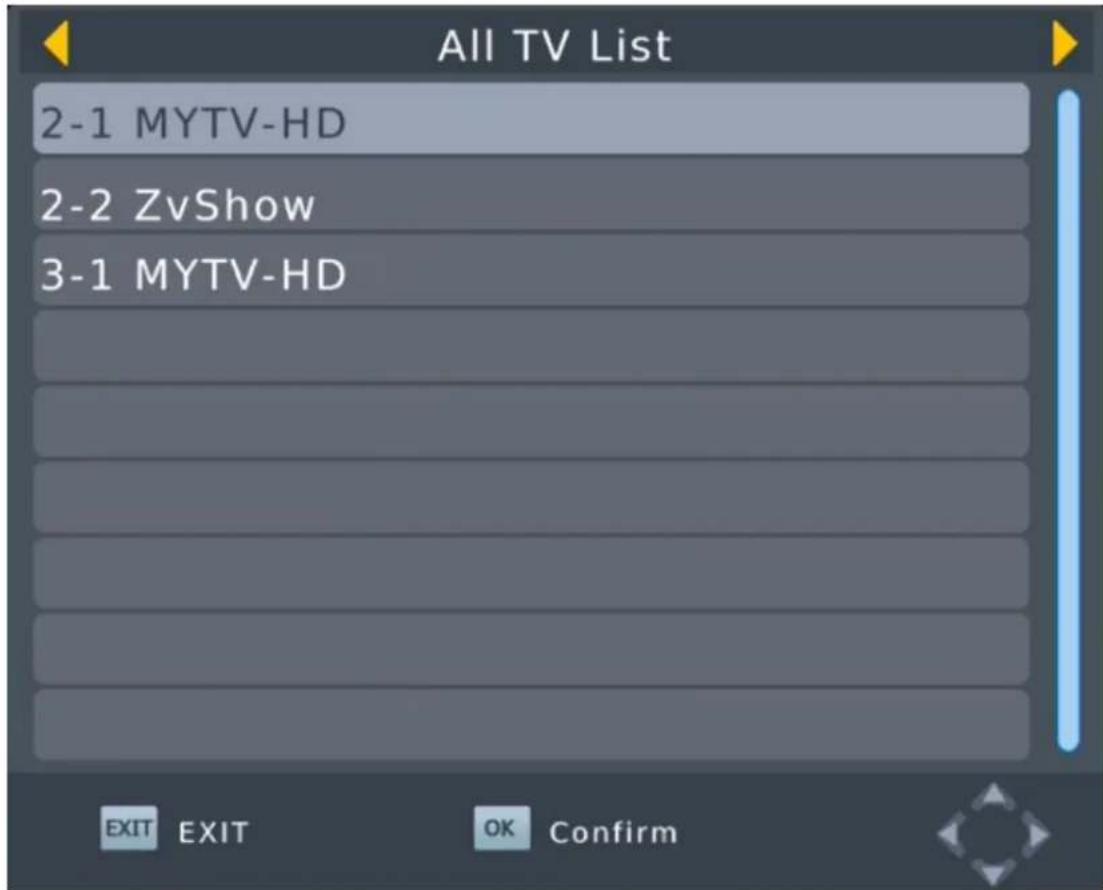
Navigating up or down with the arrow keys allows for rapid selection of a program. Once highlighted, pressing the "OK" key selects the program for viewing.
Alternately, the explicit channel number can be typed; "3-1", for example.
4.2 Picture Settings
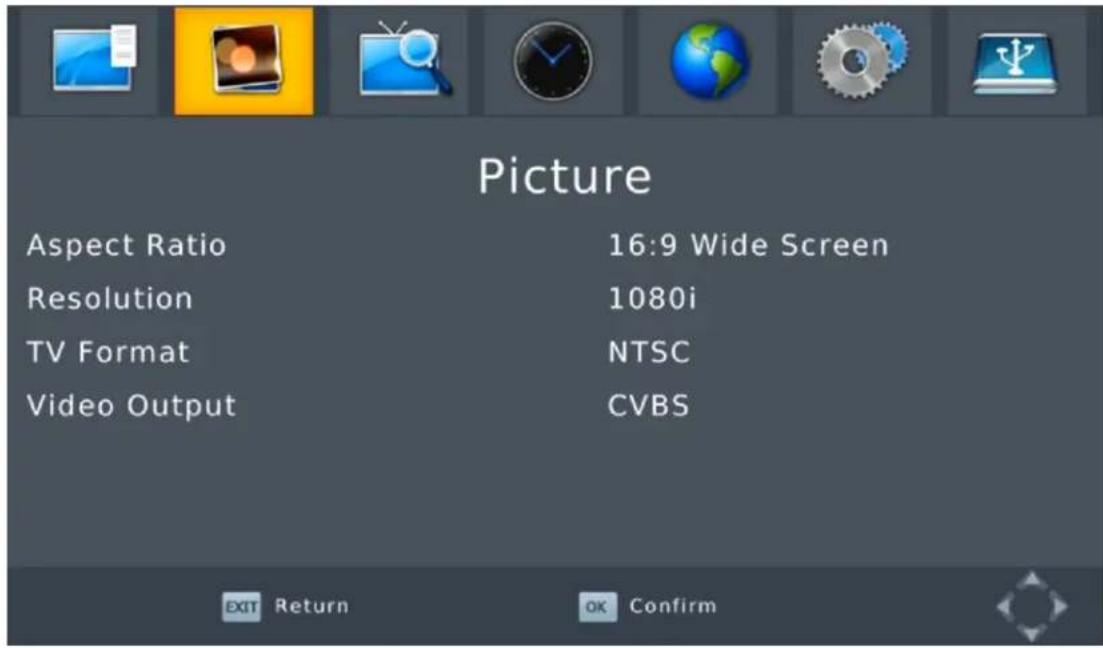
The allowed output video settings can be adjusted at the "Picture" top-level settings page.
When the HDTV port is connected via HDMI to the television display all the settings are honored. If composite video (CVBS) is being used to send the video to the display device the only supported resolution is 480i regardless of the setting on the Resolution item.
4.3 Channel Search
The “Channel Search” top-level navigation page allows the ZvSync tuner/decoder to rescan for channels and change settings relevant to the attached reception method.
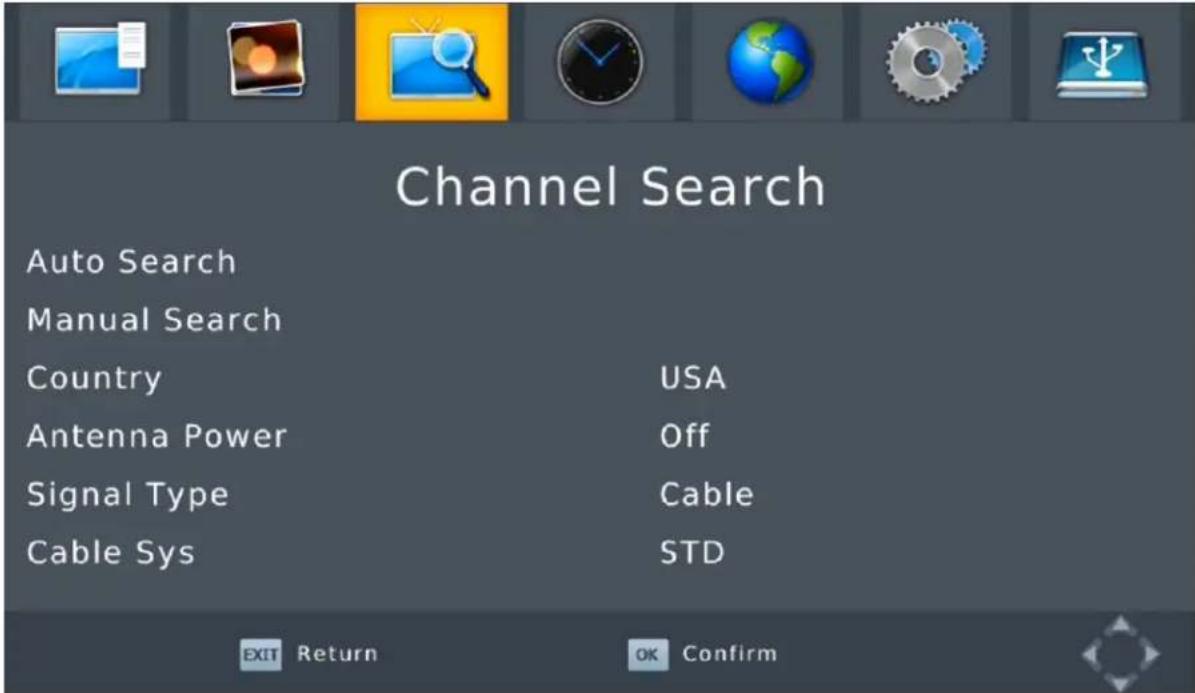
Auto Search
Automatically searches for channels and saves them once the scan is complete. All previous entries will be deleted.
Select "Auto Search" and press OK or RIGHT arrow to start
To cancel press EXIT. Only found channels will be saved.
Manual Search
Allows for the addition of individual channels without deleting the previously saved channels and settings. User must know the channel number or center frequency of the channel of interest.
Antenna Power
Disabled normally unless an externally powered antenna is employed
Signal Type
Select "AIR" if receiving from an Antenna. Select "Cable" if receiving from a Cable Provider or ZeeVee encoder/modulator product.
Cable Sys
Indicates the frequency plan active on the cable plant being scanned. Most commonly found is "STD". "HRC" or "IRC" are still used in some instances, though not common.
4.4 Time Setting
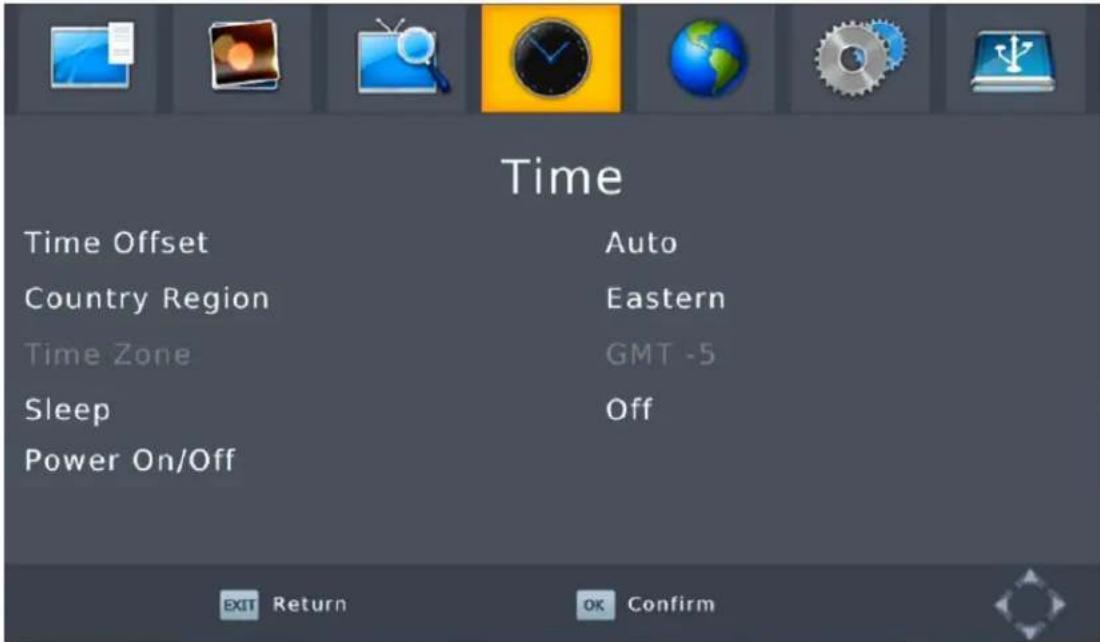
Time Offset
Automatic or manual GMT time offset adjustments.
Country Region
Select Region of interest for use with Auto Time Offset adjustments.
Time Zone
Time zone when Time Offset is set to manual.
Sleep
Allows setting of an interval after which the ZvSync will automatically shut off
Power On/Off
Allows setting a schedule for time-of-day activation and shutdown of the ZvSync device.
4.5 World Option Settings
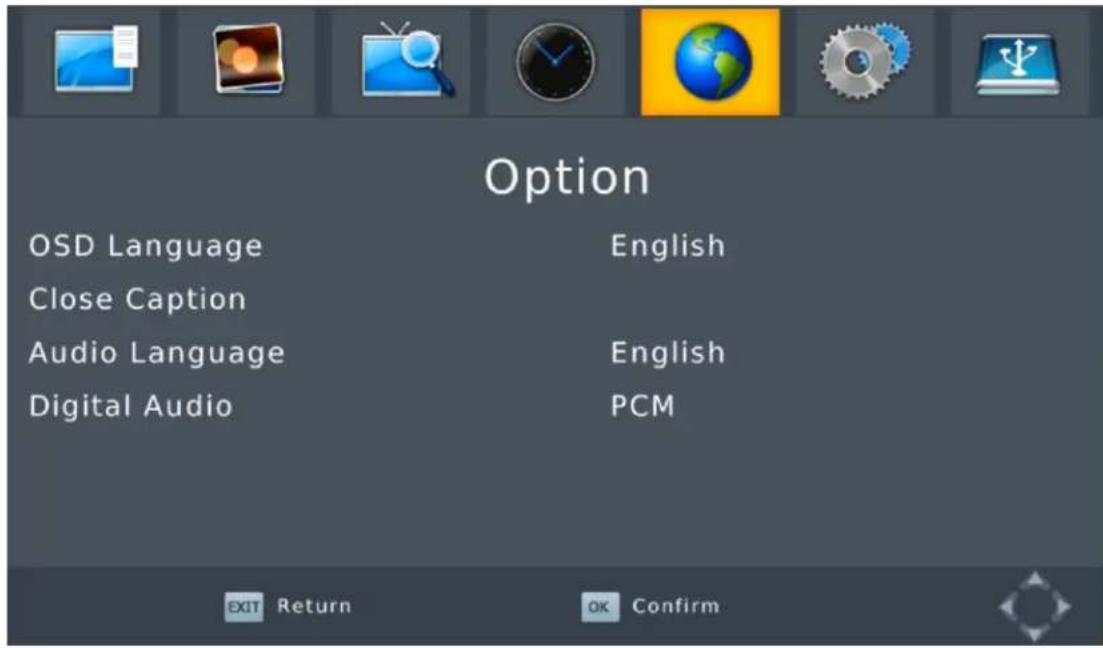
The Option screen allows for setting the On Screen Display language and the audio language to be played if the incoming program allows for those options.
Closed Caption
Navigating and selecting this option allows for configuration of the type and position of the Closed Caption data display when the "CC" button is pressed while watching a program.
Digital Audio
Allows setting various types of audio to be output over the HDTV port.
4.6 System Settings
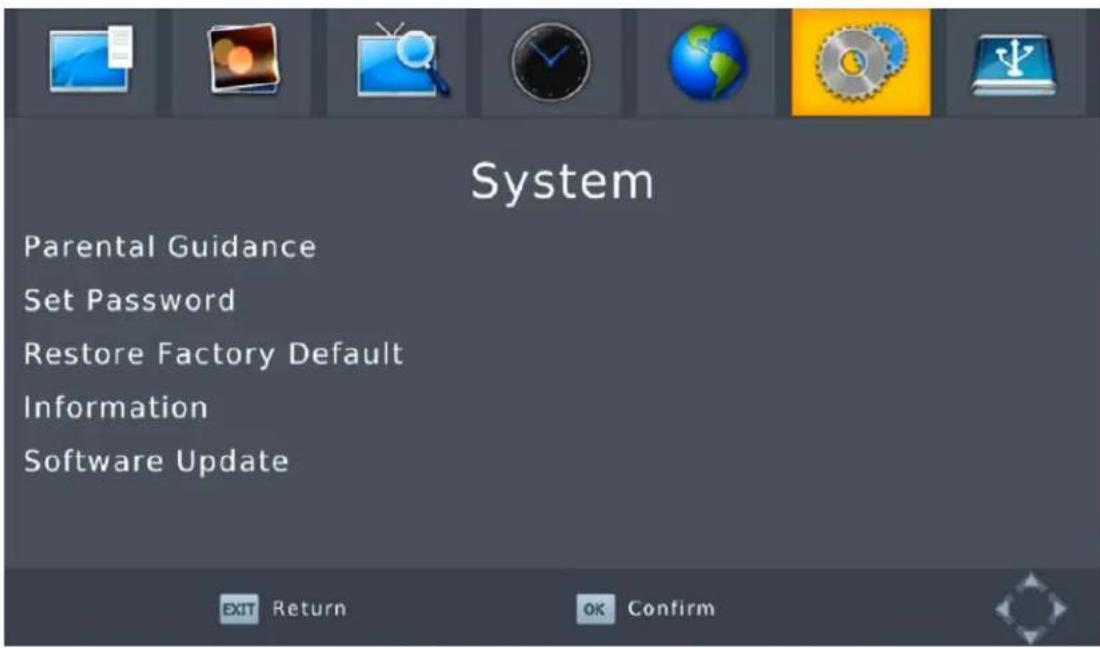
Various System Parameters
Default user password is '000000'. Master unlock password is '888888'.
4.7 USB & Multimedia
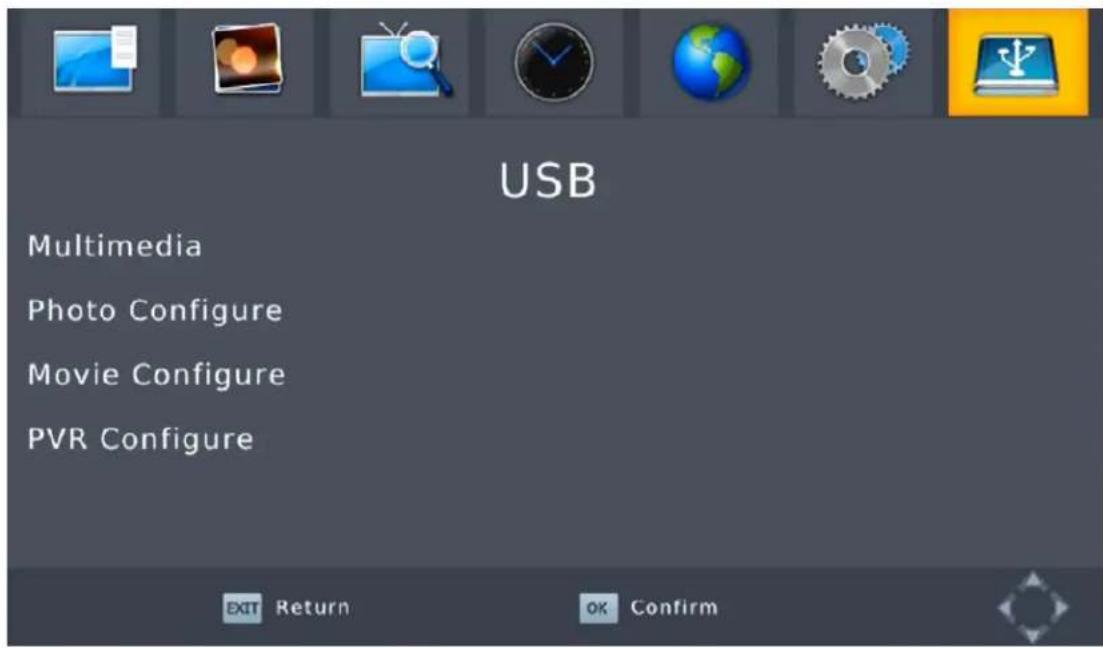
The ZvSync device supports a rich set of features enabled through the use of a USB device. In order to support the PVR functions of time shifting and recording, a storage device (not provided) must be present.
It is recommended that a high-performance USB storage device be used if these functions are to be utilized. The format must be FAT32. NTFS is not supported.
Use of the PVR and media storage functions is freely available and encouraged. This set of features is not actively supported by ZeeVee and customer support is not available for the time-shifting, media playing, or PVR functions.
Media types of AVI, MP3, WMA, JPEG, BMP, etc. are supported.
5 Troubleshooting
| Problem | Potential Reason | Possible Action |
| No Picture | Power is not connected | Connect power supply.Check wall source. |
| The power is switched off | Switch on Power to ZvSync | |
| Screen shows “No Signal” | Cable feed is not connected | Check/Connect power cable |
| Aerial cable is faulty | Check aerial and connections | |
| No Sound from speaker | Incorrect or faulty connection with audio cable | Correctly connect the audio cables |
| Sound on Mute | Select the mute/unmute on the remote | |
| Only Sound, no image on screen | Incorrect A/V cable connection | Check cable connections |
| Program is a radio program | The program being tuned may be audio only | |
| Incorrect setting in digital audio | Set a different audio type in World Options | |
| Remote control is not working | The battery is exhausted | Replace the remote control's batteries. |
| Remote control is not facing or visible to ZvSync IR detector | Reorient ZvSync IR detector and remote control. Ensure detector is properly plugged in to front of unit. | |
| The picture is breaking up | The input signal is too weak. | Check aerial cable and connections |
6 Technical Specifications
| Item | Sub-Item | Parameter |
| Tuner | Input Frequency | 48-862MHz |
| RF Input Level | -20 to -82dBm | |
| IF Bandwidth | 6,7, and 8MHz | |
| Modulation | ATSC(8VSB) 16QAM, 64QAM, 256QAM | |
| Video | Decoder Format | MPEG2 MP@ML/HL |
| Output Format | 480i, 480p, 720p, 1080i, 1080p60Hz | |
| Aspect Ratio | 4:3, 16:9, Auto | |
| Output Port | HDMI(v1.3C), CVBS | |
| Audio | Decoder Format | MPEG-1(layer 1 & 2 & 3), WMA, AC-3 |
| Audio Output | Digital Audio over HDMI, RCAx2(L/R) | |
| USB2.0 | Supported Capacity | Unlimited |
| Supported Media | MP3, WMA, JPEG, BMP, AVI | |
| Power | Supply Voltage (wall) | 100-240VAC 50-60Hz |
| Supply voltage (ZvSync unit) | 5VDC | |
| Maximum Power Consumption | 10W | |
| Standby Power Consumption | <0.8W | |
| Nominal Power Consumption | 5W |
7 Declaration of Conformity
The Original Equipment Manufacturer herewith declares the conformity of the product with the following directives and standards:
Low Voltage Directive 2006/95/EC
EN 60065:2002+A1:2006
EMC Directive 2004/108/EC
EN 55 013:2001+A1:2003+A2:2006
EN 55 020:2007
EN 61 000-3-2:2006
EN 61 000-3-3:2008
FCC, CE, C-Tick
ECTQAM
natural_image
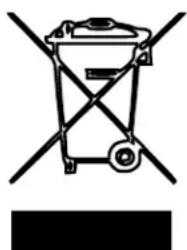
Simple line drawing of a trash bin with crossed x-axes and a circular weight, no text or symbols present.Dispose of Properly
This symbol on the product or in the instructions means that your electrical and electronic equipment should be disposed of at the end of its life separately from normal household waste. There are separate collection systems for proper recycling of the constituent elements. For more information, please contact your local environmental authority or the retailer where you purchased the product.
Contact ZeeVee
Support
Contact us for installation and technical support, repairs, and warranty service:
+1 (877) 4ZEEVEE (1-877-493-3833)
support@zeevee.com
Representatives are available from 9:00AM to 6:00PM, Monday through Friday (Eastern Time).
Sales
North America:
+1 (347) 851-7364
sales@zeevee.com
EMEA:
+44 1494 956677
EMEAsales@zeevee.com
- Warnings Cautions and Notes
- Warning
- Caution
- Note
- Important Symbols
- DANGEROUS VOLTAGE
- IMPORTANT INSTRUCTIONS
- Safety Instructions and Precautions
- Main Supply (100-240V \~50-60Hz AC)
- Connection to the Cable Feed or Aerial
- Connection to the Television
- Overloading
- Liquids
- Cleaning
- Ventilation
- Attachments
- Extraneous Objects
- Location
- Lightning, Storm, or Not in Service
- Replacement Parts
- Contents
- Before Using the Product
- Front Panel
- Front View
- Rear Panel
- Rear View
- Remote Control
- Programmable Buttons
- Programming P1 - P5 Buttons
- Setup
- Connecting to an Aerial
- Connecting to a Cable Feed
- Connecting to the Television
- HDMI Cable
- RCA Cables
- Infrared Remote Control Receiver
- Connecting Infrared Receiver to ZySync
- Infrared Receiver Usable Angles
- Connecting to Power Supply
- Installation Wizard
- Basic Operation
- Program Management
- Program Edit
- Selecting Channels
- Picture Settings
- Channel Search
- Auto Search
- Manual Search
- Antenna Power
- Signal Type
- Cable Sys
- Time Setting
- Time Offset
- Country Region
- Time Zone
- Sleep
- Power On/Off
- World Option Settings
- Closed Caption
- Digital Audio
- System Settings
- USB & Multimedia
- Troubleshooting
- Technical Specifications
- Declaration of Conformity
- Dispose of Properly
- Contact ZeeVee
- Support
- Sales
Brand : ZeeVee
Model : ZvSync
Category : Media player