impression S500 Profile - Lighting GLP - Free user manual and instructions
Find the device manual for free impression S500 Profile GLP in PDF.


| Product Type | LED Moving Head Profile Spotlight |
| Brand | GLP (German Light Products GmbH) |
| Model | impression S500 Profile HO/HC |
| LED Power | 500W white LED engine |
| Versions | Profile HC (26,000 lm, 6,000K, CRI>90) and Profile HO (40,000 lm, 7,000K) |
| Total Lumen Output | HC: 10,700 lm; HO: 14,800 lm |
| Beam Angle | 7.5° to 40° field angle |
| Weight | 26.9 kg |
| Control Protocols | DMX512, RDM, Art-Net, sACN, optional CRMX |
| Pan Range | 540° (extendable to 565°) |
| Tilt Range | 256° |
| Dimmer | Electronic 16-bit, 3 dimming curves |
| Shutter Effects | Pulse open/close, random strobe, regular strobe |
| Color Mixing | CMY system with CTC control |
| Color Wheel | 6 full colors + 4 color correction filters (10 slots incl. open) |
| Gobo Wheel 1 (Rotating) | 7 gobos + open |
| Gobo Wheel 2 (Static) | 10 gobos + open |
| Framing System | 4 individually controllable blades with tilt and rotation (-45° to +45°) |
| Frost | Variable, soft to medium |
| Prism | 8-facet rotating |
| Zoom | Motorized |
| Focus | Motorized with Focus Tracking (near/medium/far/off) |
| Display | Backlit graphic LCD with self-charging battery for offline use |
| Safety | Read Quick Start and Safety Manual before installation, operation, or service |
| Service | Contact GLP Support (Germany: +49 7248 9271955, USA: +1 818 767-8899, etc.) |
Frequently Asked Questions - impression S500 Profile GLP
User questions about impression S500 Profile GLP
0 question about this device. Answer the ones you know or ask your own.
Ask a new question about this device
Download the instructions for your Lighting in PDF format for free! Find your manual impression S500 Profile - GLP and take your electronic device back in hand. On this page are published all the documents necessary for the use of your device. impression S500 Profile by GLP.
USER MANUAL impression S500 Profile GLP
natural_image
Black industrial radar or scanning device with lens and mounting base (no visible text or symbols)Document revision: 20250116-01
Fixture software version 0.4.3
Document revisions
| Revision number | Notes | Date released |
| 20250116-02 | First release of the User Manual for the impression S500 Profile HO/HC.Covers firmware v. 0.4.3 | January 2025 |
GLP® impression S500 Profile HO/HC User Manual
© 2025 German Light Products GmbH. All rights reserved.
The marks 'GLP' and 'German Light Products' are trademarks registered as the property of German Light Products GmbH in Germany, in the United States of America and in other countries.
The information contained in this document is subject to change without notice. German Light Products GmbH and all affiliated companies disclaim liability for any injury, damage, direct or indirect loss, consequential or economic loss or any other loss occasioned by the use of, inability to use or reliance on the information contained in this document.
Manufacturer's head office:
German Light Products GmbH (GLP),
Industriestrasse 2, 76307 Karlsbad,
Germany
Tel (Germany): +49 7248 92719 - 0
Service & Support EMEA:
GLP, Industriestrasse 2,
76307 Karlsbad, Germany
Tel. (Germany): +49 7248 9271955
Email: support@glp.de
www.glp.de
Service & Support USA:
91406 Van Nuys, California
Tel (USA): +1 818 767 8899
Support (US):
info@germanlightproducts.com
www.germanlightproducts.com
Table of Contents
- Safety....4
Key to symbols 4
GLP Service and Support....5
Avoiding damage to the fixture....5
-
impression S500 Profile HO/HC overview....6
-
Features....7
Control options....7
User setting presets....7
Pan and Tilt....8
Fixture performance (speed) options 8
Intensity / Dimmer 8
Shutter....9
Control / Special channel 9
Zoom....9
Focus 10
Color Mix / Color Wheel / CTC....10
Gobo Wheel 1 (rotating gobos)....11
Gobo Wheel 2 (static)....11
Framing 12
Effect / Animation wheel....12
Frost 12
Prism....12
- Control panel....13
Default information screen....13
Using the control panel....13
Control button shortcuts....15
Live Diagnostics ....15
Toggle Display Orientation....15
Error Messages....15
Loss of DMX signal....15
Service and maintenance....15
- Control menu structure....16
Quick menu 16
Main menu....17
1. Safety
Key to symbols
The following symbols are used in the product's user documentation:

Warning! Safety hazard. Risk of severe injury or death.
Warning! Hazardous voltage. Risk of lethal or severe electric shock.

Warning! See user documentation for important safety information.

Warning! Fire hazard.

Warning! Risk of eye injury.

Warning! Hot surface. Risk of burn injury.

Important Information for correct use of the product

Warning! Read the impression S500 Profile HO/HC Quick Start and Safety Manual supplied with the fixture and available for download from www.glp.de before installing, operating or servicing the fixture. The Quick Start and Safety Manual contains important information for the safe use of impression S500 Profile HO/HC fixtures. If you fail to read that information you may create a safety hazard with a risk of serious or lethal injury or damage.

If you have any doubts or questions about how to use the GLP® impression S500 Profile HO/HC lighting fixture safely, contact your GLP supplier for assistance. Your GLP supplier will be happy to help.
The user documentation for impression S500 Profile HO/HC fixtures consists of three documents:
- The impression S500 Profile HO/HC Quick Start and Safety Manual, supplied with fixtures and available for download from www.glp.de. The Quick Start and Safety Manual contains important safety information and installation instructions that the installer and user must read. It also contains dimensions drawings and technical specifications for the fixture.
- The impression S500 Profile HO/HC User Manual, (this document). The User Manual explains features and control of impression S500 Profile HO/HC fixtures.
- The impression S500 Profile HO/HC DMX Channel Index, available for download from www.glp.de. The Channel Index is a separate document containing the DMX control channel layout and DMX commands available in the fixture.
The impression S500 Profile HO/HC is intended for use by experienced professionals with the knowledge and skills to set up, operate, and maintain high-powered, remotely controlled lighting equipment safely and efficiently. These operations require expertise that may not be provided in this manual.
- Respect all warnings and directions given in the fixture's user documentation and on the fixture. Read the fixture's Quick Start and Safety Manual and familiarize yourself with the safety precautions that it contains. GLP and affiliated companies will take no responsibility for damage or injury resulting from disregard for the information in the user documentation.
- Check the GLP website at www.glp.de and make sure that you have the latest versions of the fixture's Quick Start and Safety Manual and this user manual.
- Check the fixture software version indicated on page 2 of this user manual and then use the fixture's control panel to check the version installed in the fixture. If the versions are not the same, the user manual may still cover the fixture, because software updates do not always affect the use of the fixture. However, it is possible that this manual does not match the fixture perfectly. Software release notes can help clarify this question. You can consult software release notes and download the correct version of this user manual on the GLP website if necessary.
- Make both the Quick Start and Safety Manual and this user manual available to all persons who will install, operate or service the fixture. Save both documents for future reference.
- If you have any questions about the safe operation of the fixture, please contact an authorized GLP distributor (see list of distributors at www.glp.de).
GLP Service and Support
Contact information for the nearest GLP Service and Support is available online at www.glp.de/en/service, by email at info@glp.de, or by telephone at the following numbers:
• GLP Germany: +49 (7248) 927 1955
• GLP N. America: +1 818 767-8899
• GLP UK: +44 1392 690140
• GLP Asia: +852 (3151) 7730
• GLP Nordic: +46 737 57 11 40
Avoiding damage to the fixture
The Quick Start and Safety Manual contains important information that is intended to help you avoid possible damage to the fixture from other light sources, during transportation, etc. Read that information before storing, transporting or using the fixture.
2. impression S500 Profile HO/HC overview
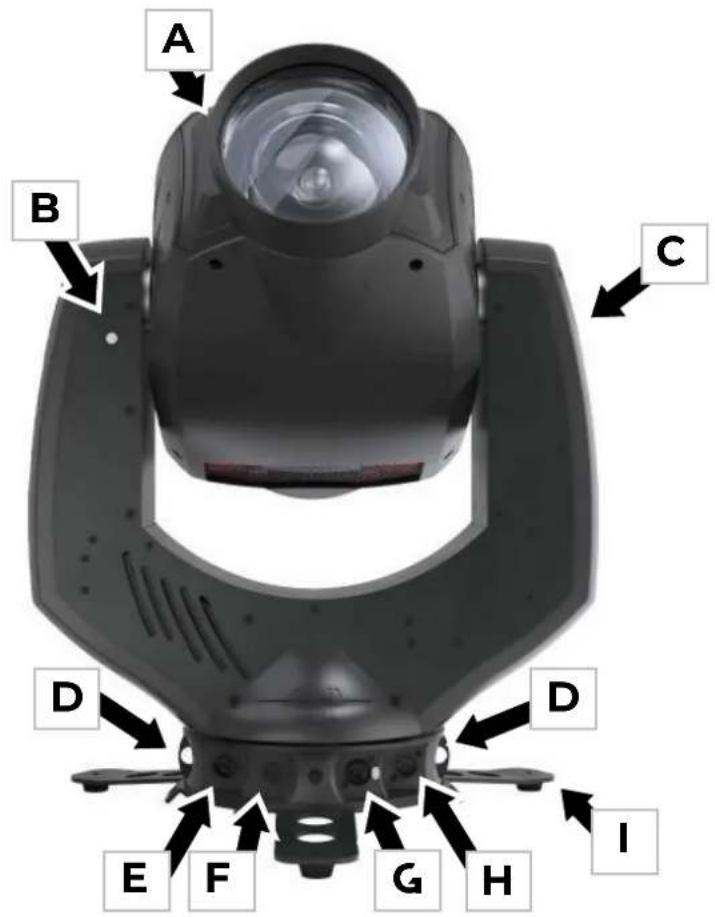
Figure 1. Impression S500 Profile HO/HC overview
A - Head
B - Tilt Lock
C - Control panel with backlit display and NFC sensor (on side)
D - Base with Safety Cable attachment points
E - AC mains power IN (powerCON TRUE1 TOP)
F - Mains fuse
G - etherCON port A ethernet connection, fail-safe
H - DMX IN (5-pin XLR)
I - Tripod base plate for free standing use (on other side of base)
- DMX OUT (5-pin XLR)
- etherCON port B ethernet connection, fail-safe
3. Features
The GLP impression S500 Series builds on the GLP impression S350 series fixtures by increasing the LED power to 500W giving 30% to 65% more output. In addition, the optics, software and all connections and controls have been updated to the latest technology. Compact construction, the identical S350 size factor and GLP's baseless design allow for an easy fixture integration.
The impression S500 Profile comes in two versions (Profile HC and Profile HO) and targets specific needs of different markets.
- The Profile HC Version houses a white LED Engine with 26,000 lm at native 6,000 K and generates a very balanced light spectrum for great color rendering of CRI and TLCI above 90. Its great light quality guarantees natural and realistic skin colors and a total lumen output of 10,700 lm.
- The Profile HO Version houses a white LED Engine with 40,000 lm at native 7,000 K. This highly efficient light source generates more output for powerful projections and mid-air effects with a total lumen output of 14,800 lm.
Both versions share a very even field illumination in the range of 7.5^ to 40^ field angle. The vast feature package houses a CMY color mixing system, an innovative CTC color control system, a color wheel with 6 full colors and 4 color correction filters, a gobo wheel with 7 rotating gobos plus open, a second gobo wheel with 10 static gobos plus open, a 90^ adjustable animation wheel, a fadeable frost system from soft to medium, a precise 4-blade framing system with blade tilt and framing rotation, a rotating 8-facet prism and motorized 540^/565^ pan and 256^ tilt movement.
The IP20 compact housing only weighs 26.9 kg and allows low-noise operation, making the fixtures perfect for noise sensitive professional applications such as TV studios, theatres and musicals (HC Version), while the higher output of the HO Version is perfect for applications such as shows, concerts, galas, events, trade shows, festivals, clubs, bars and discotheques.
Control options
The impression S500 Profile HO/HC is compatible with DMX 512, RDM, Art-Net, sACN and can be fitted with a Lumenradio CRMX module.
When receiving Art-Net, sACN or CRMX the fixture can output the received data to the DMX XLR port for use by other fixtures (Ethernet Config → Node option).
When no control data is being received you can set the fixture to Blackout, Hold the last data or go to a stored stand alone scene (Fixture Settings → No Signal option).
The fixture also features GLP iQ.Mesh and may be fitted with an optional LumenRadio CRMX module. The GLP iQ.Mesh Module allows easy configuration, control, service and maintenance via the GLP iQ.Service App. Other FPO modules can be supplied on request – GLP Service can give details.
User setting presets
You can store the current fixture option settings in one of 3 presets, this allows you to recall the fixture options into a known state (Fixture Settings → Load Settings and Service → Advanced → Save Settings).
Pan and Tilt
The impression S500 Profile HO/HC has motorized pan and tilt movement with coarse and fine (16 bit) control channels.
Direction of movement
With the fixture standing on the ground:
- Increasing Pan moves yoke clockwise from home position.
- increasing Tilt moves head to the front from home position.
Pan/Tilt direction can be reversed using the Fixture Settings → Invert settings or via DMX on the Special/Control channel. This can be useful when setting up symmetrical movement in multiple fixtures.
Position feedback and self-correction
The fixture has a position feedback and self-correction system that brings the head back to its correct position if it was unintentionally moved.
The fixture at first tries twice to move to the correct position. If it cannot move to this position, it waits for a short period and then tries again.
Motor drive and position feedback are automatically disabled for a short time if you press one of the control panel buttons so you can move the head manually to access the display panel. Pan/Tilt remains disabled while you are using the fixture's control panel.
Position feedback can also be set to constantly disabled using the Fixture Settings → Position Feedback option.
Fixture performance (speed) options
You can adjust the speed (and noise level) of fixture movements and its internal function motors by selecting from 3 different performance options in Fixture Settings → Performance.
Intensity / Dimmer
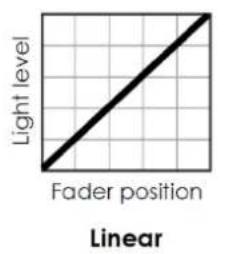
The electronic dimming effect provides smooth 16-bit dimming of the fixture output. Three dimming curves with different dimming characteristics are available.
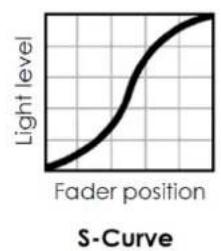
line
| Fader position | Light level | | -------------- | ----------- | | Low | Low | | Medium | Medium | | High | High |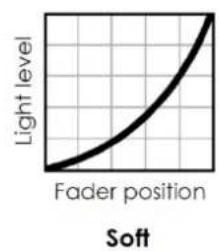
line
| Fader position | Light level | | --------------- | ----------- | | Low | 0 | | Medium | Medium | | High | High |Figure 2. Dimming curves
The PWM frequency of the LED dimming can be adjusted if you have problems with camera flicker using the Fixture Settings → PWM Frequency option. The PWM Frequency is shown on the top line of the screen. Higher PWM frequencies will reduce the dimming performance / resolution.
Shutter
The fixture's shutter channel offers continuous blackout, continuous open and a range of intensity effects.
The following shutter effects are available:
- Pulse dims up and down smoothly with the same fade-in and fade-out times. Speed can be adjusted from slow to fast.
- Pulse open fades in and then snaps to blackout. Speed can be adjusted from slow to fast.
- Pulse close fades out and then snaps to full. Speed can be adjusted from slow to fast.
- Strobe random strobes the fixture at random intervals, allowing a random strobe between multiple fixtures. Speed can be adjusted from slow to fast.
- Strobe strobes the fixture at a regular speed and also perfectly synchronizes the strobe in multiple fixtures so that all the fixtures flash at exactly the same time. Speed can be adjusted from slow to fast.
Control / Special channel
The Special/Control DMX channel lets you change fixture settings and perform a fixture reset from the control desk (which can be very useful during a show). To apply a command on the Special/Control channel, you must hold the command for the time indicated in the DMX channel index (usually 3 seconds).
To trigger a reset using the Special/Control channel, you must send the DMX value for this function for 3 seconds. If you want to trigger an additional reset using the Special/Control channel, you must first move away from the Reset DMX value and then return to this value. This stops the fixture getting into an unwanted Reset loop if it is patched wrongly.
Note: Most of the fixture settings available in the fixture's control menus or on the Special/Control DMX channel are also available via RDM.
Zoom
The impression S500 Profile HO/HC has motorized zoom control that lets you vary the beam angle from wide to narrow as the DMX value increases. You can invert this using the Fixture Settings → Zoom Invert option.
The "Performance" Setting allows you to limit the Zoom speed to control the noise made by the zoom movement.
Focus
The Focus Channel let you adjust the sharpness of the projection. The fixture has a Focus Tracking feature which automatically adjusts the focus when the zoom is changed to keep the image sharp. This is set using the Fixture Settings → Focus Tracking option.
The option can be set depending on the beam throw distance to Near (under 12m), Medium (12-15m), Far (over 20m) or Off (manual focus). When Focus Tracking is enabled, the Focus control channel selects the focus position between Open-Gobo1-Gobo2-Animation-Framing.
Color Mix / Color Wheel / CTC
The Color Mix and Color Temperature (CTC) functions of the fixture are based on three color flags giving variable amounts of Cyan, Magenta and Yellow filtering.
The fixture also has a fixed Color Wheel with 10 slots. These can be used as a base color which you can modify with the CMY controls.

natural_image
Row of colored trapezoids in white, blue, green, orange, purple, cyan, pink, yellow, and red (no text or symbols)0: Open
1: Congo Blue (UV)
2: Green
3: Orange
4: Magenta
5: Blue
6: CTC 1
7: CTC 2
8: CTC 3 (High CRI)
9: Minus green
10: Red
Gobo Wheel 1 (rotating gobos)
Gobo Wheel 1 has seven rotatable gobos. Each gobo can be positioned at a fixed index position or can be continuously rotated. It is possible to rotate the full gobo wheel through all gobos.




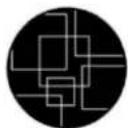


0: open (not shown)
1: Crazy loops
2: Block of lines
3: Crossed Lines
4: Zigzag
5: Ornament
6: Zebra
7: Bad painter
Gobo Wheel 2 (static)
Gobo Wheel 2 is a fixed wheel with 10 positions. It is possible to continuously rotate the wheel through all gobos.











0: open
1: dots in square
2: three thirds line
3: ants
4: big dots
5: wave lines
6: three thirds circle
7: mosaic window
8: daisy flower
9: hairy
10: random blocks
Framing
The fixture has a four-blade framing module which gives individual control of each blade, which can be inserted up to 100% allowing framing size right down to complete blackout. Additionally the whole module can be positioned from -45° to +45°.
The blades have 2 control modes:
- PI (Position/Index mode), the default mode, controls blade insertion 0-100% on one channel, and blade tilt -30° to +30° on a second channel.
- LR (Left/Right mode) controls the position of the left side of the blade on one channel, and the right side of the blade on the second channel.
Effect / Animation wheel
The fixture has an effect/animation wheel which can be rotated at variable speed in either direction to give a ripple or movement effect (adjust focus to give desired effect).
Frost
The variable frost allows you to soften the edges of the projected light beam. There are 2 ranges of frost, light and medium.
Prism
The fixture has an 8-facet prism which can be continuously rotated in either direction.
4. Control panel

Warning! DMX control is disabled when the control menus are active. Be prepared for the head to move as soon as you exit the control menus.
The control panel and backlit graphic LCD display with self-charging battery allow you to change fixture settings, view readouts and use utilities quickly and intuitively, even when the fixture is disconnected from power.
To allow comfortable use of the control panel on the side arm of the yoke, pan/tilt is automatically disabled for a few seconds if you press any button on the control panel and remains disabled for as long you are working in the control panel. If no button is pressed for a few seconds, head movement is re-enabled with pan and tilt correction applied.
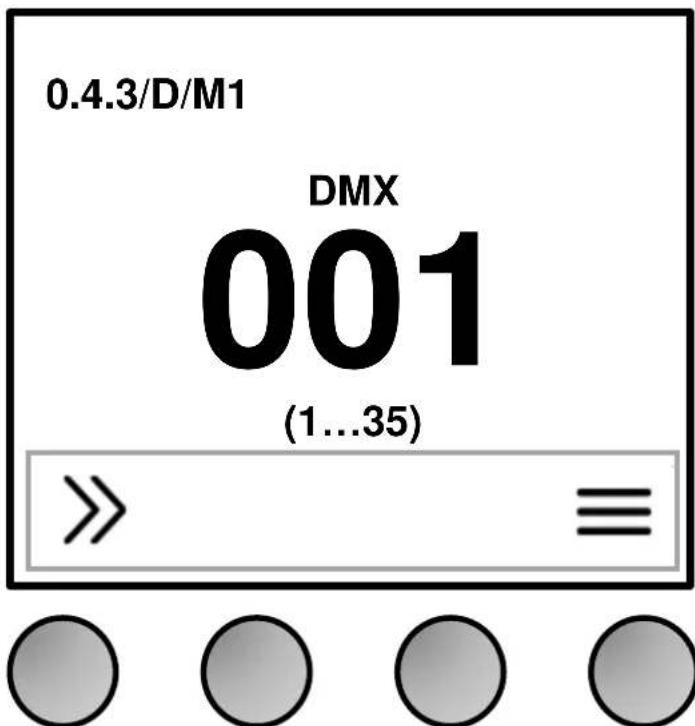
Figure 3. Default information screen
Default information screen
When power is applied, the fixture performs a reset. After the reset has completed, the default information screen appears in the control panel display on the side of the yoke.
At any other time, you can press any key to unlock the control panel. Doing this also calls up the default information screen in the control panel display.
See Figure 3. The top line of the default information screen shows:
- Main CPU firmware version
- DMX Mode
The center of the screen shows the following information:
- Signal source.
- Fixture's current DMX address in large characters. If the fixture's self-diagnosis system detects an error, the fixture will flash an error message alternately with the DMX address. This lets you see the DMX address and error message at a distance from the fixture.
- The fixture displays network IP addresses below the DMX Address.
- Below the current DMX address, the fixture displays in smaller characters the DMX channels that the fixture is currently using.
Using the control panel
The four control panel buttons under the display have the following functions.
In the main screen:
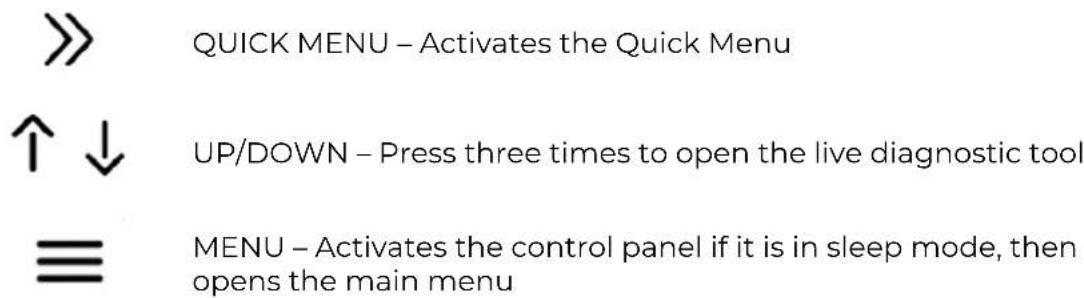
When navigating through the menus:
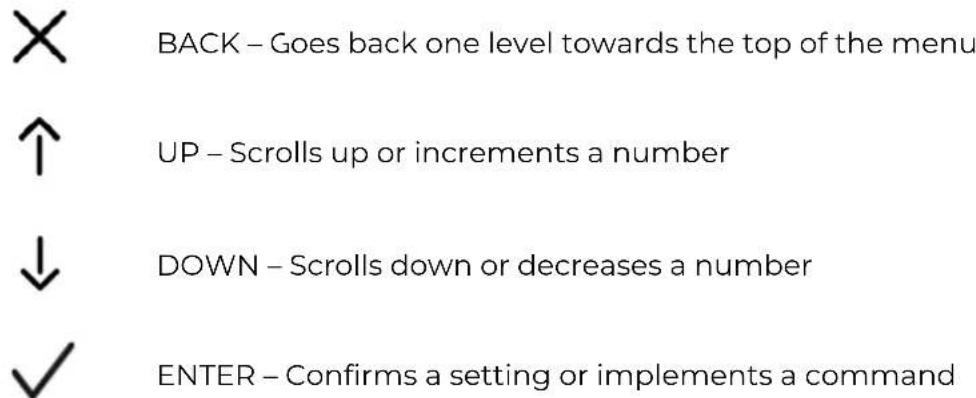
At any time:
↑ ↓ UP and DOWN at the same time – Temporarily rotates the display 180°
Control button shortcuts
Battery Eco Mode (available in Battery Mode only)
When the fixture is running on battery power, holding MENU and ENTER together for 10 seconds activates Battery Eco Mode. This switches off the display completely to avoid discharging the battery and is useful when a fixture is put into long-term storage.
Live Diagnostics
Pressing UP or DOWN three times calls up an overview of all main fixture information, signal quality and settings. This can be useful if you are troubleshooting or if you are in contact with GLP Service.
Toggle Display Orientation
Pressing and releasing UP and DOWN together rotates the display through 180°.
Note: If Display Orientation is set to Auto, changing the display orientation by pressing UP and DOWN only changes the display orientation until the next power cycle. To change the display orientation permanently, use the Fixture Settings → Display Orientation option.
Error Messages
If the fixture detects an error, it displays an error message in the display. The Error is 'sticky' and will continue to be shown in the display until the next power cycle or reset. To get details of the error message, follow the information in the display. These details are important if you talk to GLP service.
- Pressing ESC ignores the error message and exits the error display.
- Pressing ENTER shows information about the error.
Note: Make a note of any error message displayed. You may need these details for error diagnosis. Please be ready to give them to GLP Service if necessary.
Certain critical error messages are permanently stored in the display. In this case, please contact your GLP service agent.
When restarting the fixture or sending a RESET command, the fixture performs an initialization process to test all functions and sensors. The fixture also continuously checks itself for correct operation.
Loss of DMX signal
The display flashes if the DMX signal is lost (the fixture will then behave according to its No Signal setting.
Service and maintenance
See the separate impression S500 Profile HO/HC Quick Start and Safety Manual supplied with the fixture and available for download from www.glp.de for information on service and maintenance.
5. Control menu structure
Quick menu
The control panel's Quick Menu gives you quick access to the most frequently used commands. To open the Quick Menu, press MODE/ESC when the display is showing the default information screen.
The Quick Menu contains the following items:
Menus
Notes
| Reset All | Resets the entire fixture (takes a few seconds). | ||
| Live Diagnostic | Calls up overview of all main fixture information, signal quality and settings. | ||
| iQ.Service Connect | >>>Connect<<< | Enables connectivity to the GLP iQ.Service App for 5 minutes. | |
| Load User Settings | User Setting Preset 1 | >>>Confirm<<< | Loads custom user settings |
| User Setting Preset 2 | >>>Confirm<<< | ||
| User Setting Preset 3 | >>>Confirm<<< | ||
| Setting Defaults | >>>Confirm<<< | Returns fixture to default settings (not including DMX address, protocol type, Ethernet / CRMX configuration, user offsets, user presets and counters). | |
| Load Factory Defaults (!) | Displays Message: Fixture may lose connection to controller >>>Confirm<<< | Restores all factory default settings (including DMX address, protocol type, Ethernet / CRMX configuration, user offsets and user presets). Important! The fixture may lose contact with the controller! | |
Main menu
The following menus and commands are available in the impression S500 Profile HO/HC control panel. Options may also be set by RDM. Some options can be changed while operating using the Control/Settings channel.
Menus
Notes
| DMX Address | |||
| 001-512 | Set fixture's DMX start address. Highest possible address depends on control mode. | ||
| Protocol Setup | |||
| Data In | DMX | Control via DMX protocol | |
| ArtNet | Control via Art-Net | ||
| sACN | Control via sACN | ||
| iQ.Mesh | Control via iQ.Mesh | ||
| CRMX (FPO) - only if CRMX module is installed | Control via sACN | ||
| Ethernet Config | Addressing Mode | Auto 2.x.x.x | |
| Auto 10.x.x.x | |||
| DHCP | |||
| Custom IP | |||
| Custom IP Address | 0.0.0.0 | ||
| Custom IP Subnet | 0.0.0.0 | ||
| ArtNet Port | 0.32768 | ||
| sACN Universe | 1.63999 | ||
| Node | Disabled | Received data (ArtNet, sACN, CRMX) to be sent out of DMX XLR port | |
| Enabled | |||
| Linking Options | iQ.Mesh Unlink | Unlink from existing iQ.Mesh network | |
| CRMX Unlink | Unlink from existing CRMX network | ||
| Fixture Settings | |||
| Dimmer Curve | Linear | Linear dimming curve | |
| Soft | Soft (square law) dimming curve | ||
| S-Curve | Finer dimming control at low and high intensity | ||
| Fan Mode | Regulated | Fan speed temperature-regulated | |
| High | Fan speed constant high | ||
| Medium | Fan speed constant medium | ||
| Low | Fan speed constant low | ||
| Minimum | All fans off or at minimum speed | ||
| Performance | Fast | Set Mechanical effects speed to control fixture noise level. | |
| Normal | |||
| Smooth | |||
Menus
Notes
| Framing Control | PI Mode (position/index) | Control via position (blade in-out) and index (blade tilt) | |
| LR Mode (left/right) | Control via position L (left corner of blade in-out) and position R (right corner of blade in-out) | ||
| Focus tracking | Near | <12m range, focus and zoom linked. Focus fader defines focus position | |
| Medium | 12..15m, focus and zoom linked | ||
| Far | >20m, focus and zoom linked | ||
| Off | No link between focus and zoom | ||
| Effect Shortway | On | Effect and colorwheel will take the shortest way to the next position | |
| Off | Effect and colorwheel will go back to get to the next position | ||
| PWM Frequency | Low (L) | Set PWM dimming frequency of light source to prevent flicker. Higher frequencies have less dimming resolution. | |
| Optimal (O) | |||
| High 1 (H1) | |||
| High 2 (H2) | |||
| No Signal | No Signal Mode | Blackout | Fixture blacks out if no DMX signal received |
| Hold | Fixture continues to display current effect if no DMX signal received | ||
| Scene | Plays the stored captured scene (see next menu item) if no DMX signal received | ||
| Capture DMX Values | >>>Confirm<< | Captures current scene and stores it for use in No Signal Mode → Scene | |
| Pan Invert | Off | Reverse pan movement | |
| On | |||
| Tilt Invert | Off | Reverse tilt movement | |
| On | |||
| Zoom Invert | Off | Invert zoom so 0=wide, 255=narrow | |
| On | |||
| Position feedback | Off | Enable/disable /tilt position correction | |
| On | |||
| Pan Disable | Off | Disable pan motors | |
| On | |||
| Tilt Disable | Off | Disable tilt motors | |
| On | |||
| Pan Range | Normal | Normal=540°Extended=565° | |
| Extended | |||
Menus
Notes
| Display Mode | Auto | Display dims after a short period of inactivity if no errors and valid DMX signal | |
| On | Display constantly on | ||
| Off | Display dims even if there are errors / no DMX signal | ||
| Display Orientation | Auto | Display automatically inverts to match installation position | |
| Normal | Display normal (for use when fixture is standing) | ||
| Upside Down | Display inverted (for use when fixture is flown head-down) | ||
| Hibernation | On | Fixture enters energy saving mode, all electronics except DMX receiver are disabled. Cycling power off and on exits hibernation. | |
| Load User Settings | User Settings 1 | >>> Confirm 3 sec.<<< | Apply a user preset to fixture settings |
| User Settings 2 | >>> Confirm 3 sec.<<< | ||
| User Settings 3 | >>> Confirm 3 sec.<<< | ||
| Setting Defaults | >>> Confirm 3 sec.<<< | Return fixture to default settings (not including DMX address, protocol type, Ethernet / CRMX configuration, user offsets, user presets and counters) | |
| Information | |||
| Live diagnostic | Shows overview of fixture information | ||
| Show errorlist | Shows any stored errors | ||
| Show Device Info | Show serial number / sw version | ||
| Show Device Hours | Resettable and total device hours | ||
| Show Lamp Hours | Resettable and total lamp hours | ||
| Show Power Cycles | Resettable and total power cycles | ||
| Show Service Counter | |||
| Show Temperatures | |||
| Show DMX Input | Signal quality and DMX channel values | ||
| Show Fan monitor | |||
| Manual Control | |||
| Reset All | Reset all effects | ||
| Reset P/T | Reset pan and tilt | ||
| Reset Head | Reset all effects except tilt | ||
| Manual DMXWarning!Fixture will start | Pan coarse | 000-255 | Manually control all effects |
| Pan fine | 000-255 | ||
| ...Scroll through all effects... | |||
Menus
Notes
| movingPress Enter | Reset Manual Values | Confirm for 3 seconds (press Enter) | Reset all manually entered DMX values to zero | |
| Service | ||||
| Live Diagnostic | Overview of all main fixture status | |||
| iQ.Service Connect | >>>Confirm<<< | Enables connect to iQ.Service app | ||
| Tests | Test All | Run test sequence of all effects.. Stop with ESC. | ||
| Test P/T | Run test sequence of pan/tilt. | |||
| Test LED | Run test sequence of LED. | |||
| Test Zoom | Run test sequence of zoom. | |||
| Test Effects | Run tests on effects one by one | |||
| Test Fans (Auto) | Automatic fan test | |||
| Test Fans (Manual) | Manually test fans one by one | |||
| Test Encoders | Test movement position sensors | |||
| Advanced (Press and hold for 3 secs.) | Service Mode | OFF | Normal operation | |
| ON | Disable tilt and display timeouts (exit by cycling power off and on.) | |||
| Job offsets | PanTiltZoomFocus | Create custom job offsets in home positions of all effects. Default offset = 0Note: This function is not fixture calibration! | ||
| Reset counters | Device Hours | Press Enter for 2 seconds to confirm | ||
| Lamp Hours | ||||
| Power Cycles | ||||
| Service Counter | ||||
| Max Temperatures | ||||
| Save User Settings | Preset 1 | Confirm 2 seconds | Saves current fixture settings as user settings preset | |
| Preset 2 | Confirm 2 seconds | |||
| Preset 3 | Confirm 2 seconds | |||
| Firmware Push (Fixture2Fixture) | !!! Fixture will overwrite other fixtures Firmware !!! >>> Confirm<<< | Firmware of the fixture (Flash Storage) will be pushed to all other fixtures of the same type via DMX link | ||
| Load factory defaults | ||||
| >>>Confirm by pressing Enter<<< | Reloads all factory default settings and default fixture configuration settings.Important! Controller may lose connection to fixture! | |||
Default settings are written in BOLD type.
German Light Products®
impression ^® S500
- Document revisions
- Table of Contents
- Safety
- Key to symbols
- GLP Service and Support
- Avoiding damage to the fixture
- impression S500 Profile HO/HC overview
- Features
- Control options
- User setting presets
- Pan and Tilt
- Direction of movement
- Position feedback and self-correction
- Fixture performance (speed) options
- Intensity / Dimmer
- Shutter
- Control / Special channel
- Zoom
- Focus
- Color Mix / Color Wheel / CTC
- Gobo Wheel 1 (rotating gobos)
- Gobo Wheel 2 (static)
- Framing
- Effect / Animation wheel
- Frost
- Prism
- Control panel
- Default information screen
- Using the control panel
- Control button shortcuts
- Battery Eco Mode (available in Battery Mode only)
- Live Diagnostics
- Toggle Display Orientation
- Error Messages
- Loss of DMX signal
- Service and maintenance
- Control menu structure
- Quick menu
- Main menu
Brand : GLP
Model : impression S500 Profile
Category : Lighting