SpaceMouse Compact - Computer Mouse 3Dconnexion - Free user manual and instructions
Find the device manual for free SpaceMouse Compact 3Dconnexion in PDF.


| Product Type | 3D Mouse (6-Degrees-of-Freedom controller) |
| Brand | 3Dconnexion |
| Model | SpaceMouse Compact |
| Dimensions (L x W x H) | 77 mm x 77 mm x 54 mm (3" x 3" x 2.1") |
| Weight | 480 g (1.06 lb / 16.93 oz) |
| Power Supply | USB powered (via included cable) |
| Connectivity | Wired USB |
| Sensor Technology | 6-Degrees-of-Freedom (6DoF) optical sensor |
| Number of Programmable Buttons | 2 |
| Supported Operating Systems | Microsoft Windows, macOS |
| Software Included | 3DxWare (driver and configuration software) |
| Main Functions | Pan, zoom, rotate 3D models; customizable buttons, macros, and radial menus |
| Navigation Modes | Object Mode, Camera Mode, Target Camera Mode, Helicopter Mode |
| Compatible Applications | Over 300 CAD, 3D modeling, and design applications |
| Maintenance | Clean with a soft, dry cloth; avoid liquids and abrasive cleaners |
| Safety Precautions | Use in dry environment; avoid exposure to extreme temperatures or moisture |
| Spare Parts | Not listed; contact 3Dconnexion support |
| Repairability | Not user-serviceable; refer to warranty or support |
| Warranty | 3-year limited hardware warranty |
| Certifications | CE, FCC (Class B), BSMI, KCC, WEEE, WHQL |
| Package Contents | SpaceMouse Compact, USB cable, quick start guide |
| Support | 3dconnexion.com/support |
Frequently Asked Questions - SpaceMouse Compact 3Dconnexion
User questions about SpaceMouse Compact 3Dconnexion
0 question about this device. Answer the ones you know or ask your own.
Ask a new question about this device
Download the instructions for your Computer Mouse in PDF format for free! Find your manual SpaceMouse Compact - 3Dconnexion and take your electronic device back in hand. On this page are published all the documents necessary for the use of your device. SpaceMouse Compact by 3Dconnexion.
USER MANUAL SpaceMouse Compact 3Dconnexion
natural_image
Close-up of a 3D Connexion 3D controller with black top and blue control knob (no text or symbols on body)Table of Content
QuickStart Guide....3
Desktop Setup....3
Hand Position ....3
Installation 3
Feature Guide 4
3Dconnexion SpaceMouse Compact ....4
3Dconnexion Settings....5
Advanced Settings....6
Application Specific Advanced Settings....6
Buttons 8
Assigning Quick Macros to buttons 8
Assigning Commands using the flyout window 9
Creating Macros....9
Creating Radial Menus....10
3Dconnexion Home....11
Technical Specifications....12
QuickStart Guide
Desktop Setup
natural_image
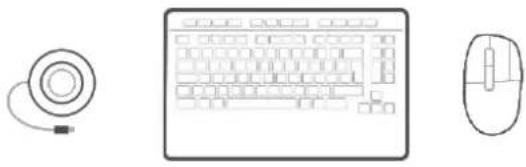
Line drawings of three computer devices: a circular earbell, a keyboard, and a mouse (no text or symbols)Place the SpaceMouse Compact on the opposite side of the keyboard to your standard mouse. One hand engages the 3D mouse to position your model: rotating, panning and zooming. The other hand uses the standard mouse to select, create and edit.
Hand Position
natural_image
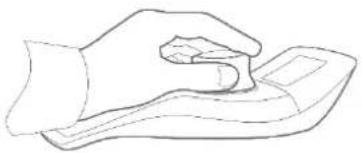
Line drawing of a hand pressing down on a surface (no text or symbols)Position your hand as shown. The contoured controller cap will guide your fingers into the perfect position for precise and effortless control.
Installation

flowchart
graph LR
    A["1: Device Input"] --> B["2: www.3dconnexion.com/drivers"]
    B --> C["3: Installation"]
    C --> D["4: Training"]
- Connect
Plug the USB cable of your SpaceMouse Compact into a USB port of your PC.
- Download the latest 3Dconnexion software
Get the latest 3Dconnexion software (3DxWare) at 3dconnexion.com/drivers.
- Install the 3Dconnexion software
Install the 3Dconnexion software by following the instructions.
- Familiarize with your SpaceMouse Compact
Open 3Dconnexion Home and launch the Trainer to get help taking the first steps with your SpaceMouse Compact.
Feature Guide
natural_image
Close-up of a black and silver circular device with blue concentric rings and a small blue dot at the center (no visible text or symbols)Controller Cap
Controller Cap
The Controller Cap is the heart of your SpaceMouse Compact. Its Six-Degrees-of-Freedom (6DoF) sensor allows you to push, pull, rotate, or tilt to pan, zoom and rotate your drawings and 3D models. The SpaceMouse has different motion profiles depending on the application you are using. In Object Mode applications the 3D navigation behaves as if you were reaching into the screen and holding the object in your own hand. In Camera Mode applications, the navigation behaves like a camera you are viewing through. For many applications, you can adjust this behaviour in the Advanced Settings of your SpaceMouse Compact.

natural_image
Six 3D mechanical component diagrams showing left-hand and right-hand views with blue arrows indicating motion (no text or symbols)3Dconnexion Buttons
The SpaceMouse Compact features two additional programmable function buttons, located on its socket. It instantly recognizes the applications you are using, as well as their environments, and automatically assigns the most used commands to the buttons. You can personalize commands assigned to the function buttons using the 3Dconnexion Settings.
3Dconnexion Settings

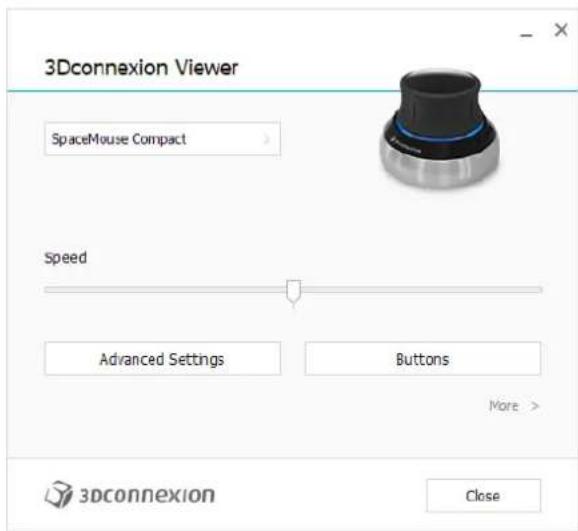
You can access the 3Dconnexion Settings panel via 3Dconnexion Home (on your desktop), the icon in your notification area (systray), or the Windows start menu. The name of the active application is displayed at the top of the panel. Any setting change is relevant to this application only
Speed
This slider sets the overall speed for your device. In other words, it changes the amount of force or torque that needs to be applied to the SpaceMouse cap to move an object, scene, or image.
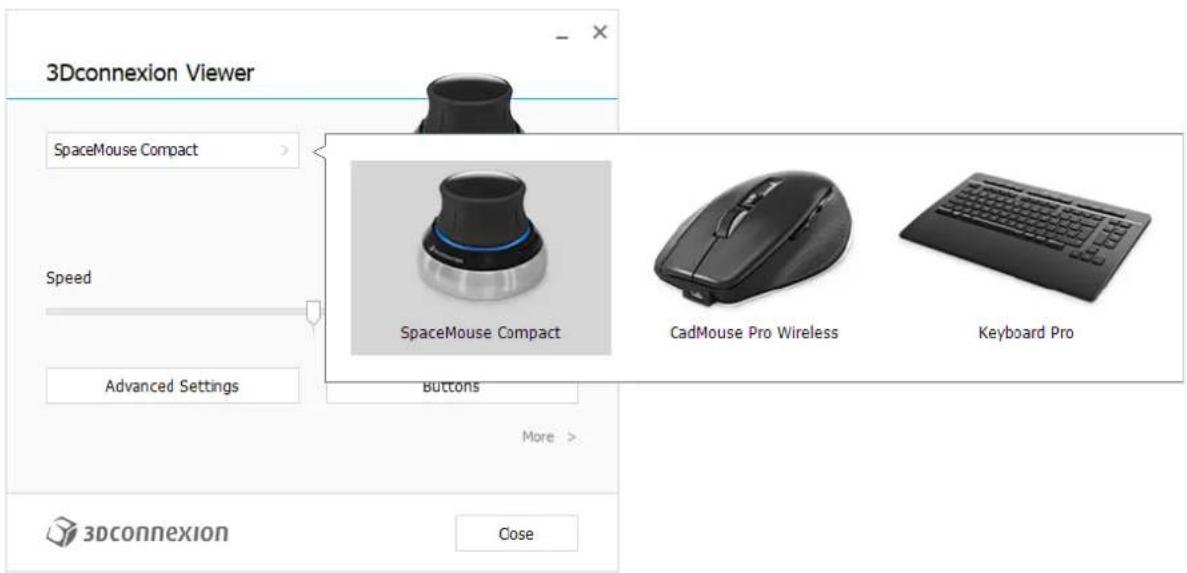
If multiple 3Dconnexion devices are connected, you can select the desired product to configure by clicking on the flyout button at the top left of the panel.
Advanced Settings
Settings you can configure in the Advanced Settings panel are application-specific. So, it's easy to configure your SpaceMouse to work just how you prefer in each application.
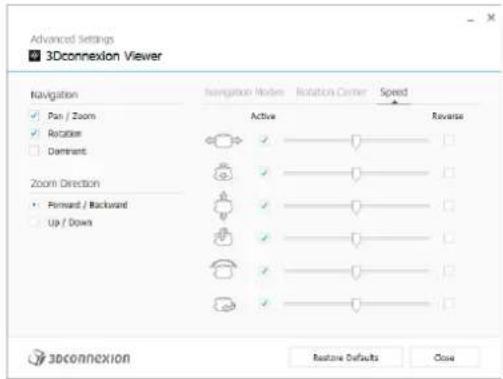
Navigation
Pan / Zoom: Enables/disables panning of your part, assembly or drawing. Enabled by default.
Rotation: Enables/disables rotation of your part, assembly or drawing. Enabled by default.
Dominant: Turns on and off dominant filter axis, which when enabled restricts the pan, zoom or, rotations to a single axis.
Zoom Direction
Forward / Backward: Zoom by pushing the cap toward or away from you parallel to the desk.
Up / Down: Zoom by pulling the cap upwards or pushing the cap downwards parallel to the screen.
Speed
Use the slider to set the speed for each of the 6-Dimensions-of-Freedom individually. To reverse the direction of a movement, check the Reverse box for that movement.
Application Specific Advanced Settings
Some applications feature additional SpaceMouse settings. For those applications you have additional options available in the Advanced Settings Panel:
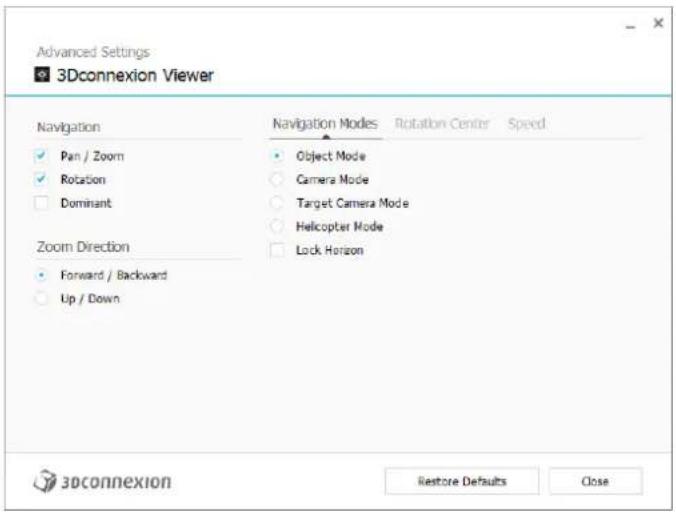
Navigation Modes
Object Mode enables Object Mode navigation - this mode is like reaching into the screen and holding the model in your hand. Push the SpaceMouse cap left, and the model moves left. Push right and the model moves right.
Camera Mode enables using the Controller Cap as if it is a camera. Push into the scene and the camera moves forward into the scene. Push left and the camera moves to the left (the scene moves to the right). Lift up and the camera moves up (the scene moves down). You are entering the scene as if walking around in it.
Target Camera Mode enables Target Camera Mode navigation. Manipulate the SpaceMouse cap as if it is a target camera. Push into the scene and the camera moves forward into the scene. Push left and the camera moves to the left (the scene moves to the right). Lift up and the camera moves up (the scene moves down). When rotating the cap in any direction you will orbit around the target point (see Rotation Center below).
Helicopter Mode enables a Camera Mode navigation but pushing the cap forward while looking down will not change the altitude of the camera.
Lock Horizon forces the horizon to be kept leveled as it currently is.
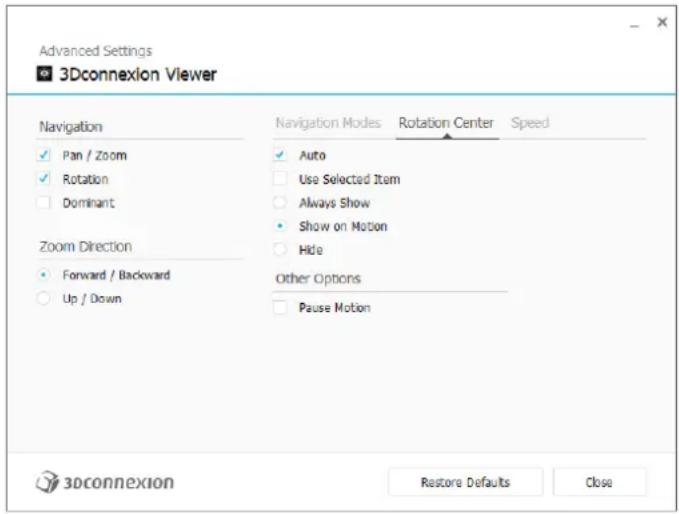
Rotation Center
Auto sets the center of rotation dynamically. When the complete model is in view, the center of volume of the whole model is used as the rotation point. When you move closer, the center of rotation will be set on an object close to your center of the view.
Use selected Item forces the rotation center to only take the currently selected objects into account.
Always Show always visualizes the Rotation Center.
Show on Motion will visualize the Rotation Center only during movement.
Hide will disable the Rotation Center visualization.
Other Options
The applications below feature special options. More information can be found in the 3Dconnexion FAQ:
Autodesk 3ds Max, Autodesk Maya, Solid Edge, SOLIDWORKS
Buttons
The Buttons panel within 3Dconnexion Settings allows you to assign commands, macros or, radial menus. The name of the active application is displayed at the top of the panel. Any setting change is relevant to this application only.
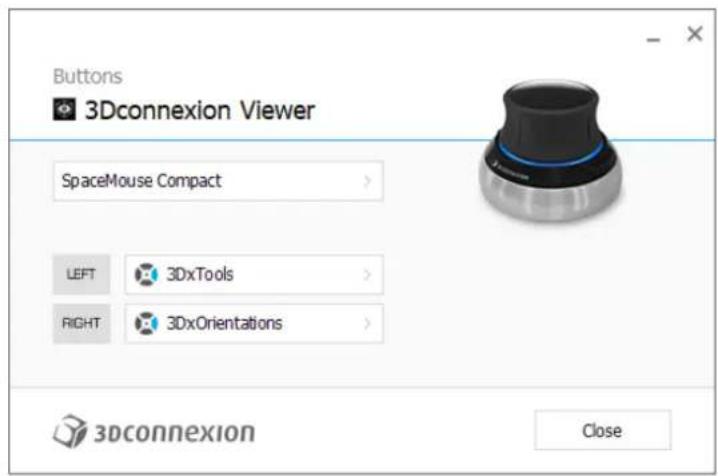
A note about Environment sensitivity: Some applications feature environment sensitive key mapping. In those applications, you can have different key assignments depending on the currently active environment.
Assigning Quick Macros to buttons
Click on the text in the input field and press the required key or key combination to quickly assign a keystroke or macro.

When a macro is created, it always sends a press and release command. If you want to assign a press and hold command instead (for example Ctrl or Shift), you should use the Keyboard command category in the flyout window.
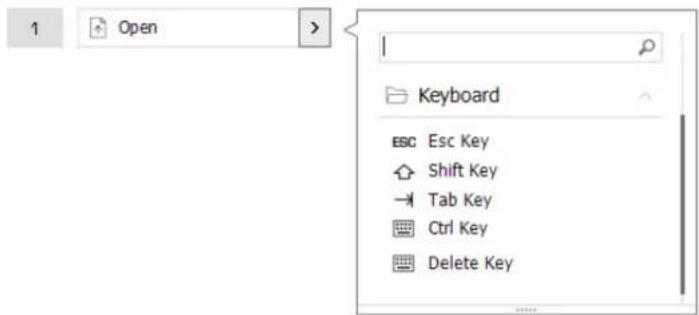
Assigning Commands using the flyout window
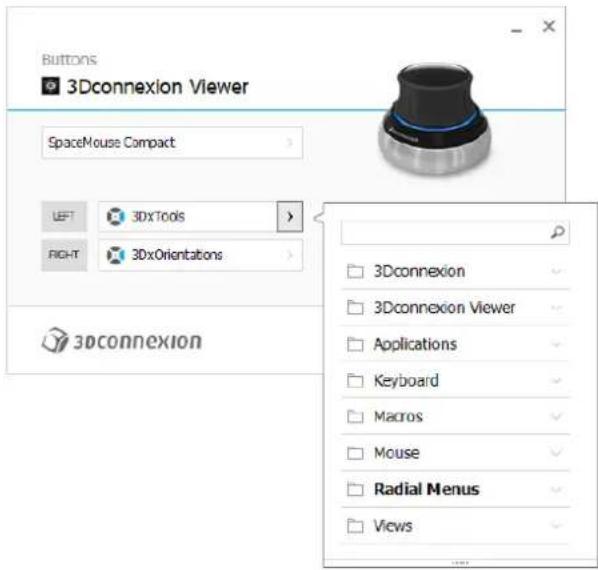
Clicking on the > arrow on the right-hand side of the button field opens a flyout window for that SpaceMouse button:
The flyout window allows you to browse or search for commands in different categories. When you select a command by clicking on it, it is automatically assigned to the corresponding SpaceMouse button. The category of the command that it is currently assigned to is highlighted in bold.
Creating Macros
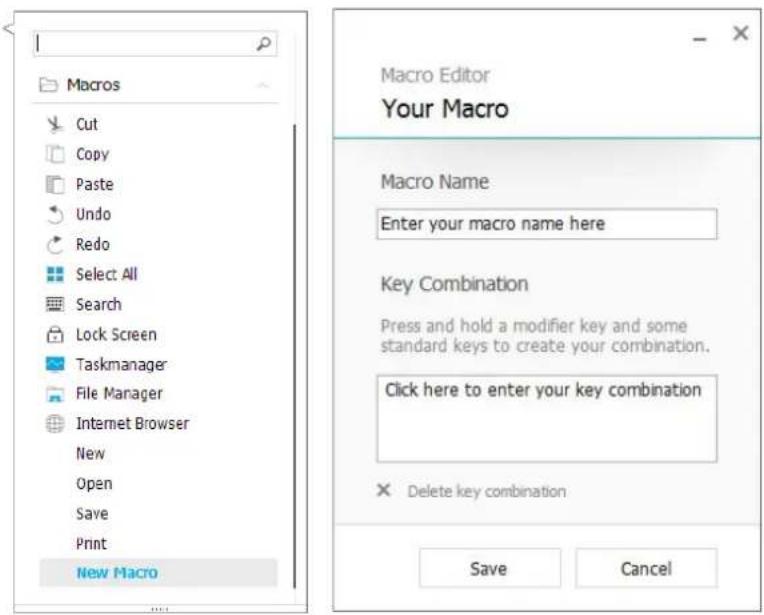
First, click on the > arrow on the right-hand side of the key field. Then, expand the Macros category and click on New Macro. This opens the macro editor where you can assign a name for your macro and a sequence of keystrokes in the corresponding fields. Clicking on Save will automatically assign the new macro to the button from where you opened the panel.
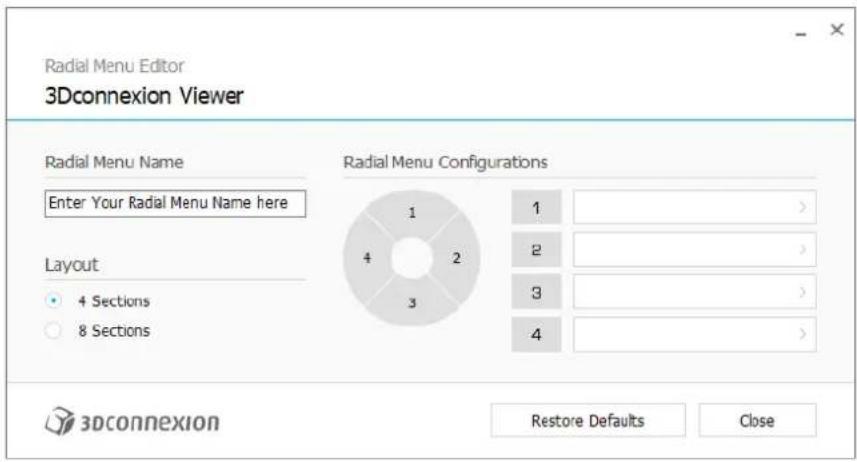
Creating Radial Menus
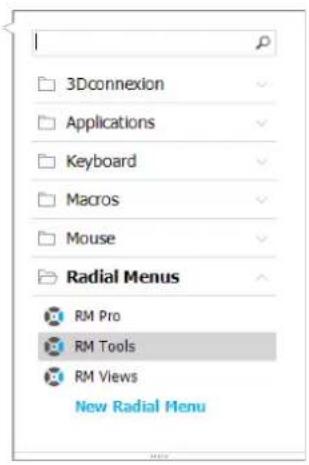
First, click on the > arrow on the right-hand side of the key field. Then, expand the Radial Menu category and click on New Radial Menu.
This brings up the radial menu editor where you can assign a name and commands to the different sections. Your new radial menu will be automatically assigned to the key from where you opened the panel.
3Dconnexion Home

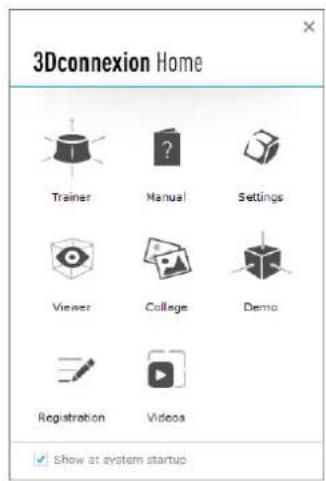
Once you have successfully installed the latest 3Dconnexion driver, 3Dconnexion Home gives you access to various 3Dconnexion apps:

Trainer:
Learn how to quickly use the 3Dconnexion SpaceMouse.
Manuals:
Here you can find the manuals for all 3Dconnexion products.
Settings:
Open the settings panel to customize your 3Dconnexion devices.

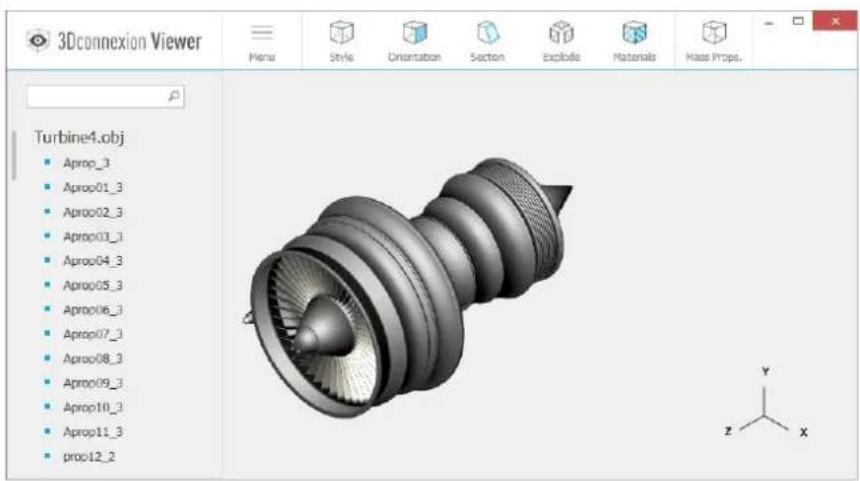
Viewer:
Use the 3Dconnexion Viewer to review 3D models.

Collage:
3Dconnexion Collage lets you create high resolution picture collages with your SpaceMouse.
Demo:
Test and practice your skills by assembling the landing gear of an aircraft.

Registration:
Register your product after the installation to benefit from 3Dconnexion services.
Videos:
Find instructive videos for your 3Dconnexion devices.
Technical Specifications
Dimensions & Weight
Length: 77 mm / 3"
Width: 77 mm / 3"
Height: 54 mm / 2.1"
Weight: 480 g / 1.06 lb / 16.93 oz
Supported Operating Systems
Microsoft Windows, macOS
More information
Package Contents
Certifications and Registrations
CE, FCC (Class B), BSMI, KCC, WEEE, WHQL
More information
Warranty
3-years limited hardware warranty
Support
3dconnexion.com/support
- Table of Content
- QuickStart Guide....3
- Feature Guide 4
- 3Dconnexion Settings....5
- 3Dconnexion Home....11
- Technical Specifications....12
- QuickStart Guide
- Desktop Setup
- Hand Position
- Installation
- Feature Guide
- Controller Cap
- 3Dconnexion Buttons
- 3Dconnexion Settings
- Speed
- Advanced Settings
- Navigation
- Zoom Direction
- Application Specific Advanced Settings
- Navigation Modes
- Rotation Center
- Other Options
- Buttons
- Assigning Quick Macros to buttons
- Assigning Commands using the flyout window
- Creating Macros
- Creating Radial Menus
- 3Dconnexion Home
- Trainer:
- Manuals:
- Settings:
- Viewer:
- Collage:
- Demo:
- Registration:
- Videos:
- Technical Specifications
- Dimensions & Weight
- Supported Operating Systems
- Package Contents
- Certifications and Registrations
- Warranty
- Support
Brand : 3Dconnexion
Model : SpaceMouse Compact
Category : Computer Mouse