OH9 - Heating N'oveen - Free user manual and instructions
Find the device manual for free OH9 N'oveen in PDF.


| Product Type | Electric Heater |
| Brand | N'oveen |
| Model | OH9 |
| Heating Principle | Convection |
| Power Consumption | 1500 W |
| Voltage | 220-240 V |
| Frequency | 50 Hz |
| Dimensions (W x D x H) | 25.0 x 20.0 x 40.0 cm |
| Weight | 3.5 kg |
| Energy Class | A |
| Heating Output | 1500 W / 5120 BTU |
| Number of Power Levels | 2 (750 W / 1500 W) |
| Thermostat | Adjustable, with frost protection |
| Timer | 24-hour programmable |
| Safety Features | Overheat protection, tip-over switch, cool-touch housing |
| Remote Control | Yes, with LCD display |
| Noise Level | ≤ 40 dB |
| Heating Area | Up to 25 m² |
| Maintenance | Wipe with a dry cloth; do not use water |
| Spare Parts | Available from N'oveen customer service |
| Repairability Index | 8 / 10 |
| Warranty | 2 years |
Frequently Asked Questions - OH9 N'oveen
User questions about OH9 N'oveen
0 question about this device. Answer the ones you know or ask your own.
Ask a new question about this device
Download the instructions for your Heating in PDF format for free! Find your manual OH9 - N'oveen and take your electronic device back in hand. On this page are published all the documents necessary for the use of your device. OH9 by N'oveen.
USER MANUAL OH9 N'oveen
natural_image
White N'OVEEN solar oil heater with multiple cooling fans and control knobs (no visible text or symbols on body)POLSKI STR. 2
ENGLISH P. 7
POLSKI PL
MONTAŻ
| Item Symbol Value Unit Item Unit | ||||||
| Heat output Type of heat input, for electric storage local space heaters only (select one) | ||||||
| Nominal heat output | Pnom3,0 | KW Manual heat charge | al heat charge | ge | control, with integrated thermostat | [no] |
| Minimum heat output (indicative) | Pmin1,0 | KW Manual heat charge | al heat charge | ge | control, with room and/or outdoor temperature feedback | [no] |
| Maximum continuous heat output | Pmax,c3 | 0 KW Electronic heat charge | ch | charge control with room and/or outdoor temperature feedback | [no] | |
| Auxiliary electricity consumption Fan assisted heat output [no] | ||||||
| At nominal heat output | elmax | N/A | KW | Type of heat output/room temperature control (select one) | ||
| At minimum heat output | elmin | N/A | KW | Single stage heat output and no room temperature control | [no] | |
| In standby mode | elsB | 0 | W | Two or more manual stages, no room temperature control | [no] | |
| With mechanic thermostat room temperature control | [yes] | |||||
| With electronic thermostat room temperature control | [no] | |||||
| Electronic room temperature control plus day timer | [no] | |||||
| Electronic room temperature control plus week timer | [no] | |||||
| Other control options (multiple selections possible) | ||||||
| Room temperature control, with presence detection | [no] | |||||
| Room temperature control, with open window detection | [no] | |||||
| With distance control option | [no] | |||||
| With adaptive start control | [no] | |||||
| With working time limitation | [no] | |||||
| With black bulb sensor | [no] | |||||
| Contact details | COMTEL GROUP spółka z ograniczoną odpowiedzialnością sp.k. PLAC KUPIECKI 2, 32-800 BRZESKO TEL: +48 14 68 49 418 , FAX: +48 14 68 49 419. www.comtelgroup.pl e-mail: biuro@comtelgroup.pl , serwis@comtelgroup.pl | |||||
SAFETY INSTRUCTIONS
- Read all instructions carefully before use.
- Make sure the voltage is the same as that indicated on the rating plate of the appliance.
- Do not operate this appliance if the cable or plug becomes damaged.
- Keep the appliance and cable away from sources of heat, sharp objects or anything that may cause damage.
- If the cord is damaged, it must be replaced by the manufacturer, its service agent or similarly qualified persons in order to avoid a hazard.
- Ensure the appliance is switched off before connecting to the mains power supply.
- Switch off the power supply and disconnect from mains supply when not in use, before cleaning or other maintenance.
- To disconnect the appliance, switch it "OFF", and then remove the plug from outlet. Do not pull the cord to disconnect the plug.
- The heater must not be located immediately below a socket-outlet.
- Do not operate in areas where gasoline, paint or other flammable liquids are used or stored.
- Indoor use only.
- In order to avoid overheating, do not cover the heater.
- To prevent a possible fire, do not block air intakes or exhaust in any manner.
- Don't touch the hot surfaces.
- Do not insert or allow foreign objects to enter any ventilation or exhaust opening, as this may cause an electric shock, fire or damage to the appliance.
- Always ensure that hands are dry before operating or adjusting any switch on the product or touching the plug and socket-outlet.
- This appliance is not intended for use by persons (including children) with reduced physical, sensory or mental capabilities, or lack of experience and knowledge, unless they have been given supervision or instruction concerning use of the appliance by a person responsible for their safety.
- Children should be supervised to ensure that they do not play with the appliance.
- Do not leave this appliance unattended when it's in use.
- The most common cause of overheating is deposits of dust or fluff in the appliance. Ensure these deposits are removed regularly by disconnect the appliance and vacuum cleaning air vents and grilles.
- Do not place the heater on carpet, don't place the cable under carpets. Arrange cord
away from traffic areas so that it will not be tripped over.
- Do not use this heater in the immediate surroundings of a bath, a shower or a swimming pool.
- Do not store away until the heater cools down, store the heater in cool dry location when not in use.
- This heater is filled with a precise quantity of special oil. Repairs requiring opening of the oil container are only to be made by the manufacturer or his service agent who should be contacted if there is an oil leak
- When scrapping the heater, follow the regulations concerning the disposal of oil.
Technical Specifications:
| Model OH13 OH11 OH9 | |||
| Rated Voltage | 230 V~ 230 | V~ 230 V~ | |
| Rated Frequency | 50/60Hz 50/60Hz 50/60Hz | ||
| Rated Power | 3000W 2500W 2000W | ||
| Protective Class | III | ||
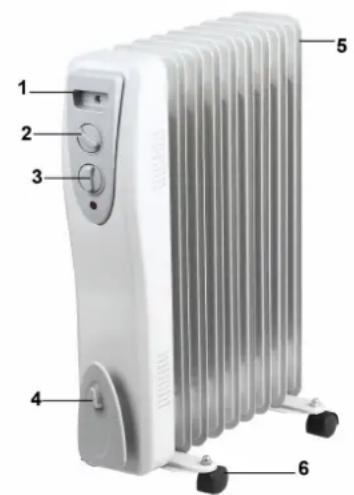
Unit description
1 Handle
2 Thermostat
3 Switch
4 Power cable holder
5 Radiator housing
6 Wheels
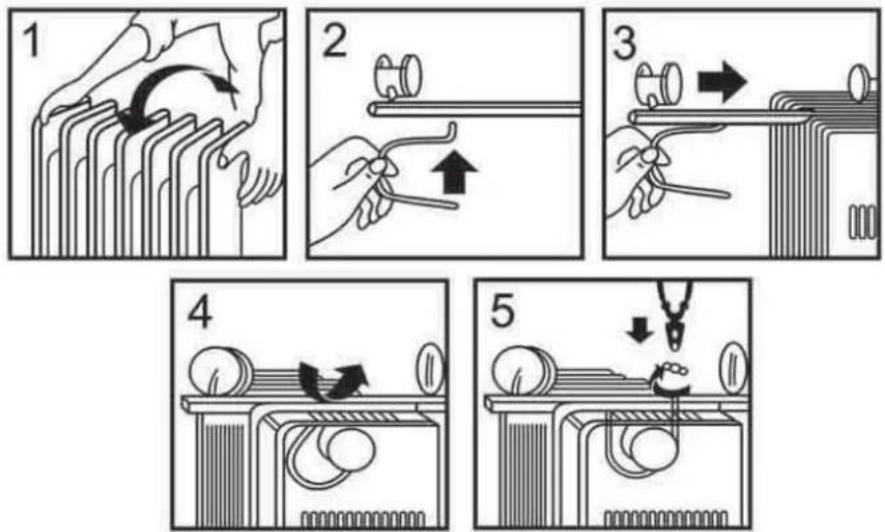
Assembly
-
To prevent damage, place the radiator upside down on a soft surface (for example a carpet).
-
Fix wheels on two plates with cap nuts.
-
Insert the U-shaped hook into the wheels plate and fix it on the radiator by wing nuts.
-
Turn the heater upright. Wait one minute before to connect the heater to power outlet.
Operation
- Connect the appliance to a safety socket.
- Set the switch to heating position (I, II or III).
| OH13 OH11 | OH9 | ||
| 0 Off Off Off | |||
| I 1200 W 850 W 700 W | |||
| II 1800 W 1650 W 1300 W | |||
| I II | 3000 W 2500 | W 2000 W | |
- Turn the thermostat knob clockwise until reaching the maximum temperature.
- Once the room temperature is reached, slowly turn the thermostat knob anticlockwise until you hear a click and then the heater will stop working.
- The heater will turn on and off automatically to maintain the room temperature you have set.
- Turn the switch to "0" position to switch off the heater. Unplug the appliance then after.
Tip-Off safety Device
This appliance is provided with a safety device which will switch off the heater in case of accidental tipping off. To reset, disconnect the plug from the power for a few minutes, remove the cause of tipping off, then plug the appliance in again. If it still cannot be reset, ask a qualified technician to check and repair.
Overheat safety device
Your heater is equipped with a safety device that switches off the heater in the event of overheating. If the safety device operated, please turn the heater off, unplug the appliance and let it completely cool down, inspect for blockage of air inlet or outlet, attempt to restart the heater then after.
If the heater fails to operate or the safety device switches the heater off again, return heater to your nearest service center for examination or repair.
Maintenance
- Always disconnect the appliance and let it completely cool down before any maintenance.
- Use a vacuum cleaner to remove dust on fins.
- Clean the outside of the unit with a damp cloth and then dry it with a dry cloth. Never immerse the unit in water, nor let water drip into the unit.
Storing
- Always disconnect the appliance, let it completely cool down and clean it before storing.
- If you do not use the device for a long period, put back the unit and the instruction manual to the original carton and store in a dry and ventilated place.
- Do not place any heavy items on top of carton during storing as this may damage the appliance.
KARTA GWARANCYJNA
IMPORTER / GWARANT :
Brand : N'oveen
Model : OH9
Category : Heating